

stm32上移植linux的实操案例经验分享
嵌入式技术
描述
刚从硬件跳槽为嵌软时,没有任何一丝的准备。一入职,领导就交代了一项特难的任务——在stm32上移植linux!
瞬间我就懵了,没办法硬着头皮上吧,先搜集资料,我之前跑的是ok6410的板子上运行的linux,现在是在stm32上移植,以前stm32倒是玩过,研究生期间就捣鼓过它,但现在还没从抓烙铁的硬件当中缓过神来,就转到嵌入式软件的开发,更头疼的是stm32没有MMU!没有MMU!找了一下,好吧,有个uClinux!
于是开始学习各种相关的知识,了解到linux的启动一般是u-boot——》liunx内核——》根文件系统,那么首先要做个基于stm32的u-boot,先初始化时钟、外设、中断什么的,看了韦东山老师的视频感觉很好,理解了不少,从一无所知到有点明白了。
移植u-boot到stm32f407
其实说白了u-boot就是一裸板程序,就是跟跑跑马灯、串口通信一个性质的,而裸板程序从正点原子的stm32开发板学习了不少,加上自己研究生阶段有点积累,首先我是参照http://www.cnblogs.com/fozu/p/3618076.html写这位博文的大神写的程序,这篇文章写得很好,后面还分析到内核了,反复看受益匪浅,这个程序不是u-boot程序但是实现的作用一样,初始化时钟,外设。。。最后传递内核参数,跳转内核。。。,一开始用keil编译这个程序,结果一堆错误,人家用的板子和你用的板子不一样,硬件的led灯、串口都可能连接不一样啊,比如人家用的是串口1,你用的是串口2,还有缺少一些头文件等等都会引发错误,所以根据自己的实际来修改,费了一阵功夫终于把错误全干掉,顺利编译成功。
这时用的板子是stm32f103,ST对这个板子早在08年就发布了支持它的u-boot、Uclinux内核(领导额外买的,说是要我对照着对应修改支持stm32f407的uClinux内核),但是只有Uclinux内核有源码,u-boot就给了个hex文件尴尬,其实cortx m3与cortx m4之前架构已经大不一样了,这样修改的话对于我来说无疑是很难的,我一听头都大了,又是单干,烦,没办法照做呗!那就先弄stm32f103的,把之前那个编译没有错误的引导程序拷入,在stm32的0x08003000的位置拷入官方提供的uClinux内核,一启动,接上串口,打开串口助手,一看啥都没有。。。
到底错在哪啦?仔细想想,先是要看看最后跳转内核那步到底有没有成功,那就先验证这一步,参照原子的IAR跳转历程,编了个跑马灯跳转程序,就是引导程序没变,拷在地址0x08000000,而跑马灯程序拷在0x08003000上,如果led灯亮灭就说明跳转无误,于是一启动,灯不亮。抓狂抓狂怎么情况啊,后仔细排查发现是跳转函数,引导程序参照的是u-boot源码来编写的,里面的函数用函数指针赋个地址(0x08003000),最后跳转过去。折腾了两天最后对着原子的程序修改,灯居然可以亮灭了,我现在想想也不知道是什么问题,不过至少现在可以实现跳转了。
再把内核拷到0x08003000,一启动,串口助手还是没有任何输出,这下就真的烦了,郁闷死了,stm32f103还搞不定还想搞stm32f407。。。之后开始各种找原因,各种修改,领导各种催,在stm32f103和stm32f407两个板子之间这搞搞,那搞搞,休息时间就看看韦老师的视频,找资料看看有什么灵感,但是还是没什么进展。
后来在网上搜到一个哥们居然在stm32f407上移植u-boot成功了,而且还有启动图晒出来,这下我就想,人家可以我为什么就不能?于是继续找,终于在网上找到了这个u-boot的源码,根据自己的stm32f407的板子修改串口,时钟等,安装好对应的交叉编译链,注意应该是arm-non-eabi不带linux的,因为是裸板程序不关linux啥事,然后一跑,终于在串口助手看到久违的u-boot启动图,狂喜!想想那段日子确实是在压力之下成长的,感觉技术上有了很大的提升了。
领导过来一看见有u-boot(有点东西交差了。。。)就说要把外部的SRAM驱动加上,以便于跑linux内核,这个sram只有512K,这么小能跑得了linux内核吗?这是后话,先把sram驱动加到u-boot上再说。
先参照原子的sram程序修改运行试试看看,结果可以运行但是写入再读出,有几个地址的数据总有错误,于是一直苦思冥想,想到了一个可能,驱动外部SRAM用到的是stm32的FSMC配置,它有btcr寄存器设置,分为bcr和btr设置,原子的开发板用的是1M16位的,而我的是512k8位,在btr寄存器设置那里应该是设成8位而不是16位,于是把相关设置位置0,这下数据正常了。
接下来就是在u-boot上添加sram的驱动,这个u-boot编写得还蛮好,不过它配置的是外部8M的SDRAM,那么我就在sdram_init()的函数上添加配置sram的代码,把原来配置sdram的代码通通删去。折腾了两天,编写修改成功,一开机,串口助手正常输出启动信息,用u-boot的md、mw指令验证sram的驱动是否可行,之间也遇到一些问题,如在前100个地址写ff,md查看有几个地址数据不对,不是显示ff,用之前的sram裸板程序也是如此,一想软件程序肯定是没问题,那就是硬件问题,幸亏还搞过一段时间硬件,不然被公司硬件工程师给坑了,用万用表仔细检测,果然发现sram有几个数据线虚焊了,怪不得数据有误,拿烙铁一拖,OK!数据正常了,嗯!想成为合格的嵌入式软件工程师还是要软件硬件相结合,不能脱离了硬件啊!!!!
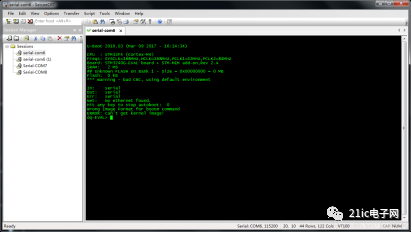
好!至此基于stm32f407的u-boot移植成功,外加外部2M的SRAM驱动(后来把512K升级为2M,因为后来内核内存不够跑到一半kernel panic挂了,此乃后话),最后上一张u-boot启动图。人生第一篇在CSDN的博文,希望以后自己不断学习技术不断提升,努力!
移植uClinux内核到stm32f407
上面介绍了先移植基于stm32f407的u-boot,下面会讲到其中最难的移植stm32f407的内核这部分,这个内核源代码我也是在网上找到了,看介绍是国外大神修改而成的,真的万分感谢这位大神,网上的资源其实很多,要善于挖掘,善于搜寻。
内核代码是我无意中down下来的,刚得到代码时并没有对在stm32f407上跑uClinux有太多的信心,一是网上还没有在stm32f407跑uClinux的资料(至少我没找到过)网上都对在stm32上跑uClinux都是唱衰的态度,的确stm32跑起uClinux系统,资源是有些匮乏,而stm32f407内部flash只有1M的空间,其中u-boot占了128K,那么内核就存储在0x08020000处,剩下900k的空间使用,还有我的板子还有外部2M 的SRAM,但更要命的是得到的代码是基于stm32f429的uClinux,很多人都在stm32f429上成功运行了,但是却从没在stm32f407成功过,但我已经没有退路了,项目需要、领导要求,只能硬着头皮瞎改,其实对于stm32f103改成stm32f429已经好很多了,最起码stm32f429的架构和stm32f407的架构大致相同(内部存储和时钟和gpio等略有不同),于是就按照自己手上的板子来改,期间遇到了不少的问题,也想过放弃,不过好歹坚持了下来,因为着急压力山大所以看了不少书,查了很多资料也学到了很多东西对u-boot和内核代码有了深入的理解,
特别感谢的是jserv老师,我走投无路之下给他发了几封邮件,他回答了我两个极为重要的问题,建议把外部的512K换成至少2M的SRAM,不然内核就真的跑不动了,跑到一半就kernel panic….
然后就是针对stm32f407来修改内核代码,stm32f429用的是串口3,我用的是串口1,改!时钟不对,改!储存地址不同,改!stm32f429不单是有外部的SRAM,空间8M还有NOR flash,财大气粗,资源随便用,不像我的stm32f407只有外部2M的SRAM(领导说硬件就那样,节约成本,无语。。),幸好uClinux代码是用XIP的方式来运行的,就是代码段放在内部flash中就地执行,数据段和bss段其它段就放在sram上运行,这样算算,空间还是足够的。
其间还出现这样的问题:
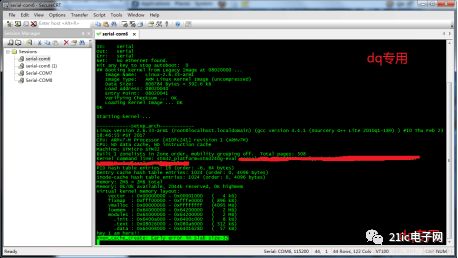
卡了我一个星期,当时我就百思不得其解,在创建高速缓存那里就出现内核错误运行不下去了,仔细比对了stm32f103的uClinux源代码,也没发现什么错误,一个多星期没有进展,内核恐慌我也恐慌了,幸好领导知道情况后也不催促我,而是买了一本《ARM Linux内核源代码分析》给我,叫我好好研读,解决问题,于是就看里面构建kmem cache那一篇,linux内核源码过于复杂,看得我头都大了,后来想想这不是办法啊,是不是又是硬件问题?因为原先用的是512k的sram升级到2M,公司的硬件工程师又重新改版了,于是我又用电烙铁把stm32芯片,sram芯片,和他们之间的上拉电阻,又重新焊了一遍,一上电就正常运行到下一步了,唉~之前移植u-boot的sram驱动也是硬件坑我的啊,真不敢相信我不懂点硬件的话会坑到我什么时候。。。
接着瞎捣鼓着,前后花了将近两个月,就成这样了:
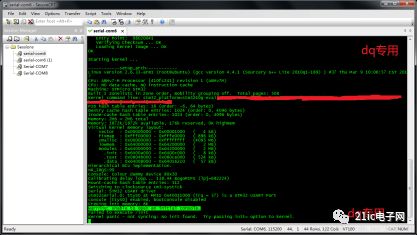
- 想想还真是运气好。。。
接下来遇到的问题,应该是少了根文件系统,这个uClinux代码原来是配有根文件系统的,是romfs,但是存储空间不够了。
uClinux的根文件系统未能挂载起来,因为系统原来配置的根文件系统是romfs,是基于stm32f429的,stm32f429的内部flash存储空间有2M,romfs占用空间为300多kB,这样存放显然是充足的,但是对于stm32f407来说,它的内部flash存储空间为1M,这样存放的话,存储空间是不够的(u-boot占用空间0x08000000-0x08020000,内核占用空间约为0x08020000-0x080BB000,约620多KB,那么只有剩下约250多KB的空间供根文件系统存放),所以根据这个情况,我想是另外搭建占用内存空间更小的initramfs作为uClinux的根文件系统来挂载。
构建stm32f407-uClinux的initramfs根文件系统
上文讲到内核运行到free init memory:8k这个地方就卡住,运行不下去了,在查阅了相关资料后,推测是缺少根文件系统所导致的,原来的内核源代码是搭配有根文件系统的bin文件,是romfs但没有源码,前面讲过我现在项目使用的是stm32f407,内部flash容量和外部SRAM都不足以拷入这个原配的romfs挂起为根文件系统来使用。
接下来就是寻找一种经济适用的文件系统来作为内核的根文件系统,从网上查阅相关资料可以知道,YAFFS2支持的是nandflash,jffs支持nor flash,这些看来对于我手上的stm32f407来说是不适用的,于是我仔细研究了stm32f103的源代码,发现它是有两种启动的方式,一种采用的是用iniramfs作为根文件系统,xip启动,在stm32f103内部flash只有512k的情况居然跑起了Uclinux,另一种是jfss2挂在外部nor flash上,显然我这种情况目前只有参考第一种方式来,采用initramfs作为根文件系统。于是开始构建initramfs相关文件。仔细研究stm32f103 XIP启动方式的内核配置make menuconfig中, CONFIG_INITRAMFS_SOURCE=”initramfs-filelist” 而initramfs-filelist位于Uclinux/linux-2.6.x下,打开一看是这样的:
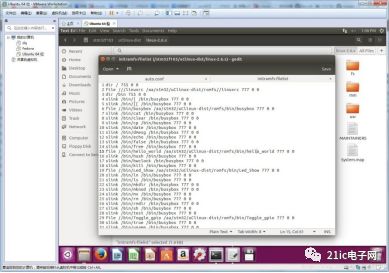
一开始我看不懂这里面的shell什么意思,网上找到一篇文章,写得很清楚,把它copy过来,学习一下:
把initramfs编译到内核里面去
使用initramfs最简单的方式,莫过于用已经做好的cpio.gz把kernel里面那个空的给换掉。这是2.6 kernel天生支持的,所以,你不用做什么特殊的设置。
kernel的config option里面有一项CONFIG_INITRAMFS_SOURCE(I.E. General setup—>Initramfs source file(s) in menuconfig)。这个选项指向放着内核打包initramfs需要的所有文件。默认情况下,这个选项是留空的,所以内核编译出来之后initramfs也就是空的,也就是前面提到的rootfs什么都不做的情形。
CONFIG_INITRAMFS_SOURCE 可以是一个绝对路径,也可以是一个从kernel’s top build dir(你敲入build或者是make的地方)开始的相对路径。而指向的目标可以有以下三种:一个已经做好的cpio.gz,或者一个已经为制作cpio.gz准备好所有内容的文件夹,或者是一个text的配置文件。第三种方式是最灵活的,我们先依次来介绍这三种方法。
1)使用一个已经做好的cpio.gz档案
If you already have your own initramfs_data.cpio.gz file (because you created it yourself, or saved the cpio.gz file produced by a previous kernel build), you can point CONFIG_INITRAMFS_SOURCE at it and the kernel build will autodetect the file type and link it into the resulting kernel image.
You can also leave CONFIG_INITRAMFS_SOURCE empty, and instead copy your cpio.gz file to usr/initramfs_data.cpio.gz in your kernel’s build directory. The kernel’s makefile won’t generate a new archive if it doesn’t need to.
Either way, if you build a kernel like this you can boot it without supplying an external initrd image, and it’ll still finish its boot by running your init program out of rootfs. This is packaging method #2, if you’d like to try it now.
2)指定给内核一个文件或者文件夹
If CONFIG_INITRAMFS_SOURCE points to a directory, the kernel will archive it up for you. This is a very easy way to create an initramfs archive, and is method #3.
Interestingly, the kernel build doesn’t use the standard cpio command to create initramfs archives. You don’t even need to have any cpio tools installed on your build system. Instead the kernel build (in usr/Makefile) generates a text file describing the directory with the script “gen_initramfs_list.sh”, and then feeds that descript to a program called “gen_init_cpio” (built from C source in the kernel’s usr directory), which create the cpio archive. This looks something like the following:
scripts/gen_initramfs_list.sh $CONFIG_INITRAMFS_SOURCE > usr/initramfs_list
usr/gen_init_cpio usr/initramfs_list > usr/initramfs_data.cpio
gzip usr/initramfs_data.cpio
To package up our hello world program, you could simply copy it into its own directory, name it “init”, point CONFIG_INITRAMFS_SOURCE at that directory, and rebuild the kernel. The resulting kernel should end its boot by printing “hello world”. And if you need to tweak the contents of that directory, rebuilding the kernel will re-package the contents of that directory if anything has changed.
The downside of this method is that it if your initramfs has device nodes, or cares about file ownership and permissions, you need to be able to create those things in a directory for it to copy. This is hard to do if you haven’t got root access, or are using a cross-compile environment like cygwin. That’s where the fourth and final method comes in.
3)使用configuration文件initramfs_list来告诉内核initramfs在哪里
This is the most flexible method. The kernel’s gen_initramfs_list.sh script creates a text description file listing the contents of initramfs, and gen_init_cpio uses this file to produce an archive. This file is a standard text file, easily editable, containing one line per file. Each line starts with a keyword indicating what type of entry it describes.
The config file to create our “hello world” initramfs only needs a single line:
file /init usr/hello 500 0 0
This takes the file “hello” and packages it so it shows up as /init in rootfs, with permissions 500, with uid and gid 0. It expects to find the source file “hello” in a “usr” subdirectory under the kernel’s build directory. (If you’re building the kernel in a different directory than the source directory, this path would be relative to the build directory, not the source directory.)
To try it yourself, copy “hello” into usr in the kernel’s build directory, copy the above configuration line to its own file, use “make menuconfig” to point CONFIG_INITRAMFS_SOURCE to that file, run the kernel build, and test boot the new kernel. Alternately, you can put the “hello” file in its own directory and use “scripts/gen_initramfs_list.sh dirname” to create a configuration file (where dirname is the path to your directory, from the kernel’s build directory). For large projects, you may want to generate a starting configuration with the script, and then customize it with any text editor.
This configuration file can also specify device nodes (with the “nod” keyword), directories (“dir”), symbolic links (“slink”), named FIFO pipes (“pipe”), and unix domain sockets (“sock”). Full documentation on this file’s format is available by running “usr/gen_init_cpio” (with no arguments) after a kernel build.
A more complicated example containing device nodes and symlinks could look like this:
dir /dev 755 0 0
nod /dev/console 644 0 0 c 5 1
nod /dev/loop0 644 0 0 b 7 0
dir /bin 755 1000 1000
slink /bin/sh busybox 777 0 0
file /bin/busybox initramfs/busybox 755 0 0
dir /proc 755 0 0
dir /sys 755 0 0
dir /mnt 755 0 0
file /init initramfs/init.sh 755 0 0
One significant advantage of the configuration file method is that any regular user can create one, specifying ownership and permissions and the creation of device nodes in initramfs, without any special permissions on the build system. Creating a cpio archive using the cpio command line tool, or pointing the kernel build at a directory, requires a directory that contains everything initramfs will contain. The configuration file method merely requires a few source files to get data from, and a description file.
This also comes in handy cross-compiling from other environments such as cygwin, where the local filesystem may not even be capable of reproducing everything initramfs should have in it.
总结一下
这四种给rootfs提供内容的方式都有一个共同点:在kernel启动时,一系列的文件被解压到rootfs,如果kernel能在其中找到可执行的文件“/init”,kernel就会运行它;这意味着,kernel不会再去理会“root=”是指向哪里的。
此外,一旦initramfs里面的init 进程运行起来,kernel就会认为启动已经完成。接下来,init将掌控整个宇宙!它拥有霹雳无敌的专门为它预留的Process ID #1,整个系统接下来的所有都将由它来创造!还有,它的地位将是不可剥夺的,嗯哼,PID 1 退出的话,系统会panic的。
接下来我会介绍其他一些,在rootfs中,init程序可以做的事。
Footnote 1: The kernel doesn’t allow rootfs to be unmounted for the same reason the same reason it won’t let the first process (PID 1, generally running init) be killed. The fact the lists of mounts and processes are never empty simplifies the kernel’s implementation.
Footnote 2: The cpio format is another way of combining files together, like tar and zip. It’s an older and simpler storage format that dates back to the original unix, and it’s the storage format used inside RPM packages. It’s not as widely used as tar or zip because the command line syntax of the cpio command is unnecessarily complicated (type “man 1 cpio” at a Linux or Cygwin command line if you have a strong stomach). Luckily, we don’t need to use this command.
Footnote 3: The kernel will always panic if PID 1 exits; this is unrelated to initramfs. All of the signals that might kill init are blocked, even “kill -9” which will reliably kill any other process. But init can still call the exit() syscall itself, and the kernel panics if this happens in PID 1. Avoiding it here is mostly a cosmetic issue: we don’t want the panic scrolling our “Hello World!” message off the top of the screen.
Footnote 4: Statically linking programs against glibc produces enormous, bloated binaries. Yes, this is expected to be over 400k for a hello world proram. You can try using the “strip” command on the resulting binary, but it won’t help much. This sort of bloat is why uClibc exists.
Footnote 5: Older 2.6 kernels had a bug where they would append to duplicate files rather than overwriting. Test your kernel version before depending on this behavior.
Footnote 6:User Mode Linux or QEMU can be very helpful testing out initramfs, but are beyond the scope of this article.
Footnote 7: Well, sort of. The default one is probably meant to be empty, but due to a small bug (gen_initramfs_list.sh spits out an example file when run with no arguments) the version in the 2.6.16 kernel actually contains a “/dev/console” node and a “/root” directory, which aren’t used for anything. It gzips down to about 135 bytes, and might as well actually be empty. On Intel you can run “readelf -S vmlinux” and look for section “.init.ramfs” to see the cpio.gz archive linked into a 2.6 kernel. Elf section names might vary a bit on other platforms.
显然stm32f103使用的是第三种方法,里面那些指令无非是设置文件权限、设置软连接等等操作,期间还学了一点bash shell,又有点收获,明白了道理之后就好办了,直接照猫画虎,我采用的是第二种方法:
1、先创建rootfs这个文件夹,再在这个文件夹下面分别创建bin、dev、etc、proc、sys等目录
2、编译busybox,把生成的bin文件复制到rootfs/bin下
3、新建linuxrc文件,设置权限chmod 777,然后在u-boot传给内核参数中一定要加上init=/linuxrc
4、在dev目录下,加设备节点,不然会没有输出信息哦!
· 1 mknod -m 666 console c 5 1
· 2 mknod -m 666 null c 1 3
5、在内核make menuconfig上CONFIG_INITRAMFS_SOURCE=“你刚刚构建的文件夹的绝对路径”
编译内核,initramfs直接和内核编译在一起,不用另外分出一个bin文件拷,这比较方便,启动,在串口调试助手中可看到相关显示信息:
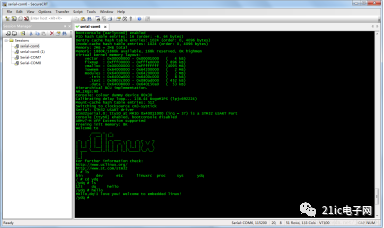
最后说一下自己的感想,用initramfs根文件系统虽然方便实用,但是有弊端就是它只读不可写,这对开发很不利,领导说会加个spi flash再在里面挂载个根文件系统(spi flash能挂jfss2吗?),那是以后的事了以后再说,目前这种情况以我的技术水平只能做到这个份上了,加了根文件之后,stm32内部flash还有200多k的存储空间,应该可以添加些驱动和应用程序,那下面我的任务是编写简单的驱动与应用程序。
编辑:黄飞
-
termius 中文,termius 中文的实操步骤,linux服务器远程连接的实用教程2024-12-18 1702
-
用STM32Cube.AI部署ONNX模型实操示例:风扇堵塞检测2023-09-28 3310
-
我将GuiLite移植到了STM32F4开发板上2023-06-26 2026
-
在STM32上移植的一个稳定可靠的FIFO2022-09-26 1080
-
STM32移植FreeRTOS(图文实操)2021-11-21 1068
-
Linux系统移植开发篇2:烧写linux镜像2021-09-29 3769
-
直播|STM32L476RG移植OpenHarmony经验分享【12月18日20:00】2020-12-10 4124
-
实操经验分享——在STM32上移植Linux2018-09-17 13666
-
实操性最强:uCOS-II移植到STM32上的详细步骤2017-11-26 53985
-
Linux在SMP系统上的移植研究2017-11-14 1307
-
嵌入式Linux 在IOP331 上的移植实现Implementation of Migrating2009-05-25 779
-
μC/OS-Ⅱ在ARM上的移植经验2009-03-28 381
全部0条评论

快来发表一下你的评论吧 !

