
【GD32L233C-START】DAC输出(正弦波、锯齿波、方波)
描述
1.介绍
GD32L233C采用的是一款M23的内核。这个芯片据说功耗非常的低,低到什么程度呢?等后面我们再进行测试,今天我们主要来测试GD32L233C-START的DAC,既然要测试DAC,示波器是不可少的,这个实验在家做,然而LZ家里并没有示波器,不过最近看到一款好东西,LOTO虚拟示波器,看过这款示波器的参数,还不错。所以入手了一款,测量芯片输出的DAC应该没什么问题,接下来开始测试吧。
2.设计
首先需要输出让芯片输出DAC,而且还需要输出波形,这个稍微费点功夫,之前在GD32L233C-START移植了RTThread,现在在这个代码的基础上添加DAC的输出程序,这个程序移植了其他网友的,代码我也贴出来,经过测试,代码没有啥问题:
比较麻烦的是正弦波的代码:
const float sinus_I_quarter[91] =
{
0.0000, 0.0175, 0.0349, 0.0523, 0.0698, 0.0872, 0.1045, 0.1219, 0.1392, 0.1564, // 00 .. 09
0.1736, 0.1908, 0.2079, 0.2250, 0.2419, 0.2588, 0.2756, 0.2924, 0.3090, 0.3256, // 10 .. 19
0.3420, 0.3584, 0.3746, 0.3907, 0.4067, 0.4226, 0.4384, 0.4540, 0.4695, 0.4848, // 20 .. 29
0.5000, 0.5150, 0.5299, 0.5446, 0.5592, 0.5736, 0.5878, 0.6018, 0.6157, 0.6293, // 30 .. 39
0.6428, 0.6561, 0.6691, 0.6820, 0.6947, 0.7071, 0.7193, 0.7314, 0.7431, 0.7547, // 40 .. 49
0.7660, 0.7771, 0.7880, 0.7986, 0.8090, 0.8192, 0.8290, 0.8387, 0.8480, 0.8572, // 50 .. 59
0.8660, 0.8746, 0.8829, 0.8910, 0.8988, 0.9063, 0.9135, 0.9205, 0.9272, 0.9336, // 60 .. 69
0.9397, 0.9455, 0.9511, 0.9563, 0.9613, 0.9659, 0.9703, 0.9744, 0.9781, 0.9816, // 70 .. 79
0.9848, 0.9877, 0.9903, 0.9925, 0.9945, 0.9962, 0.9976, 0.9986, 0.9994, 0.9998, // 80 .. 89
1.0000 // 90
};
#define CIRCLE_QUARTER_1 1
#define CIRCLE_QUARTER_2 2
#define CIRCLE_QUARTER_3 3
#define CIRCLE_QUARTER_4 4
float sinus_lookup (unsigned int angle)
{
float sin_value;
unsigned int circle_quarter;
// correct angles outside the accepted angle range into 0 .. 359
if (angle > 359u)
angle = angle % 360u;
circle_quarter = 1 + (angle / 90u);
switch (circle_quarter)
{
case CIRCLE_QUARTER_1: // 00 .. 89
sin_value = sinus_I_quarter[angle];
break;
case CIRCLE_QUARTER_2: // 90 .. 179
sin_value = sinus_I_quarter[180 - angle];
break;
case CIRCLE_QUARTER_3: // 180 .. 269
sin_value = -sinus_I_quarter[angle - 180];
break;
case CIRCLE_QUARTER_4: // 270 .. 359
sin_value = -sinus_I_quarter[360 - angle];
break;
}
return sin_value;
}
void plot_sin(uint32_t f, uint32_t delta_f)
{
/* 定时周期为T=1/delta_f, f=1/(pMax*T) */
static uint32_t point = 0;
uint32_t pMAX = delta_f/f;
uint32_t value = 0;
if (point++ > pMAX) point = 0;
value = (uint32_t)((sinus_lookup(360*point/pMAX)+1)*10000)*2047/10000;
dac_software_trigger_enable();
dac_data_set(DAC_ALIGN_12B_R, value);
}
接下来是锯齿波和方波的代码,这两个代码比较简单:
void plot_triangle(uint32_t f, uint32_t delta_f)
{
/* 定时周期为T=1/delta_f, f=1/(pMax*T) */
static uint32_t point = 0;
uint32_t pMAX = delta_f/f;
uint32_t pMAX2 = pMAX/2;
uint32_t value = 0;
if (++point > pMAX) point = 0;
if (point < pMAX2)
{
value = point * 4095 / pMAX2;
}
else
{
value = (pMAX - point) * 4095 / pMAX2;
}
dac_software_trigger_enable();
dac_data_set(DAC_ALIGN_12B_R, value);
}
void plot_square(uint32_t f, uint32_t delta_f)
{
/* 定时周期为T=1/delta_f, f=1/(pMax*T) */
static uint32_t point = 0;
uint32_t pMAX = delta_f/f;
uint32_t pMAX2 = pMAX/2;
uint32_t value = 0;
if (++point > pMAX) point = 0;
if (point < pMAX2)
{
value = 0;
}
else
{
value = 0xFFF;
}
dac_software_trigger_enable();
dac_data_set(DAC_ALIGN_12B_R, value);
}
最后需要开启一个定时器,还有DAC的初始化:
void timerx_init(uint32_t timer_periph, uint16_t period, uint16_t prescaler)
{
/* TIMER1 configuration: input capture mode -------------------
the external signal is connected to TIMER1 CH0 pin (PA0)
the rising edge is used as active edge
the TIMER1 CH0CV is used to compute the frequency value
------------------------------------------------------------ */
timer_parameter_struct timer_initpara;
timer_ic_parameter_struct timer_icinitpara;
/* enable the peripherals clock */
rcu_periph_clock_enable(RCU_TIMER2);
/* deinit a TIMER */
timer_deinit(timer_periph);
/* initialize TIMER init parameter struct */
timer_struct_para_init(&timer_initpara);
/* TIMER1 configuration */
timer_initpara.prescaler = prescaler;
timer_initpara.alignedmode = TIMER_COUNTER_EDGE;
timer_initpara.counterdirection = TIMER_COUNTER_UP;
timer_initpara.period = period;
timer_initpara.clockdivision = TIMER_CKDIV_DIV1;
timer_init(timer_periph, &timer_initpara);
/* TIMER1 CH0 input capture configuration */
timer_icinitpara.icpolarity = TIMER_IC_POLARITY_RISING;
timer_icinitpara.icselection = TIMER_IC_SELECTION_DIRECTTI;
timer_icinitpara.icprescaler = TIMER_IC_PSC_DIV1;
timer_icinitpara.icfilter = 0x00;
timer_input_capture_config(timer_periph, TIMER_CH_0, &timer_icinitpara);
/* auto-reload preload enable */
timer_auto_reload_shadow_enable(timer_periph);
/* clear channel 0 interrupt bit */
timer_interrupt_flag_clear(timer_periph, TIMER_INT_CH0);
/* channel 0 interrupt enable */
timer_interrupt_enable(timer_periph, TIMER_INT_CH0);
/* enable a TIMER */
timer_enable(timer_periph);
}
#define DAC_WAVE_TEST
void timer2_init(void)
{
timer_deinit(TIMER2);
rcu_periph_clock_enable(RCU_TIMER2);
#ifdef DAC_WAVE_TEST
timerx_init(TIMER2, 639, 9); // 100KHz 0.1ms
#endif
timer_interrupt_enable(TIMER2, TIMER_INT_UP);
nvic_irq_enable(TIMER2_IRQn, 3);
}
void TIMER2_IRQHandler(void)
{
#ifdef DAC_WAVE_TEST
plot_sin(100, 10000); //正弦波
//plot_triangle(1, 10000); //锯齿波
//plot_square(1, 10000); //方波
#endif
timer_interrupt_flag_clear(TIMER2, TIMER_INT_FLAG_UP);
}
void dac1_init(void)
{
rcu_periph_clock_enable(RCU_GPIOA);
rcu_periph_clock_enable(RCU_DAC);
gpio_mode_set(GPIOA, GPIO_MODE_ANALOG, GPIO_PUPD_NONE, GPIO_PIN_4);
dac_deinit();
/* software trigger */
dac_trigger_enable();
dac_trigger_source_config(DAC_TRIGGER_SOFTWARE);
/* no noise wave */
dac_wave_mode_config(DAC_WAVE_DISABLE);
/* noise wave - triangle */
//dac_wave_mode_config(DAC_WAVE_MODE_TRIANGLE);
//dac_triangle_noise_config(DAC_TRIANGLE_AMPLITUDE_4095);
/* noise wave - lfsr */
//dac_wave_mode_config(DAC_WAVE_MODE_LFSR);
//dac_lfsr_noise_config(DAC_LFSR_BITS11_0);
dac_output_buffer_enable();
/* enable DAC and set data */
dac_enable();
dac_software_trigger_enable();
dac_data_set(DAC_ALIGN_12B_R, 0);
}
这样就可以输出正弦波、锯齿波和方波了。
3.波形测量
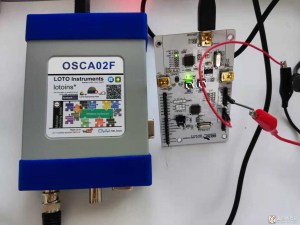
接下来我们来看一下输出的波形是否符合要求,首先需要将【GD32L233C-START】开发板连接LOTO示波器,分别连接GND和PA4管教,连接效果图如下图1所示。

图1
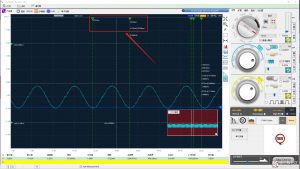
然后让DAC输出正弦波,看一下波形如何。

图2
从上图2中可以看到,一个周期大约在10ms,所以正弦波的周期为100Hz,输出还是听精准的。
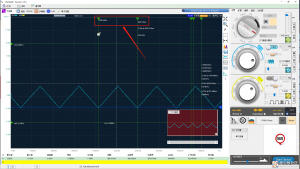
然后输出锯齿波看看波形如何。

图3
从上图3可以得出,锯齿波的波形频率为1Hz。
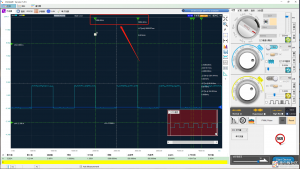
最后我们来看看方波的波形图如何。

图4
从上图4可以看到,方波的波形频率为1Hz。
从上面波形可以得出,【GD32L233C-START】的定时器比较精准,DAC的输出值也比较稳定,性能还是不错的!
4.总结
刚入手的LOTO示波器还不错,测量的精度挺高的,不过还有好多设置没弄明白,等后续多琢磨琢磨。做电子的示波器是必不可少的,我先替你们测试测试这个示波器如何。
GD32L233C是新出来的芯片,整体功能还需要多进行测试,它最突出的低功耗后续要好好测量一下,这次就先到这里了。
- 相关推荐
- 热点推荐
- �
-
DAC8832能否输出正弦波或方波?2024-11-29 380
-
51proteus仿真:生成方波、正弦波、锯齿波和三角波2012-01-13 34228
-
用STC89C52和DAC7512怎么C编程产生方波,三角波,锯齿波等2012-04-19 3824
-
STM32f103输出正弦波/锯齿波/方波的代码分享2021-12-14 3344
-
【GD32L233C-START】DAC输出(正弦波、锯齿波、方波)2022-03-30 14790
-
正弦波转方波电路2008-07-18 37889
-
把正弦波改变为锯齿波或方波的变换器电路图2009-07-02 3612
-
方波_三角波_正弦波_锯齿波发生器_课程设计报告2016-01-20 2216
-
利用DAC实现正弦波输出2021-09-28 2640
-
单片机课设波形发生器 产生方波、三角波、正弦波、锯齿波 波形幅度可调、频率可调2021-11-15 2463
-
波形发生器 -- 输出正弦波,三角波,矩形波,锯齿波,梯形波 -- DAC08322021-11-22 2558
-
基于单片机正弦波三角波锯齿波方波波形仿真2021-11-23 2223
-
什么是方波、矩形波、修正正弦波、纯正弦波?2023-06-10 21211
-
纯正弦波逆变器、修正弦波逆变器和方波逆变器有哪些区别2022-04-16 6535
-
什么是方波、矩形波、修正正弦波、纯正弦波?方波怎样变成正弦波?2023-10-25 9041
全部0条评论

快来发表一下你的评论吧 !

