

实操丨米尔MYD-YT507H开发板基于Fluter+Django+OpenCV的行车记录仪
描述
本篇测评由电子工程世界的优秀测评者“HonestQiao ”提供。
此次的板卡测试,是米尔MYD-YT507H开发板的行车记录仪测试体验。
之前分享的文章中,在米尔MYD-YT507H开发板上进行了摄像头流媒体的尝试,在此基础上,进一步对之前的评测计划进行了实现。 经过充分的学习,最终应用Fluter+Django+OpenCV,实现了一款米尔行车记录仪,现将实现的具体内容,与大家分享。 目录:
- 行车记录仪业务逻辑规划
- 硬件设备准备
- 摄像头信息记录和实时画面播放服务开发
- 摄像头视频信息记录
- 摄像头服务的完整代码
- 历史数据RestFul服务开发
- Flutter Web界面开发
- 整体运行效果
- 车试
- 实际代码使用
- 感谢
- 总结
一、行车记录仪业务逻辑规划 经过详细的分析,规划了如下的基本业务逻辑结构: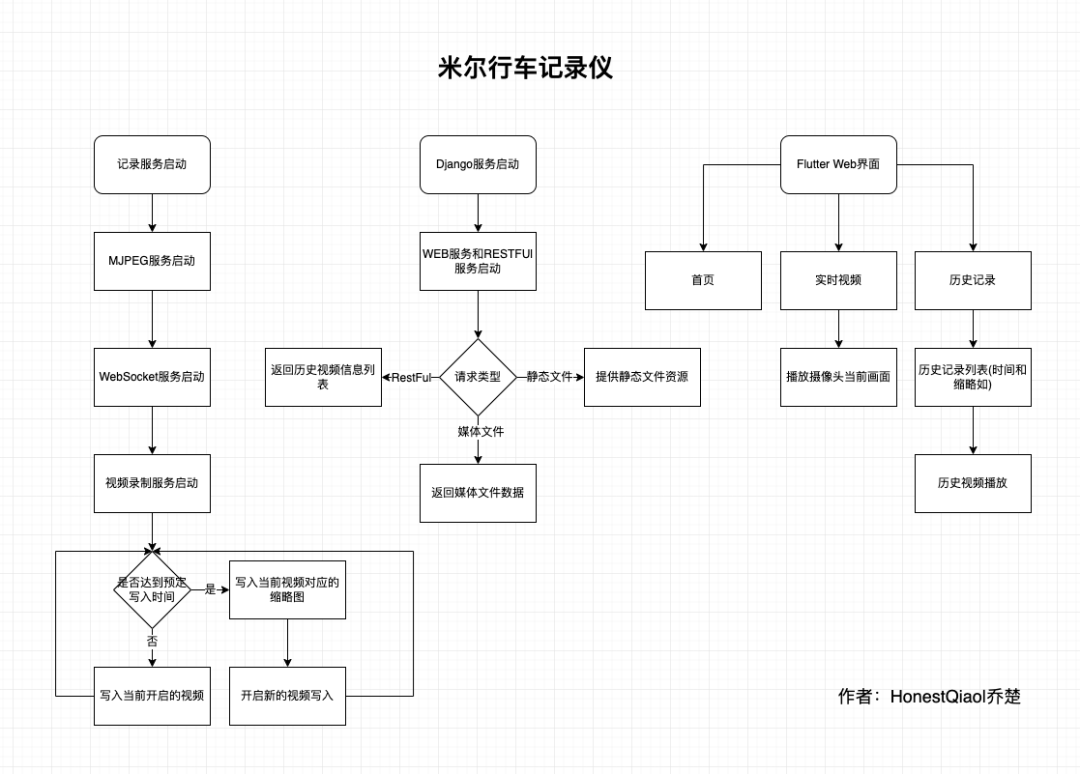 整体分为三个部分:
- 记录服务:用于记录摄像头拍摄的视频信息,以及提供摄像头当前画面的实时播放服务
- Django服务:包括RestFul提供API接口获取历史数据信息,以及为Flutter的Web界面提供访问服务
- Flutter Web界面,用于实时画面播放、历史记录播放的界面
为了又快又好的开发行车记录仪的实际界面,以及后续进行各移动平台的App开发,选择了Flutter。事实证明,坑太多了。不过,跨平台特性,确实好。
二、硬件设备准备: 开发这款行车记录仪,实际使用到的硬件设备如下:
- 主控板:米尔MYD-YT507H开发板
- 摄像头:海康威视DS-E11 720P USB摄像头
- 存储卡:闪迪32GB高速MicroSD存储卡
- 路由器:云来宝盒无线路由器
路由器没有拍照,用普通无线路由器即可,当然带宽越高越好。 开发板上有两个USB3.0接口,选一个接上路由器即可。然后,将开发板使用网线连接到路由器,再上电,就可以进行实际的操作了。 我这边实际使用中,电源接口有点松,容易突然断电,所以使用胶带进行了加固。 三、摄像头实时画面播放服务开发 在之前尝试MJPEG视频流直播的时候,使用了mjpeg_streamer,但不清楚如何进行视频的分割。 因为行车记录仪,一般都是按照一定的时间进行视频的分割存放,避免单个视频过大。 经过仔细的学习了解,OpenCV也可以获取摄像头的信息,并按照需要写入文件。 最后,采用了Python+OpenCV的方案,有Python负责具体的逻辑,Python-OpenCV负责摄像头视频数据的采集。 视频采集部分,包含的具体功能为:
- 能够采集摄像头的数据
- 能够提供实时视频查看
- 能够按时间写入视频数据到文件,自动进行分割
采集摄像头的数据,Python-opencv搞定。 写入视频数据到文件,Python简单搞定。 提供实时视频预览,这个花了不少功夫。 因为同时要写入到文件,还要提供预览,数据需要复用。 经过学习了解,可以将Python-opencv采集的画面,按帧在HTTP以JPEG数据发送,那么播放端,就能收到MJPEG数据流,进行播放了。 因此,第一版,参考资料,实现了一个Python版的MJPEG播放服务,读取帧,写入临时文件,然后从临时文件读取数据返回。 为了提高效率,还进行了优化,不写入临时文件,直接在内存中进行转换。 最终形成的代码如下:
# http服务器请求处理:网页、MJPEG数据流class CamHandler(BaseHTTPRequestHandler): def do_GET(self): # mjpeg推流 if self.path.endswith('.mjpg'): self.send_response(200) self.send_header('Content-type','multipart/x-mixed-replace; boundary=--jpgboundary') self.end_headers() while True: if is_stop: break try: # rc,img = cameraCapture.read() rc,img = success,frame if not rc: continue if True: imgRGB=cv2.cvtColor(img,cv2.COLOR_BGR2RGB) jpg = Image.fromarray(imgRGB) tmpFile = BytesIO() jpg.save(tmpFile,'JPEG') self.wfile.write(b"--jpgboundary") self.send_header(b'Content-type','image/jpeg') self.send_header(b'Content-length',str(tmpFile.getbuffer().nbytes)) self.end_headers() jpg.save(self.wfile,'JPEG') else: img_fps = JPEG_QUALITY_VALUE img_param = [int(cv2.IMWRITE_JPEG_QUALITY), img_fps] img_str = cv2.imencode('.jpg', img, img_param)[1].tobytes() # change image to jpeg format self.send_header('Content-type','image/jpeg') self.end_headers() self.wfile.write(img_str) self.wfile.write(b"--jpgboundary") # end of this part time.sleep(0.033) except KeyboardInterrupt: self.wfile.write(b"--jpgboundary--") break except BrokenPipeError: continue return # 网页 if self.path == '/' or self.path.endswith('.html'): self.send_response(200) self.send_header('Content-type','text/html') self.end_headers() self.wfile.write(b'Live video') self.wfile.write(('' % self.headers.get('Host')).encode()) self.wfile.write(b'') return这段代码,提供了两个功能:
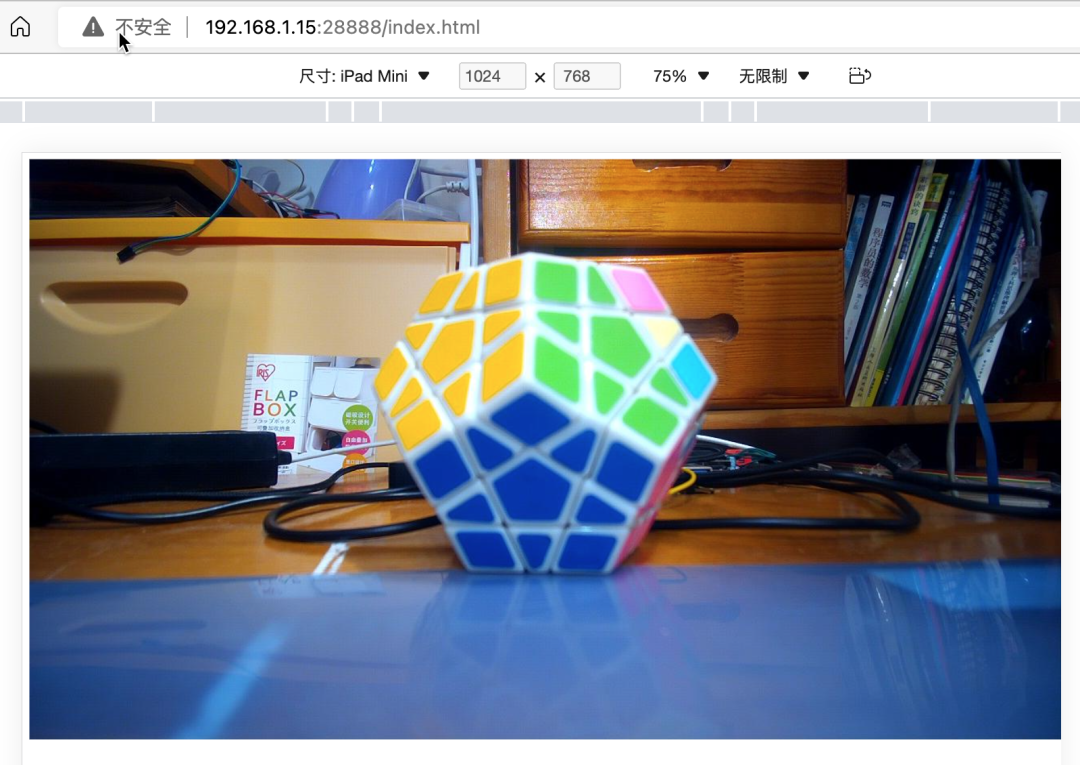
- 如果通过浏览器访问http://ip:端口/index.html,就会返回包含MJPEG调用地址的网页
- 如果通过浏览器访问http://ip:端口/live.mjpg,就会返回MJPEG流媒体数据,以便播放
在开发过程中,运行该服务后,随时可以通过浏览器查看效果。其中涉及到opencv相关的知识,以及webserver相关的知识,大家可以了解相关的资料做基础,这里就不详细说了。 本来以为提供了MJPEG服务,就能够在Flutter开发的Web界面中调用了。然而,实际使用时,发现坑来了。 Flutter的公共库里面,有MJPEG的库,但是在目前的版本中,已经不能使用了。且官方认为用的人不多,在可预见的将来,不会修复。悲催啊!!! 条条大道通罗马,此处不通开新路。 经过再次的学习了解,Flutter的Video功能,支持Stream模式,其可以采用WebSocket的方式来获取数据,然后进行播放。 那么,只要能够在服务端,将获取的帧数据,使用WebSocket提供,就能够正常播放了。 最终,使用Python开发了能够提供实时视频数据的WebSocket服务,具体代码如下:
# websocket服务请求处理async def CamTransmitHandler(websocket, path): print("Client Connected !") try : while True: # rc,img = cameraCapture.read() rc,img = success,frame if not rc: continue
img_fps = JPEG_QUALITY_VALUE img_param = [int(cv2.IMWRITE_JPEG_QUALITY), img_fps] encoded = cv2.imencode('.jpg', img, img_param)[1] data = str(base64.b64encode(encoded)) data = data[2:len(data)-1] await websocket.send(data)
# cv2.imshow("Transimission", frame) # if cv2.waitKey(1) & 0xFF == ord('q'): # break # cap.release() except EXCEPTION_CONNECTION_CLOSE as e: print("Client Disconnected !") # cap.release() except: print("Someting went Wrong !") 这个部分比之前的更简单,就是简单的转换数据,喂数据给WebSocket即可。 上述的两部分代码中,都没有包含完整的逻辑处理过程,只有关键代码部分。 各部分分别讲完以后,将提供完整的代码以供学习。 到这里,实时流媒体功能就实现了。
四、摄像头视频信息记录 实际上,上一步的实时视频功能,也依赖于这一步,因为其需要共享实际获取的摄像头信息。 其基本逻辑也比较简单,步骤如下:
- 初始化opencv,开始摄像头数据帧的获取
- 检测是否达到预定时间
- 未达到时间,则继续写入当前视频
- 达到时间了,则关闭当前视频,写入缩略图,并开启新的文件写入
具体代码如下:
# 捕获摄像头cameraCapture = cv2.VideoCapture(CAMERA_NO)
# 摄像头参数设置cameraCapture.set(cv2.CAP_PROP_FRAME_WIDTH, 320)cameraCapture.set(cv2.CAP_PROP_FRAME_WIDTH, 240)cameraCapture.set(cv2.CAP_PROP_SATURATION, 135)
fps = 30size=(int(cameraCapture.get(cv2.CAP_PROP_FRAME_WIDTH)),int(cameraCapture.get(cv2.CAP_PROP_FRAME_HEIGHT)))
# 读取捕获的数据success,frame = cameraCapture.read()...
while True: if is_stop: success = False break;
success,frame = cameraCapture.read() if not success: continue
time_now = get_current_time() if time_now["time"] - time_record["time"] >= ROTATE_TIME: if time_record_prev: thubm_file = get_file_name(time_record_prev, 'thumbs', 'jpg') print("[Info] write to thumb: %s" % thubm_file) if not os.path.isfile(thubm_file): cv2.imwrite(thubm_file, frame)
time_record = time_now time_record_prev = get_current_time() video_file = get_file_name(time_record_prev, 'videos', MEDIA_EXT) print("[Info] write to video: %s" % video_file)
# encode = cv2.VideoWriter_fourcc(*"mp4v") encode = cv2.VideoWriter_fourcc(*'X264') # encode = cv2.VideoWriter_fourcc(*'AVC1') # encode = cv2.VideoWriter_fourcc(*'XVID') # encode = cv2.VideoWriter_fourcc(*'H264') videoWriter=cv2.VideoWriter(video_file, encode,fps,size) # mp4 numFrameRemaining = ROTATE_TIME * fps #摄像头捕获持续时间 while success and numFrameRemaining > 0: videoWriter.write(frame) success,frame = cameraCapture.read() numFrameRemaining -= 1
cameraCapture.release() 上述代码的逻辑其实很清晰,有opencv的基础,一看就懂。 有一个关键点需要注意的就是 encode = cv2.VideoWriter_fourcc(*'X264'),在不同的环境下面,提供的编码方式不完全相同。 在米尔MYD-YT507H开发板的Ubuntu环境中,可以使用X264编码。 上述代码,会持续不断的读取摄像头的数据帧,存放到frame变量中,然后写入到视频文件中。并进行时间判断,以确定是否需要写入到新的视频文件中。 frame变量,在之前实时视频服务中,也会使用,相当于是共享了。
五、摄像头服务的完整代码 经过上面的两个部分,就完成了摄像头部分的服务代码。 整体的代码如下:
# -*- coding: utf-8 -*-import signalimport cv2import timefrom PIL import Imagefrom threading import Threadfrom http.server import BaseHTTPRequestHandler,HTTPServerfrom socketserver import ThreadingMixInfrom io import BytesIO
import osimport sysimport websocketsimport asyncioimport base64import ctypesimport inspect
CAMERA_NO = 2ROTATE_TIME = 120MJPEG_ENABLE = 1WEBSOCKET_ENABLE = 1MJPEG_SERVER_PORT = 28888WEBSOCKET_PORT = 28889JPEG_QUALITY_VALUE = 65STORE_DIR = "./data/" if os.uname()[0] == 'Darwin' else "/sdcard/data/"MEDIA_EXT = "mkv"
EXCEPTION_CONNECTION_CLOSE = websockets.exceptions.ConnectionClosed if sys.version[:3] == '3.6' else websockets.ConnectionClosed
def _async_raise(tid, exctype): """raises the exception, performs cleanup if needed""" try: tid = ctypes.c_long(tid) if not inspect.isclass(exctype): exctype = type(exctype) res = ctypes.pythonapi.PyThreadState_SetAsyncExc(tid, ctypes.py_object(exctype)) if res == 0: # pass raise ValueError("invalid thread id") elif res != 1: # """if it returns a number greater than one, you're in trouble, # and you should call it again with exc=NULL to revert the effect""" ctypes.pythonapi.PyThreadState_SetAsyncExc(tid, None) raise SystemError("PyThreadState_SetAsyncExc failed") except Exception as err: print(err)
def stop_thread(thread): """终止线程""" _async_raise(thread.ident, SystemExit)
# 信号处理回调def signal_handler(signum, frame): # global cameraCapture # global thread # global server # global is_stop # global success print('signal_handler: caught signal ' + str(signum)) if signum == signal.SIGINT.value: print('stop server:') is_stop = True success = False print("mjpeg server.socket.close...") server.socket.close() print("mjpeg server.shutdown...") server.shutdown() print("ws server.socket.close...") server_ws.ws_server.close() time.sleep(1) # print("ws server.shutdown...") # await server_ws.ws_server.wait_closed() print("mjpeg thread.shutdown...") thread_mjpeg.join() print("ws loop.shutdown...") # event_loop_ws.stop() event_loop_ws.call_soon_threadsafe(event_loop_ws.stop) time.sleep(1) # print("ws thread.shutdown...") # stop_thread(thread_ws) # time.sleep(1) # print(server) # print(server_ws) print(thread_mjpeg.is_alive()) print(thread_ws.is_alive()) print(event_loop_ws.is_running()) # thread_ws.join() print("cameraCapture.release...") cameraCapture.release() print("quit...") # print(server_ws) sys.exit(0)
# http服务器请求处理:网页、MJPEG数据流class CamHandler(BaseHTTPRequestHandler): def do_GET(self): # mjpeg推流 if self.path.endswith('.mjpg'): self.send_response(200) self.send_header('Content-type','multipart/x-mixed-replace; boundary=--jpgboundary') self.end_headers() while True: if is_stop: break try: # rc,img = cameraCapture.read() rc,img = success,frame if not rc: continue if True: imgRGB=cv2.cvtColor(img,cv2.COLOR_BGR2RGB) jpg = Image.fromarray(imgRGB) tmpFile = BytesIO() jpg.save(tmpFile,'JPEG') self.wfile.write(b"--jpgboundary") self.send_header(b'Content-type','image/jpeg') self.send_header(b'Content-length',str(tmpFile.getbuffer().nbytes)) self.end_headers() jpg.save(self.wfile,'JPEG') else: img_fps = JPEG_QUALITY_VALUE img_param = [int(cv2.IMWRITE_JPEG_QUALITY), img_fps] img_str = cv2.imencode('.jpg', img, img_param)[1].tobytes() # change image to jpeg format self.send_header('Content-type','image/jpeg') self.end_headers() self.wfile.write(img_str) self.wfile.write(b"--jpgboundary") # end of this part time.sleep(0.033) except KeyboardInterrupt: self.wfile.write(b"--jpgboundary--") break except BrokenPipeError: continue return # 网页 if self.path == '/' or self.path.endswith('.html'): self.send_response(200) self.send_header('Content-type','text/html') self.end_headers() self.wfile.write(b'Live video') self.wfile.write(('' % self.headers.get('Host')).encode()) self.wfile.write(b'') return
class ThreadedHTTPServer(ThreadingMixIn, HTTPServer): """Handle requests in a separate thread."""
# 启动MJPEG服务def mjpeg_server_star(): global success global server global thread_mjpeg
try: server = ThreadedHTTPServer(('0.0.0.0', MJPEG_SERVER_PORT), CamHandler) print("mjpeg server started: http://0.0.0.0:%d" % MJPEG_SERVER_PORT) # server.serve_forever() thread_mjpeg = Thread(target=server.serve_forever); thread_mjpeg.start() except KeyboardInterrupt: print("mjpeg server stoping...") server.socket.close() server.shutdown() print("mjpeg server stoped")
# websocket服务请求处理async def CamTransmitHandler(websocket, path): print("Client Connected !") try : while True: # rc,img = cameraCapture.read() rc,img = success,frame if not rc: continue
img_fps = JPEG_QUALITY_VALUE img_param = [int(cv2.IMWRITE_JPEG_QUALITY), img_fps] encoded = cv2.imencode('.jpg', img, img_param)[1] data = str(base64.b64encode(encoded)) data = data[2:len(data)-1] await websocket.send(data)
# cv2.imshow("Transimission", frame) # if cv2.waitKey(1) & 0xFF == ord('q'): # break # cap.release() except EXCEPTION_CONNECTION_CLOSE as e: print("Client Disconnected !") # cap.release() except: print("Someting went Wrong !")
# websocket服务器启动def websocket_server_start(): global thread_ws global server_ws global event_loop_ws
event_loop_ws = asyncio.new_event_loop() def run_server(): global server_ws print("websocket server started: ws://0.0.0.0:%d" % WEBSOCKET_PORT) server_ws = websockets.serve(CamTransmitHandler, port=WEBSOCKET_PORT, loop=event_loop_ws) event_loop_ws.run_until_complete(server_ws) event_loop_ws.run_forever()
thread_ws = Thread(target=run_server) thread_ws.start() # try: # yield # except e: # print("An exception occurred") # finally: # event_loop.call_soon_threadsafe(event_loop.stop)
# 获取存储的文件名def get_file_name(time_obj, path, ext): file_name_time = "%04d-%02d-%02d_%02d-%02d-%02d" % (time_obj["year"], time_obj["month"], time_obj["day"], time_obj["hour"], time_obj["min"], 0) return '%s/%s/%s.%s' % (STORE_DIR, path, file_name_time, ext)
# 获取当前整分时间def get_current_time(): time_now = time.localtime() time_int = int(time.time()) return { "year": time_now.tm_year, "month": time_now.tm_mon, "day": time_now.tm_mday, "hour": time_now.tm_hour, "min": time_now.tm_min, "sec": time_now.tm_sec, "time": time_int - time_now.tm_sec }
# 设置信号回调signal.signal(signal.SIGINT, signal_handler)signal.signal(signal.SIGTERM, signal_handler)
# 捕获摄像头cameraCapture = cv2.VideoCapture(CAMERA_NO)
# 摄像头参数设置cameraCapture.set(cv2.CAP_PROP_FRAME_WIDTH, 320)cameraCapture.set(cv2.CAP_PROP_FRAME_WIDTH, 240)cameraCapture.set(cv2.CAP_PROP_SATURATION, 135)
fps = 30size=(int(cameraCapture.get(cv2.CAP_PROP_FRAME_WIDTH)),int(cameraCapture.get(cv2.CAP_PROP_FRAME_HEIGHT)))
# 读取捕获的数据success,frame = cameraCapture.read()
if not success: print("camera start failed.") quit()
is_stop = Falseserver = Noneserver_ws = Noneevent_loop_ws = Nonethread_mjpeg = Nonethread_ws = Nonemjpeg_server_star()websocket_server_start()
print("record server star:")
thubm_file = Nonevideo_file = Nonetime_start = int(time.time())time_record = {"time":0}time_record_prev = None
while True: if is_stop: success = False break;
success,frame = cameraCapture.read() if not success: continue
time_now = get_current_time() if time_now["time"] - time_record["time"] >= ROTATE_TIME: if time_record_prev: thubm_file = get_file_name(time_record_prev, 'thumbs', 'jpg') print("[Info] write to thumb: %s" % thubm_file) if not os.path.isfile(thubm_file): cv2.imwrite(thubm_file, frame)
time_record = time_now time_record_prev = get_current_time() video_file = get_file_name(time_record_prev, 'videos', MEDIA_EXT) print("[Info] write to video: %s" % video_file)
# encode = cv2.VideoWriter_fourcc(*"mp4v") encode = cv2.VideoWriter_fourcc(*'X264') # encode = cv2.VideoWriter_fourcc(*'AVC1') # encode = cv2.VideoWriter_fourcc(*'XVID') # encode = cv2.VideoWriter_fourcc(*'H264') videoWriter=cv2.VideoWriter(video_file, encode,fps,size) # mp4 numFrameRemaining = ROTATE_TIME * fps #摄像头捕获持续时间 while success and numFrameRemaining > 0: videoWriter.write(frame) success,frame = cameraCapture.read() numFrameRemaining -= 1
cameraCapture.release() 在上述代码中,除了前面说过的三个部分,还包括启动web和websocket线程的部分。因为核心逻辑为读取视频数据并写入文件,所以其他部分,以线程的模式启动,以便同时进行处理。 将上述代码保存为DrivingRecorderAndMjpegServer.py,然后运行即可。(依赖包,见代码库中requirements.txt) 实际访问效果如下:
 六、历史数据RestFul服务开发 历史数据服务,本来也可以使用Python直接手写,但考虑到可扩展性,使用Django来进行了编写。 Djano服务,需要提供如下的功能:
- 提供api接口,以便获取历史数据记录列表,便于前端界面呈现展示
- 提供Flutter Web界面代码文件的托管,以便通过浏览器访问
- 提供静态文件的访问,例如查看历史视频文件
2和3本质都是一个问题,通过Django的static功能,就能实现。也就是在settings.py配置中,提供下面的配置即可:
STATIC_URL = 'static/'
STATICFILES_DIRS = [ BASE_DIR / "static"]1对外提供api服务,则需要设置对应的url接口,以及读取历史文件信息,生成前端需要的json数据结构,这部分的具体代码如下:
# 媒体文件存放目录,以及缩略图和视频文件的后缀THUMB_HOME_DIR = "%s/%s/data/thumbs/" % (BASE_DIR, STATIC_URL)VIDEO_HOME_DIR = "%s/%s/data/videos/" % (BASE_DIR, STATIC_URL)
IMG_FILTER = [".jpg"]MEDIA_FILTER = [ ".mkv"]
import jsonfrom django.shortcuts import render, HttpResponsefrom rest_framework.response import Responsefrom rest_framework.permissions import AllowAnyfrom rest_framework.decorators import api_view, permission_classesimport osfrom django.conf import settings
THUMB_HOME_DIR = settings.THUMB_HOME_DIRVIDEO_HOME_DIR = settings.VIDEO_HOME_DIRIMG_FILTER = settings.IMG_FILTERMEDIA_FILTER = settings.MEDIA_FILTER
# Create your views here.@api_view(['GET'],)@permission_classes([AllowAny],)def hello_django(request): str = '''[ { "id": 1, "time": "2022-07-28 21:00", "title": "2022-07-28 21:00", "body": "videos/2022-07-28_2100.mp4" }, { "id": 2, "time": "2022-07-28 23:00", "title": "2022-07-28 23:00", "body": "videos/2022-07-28_2300.mp4" }, { "id": 3, "time": "2022-07-28 25:00", "title": "2022-07-28 25:00", "body": "videos/2022-07-28_2500.mp4" }]''' _json = json.loads(str) return HttpResponse(json.dumps(_json), content_type='application/json')
@api_view(['GET'],)@permission_classes([AllowAny],)def history_list(request): next = request.GET.get("next", '') print(f"thumb next = {next}") path = "/".join(request.path.split("/")[3:]) print(f"thumb request.path= {request.path}") print(f"thumb path = {path}")
#print os.listdir(FILE_HOME_DIR+".none/") data = {"files":[], "dirs":[]} print(data) child_path = THUMB_HOME_DIR+next print(f"child_path = {child_path}") data['cur_dir'] = path+next print(data) for dir in os.listdir(child_path): if os.path.isfile(child_path+"/"+dir): if os.path.splitext(dir)[1] in IMG_FILTER: data['files'].append(dir) else: data['dirs'].append(dir)
print(data) data['files']=sorted(data['files']) data['files'].reverse() data['infos'] = []
for i in range(0,len(data['files'])): thumb_name = data['files'][i] video_name = thumb_name.replace('.jpg', MEDIA_FILTER[0]) file_time = thumb_name.replace('.jpg', '').replace('_', ' ') data['infos'].append( { "id": i, "time": file_time, "title": file_time, "body": thumb_name, 'thumb': thumb_name, 'video': video_name } ) return Response(data['infos'], status = 200) 其中有两个接口: hello_django是最开始学习使用的,返回写死的json数据。 history_list,则是自动遍历缩略图文件夹,获取缩略图文件信息,并生成所需要的json数据格式。 在对应的代码库文件中,也包含了requirements.txt,其中标明了实际需要的依赖库。 下载代码,进入manage.py所在的目录后,执行下面的命令即可启动: 访问 192.168.1.15:8000/app/hellodjango :
 访问:History List – Django REST framework
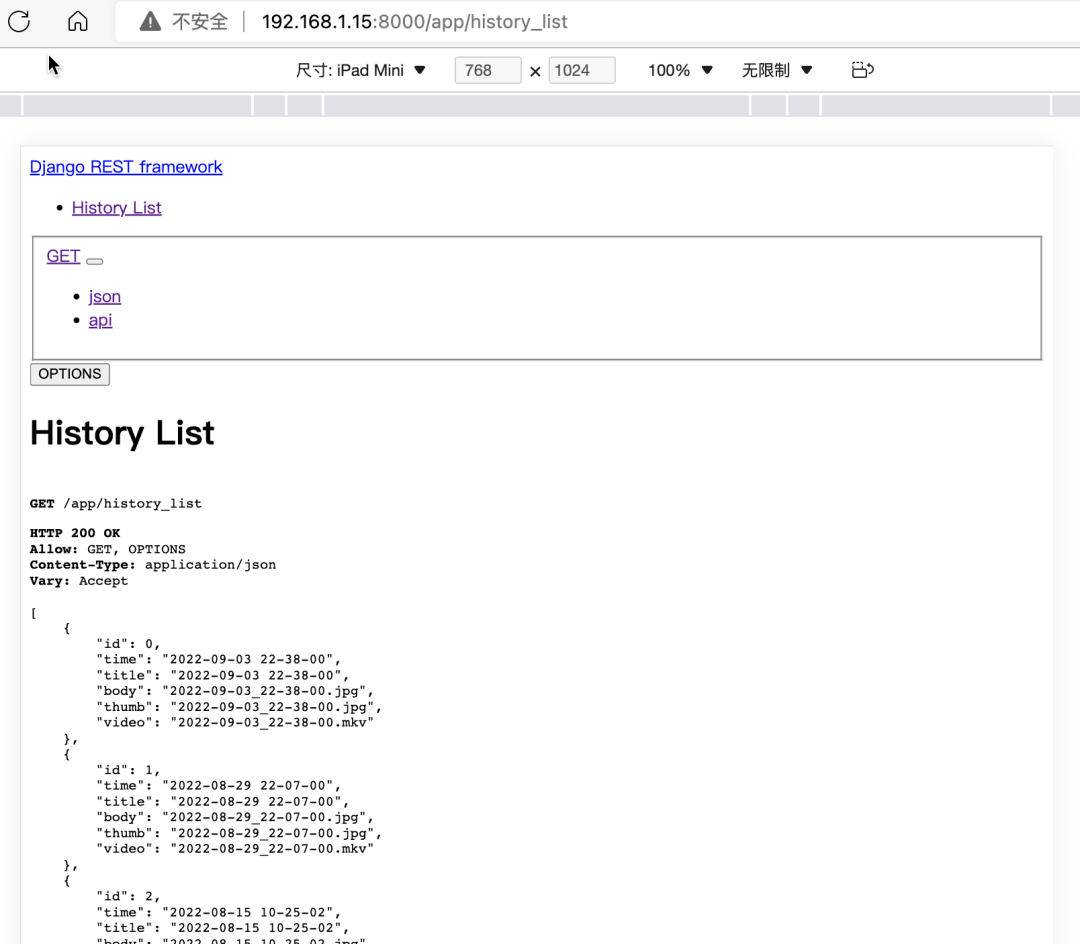
可以看到 history_list接口,已经可以提供实际需要的数据了。七、Flutter Web界面开发 这个部分设计的代码比较多,所以只对关键部分的代码进行说明。 开发的实际代码,位于lib目录,具体为: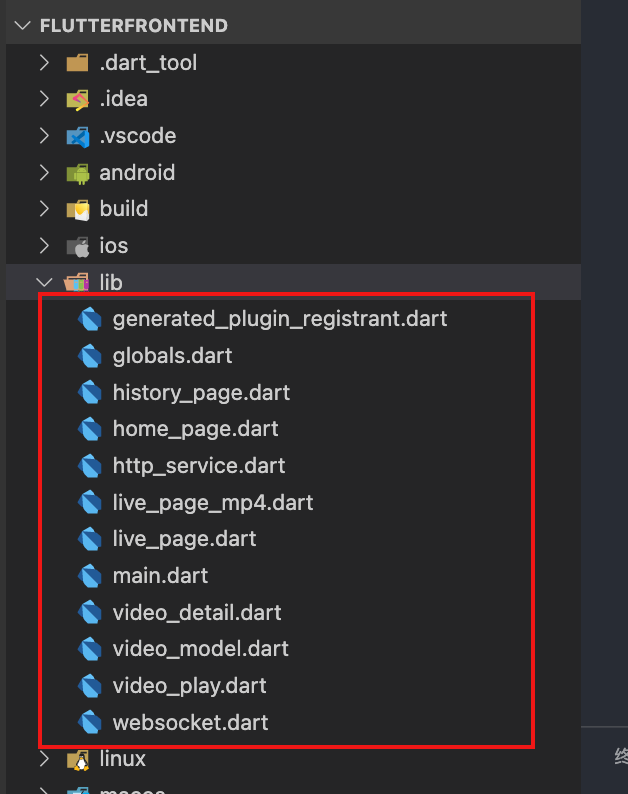
- globals.dart:全局变量定义
- main.dart:程序入口
- home_page.dart:首页
- live_page.dart:实时播放
- live_page_mp4.dart:测试播放mp4视频
- history_page.dart:历史记录列表页面
- video_detail.dart:单条历史记录详情
- video_play.dart:播放具体的历史视频
- video_model.dart:单条记录的数据模型
- http_service.dart:请求RestFul接口
- websocket.dart:实时视频的WebSocket请求
整个界面,使用了Scaffold来模拟手机/Pad的操作界面,具体界面如下: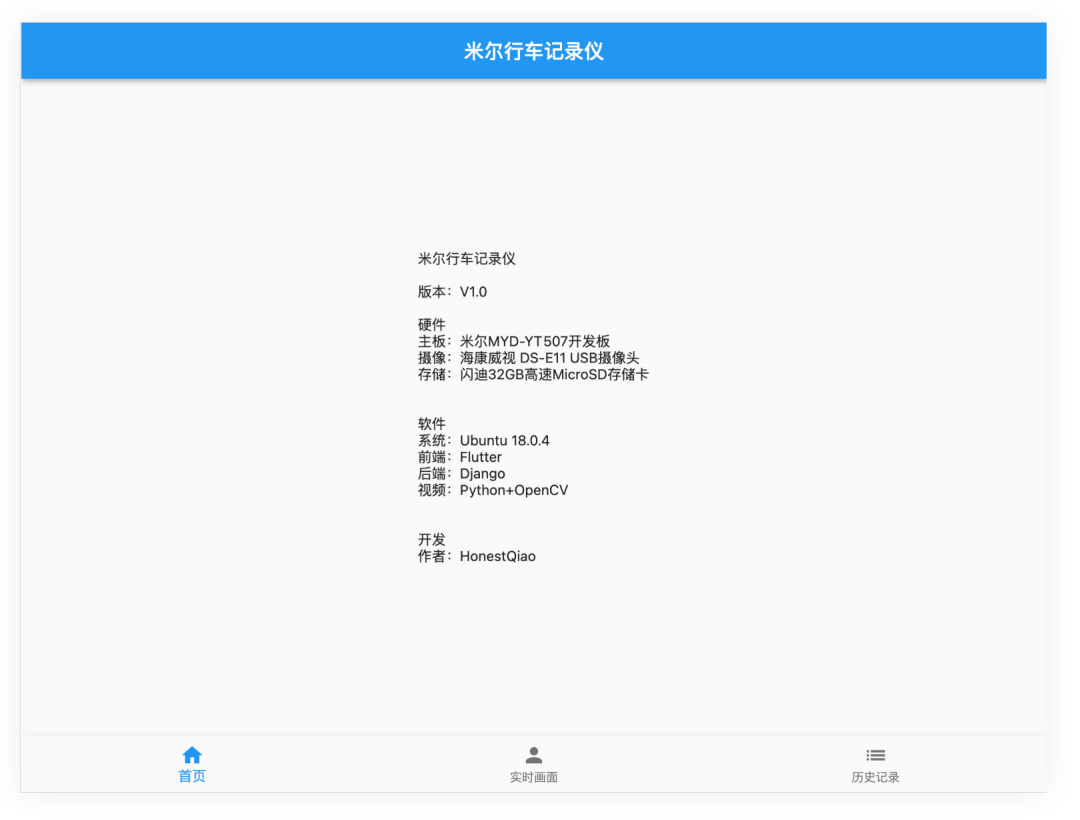 在实时画面界面中,使用了WebSocket监听,获取到信息,就使用Stream模式,推送给视频播放。 在历史记录界面中,则通过RestFul请求列表数据,然后呈现。
八、整体运行效果 实际的运行效果,不用多说,看界面就成:
- 实时画面:
- 历史记录列表:
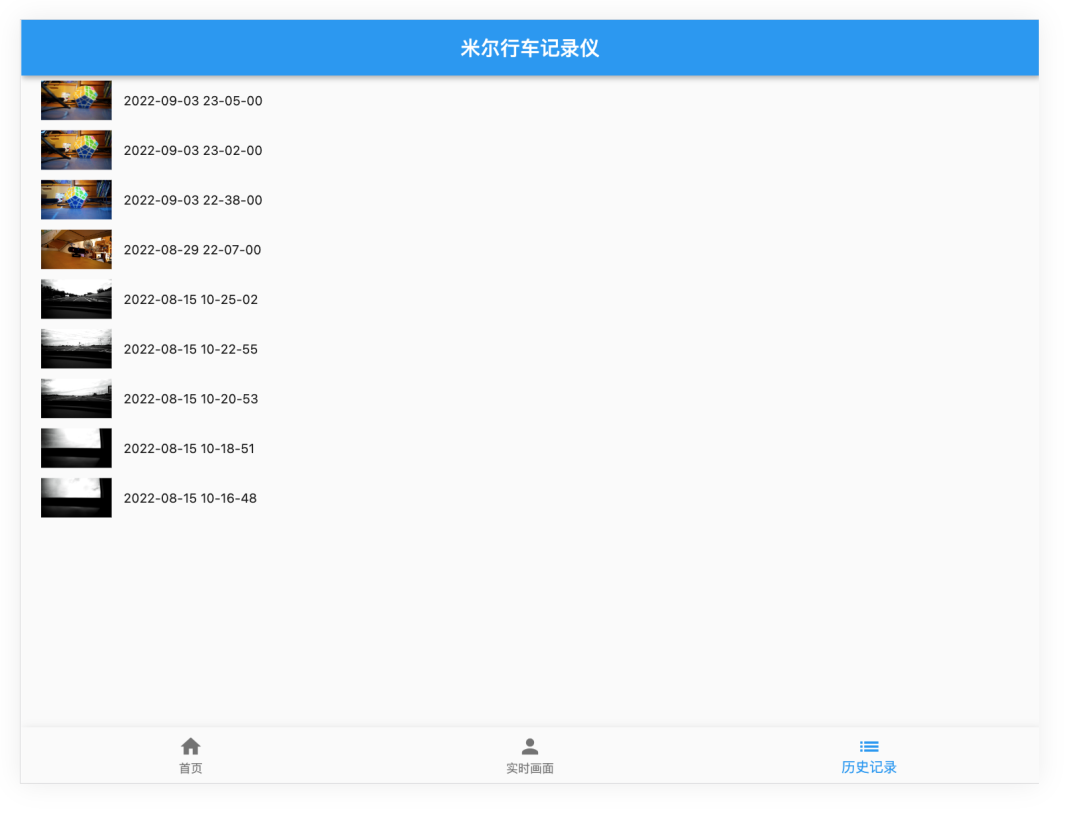
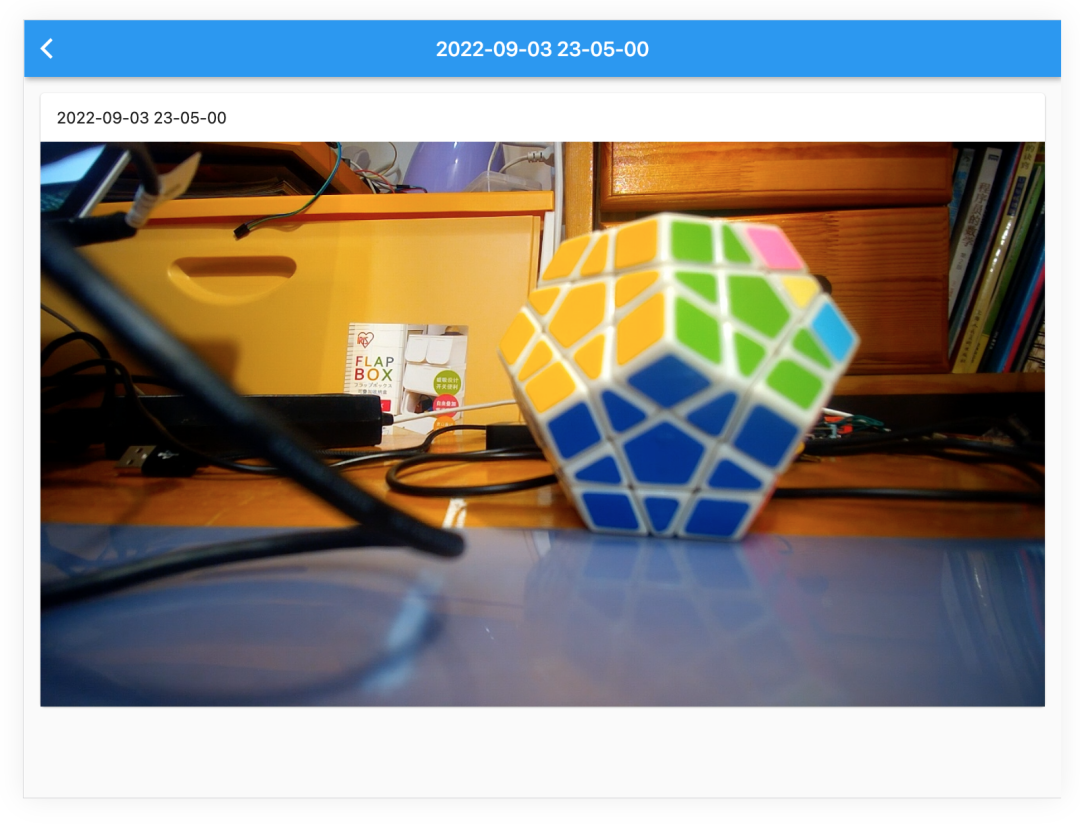
- 历史记录播放:
九、车试: 经过反复的测试验证,确保各项功能完整后,进行了上车实测。
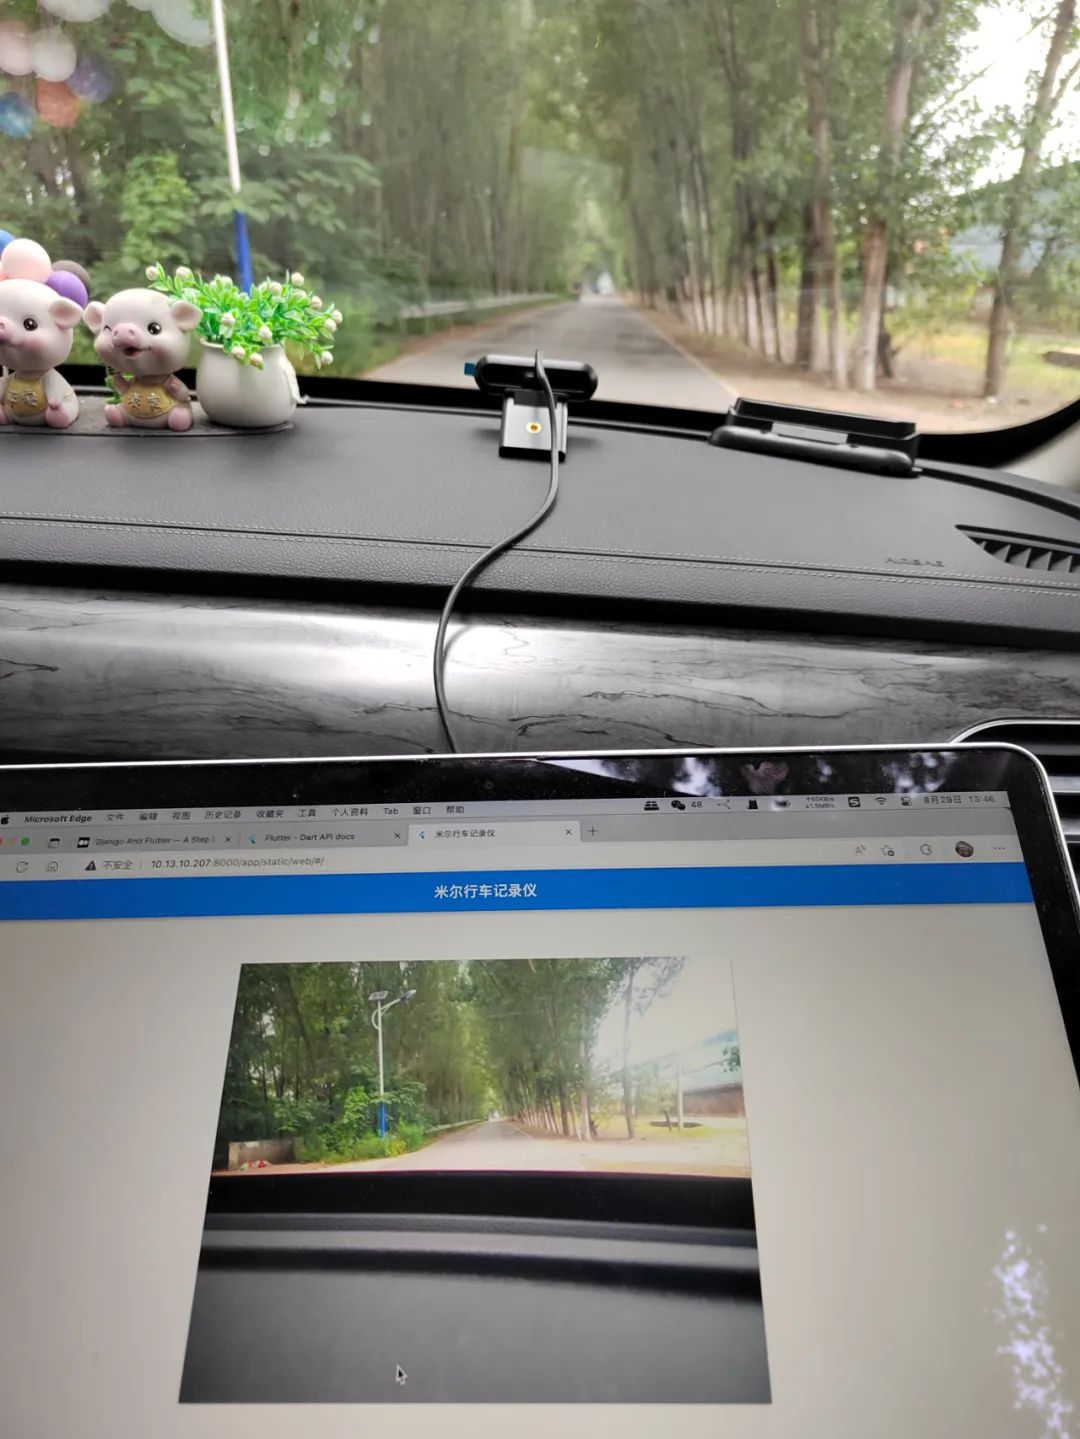
因为最近的疫情原因,所以只在村里转了一圈,进行了实际测试,可以查看最后的视频。后续有机会,再找个晴朗的天气,去环境优美的地方实际拍摄录制。
十、实际代码说明: 完整的代码,请通过 米尔行车记录仪: 米尔行车记录仪 (https://gitee.com/honestqiao/MYiR-Driving-Recorder) 获取。 代码目录说明如下:
- DrivingRecorder:摄像头服务
- backend:RestFul服务
- frontend:Flutter Web界面
在以上仓库中,包含了详细的代码使用说明。 在实际应用中,将记录视频的data目录与后端static/data目录关联,以便两者统一。
十一、感谢 在研究学习的过程中,参考了数十篇各类资料,先将部分列出如下。对所有学习过的资料的作者,表示深深的感谢。
- janakj/py-mjpeg: Python MJPEG streaming utilities (github.com)
- Simple Python Motion Jpeg (mjpeg server) from webcam. Using: OpenCV,BaseHTTPServer (github.com)
- Python 使用USB Camera录制MP4视频_Frank_Abagnale的博客-CSDN博客
- 用 Python、nginx 搭建在线家庭影院 - 知乎 (zhihu.com)
- Django报错解决:RuntimeError: Model class ...apps... doesn't declare an explicit app_label and isn't in a_lyp039078的博客-CSDN博客
- Python OpenCV 调用摄像头并截图保存_Clannad_niu的博客-CSDN博客
- 用 Python、nginx 搭建在线家庭影院mob604756e97f09的技术博客51CTO博客
- Python-OpenCV录制H264编码的MP4视频 - 掘金 (juejin.cn)
- ****[VideoWriter]保存H264/MPEG4格式MP4视频 - image processing (zj-image-processing.readthedocs.io)
- Manual USB camera settings in Linux | KUROKESU
- UVC Web Cameras (indilib.org)
- 编写你的第一个 Flutter 网页应用 - Flutter 中文文档 - Flutter 中文开发者网站 - Flutter
- macOS install | Flutter
- [Django 設定 LANGUAGE_CODE 時所遇到的麻煩] OSError: No translation files found for default language zh-TW. (github.com)**
- Django And Flutter — 样板应用程序|的分步教程作者:Clever Tech Memes |中等 (medium.com)
- joke2k/django-environ: Django-environ allows you to utilize 12factor inspired environment variables to configure your Django application. (github.com)
- django 之跨域访问问题解决 access-control-allow-origin - 腾讯云开发者社区-腾讯云 (tencent.com)
- django-cors-headers · PyPI
- Django项目解决跨域问题 - SegmentFault 思否
- video_player | Flutter Package (pub.dev)
- 视频的播放和暂停 - Flutter 中文文档 - Flutter 中文开发者网站 - Flutter
- 5.7 页面骨架(Scaffold) | 《Flutter实战·第二版》 (flutterchina.club)
- itfitness/BottomNavigationBarDemo - 码云 - 开源中国 (gitee.com)
- Flutter底部导航 - 简书 (jianshu.com)
- Flutter之自定义底部导航条以及页面切换实例——Flutter基础系列houruoyu3的博客-CSDN博客flutter 自定义底部导航
- How To Use HTTP Requests in Flutter | DigitalOcean
- 在Flutter中发起HTTP网络请求 - Flutter中文网 (flutterchina.club)
- Fetch data from the internet | Flutter
- 获取网络数据 - Flutter 中文文档 - Flutter 中文开发者网站 - Flutter
- 深入理解 Function & Closure - Flutter 中文文档 - Flutter 中文开发者网站 - Flutter
- Django And Flutter — A Step by Step Tutorial for a Boilerplate Application | by Clever Tech Memes | Medium
- multithreading - Multithreaded web server in python - Stack Overflow
- Simple Python HTTP Server with multi-threading and partial-content support (github.com)
- meska/mjpeg_stream_webcam: Webcam Streamer for Octoprint MacOs (github.com)
- blueimp/mjpeg-server: MJPEG Server implements MJPEG over HTTP using FFmpeg or any other input source capable of piping a multipart JPEG stream to stdout. Its primary use case is providing Webdriver screen recordings. (github.com)
- n3wtron/simple_mjpeg_streamer_http_server: simple python mjpeg streamer http server (github.com)
- Python3远程监控程序实现肥宅Sean的博客-CSDN博客
- opencv imencode跟imdecode函数jpg(python) - PythonTechWorld
- flutter_mjpeg | Flutter Package (pub.dev)
- Can't work on web platform. · Issue #13 · mylisabox/flutter_mjpeg (github.com)
- Consider if fetch is widely supported enough to use · Issue #595 · dart-lang/http (github.com)
- 在 Flutter | 中创建实时视频流应用程序作者:Mitrajeet Golsangi |开发人员学生社区 Vishwakarma 技术学院,浦那 |中等 (medium.com)
- Python websockets.serve方法代碼示例 - 純淨天空 (vimsky.com)
- Flutter 常用組件講解 | ImageWidget - iT 邦幫忙::一起幫忙解決難題,拯救 IT 人的一天 (ithome.com.tw)
- Bad State: Stream has already been listened to. · Issue #29105 · flutter/flutter (github.com)
- flutter - Streambuilder with WebSockets stream in TabBarView: Bad state: Stream has already been listened to - Stack Overflow
- 使用WebSockets - Flutter中文网 (flutterchina.club)
- VideoStreaming.dart (github.com)
- 在 Flutter | 中创建实时视频流应用程序作者:Mitrajeet Golsangi |开发人员学生社区 Vishwakarma 技术学院,浦那 |中等 (medium.com)
- Flutter:WebSocket封装-实现心跳、重连机制 - 让我留在你身边 (ricardolsw.github.io)
- 2.3 状态管理 | 《Flutter实战·第二版》 (flutterchina.club)
- 路由和导航 - Flutter 中文文档 - Flutter 中文开发者网站 - Flutter
- 7.6 异步UI更新(FutureBuilder、StreamBuilder) | 《Flutter实战·第二版》 (flutterchina.club)
- Flutter 常用組件講解 | ImageWidget - iT 邦幫忙::一起幫忙解決難題,拯救 IT 人的一天 (ithome.com.tw)
- Step By Step Tutorial in Learning Flutter: Lesson 12 — Adding Image (Ice Pokemon) | by Misterflutter | Quick Code | Medium
- Django CORS on static asset - Stack Overflow
- 配置 | Django 文档 | Django (djangoproject.com)
- Global Variables in Dart - Stack Overflow
- UVC - Community Help Wiki (ubuntu.com)
- 利用OpenCV进行H264视频编码的简易方式 - 知乎 (zhihu.com)
- Documentation for OPENCV_FFMPEG_WRITER_OPTIONS and OPENCV_FFMPEG_CAPTURE_OPTIONS · Issue #21155 · opencv/opencv (github.com)
- 利用OpenCV进行H264视频编码的简易方式 - 知乎 (zhihu.com)
- FFmpeg概述及编码支持 - 知乎 (zhihu.com)
- Web 渲染器 - Flutter 中文文档 - Flutter 中文开发者网站 - Flutter
十二、总结 在研究学习的过程中,对Linux系统下的UVC框架有了进一步的了解,对Flutter进行应用开发有了实际的了解,对OpenCV的实际应用也有了具体的了解。 在实际开发的过程中,遇到的最大的坑来自Flutter,因为变化太快,有一些功能可能兼容性没有跟上。不过更多是自己学艺不精导致的。 另外,目前还只是V1.0版本,后续还存在较大的优化空间。例如对于OpenCV的应用,可以调整参数,优化获取的视频数据的指令和大小等。这些有待于进一步学习后进行。 最主要的,对米尔MYD-YT507开发板有了深入的了解,进行了实际的应用。作为一款车规级处理器T507的开发板,名不虚传!
- 相关推荐
- 热点推荐
- 开发板
-
视频关注23万!国产车规级处理器T507H平台上,用50行Python代码实现图传和人脸识别2023-04-03 2194
-
【米尔MYD-YT507开发板试用体验】+2.硬件初识2022-10-27 1504
-
【米尔MYD-YT507开发板试用体验】使用mjpeg_streamer建立摄像头图传2022-10-26 2245
-
米尔MYD-YT507H开发板实战应用-行车记录仪(上)-MJPEG推流演示。实战应用#硬声创作季米尔电子 2022-09-29
-
第一视角体验搭载全志T507-H的开发板MYD-YT507H开发板2022-09-19 18711
-
国产开发板各项性能测试--米尔MYD-YT507H开发板2022-09-14 2618
-
【米尔MYD-YT507开发板试用体验】基于Fluter+Django+OpenCV的米尔行车记录仪2022-09-03 23874
-
试用视频丨国产开发板各项性能测试--米尔MYD-YT507H开发板2022-09-02 1579
-
国产处理器丨如何在Ubuntu建立xfce桌面环境,远程穿透访问家中米尔MYD-YT507H开发板2022-08-28 2627
-
【鸿蒙IPC开发板开发板体验】米尔MYD-YT507上驱动HiSpark IPC DIY Camera2022-08-21 5581
-
米尔视频丨第一视角体验国产处理器T507-H开发板2022-08-15 3032
-
【米尔MYD-YT507开发板试用体验】+3.系统烧录2022-07-19 21526
-
【米尔MYD-YT507开发板试用体验】Ubuntu的xfce桌面环境建立及远程穿透访问家中米尔MYD-YT507开发板2022-07-15 22279
全部0条评论

快来发表一下你的评论吧 !

