

基于AX650N部署SegFormer
描述
一背景
语义分割(Semantic Segmentation)是计算机视觉中的一项基本任务。与单张图像分类任务相比,语义分割相当于是像素级别上的分类任务。语义分割为许多下游应用特别是近几年来的智能驾驶技术的落地提供了可能。
本文将简单介绍SegFormer的基本原理,同时指导如何导出ONNX模型,并将其部署在优秀的端侧AI芯片AX650N上,希望能给行业内对边缘侧/端侧部署Transformer模型的爱好者提供新的思路。
二SegFormer介绍
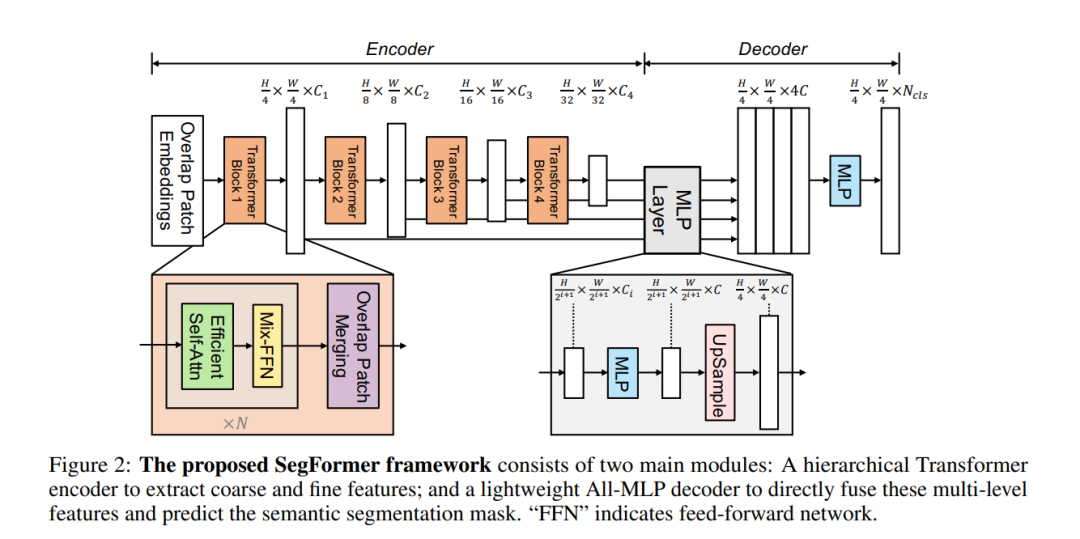
SegFormer的论文中提出了一个简单、高效的语义分割方案,它将Transformers与轻量级多层感知(MLPs)解码器结合起来。SegFormer有两个吸引人的特点:
1SegFormer包含一个新的层次结构的Transformer编码器,输出多尺度特征。它不需要位置编码,这样就不用对位置编码做插值。
2SegFormer避免了复杂的解码器。所提出的MLP解码器从不同的层聚集信息,从而结合Local Attention和Global Attention来呈现强大的表示。这种简单而轻量级的设计是用Transformer高效地做分割的关键。
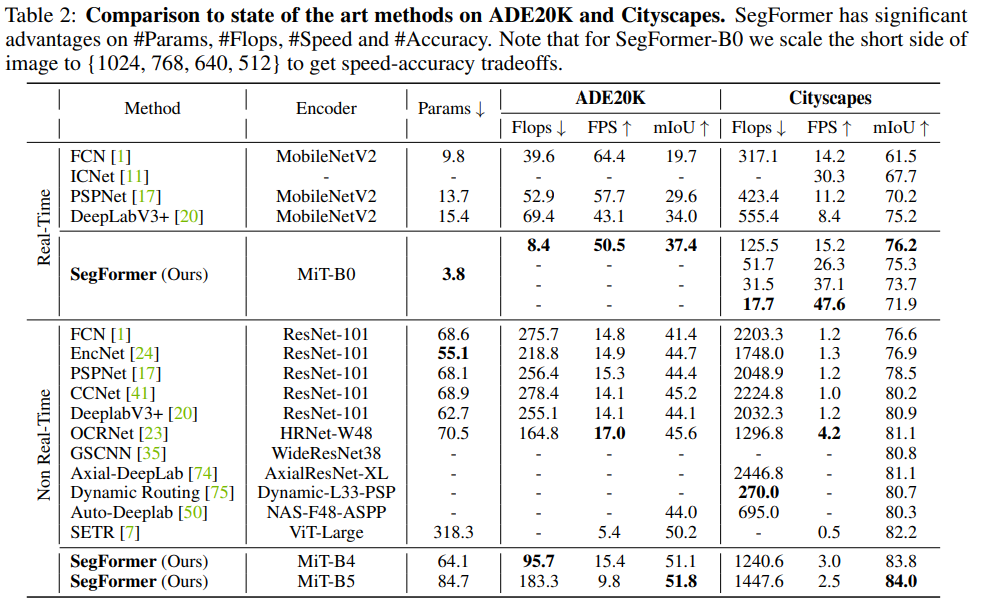
论文中扩展了上述方案,得到了一系列不同大小型号的模型,从SegFormer-B0到SegFormer-B5,相比之前的分割模型达到了更好的性能和效率。例如,SegFormer-B4在ADE20K上以64M参数实现了50.3%的mIoU,最佳模型SegFormer-B5在Cityscapes验证集上达到了84.0%的mIoU。
2.1 骨干网络
backbone
2.2 分级Transformer编码器
论文中提出了一系列的Mix Transformer编码器(MiT),MiT-B0到MiT-B5,具有相同的结构,但尺寸不同。MiT-B0是用于快速推理的轻量级模型,而MiT-B5是用于最佳性能的最大模型。设计的MiT部分灵感来自ViT,但针对语义分割进行了定制和优化。
2.3 轻量级All-MLP解码器
集成了一个仅由MLP层组成的轻量级解码器,这避免了其他方法中通常用的手工制作和计算要求很高的组件。实现这种简单解码器的关键是分级Transformer编码器比传统的CNN编码器具有更大的有效感受野(ERF)。
benchmark
三AX650N
AX650N是一款兼具高算力与高能效比的SoC芯片,集成了八核Cortex-A55 CPU,10.8TOPs@INT8 NPU(针对 Transformer 模型进行了定制优化),支持8K@30fps的ISP,以及H.264、H.265编解码的VPU。接口方面,AX650N支持64bit LPDDR4x,多路MIPI输入,千兆Ethernet、USB、以及HDMI 2.0b输出,并支持32路1080p@30fps解码。强大的性能可以让AX650N帮助用户在智慧城市、智慧教育、智能制造等领域发挥更大的价值。
AX650N更多介绍请点击下图查看:
四
模型转换
本文以segformer-b0-cityscapes-640-1280为例。
4.1 模型下载
这次我们推荐从Huggingface的ModelZoo下载模型。
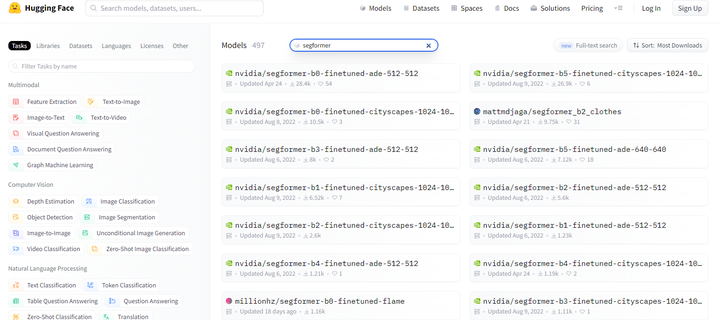
huggingface
● ONNX模型导出的脚本
ONNX模型导出
import torch
from transformers import SegformerForSemanticSegmentation, SegformerFeatureExtractor
from pathlib import Path
from onnxruntime.quantization import quantize_dynamic, QuantType, preprocess
import onnx
import onnxruntime
import os
from PIL import Image
from typing import List


def export_model(model_name: str, export_dir: str, input_sample: torch.Tensor):
    model = SegformerForSemanticSegmentation.from_pretrained(model_name)
    model.eval()
    export_path = os.path.join(export_dir, model_name)
    Path(export_path).mkdir(parents=True, exist_ok=True)
    onnx_path = os.path.join(export_path, "model.onnx")
    # export the model to ONNX while preserving the first dimension as dynamic
    torch.onnx.export(model, input_sample, onnx_path, export_params=True,
                        opset_version=11,
                        input_names=["input"],
                        output_names=["output"],
                        )


export_dir = "./hf_export/"


model_name = "nvidia/segformer-b0-finetuned-cityscapes-640-1280"
export_model(model_name, export_dir, torch.randn([1,3,640,1280]))


# model_name = "nvidia/segformer-b1-finetuned-ade-512-512"
# export_model(model_name, export_dir, torch.randn([1,3,512,512]))
# check_models(model_name, export_dir, image_paths)
● onnxsim优化
$ onnxsim segformer-b0-cityscapes-640-1280.onnx segformer-b0-cityscapes-640-1280-sim.onnx
Simplifying...
Finish! Here is the difference:
┏━━━━━━━━━━━━┳━━━━━━━━━━━━━━━━┳━━━━━━━━━━━━━━━━━━┓
┃            ┃ Original Model ┃ Simplified Model ┃
┡━━━━━━━━━━━━╇━━━━━━━━━━━━━━━━╇━━━━━━━━━━━━━━━━━━┩
│ Add        │ 136            │ 136              │
│ Concat     │ 21             │ 1                │
│ Constant   │ 176            │ 0                │
│ Conv       │ 20             │ 20               │
│ Div        │ 46             │ 46               │
│ Erf        │ 8              │ 8                │
│ MatMul     │ 68             │ 68               │
│ Mul        │ 46             │ 46               │
│ Pow        │ 30             │ 30               │
│ ReduceMean │ 60             │ 60               │
│ Relu       │ 1              │ 1                │
│ Reshape    │ 76             │ 76               │
│ Resize     │ 4              │ 4                │
│ Shape      │ 20             │ 0                │
│ Slice      │ 20             │ 0                │
│ Softmax    │ 8              │ 8                │
│ Sqrt       │ 30             │ 30               │
│ Sub        │ 30             │ 30               │
│ Transpose  │ 76             │ 76               │
│ Model Size │ 14.3MiB        │ 14.3MiB          │
└────────────┴────────────────┴──────────────────┘
● 添加argmax输出头
由于AX650N的NPU支持argmax算子,因此可以将argmax添加到该模型的输出头,直接获取每个像素点置信度最高的类别ID。
首先安装onnx_graphsurgeon依赖:
pip install onnx_graphsurgeon --index-url https://pypi.ngc.nvidia.com
运行下面的脚本,添加argmax op:
import numpy as np
import onnx
import onnx_graphsurgeon as gs


model_path = "./segformer-b0-cityscapes-640-1280-sim.onnx"
output_model_path = "./segformer-b0-cityscapes-640-1280-sim-argmax.onnx"


onnx_model = onnx.load(model_path)
onnx_graph = gs.import_onnx(onnx_model)
node_last_conv = onnx_graph.nodes[-1]


# Attrs for ArgMax
axis = 1
keepdims = 1


argmax_out_shape = node_last_conv.outputs[0].shape.copy()
argmax_out_shape[axis] = 1


argmax_out = gs.Variable(
    "argmax_output",
    dtype=np.int64,
    shape=argmax_out_shape,
)


argmax_node = gs.Node(
    op="ArgMax",
    name="decode_head_ArgMax",
    inputs=[node_last_conv.outputs[0]],
    outputs=[argmax_out],
    attrs={"axis": axis, "keepdims": keepdims},
)


onnx_graph.nodes.append(argmax_node)
onnx_graph.outputs.clear()
onnx_graph.outputs = [argmax_out]
onnx_graph.cleanup().toposort()
onnx_model_with_argmax = gs.export_onnx(onnx_graph)
onnx_model_with_argmax.ir_version = onnx_model.ir_version


onnx.save(onnx_model_with_argmax, output_model_path)
添加argmax前后两个ONNX模型对比:
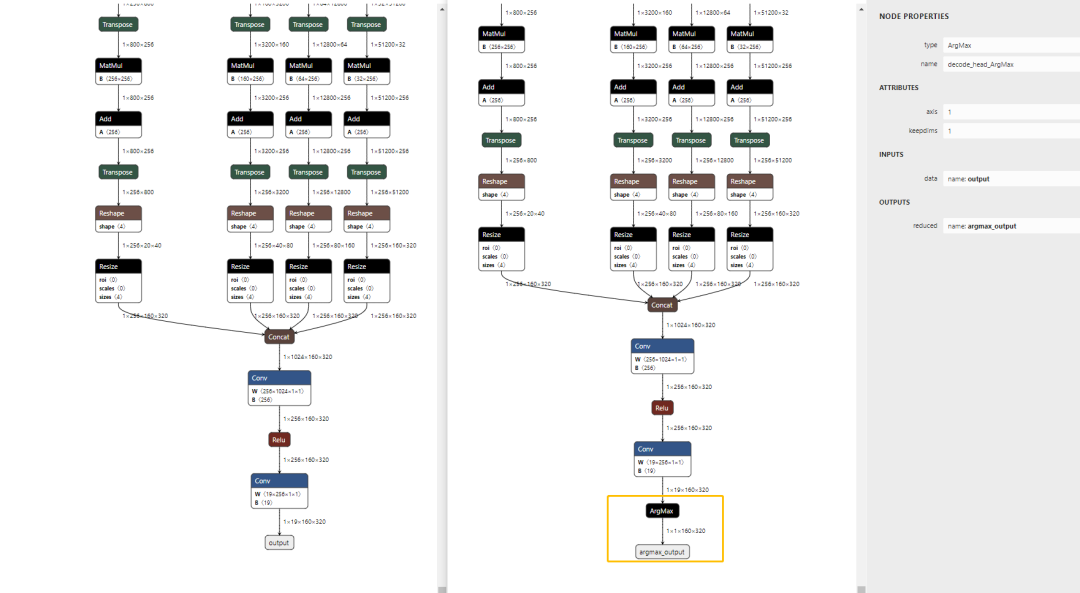
add-argmax
4.2 模型编译
使用AX650N配套的AI工具链Pulsar2,一键完成图优化、离线量化、编译、对分功能。
$ pulsar2 build --input model/segformer-b0-cityscapes-640-1280-sim-argmax.onnx --output_dir segformer/ --config config/seg                    former_config.json --npu_mode NPU3
Building onnx ━━━━━━━━━━━━━━━━━━━━━━━━━━━━━━━━━━━━━━━━ 100% 0:00:00
patool: Extracting ./dataset/coco_4.tar ...
patool: running /usr/bin/tar --extract --file ./dataset/coco_4.tar --directory segformer/quant/dataset/input
patool: ... ./dataset/coco_4.tar extracted to `segformer/quant/dataset/input'.
                                                                              Quant Config Table
┏━━━━━━━┳━━━━━━━━━━━━━━━━━━━┳━━━━━━━━━━━━━━━━━━━┳━━━━━━━━━━━━━┳━━━━━━━━━━━━━━━┳━━━━━━━━━━━━━━━━━━━━━━━━━━━━━━━━━━━━━━━━━━━━━━━┳━━━━━━━━━━━━━━━━━━━━━━━━━━━━━━━━━━━━━━━━━━━━━━┓
┃ Input ┃ Shape             ┃ Dataset Directory ┃ Data Format ┃ Tensor Format ┃ Mean                                          ┃ Std                                          ┃
┡━━━━━━━╇━━━━━━━━━━━━━━━━━━━╇━━━━━━━━━━━━━━━━━━━╇━━━━━━━━━━━━━╇━━━━━━━━━━━━━━━╇━━━━━━━━━━━━━━━━━━━━━━━━━━━━━━━━━━━━━━━━━━━━━━━╇━━━━━━━━━━━━━━━━━━━━━━━━━━━━━━━━━━━━━━━━━━━━━━┩
│ input │ [1, 3, 640, 1280] │ input             │ Image       │ RGB           │ [123.67500305175781, 116.27999877929688,      │ [58.39500045776367, 57.119998931884766,      │
│       │                   │                   │             │               │ 103.52999877929688]                           │ 57.356998443603516]                          │
└───────┴───────────────────┴───────────────────┴─────────────┴───────────────┴───────────────────────────────────────────────┴──────────────────────────────────────────────┘
4 File(s) Loaded.
[14:17:44] AX LSTM Operation Format Pass Running ...      Finished.
[14:17:44] AX Refine Operation Config Pass Running ...    Finished.
[14:17:44] AX Transformer Optimize Pass Running ...       Finished.
[14:17:45] AX Reset Mul Config Pass Running ...           Finished.
[14:17:45] AX Tanh Operation Format Pass Running ...      Finished.
[14:17:45] AX Quantization Config Refine Pass Running ... Finished.
[14:17:45] AX Quantization Fusion Pass Running ...        Finished.
[14:17:45] AX Quantization Simplify Pass Running ...      Finished.
[14:17:45] AX Parameter Quantization Pass Running ...     Finished.
Calibration Progress(Phase 1): 100%|████████████████████████████████████████████████████████████████████████████████████████████████████████████| 4/4 [00:23<00:00,  5.86s/it]
Finished.
[1411] AX Passive Parameter Quantization Running ...  Finished.
[1411] AX Parameter Baking Pass Running ...           Finished.
[1412] AX Refine Int Parameter Pass Running ...       Finished.
Network Quantization Finished.
quant.axmodel export success: segformer/quant/quant_axmodel.onnx
Building native ━━━━━━━━━━━━━━━━━━━━━━━━━━━━━━━━━━━━━━━━ 100% 000
......
2023-05-30 1418.661 | INFO     | yasched.test_onepass1615 - max_cycle = 37883954
2023-05-30 14:35:04.545 | INFO     | yamain.command.build904 - fuse 1 subgraph(s)
五上板部署
5.1 AX-Samples
开源项目AX-Samples实现了常见的深度学习开源算法在爱芯元智的AI SoC上的示例代码,方便社区开发者进行快速评估和适配。最新版本已开始提供AX650系列的NPU示例,其中也包含了本文介绍的SegFormer参考代码。
https://github.com/AXERA-TECH/ax-samples/blob/main/examples/ax650/ax_segformer_steps.cc
5.2 运行
# ./ax_segformer -m segformer-b0-cityscapes-640-1280-argmax.axmodel -i segformer_test.png
--------------------------------------
model file : segformer-b0-cityscapes-640-1280-argmax.axmodel
image file : segformer_test.png
img_h, img_w : 640 1280
--------------------------------------
post process cost time:7.07 ms
--------------------------------------
Repeat 1 times, avg time 48.15 ms, max_time 48.15 ms, min_time 48.15 ms
--------------------------------------
--------------------------------------
Segformer运行结果展示
六后续计划
● 尝试部署视觉大模型DINOv2,敬请期待!
-
基于AX650N/AX630C部署端侧大语言模型Qwen22024-07-06 6024
-
部署DeepSeek R1于AX650N与AX630C平台2025-02-09 2577
-
AI SoC # 爱芯元智AX650N详细介绍:原生支持Transformer架构模型 适用部署DeepSeek R12025-03-04 10504
-
爱芯元智发布第三代智能视觉芯片AX650N,为智慧生活赋能2023-03-07 2470
-
【爱芯派 Pro 开发板试用体验】爱芯元智AX650N部署yolov5s 自定义模型2023-11-16 2386
-
【爱芯派 Pro 开发板试用体验】爱芯元智AX650N部署yolov8s 自定义模型2023-11-24 1781
-
【爱芯派 Pro 开发板试用体验】ax650使用ax-pipeline进行推理2023-12-19 2211
-
爱芯元智第三代智能视觉芯片AX650N高能效比SoC芯片2023-03-10 6344
-
基于AX650N部署DETR2023-05-15 2092
-
基于AX650N部署EfficientViT2023-05-26 2380
-
基于AX650N部署SegFormer2023-06-20 1767
-
爱芯元智AX620E和AX650系列芯片正式通过PSA Certified安全认证2024-04-23 2587
-
重磅发布 | 矽速 M4N Dock 支持 DeepSeek R1,端侧大模型部署新标杆!2025-02-18 2095
-
Immich智能相册在树莓派5上的高效部署与优化2025-10-14 1754
全部0条评论

快来发表一下你的评论吧 !
