

用OpenVINO™ C++ API编写YOLOv8-Seg实例分割模型推理程序
描述
文章作者:英特尔边缘计算创新大使 战鹏州
01. 简介
本文章将介绍使用 OpenVINO 2023.0 C++ API 开发YOLOv8-Seg 实例分割(Instance Segmentation)模型的 AI 推理程序。本文 C++ 范例程序的开发环境是 Windows + Visual Studio Community 2022。
请读者先配置基于 Visual Studio 的 OpenVINO C++ 开发环境。
请克隆本文的代码仓:
git clone
https://gitee.com/ppov-nuc/yolov8_openvino_cpp.git
02. 导出 YOLOv8-Seg OpenVINO IR 模型
YOLOv8 是 Ultralytics 公司基于 YOLO 框架,发布的一款面向物体检测与跟踪、实例分割、图像分类和姿态估计任务的 SOTA 模型工具套件。
首先用命令 :
pip install -r requirements.txt
安装 ultralytics 和 openvino-dev 。
然后使用命令:
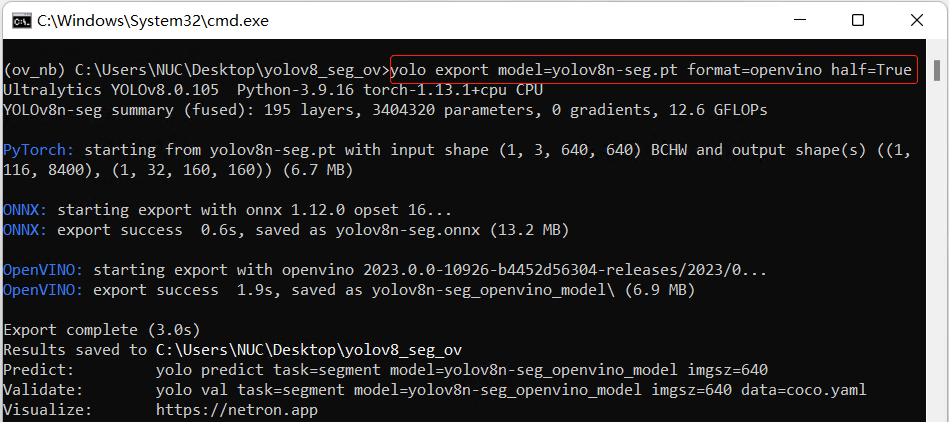
yolo export model=yolov8n-seg.pt format=openvino half=True
向右滑动查看完整代码
导出 FP16 精度的 OpenVINO IR 模型,如下图所示。
接着使用命令:
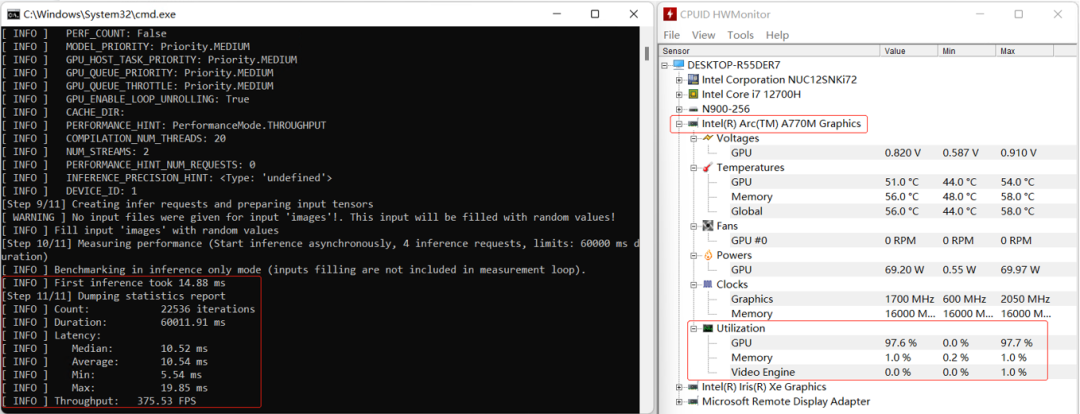
benchmark_app -m yolov8n-seg.xml -d GPU.1
向右滑动查看完整代码
获得 yolov8n-seg.xml 模型在 A770m 独立显卡上的异步推理计算性能,如下图所示。
03. 使用 OpenVINO C++ API
编写 YOLOv8-Seg 实例分割模型推理程序
使用 OpenVINO C++ API 编写 YOLOv8-Seg 实例分割模型推理程序主要有5个典型步骤:
1 采集图像&图像解码
2 图像数据预处理
3 AI 推理计算(基于 OpenVINO C++ API )
4 对推理结果进行后处理
5 将处理后的结果可视化

YOLOv8-Seg 实例分割模型推理程序的图像数据预处理和AI推理计算的实现方式跟 YOLOv8 目标检测模型推理程序的实现方式几乎一模一样,可以直接复用。
3.1 图像数据预处理
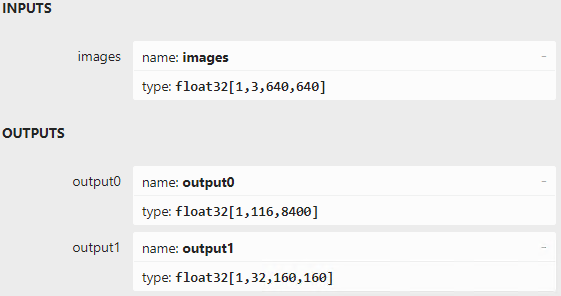
使用 Netron 打开 yolov8n-seg.onnx ,如下图所示,可以看到:
输入节点的名字:“ images ”;数据:float32[1,3,640,640]
输出节点1的名字:“ output0 ”;数据:float32[1,116,8400]。其中116的前84个字段跟 YOLOv8 目标检测模型输出定义完全一致,即cx,cy,w,h 和80类的分数;后32个字段为掩膜置信度,用于计算掩膜数据。
输出节点2的名字:“ output1 ”;数据:float32[1,32,160,160]。output0 后32个字段与 output1 的数据做矩阵乘法后得到的结果,即为对应目标的掩膜数据
图像数据预处理的目标就是将任意尺寸的图像数据转变为形状为[1,3,640,640],精度为 FP32 的张量。YOLOv8-Seg 模型的输入尺寸为正方形,为了解决将任意尺寸数据放缩为正方形带来的图像失真问题,在图像放缩前,采用 letterbox 算法先保持图像的长宽比,如下图所示,然后再使用 cv::blobFromImage 函数对图像进行放缩。
图像数据预处理的范例程序如下所示:
Mat letterbox(const Mat& source)
{
    int col = source.cols;
    int row = source.rows;
    int _max = MAX(col, row);
    Mat result = Mat::zeros(_max, _max, CV_8UC3);
    source.copyTo(result(Rect(0, 0, col, row)));
    return result;
}
Mat img = cv::imread("bus.jpg");
Mat letterbox_img = letterbox(img);
Mat blob = blobFromImage(letterbox_img, 1.0/255.0, Size(640,640), Scalar(), true);
向右滑动查看完整代码
3.2 AI 同步推理计算
用 OpenVINO C++ API 实现同步推理计算,主要有七步:
1实例化 Core 对象:ov::Core core;
2编译并载入模型:core.compile_model();
3创建推理请求:infer_request = compiled_model.create_infer_request();
4读取图像数据并完成预处理;
5将输入数据传入模型:infer_request.set_input_tensor(input_tensor);
6启动推理计算:infer_request.infer();
7获得推理结果:output0 = infer_request.get_output_tensor(0) ;
output1 = infer_request.get_output_tensor(1) ;
范例代码如下所示:
 // -------- Step 1. Initialize OpenVINO Runtime Core --------
    ov::Core core;
    // -------- Step 2. Compile the Model --------
    auto compiled_model = core.compile_model("yolov8n-seg.xml", "CPU");
    // -------- Step 3. Create an Inference Request --------
    ov::InferRequest infer_request = compiled_model.create_infer_request();
    // -------- Step 4.Read a picture file and do the preprocess --------
    Mat img = cv::imread("bus.jpg");
    // Preprocess the image
    Mat letterbox_img = letterbox(img);
    float scale = letterbox_img.size[0] / 640.0;
    Mat blob = blobFromImage(letterbox_img, 1.0 / 255.0, Size(640, 640), Scalar(), true);
    // -------- Step 5. Feed the blob into the input node of the Model -------
    // Get input port for model with one input
    auto input_port = compiled_model.input();
    // Create tensor from external memory
    ov::Tensor input_tensor(input_port.get_element_type(), input_port.get_shape(), blob.ptr(0));
    // Set input tensor for model with one input
    infer_request.set_input_tensor(input_tensor);
    // -------- Step 6. Start inference --------
    infer_request.infer();
    // -------- Step 7. Get the inference result --------
    auto output0 = infer_request.get_output_tensor(0); //output0
    auto output1 = infer_request.get_output_tensor(1); //otuput1
向右滑动查看完整代码
3.3 推理结果后处理
实例分割推理程序的后处理是从结果中拆解出预测别类(class_id),类别分数(class_score),类别边界框(box)和类别掩膜(mask),范例代码如下所示:
// -------- Step 8. Postprocess the result -------- Mat output_buffer(output0_shape[1], output0_shape[2], CV_32F, output0.data()); Mat proto(32, 25600, CV_32F, output1.data ()); //[32,25600] transpose(output_buffer, output_buffer); //[8400,116] float score_threshold = 0.25; float nms_threshold = 0.5; std::vector class_ids; std::vector class_scores; std::vector boxes; std::vector mask_confs; // Figure out the bbox, class_id and class_score for (int i = 0; i < output_buffer.rows; i++) { Mat classes_scores = output_buffer.row(i).colRange(4, 84); Point class_id; double maxClassScore; minMaxLoc(classes_scores, 0, &maxClassScore, 0, &class_id); if (maxClassScore > score_threshold) { class_scores.push_back(maxClassScore); class_ids.push_back(class_id.x); float cx = output_buffer.at (i, 0); float cy = output_buffer.at (i, 1); float w = output_buffer.at (i, 2); float h = output_buffer.at (i, 3); int left = int((cx - 0.5 * w) * scale); int top = int((cy - 0.5 * h) * scale); int width = int(w * scale); int height = int(h * scale); cv::Mat mask_conf = output_buffer.row(i).colRange(84, 116); mask_confs.push_back(mask_conf); boxes.push_back(Rect(left, top, width, height)); } } //NMS std::vector indices; NMSBoxes(boxes, class_scores, score_threshold, nms_threshold, indices);
向右滑动查看完整代码
完整范例参考参见:yolov8_seg_ov_infer.cpp ,运行结果如下图所示:
04 结论
OpenVINO C++ API 简单清晰,易学易用。本文用不到100行(不含可视化检测结果) C++ 代码就实现了基于 OpenVINO 的 YOLOv8-Seg 实例分割模型推理程序,在英特尔 独立显卡 A770m 上获得了较好的推理计算性能。
审核编辑:汤梓红
-
OpenVINO C#如何运行YOLO11实例分割模型2025-04-29 2482
-
为什么无法在运行时C++推理中读取OpenVINO™模型?2025-03-05 518
-
用OpenVINO C# API在intel平台部署YOLOv10目标检测模型2024-06-21 3124
-
在C++中使用OpenVINO工具包部署YOLOv5-Seg模型2023-12-21 4246
-
如何使用OpenVINO C++ API部署FastSAM模型2023-11-17 2185
-
基于OpenVINO C# API部署RT-DETR模型2023-11-10 2224
-
基于OpenVINO C++ API部署RT-DETR模型2023-11-03 2637
-
三种主流模型部署框架YOLOv8推理演示2023-08-06 4283
-
教你如何用两行代码搞定YOLOv8各种模型推理2023-06-18 5274
-
在AI爱克斯开发板上用OpenVINO™加速YOLOv8-seg实例分割模型2023-06-05 2324
-
AI爱克斯开发板上使用OpenVINO加速YOLOv8目标检测模型2023-05-26 3084
-
在AI爱克斯开发板上用OpenVINO™加速YOLOv8目标检测模型2023-05-12 2949
-
在AI爱克斯开发板上用OpenVINO™加速YOLOv8分类模型2023-05-05 2129
-
TensorRT 8.6 C++开发环境配置与YOLOv8实例分割推理演示2023-04-25 9169
全部0条评论

快来发表一下你的评论吧 !
