
PIO工程的结构以及配置文件
描述
你好,我是爱吃鱼香ROS的小鱼。上一节我们搭建好了MicroROS学习板的开发环境,并新建了第一个工程。本节我们详细了解下该工程,了解我们需要在哪里写代码,在哪里改配置?
一、工程目录概述

image-20221218001241164
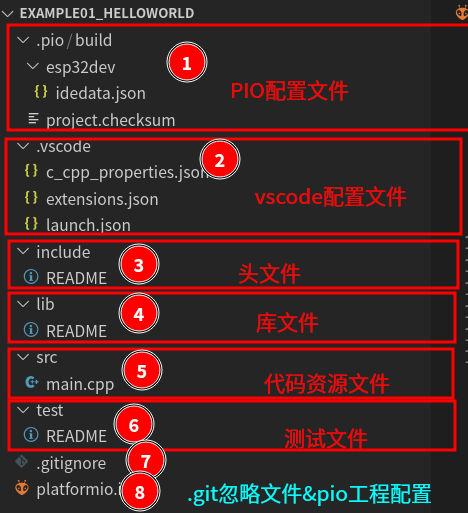
首先展开工程,可以看到工程一共有8个部分如上图所示。
- PIO配置文件
- VsCode配置文件
- 头文件放置目录
- 库文件放置目录
- 代码资源放置目录,主函数就在这里
- 测试文件放置目录
- git忽略文件
- platformio配置文件
二、在哪里写代码?
打开src/main.cpp就是我们工程的程序入口文件,打开该文件,已经默认给我们生成了9行代码,后续的主要开发就在这里进行。
#include < Arduino.h >

void setup() {
  // put your setup code here, to run once:
}

void loop() {
  // put your main code here, to run repeatedly:
}Copy to clipboardErrorCopied
三、工程配置文件-platformio.ini
打开工程主目录下的platformio.ini文件,预生成的配置文件如下
; PlatformIO Project Configuration File
;
;   Build options: build flags, source filter
;   Upload options: custom upload port, speed and extra flags
;   Library options: dependencies, extra library storages
;   Advanced options: extra scripting
;
; Please visit documentation for the other options and examples
; https://docs.platformio.org/page/projectconf.html

[env:featheresp32]
platform = espressif32
board = featheresp32
framework = arduinoCopy to clipboardErrorCopied
这里用到的主要配置有四个
[env:featheresp32]编译环境platform = espressif32,单片机平台board = featheresp32,开发板framework = arduino,开发框架-arduino
后续还有很多关于工程的配置都放在这里,同时我们可以添加一条配置board_build.f_cpu = 240000000L,将单片机的主频提高到240MHZ的主频。
[env:featheresp32]
platform = espressif32
board = featheresp32
framework = arduino
board_build.f_cpu = 240000000LCopy to clipboardErrorCopied
四、编译工程
在VsCode中编译PIO,编译工程和将编译结果下载到开发板上都非常的方便。
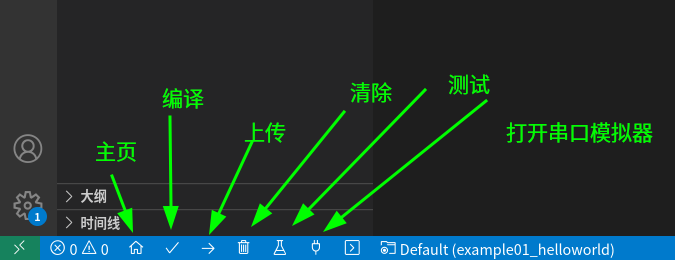
编译工程可以手动点击左下角的对号进行,其他操作也可以通过按钮进行。

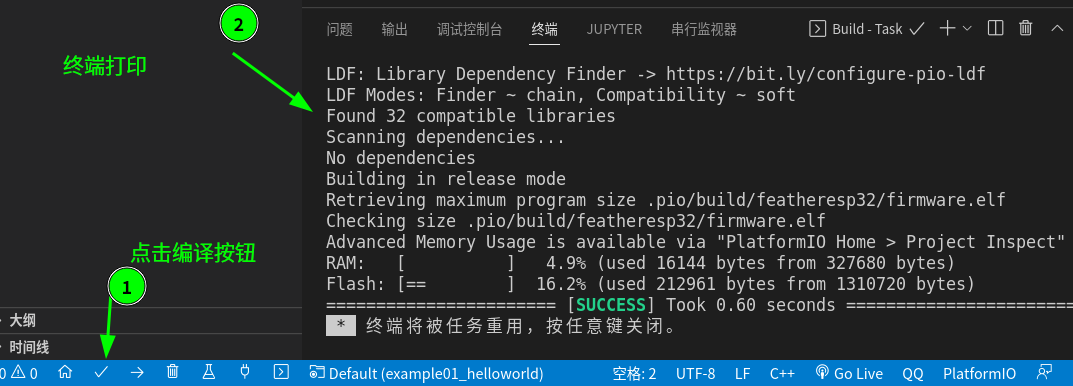
点击编译按钮,看到如下界面则代表编译成功

其中打印信息有很多有用的提示,比如工程占用的RAM和Flash大小(可以理解为系统程序大小)
RAM:   [          ]   4.9% (used 16144 bytes from 327680 bytes)
Flash: [==        ]  16.2% (used 212961 bytes from 1310720 bytes)Copy to clipboardErrorCopied
编译完成工程,在.pio/build/featheresp32目录下可以看到firmware.bin,这个就是我们工程编译之后生成的二进制文件,将该文件下载到开发板上就可以运行了。
五、PIO快捷键
这里再介绍几个PIO的快捷键,在接下来的学习中你肯定能用到
| 快捷键 | 内容 |
|---|---|
| Ctrl+Alt+B | 编译工程 |
| Ctrl+Alt+U | 将程序上传烧录到开发板 |
| Ctrl+Alt+S | 打开串口Monitor |
六、总结
本节我们简单的了解下PIO工程的结构以及配置文件,下一节我们开始学习如何输出Hello World!
声明:本文内容及配图由入驻作者撰写或者入驻合作网站授权转载。文章观点仅代表作者本人,不代表电子发烧友网立场。文章及其配图仅供工程师学习之用,如有内容侵权或者其他违规问题,请联系本站处理。
举报投诉
-
基于libconfig进行配置文件解析2023-06-08 2701
-
探讨PROE的配置文件——系统配置文件config.pro2010-09-28 2122
-
ICD配置文件的详细介绍和配置内容的详细概述2018-06-02 19282
-
Keil的黑色界面配置文件和配置方法2019-12-03 1539
-
Python进行配置文件的教程免费下载2020-09-30 887
-
AD8283评估板设计和配置文件2021-05-31 823
-
labview读写配置文件实例分享2021-11-01 1192
-
SpringBoot配置文件application2023-01-13 998
-
Python程序配置文件管理的最佳工程实践2023-05-04 1261
-
KT142C语音芯片配置文件总是不起作用?配置文件的问题集中归纳2023-10-20 1366
-
linux修改网卡ip配置文件2023-11-17 3473
-
springboot的全局配置文件有几种2023-12-03 2550
-
php的配置文件是什么2023-12-04 2200
-
oracle配置文件tnsnames怎么配置2023-12-06 11370
-
如何导出交换机的配置文件2025-02-02 6677
全部0条评论

快来发表一下你的评论吧 !

