

 Linux开发_CentOS7.4服务器搭建NFS、NGINX服务器,安装ffmpeg、Qt环境
描述
1. 内容介绍
环境介绍:采用的是华为云的ECS弹性云服务器--镜像安装的CentOS7.4 64位 -----是服务器版,非桌面版哦。
在CentOS7.4服务器版本的环境下搭建NFS服务器、安装ffmpeg、安装nginx服务器、部署Qt编译环境。
(1)配置NGINX为HTTP服务器,安装rtmp模块,完成rtmp视频推流,支持缓存视频到本地目录、支持转为HLS流,通过浏览器访问直播流。
(2)部署Qt编译环境,可以编译Qt代码,运行Qt程序。 因为是服务器,我这里部署Qt环境,运行Qt程序是属于控制台版本,不用Qt的GUI模块,只是用核心模块完成一些功能设计。
(3)安装、编译 ffmpeg : 支持源码编译安装ffmpeg、在线安装ffmpeg,通过ffmpeg可以完成音视频的一些开发。比如:视频转码、视频合并、视频剪切、视频特效处理。----这里用ffmpeg并不是做播放器,是在服务器上用,主要是处理视频文件。
(4)安装NFS服务器,主要是方便与本地Linux系统进行通信,编译代码,文件共享。
(5)部署开机自动启动程序:方便设置自己的程序为开机启动。
2. 部署NFS服务器
注意:在云服务器上搭建NFS服务器,需要在控制台开放端口,不然NFS的端口无法正常访问,会被拦截。
2.1 安装NFS
[root@ecs-c687-ecrs work]# yum install -y rpc-bind nfs-utils
Loaded plugins: fastestmirror
Determining fastest mirrors
base | 3.6 kB 00:00:00
epel | 4.7 kB 00:00:00
extras | 2.9 kB 00:00:00
updates | 2.9 kB 00:00:00
(1/7): base/7/x86_64/group_gz | 153 kB 00:00:00
(2/7): epel/x86_64/group_gz | 97 kB 00:00:00
(3/7): epel/x86_64/updateinfo | 1.0 MB 00:00:00
(4/7): base/7/x86_64/primary_db | 6.1 MB 00:00:00
(5/7): epel/x86_64/primary_db | 7.0 MB 00:00:00
(6/7): extras/7/x86_64/primary_db | 250 kB 00:00:00
(7/7): updates/7/x86_64/primary_db | 17 MB 00:00:01
No package rpc-bind available.
Resolving Dependencies
-- > Running transaction check
--- > Package nfs-utils.x86_64 1:1.3.0-0.68.el7.2 will be installed
-- > Processing Dependency: gssproxy >= 0.7.0-3 for package: 1:nfs-utils-1.3.0-0.68.el7.2.x86_64
-- > Processing Dependency: rpcbind for package: 1:nfs-utils-1.3.0-0.68.el7.2.x86_64
-- > Processing Dependency: quota for package: 1:nfs-utils-1.3.0-0.68.el7.2.x86_64
-- > Processing Dependency: libnfsidmap for package: 1:nfs-utils-1.3.0-0.68.el7.2.x86_64
-- > Processing Dependency: libevent for package: 1:nfs-utils-1.3.0-0.68.el7.2.x86_64
-- > Processing Dependency: keyutils for package: 1:nfs-utils-1.3.0-0.68.el7.2.x86_64
-- > Processing Dependency: libnfsidmap.so.0()(64bit) for package: 1:nfs-utils-1.3.0-0.68.el7.2.x86_64
-- > Processing Dependency: libevent-2.0.so.5()(64bit) for package: 1:nfs-utils-1.3.0-0.68.el7.2.x86_64
-- > Running transaction check
--- > Package gssproxy.x86_64 0:0.7.0-30.el7_9 will be installed
-- > Processing Dependency: libini_config >= 1.3.1-31 for package: gssproxy-0.7.0-30.el7_9.x86_64
-- > Processing Dependency: libverto-module-base for package: gssproxy-0.7.0-30.el7_9.x86_64
-- > Processing Dependency: libref_array.so.1(REF_ARRAY_0.1.1)(64bit) for package: gssproxy-0.7.0-30.el7_9.x86_64
-- > Processing Dependency: libini_config.so.3(INI_CONFIG_1.2.0)(64bit) for package: gssproxy-0.7.0-30.el7_9.x86_64
-- > Processing Dependency: libini_config.so.3(INI_CONFIG_1.1.0)(64bit) for package: gssproxy-0.7.0-30.el7_9.x86_64
-- > Processing Dependency: libref_array.so.1()(64bit) for package: gssproxy-0.7.0-30.el7_9.x86_64
-- > Processing Dependency: libini_config.so.3()(64bit) for package: gssproxy-0.7.0-30.el7_9.x86_64
-- > Processing Dependency: libcollection.so.2()(64bit) for package: gssproxy-0.7.0-30.el7_9.x86_64
-- > Processing Dependency: libbasicobjects.so.0()(64bit) for package: gssproxy-0.7.0-30.el7_9.x86_64
--- > Package keyutils.x86_64 0:1.5.8-3.el7 will be installed
--- > Package libevent.x86_64 0:2.0.21-4.el7 will be installed
--- > Package libnfsidmap.x86_64 0:0.25-19.el7 will be installed
--- > Package quota.x86_64 1:4.01-19.el7 will be installed
-- > Processing Dependency: quota-nls = 1:4.01-19.el7 for package: 1:quota-4.01-19.el7.x86_64
-- > Processing Dependency: tcp_wrappers for package: 1:quota-4.01-19.el7.x86_64
--- > Package rpcbind.x86_64 0:0.2.0-49.el7 will be installed
-- > Running transaction check
--- > Package libbasicobjects.x86_64 0:0.1.1-32.el7 will be installed
--- > Package libcollection.x86_64 0:0.7.0-32.el7 will be installed
--- > Package libini_config.x86_64 0:1.3.1-32.el7 will be installed
-- > Processing Dependency: libpath_utils.so.1(PATH_UTILS_0.2.1)(64bit) for package: libini_config-1.3.1-32.el7.x86_64
-- > Processing Dependency: libpath_utils.so.1()(64bit) for package: libini_config-1.3.1-32.el7.x86_64
--- > Package libref_array.x86_64 0:0.1.5-32.el7 will be installed
--- > Package libverto-libevent.x86_64 0:0.2.5-4.el7 will be installed
--- > Package quota-nls.noarch 1:4.01-19.el7 will be installed
--- > Package tcp_wrappers.x86_64 0:7.6-77.el7 will be installed
-- > Running transaction check
--- > Package libpath_utils.x86_64 0:0.2.1-32.el7 will be installed
-- > Finished Dependency Resolution
Dependencies Resolved
=============================================================================================================================================================
Package Arch Version Repository Size
=============================================================================================================================================================
Installing:
nfs-utils x86_64 1:1.3.0-0.68.el7.2 updates 413 k
Installing for dependencies:
gssproxy x86_64 0.7.0-30.el7_9 updates 111 k
keyutils x86_64 1.5.8-3.el7 base 54 k
libbasicobjects x86_64 0.1.1-32.el7 base 26 k
libcollection x86_64 0.7.0-32.el7 base 42 k
libevent x86_64 2.0.21-4.el7 base 214 k
libini_config x86_64 1.3.1-32.el7 base 64 k
libnfsidmap x86_64 0.25-19.el7 base 50 k
libpath_utils x86_64 0.2.1-32.el7 base 28 k
libref_array x86_64 0.1.5-32.el7 base 27 k
libverto-libevent x86_64 0.2.5-4.el7 base 8.9 k
quota x86_64 1:4.01-19.el7 base 179 k
quota-nls noarch 1:4.01-19.el7 base 90 k
rpcbind x86_64 0.2.0-49.el7 base 60 k
tcp_wrappers x86_64 7.6-77.el7 base 78 k
Transaction Summary
=============================================================================================================================================================
Install 1 Package (+14 Dependent packages)
Total download size: 1.4 M
Installed size: 4.1 M
Downloading packages:
(1/15): keyutils-1.5.8-3.el7.x86_64.rpm | 54 kB 00:00:00
(2/15): libcollection-0.7.0-32.el7.x86_64.rpm | 42 kB 00:00:00
(3/15): gssproxy-0.7.0-30.el7_9.x86_64.rpm | 111 kB 00:00:00
(4/15): libevent-2.0.21-4.el7.x86_64.rpm | 214 kB 00:00:00
(5/15): libbasicobjects-0.1.1-32.el7.x86_64.rpm | 26 kB 00:00:00
(6/15): libini_config-1.3.1-32.el7.x86_64.rpm | 64 kB 00:00:00
(7/15): libnfsidmap-0.25-19.el7.x86_64.rpm | 50 kB 00:00:00
(8/15): libpath_utils-0.2.1-32.el7.x86_64.rpm | 28 kB 00:00:00
(9/15): libref_array-0.1.5-32.el7.x86_64.rpm | 27 kB 00:00:00
(10/15): libverto-libevent-0.2.5-4.el7.x86_64.rpm | 8.9 kB 00:00:00
(11/15): quota-nls-4.01-19.el7.noarch.rpm | 90 kB 00:00:00
(12/15): quota-4.01-19.el7.x86_64.rpm | 179 kB 00:00:00
(13/15): tcp_wrappers-7.6-77.el7.x86_64.rpm | 78 kB 00:00:00
(14/15): rpcbind-0.2.0-49.el7.x86_64.rpm | 60 kB 00:00:00
(15/15): nfs-utils-1.3.0-0.68.el7.2.x86_64.rpm | 413 kB 00:00:00
-------------------------------------------------------------------------------------------------------------------------------------------------------------
Total 1.5 MB/s | 1.4 MB 00:00:00
Running transaction check
Running transaction test
Transaction test succeeded
Running transaction
Warning: RPMDB altered outside of yum.
Installing : rpcbind-0.2.0-49.el7.x86_64 1/15
Installing : libbasicobjects-0.1.1-32.el7.x86_64 2/15
Installing : libref_array-0.1.5-32.el7.x86_64 3/15
Installing : libcollection-0.7.0-32.el7.x86_64 4/15
Installing : libevent-2.0.21-4.el7.x86_64 5/15
Installing : libverto-libevent-0.2.5-4.el7.x86_64 6/15
Installing : 1:quota-nls-4.01-19.el7.noarch 7/15
Installing : tcp_wrappers-7.6-77.el7.x86_64 8/15
Installing : 1:quota-4.01-19.el7.x86_64 9/15
Installing : keyutils-1.5.8-3.el7.x86_64 10/15
Installing : libnfsidmap-0.25-19.el7.x86_64 11/15
Installing : libpath_utils-0.2.1-32.el7.x86_64 12/15
Installing : libini_config-1.3.1-32.el7.x86_64 13/15
Installing : gssproxy-0.7.0-30.el7_9.x86_64 14/15
Installing : 1:nfs-utils-1.3.0-0.68.el7.2.x86_64 15/15
Verifying : gssproxy-0.7.0-30.el7_9.x86_64 1/15
Verifying : 1:quota-4.01-19.el7.x86_64 2/15
Verifying : libpath_utils-0.2.1-32.el7.x86_64 3/15
Verifying : libnfsidmap-0.25-19.el7.x86_64 4/15
Verifying : libevent-2.0.21-4.el7.x86_64 5/15
Verifying : keyutils-1.5.8-3.el7.x86_64 6/15
Verifying : libverto-libevent-0.2.5-4.el7.x86_64 7/15
Verifying : tcp_wrappers-7.6-77.el7.x86_64 8/15
Verifying : libcollection-0.7.0-32.el7.x86_64 9/15
Verifying : 1:quota-nls-4.01-19.el7.noarch 10/15
Verifying : libref_array-0.1.5-32.el7.x86_64 11/15
Verifying : libbasicobjects-0.1.1-32.el7.x86_64 12/15
Verifying : 1:nfs-utils-1.3.0-0.68.el7.2.x86_64 13/15
Verifying : libini_config-1.3.1-32.el7.x86_64 14/15
Verifying : rpcbind-0.2.0-49.el7.x86_64 15/15
Installed:
nfs-utils.x86_64 1:1.3.0-0.68.el7.2
Dependency Installed:
gssproxy.x86_64 0:0.7.0-30.el7_9 keyutils.x86_64 0:1.5.8-3.el7 libbasicobjects.x86_64 0:0.1.1-32.el7 libcollection.x86_64 0:0.7.0-32.el7
libevent.x86_64 0:2.0.21-4.el7 libini_config.x86_64 0:1.3.1-32.el7 libnfsidmap.x86_64 0:0.25-19.el7 libpath_utils.x86_64 0:0.2.1-32.el7
libref_array.x86_64 0:0.1.5-32.el7 libverto-libevent.x86_64 0:0.2.5-4.el7 quota.x86_64 1:4.01-19.el7 quota-nls.noarch 1:4.01-19.el7
rpcbind.x86_64 0:0.2.0-49.el7 tcp_wrappers.x86_64 0:7.6-77.el7
Complete!
[root@ecs-c687-ecrs work]# yum install -y rpcbind
Loaded plugins: fastestmirror
Loading mirror speeds from cached hostfile
Package rpcbind-0.2.0-49.el7.x86_64 already installed and latest version
Nothing to do
[root@ecs-c687-ecrs work]#
2.2 设置节点
(1)设置节点名称
hostnamectl set-hostname nfs
(2)服务端安装NFS
yum -y install nfs-utils rpcbind
2.3 服务端配置
在NFS服务端上创建共享目录/data/nfs并设置权限
mkdir -p /data/nfs
 chmod 666 /data/nfs
2.4 编辑export文件
vim /etc/exports
/data/nfs *(rw,no_root_squash,no_all_squash,sync)
其中的/data/nfs 就是NFS服务器需要共享出去的目录。 *号表示所有IP地址都可以访问。
参数介绍:
rw 读写权限
no_root_squash 客户端使用 root 身份来操作服务器的文件系统
sync 代表数据会同步写入到内存与硬盘中
(1)配置生效
exportfs -r
(2)启动rpcbind、nfs服务
systemctl enable rpcbind && systemctl start rpcbind
 systemctl enable nfs && systemctl start nfs
(3)查看 RPC 服务的注册状况
rpcinfo -p localhost
program vers proto port service
100000 4 tcp 111 portmapper
100000 3 tcp 111 portmapper
100000 2 tcp 111 portmapper
100000 4 udp 111 portmapper
100000 3 udp 111 portmapper
100000 2 udp 111 portmapper
100024 1 udp 39748 status
100024 1 tcp 41475 status
100005 1 udp 20048 mountd
100005 1 tcp 20048 mountd
100005 2 udp 20048 mountd
100005 2 tcp 20048 mountd
100005 3 udp 20048 mountd
100005 3 tcp 20048 mountd
100003 3 tcp 2049 nfs
100003 4 tcp 2049 nfs
100227 3 tcp 2049 nfs_acl
100003 3 udp 2049 nfs
100003 4 udp 2049 nfs
100227 3 udp 2049 nfs_acl
100021 1 udp 46720 nlockmgr
100021 3 udp 46720 nlockmgr
100021 4 udp 46720 nlockmgr
100021 1 tcp 33605 nlockmgr
100021 3 tcp 33605 nlockmgr
100021 4 tcp 33605 nlockmgr
(4)showmount令来查阅是否可以联机
showmount -e localhost

选项与参数:
-a :显示目前主机与客户端的 NFS 联机分享的状态;
-e :显示某部主机的 /etc/exports 所分享的目录数据。
2.5 客户端配置
(1)安装nfs-utils客户端 ---一般系统都自带了,不用安装。
yum -y install nfs-utils
(2)创建挂载目录---就是用来挂载NFS服务器的共享目录
mkdir /home/work
(3)查看服务器抛出的共享目录信息
showmount -e < NFS服务器IP地址 >
(4)挂载服务器共享目录
mount -t nfs < NFS服务器IP地址 >:< NFS服务器路径 > < 挂载到本地的路径 >
(5)查看挂载结果
df -h
(6)卸载已挂在的NFS
umount < 挂载到本地的路径 >
3. 安装ffmpeg
3.1 安装yasm
wget http://www.tortall.net/projects/yasm/releases/yasm-1.3.0.tar.gz  #下载源码包
tar zxvf yasm-1.3.0.tar.gz #解压
cd yasm-1.3.0 #进入目录
./configure #配置
make && make install #编译安装
3.2 在线安装ffmpeg
(1)设置下载源
CentOS没有官方FFmpeg软件包,可以使用第三方YUM源(Nux Dextop)下载,就是版本较低,ffmpeg 2.8。
(1) yum -y install epel-release
(2) yum update -y
(3) rpm --import http://li.nux.ro/download/nux/RPM-GPG-KEY-nux.ro
(4)
[CentOS 7]
rpm -Uvh http://li.nux.ro/download/nux/dextop/el7/x86_64/nux-dextop-release-0-5.el7.nux.noarch.rpm

[CentOS 6]
sudo rpm -Uvh http://li.nux.ro/download/nux/dextop/el6/x86_64/nux-dextop-release-0-2.el6.nux.noarch.rpm
(2)安装FFmpeg 和 FFmpeg开发包
sudo yum install ffmpeg ffmpeg-devel -y
(3)测试ffmpeg是否安装OK
ffmpeg -version
查看版本:
[root@nfs ecrs_web_lib_centos]# ffmpeg -version
ffmpeg version 2.8.15 Copyright (c) 2000-2018 the FFmpeg developers
built with gcc 4.8.5 (GCC) 20150623 (Red Hat 4.8.5-36)
configuration: --prefix=/usr --bindir=/usr/bin --datadir=/usr/share/ffmpeg --incdir=/usr/include/ffmpeg --libdir=/usr/lib64 --mandir=/usr/share/man --arch=x86_64 --optflags='-O2 -g -pipe -Wall -Wp,-D_FORTIFY_SOURCE=2 -fexceptions -fstack-protector-strong --param=ssp-buffer-size=4 -grecord-gcc-switches -m64 -mtune=generic' --extra-ldflags='-Wl,-z,relro ' --enable-libopencore-amrnb --enable-libopencore-amrwb --enable-libvo-amrwbenc --enable-version3 --enable-bzlib --disable-crystalhd --enable-gnutls --enable-ladspa --enable-libass --enable-libcdio --enable-libdc1394 --enable-libfdk-aac --enable-nonfree --disable-indev=jack --enable-libfreetype --enable-libgsm --enable-libmp3lame --enable-openal --enable-libopenjpeg --enable-libopus --enable-libpulse --enable-libschroedinger --enable-libsoxr --enable-libspeex --enable-libtheora --enable-libvorbis --enable-libv4l2 --enable-libx264 --enable-libx265 --enable-libxvid --enable-x11grab --enable-avfilter --enable-avresample --enable-postproc --enable-pthreads --disable-static --enable-shared --enable-gpl --disable-debug --disable-stripping --shlibdir=/usr/lib64 --enable-runtime-cpudetect
libavutil      54. 31.100 / 54. 31.100
libavcodec     56. 60.100 / 56. 60.100
libavformat    56. 40.101 / 56. 40.101
libavdevice    56.  4.100 / 56.  4.100
libavfilter     5. 40.101 /  5. 40.101
libavresample   2.  1.  0 /  2.  1.  0
libswscale      3.  1.101 /  3.  1.101
libswresample   1.  2.101 /  1.  2.101
libpostproc    53.  3.100 / 53.  3.100
[root@nfs ecrs_web_lib_centos]#
3.3 从源码编译ffmpeg
(1)编译X264
[root@ecs-c687-ecrs work_pc]# tar xvf last_x264.tar.bz2
./configure
make
make install

(2)编译ffmpeg
./configure --enable-shared --target-os=linux --enable-gpl --enable-ffmpeg --enable-libx264
3.4 如果有多个ffmpeg版本存在怎么办?
如果系统里有多个ffmpeg存在,那么在命令行执行ffmpeg肯定是不知道当前这个命令是不是自己想要的。
如果是编译ffmpeg源码得到ffmpeg相关文件,那么在执行./configure时,加一个选项,设置一下安装路径--prefix=$PWD/_install。这样执行make install时,安装的文件会拷贝到当前目录下的_install目录里。
然后再通过ln建立一个链接文件到/usr/local/bin/目录下。
ln -s /home/wbyq/ffmpe4.2.2/_install/bin/ffmpeg /usr/local/bin/ffmpeg422
然后将/home/wbyq/ffmpe4.2.2/_install/lib目录加到系统库搜索的环境变量里。
export LD_LIBRARY_PATH=$LD_LIBRARY_PATH:/home/wbyq/ffmpe4.2.2/_install/lib
如果觉得设置环境变量麻烦,以后也不常修改这些库,那么可以将ffmpeg的全部.so库拷贝到/usr/lib目录下去。
cp /home/wbyq/ffmpe4.2.2/_install/lib/* /usr/lib -dfv
说明:拷贝动态库最好都加上-d参数,保留库之间的链接属性。
拷贝之后再执行ldconfig命令生效,也就是刷新缓存文件,让系统知道你更改了/usr/lib目录。
4. 编译zlib
4.1 编译zlib
wget http://www.zlib.net/zlib-1.2.12.tar.gz  #下载zlib
tar zxvf zlib-1.2.12.tar.gz #解压
cd zlib-1.2.12 #进入目录
./configure #配置
make && make install #编译安装
4.2 安装g++编译器
如果需要编译C++代码,需提前安装g++编译器,默认只有gcc编译器。
yum -y install gcc-c++
4.3 编译quazip
wget https://udomain.dl.sourceforge.net/project/quazip/quazip/0.7.3/quazip-0.7.3.zip  #下载quazip
unzip quazip-0.7.3.zip  #解压
cd quazip-0.7.3 #进入目录
qmake   #生成Makefile
make    #编译
说明: quazip是Qt的工程,需要使用qmake进行编译。
如果是桌面版Linux那就很简单的,直接在Qt官网上下载xxx.run安装包,在命令行运行就可以安装。
那如果在Linux服务器上如何安装Qt的编译环境?因为可能有这么个需求,需要在Linux服务器命令行上编译Qt代码。 这种情况下就需要搭建一个Qt编译环境。
解决办法: 将桌面版上安装好的Qt目录下,对应的编译器套件目录打包拷贝到Linux服务器上解码即可使用。
比如:我在ubuntu18.04上安装了Qt5.12.6,我的安装目录:/home/wbyq/Qt5.12.6, 那么将/home/wbyq/Qt5.12.6/5.12.6/gcc_64/目录打包即可。
下面是/home/wbyq/Qt5.12.6/5.12.6/gcc_64/目录下的文件。
wbyq@wbyq:~/work$ ls /home/wbyq/Qt5.12.6/5.12.6/gcc_64/
bin  doc  include  lib  mkspecs  phrasebooks  plugins  qml  translations
打包压缩的命令:
tar czvf gcc_64.tar.gz /home/wbyq/Qt5.12.6/5.12.6/gcc_64
打包之后生成的文件: gcc_64.tar.gz ,拷贝到Linux服务器上解压,然后将bin目录下的qmake文件建立一个软链接文件到/usr/local/bin/目录下。
ln -s /home/work/gcc_64/bin/qmake /usr/local/bin/qmake
前面的目录/home/work/gcc_64/bin/qmake 是我在服务器上解压的路径。
然后就可以在Qt的工程目录下使用qmake生成Makefile文件,然后执行make即可编译Qt程序了。
如果编译好的Qt程序无法正常的运行,缺少库,需要告诉系统你的Qt动态库在哪里。
export LD_LIBRARY_PATH=$LD_LIBRARY_PATH:/home/work/gcc_64/lib
这行命令在当前命令行执行只是当前终端进程有效,如果想要全局生效,将这行代码加到/etc/profile文件最后,然后执行reoot命令重启系统即可。
5. Centos中安装带rtmp模块的Nginx
5.1 新安装的系统可以先安装一些工具
yum install -y pcre pcre-devel openssl openssl-devel zlib zlib-devel gcc gcc-c++
yum install -y vim wget lsof git zip unzip
5.2 获取Nginx二进制源码
听说srtmp模块暂时只支持Nginx13-15版本,当前就在官网下载Nginx14
wget http://nginx.org/download/nginx-1.14.2.tar.gz
tar xvf nginx-1.14.2.tar.gz
5.2 获取nginx-rtmp-module
wget https://github.com/arut/nginx-rtmp-module/archive/refs/tags/v1.2.1.tar.gz
tar xvf v1.2.1.tar.gz
5.3 编译nginx
cd nginx-1.14.2
./configure --add-module=../nginx-rtmp-module-1.2.1/ --with-http_ssl_module
make && make install

#建立软链接
ln -s /usr/local/nginx/sbin/nginx /usr/bin
特别说明:
如果在配置时报错,一般就是缺东西了,安装了再配置。
比如:报错 ./configure: error: the HTTP rewrite module requires the PCRE library. You can either disable the mo ....

解决:
yum -y install pcre-devel
yum -y install openssl openssl-devel
5.4 修改Nginx的配置文件
打开/usr/local/nginx/conf/nginx.conf文件,在文件最后面加入下面的配置。
rtmp {
    server {
        listen 8888;
        application live {
            live on;
        	}
         }
}
上面8888是rtmp推流和拉流的端口。
修改nginx.conf之后,重启nginx服务:
sudo service nginx restart
重启服务之后,使用netstat -ltn命令查看TCP监听的端口,确认下Nginx的监听端口是否正常。
正常情况,一个是我们自己设置的rtmp服务监听端口8888,还有一个80是Nginx默认的HTTP服务监听端口。
接下来可以在浏览器里输入本机IP地址:http://127.0.0.1/,查看Nginx服务开启状态。
5.5 设置开机启动
wget http://raw.github.com/JasonGiedymin/nginx-init-ubuntu/master/nginx -O /etc/init.d/nginx

chmod +x /etc/init.d/nginx

update-rc.d nginx defaults
5.6 控制nginx服务的3个命令: 启动、停止、重启
service nginx start
service nginx stop
service nginx restart  或者 nginx -s reload  (运行中生效配置文件)
5.7 进行rtmp推流
服务器搭建好之后,推流和拉流的地址就是:  rtmp://< 服务器IP地址 >:8888/live/< 推流存放的目录 >
例如: rtmp://127.0.0.1:8888/live/xl
5.8 nginx保存推流视频文件
如果需要让推流上来的文件保存下来后续进行查看历史文件,可以配置nginx进行保存。
在原来的/usr/local/nginx/conf/nginx.conf配置文件里rtmp模块中增加新的配置:
record all;
record_unique on;
record_path "./video";  #视频缓存的路径
record_suffix -%Y-%m-%d-%H_%M_%S.flv;
完整/usr/local/nginx/conf/nginx.conf里的rtmp模块的配置如下:
#RTMP服务
rtmp {
    server {
           listen 8888;
            application live {
            live on;  #开启实时
			record all;
    		record_unique on;
    		record_path "./video";  #视频缓存的路径
    		record_suffix -%Y-%m-%d-%H_%M_%S.flv;
        	}
         }
}
配置之后执行命令nginx -s reload重启服务器即可。
5.9 rtmp直播流转为hls直播流
什么是HLS直播流?
HLS 全称是 HTTP Live Streaming,是一个由 Apple 公司提出的基于 HTTP 的媒体流传输协议,用于实时音视频流的传输。目前HLS协议被广泛的应用于视频点播和直播领域。

原理介绍
HLS 跟 DASH 协议的原理非常类似。通过将整条流切割成一个小的可以通过 HTTP 下载的媒体文件,然后提供一个配套的媒体列表文件,提供给客户端,让客户端顺序地拉取这些媒体文件播放,来实现看上去是在播放一条流的效果。由于传输层协议只需要标准的 HTTP 协议,HLS 可以方便的透过防火墙或者代理服务器,而且可以很方便的利用 CDN 进行分发加速,并且客户端实现起来也很方便。

HLS 把整个流分成一个个小的基于 HTTP 的文件来下载,每次只下载一些。HLS 协议由三部分组成:HTTP、M3U8、TS。这三部分中,HTTP 是传输协议,M3U8 是索引文件,TS 是音视频的媒体信息。
HLS协议编码格式要求:
视频的编码格式:H264
音频的编码格式:AAC、MP3、AC-3
视频的封装格式:ts
保存 ts 索引的 m3u8 文件
配置/usr/local/nginx/conf/nginx.conf将RTMP流转为HLS流。
在http模块的server配置里增加新的配置:
location /live_hls{
	  types {
	  #m3u8 type设置
	  application/vnd.apple.mpegurl m3u8;
	  #ts分片文件设置
	  video/mp2t ts;
	}
	#指向访问m3u8文件目录
	alias ./m3u8File; #和rtmp模块里的hls_path设置路径一样
	add_header Cache-Control no-cache; #禁止缓存
}
在rtmp模块的server配置里增加新的配置:
hls on;   #开启hls
hls_path ./m3u8File;  #hls的ts切片存放路径 (这是个目录,会自动创建的)
hls_fragment 2s;	  #本地切片长度
hls_playlist_length 6s;#HLS播放列表长度
/usr/local/nginx/conf/nginx.conf文件的完整的配置如下:
worker_processes  1;   #Nginx进程数,建议设置为等于CPU总核数

events {
    worker_connections  1024;  #工作模式与连接数上限
}

rtmp_auto_push on;

#RTMP服务
rtmp {
    server {
        listen 8888;
        application live {
            live on;  #开启实时
			record all;
    		record_unique on;
    		record_path "./video";  #视频缓存的路径
    		record_suffix -%Y-%m-%d-%H_%M_%S.flv;

            hls on;   #开启hls
            hls_path ./m3u8File;  #hls的ts切片存放路径
            hls_fragment 2s;	  #本地切片长度
            hls_playlist_length 6s;#HLS播放列表长度
        	}
         }
}

#HTTP服务
http {
    include       mime.types;
    default_type  application/octet-stream;
    sendfile        on;
    keepalive_timeout  65;

    server {
        listen       8099;
        server_name  localhost;

        location / {
            root   html;
            index  index.html index.htm;
        }

        location /live_hls{
		    types{
			    #m3u8 type设置
				application/vnd.apple.mpegurl m3u8;
				#ts分片文件设置
				video/mp2t ts;
			}
			#指向访问m3u8文件目录
			alias ./m3u8File;
			add_header Cache-Control no-cache; #禁止缓存
		}

        location /control{
		    rtmp_control all;
		}

		location /stat{
		    rtmp_stat all;
			rtmp_stat_stylesheet stat.xsl;
		}
		location /stat.xsl{
		    root ./nginx-rtmp-module-master;
		}
        # redirect server error pages to the static page /50x.html
        #
        error_page   500 502 503 504  /50x.html;
        location = /50x.html {
            root   html;
        }
    }
}
配置之后重启服务器即可。
按照前面的配置,RTMP推流地址和HTTP访问地址如下:
RTMP推流和拉流地址: rtmp://127.0.0.1:8888/live/video01


那么对应的HTTP的访问地址:http://127.0.0.1:8099/live_hls/video01.m3u8
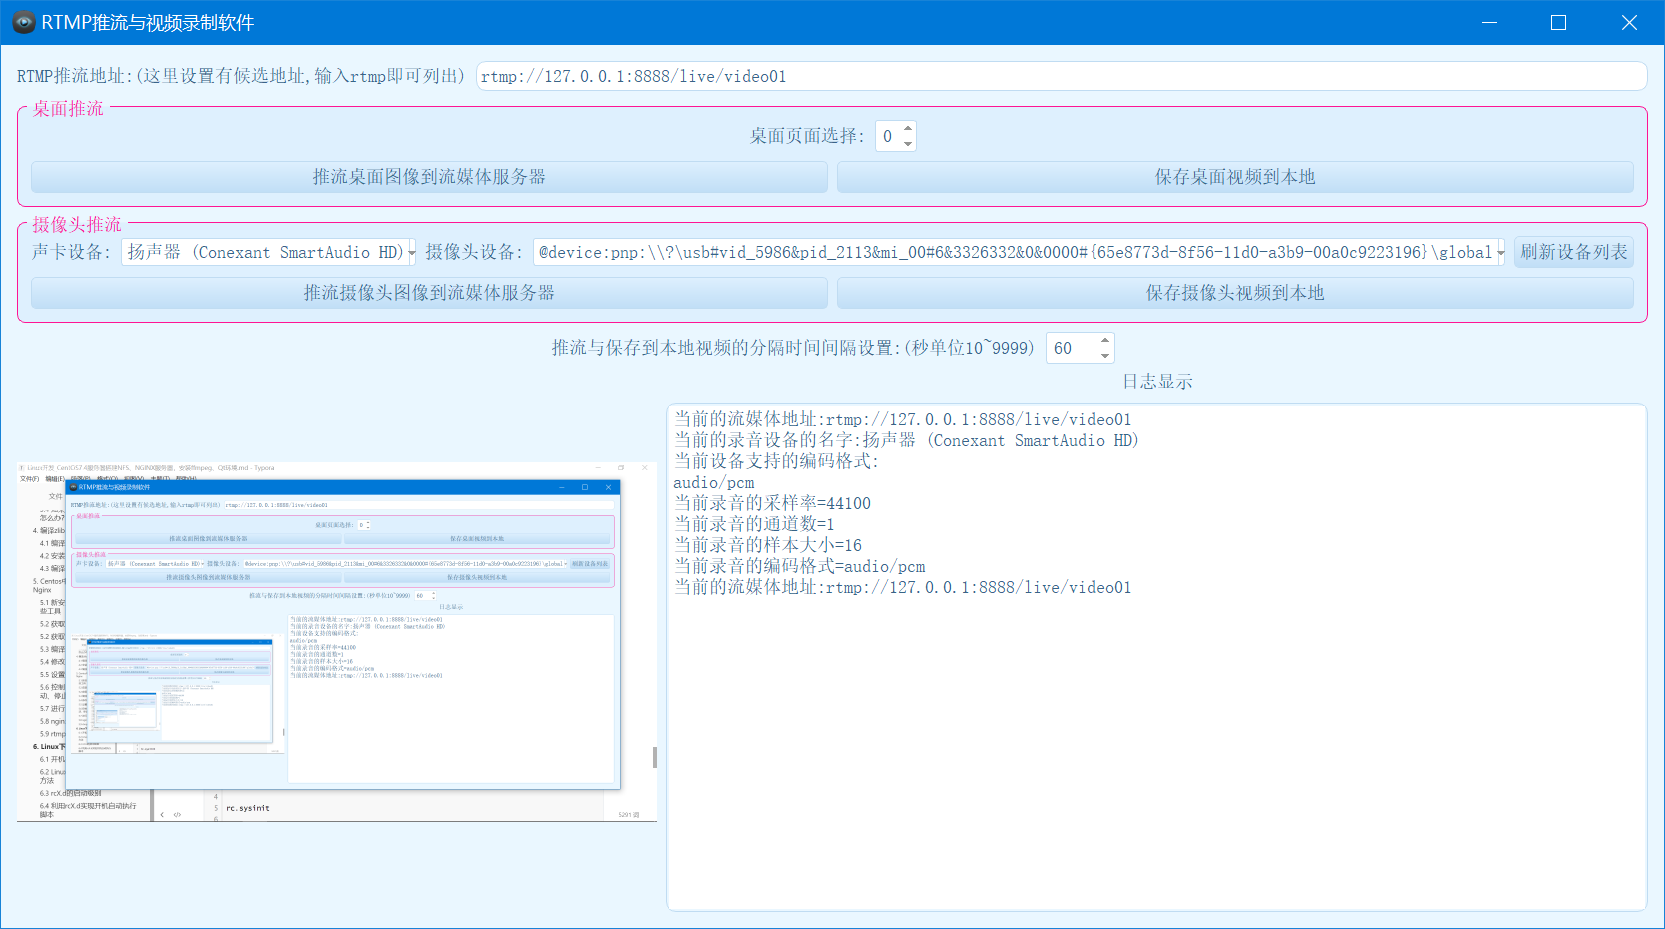
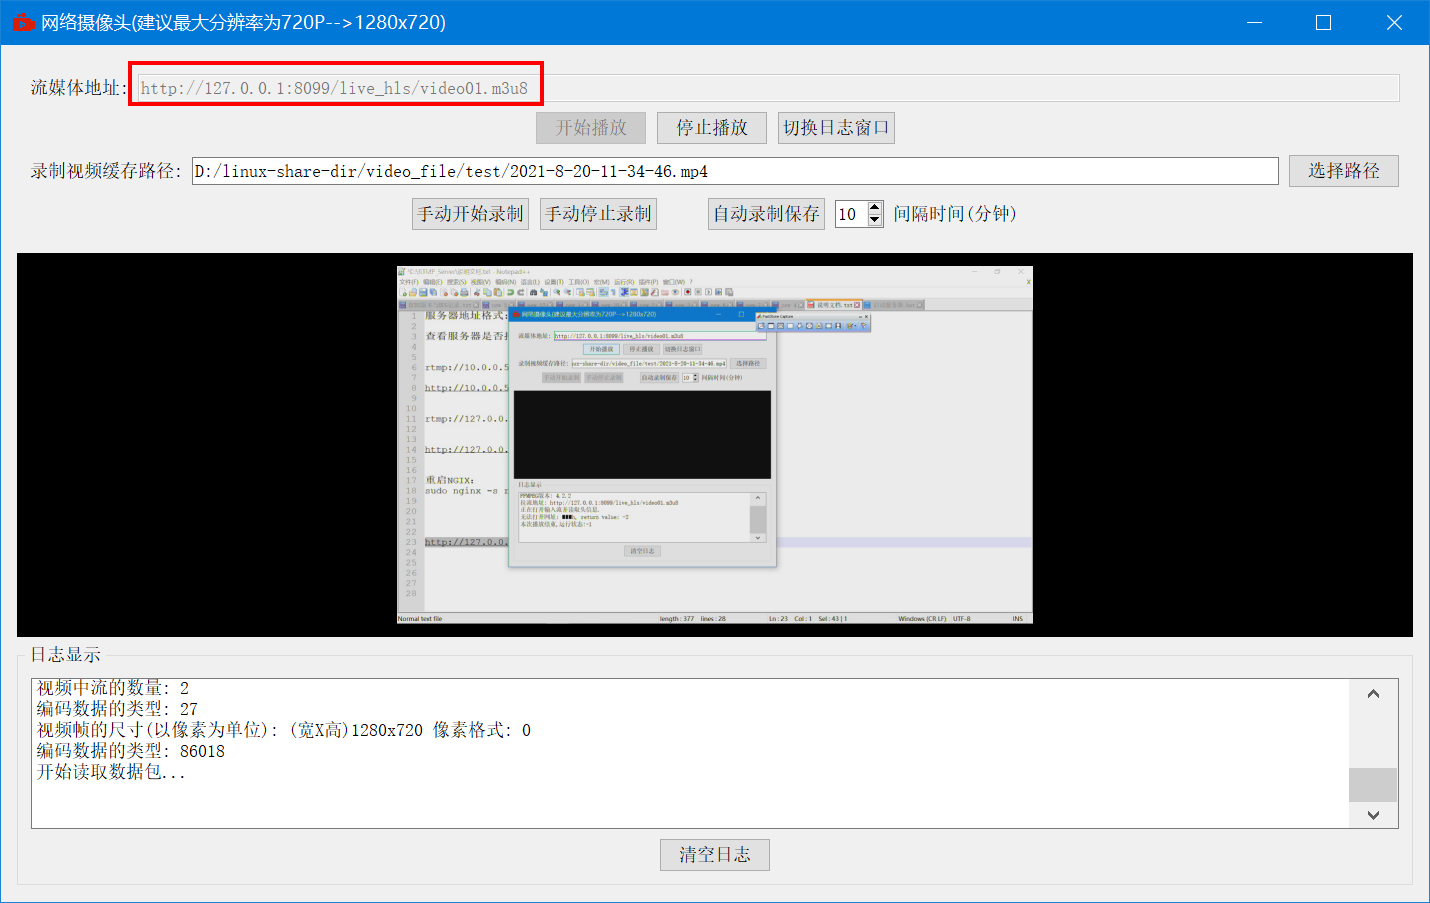
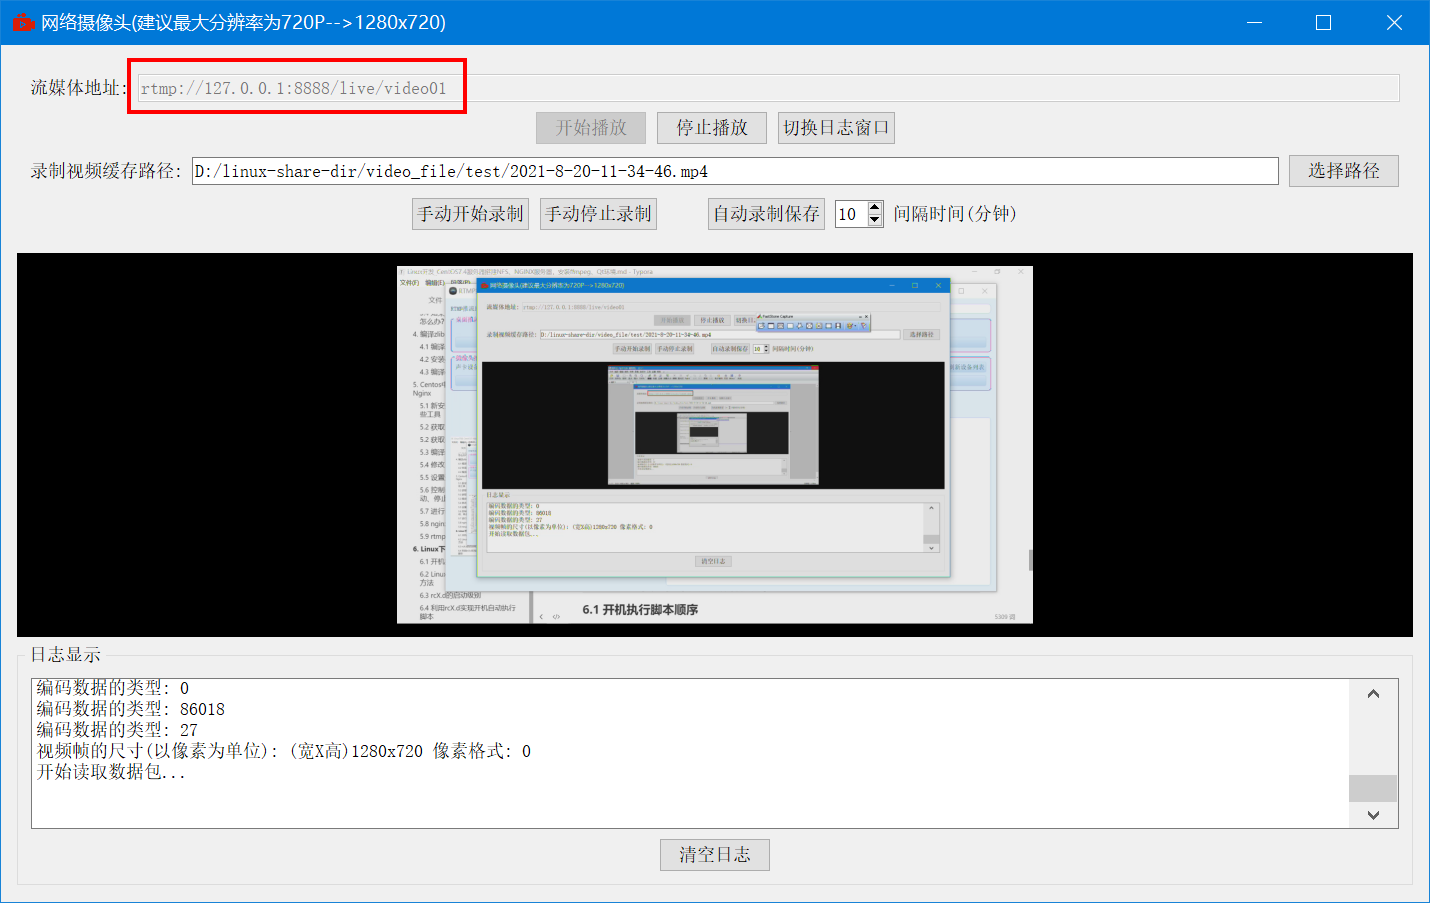
说明: 转为HLS流之后,如果浏览器支持HLS流就可以直接输入地址播放。一般手机浏览器都支持的。比如:苹果手机的自带浏览器,QQ浏览器等浏览器都支持直接播放HLS流。PC机的谷歌浏览器默认是不支持的。
5.10 NGINX配置HTTP文件服务器
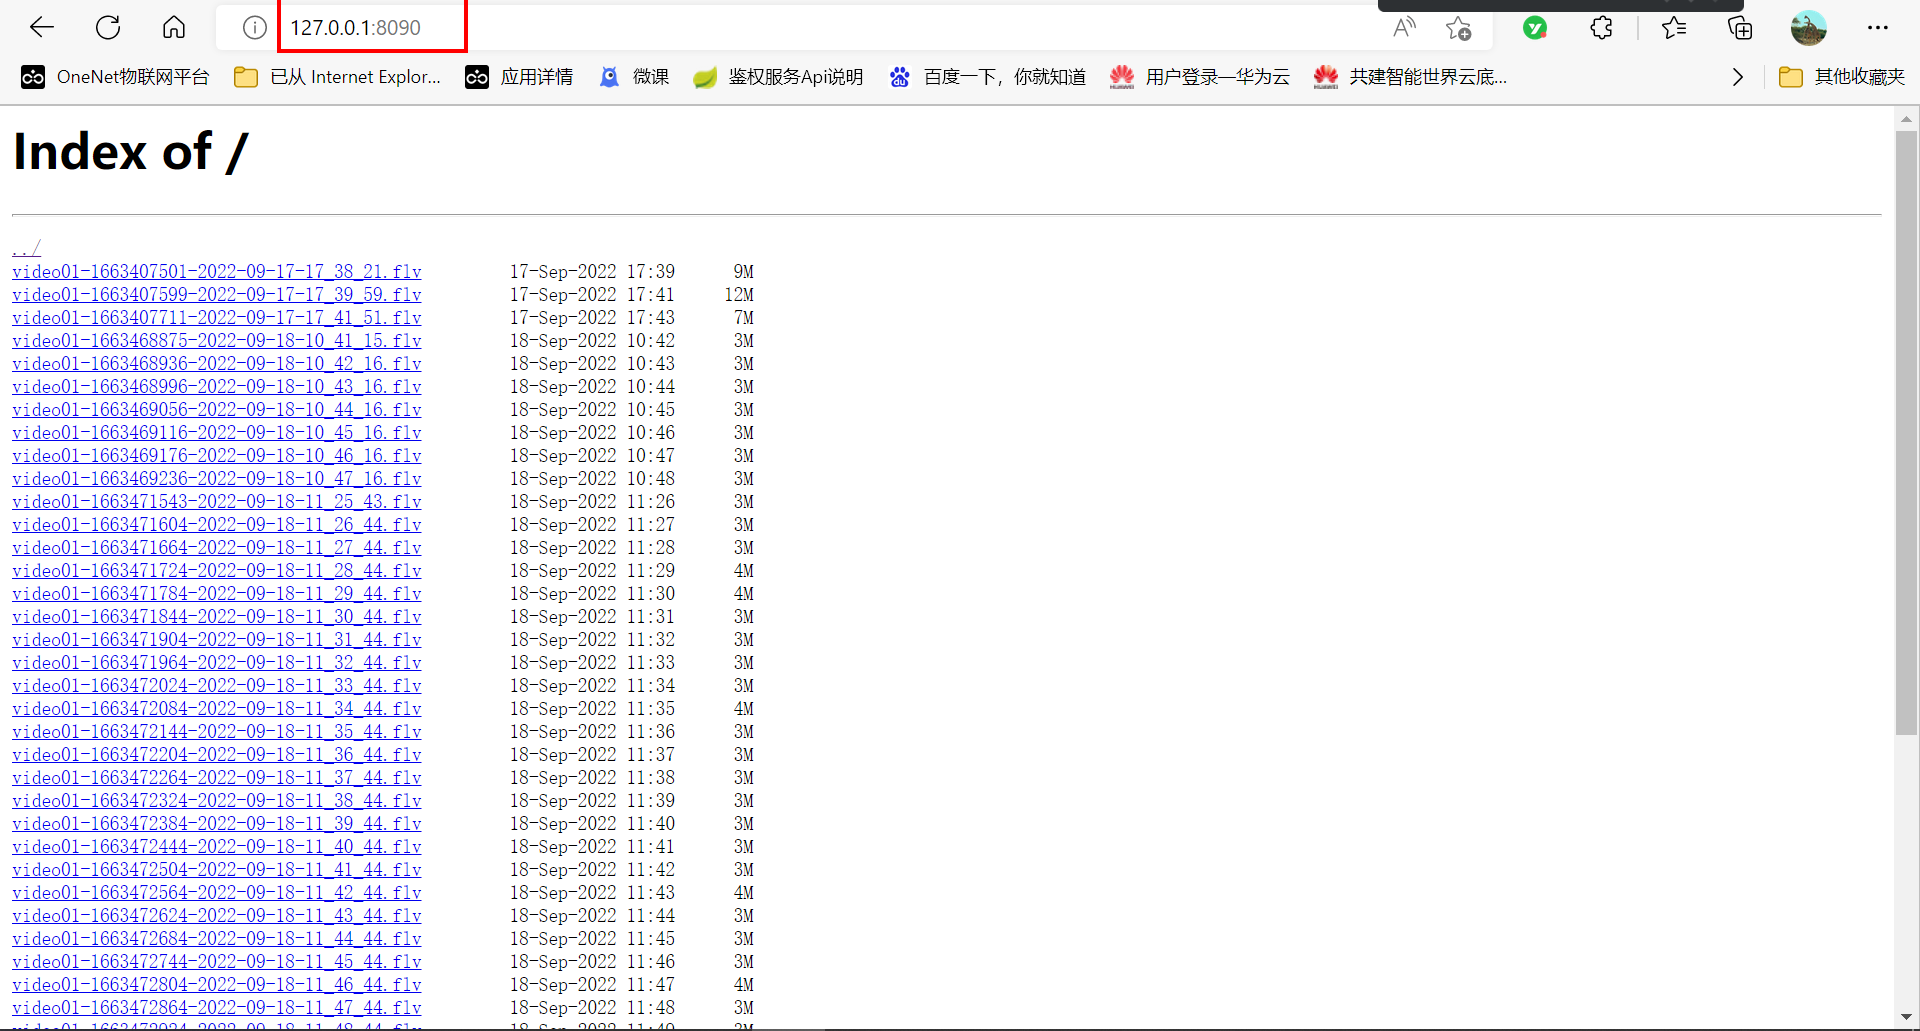
在5.8小节里介绍了如何配置NGINX保留RTMP推流的视频文件,如果想做一个直播回放,历史记录查看的播放器,那么就可以将rtmp视频缓存的目录作为HTTP文件服务器访问的根目录,通过访问这个根目录获取目录下文件的索引,得到视频文件的访问地址就可以直接进行播放,就能做一个视频回放播放器。
在http模块里新增加一个server配置,并填入新的配置,详细内容如下:
server {
		 listen       8090;
		 server_name  localhost;
		 location / {
			root ./video;  #指定哪个目录作为Http文件服务器的根目录,如果你这里写了file就是你的根目录,那么访问的时候file就不会出现在目录中
			autoindex on;   #设置允许列出整个目录
			autoindex_exact_size off; #默认为on,显示出文件的确切大小,单位是bytes。改为off后,显示出文件的大概大小,单位是kB或者MB或者GB
			autoindex_localtime on; #默认为off,显示的文件时间为GMT时间。改为on后,显示的文件时间为文件的服务器时间
			charset utf-8; #防止文件乱码显示, 如果用utf-8还是乱码,就改成gbk试试
        }
	}
特别说明: nginx是支持配置多个server配置,监听不同的端口,可以给文件服务器单独设置一个监听端口,专门作为文件遍历使用。
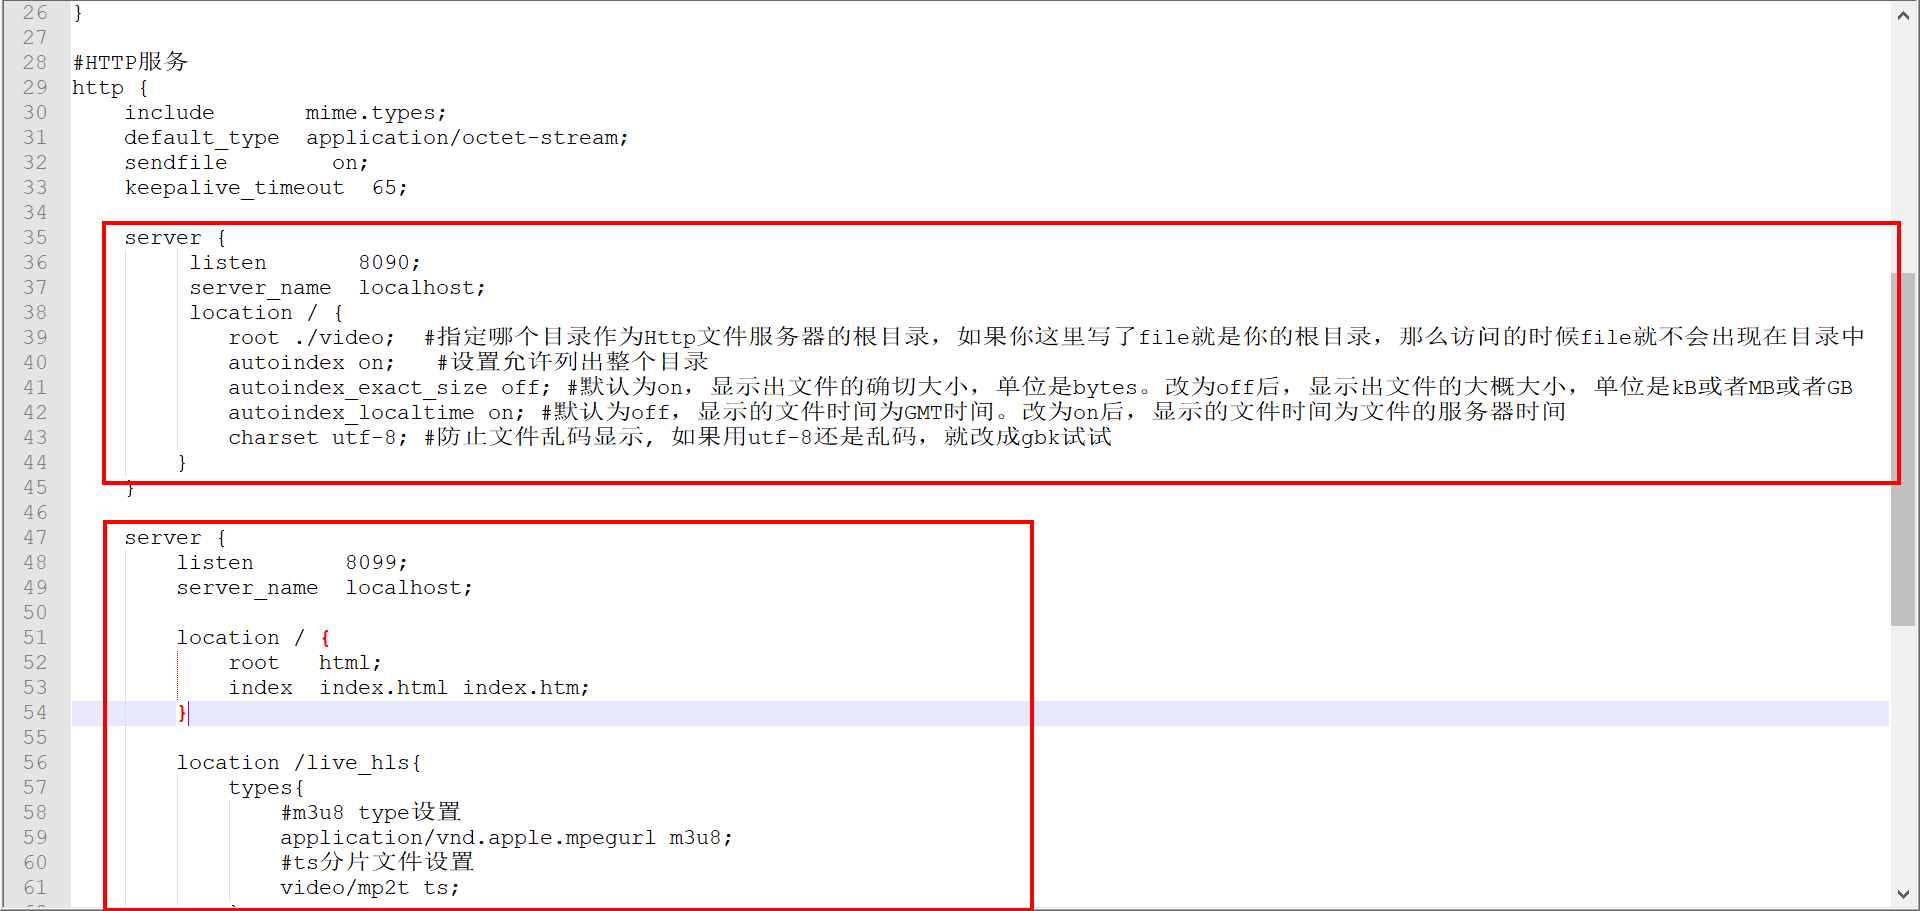
/usr/local/nginx/conf/nginx.conf文件的完整的配置如下:
worker_processes  1;   #Nginx进程数,建议设置为等于CPU总核数

events {
    worker_connections  1024;  #工作模式与连接数上限
}

rtmp_auto_push on;

#RTMP服务
rtmp {
    server {
        listen 8888;
        application live {
            live on;  #开启实时
			record all;
    		record_unique on;
    		record_path "./video";  #视频缓存的路径
    		record_suffix -%Y-%m-%d-%H_%M_%S.flv;

            hls on;   #开启hls
            hls_path ./m3u8File;  #hls的ts切片存放路径
            hls_fragment 2s;	  #本地切片长度
            hls_playlist_length 6s;#HLS播放列表长度
        	}
         }
}

#HTTP服务
http {
    include       mime.types;
    default_type  application/octet-stream;
    sendfile        on;
    keepalive_timeout  65;

	server {
		 listen       8090;
		 server_name  localhost;
		 location / {
			root ./video;  #指定哪个目录作为Http文件服务器的根目录,如果你这里写了file就是你的根目录,那么访问的时候file就不会出现在目录中
			autoindex on;   #设置允许列出整个目录
			autoindex_exact_size off; #默认为on,显示出文件的确切大小,单位是bytes。改为off后,显示出文件的大概大小,单位是kB或者MB或者GB
			autoindex_localtime on; #默认为off,显示的文件时间为GMT时间。改为on后,显示的文件时间为文件的服务器时间
			charset utf-8; #防止文件乱码显示, 如果用utf-8还是乱码,就改成gbk试试
        }
	}

    server {
        listen       8099;
        server_name  localhost;

        location / {
            root   html;
            index  index.html index.htm;
        }

        location /live_hls{
		    types{
			    #m3u8 type设置
				application/vnd.apple.mpegurl m3u8;
				#ts分片文件设置
				video/mp2t ts;
			}
			#指向访问m3u8文件目录
			alias ./m3u8File;
			add_header Cache-Control no-cache; #禁止缓存
		}

        location /control{
		    rtmp_control all;
		}

		location /stat{
		    rtmp_stat all;
			rtmp_stat_stylesheet stat.xsl;
		}
		location /stat.xsl{
		    root ./nginx-rtmp-module-master;
		}
        # redirect server error pages to the static page /50x.html
        #
        error_page   500 502 503 504  /50x.html;
        location = /50x.html {
            root   html;
        }
    }
}
访问文件测试:http://127.0.0.1:8090
6. Linux下开机启动的执行流程
6.1 开机执行脚本顺序
第一步:init /etc/inittab

第二步:启动相应的脚本,并且打开终端

rc.sysinit

rc.d(里面的脚本)

rc.local

第三步:启动login登录界面 login

第四步:在用户登录的时候执行sh脚本的顺序,每次登录的时候都会完全执行的

/etc/profile.d/file

/etc/profile

/etc/bashrc

/root/.bashrc

/root/.bash_profile
6.2 Linux中修改环境变量及生效方法
修改/etc/profile 或者 /etc/bashrc 可以让环境变量全部用户全局生效(需要重启系统)。 修改~/.bash_profile 或~/.bashrc对当前用户全局有效(需要重启系统)。
如果需要立即生效,修改完之后用source命令执行,如: source .bash_profile
6.3 rcX.d的启动级别
一般有开机自启动的需求时,一般会在/etc/rc.local文件中写命令行或脚本执行命令的方式来实现。也可以在/etc/profile文件里实现(不建议)。
现在很多Linux发行版,默认是没有/etc/rc.local这个文件或者没有去执行,而使用的是/etc/rcX.d。
rcX.d并不是指这个目录或者文件就是叫rcX.d,这其中的X对应是0~6这7个数字,不同的数字对应着不同的级别
查看当前系统/etc/rcX.d目录:
[root@ecs-c687-ecrs work]# ls /etc/ | grep rc
bashrc
csh.cshrc
inputrc
mail.rc
rc0.d
rc1.d
rc2.d
rc3.d
rc4.d
rc5.d
rc6.d
rc.d
rc.local
vimrc
virc
wgetrc
通过runlevel命令查看当前系统的启动级别:
| 启动级别(X所代表的数字) | 启动级别所代表的含义 |
|---|---|
| 0 | 停机(不能使用) |
| 1 | 单用户模式 |
| 2 | 多用户模式,但不能使用NFS等 |
| 3 | 完整的多用户模式 |
| 4 | 系统保留(未使用) |
| 5 | 图形化界面模式 |
| 6 | 重启模式(不能使用) |
我当前使用的是CentOS7.4服务器版本,启动级别如下:
[root@ecs-c687-ecrs ]# runlevel
N 3
查看/etc/rc3.d/目录下文件的详细信息:
[root@ecs-c687-ecrs ~]# ls /etc/rc3.d/ -l
total 0
lrwxrwxrwx. 1 root root 20 Feb 14  2022 K50netconsole - > ../init.d/netconsole
lrwxrwxrwx. 1 root root 17 Feb 14  2022 K90network - > ../init.d/network
lrwxrwxrwx  1 root root 19 Sep 15 22:07 S12hostguard - > ../init.d/hostguard
lrwxrwxrwx  1 root root 24 Feb 14  2022 S50multi-queue-hw - > ../init.d/multi-queue-hw
可以看到该目录下的文件都是链接文件,而且都是指向/etc/init.d中的shell脚本或者其他可执行文件,它们的命名方式基本都是以S或者K开头,其后紧跟一个数字,数字后则是链接文件的名字,这个名字可以自行定义。
命名规则解释如下:
以K90network为例:

K表示stop,S表示start。(表示需要传入参数),也就是说开机自启动命令会向脚本传入start或者stop,在脚本里可以收到参数$1进行一些判断,完成一些不同情况下的逻辑处理。比如:开机执行什么代码,关机执行什么代码。

90 表示脚本执行等级。(通常越小越优先)

network与/etc/init.d下的脚本文件名称保持一致。
6.4 利用rcX.d实现开机自动执行脚本
比如:需求是开机之后创建一个文件,并向文件里存放一些数据。
(1)先在/etc/init.d目录下创建一个up_demo.sh脚本,编写脚本代码:
#!/bin/bash
echo $0 $1 > > /home/up_test.txt
修改脚本权限:
[root@ecs-c687-ecrs init.d]# chmod 777 /etc/init.d/up_demo.sh
[root@ecs-c687-ecrs init.d]# ls up_demo.sh -l
-rwxrwxrwx 1 root root 76 Sep 16 14:13 up_demo.sh
(2) 在/etc/rc3.d目录里,创建软连接。 (因为我的系统启动级别为3)
[root@ecs-c687-ecrs rc3.d]# ln -s /etc/init.d/up_demo.sh S10up_demo
[root@ecs-c687-ecrs rc3.d]# ls -l
total 0
lrwxrwxrwx. 1 root root 20 Feb 14  2022 K50netconsole - > ../init.d/netconsole
lrwxrwxrwx. 1 root root 17 Feb 14  2022 K90network - > ../init.d/network
lrwxrwxrwx  1 root root 22 Sep 16 14:17 S10up_demo - > /etc/init.d/up_demo.sh
lrwxrwxrwx  1 root root 19 Sep 15 22:07 S12hostguard - > ../init.d/hostguard
lrwxrwxrwx  1 root root 24 Feb 14  2022 S50multi-queue-hw - > ../init.d/multi-queue-hw
(3)重启系统,进入到/home目录下查看文件内容,可以看到开机启动成功,内容已经写到up_test.txt文件里了。
Welcome to Huawei Cloud Service

[root@ecs-c687-ecrs ~]# cd /home/
[root@ecs-c687-ecrs home]# ls
lib_run.sh  up_test.txt  video  work  work_pc  work.tar.gz
[root@ecs-c687-ecrs home]# cat up_test.txt
/etc/rc.d/init.d/up_demo.sh start
[root@ecs-c687-ecrs home]#
审核编辑:汤梓红
-
【AWorks试用体验】+NFS服务器搭建2015-08-18 4973
-
【OK210试用体验】之(4)——NFS服务器的搭建2015-09-09 3517
-
TQ210 NFS服务器的配置和使用2015-11-23 2871
-
4412开发板学习笔记-NFS服务器的搭建2016-06-20 2928
-
ubuntu下搭建NFS服务器2019-11-02 3315
-
CentOS的ntp服务器搭建2020-03-20 1351
-
Nginx服务器的搭建步骤2020-04-07 2787
-
云服务器搭建嵌入式Linux开发环境的步骤2021-11-08 2394
-
教你linux搭建web服务器2011-12-28 9212
-
如何搭建本地smtp服务器2018-04-08 20022
-
如何搭建Linux服务器的详细资料说明2019-04-18 1391
-
linux如何搭建web服务器2020-06-08 9903
-
Linux学习之云服务器搭建嵌入式Linux开发环境2021-11-03 900
-
瑞芯为RK3568开发板搭建NFS服务器2022-05-24 1956
-
云服务器的linux中如何搭建php运行环境?2024-03-21 1264
全部0条评论

快来发表一下你的评论吧 !

