

如何使用操纵杆和Arduino控制伺服电机
描述
在这篇文章中,我们将学习如何使用操纵杆和Arduino控制伺服电机。我们将看到有关操纵杆,其销,其结构和工作的概述。我们将从操纵杆中提取有用的数据,这些数据将成为控制伺服电机的基础。
现在让我们看一下操纵杆。
操纵杆是一种输入设备,由杠杆组成,杠杆可以在 X 轴和 Y 轴上沿多个方向移动。杠杆的运动用于控制电机或任何外围电子设备。
从遥控玩具到Boing飞机,操纵杆都用于执行类似的功能。此外,游戏和较小的操纵杆在Z轴上有一个按钮,可以对其进行编程以执行许多有用的操作。
操纵杆通常是电子设备,因此我们需要施加电源。杠杆的移动会在输出引脚上产生电压差。电压电平由微控制器处理,以控制电机等输出设备。
图示的操纵杆与此类似,可以在PlayStation和Xbox控制器中找到。您无需破坏这些控制器即可挽救一个。这些模块在当地电子商店和电子商务网站上随时可用。
现在让我们看看这个操纵杆的构造。
它有两个 10 千欧姆电位器,位于带有弹簧的 X 轴和 Y 轴上,因此当用户从杠杆释放力时,它会返回到其原始位置。它在 Z 轴上有一个按下 ON
按钮。
它具有 5 个引脚、5 伏 Vcc、GND、可变 X、可变 Y 和 SW(Z 轴开关)。当我们施加电压并将操纵杆留在其原始杠杆位置时。X 和 Y
引脚将产生施加电压的一半。
当我们移动杠杆时,X 和 Y 输出引脚的电压会发生变化。现在让我们实际将操纵杆连接到Arduino。
示意图:
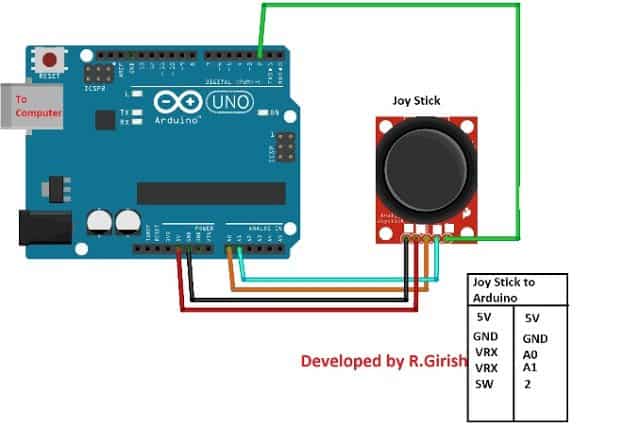
引脚连接详细信息在电路旁边给出。连接完成的硬件设置并上传代码。
程序:
//---------------Program Developed by R.Girish--------------//
int X_axis = A0;
int Y_axis = A1;
int Z_axis = 2;
int x = 0;
int y = 0;
int z = 0;
void setup()
{
Serial.begin(9600);
pinMode(X_axis, INPUT);
pinMode(Y_axis, INPUT);
pinMode(Z_axis, INPUT);
digitalWrite(Z_axis, HIGH);
}
void loop()
{
x = analogRead(X_axis);
y = analogRead(Y_axis);
z = digitalRead(Z_axis);
Serial.print(“X axis = ”);
Serial.println(x);
Serial.print(“Y axis = ”);
Serial.println(y);
Serial.print(“Z axis = ”);
if(z == HIGH)
{
Serial.println(“Button not Pressed”);
}
else
{
Serial.println(“Button Pressed”);
}
Serial.println(“----------------------------”);
delay(500);
}
//---------------Program Developed by R.Girish--------------//
Open the Serial monitor you can see the voltage level at the X and Y axes
pins and the status of the Z axis i.e. push button as illustrated below.

These X, Y, Z axes values are used to interpret the position of the lever.
As you can see the values are from 0 to 1023.
That’s because Arduino has built in ADC converter which convert the voltage
0V - 5V to 0 to 1023 values.
You can witness from the serial monitor that when the lever is left
untouched the lever stays at mid position of both X and Y axes and shows half
value of 1023.
You can also see it is not exact half of the 1023 that’s because
manufacturing these joysticks never been perfect.
By now, you would have got some technical knowledge about joysticks.
Now let’s see how to control two servo motors using one joystick.
Circuit Diagram:

两个伺服电机由一个操纵杆控制;当您沿 X 轴移动操纵杆时,连接在引脚 #7 处的伺服器会根据操纵杆位置顺时针和逆时针移动。
如果将操纵杆水平保持在特定位置,也可以将伺服执行器保持在某个位置。
与在引脚 #6 处连接的伺服电机类似,您可以沿 Y 轴移动杠杆。
当您沿 Z 轴按下杠杆时,两个电机将执行 180 度扫描。
您可以将 arduino 连接到 9v 电池或计算机。如果将Arduino连接到计算机,则可以打开串行监视器并查看伺服执行器的角度和电压电平。
伺服电机控制程序:
//---------------Program Developed by R.Girish--------------//
#include《Servo.h》
Servo servo_X;
Servo servo_Y;
int X_angleValue = 0;
int Y_angleValue = 0;
int X_axis = A0;
int Y_axis = A1;
int Z_axis = 2;
int x = 0;
int y = 0;
int z = 0;
int pos = 0;
int check1 = 0;
int check2 = 0;
int threshold = 10;
void setup()
{
Serial.begin(9600);
servo_X.attach(7);
servo_Y.attach(6);
pinMode(X_axis, INPUT);
pinMode(Y_axis, INPUT);
pinMode(Z_axis, INPUT);
digitalWrite(Z_axis, HIGH);
}
void loop()
{
x = analogRead(X_axis);
y = analogRead(Y_axis);
z = digitalRead(Z_axis);
if(z == LOW)
{
Serial.print(“Z axis status = ”);
Serial.println(“Button Pressed”);
Serial.println(“Sweeping servo actuators”);
for (pos = 0; pos 《= 180; pos += 1)
{
servo_X.write(pos);
delay(10);
}
for (pos = 180; pos 》= 0; pos -= 1)
{
servo_X.write(pos);
delay(15);
}
for (pos = 0; pos 《= 180; pos += 1)
{
servo_Y.write(pos);
delay(10);
}
for (pos = 180; pos 》= 0; pos -= 1)
{
servo_Y.write(pos);
delay(15);
}
Serial.println(“Done!!!”);
}
if(x 》 check1 + threshold || x 《 check1 - threshold)
{
X_angleValue = map(x, 0, 1023, 0, 180);
servo_X.write(X_angleValue);
check1 = x;
Serial.print(“X axis voltage level = ”);
Serial.println(x);
Serial.print(“X axis servo motor angle = ”);
Serial.print(X_angleValue);
Serial.println(“ degree”);
Serial.println(“------------------------------------------”);
}
if(y 》 check2 + threshold || y 《 check2 - threshold)
{
Y_angleValue = map(y, 0, 1023, 0, 180);
servo_Y.write(Y_angleValue);
check2 = y;
Serial.print(“Y axis voltage level = ”);
Serial.println(y);
Serial.print(“Y axis servo motor angle = ”);
Serial.print(Y_angleValue);
Serial.println(“ degree”);
Serial.println(“------------------------------------------”);
}
}
-
小白求教,怎么实现操纵杆控制电机的旋转角度2018-02-05 7968
-
如何使用Arduino UNO、操纵杆模块和NRF24L01模块控制伺服电机?2021-06-28 1390
-
基于arduino的超级无尾卡丁车操纵杆2022-06-24 1057
-
怎样用Arduino和操纵杆控制伺服电机2019-08-01 6756
-
如何使用操纵杆通过FPGA控制步进电机2019-09-29 6884
-
用拇指操纵杆控制伺服电机2022-10-26 594
-
使用Arduino Uno制作操纵杆控制的PC鼠标2022-11-04 1095
-
如何用操纵杆控制伺服2022-11-16 717
-
如何使用Arduino和操纵杆控制BLDC电机2022-11-24 801
-
如何使用Arduino创建操纵杆控制器2022-12-06 808
-
Arduino之使用PS2操纵杆控制LED2022-12-22 1296
-
基于Arduino Pro Mini的操纵杆手柄和DIY相机滑块2022-12-27 1023
-
NRF24L01带操纵杆的无线伺服电机控制2023-01-31 850
-
Arduino基于网络的操纵杆2023-02-01 660
-
一个使用操纵杆控制器控制伺服电机的电路2023-06-16 1572
全部0条评论

快来发表一下你的评论吧 !
