

Centos7下完美安装部署python3.10
电子说
描述
前段时间浩道分享了一篇关于pycharm专业版本安装破解后,不少小伙伴后台咨询浩道,linux环境下如何安装更高版本的python3,毕竟系统默认自带的python2版本已经不符合当前发展潮流,本文浩道就centos7下安装部署python3.10.9版本带大家通过以下15个步骤完成,其它版本安装都可以参照如下步骤进行。福利在文末喔~
步骤1、首先使用 python -V 命令查看一下是否安装Python,如下所示:
[root@huanghao-1 ~]# python -V
Python 2.7.5
由上面命令可以知道,CentOS7默认安装了python2.7.5 ,因为一些命令要用它,比如yum 它使用的是python2.7.5。
步骤2、然后使用命令 which python 查看一下Python可执行文件的位置,可见执行文件在/usr/bin/ 目录下。如下所示:
[root@huanghao-1 ~]# which python
/usr/bin/python
步骤3、通过cd /usr/bin/命令切换到/usr/bin/目录下执行ll python* 命令查看,如下所示 :
[root@huanghao-1 bin]# cd /usr/bin/
[root@huanghao-1 bin]# ll python*
lrwxrwxrwx. 1 root root    7 Jul 28  2018 python -> python2
lrwxrwxrwx. 1 root root    9 Jul 28  2018 python2 -> python2.7
-rwxr-xr-x. 1 root root 7136 Nov 20  2015 python2.7
由上面可知,python 指向的是python2.7,今天我们安装3.10版本,所以python要指向python3.10才行。
步骤4:通过cd /usr/bin/切换到/usr/bin/目录下,执行mv python python.bak命令进行备份。若有过程中用到yum,可以暂时恢复回来!!!,执行ll python* 命令查看,如下所示:
[root@huanghao-1 bin]# cd /usr/bin/
[root@huanghao-1 bin]# mv python python.bak
[root@huanghao-1 bin]# ll python*
lrwxrwxrwx. 1 root root    9 Jul 28  2018 python2 -> python2.7
-rwxr-xr-x. 1 root root 7136 Nov 20  2015 python2.7
lrwxrwxrwx. 1 root root    7 Jul 28  2018 python.bak -> python2
步骤5、通过yum命令先安装相关包:
yum install -y zlib-devel bzip2-devel openssl-devel ncurses-devel sqlite-devel readline-devel tk-devel gcc make libffi-devel
[root@huanghao-1 bin]# yum install -y zlib-devel bzip2-devel openssl-devel ncurses-devel sqlite-devel readline-devel tk-devel gcc make libffi-devel
-bash: /usr/bin/yum: /usr/bin/python: bad interpreter: No such file or directory
执行以上命令后,可以报错了,不要慌!!这是因为我们在步骤4中改变了其环境变量,在/usr/bin目录下,通过命令mv python.bak python还原回来即可。再次执行安装命令就正常了。但是安装完后记得备份回去!!!
mv python python.bak
步骤6、下载python3.10.9的源码,自己创建一个目录保存源码,我自己放在/home/目录下。通过cd /home/命令切换到/home/目录下,执行wget下载命令:
wget https://www.python.org/ftp/python/3.10.9/Python-3.10.9.tar.xz
如果自己系统没有wget命令,则yum安装一下。
yum install-y wget
自己想安装什么python3版本,就到https://www.python.org/getit/这个网站找,只需将以上版本路径替换即可。
(1)如我这里安装python3.10.9,打开上面网址后如下图所示:

(2)选择对应python版本后,点击“download”后,下拉找到file页面,如下图所示:
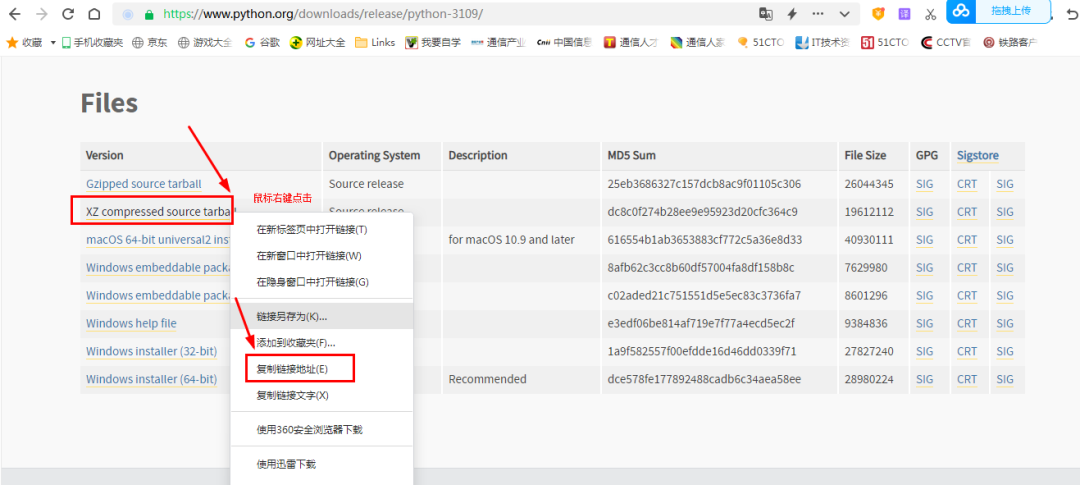
(3)此时复制链接地址后,即可通过wget + 链接地址进行python源码下载,如下命令所示,这里对应步骤6的命令:
wget https://www.python.org/ftp/python/3.10.9/Python-3.10.9.tar.xz
步骤7、在/home/目录下已经看到下载好的源码,通过tar -xvJf Python-3.7.0a4.tar.xz命令进行解压缩。如下所示:
[root@huanghao-1 home]# ll
total 19156
-rw-r--r-- 1 root root 19612112 Dec  7 03:01 Python-3.10.9.tar.xz
[root@huanghao-1 home]# tar -xvJf  Python-3.10.9.tar.xz
步骤8、/home/目录下,通过命令cd Python-3.10.9切换进入源码包目录。
cd Python-3.10.9
步骤9、编译安装,依次执行以下命令进行:
./configure prefix=/usr/local/python3.10 --with-ssl
make && make install
等待安装完毕后,通过命令cd /usr/local/切换到/usr/local/目录下,通过ll命令查看,就会有python3.10目录了,如下图所示:
[root@huanghao-1 Python-3.10.9]# cd /usr/local/
[root@huanghao-1 local]# ll
total 0
drwxr-xr-x. 2 root root  6 Aug 12  2015 bin
drwxr-xr-x. 2 root root  6 Aug 12  2015 etc
drwxr-xr-x. 2 root root  6 Aug 12  2015 games
drwxr-xr-x. 2 root root  6 Aug 12  2015 include
drwxr-xr-x. 2 root root  6 Aug 12  2015 lib
drwxr-xr-x. 2 root root  6 Aug 12  2015 lib64
drwxr-xr-x. 2 root root  6 Aug 12  2015 libexec
drwxr-xr-x  6 root root 52 Mar 26 19:06 python3.10
drwxr-xr-x. 2 root root  6 Aug 12  2015 sbin
drwxr-xr-x. 5 root root 46 Jul 28  2018 share
drwxr-xr-x. 2 root root  6 Aug 12  2015 src
[root@huanghao-1 local]#
步骤10、将python3.10版本对应的执行文件添加软链接到执行目录下/usr/bin,通过以下命令完成:
ln -s /usr/local/python3.10/bin/python3.10 /usr/bin/python
最终结果如下所示:
[root@huanghao-1 bin]# cd /usr/bin/
[root@huanghao-1 bin]# ll python*
lrwxrwxrwx  1 root root   36 Mar 26 19:11 python -> /usr/local/python3.10/bin/python3.10
lrwxrwxrwx. 1 root root    9 Jul 28  2018 python2 -> python2.7
-rwxr-xr-x. 1 root root 7136 Nov 20  2015 python2.7
lrwxrwxrwx. 1 root root    7 Jul 28  2018 python.bak -> python2
步骤11、测试是否成功安装,执行python -V命令,执行python2 -V,输出如下所示:成功安装python3.10.9版本。
[root@huanghao-1 bin]# python -V
Python 3.10.9
[root@huanghao-1 bin]# python2 -V
Python 2.7.5
步骤12、因为执行yum等命令需要python2版本,所以我们还要修改yum配置及其它相关配置:
(1)执行命令vi /usr/bin/yum进行修改,修改内容如下:
把#! /usr/bin/python修改为:
#! /usr/bin/python2
(2)执行命令vi /usr/libexec/urlgrabber-ext-down
把文件里面的#! /usr/bin/python 也要修改为:
#! /usr/bin/python2
(3)执行命令vi /usr/sbin/firewalld
文件里面的#!/usr/bin/python -Es也要修改为:
#!/usr/bin/python2 -Es
步骤13、建立pip3的软链接,执行以下命令:
ln -s /usr/local/python3.10/bin/pip3 /usr/bin/pip3
步骤14、这样python3版本就安装完成,同时python2也存在:可以通过以下命令进行查看:
[root@huanghao-1 bin]# python -V
Python 3.10.9
[root@huanghao-1 bin]# python2 -V
Python 2.7.5
步骤15、此时发现安装完成后,无法通过pip3命令安装相关模块,如:
[root@huanghao-1 ~]# pip3 install Flask
WARNING: pip is configured with locations that require TLS/SSL, however the ssl module in Python is not available.
WARNING: Retrying (Retry(total=4, connect=None, read=None, redirect=None, status=None)) after connection broken by 'SSLError("Can't connect to HTTPS URL because the SSL module is not available.")': /simple/flask/
WARNING: Retrying (Retry(total=3, connect=None, read=None, redirect=None, status=None)) after connection broken by 'SSLError("Can't connect to HTTPS URL because the SSL module is not available.")': /simple/flask/
WARNING: Retrying (Retry(total=2, connect=None, read=None, redirect=None, status=None)) after connection broken by 'SSLError("Can't connect to HTTPS URL because the SSL module is not available.")': /simple/flask/
WARNING: Retrying (Retry(total=1, connect=None, read=None, redirect=None, status=None)) after connection broken by 'SSLError("Can't connect to HTTPS URL because the SSL module is not available.")': /simple/flask/
WARNING: Retrying (Retry(total=0, connect=None, read=None, redirect=None, status=None)) after connection broken by 'SSLError("Can't connect to HTTPS URL because the SSL module is not available.")': /simple/flask/
Could not fetch URL https://pypi.org/simple/flask/: There was a problem confirming the ssl certificate: HTTPSConnectionPool(host='pypi.org', port=443): Max retries exceeded with url: /simple/flask/ (Caused by SSLError("Can't connect to HTTPS URL because the SSL module is not available.")) - skipping
ERROR: Could not find a version that satisfies the requirement Flask (from versions: none)
ERROR: No matching distribution found for Flask
WARNING: pip is configured with locations that require TLS/SSL, however the ssl module in Python is not available.
Could not fetch URL https://pypi.org/simple/pip/: There was a problem confirming the ssl certificate: HTTPSConnectionPool(host='pypi.org', port=443): Max retries exceeded with url: /simple/pip/ (Caused by SSLError("Can't connect to HTTPS URL because the SSL module is not available.")) - skipping
WARNING: There was an error checking the latest version of pip.
[root@node1 Python-3.10.9]# pip3 install --upgrade pip
WARNING: pip is configured with locations that require TLS/SSL, however the ssl module in Python is not available.
Requirement already satisfied: pip in /usr/local/python3.10/lib/python3.10/site-packages (22.3.1)
WARNING: Retrying (Retry(total=4, connect=None, read=None, redirect=None, status=None)) after connection broken by 'SSLError("Can't connect to HTTPS URL because the SSL module is not available.")': /simple/pip/
WARNING: Retrying (Retry(total=3, connect=None, read=None, redirect=None, status=None)) after connection broken by 'SSLError("Can't connect to HTTPS URL because the SSL module is not available.")': /simple/pip/
WARNING: Retrying (Retry(total=2, connect=None, read=None, redirect=None, status=None)) after connection broken by 'SSLError("Can't connect to HTTPS URL because the SSL module is not available.")': /simple/pip/
WARNING: Retrying (Retry(total=1, connect=None, read=None, redirect=None, status=None)) after connection broken by 'SSLError("Can't connect to HTTPS URL because the SSL module is not available.")': /simple/pip/
WARNING: Retrying (Retry(total=0, connect=None, read=None, redirect=None, status=None)) after connection broken by 'SSLError("Can't connect to HTTPS URL because the SSL module is not available.")': /simple/pip/
Could not fetch URL https://pypi.org/simple/pip/: There was a problem confirming the ssl certificate: HTTPSConnectionPool(host='pypi.org', port=443): Max retries exceeded with url: /simple/pip/ (Caused by SSLError("Can't connect to HTTPS URL because the SSL module is not available.")) - skipping
WARNING: Running pip as the 'root' user can result in broken permissions and conflicting behaviour with the system package manager. It is recommended to use a virtual environment instead: https://pip.pypa.io/warnings/venv
WARNING: pip is configured with locations that require TLS/SSL, however the ssl module in Python is not available.
Could not fetch URL https://pypi.org/simple/pip/: There was a problem confirming the ssl certificate: HTTPSConnectionPool(host='pypi.org', port=443): Max retries exceeded with url: /simple/pip/ (Caused by SSLError("Can't connect to HTTPS URL because the SSL module is not available.")) - skipping
WARNING: There was an error checking the latest version of pip.
如上出现报错,此时可以按照如下方法进行解决。
(1)在用户家目录下创建相关文件后进行如下编辑:
[root@huanghao-1 ~]# mkdir -p ~/.pip
[root@huanghao-1 ~]# vi ~/.pip/pip.conf
(2)在上一步编辑文件中,新增如下内容:
[global]
index-url = http://mirrors.aliyun.com/pypi/simple


[install]
trusted-host = mirrors.aliyun.com
(3)此时再次安装相应模块,如下可以成功了。
[root@huanghao-1 ~]# pip3 install Flask
Looking in indexes: http://mirrors.aliyun.com/pypi/simple
Collecting Flask
  Downloading http://mirrors.aliyun.com/pypi/packages/fa/1a/f191d32818e5cd985bdd3f47a6e4f525e2db1ce5e8150045ca0c31813686/Flask-2.3.2-py3-none-any.whl (96 kB)
     ━━━━━━━━━━━━━━━━━━━━━━━━━━━━━━━━━━━━━━━━ 96.9/96.9 kB 1.8 MB/s eta 000
Collecting Jinja2>=3.1.2
  Downloading http://mirrors.aliyun.com/pypi/packages/bc/c3/f068337a370801f372f2f8f6bad74a5c140f6fda3d9de154052708dd3c65/Jinja2-3.1.2-py3-none-any.whl (133 kB)
     ━━━━━━━━━━━━━━━━━━━━━━━━━━━━━━━━━━━━━━━━ 133.1/133.1 kB 1.4 MB/s eta 000
Collecting click>=8.1.3
  Downloading http://mirrors.aliyun.com/pypi/packages/1a/70/e63223f8116931d365993d4a6b7ef653a4d920b41d03de7c59499962821f/click-8.1.6-py3-none-any.whl (97 kB)
     ━━━━━━━━━━━━━━━━━━━━━━━━━━━━━━━━━━━━━━━━ 97.9/97.9 kB 1.4 MB/s eta 000
Collecting Werkzeug>=2.3.3
  Downloading http://mirrors.aliyun.com/pypi/packages/ba/d6/8040faecaba2feb84e1647af174b3243c9b90c163c7ea407820839931efe/Werkzeug-2.3.6-py3-none-any.whl (242 kB)
     ━━━━━━━━━━━━━━━━━━━━━━━━━━━━━━━━━━━━━━━━ 242.5/242.5 kB 1.5 MB/s eta 000
Collecting blinker>=1.6.2
  Downloading http://mirrors.aliyun.com/pypi/packages/0d/f1/5f39e771cd730d347539bb74c6d496737b9d5f0a53bc9fdbf3e170f1ee48/blinker-1.6.2-py3-none-any.whl (13 kB)
Collecting itsdangerous>=2.1.2
  Downloading http://mirrors.aliyun.com/pypi/packages/68/5f/447e04e828f47465eeab35b5d408b7ebaaaee207f48b7136c5a7267a30ae/itsdangerous-2.1.2-py3-none-any.whl (15 kB)
Collecting MarkupSafe>=2.0
  Downloading http://mirrors.aliyun.com/pypi/packages/12/b3/d9ed2c0971e1435b8a62354b18d3060b66c8cb1d368399ec0b9baa7c0ee5/MarkupSafe-2.1.3-cp310-cp310-manylinux_2_17_x86_64.manylinux2014_x86_64.whl (25 kB)
Installing collected packages: MarkupSafe, itsdangerous, click, blinker, Werkzeug, Jinja2, Flask
Successfully installed Flask-2.3.2 Jinja2-3.1.2 MarkupSafe-2.1.3 Werkzeug-2.3.6 blinker-1.6.2 click-8.1.6 itsdangerous-2.1.2
WARNING: Running pip as the 'root' user can result in broken permissions and conflicting behaviour with the system package manager. It is recommended to use a virtual environment instead: https://pip.pypa.io/warnings/venv


[notice] A new release of pip available: 22.3.1 -> 23.2.1
[notice] To update, run: /usr/local/python3.10/bin/python3.10 -m pip install --upgrade pip
(4)根据提示,也可以升级pip版本到最新的版本。
pip3 install --upgrade pip
(5)下面可以通过创建一段脚本,验证下载的模块是否可以正常使用,创建名为hello_flask.py的文件,内容如下:
[root@huanghao-1 ~]# cat hello_flask.py
from flask import Flask


app = Flask(__name__)


@app.route('/')
def hello():
        return 'Hello flask'


if __name__ == '__main__':
        app.run(host='0.0.0.0',port=8888,debug=True)
(6)执行hello_flask.py脚本
python hello_flask.py
(7)当前我的服务器地址是192.168.20.232,在浏览器访问如下地址:得到响应如下图所示:
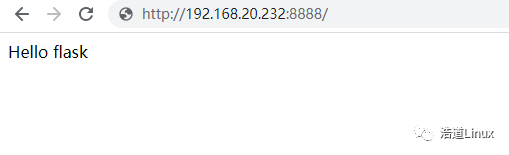
到此整个安装部署完成,大家可以参考以上步骤自己进行各个python3版本的安装,注意更改到自己实际环境中的对应目录即可。
PS:学习python,怎么能少了专业版的开发工具pycharm呢!需要专业破解版可以看看之前发布的这篇文章,三部完美破解,有效期到2099年!
【python开发工具】pycharm专业版安装破解激活
-
CentOS7配置Tomcat的安装和整合Jenkins2019-03-29 1809
-
centos7 redis的安装2019-05-14 1194
-
安装linux lnmp centos7环境的小问题总结2019-07-22 1170
-
基于CentOS7的MySQL57安装2020-03-26 1651
-
VMware虚拟机安装CentOS7教程步骤2020-05-27 1473
-
Centos7下如何使用Apache部署Django项目2020-05-29 1035
-
Centos7Nginx安装与配置步骤2020-06-02 2316
-
请问Centos7如何搭建PPTP?2020-11-09 10764
-
为什么VMware安装CentOS7刚开启虚拟机时就出现黑屏呢2021-10-26 2402
-
安装centos7之挂在分区的方法2021-12-27 1423
-
CentOS7如何设置电源选项/待机/睡眠/挂起2021-12-28 693
-
在vmware上安装centos7以及网络配置2017-12-02 719
-
CentOS7 设置电源选项,待机、睡眠、挂起2022-01-05 1361
-
CentOS7中使用一键脚本部署Librenms网络监控系统2023-09-14 2175
-
记录RocketMQ在centos7上的安装过程2024-01-02 2643
全部0条评论

快来发表一下你的评论吧 !
