
OpenWrt应用程序开发之minicom串口终端
嵌入式技术
描述
【openwrt应用开发】openwrt交叉编译自己的应用程序入门
类似minicom串口终端at应用程序开发
准备
开发板: SUN7628 (MT7628 ROM:32MB RAM:128MB)
openwrt源码: OpenWrt Chaos Calmer(CC) 15.05.1 r49396
前提:编译Openwrt源码包通过
OpenWrt应用程序开发方式
OpenWrt上面应用程序开发有两种方式:
1、利用OpenWrt SDK,
2、利用OpenWrt源码。
其实过程都差不是很多。源码会直接生成可执行程序的demo,SDK只生成ipk包,进行opkg安装。
在编译根目录下会有一个dl的目录,这个目录其实是“download”的简写,在编译前期,需要从网络下载的数据包都会放在这个目录下,这些软件包的一个特点就是,会自动安装在所编译的固件中,也就是我们make menuconfig的时候,为固件配置的一些软件包。如果我们需要更改这些源码包,只需要将更改好的源码包打包成相同的名字放在这个目录下,然后开始编译即可。编译时,会将软件包解压到build_dir目录下。
OpenWrt应用程序开发
很多入门教程都写hellowrold, 写helloword没什么实际用途,本次制作一个类似minicom串口终端, 我命名为at, minicom太大,我们自己写的at非常小,使用简单方便,相信大家用后会爱不释手。
下面我们利用OpenWrt源码开发at:
1、进入package目录,创建软件目录
#cd openwrt/package
#mkdir at
2、进入test目录,创建Makefile文件和代码路径
├── at
├── Makefile
└── src
├── at.c
└── Makefile
该Makefile基本内容格式都差不多,可参照以下进行修改
#
# Copyright (C) 2009-2010 Jo-Philipp Wich
#
# This is free software, licensed under the GNU General Public License v2.
# See /LICENSE for more information.
#
# 导入通用编译规则
include $(TOPDIR)/rules.mk
# name和version用来定义编译目录名$(PKG_BUILD_DIR)]
PKG_NAME:=at
PKG_VERSION:=1.0
PKG_RELEASE:=1
#PKG_BUILD_DIR:=$(BUILD_DIR)/$(PKG_NAME) # 也可以直接定义编译目录名,代替默认的目录名
# 导入包定义
include $(INCLUDE_DIR)/package.mk
# 包定义:定义我们的包在menuconfig中的位置
# Makefile中的define语法可以理解为函数,用于定义命令集合
define Package/at
SECTION:=utils
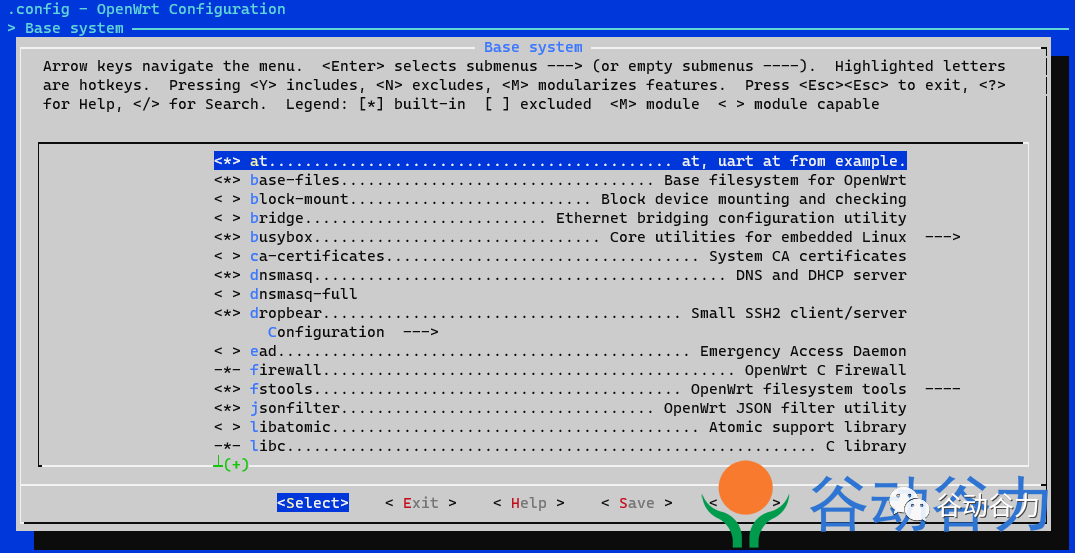
CATEGORY:=Base system
TITLE:=at, uart at from example.
endef
# 包描述:关于我们包的更详细的描述
define Package/at/description
A simple at example for uart utils, my first openwrt package example.
endef
# 编译准备. 必须使用tab缩进,表示是可执行的命令
define Build/Prepare
echo "Here is Build/Prepare at"
mkdir -p $(PKG_BUILD_DIR)
cp ./src/* $(PKG_BUILD_DIR)/
endef
# 安装
define Package/at/install
$(INSTALL_DIR) $(1)/usr/bin
$(INSTALL_BIN) $(PKG_BUILD_DIR)/at $(1)/usr/bin
endef
# 这一行总是在最后
$(eval $(call BuildPackage,at))
复制代码
注意以上凡是命令行,必须以tab开头,否则会出现Makefile *** missing separator. Stop.
#mkdir src
3、进入src目录,创建相关源文件
#cd src
创建源文件at.c,如下
/*
* at
* Like minicom
* Usage: ./at /dev/ttyx
* lojam
* http://bbs.sunsili.com
*/
#include
#include
#include
#include
#include
#include
#include
#include
#include
#include
#include
int ttyfd;
int stdout_changed = 0;
int tty_changed = 0;
struct termios stdout_tio;
struct termios tty_tio;
void restore_tio()
{
if(stdout_changed)
{
stdout_tio.c_lflag |= ECHO;
tcsetattr(STDIN_FILENO, TCSANOW, &stdout_tio);
}
if(tty_changed)
{
tcsetattr(ttyfd, TCSANOW, &tty_tio);
}
}
void int_handler(int signum)
{
close(ttyfd);
exit(EXIT_SUCCESS);
}
int main(int args, const char *argv[])
{
char readBuf[256];
const char *ttyPath = argv[1];
const char *atCommand = argv[2];
struct termios tio;
int ret;
if(args !=2 )
{
fprintf(stderr, "Usage: ./at /dev/ttyx ");
exit(EXIT_FAILURE);
}
atexit(restore_tio);
ttyfd = open(ttyPath, O_RDWR | O_NOCTTY | O_NDELAY);
if(ttyfd < 0)
{
perror("open");
exit(EXIT_FAILURE);
}
signal(SIGINT, int_handler);
ret = tcgetattr(ttyfd, &tio);
if (ret == -1)
{
perror("tcgetattr");
exit(EXIT_FAILURE);
}
memcpy(&tty_tio, &tio, sizeof(struct termios));
tio.c_iflag = 0;
tio.c_oflag = 0;
tio.c_cflag = CS8 | CREAD | CLOCAL;
tio.c_cflag &= (~CRTSCTS);
tio.c_lflag = 0;
tio.c_cc[VMIN] = 1;
tio.c_cc[VTIME] = 0;
if (cfsetospeed(&tio, B115200) < 0 || cfsetispeed(&tio, B115200) < 0)
{
perror("cfseti/ospeed");
exit(EXIT_FAILURE);
}
ret = tcsetattr(ttyfd, TCSANOW, &tio);
if (ret == -1)
{
perror("tcsetattr");
exit(EXIT_FAILURE);
}
tty_changed = 1;
struct termios outio;
ret = tcgetattr(STDIN_FILENO, &outio);
if (ret == -1)
{
perror("tcgetattr");
exit(EXIT_FAILURE);
}
memcpy(&stdout_tio, &outio, sizeof(struct termios));
stdout_changed = 1;
outio.c_lflag &= ~ECHO;
ret = tcsetattr(STDIN_FILENO, TCSANOW, &outio);
int flags = fcntl(STDIN_FILENO, F_GETFL, 0);
fcntl(STDIN_FILENO, F_SETFL, flags | O_NONBLOCK);
struct pollfd fds[] = {
{STDIN_FILENO, POLLIN, 0},
{ttyfd, POLLIN, 0}
};
while (1)
{
ret = poll(fds, sizeof(fds)/sizeof(struct pollfd), 0);
if (ret == -1)
{
perror("poll");
exit(EXIT_FAILURE);
}
if (fds[0].revents & POLLIN)
{
memset(readBuf, 0, sizeof(readBuf));
ret = read(fds[0].fd, readBuf, sizeof(readBuf));
if (ret < 0 && errno != EAGAIN)
{
perror("read");
exit(EXIT_FAILURE);
}
if (ret > 0)
{
strcpy(readBuf+ret-1, " ");
// printf("%s", readBuf);
ret = write(ttyfd, readBuf, strlen(readBuf));
if (ret < 0)
{
perror("write");
exit(EXIT_FAILURE);
}
}
}
if (fds[1].revents & POLLIN)
{
memset(readBuf, 0, sizeof(readBuf));
ret = read(fds[1].fd, readBuf, sizeof(readBuf));
if (ret == -1 && errno != EAGAIN)
{
perror("read");
exit(EXIT_FAILURE);
}
printf("%s", readBuf);
}
}
int commandLen = strlen(atCommand);
char *buf = (char *)malloc(commandLen + 3);
sprintf(buf, "%s ", atCommand);
ret = write(ttyfd, buf, strlen(buf));
if (ret < 0)
{
perror("write");
exit(EXIT_FAILURE);
}
free(buf);
while (1)
{
ret = read(ttyfd, readBuf, sizeof(readBuf));
if (ret < 0 && errno != EAGAIN)
{
perror("read");
exit(EXIT_FAILURE);
}
if (ret > 0)
write(1, readBuf, ret);
}
return 0;
}
复制代码
创建源文件的Makefile
TARGET = at
OBJS = at.o
$(TARGET):$(OBJS)
$(CC) $(LDFLAGS) -o $@ $^
%.o: %.c
$(CC) $(CFLAGS) -c [ DISCUZ_CODE_11 ]lt; -o $@
.PHONY: clean
clean:
rm -f $(TARGET) $(OBJS)
复制代码
编译
4、回到顶层目录
make menuconfig
Base system —>
at
选中行按空格键我们刚刚创建的at。保存退出
单独编译at模块
make package/at/compile V=s
make[1]: Entering directory '/home/fan/openwrt_CC_mt76xx_omj_source'
make[2]: Entering directory '/home/fan/openwrt_CC_mt76xx_omj_source/package/libs/toolchain'
if [ -f /home/fan/openwrt_CC_mt76xx_omj_source/staging_dir/target-mipsel_24kec+dsp_uClibc-0.9.33.2/pkginfo/toolchain.default.install.clean ]; then rm -f /home/fan/openwrt_CC_mt76xx_omj_source/staging_dir/target-mipsel_24kec+dsp_uClibc-0.9.33.2/pkginfo/toolchain.default.install /home/fan/openwrt_CC_mt76xx_omj_source/staging_dir/target-mipsel_24kec+dsp_uClibc-0.9.33.2/pkginfo/toolchain.default.install.clean; fi; echo "libc" >> /home/fan/openwrt_CC_mt76xx_omj_source/staging_dir/target-mipsel_24kec+dsp_uClibc-0.9.33.2/pkginfo/toolchain.default.install
.........
make[2]: Leaving directory '/home/fan/openwrt_CC_mt76xx_omj_source/package/at'
make[1]: Leaving directory '/home/fan/openwrt_CC_mt76xx_omj_source'
不出意外,就编译好了
也可以编译openwrt固件时编译,编译固件,参考:【openwrt】基于 WSL的openwrt开发环境(构建系统)配置-谷动谷力 (sunsili.com)
观察编译过程可以发现交叉编译工具为CC="mips-openwrt-linux-uclibc-gcc" 位置大概是./staging_dir/toolchain-mips_34kc_gcc-4.8-linaro_uClibc-0.9.33.2/mips-openwrt-linux-uclibc/bin/
编译成功后,
#ls build_dir/target-mipsel_24kec+dsp_uClibc-0.9.33.2/at-1.0/at at.c at.o ipkg-ramips_24kec Makefile
编译openwrt打包进固件
直接make (-j8 需要电脑支持)
编译成功后
生成ipk安装好
.......
Generating index for package ./at_1.0-1_ramips_24kec.ipk
......
at应用程序存放位置
ls staging_dir/target-mipsel_24kec+dsp_uClibc-0.9.33.2/root-ramips/usr/bin/
可以找到 at
at_1.0-1_ramips_24kec.ipk ipk包存放位置
ls bin/ramips/packages/base/
可以找到 at_1.0-1_ramips_24kec.ipk
测试
单独编译的at模块
用scp拷贝at到开发板,执行就ok了。
scp build_dir/target-mipsel_24kec+dsp_uClibc-0.9.33.2/at-1.0/at root@19
2.168.3.125:/root
root@192.168.3.125's password: #输入openwrt开发板密码
at 100% 12KB 12.2KB/s 00:00
等待传输完成
ssh登录开发板(可以用可视化工具,如mobaxterm,点击可以查看用法)
ssh root@192.168.3.125
root@192.168.3.125's password:#输入openwrt开发板密码
BusyBox v1.23.2 (2023-07-31 0921 CST) built-in shell (ash)
_______ ________ __
| |.-----.-----.-----.| | | |.----.| |_
| - || _ | -__| || | | || _|| _|
|_______|| __|_____|__|__||________||__| |____|
|__| W I R E L E S S F R E E D O M
-----------------------------------------------------
CHAOS CALMER (Chaos Calmer, r49396)
-----------------------------------------------------
* 1 1/2 oz Gin Shake with a glassful
* 1/4 oz Triple Sec of broken ice and pour
* 3/4 oz Lime Juice unstrained into a goblet.
* 1 1/2 oz Orange Juice
* 1 tsp. Grenadine Syrup
-----------------------------------------------------
root@SUN:~# ls -la
.....
-rwxr-xr-x 1 root root 12487 Aug 1 14:06 at #绿色的, 可执行的, root有执行权限
....
在开发板运行at测试一下, 我开发板开有一个Air724模块,用ttyUSB0端
Usage: ./at /dev/ttyUSB0
运行加端口号即可
root@TJ:~# ./at /dev/ttyUSB0
ATI #发行AT指令
AirM2M_Air724UG_V401876_LTE_AT #Air724模块 返回Air724模块软硬件相关信息
OK
同时ctrl+c 可以退出 at 应用
openwrt打包编译
用scp拷贝at_1.0-1_ramips_24kec.ipk到开发板
scp ./bin/ramips/packages/base/at_1.0-1_ramips_24kec.ipk root@192.168.3
.125:/tmp
root@192.168.3.125's password:
at_1.0-1_ramips_24kec.ipk 100% 3108 3.0KB/s 00:00
等待传输完成
安装at
在开发板上运行
root@SUN:~# opkg install /tmp/at_1.0-1_ramips_24kec.ipk
Installing at (1.0-1) to root...
Configuring at.
运行at (安装后,无论在何目录下,都不用加./ 加路径,可以直接用at /dev/ttyx 运行
root@SUN:~# at /dev/ttyUSB0
ATI
AirM2M_Air724UG_V401876_LTE_AT
OK
烧录固件
用scp拷贝penwr升级固件k到开发板
scp bin/ramips/openwrt-ramips-mt7628-mt7628-squashfs-sysupgrade.bin root@192.168.3.125:/tmp
root@192.168.3.125's password:
openwrt-ramips-mt7628-mt7628-squashfs-sysupgrade.bin 100% 8704KB 1.1MB/s 00:08
开发板运行:
sysupgrade -n -F /tmp/openwrt-ramips-mt7628-mt7628-squashfs-sysupgrade.bin
详细说明openwrtl固件升级,请参考:openwrt怎么升级固件?使用命令sysupgrade实现openwrt升级固件-谷动谷力 (sunsili.com)
烧录后,at会存放在开发析的 /usr/bin目录下,不用安装,无论在何目录下,都不用加./ 加路径,可以直接用at /dev/ttyx 运行
运行at
root@SUN:~# at /dev/ttyUSB0
ATI
AirM2M_Air724UG_V401876_LTE_AT
OK
审核编辑:汤梓红
-
minicom Linux终端工具2022-05-26 596
-
Openwrt开发指南 第18章 驱动开发之字符设备应用程序2023-07-02 3561
-
Openwrt开发指南 第20章 驱动开发之LED应用程序2023-07-03 3974
-
Openwrt开发指南 第22章 Openwrt串口的使用22023-07-05 6337
-
4412开发板Ubuntu下minicom连接到串口后,没有出现串口终端打印信息,请问是怎么回事?2016-06-28 7784
-
移植minicom到ARM开发板2018-07-05 2231
-
如何利用minicom进行串口通信?2021-10-25 606
-
minicom配置串口通信参数的过程2021-12-24 596
-
为什么无法使用TeraTerm或Minicom加载UserApp?2022-12-29 301
-
ADS环境下基于S3C2410串口应用程序的开发2009-11-06 1448
-
MATLAB串口调试助手应用程序和基于MATLAB开发USB的串口通信源代码2018-11-05 2206
-
串口调试助手应用程序免费下载2019-10-29 1541
-
如何使用DTK开发应用程序?2021-07-06 985
-
【嵌入式Linux(环境篇)】Linux下的串口助手 —— minicom或putty2021-11-02 943
-
嵌入式Linux应用程序开发之图形编程2022-04-12 731
全部0条评论

快来发表一下你的评论吧 !

