

bgp配置实例讲解 如何配置Cilium和BGP协同工作
电子说
描述
背景
官方提供了多篇文档说明如何配置 Cilium 和 BGP 协同工作,本文主要对以下部分功能进行验证:
Using BIRD to run BGP[1]
Using kube-router to run BGP[2]
BGP[3]
Cilium BGP Control Plane[4]
为了模拟支持 BGP 的网络环境,文中所有节点均是通过 vagrant 创建的 VM, 网络拓扑如下图。
❝
注意:实际配置时使用 vagrant 创建的 VM 模拟网络环境并不便利。可以参考以下文章,使用 ContainerLab 和 Kind 进行验证。参考:https://mp.weixin.qq.com/s/k25e7gTIIJLnL_FLlgdHUw
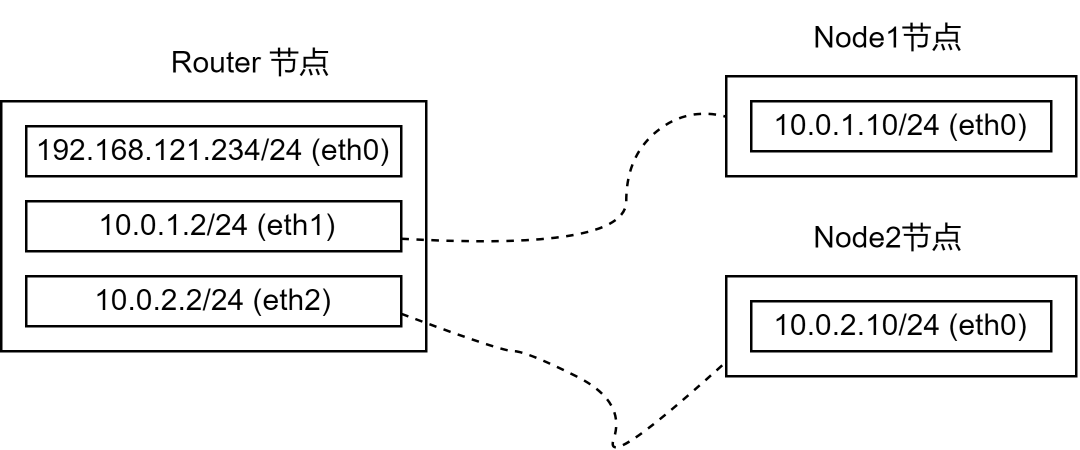
上图中,Router 节点包含多张网卡并将作为其他两台主机的网关,对应的系统配置如下:
net.ipv4.ip_forward = 1
net.ipv6.conf.all.disable_ipv6 = 1
net.ipv6.conf.default.disable_ipv6 = 1
net.ipv6.conf.lo.disable_ipv6 = 1
net.ipv6.conf.all.forwarding = 1
node1、node2 节点均只包含一张网卡,其默认路由均指向 router 节点(node1 指向 10.0.1.2,node2 指向 10.0.2.2)。
node1、node2 上将部署 Kubernetes 和 Cilium。
基于 Bird 部署容器网络
Cilium 为 PodCIDR 提供了 Encapsulation 和 Native-Routing 两种组网方式。
Native-Routing 方案中,Cilium 会将 PodCIDR 中的跨节点流量委托给 Linux 内核的路由子系统,此时 Linux 内核需要知道如何路由 PodCIDR 中的特定地址。
当用户的所有 Node 处于同一个 L2 网络时,我们可以设置参数 autoDirectNodeRoutes=true ,此时整个 PodCIDR 路由信息被插入到每个节点的内核路由表中,用户无需其他额外工作即部署完成。
上述测试环境中,Node1 和 Node2 分别处于 10.0.1.0/24 和 10.0.2.0/24 ,并不满足设置 autoDirectNodeRoutes 的条件,因此我们需要借助设置 BGP 服务完成 PodCIDR 组网。
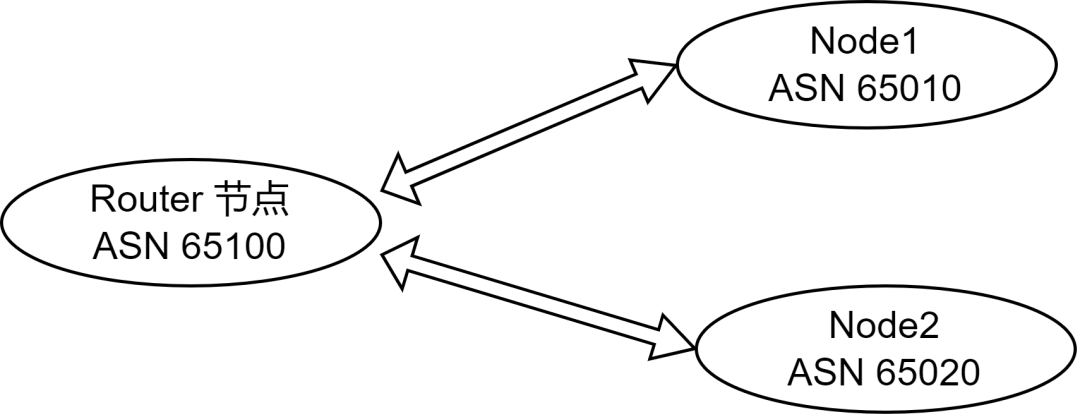
参考 Using BIRD to run BGP[5] 文档中的描述,并结合测试环境的网络拓扑,我们设定测试节点的 ASN 如下图:
1. FRR 设置
在 router 上部署软件路由器 FRR (参考:https://rpm.frrouting.org/), 如下:
FRRVER="frr-stable"
curl -O https://rpm.frrouting.org/repo/$FRRVER-repo-1-0.el7.noarch.rpm
sudo yum install ./$FRRVER*
sudo yum install frr frr-pythontools
修改 /etc/frr/daemons 文件,打开 bgpd 功能(设置配置文件中 bgpd=yes)。编辑 /etc/frr/frr.conf 文件,写入以下 BGP 相关的配置:
frr version 8.4.1
frr defaults traditional
hostname router                        # 主机名
log syslog informational
!
router bgp 65100                       # router 节点的本地 ASN
 bgp router-id 192.168.121.16          # router-id
 no bgp ebgp-requires-policy
 neighbor 10.0.1.10 remote-as 65010    # 配置 Node1 作为 router 的邻居,ASN 为 65010
 neighbor 10.0.2.10 remote-as 65020    # 配置 Node2 作为 router 的邻居,ASN 为 65020
exit
!
完成上述配置后,启动 frr 服务 systemctl restart frr !
2. 部署 Cilium
登录 Node1 或 Node2 部署 Cilium,配置如下:
k8sServiceHost: "10.0.1.10"
k8sServicePort: 6443
kubeProxyReplacement: strict
devices: eth1
ipam:
  operator:
    clusterPoolIPv4PodCIDR: "172.31.254.0/23"
    clusterPoolIPv4PodCIDRList: []
    clusterPoolIPv4MaskSize: 26
loadBalancer:
  mode: dsr
tunnel: disabled
autoDirectNodeRoutes: false
bpf:
  masquerade: true
ipv4NativeRoutingCIDR: "172.31.254.0/23"
socketLB:
  enabled: true
nodePort:
  enabled: true
externalIPs:
  enabled: true
hostPort:
  enabled: true
Cilium 容器就绪后,Kubernetes 集群中可以正常创建容器并分配容器IP,但是跨节点容器无法正常通信。
3. 部署 Bird
Cilium 官方文档中,给出了 Bird2 的配置示例。我们可以直接通过 yum -y install bird2 安装。
查看各个节点分配的 PodCIDR 网段,执行kubectl -n kube-system exec -it ds/cilium -- cilium node list:

参考以下配置 bird2 服务,配置文件 /etc/bird.conf
router id 10.0.1.10;
protocol device {
    scan time 10;           # Scan interfaces every 10 seconds
}
# Disable automatically generating direct routes to all network interfaces.
protocol direct {
    disabled;               # Disable by default
}
# Forbid synchronizing BIRD routing tables with the OS kernel.
protocol kernel {
    ipv4 {                # Connect protocol to IPv4 table by channel
        import none;      # Import to table, default is import all
        export none;      # Export to protocol. default is export none
    };
}
# Static IPv4 routes.
protocol static {
    ipv4;
    route 172.31.254.0/26 via "cilium_host";    # 将 PodCICR 通告到上游,PS:这里是 Node1 分配到的 PodCIDR
}
# BGP peers
protocol bgp uplink0 {
    description "BGP uplink 0";
    local 10.0.1.10 as 65010;                   # 设置当前节点的 ASN ,PS:这里示例的是 Node1
    neighbor 10.0.1.2 as 65100;                 # 设置节点的 Neighbor, 这里是 router 节点
    ipv4 {
        import filter {reject;};
        export filter {accept;};
    };
}
在 Node1、Node2 按照上述方式配置完成 Bird2 后启动服务。执行以下命令检查 BGP 连接是否正常:
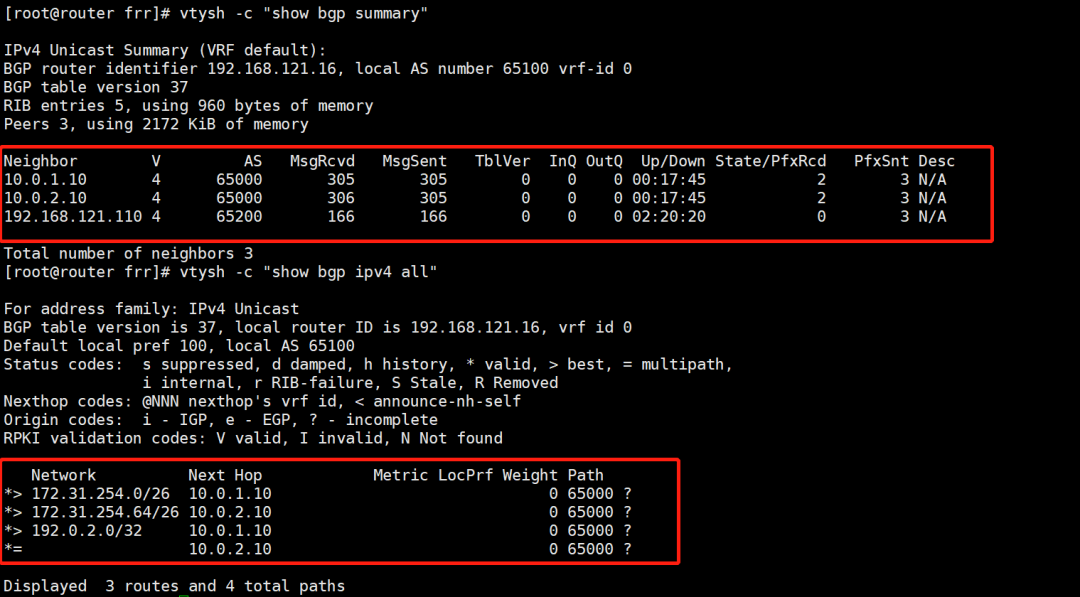
# 在 router 执行以下命令

# 查看 bgp peer 连接
vtysh -c "show bgp summary"
# 查看注册到 router 的路由信息
vtysh -c "show bgp ipv4 all"
完成上述流程后,使得 Node1 和 Node2 上的容器网络打通,并且任意以 router 节点作为默认网关的服务器都可以直连 PodIP。
查看 router 接地的路由信息如下:
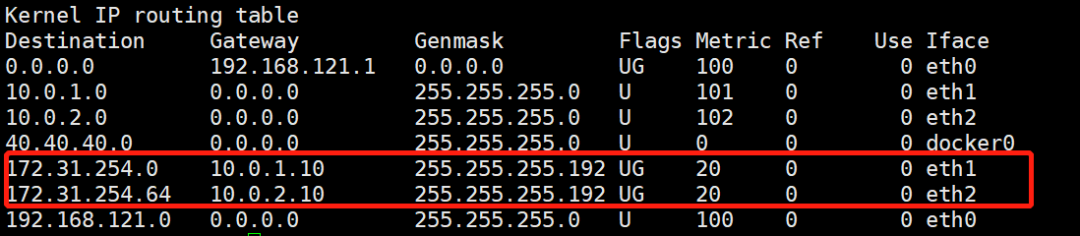
上图中,我们发现 router 节点被注入了 PodCIDR 。
本文测试环境的网络拓扑非常简单,实际上直接通过命令行直接在 router 节点上插入路由信息可以达到同样效果。在实际生产中,我们可以通过 BGP 动态发现简化配置流程。
内置 BGP
Cilium 1.10 之后的版本内置了 BGP Speaker 的功能,用户无需在节点上部署 Bird2 也可以向外广播节点的 PodCIDR 信息,并且 1.12 版本中 Cilium 参考 Metallb 实现支持基于 BGP + ECMP 的 LoadBalancer 功能。
参考文档[6]中的描述,启用内置的 BGP 能力需要额外创建以下 ConfigMap,Cilium-Agent 和 Cilium-Operator 启动时均会挂载该配置。
apiVersion: v1
kind: ConfigMap
metadata:
  name: bgp-config
  namespace: kube-system
data:
  config.yaml: |
    peers:
      - peer-address: 192.168.121.16
        peer-asn: 65100
        my-asn: 65000
    address-pools:
      - name: default
        protocol: bgp
        addresses:
          - 192.0.2.0/24
上述配置中,Cilium 将使用 192.168.121.16 连接 router 节点的 bgpd 服务(PS:BGP 建立连接是基于 TCP 的),并且 Node1 和 Node2 将使用相同的 ASN 65000。
address-pools 指定的是 LoadBalanacer 的 IP 地址池,当用户创建 LoadBalancer 类型的 Service 时,Cilium 将自动从该地址池中分配 ip 地址,并自动进行 BGP 宣告。
安装上述 Configmap 后,我们需要为 Cilium 为添加如下配置:
bgp:
  enabled: true
  announce:
    loadbalancerIP: true
    podCIDR: true
loadBalancer:
  mode: snat      # 此处使用 dsr 模式时,存在问题
创建 service 如下:
apiVersion: v1
kind: Service
metadata:
  name: whoami-lb
spec:
  type: LoadBalancer
  ports:
  - port: 80
    targetPort: 80
    protocol: TCP
    name: http
  selector:
    app: whoami
cilium 自动分配 192.0.2.0 作为 service 的 EXTERNAL-IP:

我们登录 router 节点通过 vtysh 查看 Cilium 是否 bgpd 服务建立了连接,并且查看其通告的路由信息如下:
需要注意,router 节点上我们需要添加 ECMP 的相关配置,并且依然静态指定 Node1 和 Node2 作为 neighbor 如下:
frr version 8.4.1
frr defaults traditional
hostname router
log syslog informational
!
router bgp 65100
 bgp bestpath as-path multipath-relax
 bgp bestpath bandwidth skip-missing
 bgp router-id 192.168.121.16
 no bgp ebgp-requires-policy
 neighbor 10.0.1.10 remote-as 65000
 neighbor 10.0.2.10 remote-as 65000
exit
!
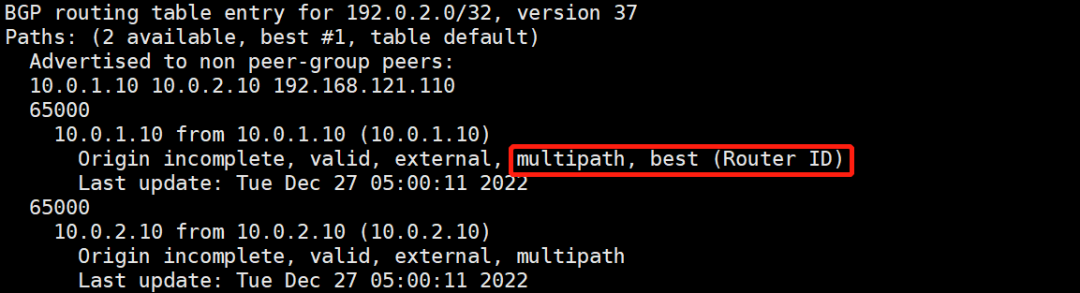
执行 vtysh -c "show bgp ipv4 unicast 192.0.2.0/32" 我们可以查看当前,FRR 执行 ECMP 时的路径选择:
Cilium BGP Control Plane
BGP Controller 控制器是 Cilium 高版本推出的针对内置 BGP Speaker 更加细粒度的控制功能,其功能是上述 ConfigMap 的扩展。
责任编辑:彭菁
-
动态BGP与静态BGP的区别?2025-06-24 4759
-
华为路由器BGP基础配置实验记录2024-01-06 3446
-
BGP硬核笔记分享2023-12-11 2192
-
动态BGP与静态BGP的区别2023-12-01 7863
-
如何配置Cilium和BGP协同工作呢?2023-08-15 6817
-
BGP知识点总结2023-04-10 2583
-
跟大家聊聊BGP与OSPF2023-01-30 5170
-
BGP路由优选规则的深入了解2022-11-14 6044
-
使用自动BGP在数据中心构建最佳ASN配置2022-04-30 1625
-
如何使用自动BGP在数据中心构建最佳 ASN 配置2021-07-28 3122
-
什么是BGP高防,BGP高防的优势是什么2019-12-28 1565
-
bgp路由协议的路由属性_BGP路由协议的优势2019-08-20 4350
-
测量BGP传递时间2019-07-22 839
-
BGP关键特征及设计可扩展的IBGP网络2009-09-03 589
全部0条评论

快来发表一下你的评论吧 !
