

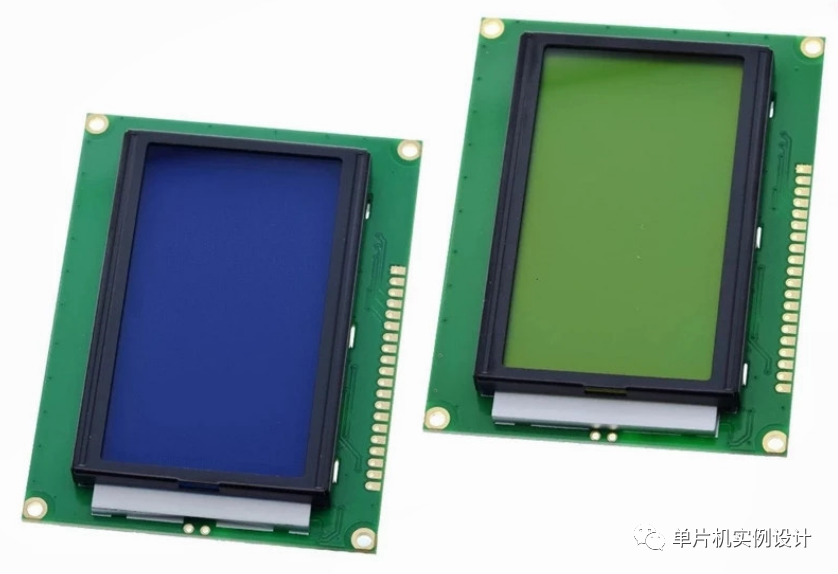
LCD12864液晶显示模块串行连接方式
描述
1.芯片简介
LCD12864液晶显示模块是 128×64点阵的汉字图形型液晶显示模块,可显示汉字及图形,内置 8192个中文汉字(16X16 点阵)(需带有字库的型号才能显示中文)、128 个字符(8X16 点阵)及 64X256 点阵显示 RAM(GDRAM)。可与 CPU 直接接口,提供两种界面来连接微处理机:8-位并行及串行两种连接方式。具有多种功能:光标显示、画面移位、睡眠模式等。
主要特点如下
- 逻辑工作电压(VDD):4.5~5.5V;
- 背光源电压 :4.5~5.5V;
- 工作温度(Ta):0~60℃(常温) / -20~75℃(宽温);
- 显示角度:6:00 钟直视;
- 与 MCU 接口:8位或3位串行模式;
2. LCD12864引脚定义

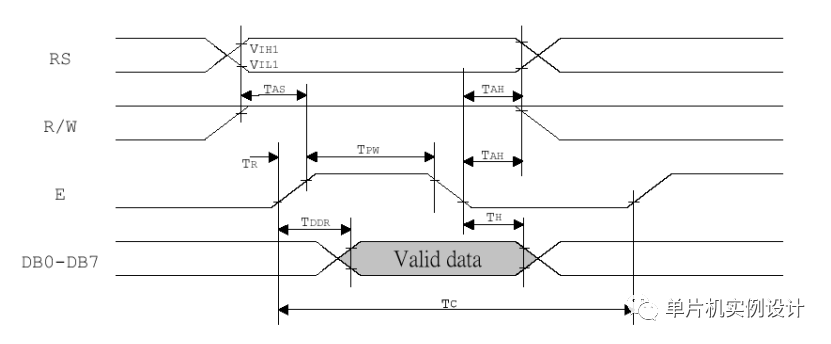
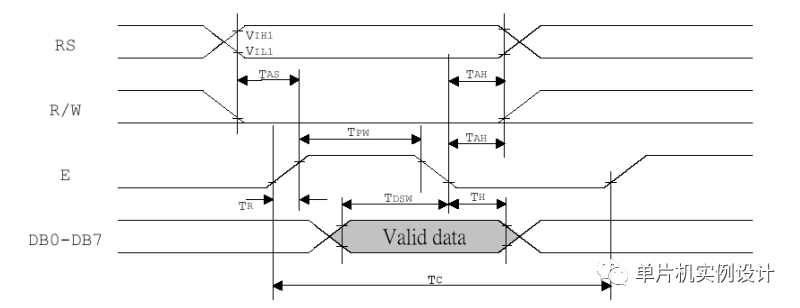
3.LCD12864并行控制
(1)读操作时序如图
(2)写操作时序如图
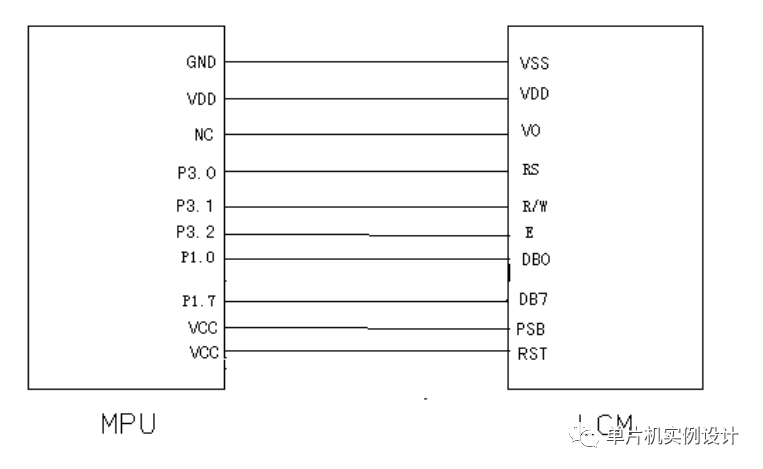
(3)与MCU连接原理图
并行模式,除电源外,需要将模块的CS、SCLK、SID、DB0-DB7引脚一一与单片机连接,PSB接VCC(接地为串行模式,接VCC为并行模式),RST接VCC(低电平复位);
(4)并行模式驱动程序
LCD12864.h
#ifndef __LCD12864_H
#define __LCD12864_H


//---包含头文件---//
#include< reg51.h >


//---重定义关键词---//
#ifndef uchar
#define uchar unsigned char
#endif


#ifndef uint
#define uint unsigned int
#endif
//---定义使用的IO口---//


#define LCD12864_DATAPORT P0    //数据IO口


sbit LCD12864_RS  =  P2^6;             //(数据命令)寄存器选择输入
sbit LCD12864_RW  =  P2^5;             //液晶读/写控制
sbit LCD12864_EN  =  P2^7;             //液晶使能控制
sbit LCD12864_PSB =  P3^2;             //串/并方式控制
sbit LCD12864_RST =  P3^4;         //复位端
//---声明全局函数---//
void LCD12864_Delay1ms(uint c);
uchar LCD12864_Busy(void);
void LCD12864_WriteCmd(uchar cmd);
void LCD12864_WriteData(uchar dat);
void LCD12864_Init();
void LCD12864_ClearScreen(void);
void LCD12864_SetWindow(uchar x, uchar y,uchar *word);


#endif
LCD12864.c
#include"lcd12864.h"
/*******************************************************************************
* 函 数 名         : LCD12864_Delay1ms
*******************************************************************************/
void LCD12864_Delay1ms(uint c)
{
    uchar a,b;
  for(; c >0; c--)
  {
      for(b=199; b >0; b--)
    {
          for(a=1; a >0; a--);
    }
  }
}


/*******************************************************************************
* 函 数 名         : LCD12864_Busy
* 函数功能       : 检测LCD是否忙
* 输    出         : 1或0(1表示不忙,0表示忙)
*******************************************************************************/
uchar LCD12864_Busy(void)
{
  uchar i = 0;
  LCD12864_RS = 0;     //选择命令
  LCD12864_RW = 1;  //选择读取
  LCD12864_EN = 1;
  LCD12864_Delay1ms(1);
  while((LCD12864_DATAPORT & 0x80) == 0x80)  //检测读取到的值
  {
    i++;
    if(i > 100)
    {
      LCD12864_EN = 0;
      return 0;     //超过等待时间返回0表示失败
    }
  }
  LCD12864_EN = 0;
  return 1;
}


/*******************************************************************************
* 函 数 名         : LCD12864_WriteCmd
* 函数功能       : 写命令
*******************************************************************************/
void LCD12864_WriteCmd(uchar cmd)
{
  uchar i;
  i = 0;
  while( LCD12864_Busy() == 0)
  {
    LCD12864_Delay1ms(1);
    i++;
    if( i >100)
    {
      return;     //超过等待退出
    }
  }
  LCD12864_RS = 0;     //选择命令
  LCD12864_RW = 0;     //选择写入
  LCD12864_EN = 0;     //初始化使能端
  LCD12864_DATAPORT = cmd;   //放置数据
  LCD12864_EN = 1;       //写时序
  LCD12864_Delay1ms(5);
  LCD12864_EN = 0;
}


/*******************************************************************************
* 函 数 名         : LCD12864_WriteData
* 函数功能       : 写数据
*******************************************************************************/
void LCD12864_WriteData(uchar dat)
{
  uchar i;
  i = 0;
  while( LCD12864_Busy() == 0)
  {
    LCD12864_Delay1ms(1);
    i++;
    if( i >100)
    {
      return;     //超过等待退出
    }
  }
  LCD12864_RS = 1;     //选择数据
  LCD12864_RW = 0;     //选择写入
  LCD12864_EN = 0;     //初始化使能端
  LCD12864_DATAPORT = dat;   //放置数据
  LCD12864_EN = 1;       //写时序
  LCD12864_Delay1ms(5);
  LCD12864_EN = 0;
}


/*******************************************************************************
* 函 数 名         : LCD12864_Init
*******************************************************************************/
void LCD12864_Init()
{
  LCD12864_PSB = 1;    //选择并行输入
  LCD12864_RST = 1;    //复位
  LCD12864_WriteCmd(0x30);  //选择基本指令操作
  LCD12864_WriteCmd(0x0c);  //显示开,关光标
  LCD12864_WriteCmd(0x01);  //清除LCD12864的显示内容
}


/*******************************************************************************
* 函 数 名         : LCD12864_SetWindow
*******************************************************************************/
void LCD12864_SetWindow(uchar x, uchar y,uchar *word)
{
  uchar pos;
  uchar i=y;
  if(x == 0)     // 第一行的地址是80H
  {
    x = 0x80;
  }
  else if(x == 1)  //第二行的地址是90H
  {
    x = 0x90;
  }
  else if(x == 2)  //第三行的地址是88H
  {
    x = 0x88;
  }
  else if(x == 3)  //第三行的地址是98H
  {
    x = 0x98;
  }
  pos = x + y;
  LCD12864_WriteCmd(pos);
  while(word[i]!='�')
  {
    if(i< 16)    //判断是否在本行的显示范围内
    {
      LCD12864_WriteData(word[i]);
      i++;
    }
   }
}
4.LCD12864串行控制
(1)串行控制时序如图:
第一字节:格式 11111ABC
- A 为数据传送方向控制:H 表示数据从 LCD 到 MCU,L 表示数据从 MCU 到 LCD;
- B 为数据类型选择:H 表示数据是显示数据,L 表示数据是控制指令;
- C 固定为 0;
第二字节:(串行)8 位数据的高 4 位—格式 DDDD0000;
第三字节:(串行)8 位数据的低 4 位—格式 0000DDDD;

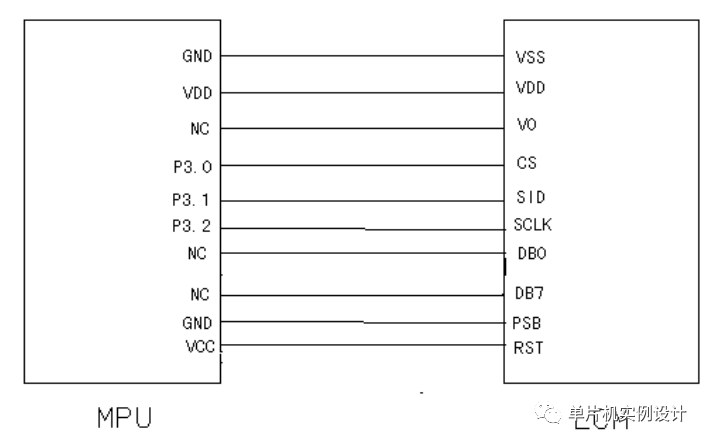
(2)与MCU连接原理图
串行模式,除电源外,只需要将模块的CS、SCLK、SID引脚与单片机连接,PSB接GND(接地为串行模式,接VCC为并行模式),RST接VCC(低电平复位);
(3)串行模式驱动程序
LCD12864.h
#ifndef   _LCD12864_h_
#define   _LCD12864_h_
/**************************************************************
               iO口宏定义区
***************************************************************/
sbit CS =P2^3;//RS
sbit SID=P2^4;//RW
sbit SCK=P2^5;//E


extern void WriteCommand( unsigned char Cbyte );   //写入指令函数
extern void WriteData( unsigned char Dbyte );  //写入指令数据
extern void LcmInit( void );   //显示屏初始化
extern void LcmClearTXT( void );  //显示屏清屏
extern void Location_xy_12864(unsigned char x,unsigned char y);
extern void PutStr(unsigned char row,unsigned char col,unsigned char *puts);
#endif
LCD12864.c
#include < reg52.h >
#include < intrins.h >
#include"LCD12864.h"
/**************************************************************


      //串行方式控制
/*******************************************************************
              常量声明区
********************************************************************/
unsigned char code AC_TABLE[]={                   //坐标编码
0x80,0x81,0x82,0x83,0x84,0x85,0x86,0x87,
0x90,0x91,0x92,0x93,0x94,0x95,0x96,0x97,
0x88,0x89,0x8a,0x8b,0x8c,0x8d,0x8e,0x8f,
0x98,0x99,0x9a,0x9b,0x9c,0x9d,0x9e,0x9f,
};
/****************************************************************
              发送一个字节
*****************************************************************/
void SendByte(unsigned char Dbyte)
{
  unsigned char i;
  for(i=0;i< 8;i++)
  {
    SCK = 0;
    Dbyte=Dbyte< < 1;
    SID = CY;
    SCK = 1;
    SCK = 0;
  }
}
/**********************************************************
              接收一个字节
***********************************************************/


unsigned char ReceiveByte(void)
{
  unsigned char i,temp1,temp2;
  temp1=temp2=0;
  for(i=0;i< 8;i++)
  {
    temp1=temp1< < 1;
    SCK = 0;
    SCK = 1;
    SCK = 0;
    if(SID) temp1++;
  }
  for(i=0;i< 8;i++)
  {
    temp2=temp2< < 1;
    SCK = 0;
    SCK = 1;
    SCK = 0;
    if(SID) temp2++;
  }
  return ((0xf0&temp1)+(0x0f&temp2));
}
/****************************************************************
                      检查忙状态
******************************************************************/
void CheckBusy( void )
{
  do SendByte(0xfc);     //11111,RW(1),RS(0),0
  while(0x80&ReceiveByte());
}


/******************************************************************
           写一个字节的指令
*******************************************************************/
void WriteCommand( unsigned char Cbyte )
{
  CS = 1;
  CheckBusy();
  SendByte(0xf8);          //11111,RW(0),RS(0),0
  SendByte(0xf0&Cbyte);
  SendByte(0xf0&Cbyte< < 4);
  CS = 0;
}
/*************************************************************
                 写一个字节的数据
**************************************************************/
void WriteData( unsigned char Dbyte )
{
  CS = 1;
  CheckBusy();
  SendByte(0xfa);          //11111,RW(0),RS(1),0
  SendByte(0xf0&Dbyte);
  SendByte(0xf0&Dbyte< < 4);
  CS = 0;
}


/******************************************************************
                         lcd初始化函数
*******************************************************************/
void LcmInit( void )
{
     WriteCommand(0x30);
     WriteCommand(0x03);
     WriteCommand(0x0c);
     WriteCommand(0x01);
     WriteCommand(0x06);
}


/*******************************************************************************************************
                                 设定光标函数
********************************************************************************************************/
void Location_xy_12864(unsigned char x,unsigned char y)
{
  switch(x)
  {
    case 0:
      x=0x80;break;
    case 1:
      x=0x90;break;
    case 2:
      x=0x88;break;
    case 3:
      x=0x98;break;
    default:
      x=0x80;
  }
  y=y&0x07;
  WriteCommand(0x30);
  WriteCommand(y+x);
  WriteCommand(y+x);


}
/***********************************************************************************
                  清除文本
************************************************************************************/
void LcmClearTXT( void )
{
  unsigned char i;
  WriteCommand(0x30);
  WriteCommand(0x80);
  for(i=0;i< 64;i++)
  WriteData(0x20);
  Location_xy_12864(0,0);
}
/****************************************************************************************
                      显示字符串
*****************************************************************************************/
void PutStr(unsigned char row,unsigned char col,unsigned char *puts)
{
  WriteCommand(0x30);
  WriteCommand(AC_TABLE[8*row+col]);
  while(*puts != '�')
  {
    if(col==8)
    {
      col=0;
      row++;
    }
    if(row==4) row=0;
    WriteCommand(AC_TABLE[8*row+col]);
    WriteData(*puts);
    puts++;
    if(*puts != '�')
    {
      WriteData(*puts);
      puts++;
      col++;
    }
  }
}
声明:本文内容及配图由入驻作者撰写或者入驻合作网站授权转载。文章观点仅代表作者本人,不代表电子发烧友网立场。文章及其配图仅供工程师学习之用,如有内容侵权或者其他违规问题,请联系本站处理。
举报投诉
评论(0)
发评论
-
 yuanyonghua
2024-01-01
0 回复 举报SID=CY,是啥意思 收起回复
yuanyonghua
2024-01-01
0 回复 举报SID=CY,是啥意思 收起回复
- 相关推荐
- 热点推荐
- 接口
- 液晶显示模块
- 串行连接
- LCD12864液晶
-
LCD12864点阵图形液晶显示模块中文资料2023-11-17 1023
-
LCD12864的相关资料分享2022-02-15 1644
-
LCD12864显示屏怎么使用2022-02-07 1096
-
LCD12864的液晶显示程序免费下载2020-06-24 1897
-
dfrobotSPI LCD12864 Module显示模块简介2019-12-15 4937
-
使用Proteus仿真LCD12864液晶显示动画的程序免费下载2019-09-11 2564
-
使用LCD12864液晶显示出十进制数据的C语言程序免费下载2019-07-31 1649
-
TMS320F2812和LCD12864液晶显示模块的硬件和程序2019-04-16 2294
-
lcd12864液晶显示程序2017-11-06 13093
-
LCD12864液晶显示的设计2016-06-21 1326
-
LCD12864显示动画说明书2015-12-30 928
-
LCD12864液晶使用分析2011-08-16 2051
-
LCD12864液晶显示模块(中文资料)2011-02-17 12644
全部0条评论

快来发表一下你的评论吧 !
