

山石防火墙双机热备模式配置案例
描述
1. 需求分析
配置HA Active- Active[1]工作模式,以提高网络可靠性,保证业务不中断。
本案例将分别演示WebUI和CLI两种配置方式。
2. 案例说明
2.1 环境说明
在配置之前,确认搭建成HA典型组网模式的两台Hillstone设备采用完全相同的硬件平台、固件版本和安装相同的许可证,并且两台设备使用同样的接口连接到网络。
2.2 软硬件信息
| 硬件平台 | 软件版本 |
| SG-6000-E1100 | SG6000-M-3-5.5R8P5-v6.bin |
| SG-6000-E1100 | SG6000-M-3-5.5R8P5-v6.bin |
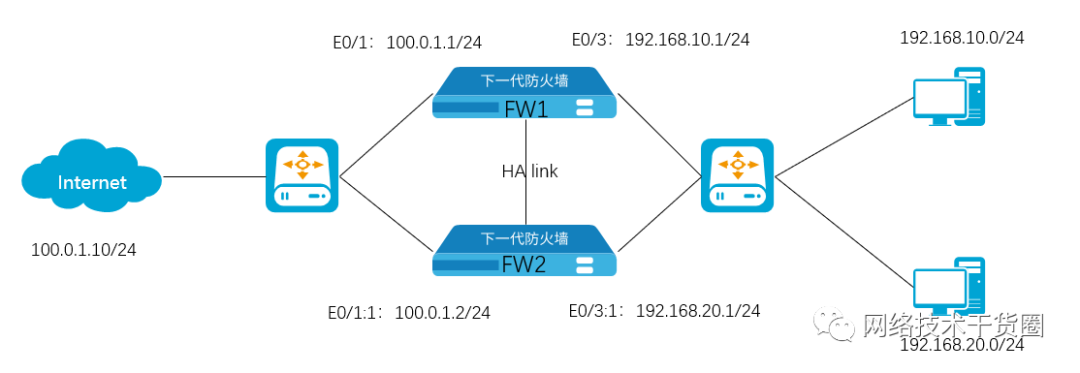
2.3 组网拓扑
3. 功能配置
3.1 WebUI配置步骤
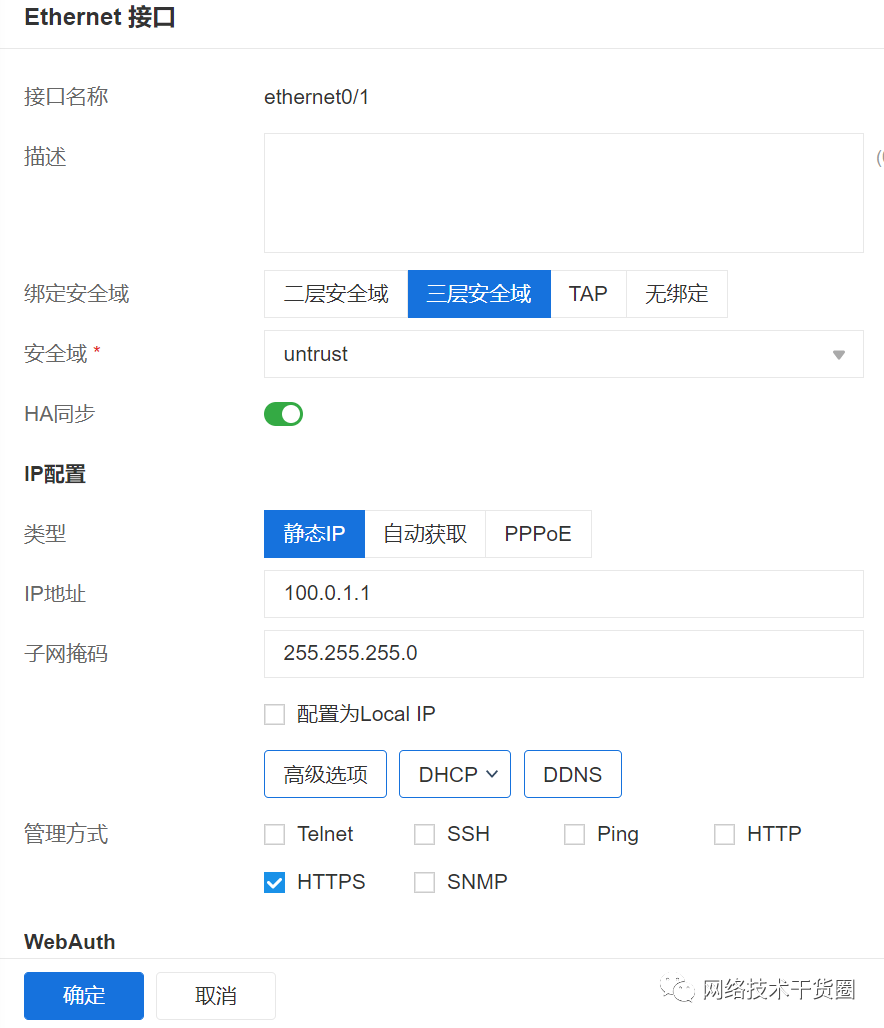
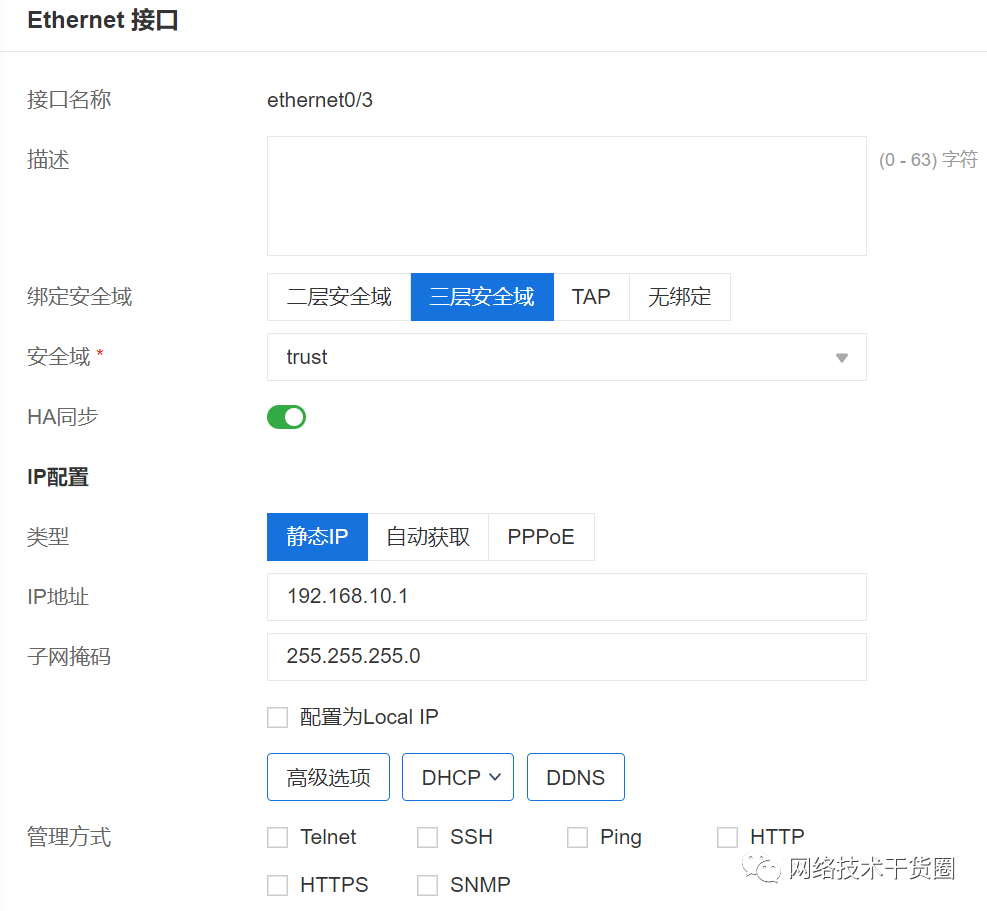
FW1接口配置,ethernet0/1为外网出接口,ethernet0/3为内网口。
配置安全策略。

配置检测对象,建议同时监测内网口和外网口(本案例只监测外网口)。


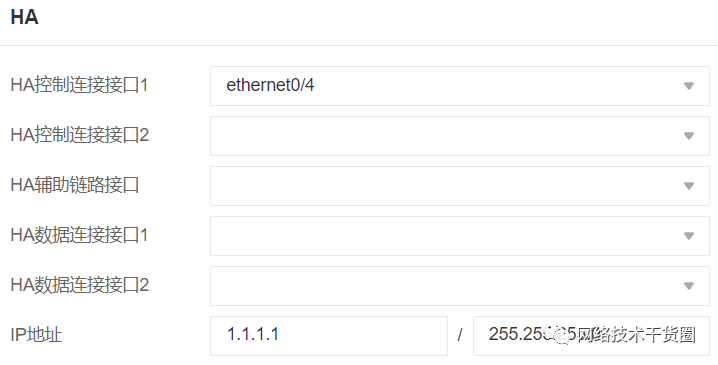
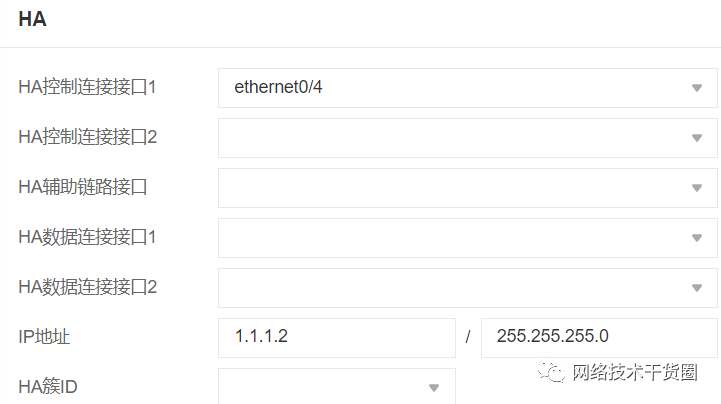
配置FW1,group0为主,group1为备(配置 ha link 和 HA group并调用检测对象)。(系统->HA)


配置FW2,group0为备,group1为主。


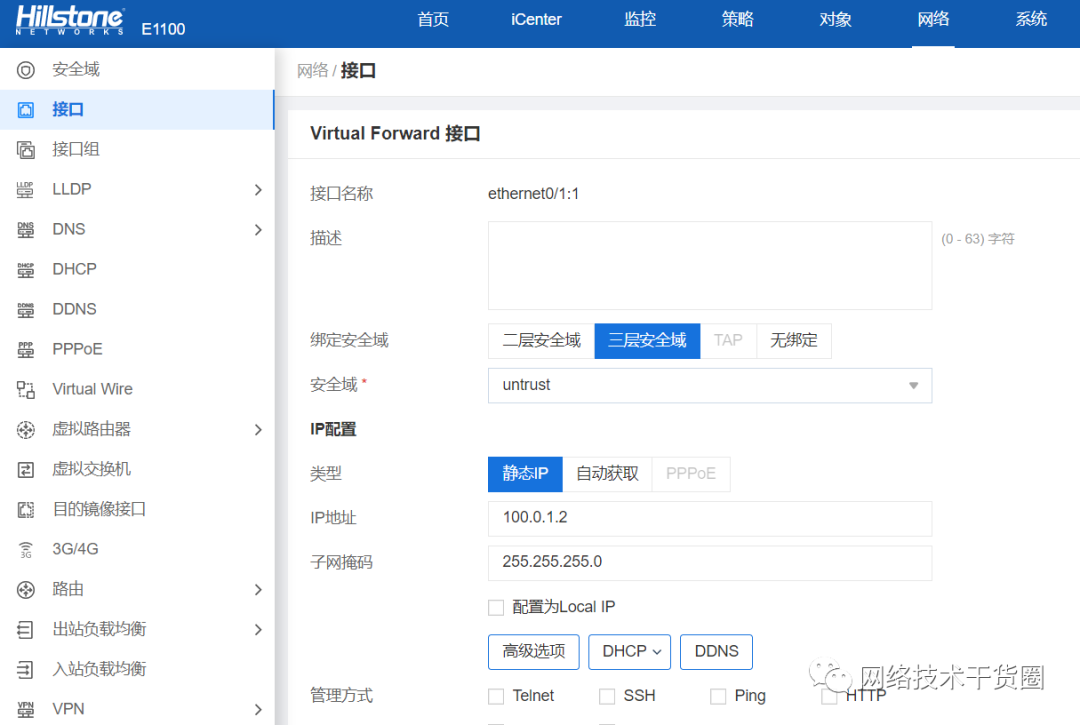
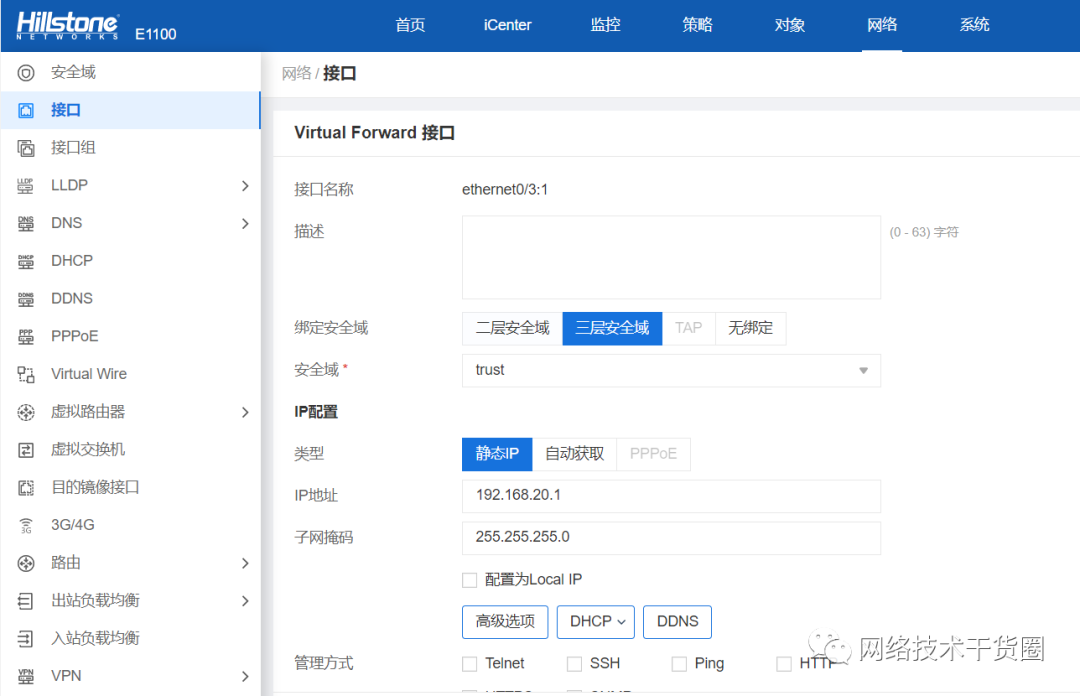
配置FW1上为group 1所生成的VFI接口。
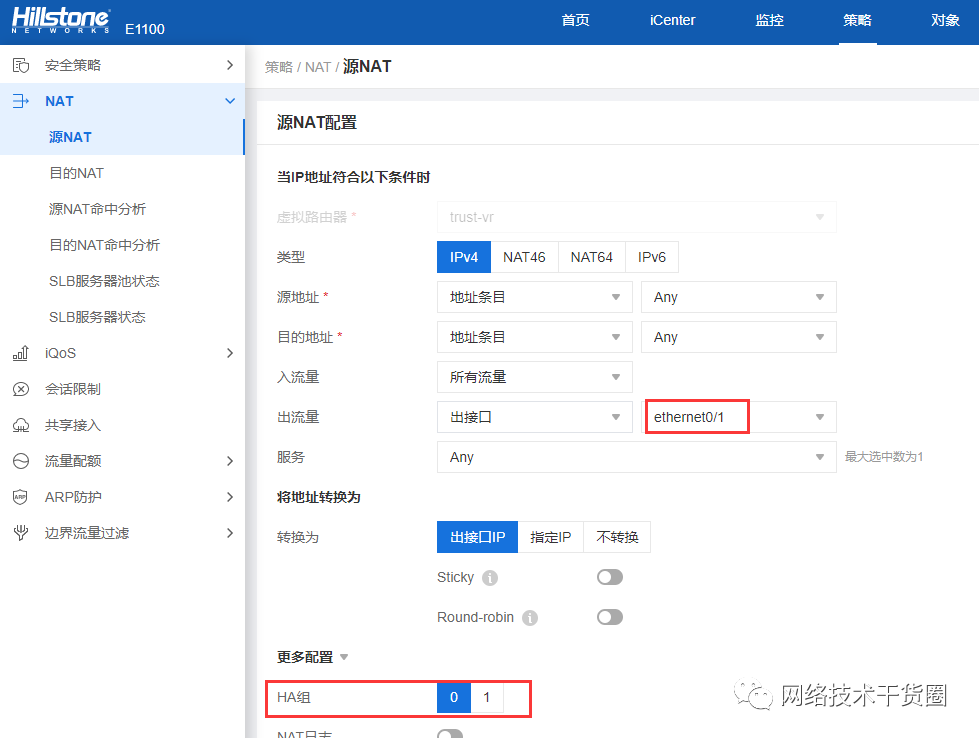
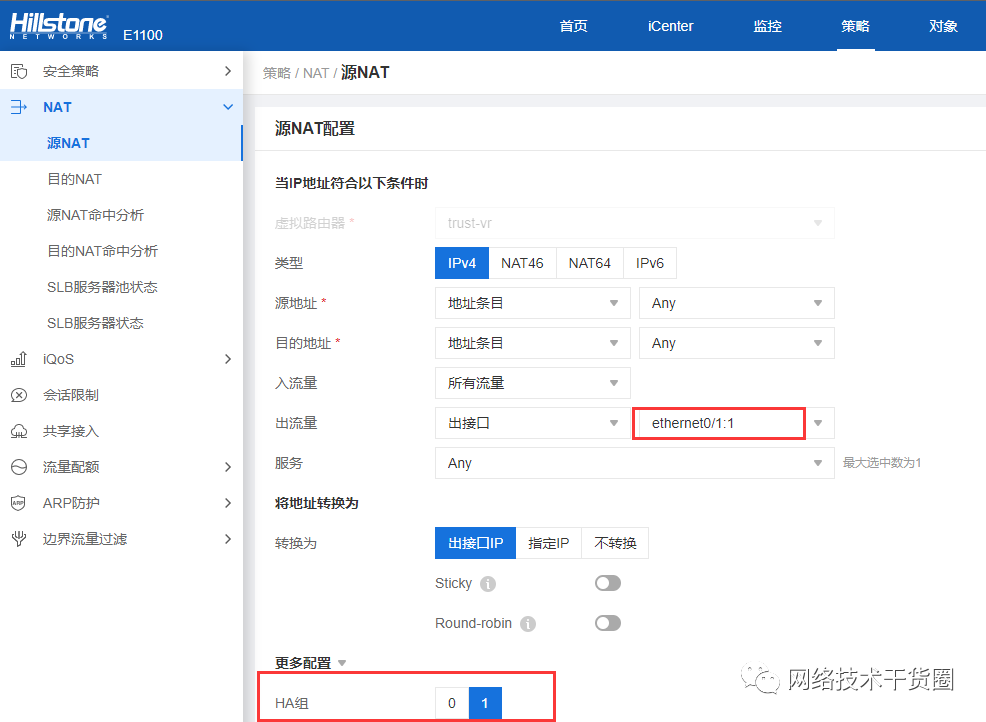
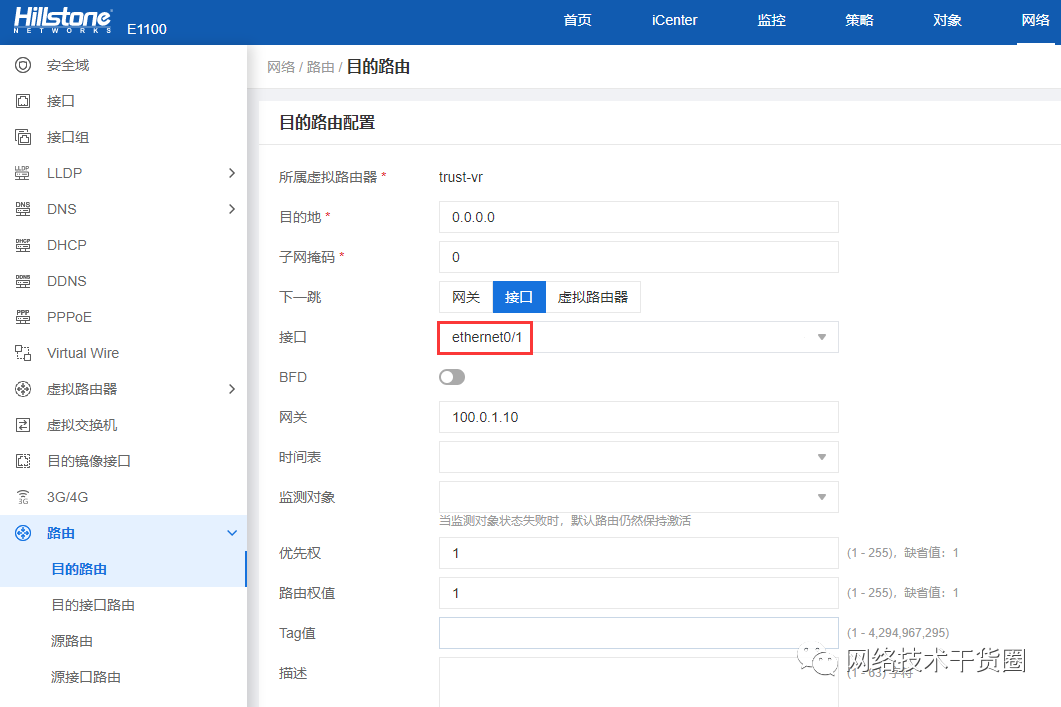
配置FW1的SNAT和目的路由。
FW1,FW2分别配置HA簇,开启HA功能。

配置完成后,点击“系统 > 系统信息”,两台设备的HA状态分别如下显示:
FW1:
FW2:

3.2 CLI配置步骤
• 配置FW1 ,group 0 为 主, group 1 为备。
FW1(config)# interface ethernet0/1
FW1 (config-if-eth0/2)# zone untrust
FW1(config-if-eth0/2)# ip address 100.0.1.1/24
FW1(config-if-eth0/2)# exit
FW1(config)# interface ethernet0/3
FW1(config-if-eth0/0)# zone trust
FW1(config-if-eth0/0)# ip address 192.168.10.1/24
FW1(config-if-eth0/0)# exit
FW1(config)# policy-global
FW1(config-policy)# rule from any to any service any permit
FW1(config-policy)# exit
FW1(config)#
配置 track
FW1(config)# track trackobj1
FW1(config-trackip)# interface ethernet0/3 weight 255
FW1(config-trackip)# interface ethernet0/1 weight 255
FW1(config-trackip)# exit
FW1(config)#
FW1(config)# track trackobj2
FW1(config-trackip)# interface ethernet0/3 weight 255
FW1(config-trackip)# interface ethernet0/1 weight 255
FW1(config-trackip)# exit
FW1(config)#
配置 ha link 和 HA group
FW1(config)# ha link interface ethernet0/4
FW1(config)# ha link ip 1.1.1.1/24
FW1(config)# ha group 0
FW1(config-ha-group)# priority 50
FW1(config-ha-group)# preempt 5
FW1(config-ha-group)# monitor track trackobj1
FW1(config-ha-group)# exit
FW1(config)# ha group 1
FW1(config-ha-group)# priority 100
FW1(config-ha-group)# monitor track trackobj2
FW1(config-ha-group)# exit
• 配置 FW2 , group 0为 备 ,group 1 为 主 。
FW1(config)# ha link interface ethernet0/4
FW1(config)# ha link ip 1.1.1.2/24
FW2(config)# ha group 0
FW2(config-ha-group)# priority 100
FW2(config-ha-group)# exit
FW2(config)# ha group 1
FW2(config-ha-group)# priority 50
FW2(config-ha-group)# exit
• 配置 FW1 上为 group 1 所生成的 VFI 接口。
VFI(Virtual Forward Interface)接口就是专为 HA group 1 所用
FW1(config)# interface ethernet0/3:1
FW1(config-if-eth0/1:1)# zone trust
FW1(config-if-eth0/1:1)# ip address 192.168.20.1/24
FW1(config-if-eth0/1:1)# exit
FW1(config)# interface ethernet0/1:1
FW1(config-if-eth0/3:1)# zone untrust
FW1(config-if-eth0/3:1)# ip address 100.0.1.2/24
FW1(config-if-eth0/3:1)# exit
FW1(config)# ip vrouter trust-vr
FW1(config-vrouter)# snatrule from any to any eif ethernet0/1 trans-to eif-ip mode dynamicport
FW1(config-vrouter)# snatrule from any to any eif ethernet0/1:1 trans-to eif-ip mode dynamicport group 1
FW1(config-vrouter)# ip route 0.0.0.0/0 ethernet0/1 100.0.1.10
FW1(config-vrouter)# ip route 0.0.0.0/0 ethernet0/1:1 100.0.1.10
FW1(config-vrouter)#exit
• 配置 HA 簇开启HA 功能,等待配置同步。
FW1(config)# ha cluster 1
FW2(config)# ha cluster 1
• 查看HA协商结果。
FW1# show ha group 0
FW1# show ha group 1
FW2# show ha group 0
FW2# show ha group 1
审核编辑:汤梓红
-
发现 STM32 防火墙的安全配置2018-07-27 0
-
NAT在防火墙交换模式和路由模式上的问题2021-10-18 0
-
防火墙技术2009-06-16 774
-
防火墙的配置2008-09-24 2218
-
防火墙的配置--过滤规则示例2008-12-07 9333
-
谈防火墙及防火墙的渗透技术2009-08-01 1090
-
防火墙的控制端口2010-01-08 1120
-
防火墙管理2010-01-08 1369
-
防火墙的分类2010-01-08 6913
-
如何配置Cisco PIX防火墙2010-01-13 595
-
究竟什么是防火墙?2010-02-24 791
-
防火墙,防火墙的作用有哪些?2010-04-03 8346
-
什么是防火墙?防火墙如何工作?2020-09-30 5476
-
防火墙在云计算安全方案中的应用方案2022-11-02 1579
-
防火墙双机热备命令行配置方案2024-01-02 1186
全部0条评论

快来发表一下你的评论吧 !
