

基于嵌入式STM32的智能手表设计实现
可穿戴设备
描述
一、前言
本文的OLED多级菜单UI为一个综合性的STM32小项目,使用多传感器与OLED显示屏实现智能终端的效果。项目中的多级菜单UI使用了较为常见的结构体索引法去实现功能与功能之间的来回切换,搭配DHT11,RTC,LED,KEY等器件实现高度智能化一体化操作。
后期自己打板设计结构,可以衍生为智能手表等小玩意。目前,项目属于裸机状态(CPU占用率100%),后期可能会加上RTOS系统。
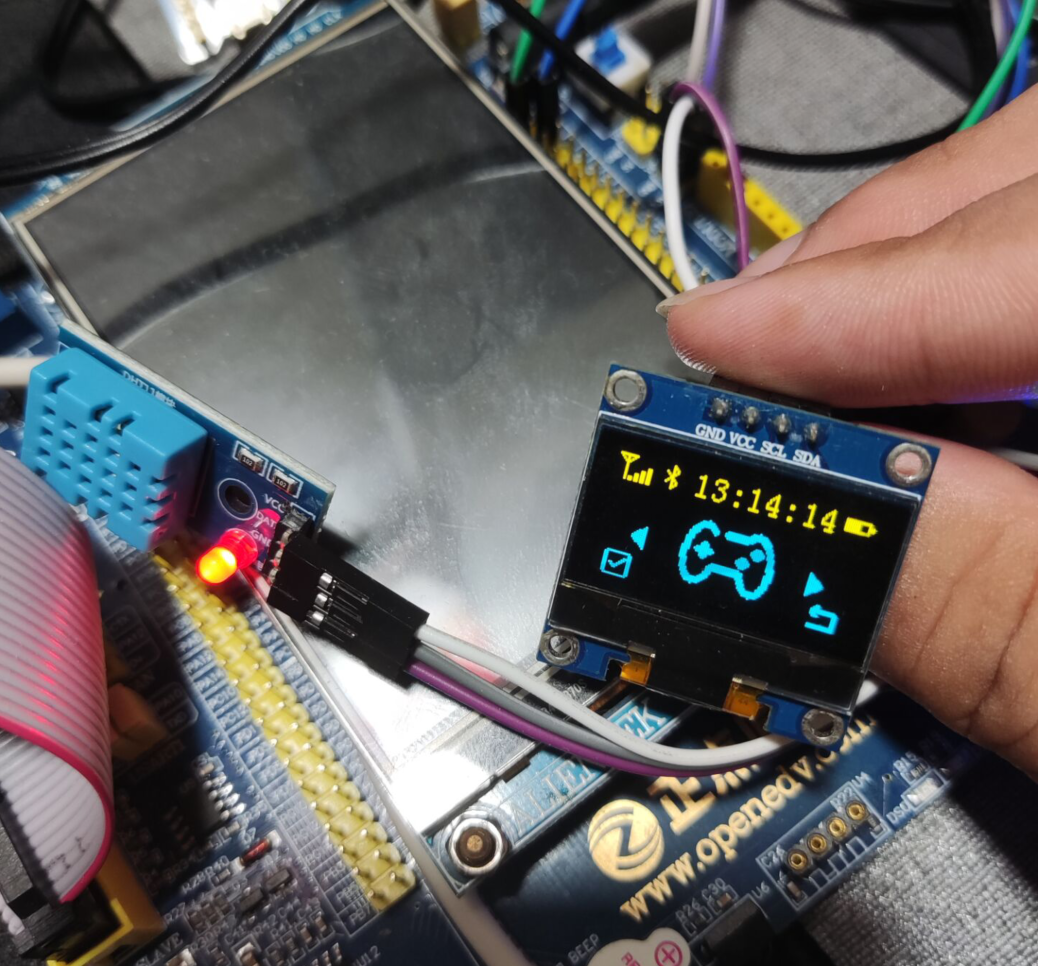
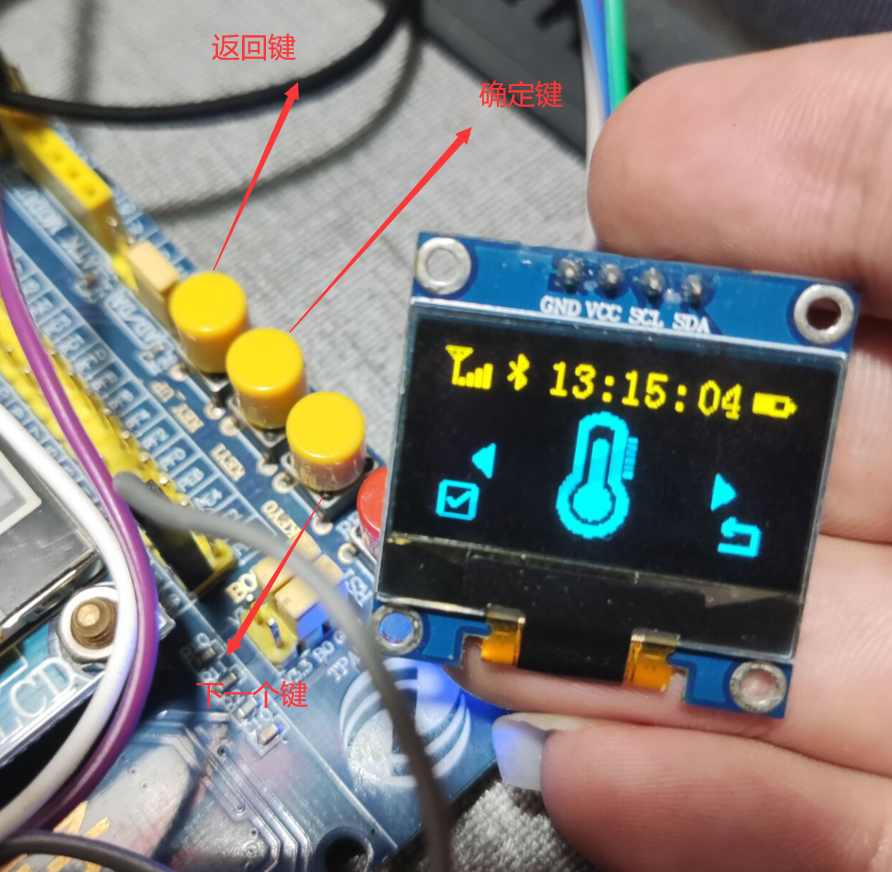
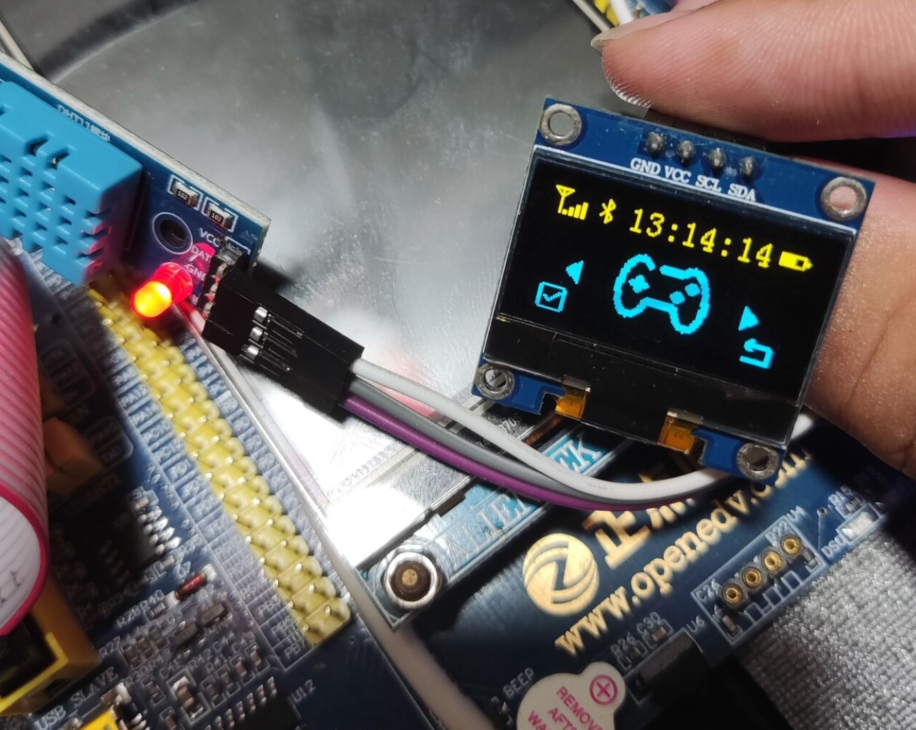
二、硬件实物图
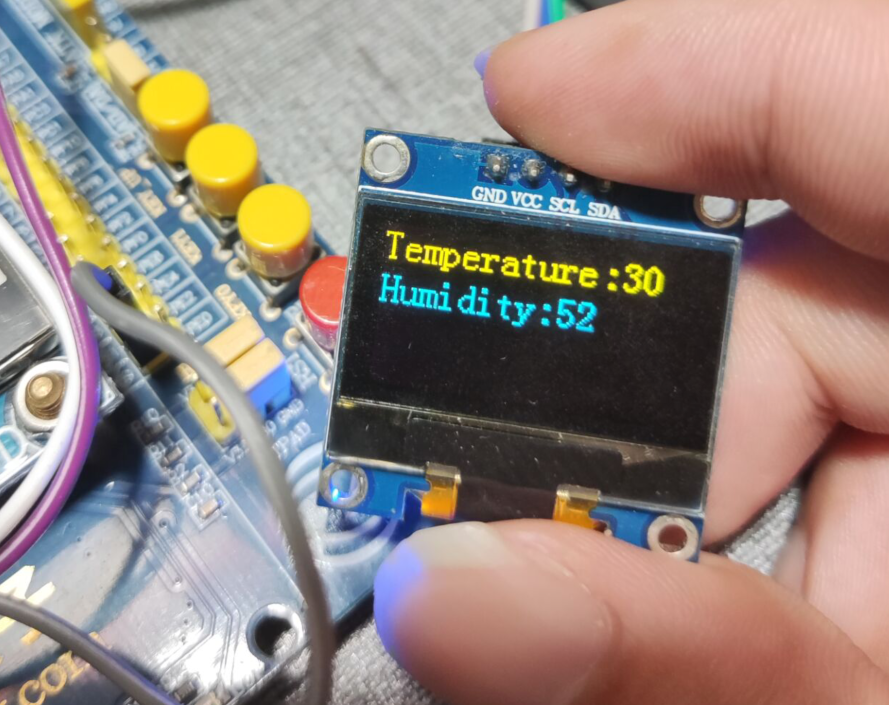
温度计:
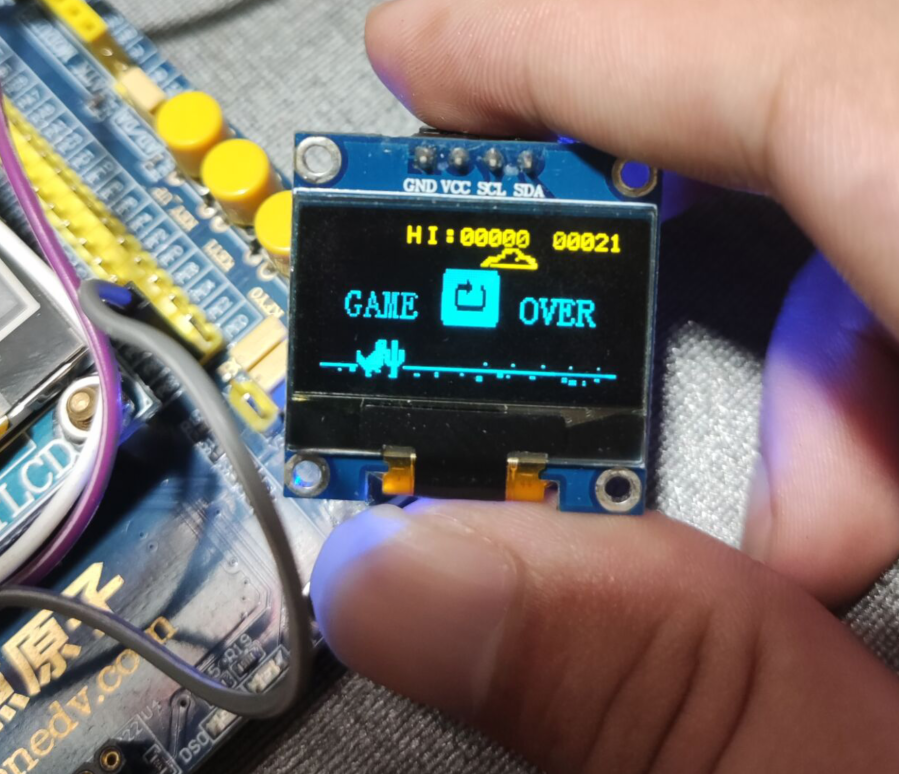
游戏机:
三、硬件引脚图
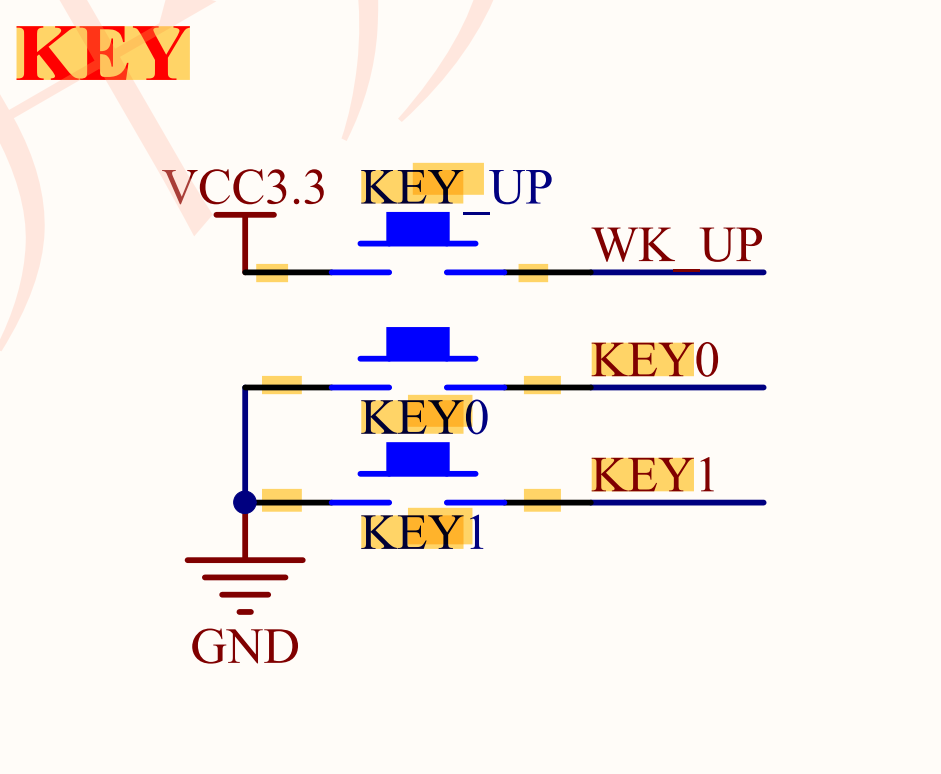
OLED模块:

VCC --> 3.3V

GND --> GND

SCL --> PB10

SDA --> PB11

DHT11模块:

DATA --> PB9

VCC --> 3.3V

GND --> GND

KEY模块(这部分笔者直接使用了正点原子精英板上的):

KEY0 --> PE4

KEY1 --> PE3

KEY_UP --> PA0
四、多级菜单
随着工业化和自动化的发展,如今基本上所有项目都离不开显示终端。而多级菜单更是终端显示项目中必不可少的组成因素,其实 TFT-LCD 屏幕上可以借鉴移植很多优秀的开源多级菜单(GUI,比如:LVGL),而0.96寸的OLED屏幕上通常需要自己去适配和编程多级菜单。
网上的普遍采用的多级菜单的方案是基于索引或者结构树,其中,索引法居多。索引法的优点:可阅读性好,拓展性也不错,查找的性能差不多是最优,就是有点占用内存空间。
4.1 索引法多级菜单实现
网上关于索引法实现多级菜单功能有很多基础教程,笔者就按照本项目中的具体实现代码过程给大家讲解一下索引法实现多级菜单。特别说明:本项目直接使用了正点原子的精英板作为核心板,所以读者朋友复现代码还是很简单的。
首先,基于索引法实现多级菜单的首要条件是先确定项目中将使用到几个功能按键(比如:向前,向后,确定,退出等等)本项目中,笔者使用到了3个按键:下一个(next),确定(enter),退出(back)。所以,接下首先定义一个结构体,结构体中一共有5个变量(3+2),分别为:当前索引序号(current),向下一个(next),确定(enter),退出(back),当前执行函数(void)。其中,标红的为需要设计的按键(笔者这里有3个),标绿的则为固定的索引号与该索引下需要执行的函数。
typedef struct
{
    u8 current;     //当前状态索引号
    u8 next;   //向下一个
    u8 enter;      //确定
    6u8 back;   //退出
    void (*current_operation)(void); //当前状态应该执行的操作
} Menu_table;
接下来就是定义一个数组去决定整个项目菜单的逻辑顺序(利用索引号)
Menu_table table[30]=
{
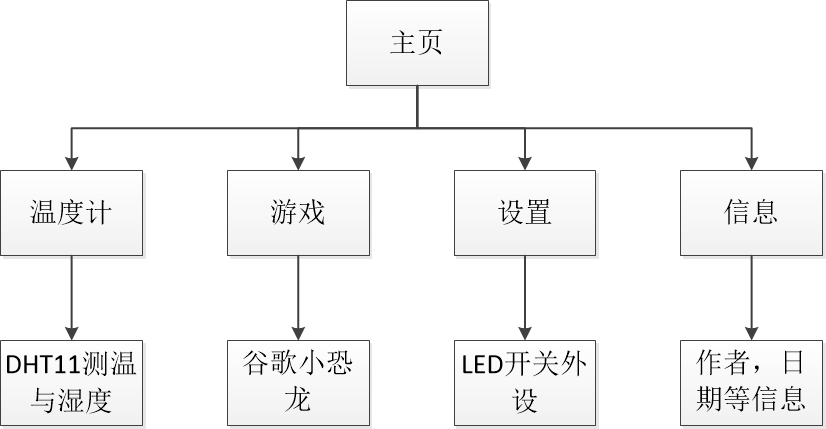
{0,0,1,0,(*home)}, //一级界面(主页面) 索引,向下一个,确定,退出
{1,2,5,0,(*Temperature)}, //二级界面 温湿度
{2,3,6,0,(*Palygame)}, //二级界面 游戏
{3,4,7,0,(*Setting)}, //二级界面 设置
{4,1,8,0,(*Info)}, //二级界面 信息
{5,5,5,1,(*TestTemperature)}, //三级界面:DHT11测量温湿度
{6,6,6,2,(*ControlGame)}, //三级界面:谷歌小恐龙Dinogame
{7,7,9,3,(*Set)}, //三级界面:设置普通外设状态 LED
{8,8,8,4,(*Information)}, //三级界面:作者和相关项目信息
{9,9,7,3,(*LED)}, //LED控制
};
这里解释一下这个数组中各元素的意义,由于我们在前面先定义了Menu_table结构体,结构体成员变量分别与数组中元素对应。比如:{0,0,1,0,(*home)},代表了索引号为0,按向下键(next)转入索引号为0,按确定键(enter)转入索引号为1,按退出键(back)转入索引号为0,索引号为0时执行home函数。
在举一个例子帮助大家理解一下,比如,我们当前程序处在索引号为2(游戏界面),就会执行Playgame函数。此时,如果按下next按键,程序当前索引号就会变为3,并且执行索引号为3时候的Setting函数。如果按下enter按键,程序当前索引号就会变为6,并且执行索引号为6时候的ControlGame函数。如果按下back按键,程序当前索引号就会变为0,并且执行索引号为0时候的home函数。
再接下就是按键处理函数:
uint8_t  func_index = 0; //主程序此时所在程序的索引值

void  Menu_key_set(void)
{
  if((KEY_Scan(1) == 1) && (func_index != 6))        //屏蔽掉索引6下的情况,适配游戏
  {
    func_index=table[func_index].next; //按键next按下后的索引号
    OLED_Clear();
  }

  if((KEY_Scan(1) == 2) && (func_index != 6))
  {
    func_index=table[func_index].enter; //按键enter按下后的索引号
    OLED_Clear();
  }

 if(KEY_Scan(1) == 3)
  {
    func_index=table[func_index].back; //按键back按下后的索引号
    OLED_Clear();
  }

  current_operation_index=table[func_index].current_operation; //执行当前索引号所对应的功能函数
  (*current_operation_index)();//执行当前操作函数
}


//按键函数
u8 KEY_Scan(u8 mode)
{
 static u8 key_up=1;
 if(mode)key_up=1;
 if(key_up&&(KEY0==0||KEY1==0||WK_UP==1))
 {
  HAL_Delay(100);  //消抖
  key_up=0;
  if(KEY0==0)return 1;
  else if(KEY1==0)return 2;
  else if(WK_UP==1)return 3;
 }else if(KEY0==1&&KEY1==1&&WK_UP==0)key_up=1;
 return 0;
}
说明2点:
(1)由于是目前本项目是裸机状态下运行的,所以CPU占用率默认是100%的,所以这里使用按键支持连按时,对于菜单的切换更好些。
(2)可能部分索引号下的执行函数,需要使用到已经定义的3个按键(比如,本项目中的DInogame中)。所以,可以在需要差别化的索引号下去屏蔽原先的按键功能。如下:
  if((KEY_Scan(1) == 1) && (func_index != 6))        //屏蔽掉索引6下的情况,适配游戏
  {
    func_index=table[func_index].next; //按键next按下后的索引号
    OLED_Clear();
  }

  if((KEY_Scan(1) == 2) && (func_index != 6))        //屏蔽掉索引6下的情况,适配游戏
  {
    func_index=table[func_index].enter; //按键enter按下后的索引号
    OLED_Clear();
  }
(3)笔者这里是使用全屏刷新去切换功能界面,同时,没有启用高级算法去加速显示,所以可能在切换界面的时候效果一般。读者朋友可以试试根据自己的UI情况使用局部刷新,这样可能项目会更加丝滑一点。
本项目中的菜单索引图:
4.2 内部功能实现(简化智能手表)
OLED就是正常的驱动与显示,有能力的读者朋友可以使用高级算法去加速OLED屏幕的刷新率,可以使自己的多级菜单切换起来更丝滑。
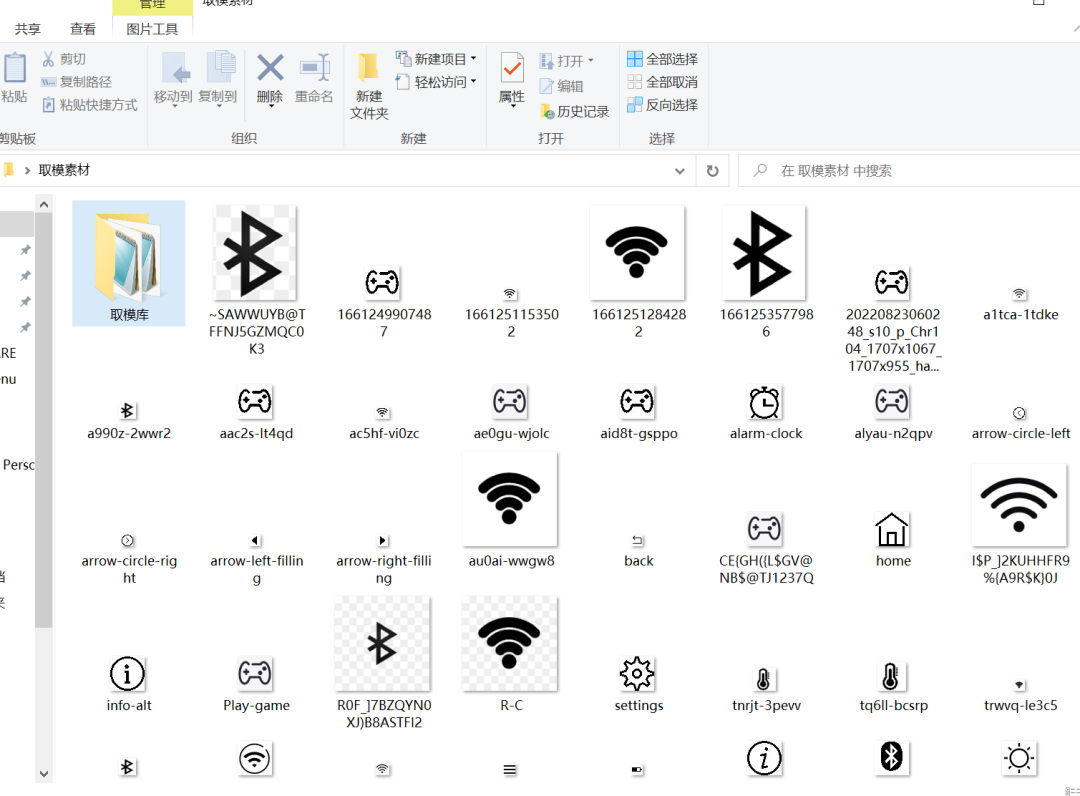
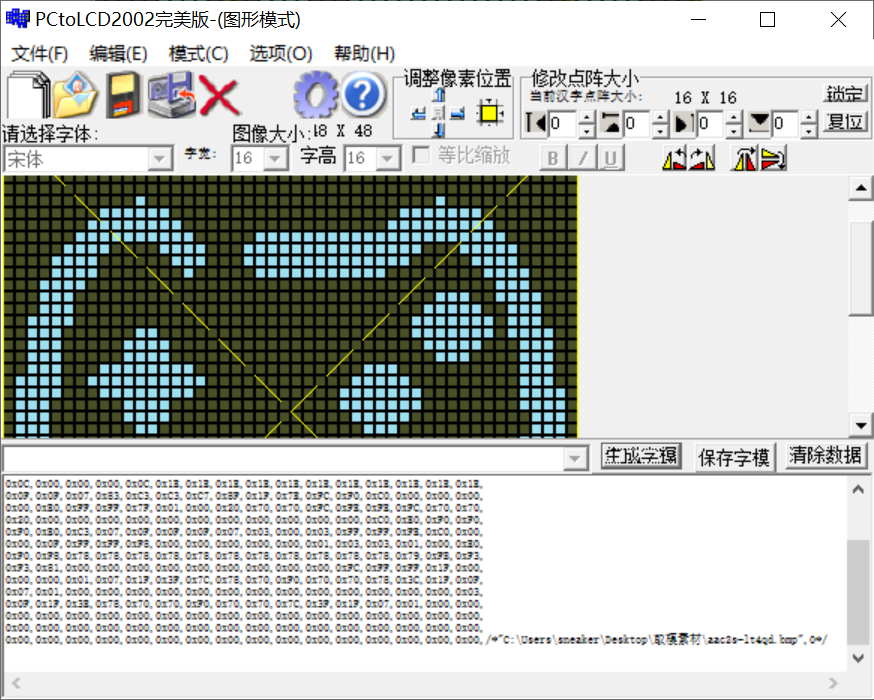
唯一需要注意的点就是需要去制作菜单里面的UI图标(注意图片大小是否合适):
如果是黑白图片的话,可以直接使用PCtoLCD2002完美版进行取模:
4.3 KEY按键
KEY按键注意消抖(建议裸机情况下支持连续按动),同时注意自己实际硬件情况去进行编程(电阻是否存在上拉或者下拉)。
4.4 DinoGame实现
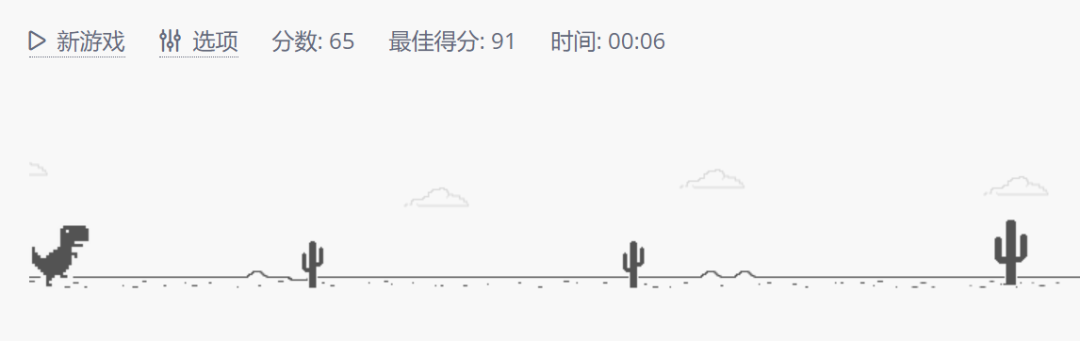
谷歌公司最近比较流行的小游戏,笔者之前有文章进行了STM32的成功复刻。博客地址: 谷歌小恐龙在线 — 免费玩谷歌小恐龙 (dino.zone)
4.5 LED控制和DHT11模块
LED和DHT11模块其实都属于外设控制,这里读者朋友可以根据自己的实际情况去取舍。需要注意的是尽可能适配一下自己多级菜单(外设控制也需要注意一下按键安排,可以参考笔者项目的设计)。
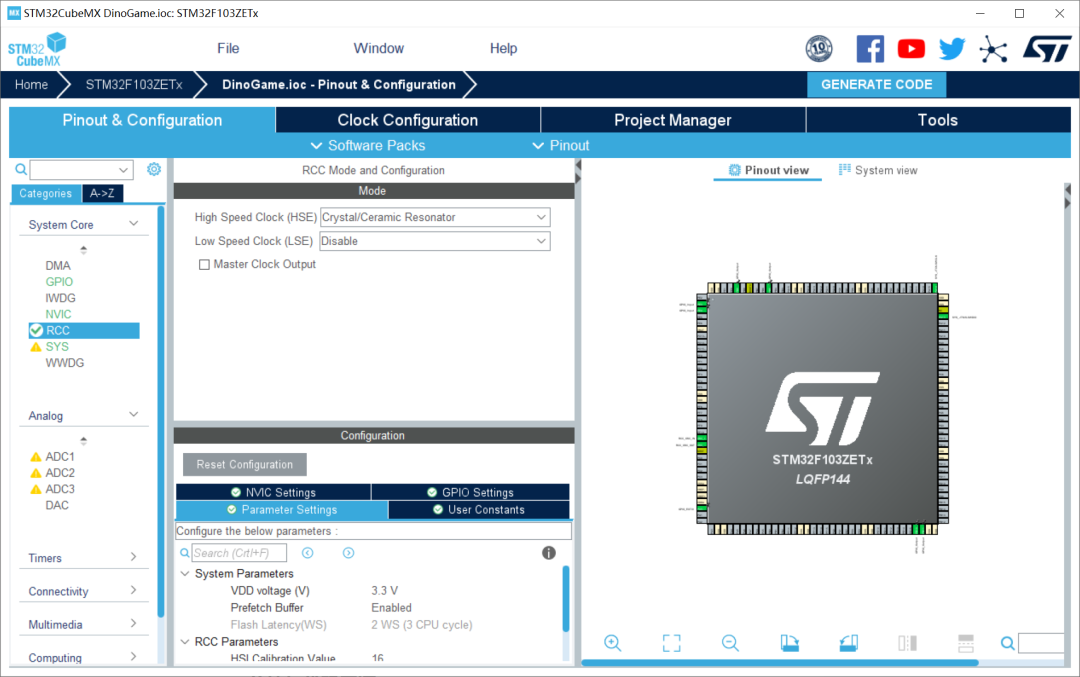
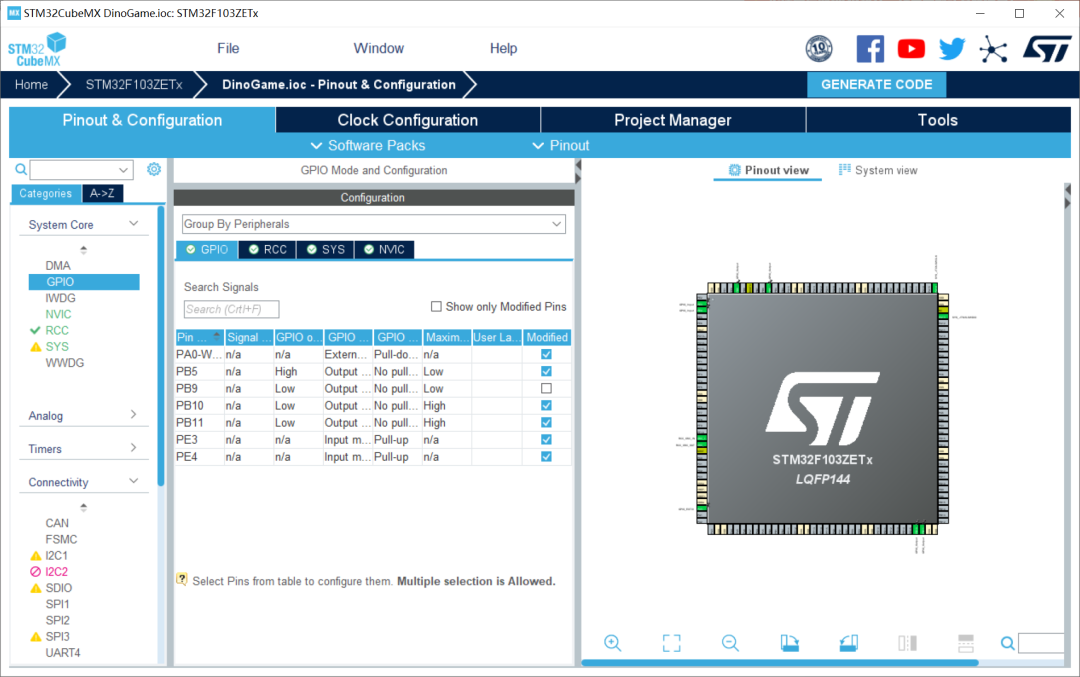
五、CubeMX配置
1、RCC配置外部高速晶振(精度更高)——HSE;
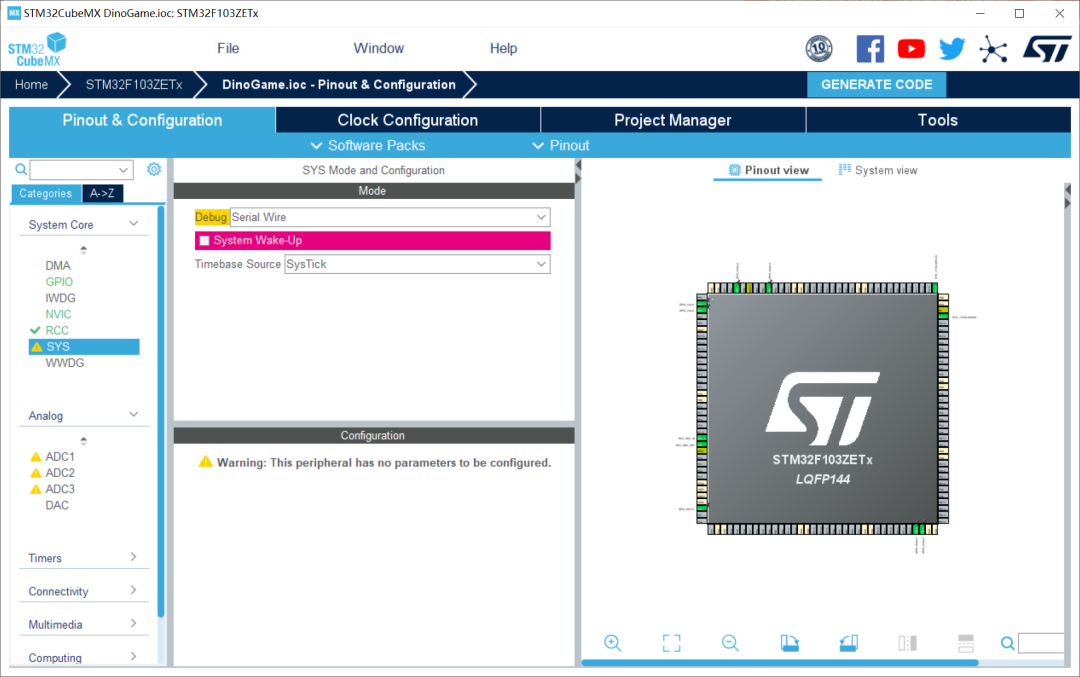
2、SYS配置:Debug设置成Serial Wire(否则可能导致芯片自锁);
3、I2C2配置:这里不直接使用CubeMX的I2C2,使用GPIO模拟(PB10:CLK;PB11:SDA)
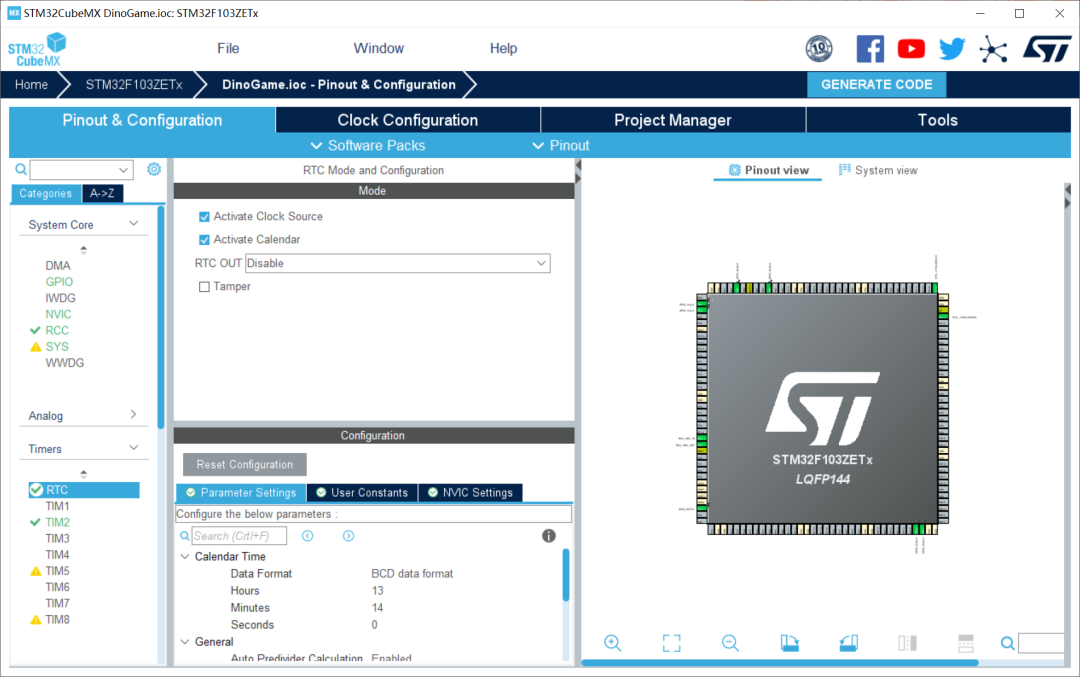
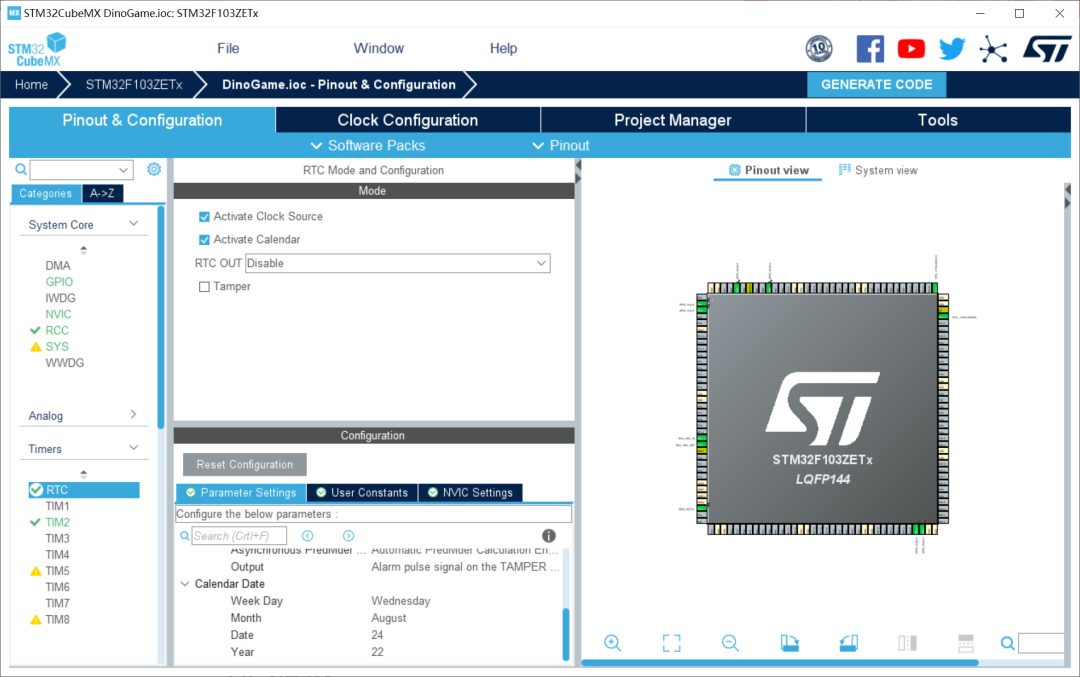
4、RTC配置:年月日,时分秒;
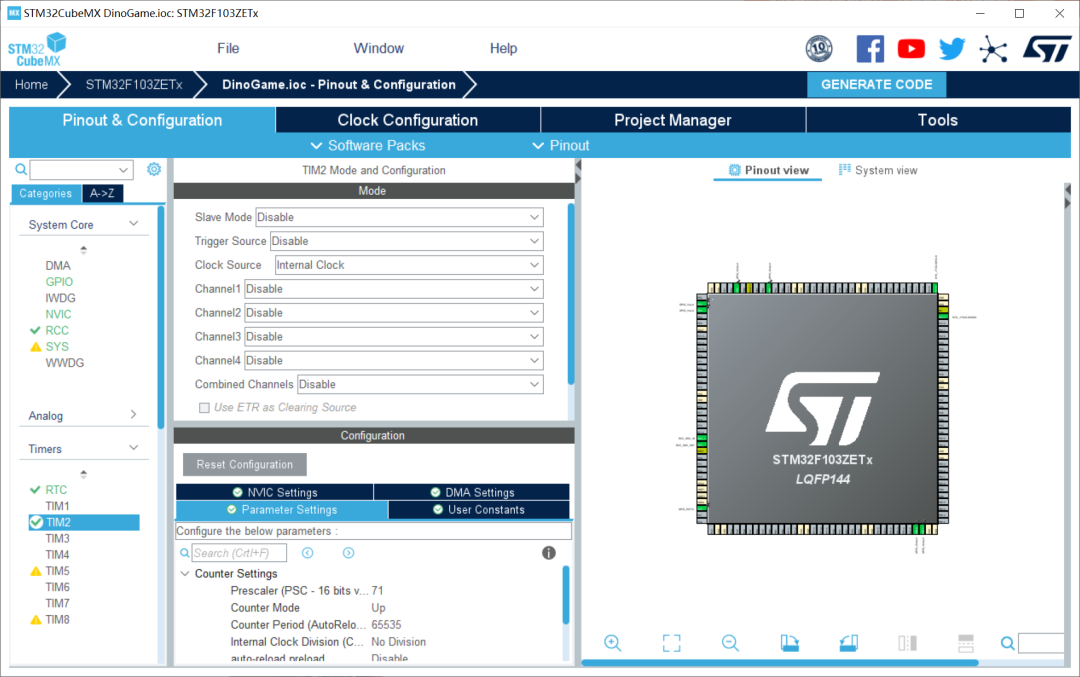
5、TIM2配置:由上面可知DHT11的使用需要us级的延迟函数,HAL库自带只有ms的,所以需要自己设计一个定时器;
6、KEY按键配置:PE3,PE4和PA0设置为端口输入(开发板原理图)
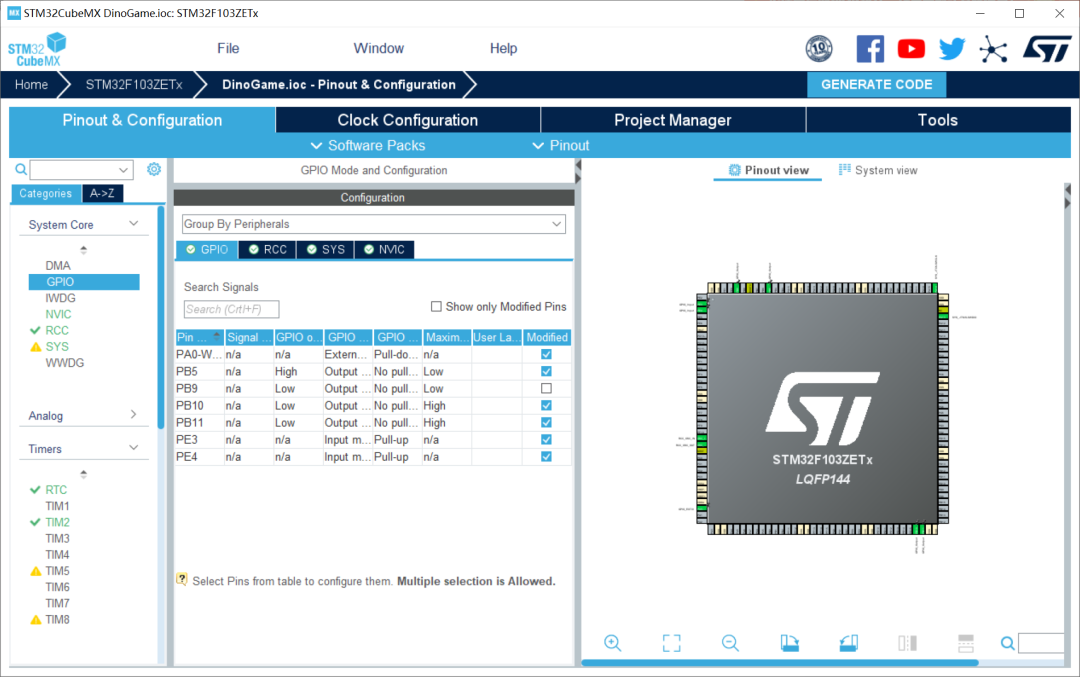
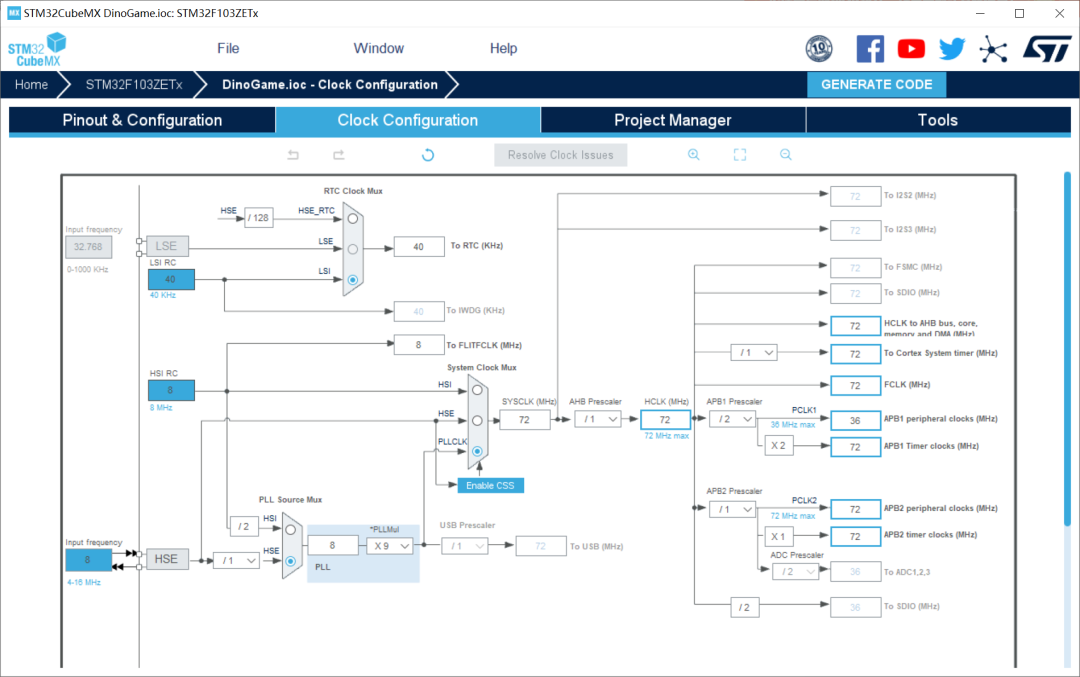
7、时钟树配置:
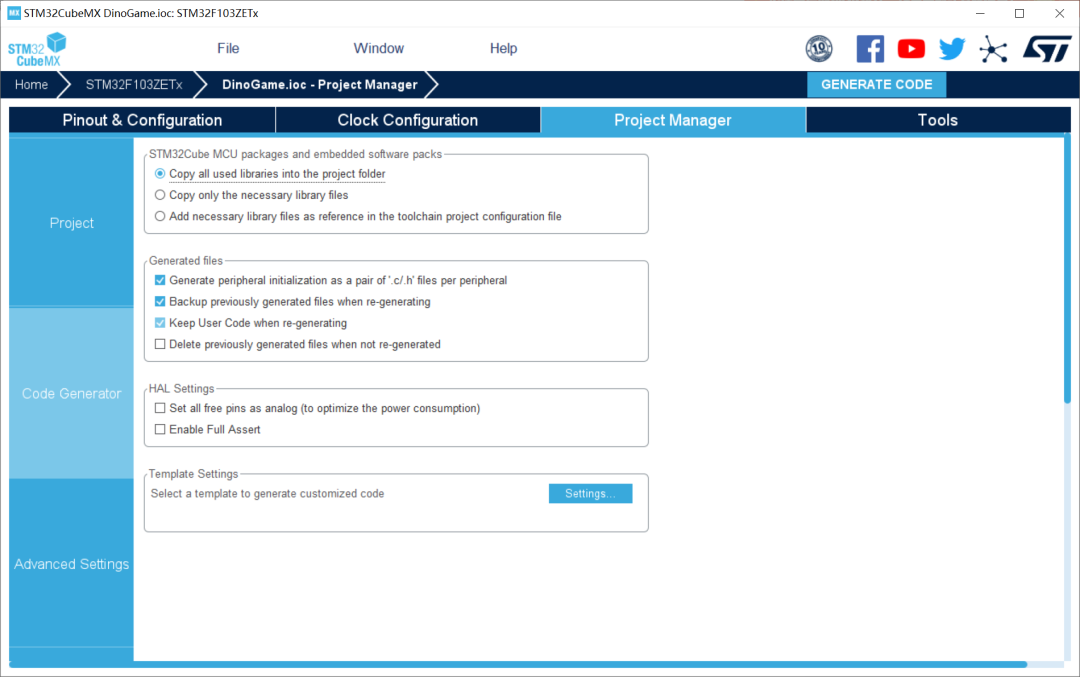
8、文件配置
六、代码
6.1 OLED驱动代码
此部分OLED的基本驱动函数,笔者使用的是I2C驱动的0.96寸OLED屏幕。所以,首先需要使用GPIO模拟I2C通讯。随后,使用I2C通讯去驱动OLED。(此部分代码包含了屏幕驱动与基础显示)
oled.h:
#ifndef __OLED_H
#define __OLED_H

#include "main.h"

#define u8 uint8_t
#define u32 uint32_t

#define OLED_CMD  0 //写命令
#define OLED_DATA 1 //写数据

#define OLED0561_ADD 0x78  // OLED I2C地址
#define COM    0x00  // OLED
#define DAT    0x40  // OLED

#define OLED_MODE 0
#define SIZE 8
#define XLevelL  0x00
#define XLevelH  0x10
#define Max_Column 128
#define Max_Row  64
#define Brightness 0xFF
#define X_WIDTH  128
#define Y_WIDTH  64


//-----------------OLED IIC GPIO进行模拟----------------

#define OLED_SCLK_Clr() HAL_GPIO_WritePin(GPIOB, GPIO_PIN_10, GPIO_PIN_RESET) //GPIO_ResetBits(GPIOB,GPIO_Pin_10)//SCL
#define OLED_SCLK_Set() HAL_GPIO_WritePin(GPIOB, GPIO_PIN_10, GPIO_PIN_SET) //GPIO_SetBits(GPIOB,GPIO_Pin_10)

#define OLED_SDIN_Clr() HAL_GPIO_WritePin(GPIOB, GPIO_PIN_11, GPIO_PIN_RESET) // GPIO_ResetBits(GPIOB,GPIO_Pin_11)//SDA
#define OLED_SDIN_Set() HAL_GPIO_WritePin(GPIOB, GPIO_PIN_11, GPIO_PIN_SET) // GPIO_SetBits(GPIOB,GPIO_Pin_11)


//I2C GPIO模拟
void IIC_Start();
void IIC_Stop();
void IIC_WaitAck();
void IIC_WriteByte(unsigned char IIC_Byte);
void IIC_WriteCommand(unsigned char IIC_Command);
void IIC_WriteData(unsigned char IIC_Data);
void OLED_WR_Byte(unsigned dat,unsigned cmd);


//功能函数
void OLED_Init(void);
void OLED_WR_Byte(unsigned dat,unsigned cmd);

void OLED_FillPicture(unsigned char fill_Data);
void OLED_SetPos(unsigned char x, unsigned char y);
void OLED_DisplayOn(void);
void OLED_DisplayOff(void);
void OLED_Clear(void);
void OLED_On(void);
void OLED_ShowChar(u8 x,u8 y,u8 chr,u8 Char_Size);
u32 oled_pow(u8 m,u8 n);
void OLED_ShowNum(u8 x,u8 y,u32 num,u8 len,u8 size2);
void OLED_ShowString(u8 x,u8 y,u8 *chr,u8 Char_Size);

#endif
oled.c:
#include "oled.h"
#include "asc.h"    //字库(可以自己制作)
#include "main.h"


/********************GPIO 模拟I2C*******************/
//注意:这里没有直接使用HAL库中的模拟I2C
/**********************************************
//IIC Start
**********************************************/
void IIC_Start()
{

 OLED_SCLK_Set() ;
 OLED_SDIN_Set();
 OLED_SDIN_Clr();
 OLED_SCLK_Clr();
}

/**********************************************
//IIC Stop
**********************************************/
void IIC_Stop()
{
 OLED_SCLK_Set() ;
 OLED_SDIN_Clr();
 OLED_SDIN_Set();

}

void IIC_WaitAck()
{
 OLED_SCLK_Set() ;
 OLED_SCLK_Clr();
}
/**********************************************
// IIC Write byte
**********************************************/

void IIC_WriteByte(unsigned char IIC_Byte)
{
 unsigned char i;
 unsigned char m,da;
 da=IIC_Byte;
 OLED_SCLK_Clr();
 for(i=0;i<8;i++)
 {
   m=da;
  // OLED_SCLK_Clr();
  m=m&0x80;
  if(m==0x80)
  {OLED_SDIN_Set();}
  else OLED_SDIN_Clr();
   da=da<<1;
  OLED_SCLK_Set();
  OLED_SCLK_Clr();
 }


}
/**********************************************
// IIC Write Command
**********************************************/
void IIC_WriteCommand(unsigned char IIC_Command)
{
   IIC_Start();
   IIC_WriteByte(0x78);            //Slave address,SA0=0
 IIC_WaitAck();
   IIC_WriteByte(0x00);   //write command
 IIC_WaitAck();
   IIC_WriteByte(IIC_Command);
 IIC_WaitAck();
   IIC_Stop();
}
/**********************************************
// IIC Write Data
**********************************************/
void IIC_WriteData(unsigned char IIC_Data)
{
   IIC_Start();
   IIC_WriteByte(0x78);   //D/C#=0; R/W#=0
 IIC_WaitAck();
   IIC_WriteByte(0x40);   //write data
 IIC_WaitAck();
   IIC_WriteByte(IIC_Data);
 IIC_WaitAck();
   IIC_Stop();
}

void OLED_WR_Byte(unsigned dat,unsigned cmd)
{
 if(cmd)
 {
  IIC_WriteData(dat);
 }
 else
 {
  IIC_WriteCommand(dat);
 }
}

void OLED_Init(void)
{
 HAL_Delay(100);  //这个延迟很重要

 OLED_WR_Byte(0xAE,OLED_CMD);//--display off
 OLED_WR_Byte(0x00,OLED_CMD);//---set low column address
 OLED_WR_Byte(0x10,OLED_CMD);//---set high column address
 OLED_WR_Byte(0x40,OLED_CMD);//--set start line address
 OLED_WR_Byte(0xB0,OLED_CMD);//--set page address
 OLED_WR_Byte(0x81,OLED_CMD); // contract control
 OLED_WR_Byte(0xFF,OLED_CMD);//--128
 OLED_WR_Byte(0xA1,OLED_CMD);//set segment remap
 OLED_WR_Byte(0xA6,OLED_CMD);//--normal / reverse
 OLED_WR_Byte(0xA8,OLED_CMD);//--set multiplex ratio(1 to 64)
 OLED_WR_Byte(0x3F,OLED_CMD);//--1/32 duty
 OLED_WR_Byte(0xC8,OLED_CMD);//Com scan direction
 OLED_WR_Byte(0xD3,OLED_CMD);//-set display offset
 OLED_WR_Byte(0x00,OLED_CMD);//

 OLED_WR_Byte(0xD5,OLED_CMD);//set osc division
 OLED_WR_Byte(0x80,OLED_CMD);//

 OLED_WR_Byte(0xD8,OLED_CMD);//set area color mode off
 OLED_WR_Byte(0x05,OLED_CMD);//

 OLED_WR_Byte(0xD9,OLED_CMD);//Set Pre-Charge Period
 OLED_WR_Byte(0xF1,OLED_CMD);//

 OLED_WR_Byte(0xDA,OLED_CMD);//set com pin configuartion
 OLED_WR_Byte(0x12,OLED_CMD);//

 OLED_WR_Byte(0xDB,OLED_CMD);//set Vcomh
 OLED_WR_Byte(0x30,OLED_CMD);//

 OLED_WR_Byte(0x8D,OLED_CMD);//set charge pump enable
 OLED_WR_Byte(0x14,OLED_CMD);//

 OLED_WR_Byte(0xAF,OLED_CMD);//--turn on oled panel
 HAL_Delay(100);
 OLED_FillPicture(0x0);

}


/********************************************
// OLED_FillPicture
********************************************/
void OLED_FillPicture(unsigned char fill_Data)
{
 unsigned char m,n;
 for(m=0;m<8;m++)
 {
  OLED_WR_Byte(0xb0+m,0);  //page0-page1
  OLED_WR_Byte(0x00,0);  //low column start address
  OLED_WR_Byte(0x10,0);  //high column start address
  for(n=0;n<128;n++)
   {
    OLED_WR_Byte(fill_Data,1);
   }
 }
}

//坐标设置
void OLED_SetPos(unsigned char x, unsigned char y)
{  OLED_WR_Byte(0xb0+y,OLED_CMD);
 OLED_WR_Byte(((x&0xf0)>>4)|0x10,OLED_CMD);
 OLED_WR_Byte((x&0x0f),OLED_CMD);
}
//开启OLED显示
void OLED_DisplayOn(void)
{
 OLED_WR_Byte(0X8D,OLED_CMD);  //SET DCDC命令
 OLED_WR_Byte(0X14,OLED_CMD);  //DCDC ON
 OLED_WR_Byte(0XAF,OLED_CMD);  //DISPLAY ON
}
//关闭OLED显示
void OLED_DisplayOff(void)
{
 OLED_WR_Byte(0X8D,OLED_CMD);  //SET DCDC命令
 OLED_WR_Byte(0X10,OLED_CMD);  //DCDC OFF
 OLED_WR_Byte(0XAE,OLED_CMD);  //DISPLAY OFF
}
//清屏函数,清完屏,整个屏幕是黑色的!和没点亮一样!!!
void OLED_Clear(void)
{
 u8 i,n;
 for(i=0;i<8;i++)
 {
  OLED_WR_Byte (0xb0+i,OLED_CMD);    //设置页地址(0~7)
  OLED_WR_Byte (0x00,OLED_CMD);      //设置显示位置—列低地址
  OLED_WR_Byte (0x10,OLED_CMD);      //设置显示位置—列高地址
  for(n=0;n<128;n++)OLED_WR_Byte(0,OLED_DATA);
 } //更新显示
}
void OLED_On(void)
{
 u8 i,n;
 for(i=0;i<8;i++)
 {
  OLED_WR_Byte (0xb0+i,OLED_CMD);    //设置页地址(0~7)
  OLED_WR_Byte (0x00,OLED_CMD);      //设置显示位置—列低地址
  OLED_WR_Byte (0x10,OLED_CMD);      //设置显示位置—列高地址
  for(n=0;n<128;n++)OLED_WR_Byte(1,OLED_DATA);
 } //更新显示
}
//在指定位置显示一个字符,包括部分字符
//x:0~127
//y:0~63
//mode:0,反白显示;1,正常显示
//size:选择字体 16/12
void OLED_ShowChar(u8 x,u8 y,u8 chr,u8 Char_Size)
{
 unsigned char c=0,i=0;
  c=chr-' ';//得到偏移后的值
  if(x>Max_Column-1){x=0;y=y+2;}
  if(Char_Size ==16)
   {
   OLED_SetPos(x,y);
   for(i=0;i<8;i++)
   OLED_WR_Byte(F8X16[c*16+i],OLED_DATA);
   OLED_SetPos(x,y+1);
   for(i=0;i<8;i++)
   OLED_WR_Byte(F8X16[c*16+i+8],OLED_DATA);
   }
   else {
    OLED_SetPos(x,y);
    for(i=0;i<6;i++)
    OLED_WR_Byte(F6x8[c][i],OLED_DATA);

   }
}

//m^n函数
u32 oled_pow(u8 m,u8 n)
{
 u32 result=1;
 while(n--)result*=m;
 return result;
}

//显示2个数字
//x,y :起点坐标
//len :数字的位数
//size:字体大小
//mode:模式 0,填充模式;1,叠加模式
//num:数值(0~4294967295);
void OLED_ShowNum(u8 x,u8 y,u32 num,u8 len,u8 size2)
{
 u8 t,temp;
 u8 enshow=0;
 for(t=0;t120){x=0;y+=2;}
   j++;
 }
}
6.2 谷歌小恐龙游戏图形绘制代码
该部分为整个项目代码的核心部分之一,任何一个游戏都是需要去绘制和构建游戏的图形以及模型的。好的游戏往往都具有很好的游戏模型和精美UI,很多3A大作都具备这样的特性。
dinogame.h:
#ifndef __DINOGAME_H
#define __DINOGAME_H

void OLED_DrawBMP(unsigned char x0, unsigned char y0,unsigned char x1, unsigned char y1,unsigned char BMP[]);
void OLED_DrawBMPFast(const unsigned char BMP[]);
void oled_drawbmp_block_clear(int bx, int by, int clear_size);
void OLED_DrawGround();
void OLED_DrawCloud();
void OLED_DrawDino();
void OLED_DrawCactus();
int OLED_DrawCactusRandom(unsigned char ver, unsigned char reset);
int OLED_DrawDinoJump(char reset);
void OLED_DrawRestart();
void OLED_DrawCover();

#endif
dinogame.c代码:
#include "oled.h"
#include "oledfont.h"
#include "stdlib.h"

/***********功能描述:显示显示BMP图片128×64起始点坐标(x,y),x的范围0~127,y为页的范围0~7*****************/
void OLED_DrawBMP(unsigned char x0, unsigned char y0,unsigned char x1, unsigned char y1,unsigned char BMP[])
{
 unsigned int j=0;
 unsigned char x,y;

  if(y1%8==0) y=y1/8;
  else y=y1/8+1;
 for(y=y0;y128) break;
  IIC_WriteByte(0x0);
  IIC_WaitAck();
 }
 IIC_Stop();
}

void OLED_DrawGround()
{
 static unsigned int pos = 0;
 unsigned char speed = 5;
 unsigned int ground_length = sizeof(GROUND);
 unsigned char x;

 OLED_SetPos(0, 7);
 IIC_Start();
 IIC_WriteByte(0x78);
 IIC_WaitAck();
 IIC_WriteByte(0x40);
 IIC_WaitAck();
 for (x = 0; x < 128; x++)
 {
  IIC_WriteByte(GROUND[(x+pos)%ground_length]);
  IIC_WaitAck();
 }
 IIC_Stop();

 pos = pos + speed;
 //if(pos>ground_length) pos=0;
}


// 绘制云朵
void OLED_DrawCloud()
{
 static int pos = 128;
 static char height=0;
 char speed = 3;
 unsigned int i=0;
 int x;
 int start_x = 0;
 int length = sizeof(CLOUD);
 unsigned char byte;

 //if (pos + length <= -speed) pos = 128;

 if (pos + length <= -speed)
 {
  pos = 128;
  height = rand()%3;
 }
 if(pos < 0)
 {
  start_x = -pos;
  OLED_SetPos(0, 1+height);
 }
 else
 {
  OLED_SetPos(pos, 1+height);
 }

 IIC_Start();
 IIC_WriteByte(0x78);
 IIC_WaitAck();
 IIC_WriteByte(0x40);
 IIC_WaitAck();
 for (x = start_x; x < length + speed; x++)
 {
  if (pos + x > 127) break;
  if (x < length) byte = CLOUD[x];
  else byte = 0x0;

  IIC_WriteByte(byte);
  IIC_WaitAck();
 }
 IIC_Stop();

 pos = pos - speed;
}

// 绘制小恐龙
void OLED_DrawDino()
{
 static unsigned char dino_dir = 0;
 unsigned int j=0;
 unsigned char x, y;
 unsigned char byte;

 dino_dir++;
 dino_dir = dino_dir%2;
 for(y=0; y<2; y++)
 {
  OLED_SetPos(16, 6+y);
  IIC_Start();
  IIC_WriteByte(0x78);
  IIC_WaitAck();
  IIC_WriteByte(0x40);
  IIC_WaitAck();
  for (x = 0; x < 16; x++)
  {
   j = y*16 + x;
   byte = DINO[dino_dir][j];

   IIC_WriteByte(byte);
   IIC_WaitAck();
  }
  IIC_Stop();
 }
}

// 绘制仙人掌障碍物
void OLED_DrawCactus()
{
 char speed = 5;
 static int pos = 128;
 int start_x = 0;
 int length = sizeof(CACTUS_2)/2;

 unsigned int j=0;
 unsigned char x, y;
 unsigned char byte;

 if (pos + length <= 0)
 {
  oled_drawbmp_block_clear(0, 6, speed);
  pos = 128;
 }

 for(y=0; y<2; y++)
 {
  if(pos < 0)
  {
   start_x = -pos;
   OLED_SetPos(0, 6+y);
  }
  else
  {
   OLED_SetPos(pos, 6+y);
  }

  IIC_Start();
  IIC_WriteByte(0x78);
  IIC_WaitAck();
  IIC_WriteByte(0x40);
  IIC_WaitAck();

  for (x = start_x; x < length; x++)
  {
   if (pos + x > 127) break;
   j = y*length + x;
   byte = CACTUS_2[j];
   IIC_WriteByte(byte);
   IIC_WaitAck();
  }
  IIC_Stop();
 }
 oled_drawbmp_block_clear(pos + length, 6, speed); // 清除残影
 pos = pos - speed;
}


// 绘制随机出现的仙人掌障碍物
int OLED_DrawCactusRandom(unsigned char ver, unsigned char reset)
{
 char speed = 5;
 static int pos = 128;
 int start_x = 0;
 int length = 0;

 unsigned int i=0, j=0;
 unsigned char x, y;
 unsigned char byte;
 if (reset == 1)
 {
  pos = 128;
  oled_drawbmp_block_clear(0, 6, speed);
  return 128;
 }
 if (ver == 0) length = 8; //sizeof(CACTUS_1) / 2;
 else if (ver == 1) length = 16; //sizeof(CACTUS_2) / 2;
 else if (ver == 2 || ver == 3) length = 24;

 for(y=0; y<2; y++)
 {
  if(pos < 0)
  {
   start_x = -pos;
   OLED_SetPos(0, 6+y);
  }
  else
  {
   OLED_SetPos(pos, 6+y);
  }

  IIC_Start();
  IIC_WriteByte(0x78);
  IIC_WaitAck();
  IIC_WriteByte(0x40);
  IIC_WaitAck();

  for (x = start_x; x < length; x++)
  {
   if (pos + x > 127) break;

   j = y*length + x;
   if (ver == 0) byte = CACTUS_1[j];
   else if (ver == 1) byte = CACTUS_2[j];
   else if(ver == 2) byte = CACTUS_3[j];
   else byte = CACTUS_4[j];

   IIC_WriteByte(byte);
   IIC_WaitAck();
  }
  IIC_Stop();
 }

 oled_drawbmp_block_clear(pos + length, 6, speed);

 pos = pos - speed;
 return pos + speed;
}


// 绘制跳跃小恐龙
int OLED_DrawDinoJump(char reset)
{
 char speed_arr[] = {1, 1, 3, 3, 4, 4, 5, 6, 7};
 static char speed_idx = sizeof(speed_arr)-1;
 static int height = 0;
 static char dir = 0;
 //char speed = 4;

 unsigned int j=0;
 unsigned char x, y;
 char offset = 0;
 unsigned char byte;
 if(reset == 1)
 {
  height = 0;
  dir = 0;
  speed_idx = sizeof(speed_arr)-1;
  return 0;
 }
 if (dir==0)
 {
  height += speed_arr[speed_idx];
  speed_idx --;
  if (speed_idx<0) speed_idx = 0;
 }
 if (dir==1)
 {
  height -= speed_arr[speed_idx];
  speed_idx ++;
  if (speed_idx>sizeof(speed_arr)-1) speed_idx = sizeof(speed_arr)-1;
 }
 if(height >= 31)
 {
  dir = 1;
  height = 31;
 }
 if(height <= 0)
 {
  dir = 0;
  height = 0;
 }
 if(height <= 7) offset = 0;
 else if(height <= 15) offset = 1;
 else if(height <= 23) offset = 2;
 else if(height <= 31) offset = 3;
 else offset = 4;

 for(y=0; y<3; y++) // 4
 {
  OLED_SetPos(16, 5- offset + y);

  IIC_Start();
  IIC_WriteByte(0x78);
  IIC_WaitAck();
  IIC_WriteByte(0x40);
  IIC_WaitAck();
  for (x = 0; x < 16; x++) // 32
  {
   j = y*16 + x; // 32
   byte = DINO_JUMP[height%8][j];

   IIC_WriteByte(byte);
   IIC_WaitAck();
  }
  IIC_Stop();
 }
 if (dir == 0) oled_drawbmp_block_clear(16, 8- offset, 16);
 if (dir == 1) oled_drawbmp_block_clear(16, 4- offset, 16);
 return height;
}

// 绘制重启
void OLED_DrawRestart()
{
 unsigned int j=0;
 unsigned char x, y;
 unsigned char byte;
 //OLED_SetPos(0, 0);
 for (y = 2; y < 5; y++)
 {
  OLED_SetPos(52, y);
  IIC_Start();
  IIC_WriteByte(0x78);
  IIC_WaitAck();
  IIC_WriteByte(0x40);
  IIC_WaitAck();
  for (x = 0; x < 24; x++)
  {
   byte = RESTART[j++];
   IIC_WriteByte(byte);
   IIC_WaitAck();
  }
  IIC_Stop();
 }
 OLED_ShowString(10, 3, "GAME", 16);
 OLED_ShowString(86, 3, "OVER", 16);
}
// 绘制封面
void OLED_DrawCover()
{
 OLED_DrawBMPFast(COVER);
}
6.3 谷歌小恐龙的运行控制代码
control.h:
#ifndef __CONTROL_H
#define __CONTROL_H

int get_key();
void Game_control();

#endif****
control.c:
#include "control.h"
#include "oled.h"
#include "dinogame.h"
#include "stdlib.h"

unsigned char key_num = 0;
unsigned char cactus_category = 0;
unsigned char cactus_length = 8;
unsigned int score = 0;
unsigned int highest_score = 0;
int height = 0;
int cactus_pos = 128;
unsigned char cur_speed = 30;
char failed = 0;
char reset = 0;


int get_key()
{
 if(HAL_GPIO_ReadPin(GPIOE, GPIO_PIN_4)==0)
 {
  HAL_Delay(10);            //延迟
  if(HAL_GPIO_ReadPin(GPIOE, GPIO_PIN_4)==0)
  {
  return 2;
  }
 }

 if(HAL_GPIO_ReadPin(GPIOE, GPIO_PIN_3)==0)
 {
  HAL_Delay(10);            //延迟
  if(HAL_GPIO_ReadPin(GPIOE, GPIO_PIN_3)==0)
  {
  return 1;
  }
 }

 if(HAL_GPIO_ReadPin(GPIOA, GPIO_PIN_0)==1)
 {
  HAL_Delay(10);            //延迟
  if(HAL_GPIO_ReadPin(GPIOA, GPIO_PIN_0)==1)
  {
  return 3;
  }
 }

 return 0;
}

void Game_control()
{

 while(1)
 {

  if(get_key() == 3)  //wk_up按键按下强制退出一次循环
  {
   break;
  }

   if (failed == 1)
  {
   OLED_DrawRestart();

   key_num = get_key();
   if (key_num == 2)
   {
    if(score > highest_score) highest_score = score;
    score = 0;
    failed = 0;
    height = 0;
    reset = 1;
    OLED_DrawDinoJump(reset);
    OLED_DrawCactusRandom(cactus_category, reset);
    OLED_Clear();
   }
   continue;
  }


  score ++;
  if (height <= 0) key_num = get_key();

  OLED_DrawGround();
  OLED_DrawCloud();

  if (height>0 || key_num == 1) height = OLED_DrawDinoJump(reset);
  else OLED_DrawDino();

  cactus_pos = OLED_DrawCactusRandom(cactus_category, reset);
  if(cactus_category == 0) cactus_length = 8;
  else if(cactus_category == 1) cactus_length = 16;
  else cactus_length = 24;

  if (cactus_pos + cactus_length < 0)
  {
    cactus_category = rand()%4;
   OLED_DrawCactusRandom(cactus_category, 1);
  }

  if ((height < 16) && ( (cactus_pos>=16 && cactus_pos <=32) || (cactus_pos + cactus_length>=16 && cactus_pos + cactus_length <=32)))
  {
   failed = 1;
  }


  OLED_ShowString(35, 0, "HI:", 12);
  OLED_ShowNum(58, 0, highest_score, 5, 12);
  OLED_ShowNum(98, 0, score, 5, 12);


  reset = 0;

  cur_speed = score/20;
  if (cur_speed > 29) cur_speed = 29;
  HAL_Delay(30 - cur_speed);
//  HAL_Delay(500);
  key_num = 0;

 }

}
6.4 多级菜单核心代码:
menu.h:
#ifndef __MENU_H
#define __MENU_H

#include "main.h"
#define  u8 unsigned char

//按键定义
#define KEY0 HAL_GPIO_ReadPin(GPIOE, GPIO_PIN_4)  //低电平有效   KEY0
#define KEY1 HAL_GPIO_ReadPin(GPIOE, GPIO_PIN_3)  //低电平有效
#define WK_UP HAL_GPIO_ReadPin(GPIOA, GPIO_PIN_0)  //高电平有效


typedef struct
{
    u8 current; //当前状态索引号
    u8 next;   //向下一个
    u8 enter;  //确定
  u8 back;   //退出
    void (*current_operation)(void); //当前状态应该执行的操作
} Menu_table;

//界面UI
void home();
void Temperature();
void Palygame();
void Setting();
void Info();


void  Menu_key_set(void);
u8 KEY_Scan(u8 mode);

void TestTemperature();
void ConrtolGame();
void Set();
void Information();

void LED();
void RTC_display();

#endif
menu.c:
#include "menu.h"
#include "oled.h"
#include "gpio.h"
#include "dinogame.h"
#include "control.h"
#include "DHT11.h"
#include "rtc.h"

RTC_DateTypeDef GetData;  //获取日期结构体

RTC_TimeTypeDef GetTime;   //获取时间结构体


//UI界面
//主页
/****************************************************/
//UI库

/****************************************************/

void (*current_operation_index)();

Menu_table  table[30]=
{
    {0,0,1,0,(*home)}, //一级界面(主页面) 索引,向下一个,确定,退出

    {1,2,5,0,(*Temperature)}, //二级界面 温湿度
    {2,3,6,0,(*Palygame)}, //二级界面 游戏
    {3,4,7,0,(*Setting)}, //二级界面 设置
    {4,1,8,0,(*Info)}, //二级界面 信息

  {5,5,5,1,(*TestTemperature)},  //三级界面:DHT11测量温湿度
  {6,6,6,2,(*ConrtolGame)},    //三级界面:谷歌小恐龙Dinogame
  {7,7,9,3,(*Set)},        //三级界面:设置普通外设状态 LED
  {8,8,8,4,(*Information)},    //三级界面:作者和相关项目信息

  {9,9,7,3,(*LED)},  //LED控制
};

uint8_t  func_index = 0; //主程序此时所在程序的索引值

void  Menu_key_set(void)
{
  if((KEY_Scan(1) == 1) && (func_index != 6))
  {
    func_index=table[func_index].next; //按键next按下后的索引号
    OLED_Clear();
  }

  if((KEY_Scan(1) == 2) && (func_index != 6))
  {
    func_index=table[func_index].enter; //按键enter按下后的索引号
    OLED_Clear();
  }

 if(KEY_Scan(1) == 3)
  {
    func_index=table[func_index].back; //按键back按下后的索引号
    OLED_Clear();
  }

  current_operation_index=table[func_index].current_operation; //执行当前索引号所对应的功能函数
  (*current_operation_index)();//执行当前操作函数
}


void home()
{
 RTC_display();
 OLED_DrawBMP(0,0,20,3,signal_BMP);
 OLED_DrawBMP(20,0,36,2,gImage_bulethouch);
 OLED_DrawBMP(112,0,128,2,gImage_engery);
 OLED_DrawBMP(4,6,20,8,gImage_yes);
 OLED_DrawBMP(12,4,28,6,gImage_left);
 OLED_DrawBMP(40,2,88,8,gImage_home);
 OLED_DrawBMP(99,4,115,6,gImage_right);
 OLED_DrawBMP(107,6,123,8,gImage_back);
}

void Temperature()
{
 RTC_display();
 OLED_DrawBMP(0,0,20,3,signal_BMP);
 OLED_DrawBMP(20,0,36,2,gImage_bulethouch);
 OLED_DrawBMP(112,0,128,2,gImage_engery);
 OLED_DrawBMP(4,6,20,8,gImage_yes);
 OLED_DrawBMP(12,4,28,6,gImage_left);
 OLED_DrawBMP(40,2,88,8,gImage_temp);
 OLED_DrawBMP(99,4,115,6,gImage_right);
 OLED_DrawBMP(107,6,123,8,gImage_back);
}

void Palygame()
{
 RTC_display();
 OLED_DrawBMP(0,0,20,3,signal_BMP);
 OLED_DrawBMP(20,0,36,2,gImage_bulethouch);
 OLED_DrawBMP(112,0,128,2,gImage_engery);
 OLED_DrawBMP(4,6,20,8,gImage_yes);
 OLED_DrawBMP(12,4,28,6,gImage_left);
 OLED_DrawBMP(40,2,88,8,gImage_playgame);
 OLED_DrawBMP(99,4,115,6,gImage_right);
 OLED_DrawBMP(107,6,123,8,gImage_back);
}

void Setting()
{
 RTC_display();
 OLED_DrawBMP(0,0,20,3,signal_BMP);
 OLED_DrawBMP(20,0,36,2,gImage_bulethouch);
 OLED_DrawBMP(112,0,128,2,gImage_engery);
 OLED_DrawBMP(4,6,20,8,gImage_yes);
 OLED_DrawBMP(12,4,28,6,gImage_left);
 OLED_DrawBMP(40,2,88,8,gImage_setting);
 OLED_DrawBMP(99,4,115,6,gImage_right);
 OLED_DrawBMP(107,6,123,8,gImage_back);
}

void Info()
{
 RTC_display();
 OLED_DrawBMP(0,0,20,3,signal_BMP);
 OLED_DrawBMP(20,0,36,2,gImage_bulethouch);
 OLED_DrawBMP(112,0,128,2,gImage_engery);
 OLED_DrawBMP(4,6,20,8,gImage_yes);
 OLED_DrawBMP(12,4,28,6,gImage_left);
 OLED_DrawBMP(40,2,88,8,gImage_info);
 OLED_DrawBMP(99,4,115,6,gImage_right);
 OLED_DrawBMP(107,6,123,8,gImage_back);
}


//按键函数,不支持连按
u8 KEY_Scan(u8 mode)
{
 static u8 key_up=1;
 if(mode)key_up=1;
 if(key_up&&(KEY0==0||KEY1==0||WK_UP==1))
 {
  HAL_Delay(100);  //消抖
  key_up=0;
  if(KEY0==0)return 1;
  else if(KEY1==0)return 2;
  else if(WK_UP==1)return 3;
 }else if(KEY0==1&&KEY1==1&&WK_UP==0)key_up=1;
 return 0;
}

void TestTemperature()
{
 DHT11();
}

void ConrtolGame()
{
 Game_control();
}

void Set()
{
 OLED_ShowString(0,0,"Peripherals: Lights",16);
 OLED_ShowString(0,2,"Status: Closed",16);
 HAL_GPIO_WritePin(GPIOB, GPIO_PIN_5, GPIO_PIN_SET);
}

void Information()
{
 OLED_ShowString(0,0,"Author:Sneak",16);
 OLED_ShowString(0,2,"Date:2022/8/23",16);
 OLED_ShowString(0,4,"Lab: Multi-level menu",16);
}

void LED()
{
 OLED_ShowString(0,0,"Peripherals: Lights",16);
 OLED_ShowString(0,2,"Status: Open",16);
 HAL_GPIO_WritePin(GPIOB, GPIO_PIN_5, GPIO_PIN_RESET);
}


void RTC_display()    //RTC????
{
   /* Get the RTC current Time */
   HAL_RTC_GetTime(&hrtc, &GetTime, RTC_FORMAT_BIN);
      /* Get the RTC current Date */
    HAL_RTC_GetDate(&hrtc, &GetData, RTC_FORMAT_BIN);

  /* Display date Format : yy/mm/dd */

        /* Display time Format : hhss */
  OLED_ShowNum(40,0,GetTime.Hours,2,16);    //hour
  OLED_ShowString(57,0,":",16);
  OLED_ShowNum(66,0,GetTime.Minutes,2,16);   //min
  OLED_ShowString(83,0,":",16);
  OLED_ShowNum(93,0,GetTime.Seconds,2,16);   //seconds
}
七、总结与代码开源
总结:本项目目前还处于最初代版本,十分简易,后期笔者将抽时间去精进优化该多级菜单项目。其中,UI界面中的电池与信号目前都还处于贴图状态,后期笔者会加上库仑计测量电池电量等。文章中指出了需要注意的地方与可以改进的点,感兴趣的朋友可以彼此交流交流。
编辑:黄飞
-
智能手表完整项目实现,比赛求职双向加分,基于嵌入式大赛推荐开发板(STM32U5)2026-04-24 588
-
手撸酷炫智能手表GUI【上】2022-10-25 2399
-
蓝牙技术|传统手表品牌加入智能手表竞争,智能手表市场持续火热2022-02-17 11199
-
嵌入式linux、arm嵌入式操作系统的相关资料分享2021-12-27 1954
-
如何设计一个可穿戴式智能手表的原型2021-11-11 1770
-
如何设计智能手表2020-06-02 4035
-
智能手表植入NFC芯片具有哪些功能?2018-06-25 7655
-
智能手表精准的测量体温可以实现吗?2018-06-08 11749
-
看智能手表是如何使用晶振的?2017-07-10 4467
-
所有儿童智能手表的软肋,或会导致儿童智能手表消失2015-11-05 3545
-
【OK210申请】基于Android的智能手表2015-07-25 1924
-
【萤火虫团队】智能手表+智能家居2014-12-30 4319
-
STM32嵌入式系统设计的智能控制网络终端技术2010-05-06 2158
-
STM32设计的嵌入式系统的智能控制网络终端方案2010-05-05 1329
全部0条评论

快来发表一下你的评论吧 !
