

使用MVVM框架实现一个简单加法器
描述
使用MVVM框架来实现一个简单加法器。最终效果如下,点击按钮可以对上面两个文本框中的数字进行相加得出结果显示在第三个文本框中。重点在于看mvvm框架下程序该怎么写。使用CommunityToolkit.Mvvm框架,通过nuget进行安装。

整个工程结构
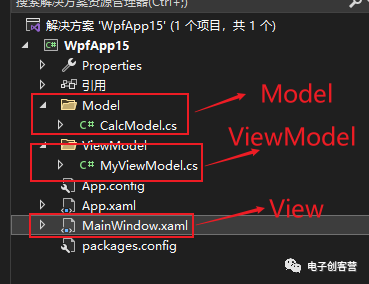
CalcModel.cs
该文件中存放数据类,类中定了三个属性Input1、Input2、Result。分别代表输入1、输入2和计算结果。和一般的属性不同,该Model属性为了实现属性变化可以进行通知和一般的属性有些区别。
- 类要继承自ObservableObject
- 属性set要调用SetProperty方法。
using System;
using System.Collections.Generic;
using System.Linq;
using System.Text;
using System.Threading.Tasks;
using CommunityToolkit.Mvvm;
using CommunityToolkit.Mvvm.ComponentModel;


namespace WpfApp15.Model
{
    public class CalcModel:ObservableObject
    {
        int input1 = 0;
        public int Input1
        {
            get = > input1;
            set
            {
                SetProperty(ref input1, value);
            }
        }


        int input2 = 0;
        public int Input2
        {
            get = > input2;
            set
            {
                SetProperty(ref input2, value);
            }
        }


        int result = 0;
        public int Result
        {
            get = > result;
            set
            {
                SetProperty(ref result, value);
            }
        }
    }
}
MyViewModel.cs
这个部分是业务核心内容,连接View和Model之间的桥梁。因为我们底层的Model已经具备了属性通知的功能,所以在这个层次里面不需要再次封装。有可能我们Model来自于别人写好的不能修改还要支持属性通知,那就要在这里进行再次封装才能和View进行绑定。
该层实现了一个命令CmdCalc,可以和View层绑定进行加法的计算。借用Mvvm框架实现命令很简单:
- 定义一个ICommand接口的属性CmdCalc
- 在类构造函数中创建一个RelayCommand的实例赋值给CmdCalc
- RelayCommand的参数
Calc方法中实现了具体的计算
using System;
using System.Collections.Generic;
using System.Linq;
using System.Text;
using System.Threading.Tasks;
using System.Windows.Input;
using CommunityToolkit.Mvvm;
using CommunityToolkit.Mvvm.ComponentModel;
using CommunityToolkit.Mvvm.Input;
using WpfApp15.Model;


namespace WpfApp15.ViewModel
{
    public class MyViewModel
    {


        public CalcModel Model { get; set; }
        public ICommand CmdCalc { get;}


        private void Calc()
        {
            Model.Result=Model.Input1+Model.Input2;
        }


        public MyViewModel()
        {
            Model=new CalcModel();
            CmdCalc = new RelayCommand(Calc);
        }


    }
}
MainWindow.xaml
这个就是View层,负责界面的显示。这里面重点的也就是三个TextBox和一个Button。三个TextBox分别绑定了Model的三个属性。Button绑定了CmdCalc命令,命令可以在按钮点击的时候被触发,替代了传统的Click事件。
<  Window x:Class="WpfApp15.MainWindow"
  xmlns="http://schemas.microsoft.com/winfx/2006/xaml/presentation"
  xmlns:x="http://schemas.microsoft.com/winfx/2006/xaml"
  xmlns:d="http://schemas.microsoft.com/expression/blend/2008"
  xmlns:mc="http://schemas.openxmlformats.org/markup-compatibility/2006"
  xmlns:local="clr-namespace:WpfApp15"
  mc:Ignorable="d"
  Title="MainWindow" Height="450" Width="800"  >
  <  StackPanel  >
    <  Grid  >
      <  Grid.ColumnDefinitions  >
        <  ColumnDefinition  ><  /ColumnDefinition  >
        <  ColumnDefinition  ><  /ColumnDefinition  >
      <  /Grid.ColumnDefinitions  >
      <  TextBox Text="{Binding Model.Input1}" Grid.Row="0" Grid.Column="0" Height="30" Margin="10"/  >
      <  TextBox Text="{Binding Model.Input2}" Grid.Row="0" Grid.Column="1" Height="30" Margin="10"/  >
    <  /Grid  >
    <  TextBox Text="{Binding Model.Result,Mode=TwoWay}" Grid.Row="0" Grid.Column="1" Height="30" Margin="10"/  >
    <  Button Command="{Binding CmdCalc}" Height="40" Width="200"  Margin="10"/  >
  <  /StackPanel  >
<  /Window  >
还有一步
目前还不能工作,还要在主窗口的构造函数中设置下DataContext,这样View层的绑定才知道去哪里寻找Model.Input1``Model.Input2``Model.Result``CmdCalc这些属性和命令。
public partial class MainWindow : Window
{
    public MyViewModel vm=new MyViewModel();
    public MainWindow()
    {
        InitializeComponent();
        this.DataContext = vm;
    }
}
到此为止
这样一个简单的例子就展示了MVVM的整体一个基本结构。把数据、界面、业务逻辑给分开在不同的层次中,使开发更加清晰,维护更加方便。
声明:本文内容及配图由入驻作者撰写或者入驻合作网站授权转载。文章观点仅代表作者本人,不代表电子发烧友网立场。文章及其配图仅供工程师学习之用,如有内容侵权或者其他违规问题,请联系本站处理。
举报投诉
-
加法器的原理是什么 加法器有什么作用2024-05-23 9102
-
基于FPGA实现Mem加法器2023-10-17 1648
-
镜像加法器的电路结构及仿真设计2023-07-07 5668
-
加法器的原理及采用加法器的原因2023-06-09 6975
-
超前进位加法器是如何实现记忆的呢2022-08-05 2696
-
什么是加法器?加法器的原理是什么 ?2021-03-11 5251
-
加法器是如何实现的2021-02-18 7195
-
怎么设计一个32位超前进位加法器?2018-07-09 22464
-
加法器2016-10-20 3427
-
同相加法器电路原理与同相加法器计算2016-09-13 59108
-
FPU加法器的设计与实现2012-07-06 1308
-
十进制加法器,十进制加法器工作原理是什么?2010-04-13 14646
-
加法器,加法器是什么意思2010-03-08 5996
全部0条评论

快来发表一下你的评论吧 !
