

i.MX6ULL时间管理和内核定时器深入研究
描述
学习过 UCOS 或 FreeRTOS 的同学应该知道,UCOS 或 FreeRTOS 是需要一个硬件定时器提供系统时钟,一般使用 Systick 作为系统时钟源。
同理,Linux 要运行,也是需要一个系统时钟的,至于这个系统时钟是由哪个定时器提供的,有兴趣的读者可以去研究一下 Linux 内核。不过对于 Linux 驱动编写者来说,不需要深入研究这些具体的实现,只需要掌握相应的 API 函数即可。
Linux 内核中有大量的函数需要时间管理,比如周期性的调度程序、延时程序、对于我们驱动编写者来说最常用的定时器。硬件定时器提供时钟源,时钟源的频率可以设置, 设置好以后就周期性地产生定时中断,系统使用定时中断来计时。
中断周期性产生的频率就是系统频率,也叫做节拍率(tick rate)(有的资料也叫系统频率),比如 1000Hz,100Hz 等等说的就是系统节拍率。
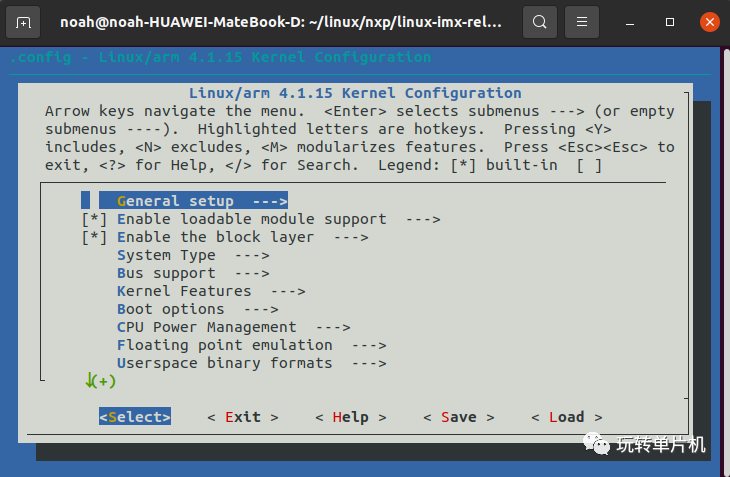
系统节拍率是可以设置的,单位是 Hz,在编译 Linux 内核的时候可以通过图形化界面设置系统节拍率,按照如下路径打开配置界面:
-> Kernel Features -> Timer frequency ([=y])
效果图:
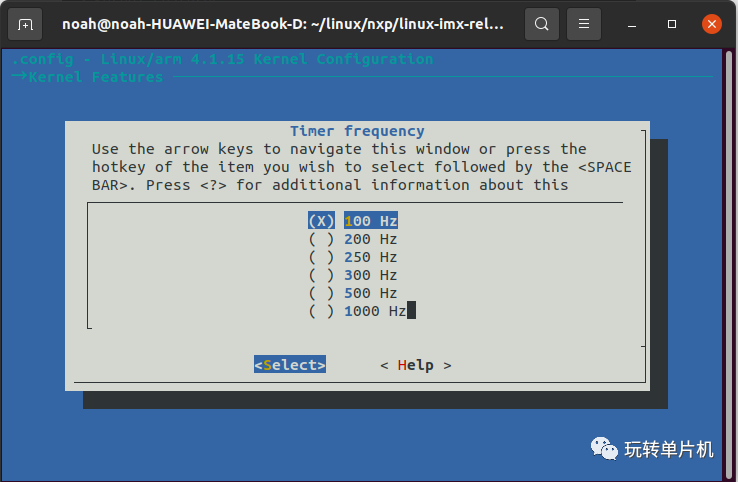
在内核文件路径通过输入:make menuconfig指令打开图形化配置界面!
可以在.config文件中找到对应的配置,在内核文件路径通过输入:gedit .config指令打开:
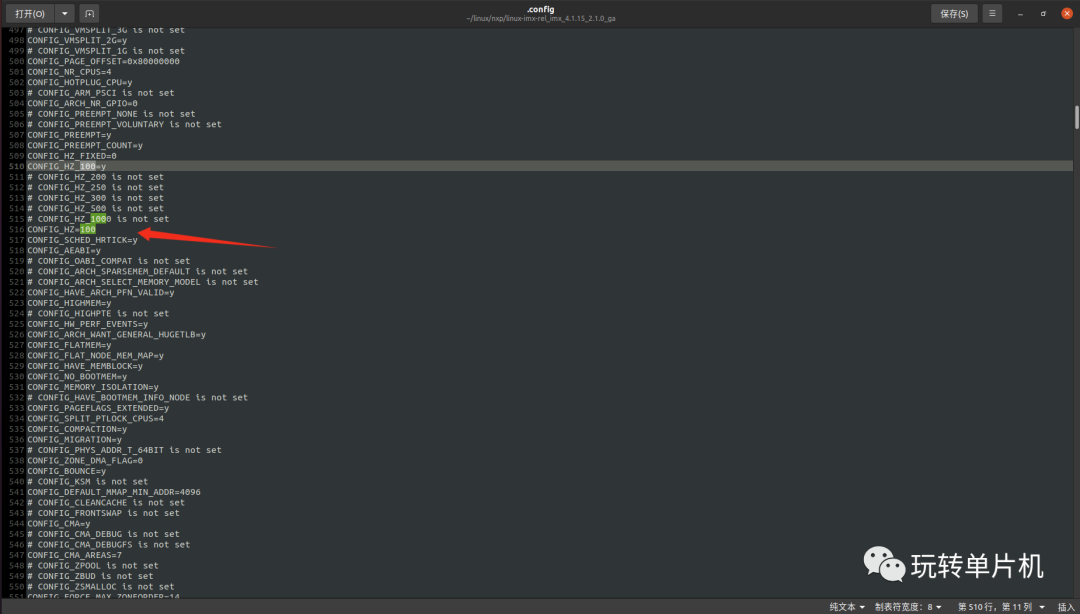
CONFIG_HZ 为 100, Linux 内核会使用 CONFIG_HZ 来设置自己的系统时钟。打开文件 include/asm-generic/param.h,有如下内容:
#ifndef __ASM_GENERIC_PARAM_H #define __ASM_GENERIC_PARAM_H #include# undef HZ # define HZ CONFIG_HZ /* Internal kernel timer frequency */ # define USER_HZ 100 /* some user interfaces are */ # define CLOCKS_PER_SEC (USER_HZ) /* in "ticks" like times() */ #endif /* __ASM_GENERIC_PARAM_H */
宏 HZ 就是 CONFIG_HZ,因此 HZ=100,后面编写 Linux驱动的时候会常常用到 HZ,因为 HZ 表示一秒的节拍数,也就是频率。
高节拍率会提高系统时间精度,如果采用 100Hz 的节拍率,时间精度就是 10ms,采用1000Hz 的话时间精度就是 1ms,精度提高了 10 倍。
高精度时钟能够以更高的精度运行,时间测量也更加准确。高节拍率会导致中断的产生更加频繁,频繁的中断会加剧系统的负担, 1000Hz 和 100Hz的系统节拍率相比,系统要花费 10 倍的“精力”去处理中断。
中断服务函数占用处理器的时间增加,但是现在的处理器性能都很强大,所以采用 1000Hz 的系统节拍率并不会增加太大的负载压力。
根据自己的实际情况,选择合适的系统节拍率,本教程全部采用默认的 100Hz 系统节拍率。
Linux 内核使用全局变量 jiffies 来记录系统从启动以来的系统节拍数,系统启动的时候会将 jiffies 初始化为 0,jiffies 定义在文件 include/linux/jiffies.h 中,定义如下:
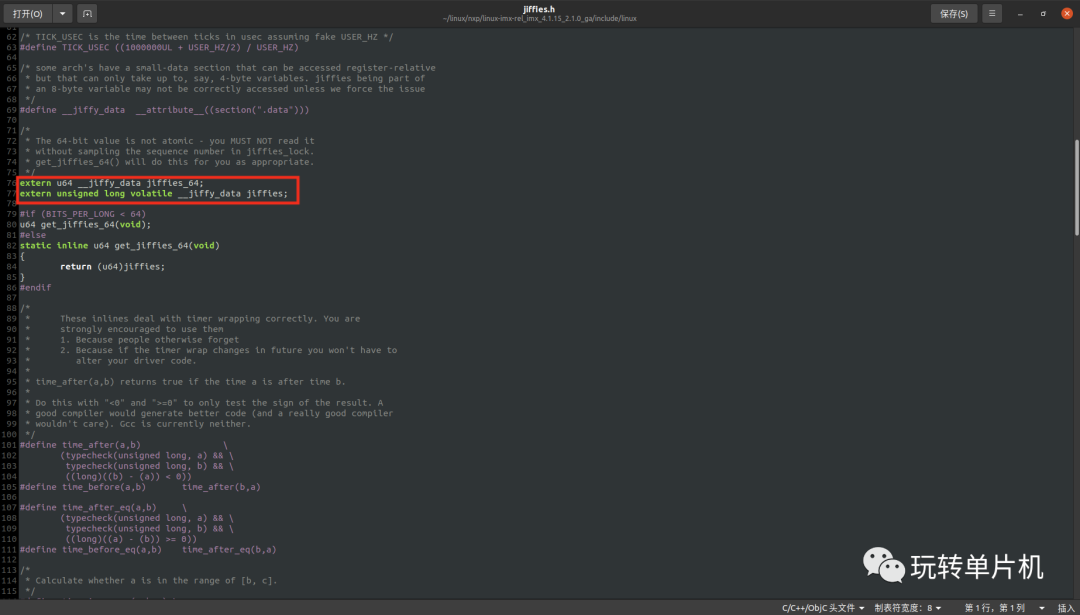
jiffies_64 和 jiffies 其实是同一个东西, jiffies_64 用于 64 位系统,而 jiffies 用于 32 位系统。当访问 jiffies 的时候其实访问的是 jiffies_64 的低 32 位,使用 get_jiffies_64 这个函数可以获取 jiffies_64 的值。
在 32 位的系统上读取 jiffies 的值,在 64 位的系统上 jiffes 和 jiffies_64表示同一个变量,因此也可以直接读取 jiffies 的值。所以不管是 32 位的系统还是 64 位系统,都可以使用 jiffies。
| 绕回
前面说了 HZ 表示每秒的节拍数,jiffies 表示系统运行的 jiffies 节拍数,所以 jiffies/HZ 就是系统运行时间,单位为秒。
不管是 32 位还是 64 位的 jiffies,都有溢出的风险,溢出以后会重新从 0 开始计数,相当于绕回来了,因此有些资料也将这个现象也叫做绕回。
假如 HZ 为最大值 1000 的时候,32 位的 jiffies 只需要 49.7 天就发生了绕回,对于 64 位的 jiffies 来说大概需要5.8 亿年才能绕回,因此 jiffies_64 的绕回忽略不计。处理 32 位 jiffies 的绕回显得尤为重要,Linux 内核提供了如表 50.1.1.1 所示的几个 API 函数来处理绕回。

可以在这个文件中找到定义:
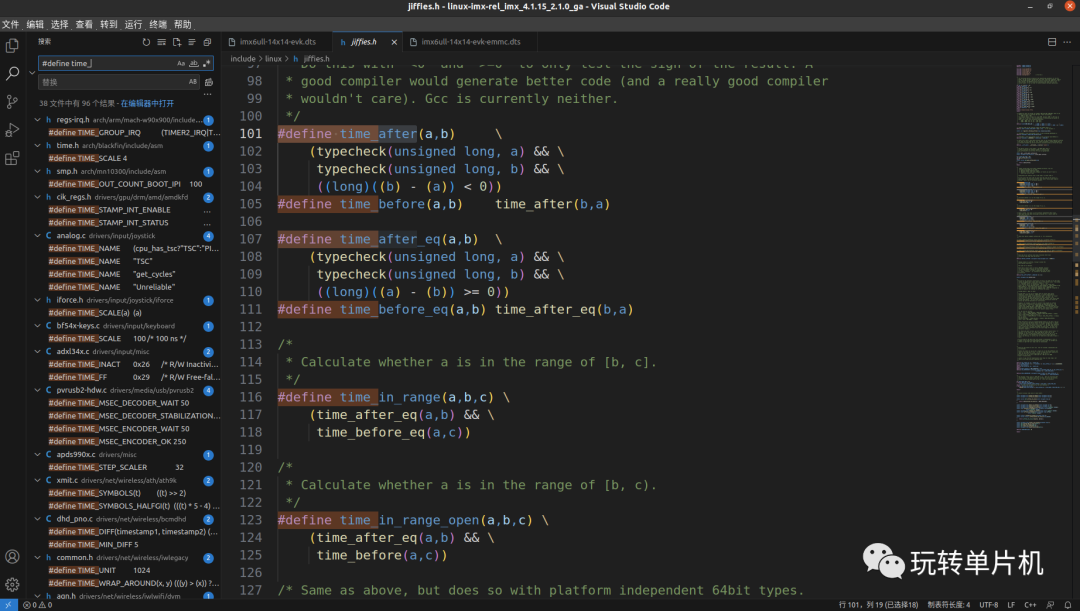
如果 unkown 超过 known 的话,time_after 函数返回真,否则返回假。如果 unkown 没有超过 known 的话 time_before 函数返回真,否则返回假。time_after_eq 函数和 time_after 函数类似,只是多了判断等于这个条件。同理,time_before_eq 函数和 time_before 函数也类似。比如要判断某段代码执行时间有没有超时,此时就可以使用如下所示代码:
unsigned long timeout;
timeout = jiffies + (2 * HZ);  /* 超时的时间点 */

/*************************************
具体的代码
************************************/

/* 判断有没有超时 */
if(time_before(jiffies, timeout))
{
    /* 超时未发生 */
}
else
{
    /* 超时发生 */
}
timeout 就是超时时间点,比如我们要判断代码执行时间是不是超过了 2 秒,那么超时时间点就是 jiffies+(2*HZ),如果 jiffies 大于 timeout 那就表示超时了,否则就是没有超时。
为了方便开发,Linux 内核提供了几个 jiffies 和 ms、us、ns 之间的转换函数:

| 定时器
定时器是一个很常用的功能,需要周期性处理的工作都要用到定时器。定时器大体分两类,一个是硬件定时器,一个是软件定时器,而软件定时器需要硬件定时器做基础,通过软件的方式使用无限拓展(理论上)的软件定时器,使用了操作系统后,往往是使用软件定时器,可以不需要再对硬件定时器进行初始化配置。
Linux 内核定时器使用很简单,只需要提供超时时间(相当于定时值)和定时处理函数即可,当超时时间到了以后设置的定时处理函数就会执行,和我们使用硬件定时器的套路一样,只是使用内核定时器不需要做一大堆的寄存器初始化工作。
在使用内核定时器的时候要注意一点,内核定时器并不是周期性运行的,超时以后就会自动关闭,因此如果想要实现周期性定时,那么就需要在定时处理函数中重新开启定时器。Linux 内核使用 timer_list 结构体表示内核定时器,timer_list 定义在文件include/linux/timer.h 中,定义如下(省略掉条件编译):
struct timer_list {
    struct list_head entry;
    unsigned long expires;
    struct tvec_base *base; /* 定时器超时时间,单位是节拍数 */
    void (*function)(unsigned long); /* 定时处理函数 */
    unsigned long data; /* 要传递给 function 函数的参数 */
    int slack;
};
要使用内核定时器首先要先定义一个 timer_list 变量,表示定时器,tiemr_list 结构体的expires 成员变量表示超时时间,单位为节拍数。比如现在需要定义一个周期为 2 秒的定时器,那么这个定时器的超时时间就是 jiffies+(2*HZ),因此 expires=jiffies+(2*HZ)。function 就是定时器超时以后的定时处理函数,要做的工作或处理就放到这个函数里面,需要根据需求编写这个定时处理函数。
API函数
init_timer 函数
init_timer 函数负责初始化 timer_list 类型变量,当我们定义了一个 timer_list 变量以后一定要先用 init_timer 初始化一下。init_timer 函数原型如下:
/*
timer:要初始化定时器。
返回值:没有返回值。
*/
void init_timer(struct timer_list *timer)
add_timer 函数
add_timer 函数用于向 Linux 内核注册定时器,使用 add_timer 函数向内核注册定时器以后,定时器就会开始运行,函数原型如下:
/*
timer:要注册的定时器。
返回值:没有返回值。
*/
void add_timer(struct timer_list *timer)
del_timer 函数
del_timer 函数用于删除一个定时器,不管定时器有没有被激活,都可以使用此函数删除。在多处理器系统上,定时器可能会在其他的处理器上运行,因此在调用 del_timer 函数删除定时器之前要先等待其他处理器的定时处理器函数退出。del_timer 函数原型如下:
/*
timer:要删除的定时器。
返回值:0,定时器还没被激活;1,定时器已经激活
*/
int del_timer(struct timer_list * timer)
del_timer_sync 函数
del_timer_sync 函数是 del_timer 函数的同步版,会等待其他处理器使用完定时器再删除,del_timer_sync 不能使用在中断上下文中。del_timer_sync 函数原型如下所示:
/*
timer:要删除的定时器。
返回值:0,定时器还没被激活;1,定时器已经激活。
*/
int del_timer_sync(struct timer_list *timer)
mod_timer 函数
mod_timer 函数用于修改定时值,如果定时器还没有激活的话,mod_timer 函数会激活定时器!函数原型如下:
/*
timer:要修改超时时间(定时值)的定时器。
expires:修改后的超时时间。
返回值:0,调用 mod_timer 函数前定时器未被激活;1,调用 mod_timer 函数前定时器已被激活。
*/
int mod_timer(struct timer_list *timer, unsigned long expires)
内核定时器一般的使用流程如下所示:
struct timer_list timer; /* 定义定时器 */

/* 定时器回调函数 */
void function(unsigned long arg)
{
    /*
    * 定时器处理代码
    */

    /* 如果需要定时器周期性运行的话就使用 mod_timer
    * 函数重新设置超时值并且启动定时器。
    */

    mod_timer(&dev->timertest, jiffies + msecs_to_jiffies(2000));
}

/* 初始化函数 */
void init(void)
{
    init_timer(&timer); /* 初始化定时器*/

    timer.function = function; /* 设置定时处理函数*/
    timer.expires=jffies + msecs_to_jiffies(2000);/* 超时时间 2 秒 */
    timer.data = (unsigned long)&dev;  /* 将设备结构体作为参数 */

    add_timer(&timer); /* 启动定时器 */
}

/* 退出函数 */
void exit(void)
{
    del_timer(&timer); /* 删除定时器 */
    /* 或者使用 */
    del_timer_sync(&timer);
}
Linux 内核短延时函数
有时候需要在内核中实现短延时,尤其是在 Linux 驱动中。Linux 内核提供了毫秒、微秒和纳秒延时函数:

| LED闪烁
通过设置一个定时器来实现周期性的闪烁 LED 灯,通过这个案例来学习定时器的基本使用,这个实验不需要看应用层。
简单使用型:
#include#include #include #include #include #include #include #include #include #include #include #include #include #include #include #include // #include // #include // #include #define CHRDEVBASE_CNT 1 /* 设备号个数 */ #define CHRDEVBASE_NAME "chrdevbase" /* 名字 */ /* chrdevbase 设备结构体 */ struct newchr_dev{ dev_t devid; /* 设备号 */ struct cdev cdev; /* cdev */ struct class *class; /* 类 */ struct device *device; /* 设备 */ int major; /* 主设备号 */ int minor; /* 次设备号 */ struct device_node *nd; /* 设备节点 */ int led_gpio; /* led 所使用的 GPIO 编号 */ struct timer_list timer; /* 定义一个定时器 */ }; struct newchr_dev chrdevbase;/* 自定义字符设备 */ /* * @description : LED 硬件初始化 * @param : 无 * @return : 无 */ static int led_hal_init(void) { int ret = 0; /* 设置 LED 所使用的 GPIO */ /* 1、获取设备节点:gpioled */ chrdevbase.nd = of_find_node_by_path("/gpioled"); if(chrdevbase.nd == NULL) { printk("chrdevbase node cant not found! "); return -EINVAL; } else { printk("chrdevbase node has been found! "); } /* 2、 获取设备树中的 gpio 属性,得到 LED 所使用的 LED 编号 */ chrdevbase.led_gpio = of_get_named_gpio(chrdevbase.nd, "led-gpio", 0); if(chrdevbase.led_gpio < 0) { printk("can't get led-gpio"); return -EINVAL; } printk("led-gpio num = %d ", chrdevbase.led_gpio); /* 3、设置 GPIO1_IO03 为输出,并且输出高电平,默认关闭 LED 灯 */ ret = gpio_direction_output(chrdevbase.led_gpio, 1); if(ret < 0) { printk("can't set gpio! "); } return 0; } /* * @description : 打开设备 * @param - inode : 传递给驱动的inode * @param - filp : 设备文件,file结构体有个叫做private_data的成员变量 * 一般在open的时候将private_data指向设备结构体。 * @return : 0 成功;其他 失败 */ static int chrdevbase_open(struct inode *inode, struct file *filp) { printk("[BSP]chrdevbase open! "); filp->private_data = &chrdevbase; /* 设置私有数据 */ return 0; } /* * @description : 从设备读取数据 * @param - filp : 要打开的设备文件(文件描述符) * @param - buf : 返回给用户空间的数据缓冲区 * @param - cnt : 要读取的数据长度 * @param - offt : 相对于文件首地址的偏移 * @return : 读取的字节数,如果为负值,表示读取失败 */ static ssize_t chrdevbase_read(struct file *filp, char __user *buf, size_t cnt, loff_t *offt) { printk("chrdevbase read! "); return 0; } /* * @description : 向设备写数据 * @param - filp : 设备文件,表示打开的文件描述符 * @param - buf : 要写给设备写入的数据 * @param - cnt : 要写入的数据长度 * @param - offt : 相对于文件首地址的偏移 * @return : 写入的字节数,如果为负值,表示写入失败 */ static ssize_t chrdevbase_write(struct file *filp, const char __user *buf, size_t cnt, loff_t *offt) { printk("chrdevbase write! "); return 0; } /* * @description : 关闭/释放设备 * @param - filp : 要关闭的设备文件(文件描述符) * @return : 0 成功;其他 失败 */ static int chrdevbase_release(struct inode *inode, struct file *filp) { printk("[BSP]release! "); return 0; } /* * 设备操作函数结构体 */ static struct file_operations chrdevbase_fops = { .owner = THIS_MODULE, .open = chrdevbase_open, .read = chrdevbase_read, .write = chrdevbase_write, .release = chrdevbase_release, }; /* 定时器回调函数 */ void timer_function(unsigned long arg) { struct newchr_dev *dev = (struct newchr_dev *)arg; static int sta = 1; sta = !sta; /* 每次都取反,实现 LED 灯反转 */ gpio_set_value(dev->led_gpio, sta); /* 重启定时器 */ mod_timer(&dev->timer, jiffies + msecs_to_jiffies(500)); } /* * @description : 驱动入口函数 * @param : 无 * @return : 0 成功;其他 失败 */ static int __init chrdevbase_init(void) { /* 初始化硬件 */ led_hal_init(); /* 注册字符设备驱动 */ /* 1、创建设备号 */ if (chrdevbase.major) { /* 定义了设备号 */ chrdevbase.devid = MKDEV(chrdevbase.major, 0); register_chrdev_region(chrdevbase.devid, CHRDEVBASE_CNT, CHRDEVBASE_NAME); } else { /* 没有定义设备号 */ alloc_chrdev_region(&chrdevbase.devid, 0, CHRDEVBASE_CNT,CHRDEVBASE_NAME); /* 申请设备号 */ chrdevbase.major = MAJOR(chrdevbase.devid); /* 获取主设备号 */ chrdevbase.minor = MINOR(chrdevbase.devid); /* 获取次设备号 */ } printk("newcheled major=%d,minor=%d ",chrdevbase.major,chrdevbase.minor); /* 2、初始化 cdev */ chrdevbase.cdev.owner = THIS_MODULE; cdev_init(&chrdevbase.cdev, &chrdevbase_fops); /* 3、添加一个 cdev */ cdev_add(&chrdevbase.cdev, chrdevbase.devid, CHRDEVBASE_CNT); /* 4、创建类 */ chrdevbase.class = class_create(THIS_MODULE, CHRDEVBASE_NAME); if (IS_ERR(chrdevbase.class)) { return PTR_ERR(chrdevbase.class); } /* 5、创建设备 */ chrdevbase.device = device_create(chrdevbase.class, NULL,chrdevbase.devid, NULL, CHRDEVBASE_NAME); if (IS_ERR(chrdevbase.device)) { return PTR_ERR(chrdevbase.device); } /* 6、初始化 timer */ init_timer(&chrdevbase.timer); chrdevbase.timer.function = timer_function; chrdevbase.timer.expires = jiffies + msecs_to_jiffies(500); chrdevbase.timer.data = (unsigned long)&chrdevbase; add_timer(&chrdevbase.timer); return 0; } /* * @description : 驱动出口函数 * @param : 无 * @return : 无 */ static void __exit chrdevbase_exit(void) { gpio_set_value(chrdevbase.led_gpio, 1); /* 卸载驱动的时候关闭 LED */ del_timer_sync(&chrdevbase.timer); /* 删除 timer */ /* 注销字符设备 */ cdev_del(&chrdevbase.cdev);/* 删除 cdev */ unregister_chrdev_region(chrdevbase.devid, CHRDEVBASE_CNT);/* 注销设备号 */ device_destroy(chrdevbase.class, chrdevbase.devid);/* 销毁设备 */ class_destroy(chrdevbase.class);/* 销毁类 */ printk("[BSP]chrdevbase exit! "); } /* * 将上面两个函数指定为驱动的入口和出口函数 */ module_init(chrdevbase_init); module_exit(chrdevbase_exit); /* * LICENSE和作者信息 */ MODULE_LICENSE("GPL"); MODULE_AUTHOR("zuozhongkai");
套路分析:
#include#include #include #include #include #include #include #include #include #include #include #include #include #include #include #include #define CHRDEVBASE_CNT 1 /* 设备号个数 */ #define CHRDEVBASE_NAME "chrdevbase" /* 名字 */ /* chrdevbase 设备结构体 */ struct newchr_dev{ .... struct timer_list timer; /* 定义一个定时器 */ }; struct newchr_dev chrdevbase;/* 自定义字符设备 */ /* * @description : LED 硬件初始化 * @param : 无 * @return : 无 */ static int led_hal_init(void) { ...... return 0; } /* * @description : 打开设备 * @param - inode : 传递给驱动的inode * @param - filp : 设备文件,file结构体有个叫做private_data的成员变量 * 一般在open的时候将private_data指向设备结构体。 * @return : 0 成功;其他 失败 */ static int chrdevbase_open(struct inode *inode, struct file *filp) { ...... return 0; } /* * @description : 从设备读取数据 * @param - filp : 要打开的设备文件(文件描述符) * @param - buf : 返回给用户空间的数据缓冲区 * @param - cnt : 要读取的数据长度 * @param - offt : 相对于文件首地址的偏移 * @return : 读取的字节数,如果为负值,表示读取失败 */ static ssize_t chrdevbase_read(struct file *filp, char __user *buf, size_t cnt, loff_t *offt) { ...... return 0; } /* * @description : 向设备写数据 * @param - filp : 设备文件,表示打开的文件描述符 * @param - buf : 要写给设备写入的数据 * @param - cnt : 要写入的数据长度 * @param - offt : 相对于文件首地址的偏移 * @return : 写入的字节数,如果为负值,表示写入失败 */ static ssize_t chrdevbase_write(struct file *filp, const char __user *buf, size_t cnt, loff_t *offt) { ...... return 0; } /* * @description : 关闭/释放设备 * @param - filp : 要关闭的设备文件(文件描述符) * @return : 0 成功;其他 失败 */ static int chrdevbase_release(struct inode *inode, struct file *filp) { ...... return 0; } /* * 设备操作函数结构体 */ static struct file_operations chrdevbase_fops = { .owner = THIS_MODULE, .open = chrdevbase_open, .read = chrdevbase_read, .write = chrdevbase_write, .release = chrdevbase_release, }; /* 定时器回调函数 */ void timer_function(unsigned long arg) { struct newchr_dev *dev = (struct newchr_dev *)arg; static int sta = 1; sta = !sta; /* 每次都取反,实现 LED 灯反转 */ gpio_set_value(dev->led_gpio, sta); /* 重启定时器 */ mod_timer(&dev->timer, jiffies + msecs_to_jiffies(500)); } /* * @description : 驱动入口函数 * @param : 无 * @return : 0 成功;其他 失败 */ static int __init chrdevbase_init(void) { /* 初始化硬件 */ led_hal_init(); /* 注册字符设备驱动 */ /* 1、创建设备号 */ ...... /* 2、初始化 cdev */ ...... /* 3、添加一个 cdev */ ...... /* 4、创建类 */ ...... /* 5、创建设备 */ ...... /* 6、初始化 timer */ init_timer(&chrdevbase.timer); chrdevbase.timer.function = timer_function; chrdevbase.timer.expires = jiffies + msecs_to_jiffies(500); chrdevbase.timer.data = (unsigned long)&chrdevbase; add_timer(&chrdevbase.timer); return 0; } /* * @description : 驱动出口函数 * @param : 无 * @return : 无 */ static void __exit chrdevbase_exit(void) { gpio_set_value(chrdevbase.led_gpio, 1); /* 卸载驱动的时候关闭 LED */ del_timer_sync(&chrdevbase.timer); /* 删除 timer */ /* 注销字符设备 */ cdev_del(&chrdevbase.cdev);/* 删除 cdev */ unregister_chrdev_region(chrdevbase.devid, CHRDEVBASE_CNT);/* 注销设备号 */ device_destroy(chrdevbase.class, chrdevbase.devid);/* 销毁设备 */ class_destroy(chrdevbase.class);/* 销毁类 */ printk("[BSP]chrdevbase exit! "); } /* * 将上面两个函数指定为驱动的入口和出口函数 */ module_init(chrdevbase_init); module_exit(chrdevbase_exit); /* * LICENSE和作者信息 */ MODULE_LICENSE("GPL"); MODULE_AUTHOR("zuozhongkai");
| ioctl
上边那个定时器案例是固定周期, 可用借助ioctl来动态修改定时器周期!
驱动:
#include#include #include #include #include #include #include #include #include #include #include #include #include #include #include #include #include #include #include #define CHRDEVBASE_CNT 1 /* 设备号个数 */ #define CHRDEVBASE_NAME "chrdevbase" /* 名字 */ #define CLOSE_CMD (_IO(0xEF, 0x01)) /* 关闭定时器 */ #define OPEN_CMD (_IO(0xEF, 0x02)) /* 打开定时器 */ #define SETPERIOD_CMD (_IO(0xEF, 0x03)) /* 设置定时器周期命令 */ #define LEDON 1 /* 开灯 */ #define LEDOFF 0 /* 关灯 */ /* chrdevbase 设备结构体 */ struct newchr_dev{ dev_t devid; /* 设备号 */ struct cdev cdev; /* cdev */ struct class *class; /* 类 */ struct device *device; /* 设备 */ int major; /* 主设备号 */ int minor; /* 次设备号 */ struct device_node *nd; /* 设备节点 */ int led_gpio; /* led 所使用的 GPIO 编号 */ int timeperiod; /* 定时周期(ms) */ struct timer_list timer; /* 定义一个定时器 */ }; struct newchr_dev chrdevbase;/* 自定义字符设备 */ /* * @description : LED 硬件初始化 * @param : 无 * @return : 无 */ static int led_hal_init(void) { int ret = 0; /* 设置 LED 所使用的 GPIO */ /* 1、获取设备节点:gpioled */ chrdevbase.nd = of_find_node_by_path("/gpioled"); if(chrdevbase.nd == NULL) { printk("chrdevbase node cant not found! "); return -EINVAL; } else { printk("chrdevbase node has been found! "); } /* 2、 获取设备树中的 gpio 属性,得到 LED 所使用的 LED 编号 */ chrdevbase.led_gpio = of_get_named_gpio(chrdevbase.nd, "led-gpio", 0); if(chrdevbase.led_gpio < 0) { printk("can't get led-gpio"); return -EINVAL; } printk("led-gpio num = %d ", chrdevbase.led_gpio); /* 3、设置 GPIO1_IO03 为输出,并且输出高电平,默认关闭 LED 灯 */ ret = gpio_direction_output(chrdevbase.led_gpio, 1); if(ret < 0) { printk("can't set gpio! "); } return 0; } /* * @description : 打开设备 * @param - inode : 传递给驱动的inode * @param - filp : 设备文件,file结构体有个叫做private_data的成员变量 * 一般在open的时候将private_data指向设备结构体。 * @return : 0 成功;其他 失败 */ static int chrdevbase_open(struct inode *inode, struct file *filp) { int ret = 0; printk("[BSP]chrdevbase open! "); filp->private_data = &chrdevbase; /* 设置私有数据 */ chrdevbase.timeperiod = 1000; /* 默认周期为 1s */ ret = led_hal_init(); /* 初始化 LED IO */ return 0; } /* * @description : ioctl 函数, * @param – filp : 要打开的设备文件(文件描述符) * @param - cmd : 应用程序发送过来的命令 * @param - arg : 参数 * @return : 0 成功;其他 失败 */ static long timer_unlocked_ioctl(struct file *filp, unsigned int cmd, unsigned long arg) { struct newchr_dev *dev = (struct newchr_dev *)filp->private_data; int timerperiod; switch (cmd) { case CLOSE_CMD: /* 关闭定时器 */ // 等待其他处理器使用完定时器再删除 del_timer_sync(&dev->timer); break; case OPEN_CMD: /* 打开定时器 */ timerperiod = dev->timeperiod; mod_timer(&dev->timer, jiffies + msecs_to_jiffies(timerperiod)); break; case SETPERIOD_CMD: /* 设置定时器周期 */ dev->timeperiod = arg; mod_timer(&dev->timer, jiffies + msecs_to_jiffies(arg)); break; default: break; } return 0; } /* * 设备操作函数结构体 */ static struct file_operations chrdevbase_fops = { .owner = THIS_MODULE, .open = chrdevbase_open, .unlocked_ioctl = timer_unlocked_ioctl, }; /* 定时器回调函数 */ void timer_function(unsigned long arg) { struct newchr_dev *dev = (struct newchr_dev *)arg; static int sta = 1; sta = !sta; /* 每次都取反,实现 LED 灯反转 */ gpio_set_value(dev->led_gpio, sta); /* 重启定时器 */ mod_timer(&dev->timer, jiffies + msecs_to_jiffies(dev->timeperiod)); } /* * @description : 驱动入口函数 * @param : 无 * @return : 0 成功;其他 失败 */ static int __init chrdevbase_init(void) { /* 注册字符设备驱动 */ /* 1、创建设备号 */ if (chrdevbase.major) { /* 定义了设备号 */ chrdevbase.devid = MKDEV(chrdevbase.major, 0); register_chrdev_region(chrdevbase.devid, CHRDEVBASE_CNT, CHRDEVBASE_NAME); } else { /* 没有定义设备号 */ alloc_chrdev_region(&chrdevbase.devid, 0, CHRDEVBASE_CNT,CHRDEVBASE_NAME); /* 申请设备号 */ chrdevbase.major = MAJOR(chrdevbase.devid); /* 获取主设备号 */ chrdevbase.minor = MINOR(chrdevbase.devid); /* 获取次设备号 */ } printk("newcheled major=%d,minor=%d ",chrdevbase.major,chrdevbase.minor); /* 2、初始化 cdev */ chrdevbase.cdev.owner = THIS_MODULE; cdev_init(&chrdevbase.cdev, &chrdevbase_fops); /* 3、添加一个 cdev */ cdev_add(&chrdevbase.cdev, chrdevbase.devid, CHRDEVBASE_CNT); /* 4、创建类 */ chrdevbase.class = class_create(THIS_MODULE, CHRDEVBASE_NAME); if (IS_ERR(chrdevbase.class)) { return PTR_ERR(chrdevbase.class); } /* 5、创建设备 */ chrdevbase.device = device_create(chrdevbase.class, NULL,chrdevbase.devid, NULL, CHRDEVBASE_NAME); if (IS_ERR(chrdevbase.device)) { return PTR_ERR(chrdevbase.device); } /* 6、初始化 timer */ init_timer(&chrdevbase.timer); chrdevbase.timer.function = timer_function; chrdevbase.timer.expires = jiffies + msecs_to_jiffies(500); chrdevbase.timer.data = (unsigned long)&chrdevbase; // add_timer(&chrdevbase.timer); return 0; } /* * @description : 驱动出口函数 * @param : 无 * @return : 无 */ static void __exit chrdevbase_exit(void) { gpio_set_value(chrdevbase.led_gpio, 1); /* 卸载驱动的时候关闭 LED */ del_timer_sync(&chrdevbase.timer); /* 删除 timer */ /* 注销字符设备 */ cdev_del(&chrdevbase.cdev);/* 删除 cdev */ unregister_chrdev_region(chrdevbase.devid, CHRDEVBASE_CNT);/* 注销设备号 */ device_destroy(chrdevbase.class, chrdevbase.devid);/* 销毁设备 */ class_destroy(chrdevbase.class);/* 销毁类 */ printk("[BSP]chrdevbase exit! "); } /* * 将上面两个函数指定为驱动的入口和出口函数 */ module_init(chrdevbase_init); module_exit(chrdevbase_exit); /* * LICENSE和作者信息 */ MODULE_LICENSE("GPL"); MODULE_AUTHOR("zuozhongkai");
应用:
#include "stdio.h"
#include "unistd.h"
#include "sys/types.h"
#include "sys/stat.h"
#include "fcntl.h"
#include "stdlib.h"
#include "string.h"
#include "linux/ioctl.h"

/* 命令值 */
#define CLOSE_CMD (_IO(0XEF, 0x1)) /* 关闭定时器 */
#define OPEN_CMD (_IO(0XEF, 0x2)) /* 打开定时器 */
#define SETPERIOD_CMD (_IO(0XEF, 0x3)) /* 设置定时器周期命令 */

/*
 * @description        : main主程序
 * @param - argc     : argv数组元素个数
 * @param - argv     : 具体参数
 * @return             : 0 成功;其他 失败
 */
int main(int argc, char *argv[])
{
    int fd, ret;
    char *filename;
    unsigned int cmd;
    unsigned int arg;
    char writebuf[100];
    unsigned char str[100];

    if(argc != 2){
        printf("[APP]Error Usage!
");
        return -1;
    }

    filename = argv[1];

    /* 打开驱动文件 */
    fd  = open(filename, O_RDWR);
    if(fd < 0){
        printf("[APP]Can't open file %s
", filename);
        return -1;
    }

    while (1) {
        printf("Input CMD:");
        ret = scanf("%d", &cmd);
        if (ret != 1) { /* 参数输入错误 */
            return 1; /* 防止卡死 */
        }

        if(cmd == 1) /* 关闭 LED 灯 */
            cmd = CLOSE_CMD;
        else if(cmd == 2) /* 打开 LED 灯 */
            cmd = OPEN_CMD;
        else if(cmd == 3) {
            cmd = SETPERIOD_CMD; /* 设置周期值 */
            printf("Input Timer Period:");
            ret = scanf("%d", &arg);
            if (ret != 1) { /* 参数输入错误 */
                return 1; /* 防止卡死 */
            }
        }
        ioctl(fd, cmd, arg); /* 控制定时器的打开和关闭 */
    }
    close(fd);

    return 0;
}
使用:

上文就是简单介绍了一下定时器, 简单使用了一下定时器, 后边根据各自需求进一步深入学习.
审核编辑:刘清
-
Linux驱动开发-内核定时器2022-09-17 2114
-
移植NXP官方linux 5.4内核到i.MX6ULL开发板2022-12-19 2641
-
如何在i.MX6ULL睡眠时停止刷新LCD?2025-04-03 884
-
【i.MX6UL/i.MX6ULL开发常见问题】单独编译内核,uboot生成很多文件,具体用哪一个?2019-07-01 7341
-
I.MX6ULL终结者开发板裸机仿真jlink调试2020-07-07 2547
-
i.MX6ULL核心板资源2021-07-12 3268
-
初识 i.MX6ULL 寄存器2021-12-20 1521
-
ARM裸机篇之i.MX6ULL处理器资料分享2022-04-14 7026
-
飞凌i.MX6ULL开发板的评测,再次进阶拥有更高的性价比2020-10-27 1824
-
基于NXP i.MX6ULL处理器的FETMX6ULL-C核心板2022-04-11 1482
-
基于i.MX6ULL应用处理器的FETMX6ULL-C核心板2022-04-29 1699
-
Linux内核定时器2022-09-22 2993
-
【北京迅为】i.MX6ULL开发板移植 Debian 文件系统2022-02-10 1938
-
基于i.MX6ULL的掉电检测设计与软件测试2023-11-09 1512
-
【迅为电子】i.MX6UL和i.MX6ULL芯片区别与开发板对比2024-11-28 2024
全部0条评论

快来发表一下你的评论吧 !

