

TypeScript设计模式之适配器模式介绍
电子说
描述
No.1****简介
在实际生活中,也存在适配器的使用场景,比如:港式插头转换器、电源适配器和 USB 转接口。而在软件工程中,适配器模式的作用是解决两个软件实体间的接口不兼容的问题。使用适配器模式之后,原本由于接口不兼容而不能工作的两个软件实体就可以一起工作。
No.2****优缺点
优点
• 将目标类和适配者类解耦,通过引入一个适配器类来重用现有的适配者类,而无须修改原有代码。
• 增加了类的透明性和复用性,将具体的实现封装在适配者类中,对于客户端类来说是透明的,而且提高了适配者的复用性。
• 灵活性和扩展性都非常好,通过使用配置文件,可以很方便地更换适配器,也可以在不修改原有代码的基础上增加新的适配器类,符合开闭原则。
缺点
• 过多地使用适配器,会让系统非常零乱,不易整体进行把握。
No.3****应用场景
• 系统需要使用现有的类,而这些类的接口不符合系统的需要。
• 想要建立一个可以重复使用的类,用于与一些彼此之间没有太大关联的一些类,包括一些可能在将来引进的类一起工作。
No.4
模式结构
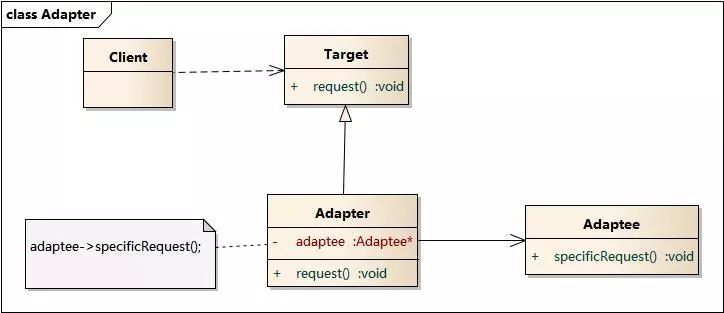
适配器模式包含以下角色:
• Target:目标抽象类
• Adapter:适配器类
• Adaptee:适配者类
• Client:客户类
适配器模式有对象适配器和类适配器两种实现,这里我们主要介绍对象适配器。
对象适配器:
No.5
实战
具体实现
定义 Target 接口
interface Target {
    request(): void;
}
创建 Adaptee(适配者) 类
class Adaptee {
public specificRequest(): void {
console.log("specificRequest of Adaptee is being called");
    }
}
创建 Adapter(适配器)类
class Adapter implements Target {
public request(): void {
console.log("Adapter's request method is being called");
var adaptee: Adaptee = new Adaptee();
        adaptee.specificRequest();
    }
}
使用示例
function show(): void {
const adapter: Adapter = new Adapter();
    adapter.request();
}
为了更好地理解适配器模式的作用,我们来举一个实际的应用示例。假设你现在拥有一个日志系统,该日志系统会将应用程序生成的所有信息保存到本地文件,具体如下:
interface Logger {
  info(message: string): Promise< void >;
}

class FileLogger implements Logger {
public async info(message: string): Promise< void > {
console.info(message);
console.info('This Message was saved with FileLogger');
  }
}
基于上述的 FileLogger 类,我们就可以在 NotificationService 通知服务中使用它:
class NotificationService {
protected logger: Logger;

constructor (logger: Logger) {
this.logger = logger;
  }

public async send(message: string): Promise< void > {
await this.logger.info(`Notification sended: ${message}`);
  }
}

(async () = > {
const fileLogger = new FileLogger();
const notificationService = new NotificationService(fileLogger);
await notificationService.send('Hello Semlinker, To File');
})();
以上代码成功运行后会输出以下结果:
Notification sended: Hello Semlinker
This Message was saved with FileLogger
但是现在我们需要使用一种新的方式来保存日志,因为随着应用的增长,我们需要将日志保存到云服务器上,而不再需要保存到本地磁盘中。因此我们需要使用另一种实现,比如:
interface CloudLogger {
  sendToServer(message: string, type: string): Promise< void >;
}

class AliLogger implements CloudLogger {
public async sendToServer(message: string, type: string): Promise< void > {
console.info(message);
console.info('This Message was saved with AliLogger');
  }
}
但这时对于我们来说,要使用这个新类,我们就可能需要重构旧的代码以使用新的日志存储方式。为了避免重构代码,我们可以考虑使用适配器来解决这个问题。
class CloudLoggerAdapter implements Logger {
protected cloudLogger: CloudLogger;

constructor (cloudLogger: CloudLogger) {
this.cloudLogger = cloudLogger;
  }

public async info(message: string): Promise< void > {
await this.cloudLogger.sendToServer(message, 'info');
  }
}
在定义好 CloudLoggerAdapter 适配器之后,我们就可以这样使用:
(async () = > {
const aliLogger = new AliLogger();
const cloudLoggerAdapter = new CloudLoggerAdapter(aliLogger);
const notificationService = new NotificationService(cloudLoggerAdapter);
await notificationService.send('Hello Kakuqo, To Cloud');
})();
以上代码成功运行后会输出以下结果:
Notification sended: Hello Kakuqo, To Cloud
This Message was saved with AliLogger
如你所见,适配器模式是一个非常有用的模式,对于任何开发人员来说,理解这种模式都是至关重要的。
日志系统适配器完整示例
接口定义
interface Logger {
  info(message: string): Promise< void >;
}

interface CloudLogger {
  sendToServer(message: string, type: string): Promise< void >;
}
日志实现类
class AliLogger implements CloudLogger {
public async sendToServer(message: string, type: string): Promise< void > {
console.info(message);
console.info('This Message was saved with AliLogger');
  }
}
适配器
class CloudLoggerAdapter implements Logger {
protected cloudLogger: CloudLogger;

constructor (cloudLogger: CloudLogger) {
this.cloudLogger = cloudLogger;
  }

public async info(message: string): Promise< void > {
await this.cloudLogger.sendToServer(message, 'info');
  }
}
通知服务类
class NotificationService {
protected logger: Logger;

constructor (logger: Logger) {
this.logger = logger;
  }

public async send(message: string): Promise< void > {
await this.logger.info(`Notification sended: ${message}`);
  }
}
使用示例
(async () = > {
const aliLogger = new AliLogger();
const cloudLoggerAdapter = new CloudLoggerAdapter(aliLogger);
const notificationService = new NotificationService(cloudLoggerAdapter);
await notificationService.send('Hello Kakuqo, To Cloud');
})();-
设计模式中什么是适配器模式?2023-08-02 2103
-
什么是硬件适配器模式2021-12-21 1303
-
引适配器模式的作用2021-11-11 1780
-
设计模式-适配器模式-以电压适配器为例2021-11-07 1379
-
JavaScript设计模式之适配器模式2021-11-06 851
-
适配器模式实现2021-09-15 1799
-
适配器模式和装饰模式的区别2018-01-15 7620
-
适配器模式和代理模式的区别2018-01-12 5753
-
适配器模式、装饰器模式、代理模式的区别2017-10-18 18030
全部0条评论

快来发表一下你的评论吧 !
