

ART Pi Smart基于RT-Thread Smart系统的LVGL移植
电子说
描述
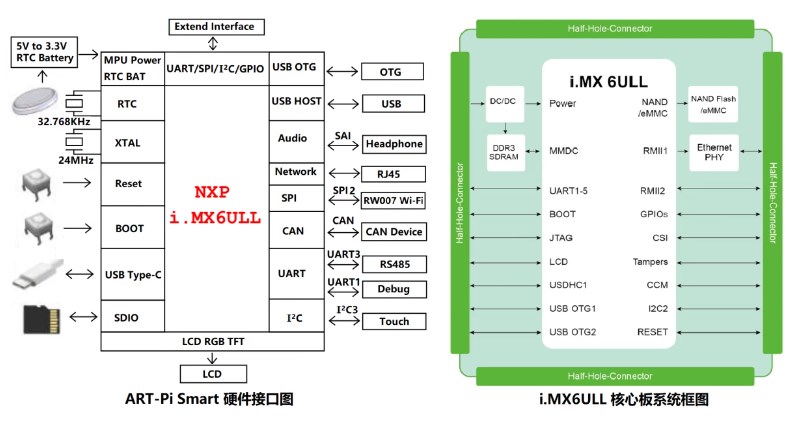
ART-Pi Smart开发板为RT-Thread联合百问科技出品,使用的是 NXP 公司的 i.MX6ULL 处理器,具备单核 ARM Cortex-A7,最高运行频率可以达到 800MHz。拥有 1 路 LCD 显示、1 路数字摄像头、8 路 UART、2 路 USB OTG、2 路 CAN、2 路以太网等资源,便于客户灵活定制。
概述
我申请测试是想实现3D打印机的高级功能的,由于测试时间有限(本来规定测试时间为一个月,但是板子到手只有不到半个月)。要在这么短的时间内移植全部程序是远远不够的,特别是RT-Thread Smart系统还需要时间学习,所以决定移植基于LVGL的图形UI。查看了RT-Thread官方网站,还没有基于LVGL的移植报告,这样就更有意义。
RT-Thread Smart简介
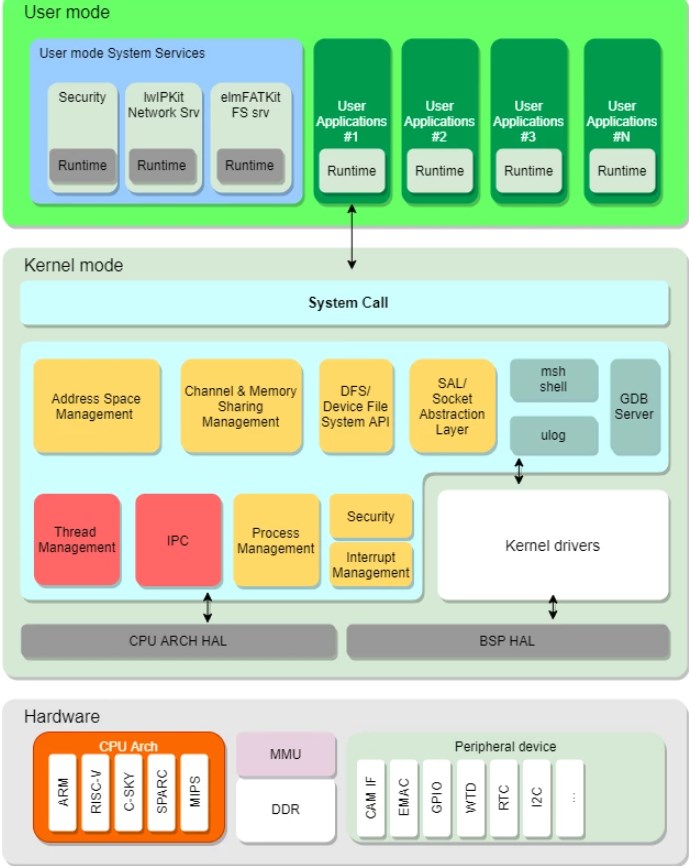
RT-Thread Smart(简称 rt-smart)是基于 RT-Thread 操作系统衍生的新分支,面向带 MMU,中高端应用的芯片,例如 ARM Cortex-A 系列芯片,MIPS 芯片,带 MMU 的 RISC-V 芯片等。rt-smart 在 RT-Thread 操作系统的基础上启用独立、完整的进程方式,同时以混合微内核模式执行。rt-smart 是一款高性能混合微内核操作系统,主要包含内核模块和用户态运行时环境。内核模块包括虚拟地址空间管理、进程管理、线程管理、进程间通信、虚拟文件系统框架、网络接口层框架、设备驱动框架、msh 控制台、日志系统、异常中断管理和系统调用接口,设备驱动框架包含串口驱动框架和看门狗驱动框架。用户态运行时环境包括用户态 C 库。
LVGL简介
LVGL(轻量级和通用图形库)是一个免费和开源的图形库,它提供了创建嵌入式GUI所需的一切,具有易于使用的图形元素,美丽的视觉效果和低内存占用。LVGL的项目作者是来自匈牙利首都布达佩斯的 Gábor Kiss-Vámosi 。Kiss 在2016年将其并发布在 GitHub 上。当时叫 LittlevGL而不是LVGL,后来作者统一修改为 LVGL。 像一般的开源项目的那样,它是作为一个人的项目开始的。 从那时起,陆续有近 100 名贡献者参与了项目开发,使得 LVGL 逐渐成为最受欢迎的嵌入式图形库之一。

开发环境
硬件
硬件环境搭建
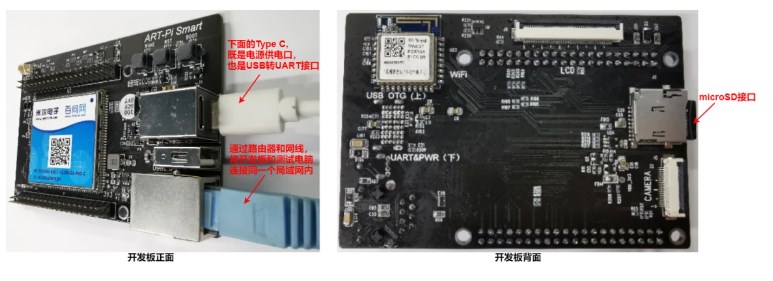
电源输入:5V,500 mA,通过开发板 USB-TypeC(下面)供电。如下图所示,通过测试电脑的 USB 直接对开发板供电
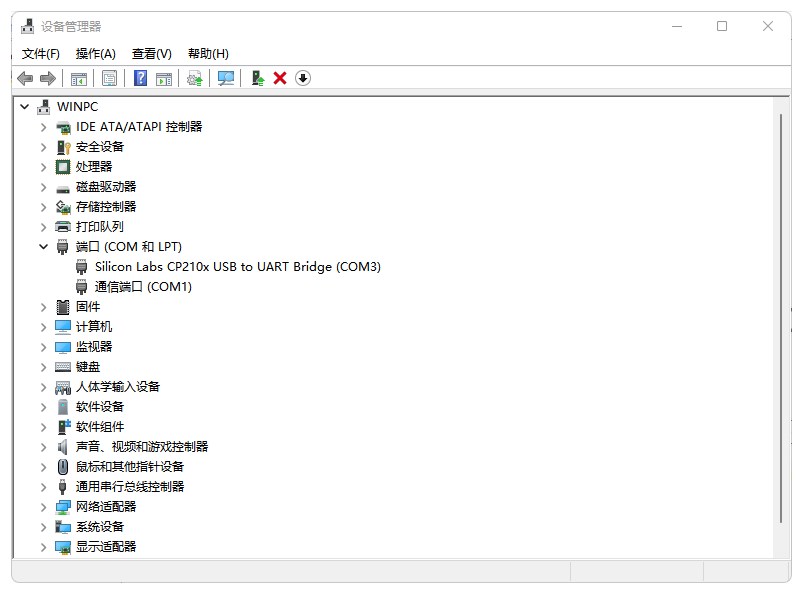
串口连接:下方的 USB-TypeC 接口,既是用作电源供电,同时也是 USB 转 UART 接口,主要用于打印系统的控制台输入和输出
| 波特率 |数据位|停止位|校验位|流控|
|—————-|———|———|———|——|
|115200 | 8 |1 |无 |无|
网络接口:通过路由器和网线,将开发板和测试电脑连接在同一个局域网内
Micro SD卡:32GB 或 32GB 以下。可使用读卡器将编译生成的用户 APP 固件文件(.elf)复制到 SD 卡
显示接口:开发板未上电之前,先将 4.3 寸 LCD 显示器的 40 Pin FPC 排线连接到 ART-Pi Smart 开发板背面的 LCD 硬件插槽
ART-Pi Smart 硬件连接图
软件
SDK下载
ART-Pi Smart SDK 软件包
ART-Pi-Smart SDK 仓库是 RT-Thread 团队对 ART-Pi Smart 开发板所作的支持包,用于学习和评估 RT-Thread Smart 微内核操作系统,让用户可以更简单方便地开发自己的应用程序。
ART-Pi smart 开发板的 SDK 仓库,主要包括 RT-Thread Smart 的源码,BSP 驱动,应用程序 demo 等。
SDK 下载方法:通过 Git 下载 ART-Pi Smart SDK 包:
git clone https://gitee.com/rtthread/ART-Pi-smart.git
下载工具链
rt-smart 采用的工具链为:arm-linux-musleabi 工具链,ART-Pi smart sdk本身并不携带工具链,所以在下载了sdk后需要自行安装工具链,不过安装工具链非常简单,只需要在sdk的tools目录下执行下python脚本即可:
python get_toolchain.py
将下载下来的工具链,解压到指定的路径 /rt-smart/tools/gnu_gcc/ 下面
软件环境
安装Visual Studio Code并安装插件
安装Visual Studio Code后要安装RT-Thread Smart插件,目前VS Code RT-Thread Smart插件已经上传到VS Code市场,所以安装非常方便,可以直接在VS Code 的扩展市场中搜索 RT-Thread Smart,点击安装即可:(推荐安装Path interestise)
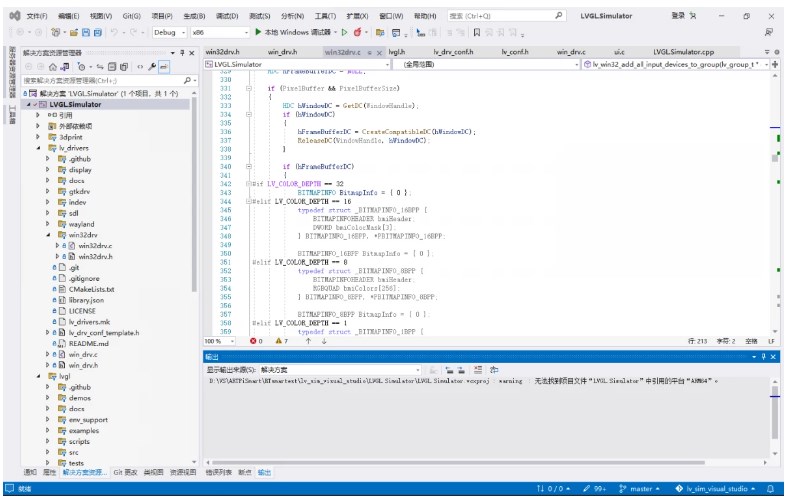
可选安装Visual Studio
根据LVGL for VS项目,设计LVGL的界面,并编译成基于Windows平台的仿真软件,确保UI部分没有bug。
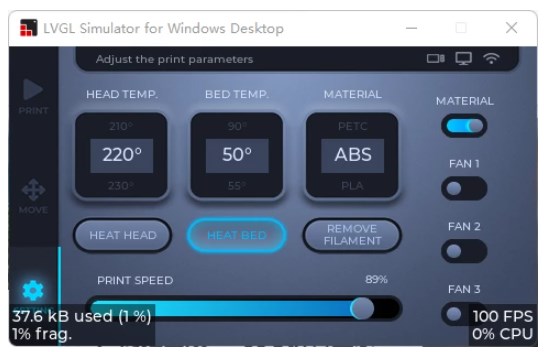
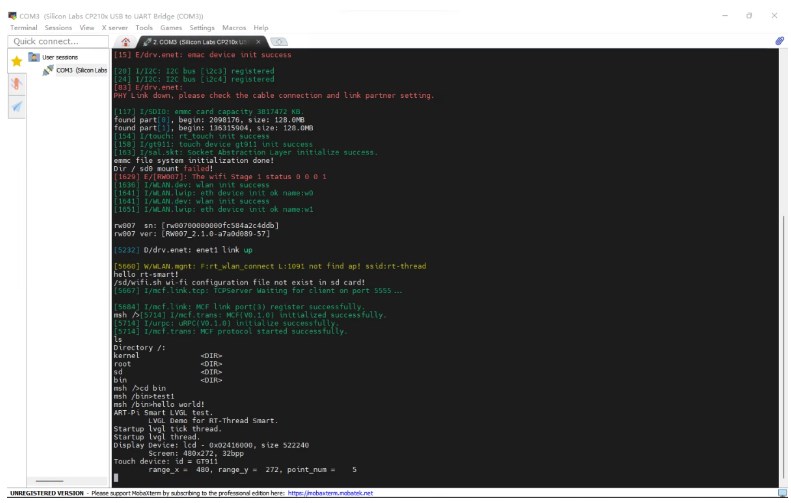
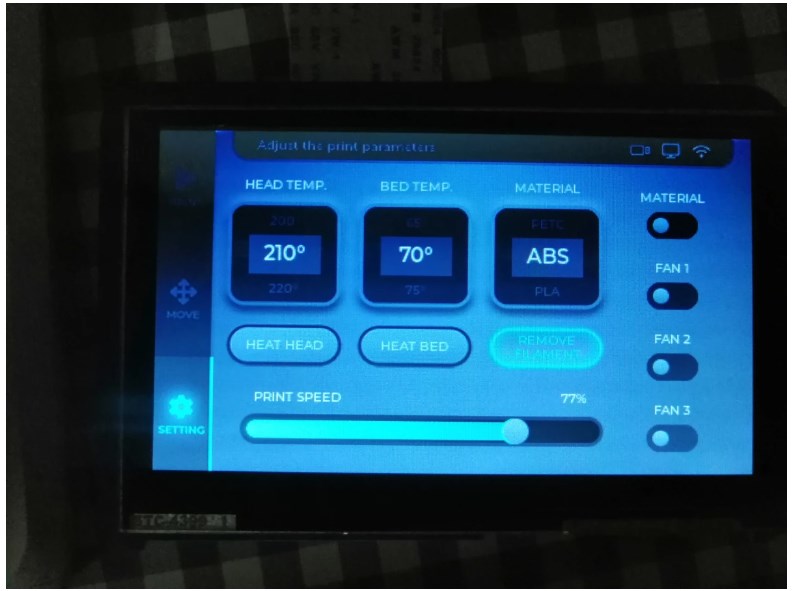
效果

创建 LVGL Demo
设置SDK工具链路径

编译文件路径
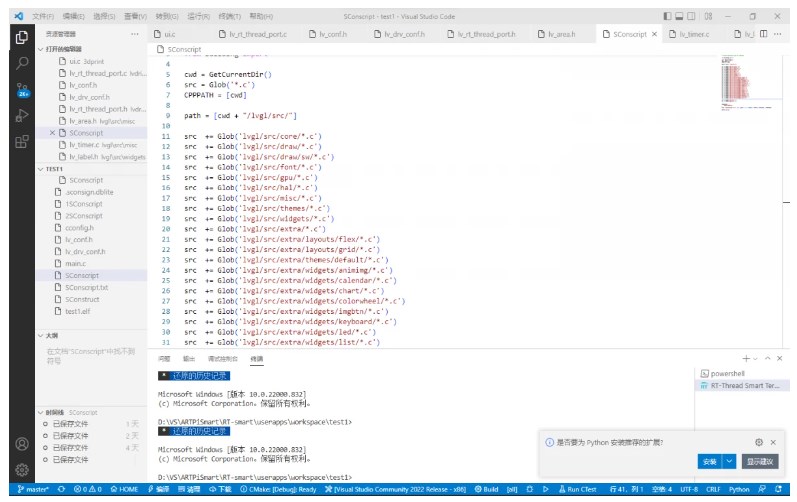
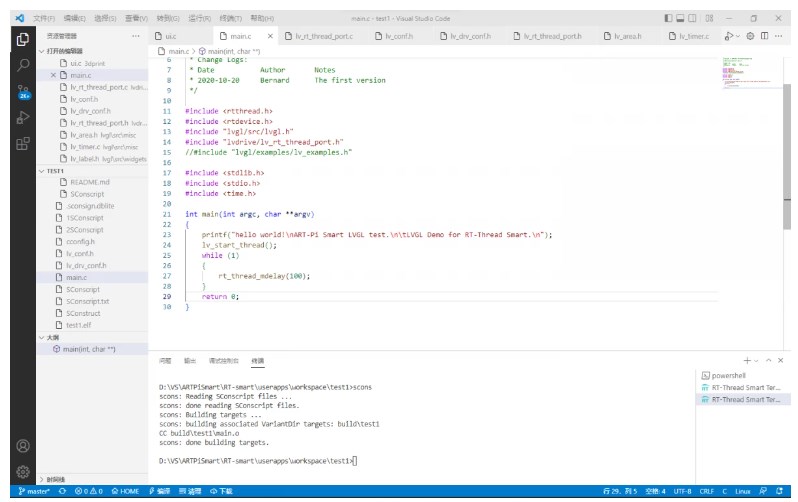
编译
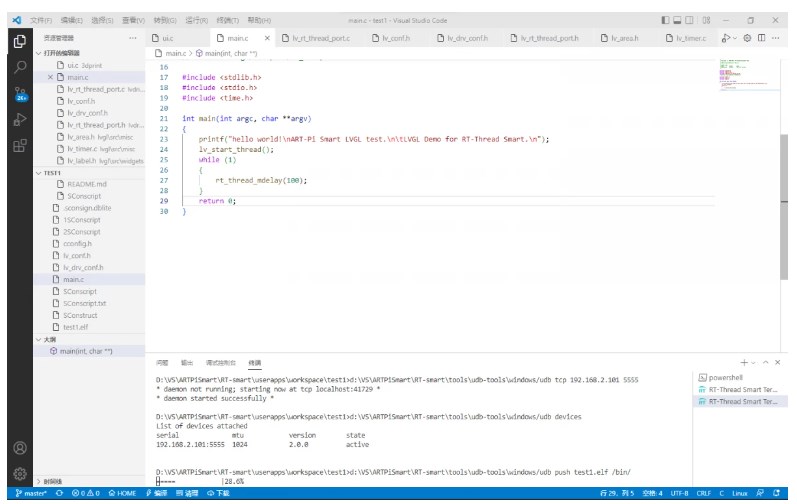
下载
关键代码
用户态应用是一份 elf(Executable Linkable Format)文件,由 GNU GCC 编译链接而产生。在 RT-Thread Smart 中,它被固定加载到虚拟地址 0x100000 处执行。当需要系统服务时通过系统调用的方式通过 MMU陷入到内核中。用户态应用环境中,外设的使用需要先调用rt_device_find()函数查找设备,然后通过rt_device_open()打开,使用rt_device_control()函数通过命令字实现相应的功能。至于设备的初始化和功能的实现交到内核完成,这样就极大的降低用户态应用开发难度,这种思想应该大赞一个。
LVGL初始化
#if LV_USE_LOG
static void lv_rt_log(const char buf)
{
LOG_I(buf);
}
#endif / LV_USE_LOG */
static void lvgl_thread_entry(void parameter)
{
rt_kprintf("Startup lvgl thread.n");
#if LV_USE_LOG
lv_log_register_print_cb(lv_rt_log);
#endif / LV_USE_LOG /
lv_init();
lv_port_disp_init();
lv_port_indev_init();
lv_user_gui_init();
/ handle the tasks of LVGL */
while(1)
{
lv_task_handler();
rt_thread_mdelay(10);
}
}
int lvgl_thread_init(void)
{
rt_thread_t rtt;
rtt = rt_thread_create("lvgl", lvgl_thread_entry, NULL, 4096, PKG_LVGL_THREAD_PRIO, 100);
if(rtt == RT_NULL)
{
LOG_D("Failed to create LVGL thread");
return -1;
}
rt_thread_startup(rtt);
return 0;
}
LCD设备接口与lvgl对接
void lv_port_disp_init(void)
{
rt_err_t result;
lcd_device = rt_device_find("lcd");
if (lcd_device == 0)
{
LOG_D("lcd_device error!");
return;
}
result = rt_device_open(lcd_device, 0);
if (result != RT_EOK)
{
LOG_D("device_open error!");
return;
}
result = rt_device_control(lcd_device, FBIOGET_FSCREENINFO, &f_info);
if (result != RT_EOK)
{
LOG_D("device_control error!");
/* get device information failed */
return;
}
rt_kprintf("Display Device: %s - 0x%08x, size %dn", f_info.id, (unsigned int)f_info.smem_start, f_info.smem_len);
rt_device_control(lcd_device, FBIOGET_VSCREENINFO, &v_info);
rt_kprintf("tScreen: %dx%d, %dbppn", v_info.xres, v_info.yres, v_info.bits_per_pixel);
/ Initialize disp_buf with the buffer(s). /
lv_disp_draw_buf_init(&disp_buf, lv_disp_buf1, RT_NULL, DISP_BUF_SIZE);
lv_disp_drv_init(&disp_drv); / Basic initialization /
/ Set the resolution of the display /
disp_drv.hor_res = v_info.xres;
disp_drv.ver_res = v_info.yres;
/ Set a display buffer /
disp_drv.draw_buf = &disp_buf;
/ Used to copy the buffer's content to the display /
disp_drv.flush_cb = lcd_fb_flush;
/ Finally register the driver /
lv_disp_t * disp = lv_disp_drv_register(&disp_drv);
g_disp_drv = disp_drv;
lv_disp_set_default(disp);
lv_theme_t * th = lv_theme_default_init(disp, lv_palette_main(LV_PALETTE_BLUE), lv_palette_main(LV_PALETTE_RED), LV_THEME_DEFAULT_DARK, LV_FONT_DEFAULT);
lv_disp_set_theme(disp, th);
lv_group_t * gr = lv_group_create();
lv_group_set_default(gr);
}
触摸采用的芯片是GT911,通过I2C接口获得
void lv_port_indev_init(void)
{
touch_dev = rt_device_find(TOUCH_DEV_NAME);
if (touch_dev == RT_NULL)
{
rt_kprintf("Can't find device:%sn", TOUCH_DEV_NAME);
return;
}
if (rt_device_open(touch_dev, RT_DEVICE_FLAG_INT_RX) != RT_EOK)
{
rt_kprintf("open device failed!n");
return;
}
void id;
rt_uint16_t x = g_disp_drv.hor_res;
rt_uint16_t y = g_disp_drv.ver_res;
id = rt_malloc(sizeof(rt_uint8_t) * 8);
rt_device_control(touch_dev, RT_TOUCH_CTRL_GET_ID, id);
rt_uint8_t * read_id = (rt_uint8_t )id;
rt_kprintf("Touch device: id = GT%d%d%d n", read_id[0] - '0', read_id[1] - '0', read_id[2] - '0');
rt_device_control(touch_dev, RT_TOUCH_CTRL_SET_X_RANGE, &x); / if possible you can set your x y coordinate /
rt_device_control(touch_dev, RT_TOUCH_CTRL_SET_Y_RANGE, &y);
rt_device_control(touch_dev, RT_TOUCH_CTRL_GET_INFO, id);
rt_kprintf("trange_x = %4d, range_y = %4d, point_num = %4dn",
( (struct rt_touch_info )id).range_x, ( (struct rt_touch_info )id).range_y, ( (struct rt_touch_info )id).point_num);
signal(SIGINT, Stop);
static lv_indev_drv_t indev_drv;
lv_indev_drv_init(&indev_drv); / Basic initialization /
indev_drv.type = LV_INDEV_TYPE_POINTER;
indev_drv.read_cb = input_read;
/ Register the driver in LVGL and save the created input device object /
g_touch_dev = lv_indev_drv_register(&indev_drv);
}
运行
按复位键启动到msh环境
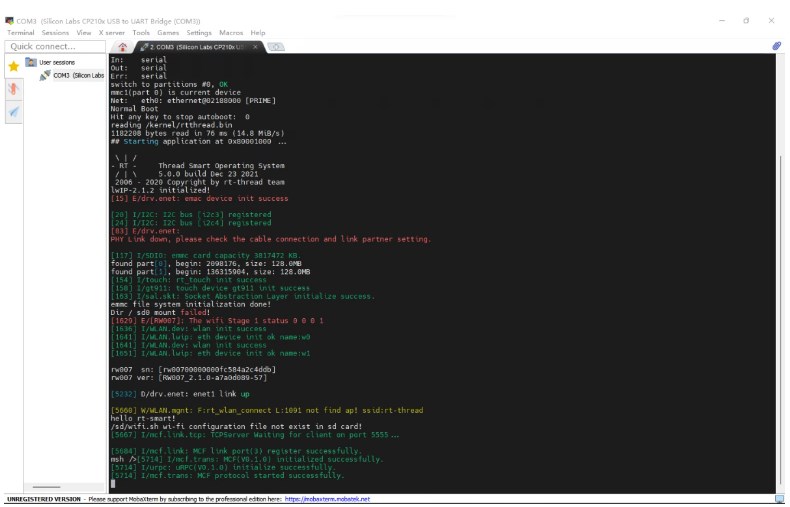
运行测试程序
总结
通过测试,我对RT-Thread smart的印象深刻。以前也开发过RT-Thread的项目,但对rt-smart这种将内核与用户态分隔开,以前只在大型桌面操作系统里见到的特征,能在嵌入式系统里运用感到震撼。这样使开发板的设计只需要提供内核和驱动代码,应用开发只需要挂载使用,极大地降低应用开发难度,提高代码重用度。而且提高应用代码隔离时系统更加健壮。
在测试过程中,遇到了问题,RT-Thread掌门人——熊谱翔先生很快亲自回答。在这里表示感谢。
由于时间太短,其它外设还没有来得及测试,颇为遗憾。
同时,希望RT-Thread能够提供统一的开发环境,特别是基于Windows平台,毕竟用户多一些。能否像LVGL提供一个模拟器(基于Visual Studio),毕竟Visual Studio调试功能很强,且有VisualGDB加持。这样就可在模拟器上消灭与平台无关的bug,减少仿真调试,下载时间。
-
基于xmake的RT-Thread Smart用户态开发教程2023-06-07 2132
-
在RT-Thread Smart下怎样去使用NimBLE软件包呢2022-09-13 2126
-
ART Pi Smart基于RT-Thread Smart系统的LVGL移植简介2022-08-03 2199
-
RT-Thread NUC97x 移植 LVGL2022-07-08 2288
-
基于RT-Thread操作系统衍生rt-smart实时操作系统简介2022-06-22 5670
-
RT-Thread全球技术大会:RT-Thread Smart更好的兼容Linux生态2022-05-27 3573
-
ART-PI Smart开发板介绍与开发环境的建立2022-05-13 3225
-
基于ART-Pi Smart平台的设计方案推荐2022-03-24 2304
-
RT-Thread Smart 上手指南2022-01-25 1424
-
RT-Thread联合百问科技出品ART-Pi Smart开发板2021-11-16 4495
-
RT-Thread Smart 入门指南2021-03-29 2181
-
RT-Thread Smart已正式上线2020-11-29 3923
-
RT-Thread Smart已正式上线,源代码可下载,采用Apache License 2.02020-11-26 4086
-
RT-Thread Smart微内核操作系统发布!2020-09-09 3735
全部0条评论

快来发表一下你的评论吧 !
