

什么是线性插值?一维线性插值和双线性插值在BMS开发中的应用
电子说
描述
Part11、什么是线性插值
线性插值法(linear interpolation),是指使用连接两个已知量的直线来确定在这两个已知量之间的一个未知量的值的方法。
有好几种插值方法,本文仅仅介绍一维线性插值和双线性插值在BMS开发中的应用。
11.1、 一维线性插值
如下图:
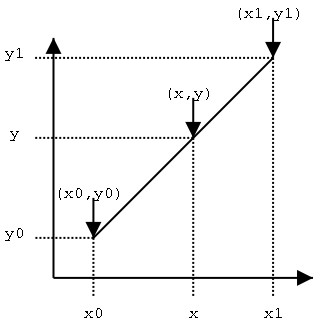
已知坐标 (x0, y0) 与 (x1, y1),要得到 [x0, x1] 区间内某一位置 x 在直线上的值。
从数学上来看,3点处于1条直线,斜率是相等的,于是有:

由于 x 值已知,所以可以从公式得到 y 的值:

公式太长不好记,可以进行简化方便记忆,方然推导也没问题....
由 ,
,
令α = (y-y0)/(x-x0),同样有,α = (y1 - y0)/(x1 - x0),上面的方程式就可以简化为:
y = y0 + α(y1 − y0)
这样已知x的值,就可以轻松计算出y的值,同样的,已知y的值,可以轻松求出x的值。
21.2、双线性插值
在数学上,双线性插值是有两个变量的插值函数的线性插值扩展,其核心思想是在两个方向分别进行一次线性插值。
以下理论搬自网络。
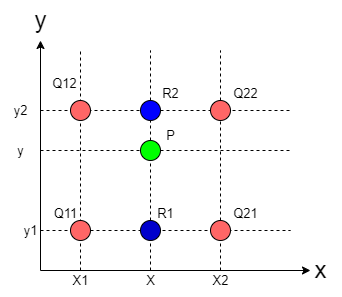 红色的数据点与待插值得到的绿色点
假如我们想得到未知函数 f 在点 P = (x, y) 的值,假设我们已知函数 f 在 Q11 = (x1, y1)、Q12 = (x1, y2), Q21 = (x2, y1) 以及 Q22 = (x2, y2) 四个点的值。
首先在 x 方向进行线性插值,得到:


然后在 y 方向进行线性插值,得到:

这样就得到所要的结果 f(x, y):


Part22、线性插值在BMS中的应用
32.1 一维线性插值在BMS中的应用
电芯SOC和开路电压是有一定关系的,也就是我们常听说的OCV,OCV是Open circuit voltage(开路电压),指的是电池不放电开路时,两极之间的电位差.
但是因为电池的极化效应,想要测量准确的OCV得静止2小时,假设我们通过设置放电电流来控制电池的SOC从100%-0%变化,间隔为1%,那么整个实验做完至少需要200小时。
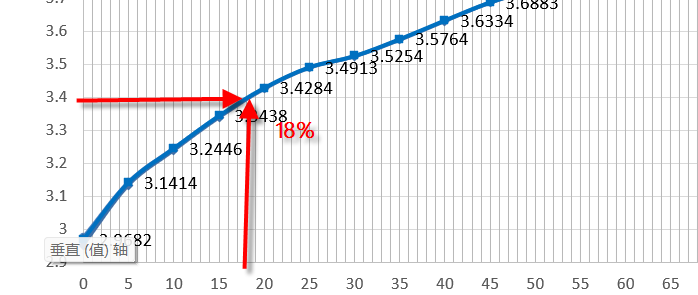
来看一组电池数据,一般电芯厂家提供的都是5%步进的SOC对应的电压值,在两个电压点之间的SOC可以近似直线,当然这样也是有误差的。
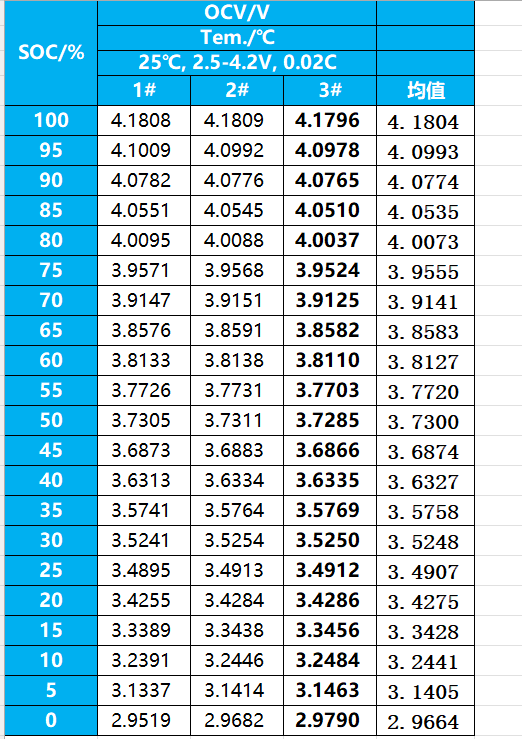
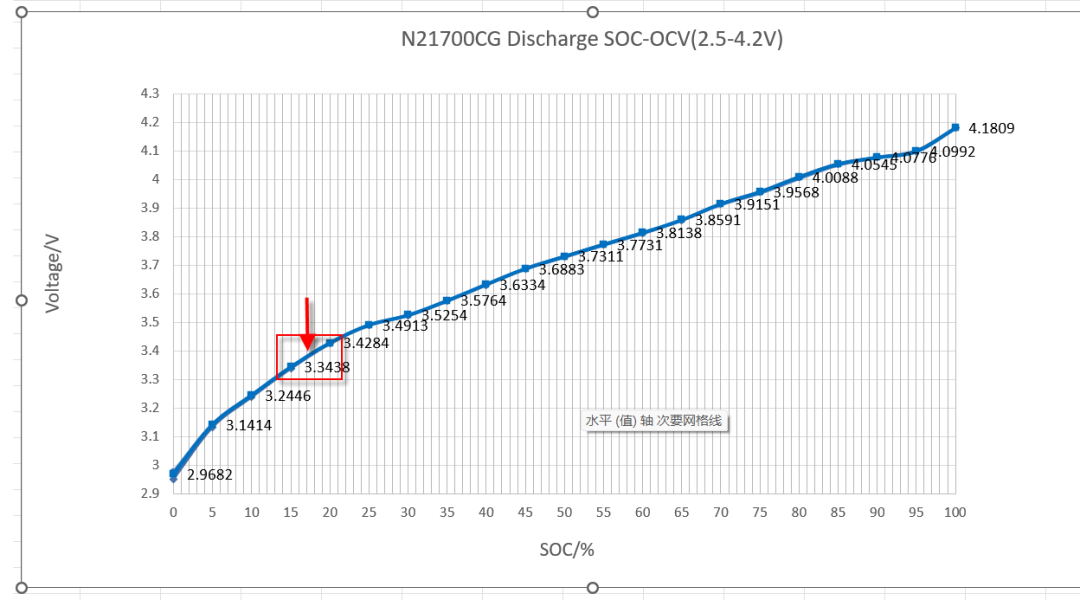
那么如何利用一维线性差值计算不同电压下对应的SOC值呢?
例如:计算红框中的某一电压对应的SOC值
根据一维线性差值的公式编写代码如下:
#include#include #define SOC_FULL (100) #define SOC_OCV_STEP (SOC_FULL / 20) #define CELLVOL_LEN (21) const uint16_t voltage[CELLVOL_LEN] = {2966, 3140, 3244, 3343, 3427, 3491, 3525, 3576, 3633, 3687, 3730, 3772, 3813, 3858, 3914, 3955, 4007, 4054, 4077, 4099, 4180}; /** *根据ocv曲线计算SOC */ uint8_t get_soc_by_cellocv(const uint16_t *cell_table, uint16_t cellvol) { /** y = y0 + (x-x0)*(y1 − y0)/(x1-x0)*/ /**计算3343和3427电压直接的电压对应的SOC值,取3400电压下的SOC*/ uint16_t soc; uint8_t i; if (cellvol <= cell_table[0]) // 0% { return 0; } else if (cellvol >= cell_table[SOC_FULL / SOC_OCV_STEP]) // 100% { return SOC_FULL; } for (i = 0; i < SOC_FULL / SOC_OCV_STEP;) { if (cellvol > cell_table[i]) { i++; } else { break; } } /**y0 = (i - 1) * SOC_OCV_STEP*/ /**(x-x0) = (cellvol - cell_table[i - 1]) */ /**(y1 − y0) = SOC_OCV_STEP,这里由于SOC是5%均匀步进,所以直接取了步进值作为y1-y0*/ soc = (i - 1) * SOC_OCV_STEP + SOC_OCV_STEP * (cellvol - cell_table[i - 1]) / (cell_table[i] - cell_table[i - 1]); return soc; } int main(void) { uint16_t soc_ocv = 0; soc_ocv = get_soc_by_cellocv(voltage, 3400); printf(" ----soc_ocv = %d--- ", soc_ocv); return 0; }
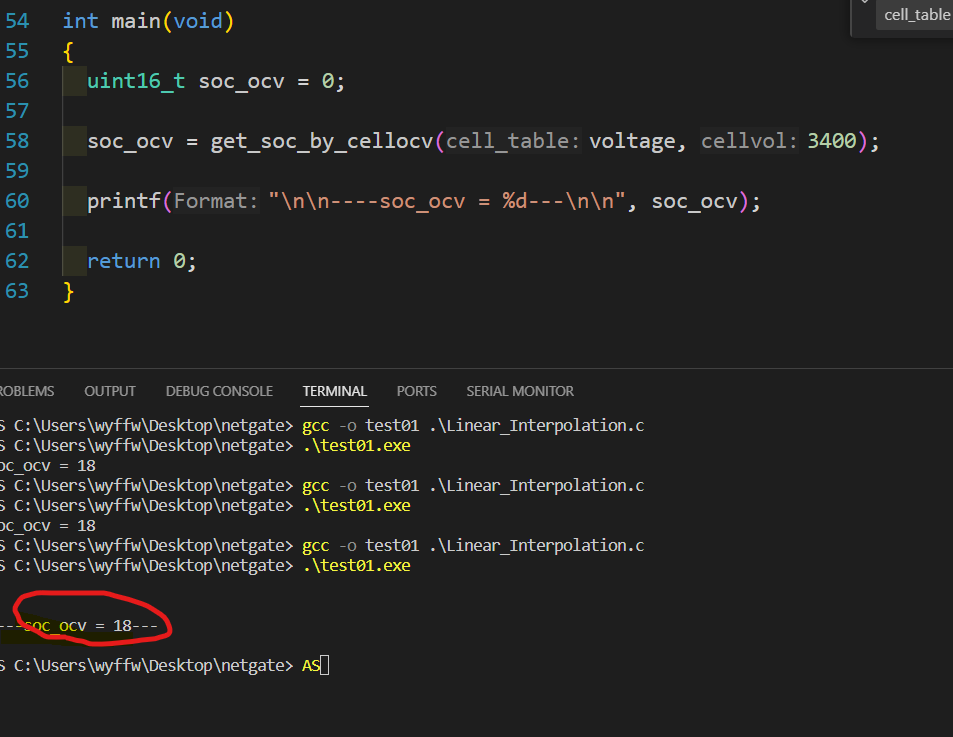
vscode环境下编译看看结果,我们要计算的是3400mV时候对应的SOC为18%,计算结果是OK的,要注意限幅处理,0%和100%对应的点。
42.2 双线性插值在BMS中的应用
要计算在负载情况下的SOC,需要对电压和电流做建模,获得比较准确的SOC,当然这个SOC也只是尽可能准确一些,相比较OCV,电池工作过程中是不能直接使用OCV计算SOC的。
包括电池的充放电MAP,都是需要进行二维插值计算的,例如:
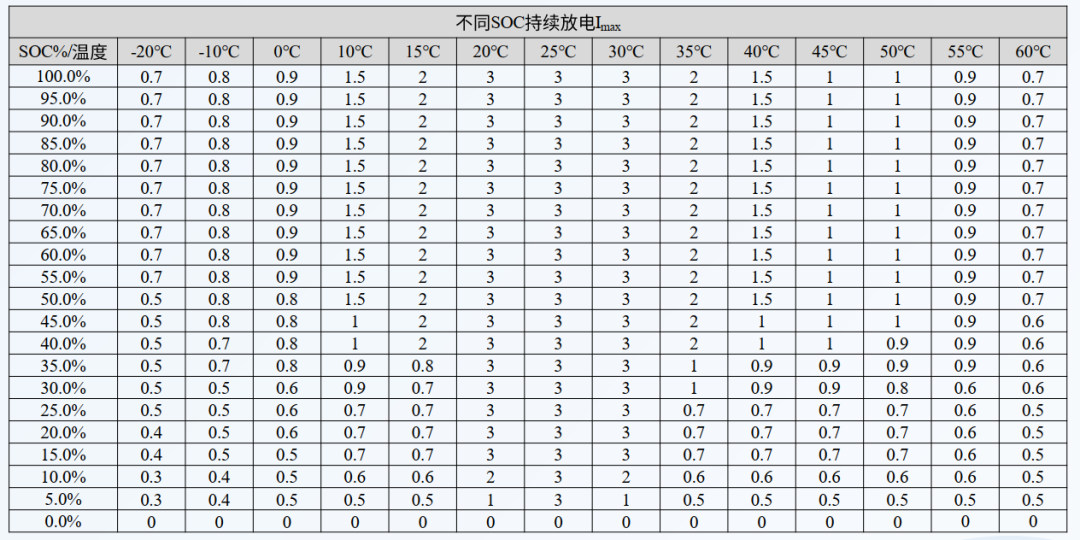
看一组数据,横轴是电流,纵轴是电压,中间数据为SOC值,接下来看看如何利用双线性插值计算SOC,这里取得都是1%精度,没有用浮点类型数据。

还是要回归到第一章节介绍的公式,双线性插值实际上是进行3次单线性插值,x轴进行2次插值计算,y轴进行1次插值计算。
就不再针对公式一一分析了,直接上代码:
#include#include #include #include #define SOC_FULL (100) #define SOC_OCV_STEP (SOC_FULL / 20) #define CELLVOL_LEN (21) #define CURRENT_LEN 7 #define VOLTAGE_LEN 6 const uint16_t voltage[CELLVOL_LEN] = {2966, 3140, 3244, 3343, 3427, 3491, 3525, 3576, 3633, 3687, 3730, 3772, 3813, 3858, 3914, 3955, 4007, 4054, 4077, 4099, 4180}; static const int32_t current_map[CURRENT_LEN] = {0, 50, 200, 500, 1200, 2500, 2501}; // 横轴 static const uint16_t voltage_map[VOLTAGE_LEN] = {0, 2500, 3200, 3380, 3500, 3501}; // 纵轴 static const int16_t load_soc_map[CURRENT_LEN][VOLTAGE_LEN] = { {100, 100, 100, 100, 100, 100}, {0, 0, 4, 15, 35, 100}, {-2, -2, 0, 8, 22, 100}, {-4, -4, -1, 4, 15, 100}, {-6, -6, -3, 2, 10, 100}, {-6, -6, -3, 2, 10, 100}, {-6, -6, -3, 2, 10, 100}}; /** *根据ocv曲线计算SOC */ uint8_t get_soc_by_cellocv(const uint16_t *cell_table, uint16_t cellvol) { /** y = y0 + (x-x0)*(y1 − y0)/(x1-x0)*/ /**计算3343和3427电压直接的电压对应的SOC值,取3400电压下的SOC*/ uint16_t soc; uint8_t i; if (cellvol <= cell_table[0]) // 0% { return 0; } else if (cellvol >= cell_table[SOC_FULL / SOC_OCV_STEP]) // 100% { return SOC_FULL; } for (i = 0; i < SOC_FULL / SOC_OCV_STEP;) { if (cellvol > cell_table[i]) { i++; } else { break; } } /**y0 = (i - 1) * SOC_OCV_STEP*/ /**(x-x0) = (cellvol - cell_table[i - 1]) */ /**(y1 − y0) = SOC_OCV_STEP,这里由于SOC是5%均匀步进,所以直接取了步进值作为y1-y0*/ soc = (i - 1) * SOC_OCV_STEP + SOC_OCV_STEP * (cellvol - cell_table[i - 1]) / (cell_table[i] - cell_table[i - 1]); return soc; } /* *负载SOC查表 */ static int16_t get_soc_by_load_map(const int16_t *table, uint16_t voltage, int32_t current) { int16_t result = 0; int16_t map_voltage_low = 0, map_voltage_high = 0, map_current_low = 0, map_current_high = 0; int16_t map_high = 0, map_low = 0; uint8_t i = 0; int16_t vol_step = 0; int16_t vol_diff = 0; int32_t current_step = 0; int32_t current_diff = 0; int16_t soc_diff = 0; int16_t soc_step = 0; for (i = 0; i < VOLTAGE_LEN; i++) // 循环电压 { if (voltage < voltage_map[i]) { if (i != 0) { map_voltage_low = i - 1; map_voltage_high = i; } else { map_voltage_low = i; map_voltage_high = i; } break; } } for (i = 0; i < CURRENT_LEN; i++) // 循环电流 { if (abs(current) < current_map[i]) { if (i != 0) { map_current_low = i - 1; map_current_high = i; } else { map_current_low = i; map_current_high = i; } break; } } if (((map_voltage_high == map_voltage_low) || (abs(current) > current_map[CURRENT_LEN - 1]) || (voltage > voltage_map[VOLTAGE_LEN - 1]))) { return 100; } vol_diff = voltage - voltage_map[map_voltage_low]; vol_step = voltage_map[map_voltage_high] - voltage_map[map_voltage_low]; soc_step = table[(CURRENT_LEN - 1 - map_current_low) * VOLTAGE_LEN + map_voltage_high] - table[(CURRENT_LEN - 1 - map_current_low) * VOLTAGE_LEN + map_voltage_low]; map_low = (int16_t)(soc_step * vol_diff / vol_step + table[(CURRENT_LEN - 1 - map_current_low) * VOLTAGE_LEN + map_voltage_low]); vol_diff = voltage - voltage_map[map_voltage_low]; vol_step = (voltage_map[map_voltage_high] - voltage_map[map_voltage_low]); soc_step = (table[(CURRENT_LEN - 1 - map_current_high) * VOLTAGE_LEN + map_voltage_high] - table[(CURRENT_LEN - 1 - map_current_high) * VOLTAGE_LEN + map_voltage_low]); map_high = (int16_t)(vol_diff * soc_step / vol_step + table[(CURRENT_LEN - 1 - map_current_high) * VOLTAGE_LEN + map_voltage_low]); result = (int16_t)((abs(current) - current_map[map_current_low]) * (map_high - map_low) / (current_map[map_current_high] - current_map[map_current_low]) + map_low); return result; } int main(void) { int16_t soc_ocv = 0; uint16_t cell_vol = 3200; int32_t current = 0; while (1) { current += 100; soc_ocv = get_soc_by_cellocv(voltage, 3400); printf("----soc_ocv = %d---- ", soc_ocv); soc_ocv = get_soc_by_load_map((const int16_t *)load_soc_map, cell_vol, current); printf("!!!!current = %d,cell_vol = %d,soc_load = %d!!!! ", current, cell_vol, soc_ocv); if (current > 2600) return 0; Sleep(1000); } return 0; }
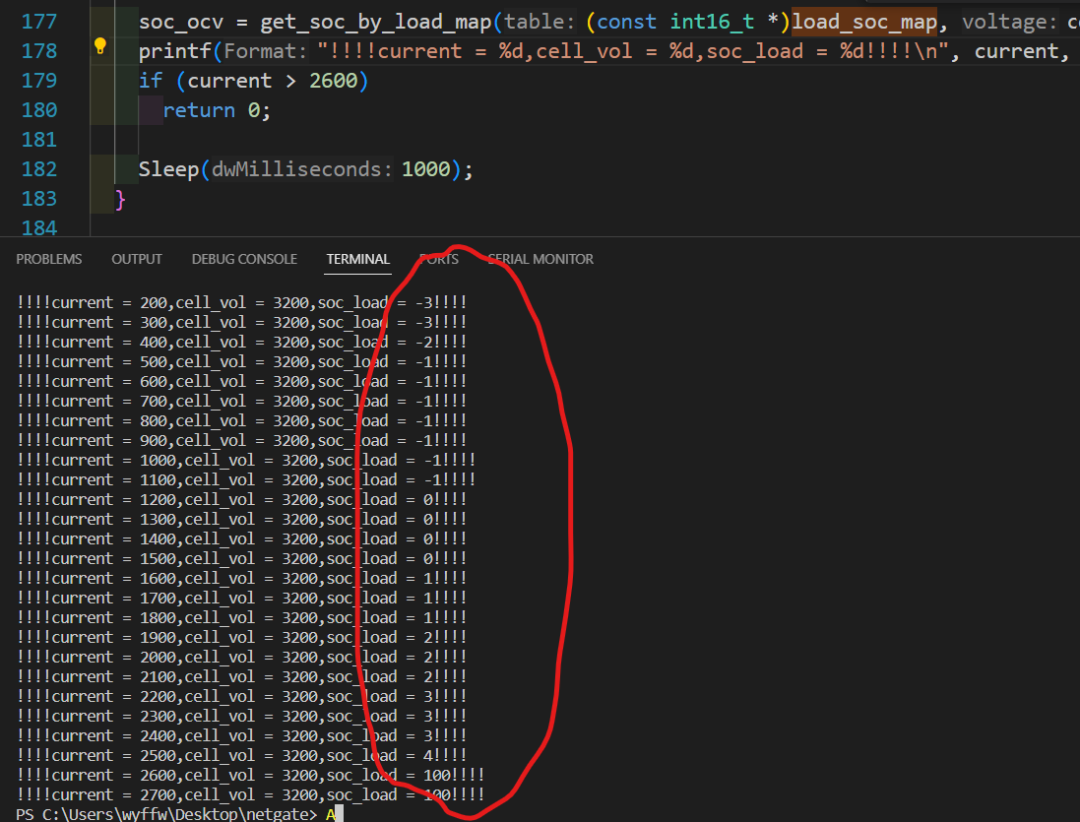
看下运行结果,验证也是OK的,这个代码写的略微shi,大家可以自己优化优化,可以把一维线性函数抽出来封装,这样单线性和双线性可以复用函数,代码更简洁一些。
Part3经验交流
审核编辑:刘清
-
神经网络加速器的双线性插值上采样2025-10-29 91
-
基于FPGA的线性插值-中2023-11-23 1877
-
基于FPGA的线性插值-上2023-11-20 1291
-
基于FPGA的图像旋转和双线性插值算法设计2023-09-04 3125
-
LInterp之线性插值PROGMEM数组生成器2022-10-20 1092
-
双线性插值算法的讲解2022-09-19 4246
-
在FPGA上如何实现双线性插值的计算2019-08-09 4957
-
一种不同于双线性插值的上采样方法2019-04-08 7271
-
基于AIS线性插值的综合插值方法2017-11-13 1608
-
基于双线性插值的图像缩放在GPU上的实现2017-01-08 925
-
基于Matlab的双线性插值算法在图像旋转中的应用2016-05-04 744
-
求双线性插值法的C语言程序!帮帮忙!拜托各位了!2014-04-20 2812
-
一种改进的线性图像插值算法2012-08-20 1498
-
求线性插值2011-11-08 3148
全部0条评论

快来发表一下你的评论吧 !

