

基于YOLOv8实现自定义姿态评估模型训练
描述
前言
Hello大家好,今天给大家分享一下如何基于YOLOv8姿态评估模型,实现在自定义数据集上,完成自定义姿态评估模型的训练与推理。
01tiger-pose数据集
YOLOv8官方提供了一个自定义tiger-pose数据集(老虎姿态评估),总计数据有263张图像、其中210张作为训练集、53张作为验证集。
其中YOLOv8-pose的数据格式如下:
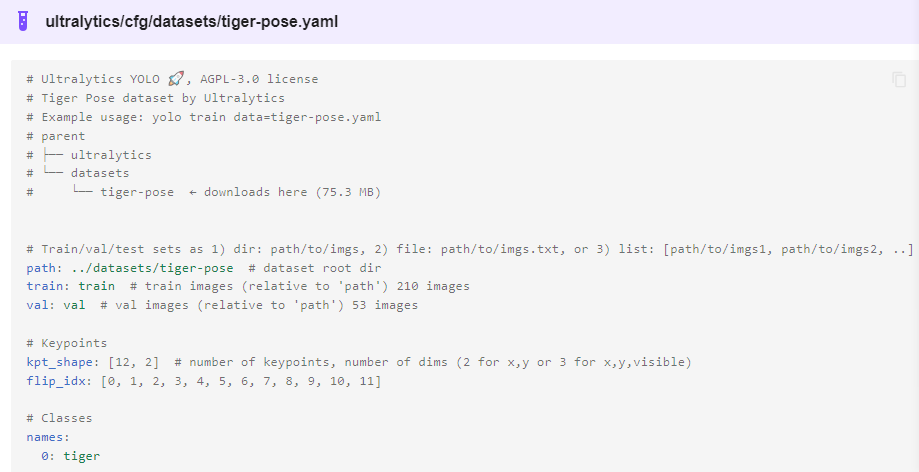
解释一下:
Class-index 表示对象类型索引,从0开始
后面的四个分别是对象的中心位置与宽高 xc、yc、width、height
px1,py1表示第一个关键点坐标、p1v表示师傅可见,默认填2即可。
kpt_shape=12x2 表示有12个关键点,每个关键点是x,y
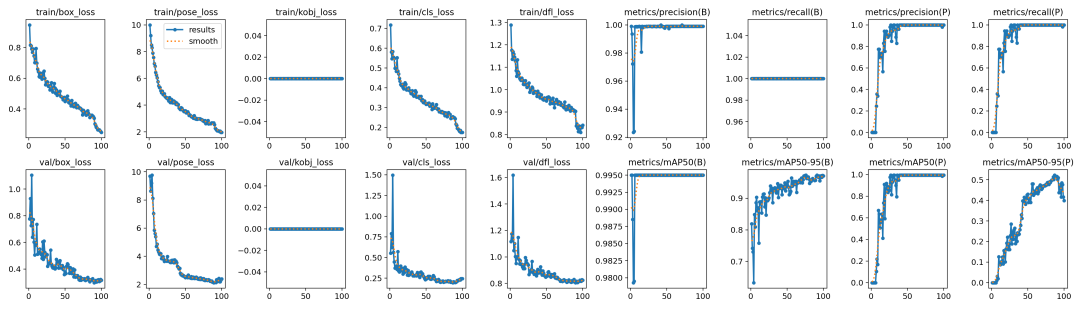
02模型训练
跟训练YOLOv8对象检测模型类似,直接运行下面的命令行即可:
yolo train model=yolov8n-pose.pt data=tiger_pose_dataset.yaml epochs=100 imgsz=640 batch=1
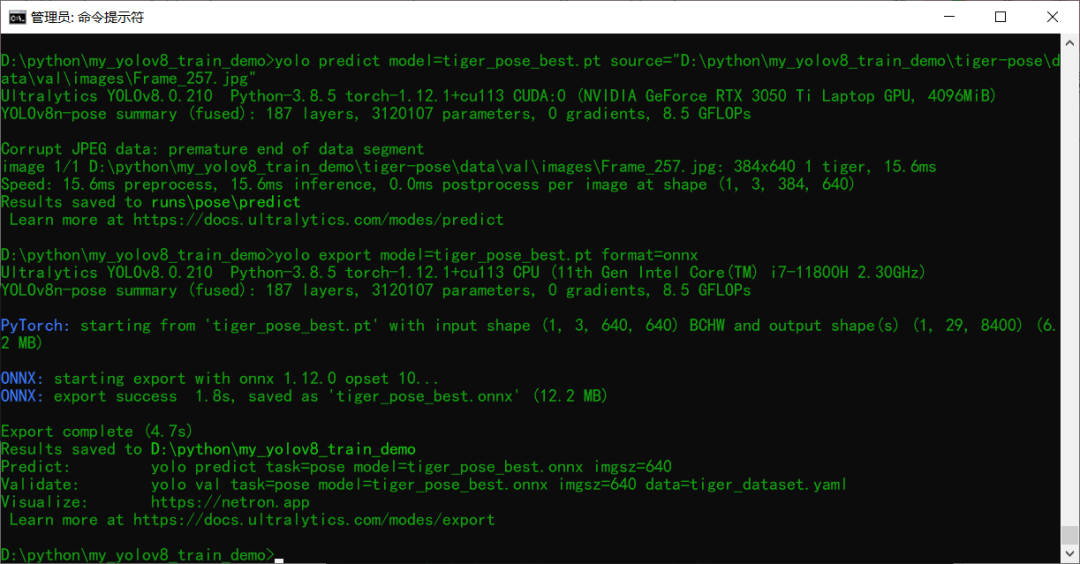
03模型导出预测
训练完成以后模型预测推理测试 使用下面的命令行:
yolo predict model=tiger_pose_best.pt source=D:/123.jpg
导出模型为ONNX格式,使用下面命令行即可
yolo export model=tiger_pose_best.pt format=onnx
04部署推理
基于ONNX格式模型,采用ONNXRUNTIME推理结果如下:
ORT相关的推理演示代码如下:
def ort_pose_demo():


    # initialize the onnxruntime session by loading model in CUDA support
    model_dir = "tiger_pose_best.onnx"
    session = onnxruntime.InferenceSession(model_dir, providers=['CUDAExecutionProvider'])


    # 就改这里, 把RTSP的地址配到这边就好啦,然后直接运行,其它任何地方都不准改!
    # 切记把 yolov8-pose.onnx文件放到跟这个python文件同一个文件夹中!
    frame = cv.imread("D:/123.jpg")
    bgr = format_yolov8(frame)
    fh, fw, fc = frame.shape


    start = time.time()
    image = cv.dnn.blobFromImage(bgr, 1 / 255.0, (640, 640), swapRB=True, crop=False)


    # onnxruntime inference
    ort_inputs = {session.get_inputs()[0].name: image}
    res = session.run(None, ort_inputs)[0]


    # matrix transpose from 1x8x8400 => 8400x8
    out_prob = np.squeeze(res, 0).T


    result_kypts, confidences, boxes = wrap_detection(bgr, out_prob)
    for (kpts, confidence, box) in zip(result_kypts, confidences, boxes):
        cv.rectangle(frame, box, (0, 0, 255), 2)
        cv.rectangle(frame, (box[0], box[1] - 20), (box[0] + box[2], box[1]), (0, 255, 255), -1)
        cv.putText(frame, ("%.2f" % confidence), (box[0], box[1] - 10), cv.FONT_HERSHEY_SIMPLEX, .5, (0, 0, 0))
        cv.circle(frame, (int(kpts[0]), int(kpts[1])), 3, (255, 0, 255), 4, 8, 0)
        cv.circle(frame, (int(kpts[2]), int(kpts[3])), 3, (255, 0, 255), 4, 8, 0)
        cv.circle(frame, (int(kpts[4]), int(kpts[5])), 3, (255, 0, 255), 4, 8, 0)
        cv.circle(frame, (int(kpts[6]), int(kpts[7])), 3, (255, 0, 255), 4, 8, 0)
        cv.circle(frame, (int(kpts[8]), int(kpts[9])), 3, (255, 0, 255), 4, 8, 0)
        cv.circle(frame, (int(kpts[10]), int(kpts[11])), 3, (255, 0, 255), 4, 8, 0)
        cv.circle(frame, (int(kpts[12]), int(kpts[13])), 3, (255, 0, 255), 4, 8, 0)
        cv.circle(frame, (int(kpts[14]), int(kpts[15])), 3, (255, 0, 255), 4, 8, 0)
        cv.circle(frame, (int(kpts[16]), int(kpts[17])), 3, (255, 0, 255), 4, 8, 0)
        cv.circle(frame, (int(kpts[18]), int(kpts[19])), 3, (255, 0, 255), 4, 8, 0)
        cv.circle(frame, (int(kpts[20]), int(kpts[21])), 3, (255, 0, 255), 4, 8, 0)
        cv.circle(frame, (int(kpts[22]), int(kpts[23])), 3, (255, 0, 255), 4, 8, 0)


    cv.imshow("Tiger Pose Demo - gloomyfish", frame)
    cv.waitKey(0)
    cv.destroyAllWindows()
审核编辑:汤梓红
声明:本文内容及配图由入驻作者撰写或者入驻合作网站授权转载。文章观点仅代表作者本人,不代表电子发烧友网立场。文章及其配图仅供工程师学习之用,如有内容侵权或者其他违规问题,请联系本站处理。
举报投诉
-
请问如何在imx8mplus上部署和运行YOLOv5训练的模型?2025-03-25 1160
-
YOLOv8自定义数据集训练到模型部署推理简析2023-03-24 12030
-
TensorRT 8.6 C++开发环境配置与YOLOv8实例分割推理演示2023-04-25 9144
-
在AI爱克斯开发板上用OpenVINO™加速YOLOv8目标检测模型2023-05-12 2929
-
YOLOv8版本升级支持小目标检测与高分辨率图像输入2023-05-16 15591
-
AI爱克斯开发板上使用OpenVINO加速YOLOv8目标检测模型2023-05-26 3063
-
教你如何用两行代码搞定YOLOv8各种模型推理2023-06-18 5258
-
三种主流模型部署框架YOLOv8推理演示2023-08-06 4269
-
YOLOv8实现任意目录下命令行训练2023-09-04 4757
-
基于YOLOv8的自定义医学图像分割2023-12-20 2084
-
如何基于深度学习模型训练实现圆检测与圆心位置预测2023-12-21 4354
-
如何基于深度学习模型训练实现工件切割点位置预测2023-12-22 1889
-
RK3576 yolov8训练部署教程2025-04-02 2323
-
RV1126 yolov8训练部署教程2025-04-16 1958
-
使用ROCm™优化并部署YOLOv8模型2025-09-24 1271
全部0条评论

快来发表一下你的评论吧 !
