
Linux配置NFS文件共享详解
描述
一、NFS简介
NFS是Network File System的缩写,是一种分布式文件系统协议,用于在计算机网络上共享文件。它允许客户端计算机通过网络远程访问和处理远程服务器上的文件和目录。
NFS最初由Sun Microsystems开发并在1984年发布,被设计为可在不同操作系统和硬件平台之间共享文件。它基于客户-服务器模型,客户端通过网络连接到NFS服务器,并使用NFS协议访问远程文件系统。
使用NFS,客户端可以像访问本地文件一样访问远程文件。这使得多个计算机之间可以方便地共享文件,并实现文件的统一管理。
NFS协议支持多种操作,包括读取、写入、创建、删除和修改文件和目录。它还提供了文件和目录的权限管理机制,以确保只有具有适当权限的用户才能访问和修改文件。
NFS是一个成熟、广泛应用的文件共享协议,被用于各种操作系统和应用场景,例如Unix和Linux系统中的文件共享、云存储服务和虚拟化环境中的文件传输等。
二、NFS配置
2.1 实验拓扑
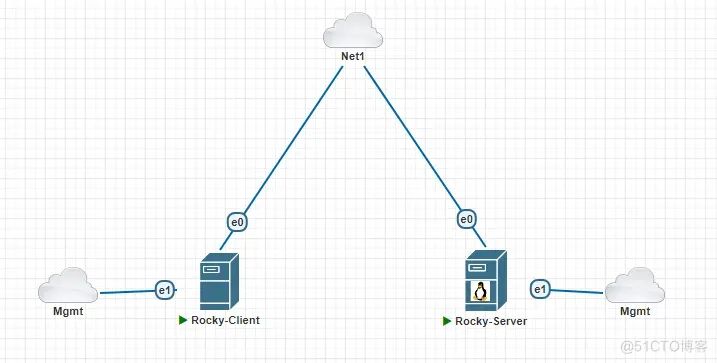
如下图,两台Linux主机通过e0网卡接入到同一网络,Net1已配置NAT服务,两台主机之间互通且可以访问Internet,e1网卡接入到Mgmt网络,方便远程管理

2.2 实验规划
| 主机-角色 | 主机名 | 操作系统 |
| Rocky-Server | nfs-server | Rocky Linux 8.9 (Green Obsidian) |
| Rocky-Client | nfs-client | Rocky Linux 8.9 (Green Obsidian) |
2.3 配置服务端
安装NFS软件包:
[root@nfs-server ~]# yum -y install nfs-utils    # 安装nfs-utils软件包
[root@nfs-server ~]#
[root@nfs-server ~]# rpm -qa | grep nfs    # 查看nfs软件包
libnfsidmap-2.3.3-59.el8.x86_64
nfs-utils-2.3.3-59.el8.x86_64
sssd-nfs-idmap-2.9.1-4.el8_9.x86_64
[root@nfs-server ~]#
[root@nfs-server ~]# rpm -qc nfs-utils    # 查看nfs-utils软件包的配置文件
/etc/gssproxy/24-nfs-server.conf
/etc/modprobe.d/lockd.conf
/etc/nfs.conf
/etc/nfsmount.conf
/etc/request-key.d/id_resolver.conf
/var/lib/nfs/etab
/var/lib/nfs/rmtab
在NFS服务器上建立用于NFS文件共享的目录,并设置足够的权限确保其他人也有写入权限:
[root@nfs-server ~]# mkdir /nfsfile    # 创建目录
[root@nfs-server ~]#
[root@nfs-server ~]# chmod 777 /nfsfile    # 赋予权限
[root@nfs-server ~]#
[root@nfs-server ~]# ls -ld /nfsfile    # 查看目录权限
drwxrwxrwx. 2 root root 6 Dec 25 22:40 /nfsfile
[root@nfs-server ~]#
[root@nfs-server ~]# echo 'This is a nfs shared folder.' > /nfsfile/README    # 写入一个文本文件
NFS服务程序的配置文件为/etc/exports,默认情况下里面没有任何内容,我们可以通过“rpm -qf”命令查看一下该配置文件是由哪个软件包安装提供的:
[root@nfs-server ~]# ls -l /etc/exports
-rw-r--r--. 1 root root 0 Sep 10  2018 /etc/exports
[root@nfs-server ~]#
[root@nfs-server ~]# rpm -qf /etc/exports
setup-2.12.2-9.el8.noarch    # 查看到“/etc/exports”文件由这个软件包提供
[root@nfs-server ~]#
[root@nfs-server ~]# rpm -qi setup    # 查看“setup”软件包信息
Name        : setup
Version     : 2.12.2
Release     : 9.el8
Architecture: noarch
Install Date: Thu 14 Dec 2023 01:10:40 PM CST
Group       : System Environment/Base
Size        : 724747
License     : Public Domain
Signature   : RSA/SHA256, Thu 12 Jan 2023 10:49:46 AM CST, Key ID 15af5dac6d745a60
Source RPM  : setup-2.12.2-9.el8.src.rpm
Build Date  : Wed 30 Nov 2022 01:24:15 PM CST
Build Host  : ord1-prod-a64build002.svc.aws.rockylinux.org
Relocations : (not relocatable)
Packager    : infrastructure@rockylinux.org
Vendor      : Rocky
URL         : https://pagure.io/setup/
Summary     : A set of system configuration and setup files
Description :
The setup package contains a set of important system configuration and
setup files, such as passwd, group, and profile.
我们可以按照“共享目录的路径 允许访问的NFS客户端(共享权限参数)”的格式,定义要共享的目录与相应的权限。
例如,如果想要把/nfsfile目录共享给172.16.0.0/24网段内的所有主机,让这些主机都拥有读写权限,在将数据写入到NFS服务器的硬盘中后才会结束操作,最大限度保证数据不丢失,以及把来访客户端root管理员映射为本地的匿名用户等,则可以按照下面命令中的格式,将下表中的参数写到NFS服务程序的配置文件中
用于配置NFS服务程序配置文件的参数
| 参数 | 作用 |
| ro | 只读 |
| rw | 读写 |
| root_squash | 当NFS客户端以root管理员访问时,映射为NFS服务器的匿名用户 |
| no_root_squash | 当NFS客户端以root管理员访问时,映射为NFS服务器的root管理员 |
| all_squash | 无论NFS客户端使用什么账户访问,均映射为NFS服务器的匿名用户 |
| sync | 同时将数据写入到内存与硬盘中,保证不丢失数据 |
| async | 优先将数据保存到内存,然后再写入硬盘;这样效率更高,但可能会丢失数据 |
编辑"/etc/exports”配置文件,注意:NFS客户端地址与权限之间没有空格
[root@nfs-server ~]# vim /etc/exports
/nfsfile 172.16.0.*(rw,sync,root_squash)
在NFS服务的配置文件中巧用通配符能够实现很多便捷功能,就比如匹配IP地址就有三种方法——第一种是直接写*号,代表任何主机都可以访问;第二种则是实验中采用的192.168.10.*通配格式,代表来自192.168.10.0/24网段的主机;第三种则是直接写对方的IP地址,如192.168.10.20,代表仅允许某个主机进行访问
启动和启用NFS服务程序。由于在使用NFS服务进行文件共享之前,需要使用RPC(Remote Procedure Call,远程过程调用)服务将NFS服务器的IP地址和端口号等信息发送给客户端。因此,在启动NFS服务之前,还需要顺带重启并启用rpcbind服务程序,并将这两个服务一并加入开机启动项中
[root@nfs-server ~]# systemctl restart rpcbind.service
[root@nfs-server ~]# systemctl enable rpcbind.service
[root@nfs-server ~]# systemctl enable --now nfs-server.service
Created symlink /etc/systemd/system/multi-user.target.wants/nfs-server.service → /usr/lib/systemd/system/nfs-server.service.
防火墙放行NFS共享相关的服务:
[root@nfs-server ~]# firewall-cmd --add-service=nfs --permanent
success
[root@nfs-server ~]# firewall-cmd --add-service=rpc-bind --permanent
success
[root@nfs-server ~]# firewall-cmd --add-service=mountd --permanent
success
[root@nfs-server ~]# firewall-cmd --reload
success
2.4 配置客户端
先使用showmount命令查询NFS服务器的远程共享信息,必要的参数下表,其输出格式为“共享的目录名称 允许使用客户端地址”
showmount命令中可用的参数以及作用
| 参数 | 作用 |
| -e | 显示NFS服务器的共享列表 |
| -a | 显示本机挂载的文件资源的情况NFS资源的情况 |
| -v | 显示版本号 |
[root@nfs-client ~]# yum provides showmount    # 查找showmount命令是由哪个软件包提供的
Last metadata expiration check: 0:45:12 ago on Mon 25 Dec 2023 10:25:00 PM CST.
nfs-utils-1:2.3.3-59.el8.x86_64 : NFS utilities and supporting clients and daemons for the kernel NFS server
Repo        : baseos
Matched from:
Provide    : showmount = 1:2.3.3-59.el8
[root@nfs-client ~]# yum -y install nfs-utils    # 安装nfs-utils软件包
[root@nfs-client ~]# showmount -e 172.16.0.100  # 显示nfs服务器的共享列表
Export list for 172.16.0.100:
/nfsfile 172.16.0.*
在NFS客户端创建一个挂载目录。使用mount命令并结合-t参数,指定要挂载的文件系统的类型,并在命令后面写上服务器的IP地址、服务器上的共享目录以及要挂载到本地系统(即客户端)的目录
[root@nfs-client ~]# mkdir /nfsfile
[root@nfs-client ~]# mount -t nfs 172.16.0.100:/nfsfile /nfsfile
[root@nfs-client ~]# df -Th
Filesystem            Type      Size  Used Avail Use% Mounted on
devtmpfs              devtmpfs  3.9G     0  3.9G   0% /dev
tmpfs                 tmpfs     3.9G     0  3.9G   0% /dev/shm
tmpfs                 tmpfs     3.9G  8.5M  3.9G   1% /run
tmpfs                 tmpfs     3.9G     0  3.9G   0% /sys/fs/cgroup
/dev/mapper/rl-root   xfs        37G  2.2G   35G   6% /
/dev/mapper/rl-home   xfs        19G  162M   18G   1% /home
/dev/vda1             xfs      1014M  172M  843M  17% /boot
tmpfs                 tmpfs     794M     0  794M   0% /run/user/0
172.16.0.100:/nfsfile nfs4       37G  2.2G   35G   6% /nfsfile
挂载成功后就应该能够顺利地看到在执行前面的操作时写入的文件内容了。如果希望NFS文件共享服务能一直有效,则需要将其写入到fstab文件中:
[root@nfs-client ~]# cat /nfsfile/README
This is a nfs shared folder.
[root@nfs-client ~]#
[root@nfs-client ~]# vim /etc/fstab


#
# /etc/fstab
# Created by anaconda on Thu Dec 14 0552 2023
#
# Accessible filesystems, by reference, are maintained under '/dev/disk/'.
# See man pages fstab(5), findfs(8), mount(8) and/or blkid(8) for more info.
#
# After editing this file, run 'systemctl daemon-reload' to update systemd
# units generated from this file.
#
/dev/mapper/rl-root     /                       xfs     defaults        0 0
UUID=e629f80e-7773-478a-90bb-2071e248cf79 /boot                   xfs     defaults        0 0
/dev/mapper/rl-home     /home                   xfs     defaults        0 0
/dev/mapper/rl-swap     none                    swap    defaults        0 0
172.16.0.100:/nfsfile   /nfsfile                nfs     defaults        0 0      # 添加这一行
[root@nfs-client ~]#
[root@nfs-client ~]# mount -a
链接:https://blog.51cto.com/min2000/8973419
审核编辑:刘清
-
如何实现NFS服务搭建2024-12-10 1296
-
NFS服务器搭建与配置步骤2023-05-26 6321
-
Linux下部署NFS服务2023-04-17 1857
-
如何在Linux卸载NFS共享目录2022-12-07 12046
-
【米尔王牌产品MYD-Y6ULX-V2开发板试用体验】挂载NFS网络文件系统2022-12-04 2929
-
linux驱动开发_文件系统本地挂载2022-09-17 2327
-
嵌入式Linux NFS挂载2021-10-20 561
-
《Linux设备驱动开发详解》第5章、Linux文件系统与设备文件系统2017-10-27 1015
-
【NanoPi NEO2试用体验】nfs文件系统2017-07-04 5354
-
linux下网卡配置详解2016-12-15 755
-
详细说明如何配置嵌入式linux 的nfs开发环境2016-07-28 3234
-
Ubuntu 15下NFS安装配置2015-12-30 3582
-
TQ210 NFS服务器的配置和使用2015-11-23 2880
-
嵌入式LINUX下的简述步骤2012-01-09 1038
全部0条评论

快来发表一下你的评论吧 !

