

视觉模型weak-to-strong的实现
描述
深度学习自然语言处理 原创
作者:pp
几天前,OpenAI「超级对齐」(Superalignment)团队发布了成立以来的首篇论文,声称开辟了对超人类模型进行实证对齐的新研究方向。GPT-2能监督GPT-4,Ilya带头OpenAI超级对齐首篇论文来了:AI对齐AI取得实证结果
可能是为了让大家更容易实现论文中的思路,也可能是为了让自己的研究更加接地气,不再被调侃为“CloseAI”。在公布这篇论文的同时,OpenAI也在GitHub开源了论文提出的"weak-to-strong"框架的代码[1]
在观察了仓库中的代码之后我们有了如下发现:
既有NLP版本也有CV版本
主代码仓库是一个对二元分类(binary classification)任务的“weak-to-strong”方法的实现。包含用于微调预训练语言模型的代码(训练弱模型,生成若标签),以及针对来自另一种语言模型的标签进行训练的代码(使用弱标签,训练强学生)。
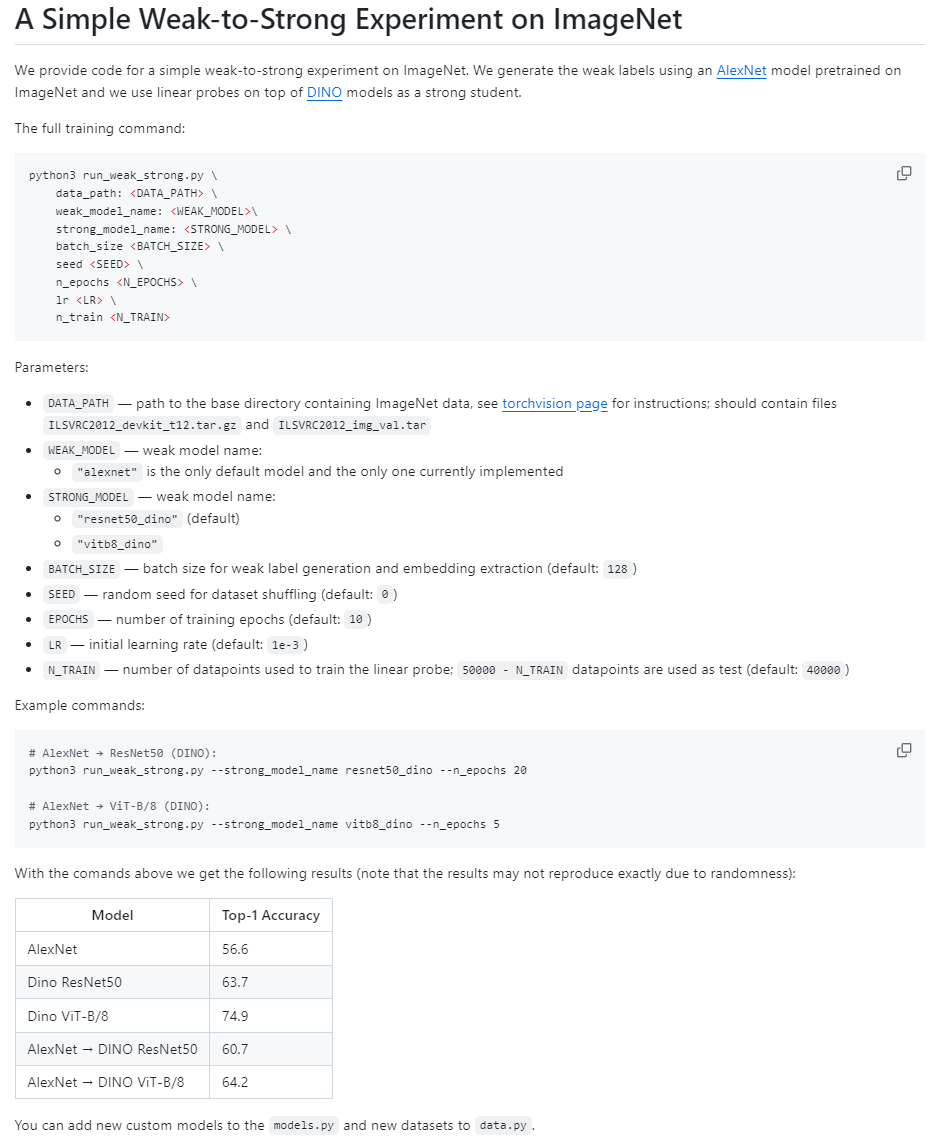
Vision目录中则包含视觉模型"weak-to-strong"的实现(AlexNet -> DINO)。
支持论文中描述的各种损失函数,如置信度辅助损失函数,也可以自己定义损失函数,见weak_to_strong/loss.py。
# Custom loss function
class xent_loss(LossFnBase):
    def __call__(
        self, logits: torch.Tensor, labels: torch.Tensor, step_frac: float
    ) -> torch.Tensor:
        """
        This function calculates the cross entropy loss between logits and labels.

        Parameters:
        logits: The predicted values.
        labels: The actual values.
        step_frac: The fraction of total training steps completed.

        Returns:
        The mean of the cross entropy loss.
        """
        loss = torch.nn.functional.cross_entropy(logits, labels)
        return loss.mean()


class product_loss_fn(LossFnBase):
        ...
        return loss.mean()


class logconf_loss_fn(LossFnBase):
        ...
        return loss.mean()
Qwen(千问)模型出现在代码中
在主文件train_weak_to_strong.py中,OpenAI以自己的GPT2模型,和国产的Qwen(千问)模型为例
    ModelConfig(
        name="gpt2",
        default_lr=5e-5,
        eval_batch_size=32,
        custom_kwargs={
            "bf16": torch.cuda.is_bf16_supported(),
            "fp32": not torch.cuda.is_bf16_supported(),
        },
    ),
    ModelConfig(
        name="gpt2-medium",
        default_lr=5e-5,
        eval_batch_size=32,
        custom_kwargs={
            "bf16": torch.cuda.is_bf16_supported(),
            "fp32": not torch.cuda.is_bf16_supported(),
        },
    ),
    ...
    ModelConfig(
        name="Qwen/Qwen-7B",
        default_lr=1e-5,
        eval_batch_size=2,
        gradient_checkpointing=True,
        model_parallel=True,
        # note: you will probably not be able to run this without many gpus
        custom_kwargs={
            "trust_remote_code": True,
            "bf16": torch.cuda.is_bf16_supported(),
            "fp32": not torch.cuda.is_bf16_supported(),
        },
    ),
    ModelConfig(
        name="Qwen/Qwen-14B",
        default_lr=1e-5,
        eval_batch_size=2,
        gradient_checkpointing=True,
        model_parallel=True,
        # note: you will probably not be able to run this without bf16 support and many gpus
        custom_kwargs={
            "trust_remote_code": True,
            "bf16": torch.cuda.is_bf16_supported(),
            "fp32": not torch.cuda.is_bf16_supported(),
        },
    ),
    ...
两阶段训练
Weak-to-strong关注的重点是:一个弱监督者如何监督一个比它聪明得多的模型?为此,OpenAI提出了一个两阶段的训练方法:
对于一个给定的任务:
构建弱监督者。通过在一半训练数据上微调较小的预训练模型来构造弱监督者,他们把弱监督者的表现称为弱表现,并通过弱模型的预测来生成弱标签。(Stage 1)
    # Train the weak model on the first half of the training data
    print(f"Training weak model, size {weak_model_size}")
    weak_test_results, weak_ds = train_model(
        weak_model_config,
        train1_ds,
        test_ds,
        loss_type="xent",
        label="weak",
        subpath=os.path.join("weak_model_gt", weak_model_size.replace("/", "_")),
        lr=weak_lr,
        eval_batch_size=weak_eval_batch_size,
        inference_ds=train2_ds,
        epochs=gt_epochs,
        linear_probe=linear_probe,
        optimizer_name=weak_optim,
    )
训练一个用于比较的性能上限的强模型。在另一半训练数据上以Ground Truth作为标签训练一个较大的模型作为比较的上限。(Upper bound)
    # Train the strong model on the second half of the training data
    print(f"Training strong model, size {strong_model_size}")
    strong_test_results, _ = train_model(
        strong_model_config,
        train2_ds,
        test_ds,
        loss_type="xent",
        label="strong",
        subpath=os.path.join("strong_model_gt", strong_model_size.replace("/", "_")),
        lr=strong_lr,
        eval_batch_size=strong_eval_batch_size,
        epochs=gt_epochs,
        linear_probe=linear_probe,
        optimizer_name=strong_optim,
    )
通过第一步中的弱监督训练强学生模型。本文使用生成的弱标签微调强模型,并将该模型称为强学生模型,将其产生的性能称为从弱到强(weak-to-strong)的性能。(Stage 2)
    # Train the strong model on the second half of the training data with labels generated by the weak model
    all_transfer_test_results = {}
    for tloss in transfer_losses:
        print(
            f"Training transfer model, size {strong_model_size} on labels from {weak_model_size}, with loss {tloss}"
        )
        transfer_test_results, _ = train_model(
            strong_model_config,
            weak_ds,
            test_ds,
            loss_type=tloss,
            label="weak2strong",
            subpath=os.path.join(
                "strong_model_transfer",
                f"{weak_model_size.replace('/', '_')}_{strong_model_size.replace('/', '_')}_{tloss}",
            ),
            lr=transfer_lr,
            eval_batch_size=strong_eval_batch_size,
            epochs=transfer_epochs,
            linear_probe=linear_probe,
            optimizer_name=transfer_optim,
        )
        all_transfer_test_results[tloss] = transfer_test_results
        del transfer_test_results
复刻版本,并非源码
OpenAI在仓库中提到,目前开源的代码并非与论文实验部分完全一致,不过是结果相近的。
"STATUS: This codebase is not well tested and does not use the exact same settings we used in the paper, but in our experience gives qualitatively similar results when using large model size gaps and multiple seeds. Expected results can be found for two datasets below. We may update the code significantly in the coming week."
这次开源的weak-to-strong实现代码较为简单,感兴趣的朋友可以去尝试一下,结合论文也许会有不一样的感受。OpenAI正在大力研究超级对齐(Superalignment),不仅仅放出论文,开源代码,同时也宣布了一项高达1000万美金的资助计划,我们将在之后的文章中为您带来详细解读,敬请期待!
-
strong-password-generator密码生成器2022-05-07 523
-
如何利用Transformers了解视觉语言模型2023-03-03 1805
-
__attribute__((weak)) __weak_symbol在idf4.4库中无效的原因?2024-06-17 341
-
人工智能多模态与视觉大模型开发实战 - 2026必会2026-04-15 394
-
在Fast-Strong情况下是否会出现过多的过冲2019-06-11 1165
-
keil中__weak的功能和应用是什么2021-11-30 895
-
__attribute__((weak)) __weak_symbol在idf4.4库中无效,要怎么操作才能起作用呢?2023-02-14 530
-
目标跟踪的视觉注意计算模型2010-01-04 746
-
【MCU】Keil编译无法识别__WEAK问题2021-11-05 3123
-
keil中__weak的功能和应用2021-11-21 926
-
基于可变形卷积的大规模视觉基础模型2022-11-21 1833
-
Strong ARM比较器电路的工作原理2023-07-17 12902
-
一文详解视觉语言模型2025-02-12 4107
-
VLM(视觉语言模型)详细解析2025-03-17 9973
全部0条评论

快来发表一下你的评论吧 !
