

如何使用Arduino UNO板和电位器控制伺服电机
描述
在本Arduino伺服电机教程中,您将学习如何使用Arduino UNO板和电位器控制伺服电机。
一旦你启动并运行了这个示例项目,你就掌握了从Arduino控制伺服电机的技能。这可以成为更先进的机器人项目的基础。
您需要的组件:
Arduino的板
5V伺服电机(如SG90)
电位器(1k及以上的任意值)
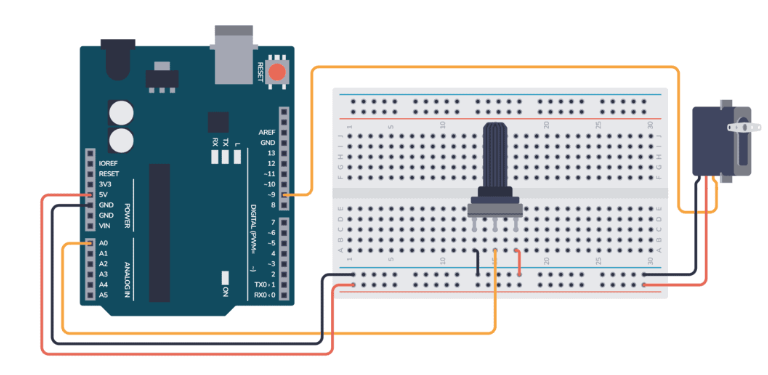
面包板和跳线
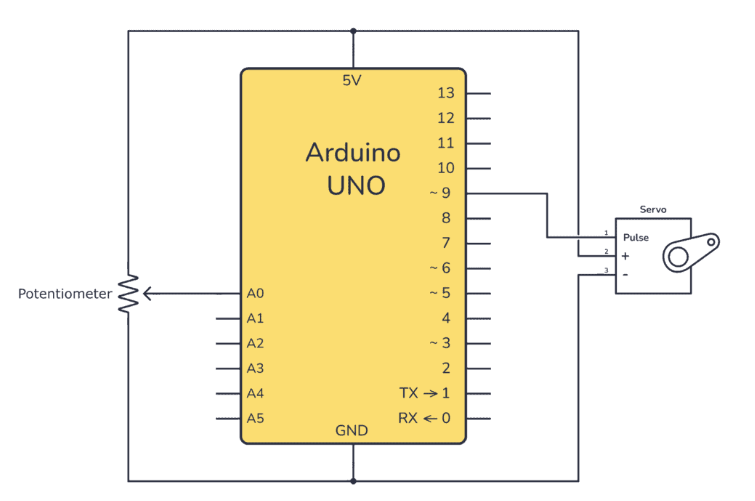
电路设置:
将舵机的电源线(通常为红色)连接到 Arduino 上的 5V 输出。
将舵机的接地电缆(通常为棕色或黑色)连接到 Arduino 上的一个 GND 引脚。
将舵机的信号线(通常为橙色或黄色)连接到 Arduino 上的数字引脚 9。
将电位器插入试验板,并将其一个外部引脚连接到 5V,另一个外部引脚连接到 Arduino 上的 GND。
将电位计的中间引脚连接到Arduino上的模拟引脚A0。
示例代码 1:自动伺服运动
首先,要测试伺服电机是否工作,请上传以下测试代码。上传后,伺服电机应开始在 0 到 180 度之间来回移动。确保您的舵机连接到引脚
9,如电路图所示。
#include < Servo.h >  // Include the Servo library

Servo myservo;  // Create a servo object to control the servo motor

void setup() {
  myservo.attach(9);  // Attaches the servo on pin 9 to the servo object
}

void loop() {
  // Goes from 0 degrees to 180 degrees in steps of 1 degree
  for (int pos = 0; pos <= 180; pos += 1) {
    myservo.write(pos);  // Tell servo to go to position in variable 'pos'
    delay(15);           // Waits for the servo to reach the position
  }

  // Goes from 180 degrees to 0 degrees
  for (int pos = 180; pos >= 0; pos -= 1) {
    myservo.write(pos);  // Tell servo to go to position in variable 'pos'
    delay(15);           // Waits for the servo to reach the position
  }
}
上传代码:
通过 USB 数据线将 Arduino UNO 连接到计算机。
在计算机上打开Arduino IDE。
将提供的代码复制到新草图中。
在“工具”菜单下选择正确的主板和端口。
单击“上传”按钮将代码传输到Arduino。
示例代码 2:使用电位计控制伺服
此示例草图使用电位计来控制伺服电机的位置。当您转动电位器时,伺服电机应相应地移动到电位器电阻所指示的位置。
此代码基于基本的Arduino电位器示例。
#include < Servo.h >

Servo myservo;  // Servo object to control the motor
int potpin = A0;  // Where the potentiometer is connected
int val;    // Variable to read the potentiometer value

void setup() {
  // Tell the servo object which pin to use
  myservo.attach(9);
}

void loop() {
  // Read the value of the potentiometer (value between 0 and 1023)
  val = analogRead(potpin);

  // Scale it to use it with the servo (value between 0 and 180)
  val = map(val, 0, 1023, 0, 180);

  // Set the servo position according to the scaled value
  myservo.write(val);

  // Wait for the servo to reach the position
  delay(15);
}
上传代码后,转动电位器将改变电阻和Arduino读取的模拟值,从而控制伺服电机的位置。
现在,您可以对位置进行试验,并了解伺服电机如何响应电位计的调整。
Arduino伺服电机故障排除
如果伺服电机没有响应:
根据原理图检查所有连接。
确保在IDE中正确选择了Arduino板。
确保试验板上没有短路。
确保您的舵机在 5V 下工作
审核编辑:陈陈
-
如何使用Arduino的蓝牙控制伺服电机2022-11-16 4832
-
针对伺服电机一款常用 Arduino 板开发2018-07-13 4378
-
三电阻FOC电机控制板电位器调速是如何移植的?2021-06-16 1843
-
如何使用Arduino开发板通过蓝牙方式控制伺服电机2021-06-28 1318
-
Arduino UNO利用电位器模拟输量输入控制步进电机调速 相关资料下载2021-06-29 1555
-
如何在arduino中利用电位器控制舵机2021-09-07 2329
-
请问Arduino UNO如何利用电位器模拟输量输入控制步进电机调速?2021-10-19 2778
-
基于Arduino UNO和HC-05蓝牙模块控制伺服电机2021-04-28 6438
-
用于Arduino UNO兼容板的3个步进电机控制器载板2022-07-19 897
-
带电位器的控制伺服开源分享2022-11-01 551
-
使用Arduino Uno和POT控制伺服电机2022-11-10 1165
-
基于Arduino UNO的手势控制伺服电机2022-12-21 957
-
用Arduino和电位器控制伺服电机的位置2023-02-06 885
-
使用电位器和Arduino实现步进电机控制2023-03-24 963
-
使用电位器和Arduino控制LED亮度2023-07-06 1452
全部0条评论

快来发表一下你的评论吧 !
