

如何使用Arduino设置热敏电阻来创建温度计
描述
在本教程中,我们将指导您如何使用Arduino设置热敏电阻以创建基本温度计。提供的原理图、试验板图和示例代码将使热敏电阻工作变得简单明了。
所需零件
Arduino开发板(例如Arduino Uno)
面包板(和一些面包板电线)
热敏电阻 (10kΩ)
电阻 (10 kΩ)
第 1 步:了解热敏电阻
我们的热敏电阻具有以下参数:
T0:25°摄氏度
RT0型:10,000 Ω
B: 3977 千米
这些值可在热敏电阻制造商提供的数据表中找到。查看 Vishay 热敏电阻的示例数据表。
T0是热敏电阻的参考温度。对于大多数热敏电阻,这是25°C。
RT0型是热敏电阻在参考温度(通常为25°C)下的电阻。
热敏电阻的 B 值,也称为“β 值”或“B 系数”,可让您深入了解电阻如何随温度变化。您需要此值来计算热敏电阻的温度。
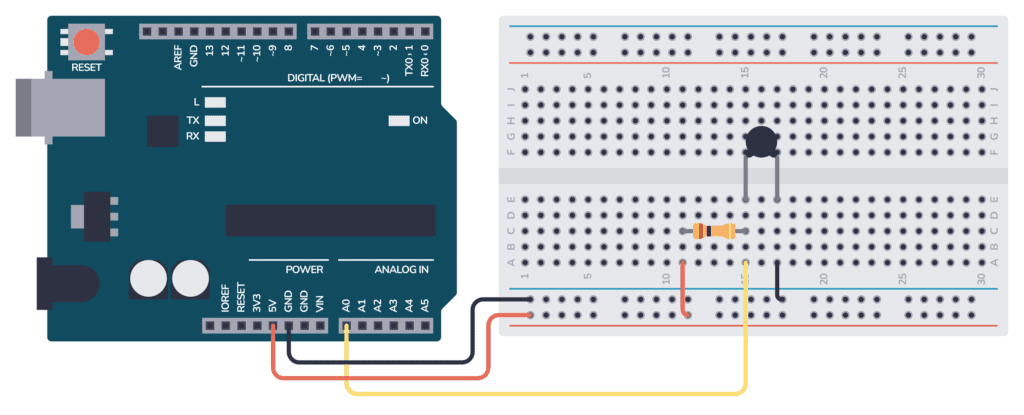
第 2 步:连接 Arduino 热敏电阻电路
要将热敏电阻连接到Arduino,请将其与5V和GND之间的电阻串联。然后将两者之间的中间连接连接到Arduino上的模拟输入引脚。

以下是使用面包板和一些电缆将热敏电阻和电阻器连接到Arduino的方法:
第 3 步:上传 Arduino 热敏电阻代码
此Arduino代码向您展示了如何读取热敏电阻两端的电压,将其转换为电阻,并使用它来计算热敏电阻周围的温度。
然后,它将以摄氏度、开尔文和华氏度为单位的温度值打印到串行监视器。
上传完整代码:
// Thermistor parameters from the datasheet
#define RT0 10000
#define B 3977

// Our series resistor value = 10 kΩ
#define R 10000

// Variables for calculations
float RT, VR, ln, TX, T0, VRT;

void setup() {
  // Setup serial communication
  Serial.begin(9600);
  // Convert T0 from Celsius to Kelvin
  T0 = 25 + 273.15;
}

void loop() {
  // Read the voltage across the thermistor
  VRT = (5.00 / 1023.00) * analogRead(A0);

  // Calculate the voltage across the resistor
  VR = 5.00 - VRT;

  // Calculate resistance of the thermistor
  RT = VRT / (VR / R);

  // Calculate temperature from thermistor resistance
  ln = log(RT / RT0);
  TX = (1 / ((ln / B) + (1 / T0)));

  // Convert to Celsius
  TX = TX - 273.15;

  Serial.print("Temperature: ");
  // Display in Celsius
  Serial.print(TX);
  Serial.print("Ct");

  // Convert and display in Kelvin
  Serial.print(TX + 273.15);
  Serial.print("Kt");

  // Convert and display in Fahrenheit
  Serial.print((TX * 1.8) + 32);
  Serial.println("F");

  delay(500);
}
第 4 步:监控温度
通过单击放大镜图标或使用键盘快捷键 (Windows/Linux) 或 (Mac) 从 Arduino IDE
打开串行监视器。将串行监视器中的波特率设置为 9600(或与代码中的函数中的值相同)。Ctrl + Shift + MCmd + Shift +
MSerial.begin()
在串行监视器窗口中,您将能够看到以摄氏度、开尔文和华氏度为单位的温度值。这些值将每 500 毫秒刷新一次。
尝试用手指加热热敏电阻以观察温度变化。
串行监视器中预期的输出示例:
Temperature: 25.00C   298.15K   77.00F
Temperature: 24.89C   298.04K   76.80F
Temperature: 26.12C   299.27K   79.02F
Temperature: 27.38C   300.53K   81.28F
Temperature: 27.50C   300.65K   81.50F
Temperature: 26.80C   299.95K   80.24F
Temperature: 25.78C   299.93K   78.40F
Temperature: 25.10C   298.25K   77.18F
结论
您已经成功地使用带有Arduino的热敏电阻设置了温度计!此设置可以集成到更大的项目中,也可以单独用于监测任何所需设置下的温度。
审核编辑:陈陈
-
使用温度计测量温度和使用热敏电阻测量温度有什么不同?2024-07-04 2021
-
基于51单片机的热敏电阻数字温度计设计2024-01-03 748
-
热敏电阻温度计开源分享2022-12-13 782
-
基于NTC热敏电阻和nRF24L01的无线温度计2022-09-30 957
-
怎样去设计一个基于热敏电阻的数字温度计2022-02-24 1405
-
基于热敏电阻的数字温度计2021-12-31 1011
-
基于51单片机热敏电阻温度计仿真设计2021-10-25 1206
-
基于51单片机的热敏电阻温度计2016-12-28 3069
-
请问有大神用NTC热敏电阻做过电子温度计没?2015-06-11 4247
-
设计制做半导体热敏电阻温度计2009-04-17 1521
-
热敏电阻温度计设计实验2009-04-16 2820
-
热敏电阻温度计的设计、安装和使用2008-12-05 14593
全部0条评论

快来发表一下你的评论吧 !
