

如何将按钮连接到Arduino板
描述
在本快速入门指南中,您将学习如何将按钮连接到Arduino板,并根据按钮是否被按下来读取HIGH或LOW。您将使用电路板上随附的发光二极管 (LED)
通过按钮打开和关闭,以便验证按钮按下代码是否正常工作。
所需零件
Arduino Uno的
面包板(和一些面包板电线)
电阻 10 kΩ
按钮或开关
电线
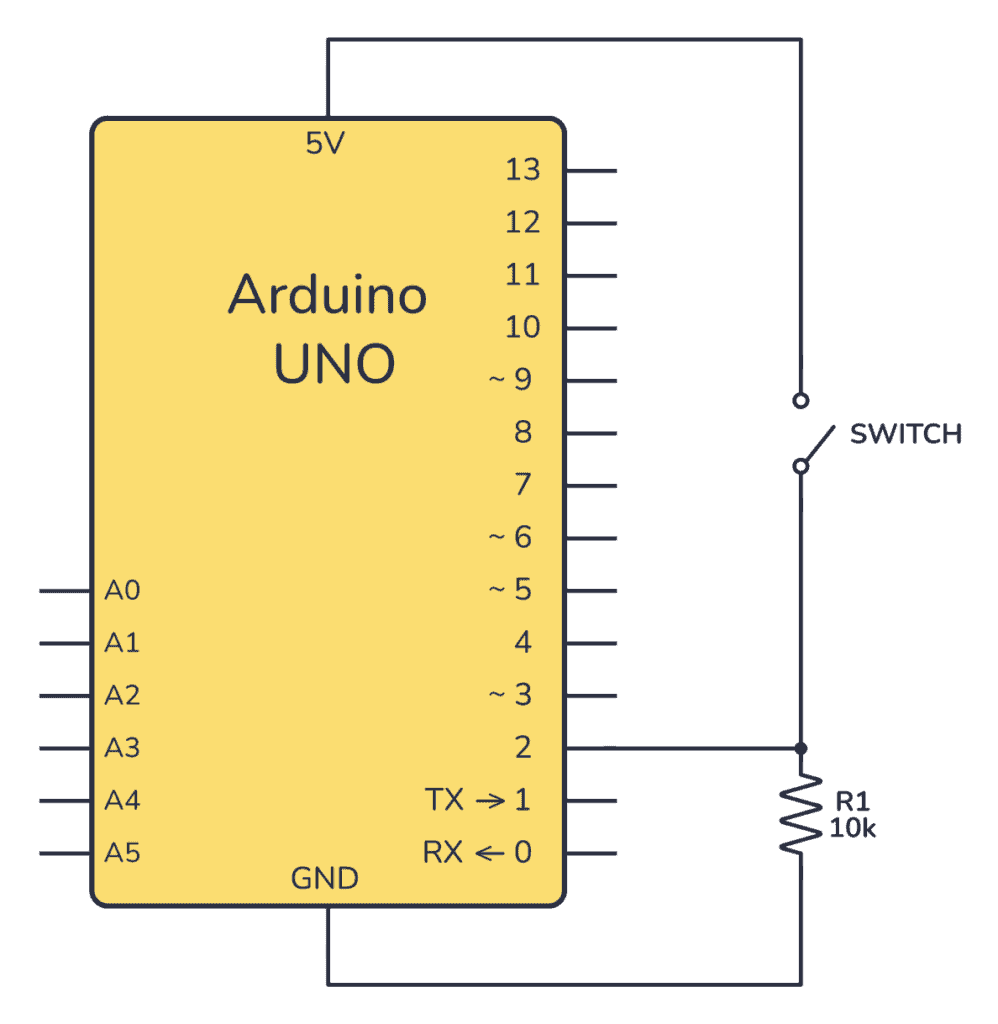
Arduino按钮电路
要将按钮连接到Arduino,您需要一个下拉或上拉电阻器。这是为了确保在不按下按钮时,它有一个定义的值。在本例中,我们使用10
kΩ的下拉电阻。
在试验板上连接
以下是使用面包板和一些电缆将电位计连接到Arduino的方法:

将按钮的一侧连接到Arduino上的5V引脚。并将另一侧连接到Arduino上的数字输入D2。将电阻器从 D2(和按钮)接地。
Arduino按钮代码
以下代码读取按钮状态,然后根据按钮是否被按下来打开或关闭板载 LED。
与所有Arduino代码一样,代码围绕两个主要函数setup()和loop()构建:
在 setup() 中,您需要设置哪些引脚应该是输入和输出。
在 loop() 中,您需要读取按钮输入并根据按钮状态设置 LED 引脚。
查看完整代码:
const int buttonPin = 2; // the number of the pushbutton pin
const int ledPin = 13; // the number of the LED pin
// variables will change:
int buttonState = 0; // variable for reading the pushbutton status
void setup() {
// initialize the LED pin as an output:
pinMode(ledPin, OUTPUT);
// initialize the pushbutton pin as an input:
pinMode(buttonPin, INPUT);
}
void loop() {
// read the state of the pushbutton value:
buttonState = digitalRead(buttonPin);
// check if the pushbutton is pressed. If it is, the buttonState is HIGH:
if (buttonState == HIGH) {
// turn LED on:
digitalWrite(ledPin, HIGH);
} else {
// turn LED off:
digitalWrite(ledPin, LOW);
}
}
代码的工作原理
下面概述了代码的工作原理:
变量和常量:
buttonPin:连接按钮的引脚 2。
ledPin:连接 LED 的引脚 13。
buttonState:存储按钮的状态(HIGH 或 LOW)。
setup():
设置为 OUTPUT 和 INPUT。ledPinbuttonPin
loop():
读取按钮的状态。
如果按下按钮 (HIGH),LED 亮起。
否则,LED 熄灭。
因此,在此代码中,按下引脚 2 上的按钮可切换引脚 13 上的 LED。
审核编辑:陈陈
-
如何将光敏电阻连接到Arduino板并读取电压2024-02-11 7822
-
如何将模块连接到互联网和Arduino板?2023-06-12 706
-
如何将Deauther手表连接到Arduino IDE?2023-06-05 620
-
如何将LoRa模块与Arduino连接2023-02-09 871
-
如何将arduino串口链接到python2023-02-01 876
-
如何将Arduino以太网连接到物联网云2023-01-03 692
-
如何将Grove语音识别器模块与Arduino板连接2022-12-28 1130
-
如何将DHT11连接到Arduino并提供示例代码2022-12-07 905
-
如何将Arduino板与不同的传感器连接2022-11-03 1484
-
如何将GPS模块与Arduino连接2022-10-21 2597
-
如何将倾斜传感器连接到Arduino开发板上?2021-07-06 2044
-
如何将步进电机连接到Arduino Nano并使用按钮进行控制2019-10-22 19486
-
如何将PIR传感器连接到Arduino2019-07-30 6846
-
如何将Arduino板连接到的计算机上的30个项目2018-12-11 1831
全部0条评论

快来发表一下你的评论吧 !
