

OpenHarmony内核编程实战
描述
在正式开始之前,对于刚接触OpenHarmony的伙伴们,面对大篇幅的源码可能无从下手,不知道怎么去编码写程序,下面用一个简单的例子带伙伴们入门。
▍任务编写程序,让开发板在串口调试工具中输出”Hello,OpenHarmony“。
▍操作
在源码的根目录中有名为”applications“的文件,他存放着应用程序样例,下面是他的目录结构:
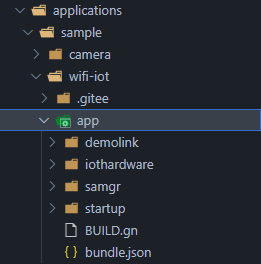
我们要编写的程序样例就在源码根目录下的:applications/sample/wifi-iot/app/下面将具体演示如何编写程序样例。
1.新建样例目录applications/sample/wifi-iot/app/hello_demo
2.新建源文件和gn文件applications/sample/wifi-iot/app/hello_demo/hello.capplications/sample/wifi-iot/app/hello_demo/BUILD.gn
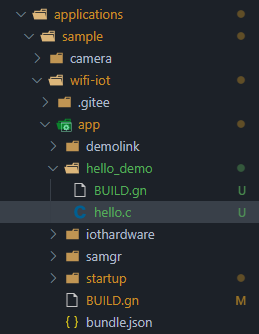
3.编写源文件hello.c
#include
#include "ohos_init.h"
void hello(void){
printf("Hello,OpenHarmony!");
}
SYS_RUN(hello);
第一次操作的伙伴们可能会在引入”ohos_init.h“库时报错,面对这个问题我们只需要修改我们的include path即可,一般我们直接在目录下的 .vscode/c_cpp_properties.json文件中直接修改includePath
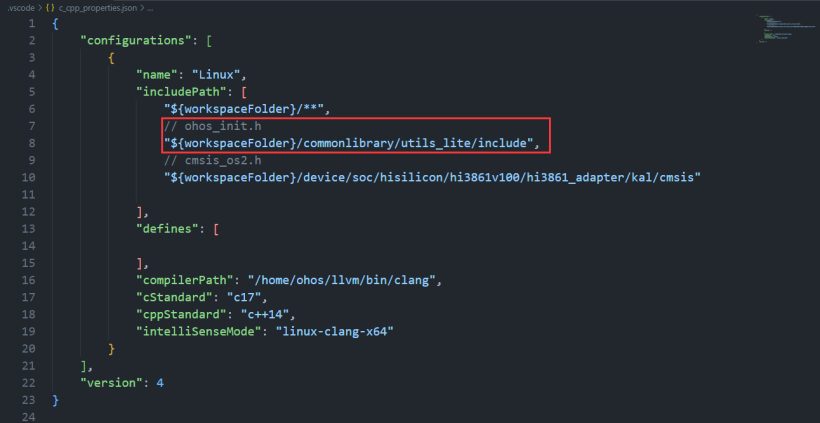 笔者的代码版本是OpenHarmony3.2Release版,不同版本的源码可能库所存放的路径不同,那么怎么去找到对应的库呢,对于不熟悉源码结构的伙伴们学习起来很不友好。对于在纯Windows环境开发的伙伴们,笔者推荐使用everything这款工具,它可以快速查找主机中的文件,比在资源管理器的搜索快上不少。
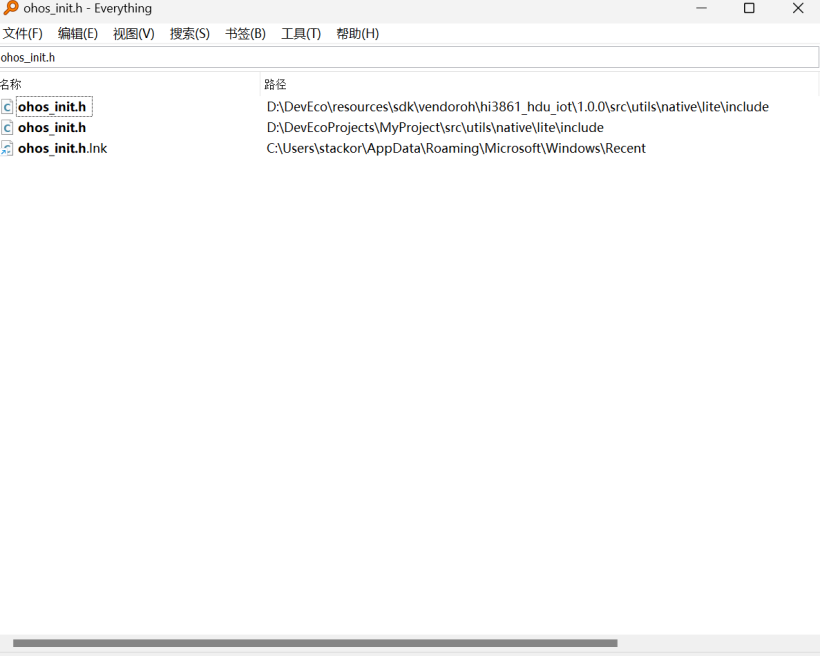 everything似乎不能找到我WSL中的Ubuntu中的文件,因此对于Windows + Linux环境下的伙伴们,这款工具又不那么适用。那就可以根据Linux的查询指令来定位文件所在目录,下面提供查询案例防止有不熟悉Linux的伙伴们。我们使用locate指令来查找文件。首先安装locate
sudo apt install mlocate
更新mlocate.db
sudo updatedb
查询文件目录
locate ohos_init.h
找到我们源码根目录下 include路径下的ohos_init.h文件
 4.编写gn文件
static_library("sayHello"){
sources = [
"hello.c"
]
include_dirs = [
"//commonlibrary/utils_lite/include"
]
}
static_library表示我们编写的静态模块,名为"sayHello", sources表示我们要编译的源码,include_dirs表示我们引入的库,这里的双斜杠就代表我们的源码根目录,”/commonlibrary/utils_lite/include“就是我们ohos_init.h的所在目录
5.编写app下的gn文件在app的目录下也有一个gn文件,我们只需要去修改他即可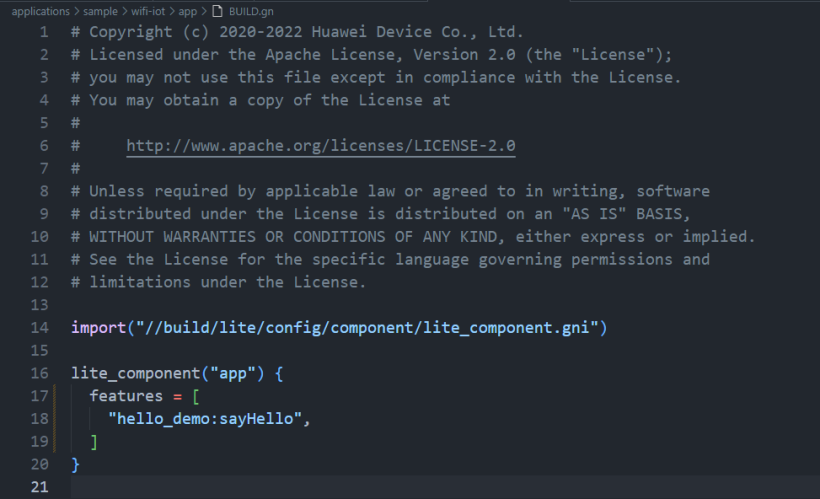
这表示我们的程序将会执行hello_demo样例中的sayHello模块
6.编译,烧录,串口调试这一步就属于基础操作了,不做过多赘述,7.观察控制台的输出
至此编码完成了编码入门,下面就具体介绍OpenHarmony的内核编程。
内核
▍内核介绍
什么是内核?或者说内核在一个操作系统中起到一个什么样的作用?相信初次接触这个词的伙伴们也会有同样的疑问。不过不用担心,笔者会尽可能地通俗地介绍内核的相关知识,以便大家能够更好地去体会内核编程。
我们先来看一张图,这是OpenHarmony官网发布的技术架构图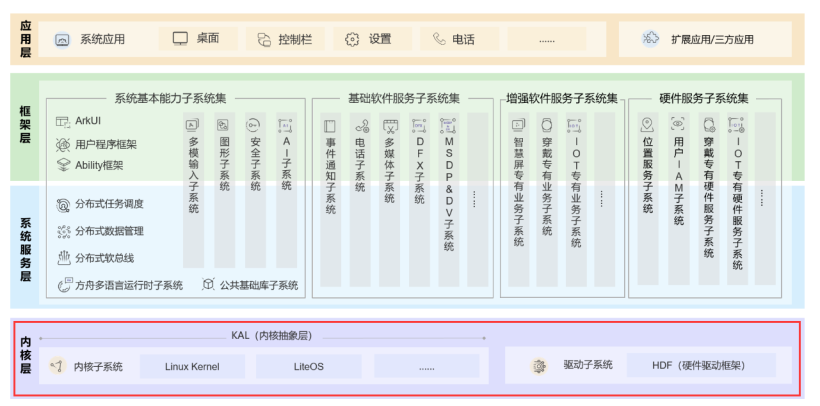
我们可以看到最底层叫做内核层,有Linux,LiteOS等。内核在整个架构,或者操作系统中起到一个核心作用,他负责管理计算机系统内的资源和硬件设备,提供给顶层的应用层一个统一规范的接口,从而使得整个系统能够完成应用与硬件的交互。
具体点来说,内核可以做以下相关的工作:1.进程管理2.内存管理3.文件资源管理4.网络通信管理5.设备驱动管理当然不局限于这些,这里只是给出具体的例子供伙伴们理解,如果实在难以理解,那么笔者再举一个例子,进程。可能你没听过进程,但你一定打开过任务管理器。
这些都是进程,一个进程又由多个线程组成。那么CPU,内存,硬盘,网络这些硬件层面资源是怎么合理分配到我们软件的各个进程中呢?这就是内核帮助我们完成的事情,我们并不关心我们设备上的应用在哪里执行,如何分配资源,内核会完成这些事情。我们日常与软件交互,而内核会帮助我们完成软件和硬件的交互。
▍OpenHarmony内核明白了什么是内核后,我们来看看OpenHarmony的内核是怎么样设计的吧。OpenHarmony采用的是多内核设计 有基于Linux内核的标准系统,有基于LiteOS-A的小型系统,也有基于LiteOS-M的轻量系统。他们分别适配不同的设备,比如说智能手表就是轻量级别的,智能汽车就是标准级别的等等。本篇并不介绍标准系统和小型系统,轻量系统更加适合初学者。▍LiteOS-M内核
下面是一张LiteOS-M的架构图
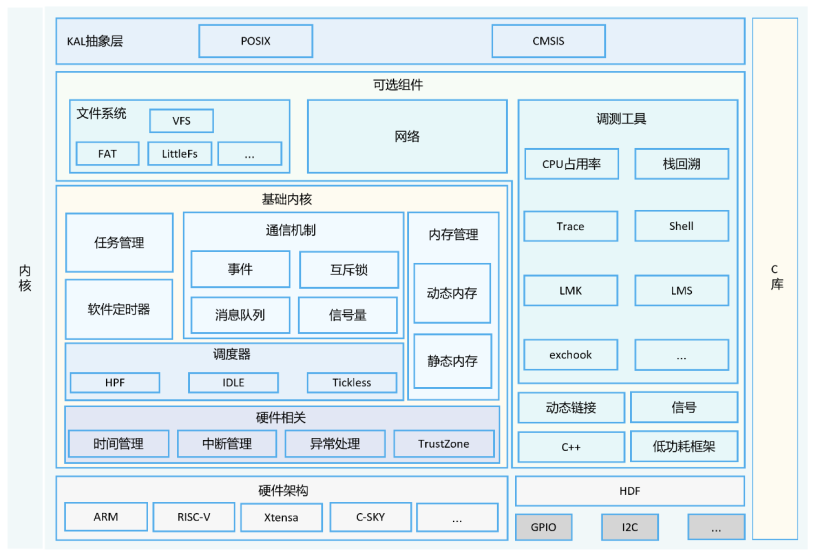
下面重点介绍KAL抽象层 和 基础内核的操作
KAL抽象层
相信大家还是会有疑惑,什么是KAL抽象层?Kernel Abstraction Layer在刚刚的内核中我们提到了,内核主要完成的是软件与硬件的交互,他会给应用层提供统一的规范接口,而KAL抽象层正是内核对应用层提供的接口集合。应用程序可以通过KAL抽象层完成对硬件的控制交互。抽象层是因为他隐藏了与硬件接口具体的交互逻辑,开发人员只需要关心如何操作硬件,而无需关心硬件底层的细节,大大提高了可移植性和维护性。以笔者的角度去看,KAL简单来说就是一堆接口,帮助你去操控硬件。CMSIS与POSIX就是具有统一规范的一些接口。通过他们我们就可以去控制一些基础的内核,线程,软件定时器,互斥锁,信号量等等。概念就先简单介绍这么多,感兴趣的伙伴们可以上官网查看更多的关于OpenHarmony内核的信息。下面笔者会带着大家编码操作,从实际去体会内核编程。
内核编程
▍线程管理
在管理线程前,我们需要了解线程,线程是调度的基本单位,具有独立的栈空间和寄存器上下文,相比与进程,他是轻量的。举一个实际的例子,动物园卖票。
对于动物园卖票这件事本身而言是一个进程,而每一个买票的人可以看作一个线程,在多个售票口处,我们并发执行,并行计算,共同消费动物园的门票,像享受共同的内存资源空间一样。为什么要线程管理呢?你我都希望买到票,但是票有限,我们都不希望看到售票厅一篇混乱,因此对线程进行管理是非常重要的一件事情。
任务
创建一个线程,每间隔0.1秒,输出“Hello,OpenHarmony”,1秒后终止线程。
操作
回忆第一个hello.c的例子我们要编写的程序样例就在源码根目录下的:applications/sample/wifi-iot/app/下面将具体演示如何编写程序样例。1.新建样例目录applications/sample/wifi-iot/app/thread_demo2.新建源文件和gn文件applications/sample/wifi-iot/app/thread_demo/singleThread.capplications/sample/wifi-iot/app/thread_demo/BUILD.gn

3.编写源码注意:我们需要使用到cmsis_os2.h这个库,请伙伴们按照笔者介绍的方法把includePath修改好。问题一:怎么创建线程?
typedef struct {
/** Thread name */
const char *name;
/** Thread attribute bits */
uint32_t attr_bits;
/** Memory for the thread control block */
void *cb_mem;
/** Size of the memory for the thread control block */
uint32_t cb_size;
/** Memory for the thread stack */
void *stack_mem;
/** Size of the thread stack */
uint32_t stack_size;
/** Thread priority */
osPriority_t priority;
/** TrustZone module of the thread */
TZ_ModuleId_t tz_module;
/** Reserved */
uint32_t reserved;
} osThreadAttr_t;
这是线程的结构体,它具有以下属性:
- name:线程的名称。
- attr_bits:线程属性位。
- cb_mem:线程控制块的内存地址。
- cb_size:线程控制块的内存大小。
- stack_mem:线程栈的内存地址。
- stack_size:线程栈的大小。
- priority:线程的优先级。
- tz_module:线程所属的TrustZone模块。
- reserved:保留字段。
问题二:怎么把线程启动起来呢?
osThreadId_t osThreadNew (osThreadFunc_t func, void *argument, const osThreadAttr_t *attr);
这是创建线程的接口函数,他有三个参数,一个返回值,我们来逐个解析func:是线程的回调函数,你创建的这个线程会执行这段函数的内容。arguments:线程回调函数的参数。attr:线程的属性,也就是我们之前创建的线程返回值:线程的id 如果id不为空则说明成功。问题三:怎么终止线程呢?
osStatus_t osThreadTerminate (osThreadId_t thread_id);
显然我们只要传入线程的id就会让该线程终止,返回值是一个状态码,下面给出全部的状态码
typedef enum {
/** Operation completed successfully */
osOK = 0,
/** Unspecified error */
osError = -1,
/** Timeout */
osErrorTimeout = -2,
/** Resource error */
osErrorResource = -3,
/** Incorrect parameter */
osErrorParameter = -4,
/** Insufficient memory */
osErrorNoMemory = -5,
/** Service interruption */
osErrorISR = -6,
/** Reserved. It is used to prevent the compiler from optimizing enumerations. */
osStatusReserved = 0x7FFFFFFF
} osStatus_t;
回调函数怎么写?当然是结合我们的任务,每间隔0.1秒,输出“Hello,OpenHarmony”,1秒后终止。讲到这里,代码的整体逻辑是不是就清晰了很多,直接上完整代码。
#include
#include "ohos_init.h"
// CMSIS
#include "cmsis_os2.h"
// POSIX
#include
// 线程回调函数
void printThread(void *args){
(void)args;
while(1){
printf("Hello,OpenHarmony!\r\n");
// 休眠0.1秒
osDelay(10);
}
}
void threadTest(void){
// 创建线程
osThreadAttr_t attr;
attr.name = "mainThread";
// 线程
attr.cb_mem = NULL;
attr.cb_size = 0U;
attr.stack_mem = NULL;
attr.stack_size = 1024;
attr.priority = osPriorityNormal;
// 将线程启动
osThreadId_t tid = osThreadNew((osThreadFunc_t)printThread, NULL, &attr);
if(tid == NULL){
printf("[Thread Test] Failed to create printThread!\r\n");
}
// 休眠5秒
osDelay(500);
// 终止线程
osStatus_t status = osThreadTerminate(tid);
printf("[Thread Test] printThread stop, status = %d.\r\n", status);
}
APP_FEATURE_INIT(threadTest);
4.编写gn文件
static_library("thread_demo"){
sources = [
"singleThread.c"
]
include_dirs = [
"//commonlibrary/utils_lite/include",
"//device/soc/hisilicon/hi3861v100/hi3861_adapter/kal/cmsis"
]
}
5.编写app下的gn文件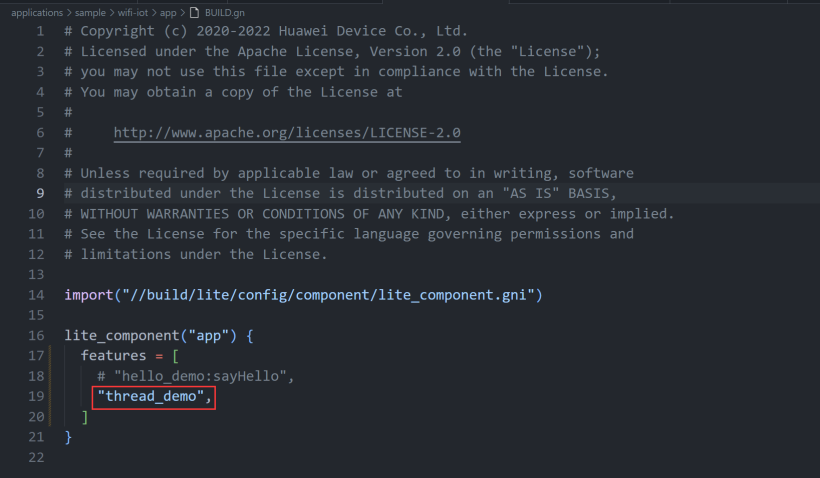
注意的是,这次的写法与上次不同,是因为笔者的样例文件名和静态模块的名字是一样的就可以简写。
执行效果
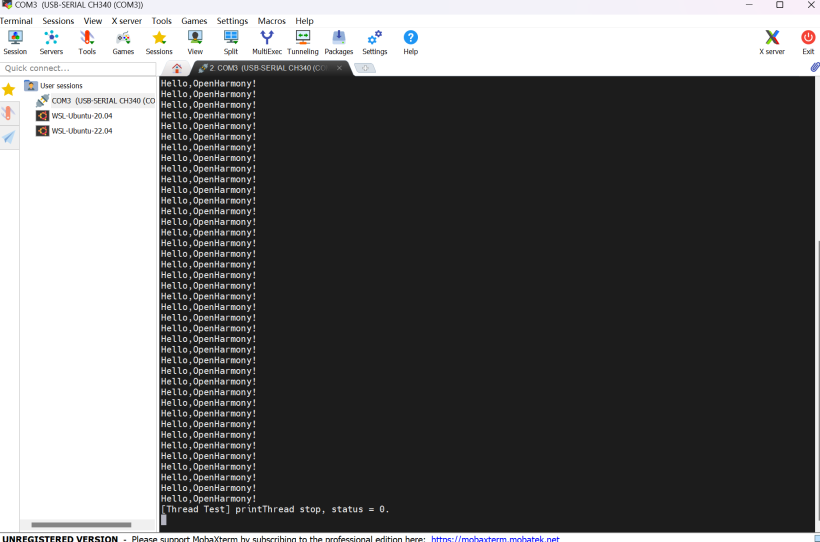 ▍多线程的封装
在处理业务的时候,我们一般是多线程的背景,下面笔者将创建线程函数封装起来,方便大家创建多线程
osThreadId_t newThread(char *name, osThreadFunc_t func, void *arg){
// 定义线程和属性
osThreadAttr_t attr = {
name, 0, NULL, 0, NULL, 1024, osPriorityNormal, 0, 0
};
// 创建线程
osThreadId_t tid = osThreadNew(func, arg, &attr);
if(tid == NULL){
printf("[newThread] osThreadNew(%s) failed.\r\n", name);
}
return tid;
}
线程部分先体会到这里,想要探索更过线程相关的API,笔者这里提供了API网站,供大家参考学习。
CMSIS_OS2 Thread API:https://arm-software.github.io/CMSIS_5/RTOS2/html/os2MigrationFunctions.html#mig_threadMgmt
软件定时器
下面我们介绍软件定时器,老样子我们先来介绍以下软件定时器。软件定时器是一种在软件层面上实现的计时器机制,用于在特定的时间间隔内执行特定的任务或触发特定的事件。它不依赖于硬件定时器,而是通过软件编程的方式实现。举一个例子,手机应用。
当你使用手机上的某个应用时,你可能会注意到,如果你在一段时间内没有进行任何操作,应用程序会自动断开连接并要求你重新登录。这是为了保护你的账号安全并释放服务器资源。类似的设定都是有软件定时器实现的,下面进行实际操作,让大家体会一下软件定时器。
任务
创建一个软件定时器,用来模拟上述手机应用的例子。为了方便理解,假设从此刻开始,我们不对手机做任何操作,也就是说,我们的回调函数只需要单纯的计算应用不被操作的时常即可。
操作
1.新建样例目录applications/sample/wifi-iot/app/thread_demo2.新建源文件和gn文件applications/sample/wifi-iot/app/thread_demo/singleThread.capplications/sample/wifi-iot/app/thread_demo/BUILD.gn3.编写源码创建软件定时器
osTimerId_t osTimerNew (osTimerFunc_t func, osTimerType_t type, void *argument, const osTimerAttr_t *attr);
func: 软件定时器的回调函数type:软件定时器的种类argument:软件定时器回调函数的参数attr:软件定时器的属性返回值:返回软件定时器的id, id为空则说明软件定时器失败
typedef enum {
/** One-shot timer */
osTimerOnce = 0,
/** Repeating timer */
osTimerPeriodic = 1
} osTimerType_t;
软件定时器的种类有两个,分为一次性定时器和周期性定时器,一次性在执行完回调函数后就会停止计数,而周期性定时器会重复触发,每次触发重新计时。根据不同的需求我们可以选择使用不同的软件定时器。启动软件定时器
osStatus_t osTimerStart (osTimerId_t timer_id, uint32_t ticks);
timer_id:软件定时器的参数,指定要启动哪个软件定时器ticks:等待多少个ticks执行回调函数,在Hi3861中 100个ticks为1秒返回值:软件定时器的状态码,在线程部分已经展示给大家了全部的状态码停止定时器
osStatus_t osTimerStop (osTimerId_t timer_id);
这个函数很简单,只需要传软件定时器的id,即可停止软件计时器,并且返回他的状态码删除定时器
osStatus_t osTimerDelete (osTimerId_t timer_id);
删除和停止类似,就不多说明了。下面是源代码
#include
#include "ohos_init.h"
// CMSIS
#include "cmsis_os2.h"
// POSIX
#include
// 为操作软件的时间
static int times = 0;
// 软件定时器回调函数
void timerFunction(void){
times++;
printf("[Timer Test] Timer is Running, times = %d.\r\n", times);
}
// 主函数
void timerMain(void){
// 创建软件定时器
osTimerId_t tid = osTimerNew(timerFunction, osTimerPeriodic, NULL, NULL);
if(tid == NULL){
printf("[Timer Test] Failed to create a timer!\r\n");
return;
} else {
printf("[Timer Test] Create a timer success!\r\n");
}
// 启动软件定时器,每1秒执行一次回调函数
osStatus_t status = osTimerStart(tid, 100);
// 当超过三个周期位操作软件时,关闭软件
while(times <= 3){
osDelay(100);
}
// 停止软件定时器
status = osTimerStop(tid);
// 删除软件定时器
status = osTimerDelete(tid);
printf("[Timer Test] Time Out!\r\n");
}
void TimerTest(void){
// 创建测试线程
osThreadAttr_t attr;
attr.name = "timerMain";
attr.attr_bits = 0U;
attr.cb_mem = NULL;
attr.cb_size = 0U;
attr.stack_mem = NULL;
attr.stack_size = 0U;
attr.priority = osPriorityNormal;
// 启动测试线程
osThreadId_t tid = osThreadNew((osThreadFunc_t)timerMain, NULL, &attr);
if(tid == NULL){
printf("[Timer Test] Failed to created timerMain!\r\n");
}
}
APP_FEATURE_INIT(TimerTest);
4.编写gn文件
static_library("timer_demo"){
sources = [
"timer.c"
]
include_dirs = [
"//commonlibrary/utils_lite/include",
"//device/soc/hisilicon/hi3861v100/hi3861_adapter/kal/cmsis"
]
}
5.编写app下的gn文件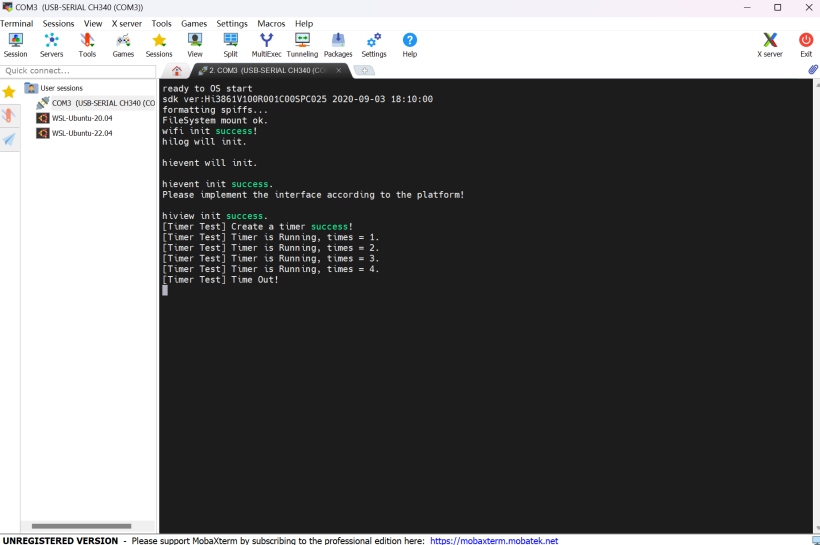
执行效果
 软件定时器的API相对较少,这里还是提供所有的软件定时器APICMSIS_OS2 Timer API:https://arm-software.github.io/CMSIS_5/RTOS2/html/os2MigrationFunctions.html#mig_timer▍互斥锁线程的状态
在介绍互斥锁之前,我们有必要去了解一下线程的状态,或者说线程的生命周期。避免伙伴们因为不够熟悉线程而对这个互斥锁的概念感到困难。首先介绍一下线程的几个状态,他们分别有:
- 创建
创建线程,在OpenHarmony的源码中,线程的属性被封装成了一个名为”osThreadAttr_t“的结构体
typedef struct {
const char *name;
uint32_t attr_bits;
void *cb_mem;
uint32_t cb_size;
void *stack_mem;
uint32_t stack_size;
osPriority_t priority;
TZ_ModuleId_t tz_module;
uint32_t reserved;
} osThreadAttr_t;
- name:线程的名称。
- attr_bits:线程属性位。
- cb_mem:线程控制块的内存地址。
- cb_size:线程控制块的内存大小。
- stack_mem:线程栈的内存地址。
- stack_size:线程栈的大小。
- priority:线程的优先级。
- tz_module:线程所属的TrustZone模块。
- reserved:保留字段。
当我们创建一个线程的时候,系统就会为该线程分配所需要的资源,将线程加入到系统的线程调度队列中,此时线程已经处在就绪状态了。
- 就绪
线程一旦被创建,就会进入就绪状态,他表示我们完成的线程的创建(线程相关属性的初始化),但是并未运行,线程正在等待操作系统调度程序,将其调度运行起来。
- 运行
之前我们介绍了一个关于线程的API,他可以将就绪状态的线程加入到活跃线程组
osThreadId_t osThreadNew (osThreadFunc_t func, void *argument, const osThreadAttr_t *attr);
此时的线程将会占用部分cpu资源执行他的程序,直到程序结束,或者线程被阻塞,cpu被抢占等。
- 阻塞
线程阻塞,可以理解为线程无法继续往下执行,但时线程执行的程序不会直接退出,他会进入到等待的状态,直到相关资源被释放,线程可以继续执行。
- 终止
上篇我们介绍了线程终止的API
sStatus_t status = osThreadTerminate(osThreadId_t tid);
此时线程完成了自己的代码逻辑,我们方可主动调用该API彻底删除这个线程。当然如果具体细分,其实不止这五个状态,但是了解了这五个状态就足够了。下面我们来聊聊什么是互斥锁。互斥锁简介
互斥锁的应用场景时处理多线程,资源访问的问题。这里还是给大家举一个例子:动物园卖票。
在我们的程序设计中,往往会有共有资源,每个线程都可以进来访问这些资源。这里的共有资源就是我们的门票,一个售票口就是一个线程,当有人来窗口买票,我们的门票就会减少一张。当然一个动物园的流量时巨大的,我们不能只设立一个售票口,这样的效率是很低的。京东淘宝抢购秒杀也一样,我们必须设立多个窗口,在同一时刻为多个人处理业务。多线程解决了效率问题但也带来了安全隐患。我们假设一个这样的场景,动物园仅剩一张门票,但是有两个在不同的窗口同时付了钱,当售票员为他们拿票的时候就会发现,少了一张票,两个人都付了钱都想要那张票,就陷入了一个死局,无奈动物园只能让他们都进去。但是在程序中体现的可能就是一个bug,动物园的门票剩余数为:-1。
if(count > 0){
count--;
}
售票的逻辑很简单,只要票数大于零,还有票能卖,那就在此基础上减掉一。问题就在于,两个线程同时在count = 1的时候通过了if判断,都执行的count--;那么就会出现了count = -1,也就是票数为负 的bug结果。
互斥锁的出现就很好地解决了一个问题,他能够阻止上面两个线程同时访问资源的同步行为,也就是说当一个线程进入这个if语句后,别的线程都不能进入。形象起来说,就像对这段代码加了锁,只有有钥匙的线程才能够访问它。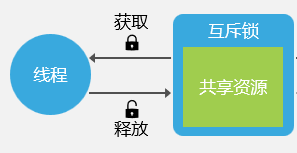
互斥锁API
通过对几个API的介绍,让大家知道怎么为一段代码加上互斥锁
1.创建互斥锁与线程的定义一样,互斥锁也封装成了一个结构体
typedef struct {
/** Mutex name */
const char *name;
/** Reserved attribute bits */
uint32_t attr_bits;
/** Memory for the mutex control block */
void *cb_mem;
/** Size of the memory for the mutex control block */
uint32_t cb_size;
} osMutexAttr_t;
- name:互斥锁的名称
- attr_bits:保留的属性位
- cb_mem:互斥锁控制块的内存
- cb_size:互斥锁控制块内存的大小
2.获取互斥锁的id
osMutexId_t osMutexNew(const osMutexAttr_t *attr);
将我们上面定义的互斥锁属性传入函数,返回互斥锁的id3.线程获取互斥锁
osStatus_t osMutexAcquire(osMutexId_t mutex_id, uint32_t timeout);
传入互斥锁id,设置我们的延迟时间,当线程获取到我们的互斥锁时,返回的状态是osOK。
下面是全部的状态码
typedef enum {
/** Operation completed successfully */
osOK = 0,
/** Unspecified error */
osError = -1,
/** Timeout */
osErrorTimeout = -2,
/** Resource error */
osErrorResource = -3,
/** Incorrect parameter */
osErrorParameter = -4,
/** Insufficient memory */
osErrorNoMemory = -5,
/** Service interruption */
osErrorISR = -6,
/** Reserved. It is used to prevent the compiler from optimizing enumerations. */
osStatusReserved = 0x7FFFFFFF
} osStatus_t;
4.释放锁
osStatus_t osMutexRelease(osMutexId_t mutex_id);
当我们的线程执行完业务后需要把锁释放出来,让别的线程获取锁,执行业务。当然这个过程是线程之间的竞争,一个线程可能一直得不到锁,一个线程也可能刚释放锁又获得锁,我们可以添加休眠操作,提高锁在各个线程间的分配。
其他API请参考:Mutex API:https://arm-software.github.io/CMSIS_5/RTOS2/html/os2MigrationFunctions.html#mig_mutex操作1.新建样例目录applications/sample/wifi-iot/app/mutex_demo2.新建源文件和gn文件applications/sample/wifi-iot/app/mutex_demo/mutex.capplications/sample/wifi-iot/app/mutex_demo/BUILD.gn
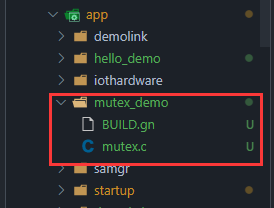
3.源码编写因为已经介绍了主要的API,这里就直接给伙伴们上源码了。
#include
#include
#include "ohos_init.h"
#include "cmsis_os2.h"
// 模拟动物园门票数
static int count = 100;
// 售票业务线程
void outThread(void *args){
// 获取互斥锁
osMutexId_t *mid = (osMutexId_t *)args;
// 每个线程都在不停地买票
while(1){
// 获取锁,进入业务流程
if(osMutexAcquire(*mid, 100) == osOK){
if(count > 0){
count--;
// 设置提示信息
printf("[Mutex Test] Thread %s get a value, the less is %d.\r\n", osThreadGetName(osThreadGetId()), count);
} else {
// 告知这些线程已经没有门票卖了,线程结束
printf("[Mutex Test] The value is out!\r\n");
osThreadTerminate(osThreadGetId());
}
}
// 释放锁
osMutexRelease(*mid);
osDelay(5);
}
}
// 创建线程封装
osThreadId_t createThreads(char *name, osThreadFunc_t func, void *args){
osThreadAttr_t attr = {
name, 0, NULL, 0, NULL, 1024, osPriorityNormal, 0, 0
};
osThreadId_t tid = osThreadNew(func, args, &attr);
return tid;
}
// 主函数实现多线程的创建,执行买票业务
void mutexMain(void){
// 创建互斥锁
osMutexAttr_t attr = {0};
// 获取互斥锁的id
osMutexId_t mid = osMutexNew(&attr);
if(mid == NULL){
printf("[Mutex Test] Failed to create a mutex!\r\n");
}
// 创建多线程
osThreadId_t tid1 = createThreads("Thread_1", (osThreadFunc_t)outThread, &mid);
osThreadId_t tid2 = createThreads("Thread_2", (osThreadFunc_t)outThread, &mid);
osThreadId_t tid3 = createThreads("Thread_3", (osThreadFunc_t)outThread, &mid);
osDelay(1000);
}
// 测试线程
void MainTest(void){
osThreadId_t tid = createThreads("MainTest", (osThreadFunc_t)mutexMain, NULL);
}
APP_FEATURE_INIT(MainTest);
4.编写gn文件
static_library("mutex_demo"){
sources = [
"mutex.c"
]
include_dirs = [
"//commonlibrary/utils_lite/include",
"//device/soc/hisilicon/hi3861v100/hi3861_adapter/kal/cmsis"
]
}
5.编写app目录下的gn文件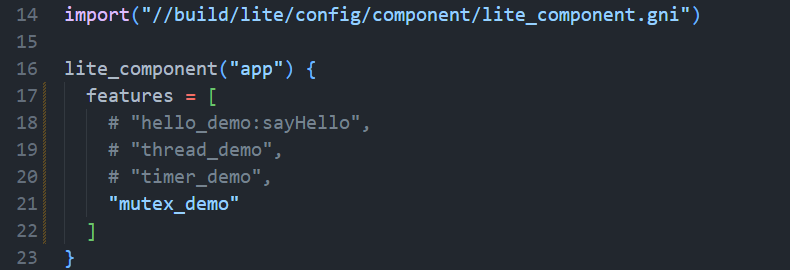
结果展示
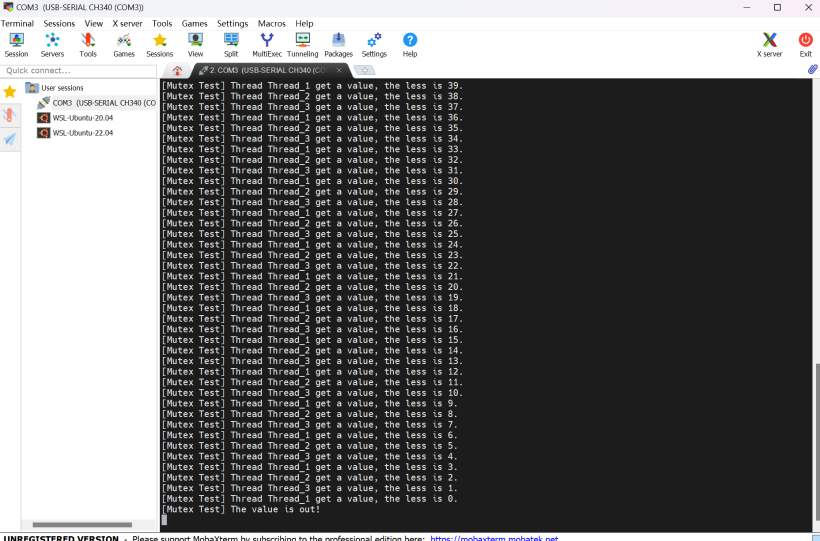 可能有的伙伴们看到这里不太清晰,会觉得这段代码真的上锁了吗
if(osMutexAcquire(*mid, 100) == osOK){
if(count > 0){
count--;
printf("[Mutex Test] Thread %s get a value, the less is %d.\r\n", osThreadGetName(osThreadGetId()), count);
} else {
printf("[Mutex Test] The value is out!\r\n");
osThreadTerminate(osThreadGetId());
}
}
那么我们可以不使用互斥锁再次执行这段代码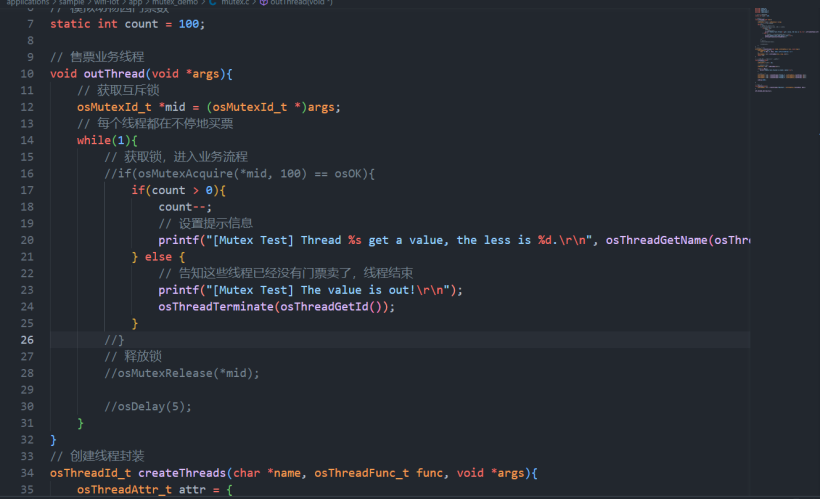
结果展示如下:
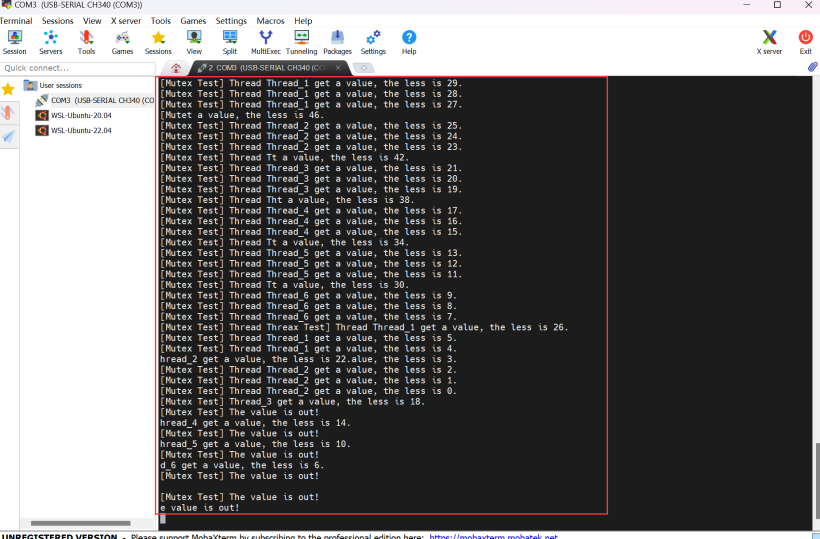
注:这里笔者还另外多加了3个线程,一共六个线程,可以看出来控制台的输出很混乱,当一个线程在执行输出指令时,另一个线程也插了进来执行输出指令所造成的,再看票数,也是出现了明显的问题。因此互斥锁在处理多线程问题时,起到了非常重要的作用。可能有伙伴好奇,怎么没有负数票的出现,笔者作为学习者,代码能力也有限,可能写出来的案例并不是非常精确,仅供参考。▍信号量
对大部分初学者而言,这又是一个新名词,什么是信号量?其实他跟我们上篇介绍的互斥锁很像。互斥锁是在多线程中允许一个线程访问资源,信号量是在多线程中允许多个线程访问资源。
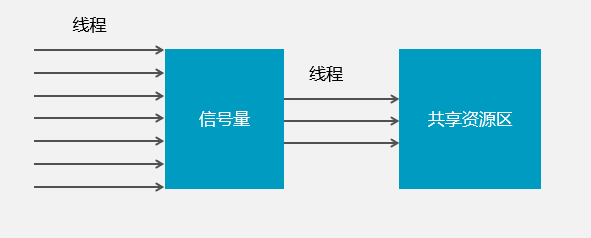 初学者一定会感到困惑,为了解决多线程访问资源的风险我们限制只能有一个线程在某一时刻访问资源,现在这个信号量怎么有允许多个线程访问资源呢。笔者刚开始也比较困惑,结合一些案例理解后,也是明白了这样的设计初衷。实际上,信号量,互斥锁本就是两种不同的多形成同步运行机制,在特定的应用场景下,有特定的需求,而信号量,互斥锁可以满足不同的需求,具体是什么需求呢,举个例子给大家。卖票,我们的确需要互斥锁解决多线程可能带来的错误,那么如果是验票呢,为了提高效率,我们开设多个入口同时验票且不会发生冲突,信号量就做到了限制线程数量访问资源的作用。如果我们不限制并发的数量,我们的程序占用资源可能会非常大,甚至崩溃,就像检票的入口没有被明确入口数量一样,门口的人们会乱成一片。
信号量API
1.创建信号量
osSemaphoreId_t osSemaphoreNew(uint32_t max_count, uint32_t initial_count, const osSemaphoreAttr_t *attr);
参数解释:最大容量量,初始容纳量,信号量属性最大容纳量说明了,我们的资源最大能被多少线程访问初始容纳量说明了,我们当前实际能有多少线程访问资源,因为一个信号对应一个线程的许可。返回值:信号量的id2.获取信号量
osStatus_t osSemaphoreAcquire(osSemaphoreId_t semaphore_id, uint32_t timeout);
参数解释:信号量的id,等待时长返回值:状态码 (介绍很多遍了,就不说明了)我们往往会在timoeout处设置为 oswaitForever
#define osWaitForever 0xFFFFFFFFU
这样我们的线程就会一直等,直到有信号量空出来被他获取,才执行后续的代码。3.释放信号量
osStatus_t osSemaphoreRelease(osSemaphoreId_t semaphore_id);
很简单,传入信号量的id,就可以释放一个信号量出来。其他的API请参考:Semaphore API:https://arm-software.github.io/CMSIS_5/RTOS2/html/os2MigrationFunctions.html#mig_sem
任务
有4个售票窗,2个检票口,每次会有4个人来买票,然后去检票,用互斥锁控制购票,信号量控制检票。
操作
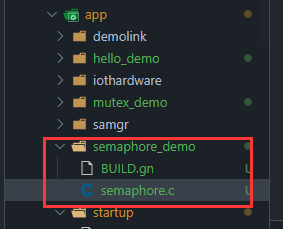
1.新建样例目录applications/sample/wifi-iot/app/semaphore_demo2.新建源文件和gn文件applications/sample/wifi-iot/app/semaphore_demo/semaphore.capplications/sample/wifi-iot/app/semaphore_demo/BUILD.gn
3.源码编写
直接上源码了
#include
#include
#include "ohos_init.h"
#include "cmsis_os2.h"
// 售票口 4
#define OUT_NUM 4
// 检票口 2
#define IN_NUM 2
// 信号量
osSemaphoreId_t sid;
// 待检票人数
static int people = 0;
// 售票业务
void outThread(void *args){
// 获取互斥锁
osMutexId_t *mid = (osMutexId_t *)args;
while(1){
if(osMutexAcquire(*mid, 100) == osOK){
// 卖一张票,带检票的人数就会加一位
people++;
printf("[SEMAPHORE TEST] out, people: %d.\r\n", people);
}
osMutexRelease(*mid);
osDelay(50);
}
}
// 检票业务
void inThread(void *args){
// 获取信号量
osSemaphoreAcquire(sid, osWaitForever);
while(1){
if(people > 0){
people--;
printf("[SEMAPHORE TEST] in, people: %d.\r\n", people);
}
osSemaphoreRelease(sid);
osDelay(100);
}
}
// 创建线程封装
osThreadId_t createThreads(char *name, osThreadFunc_t func, void *args){
osThreadAttr_t attr = {
name, 0, NULL, 0, NULL, 1024 * 2, osPriorityNormal, 0, 0
};
osThreadId_t tid = osThreadNew(func, args, &attr);
return tid;
}
// 主线程
void SemaphoreMain(void){
// 创建信号量
sid = osSemaphoreNew(IN_NUM, IN_NUM, NULL);
// 创建互斥锁
osMutexAttr_t attr = {0};
// 获取互斥锁的id
osMutexId_t mid = osMutexNew(&attr);
// 创建售票线程
for(int i = 0; i < OUT_NUM; i++){
createThreads("", (osThreadFunc_t)outThread, &mid);
}
// 创建检票线程
for(int i = 0; i < IN_NUM; i++){
createThreads("", (osThreadFunc_t)inThread, NULL);
}
}
// 测试函数
void MainTest(){
createThreads("MainTest", (osThreadFunc_t)SemaphoreMain, NULL);
}
APP_FEATURE_INIT(MainTest);
4.编写gn文件
static_library("semaphore_demo"){
sources = [
"semaphore.c"
]
include_dirs = [
"//utils/native/lite/include",
]
}
5.编写app目录下的gn文件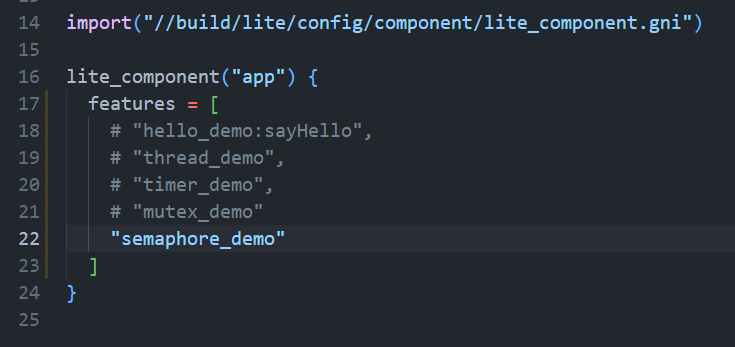
结果展示
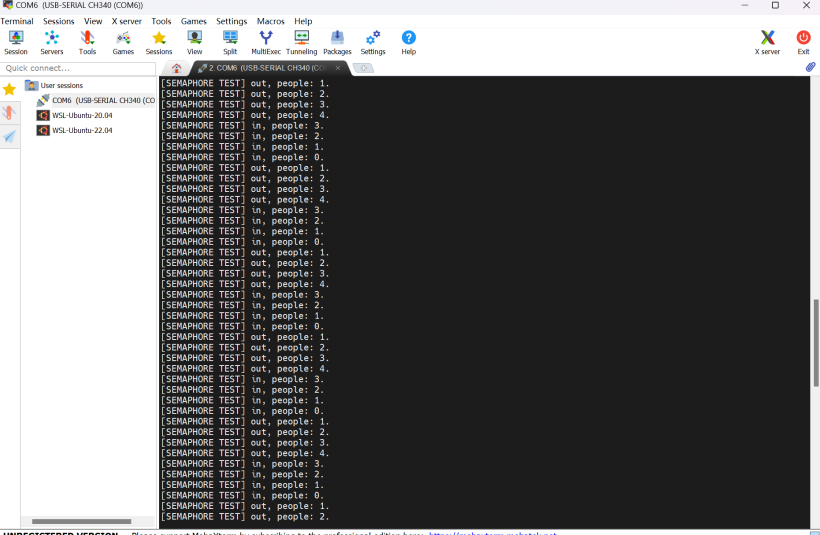 大家可以加长检票业务的休眠时间,我们的检票口是两个,in的业务一定是两个一起执行的。总之信号量和互斥锁是多线程管理中的重点,大家一定要好好体会他们的作用和区别。▍消息队列本篇的最后我们来介绍消息队列。队列相信大部分朋友都不陌生,是一种基本且常用的数据结构,这里笔者就不介绍队列的相关信息了。那么什么是消息队列呢?有什么应用场景呢。
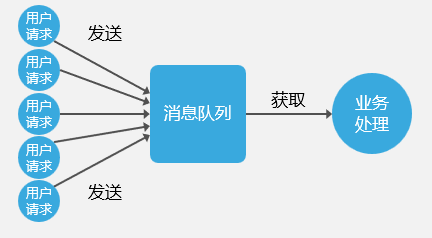
 消息队列也是多线程,高并发中的处理方式,大家可以理解为“同步入队,异步出队”。老样子从一个案例解释,网购秒杀。在网购秒杀时,会有上万甚至上百万的流量涌入服务器,下单即可看作一个请求,向服务器请求获取某个商品。服务器处理,生成买家的订单号。当然强大服务器的也无法在同一时刻支持如此多的请求,并且商品的数量也不足被所有人购买,这个时候,我们的消息队列就会同步接受大家的请求,所有的请求都会被压进一个队列中,服务器从队列中依次获取消息,确保不会因为资源被占用而导致系统崩溃。
#### 消息队列API
1.创建消息队列
osMessageQueueId_t osMessageQueueNew (uint32_t msg_count, uint32_t msg_size, const osMessageQueueAttr_t *attr);
参数说明:
- msg_count:消息队列中的消息数量。
- msg_size:消息队列中每个消息的大小,通常我们的消息会用一个结构体来自定义消息的内容
- attr:指向消息队列属性。
该函数的返回值是osMessageQueueId_t类型,表示消息队列的ID。如果创建消息队列失败,函数将返回NULL。2.向消息队列加入消息
osStatus_t osMessageQueuePut (osMessageQueueId_t mq_id, const void *msg_ptr, uint8_t msg_prio, uint32_t timeout);
参数说明:
- mq_id:消息队列的ID,通过调用osMessageQueueNew函数获得。
- msg_ptr:指向要放入消息队列的消息缓冲区的指针,也就是我们将结构体的指针转递给函数
- msg_prio:消息的优先级。
- timeout:延时,使用osWaitForever,线程就会一直等待直到队列中有空余的位置。
该函数的返回值是osStatus_t类型,表示函数执行的结果。3.从消息队列中接受消息
osStatus_t osMessageQueueGet (osMessageQueueId_t mq_id, void *msg_ptr, uint8_t *msg_prio, uint32_t timeout);
参数说明:
- mq_id:消息队列的ID,通过调用osMessageQueueNew函数获得。
- msg_ptr:指向存储从消息队列中获取的消息的缓冲区的指针。
- msg_prio:指向存储从消息队列中获取的消息的优先级的缓冲区的指针。
- timeout:延时,使用osWaitForever,线程就会一直等待直到队列中有消息了。
该函数的返回值是osStatus_t类型,表示函数执行的结果。4.删除消息队列
osStatus_t osMessageQueueDelete (osMessageQueueId_t mq_id);
参数说明:
- mq_id:消息队列的ID,通过调用osMessageQueueNew函数获得。
该函数的返回值是osStatus_t类型,表示函数执行的结果。其他的API请参考:MessageQueue API:https://arm-software.github.io/CMSIS_5/RTOS2/html/os2MigrationFunctions.html#mig_msgQueue
任务
模拟抢购秒杀,假设我们有10个线程,15个大小的消息队列,5件商品。
操作
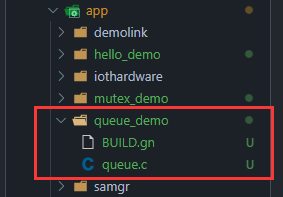
1.新建样例目录applications/sample/wifi-iot/app/queue_demo2.新建源文件和gn文件applications/sample/wifi-iot/app/queue_demo/queue.capplications/sample/wifi-iot/app/queue_demo/BUILD.gn
3.编写源码
直接上源码
#include
#include
#include "ohos_init.h"
#include "cmsis_os2.h"
// 定义消息队列的大小
#define QUEUE_SIZE 15
// 定义请求数量
#define REQ_SIZE 10
// 定义消息的结构
typedef struct{
osThreadId_t tid;
} message_queue;
// 创建消息队列id
osMessageQueueId_t qid;
// 模拟发送业务
void sendThread(void){
// 定义一个消息结构
message_queue sentry;
sentry.tid = osThreadGetId();
osDelay(100);
// 消息入队
osMessageQueuePut(qid, (const void*)&sentry, 0, osWaitForever);
// 设置提示信息
printf("[MESSAGEQUEUE TEST] %d send a message.\r\n", sentry.tid);
}
// 模拟处理业务
void receiverThread(void){
// 定义一个消息结构
message_queue rentry;
int less = 5;
while(less > 0){
osMessageQueueGet(qid, (void *)&rentry, NULL, osWaitForever);
less--;
printf("[MESSAGEQUEUE TEST] %d get a product, less = %d.\r\n", rentry.tid, less);
osDelay(5);
}
printf("[MESSAGEQUEUE TEST] over!\r\n");
}
// 创建线程封装
osThreadId_t createThreads(char *name, osThreadFunc_t func, void *args){
osThreadAttr_t attr = {
name, 0, NULL, 0, NULL, 1024 * 2, osPriorityNormal, 0, 0
};
osThreadId_t tid = osThreadNew(func, args, &attr);
return tid;
}
// 主线程
void MessageQueueMain(void){
// 创建一个消息队列
qid = osMessageQueueNew(QUEUE_SIZE, sizeof(message_queue), NULL);
// 创建发送线程
for(int i = 0; i < REQ_SIZE; i++){
createThreads("", (osThreadFunc_t)sendThread, NULL);
}
osDelay(5);
// 创建接收线程
createThreads("", (osThreadFunc_t)receiverThread, NULL);
osDelay(500);
// 删除消息队列
osMessageQueueDelete(qid);
}
// 测试函数
void MainTest(){
createThreads("MainTest", (osThreadFunc_t)MessageQueueMain, NULL);
}
APP_FEATURE_INIT(MainTest);
4.编写gn
static_library("queue_demo"){
sources = [
"queue.c",
]
include_dirs = [
"//utils/native/lite/include",
]
}
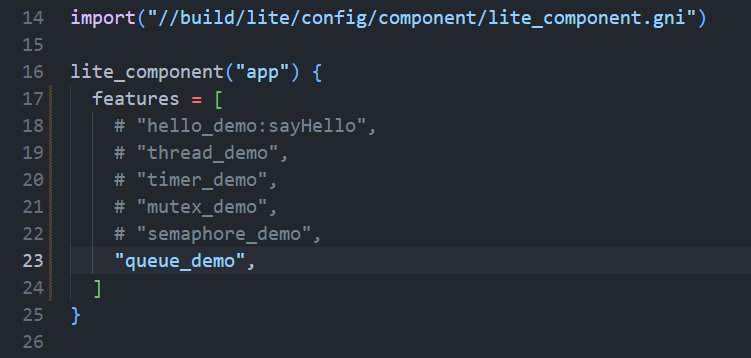
5.编写app目录下的gn
结果展示
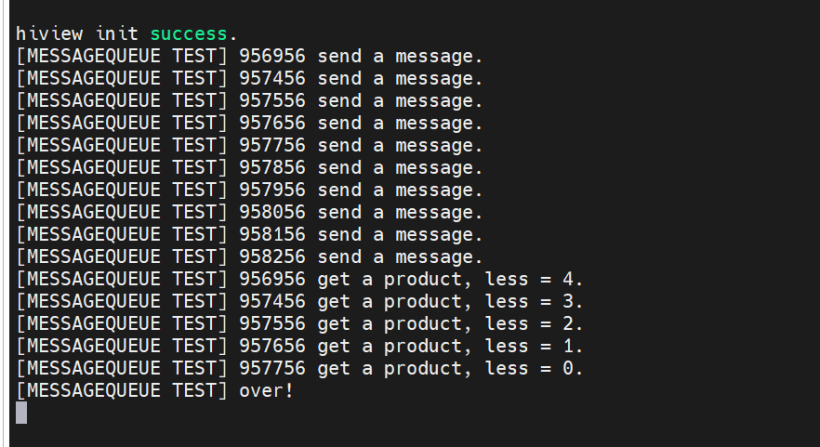 因为线程创建是循环创建的,先创建的线程就优先发送了请求,可以看的出来,前五个线程抢到了商品。如果线程可以同时发送请求,争抢入队的时机,模拟将会更加准确一些,这里只是简单的模拟。
结束语
至此内核的基础内容就给伙伴们介绍完了,内核作为一个系统的底层起到了相当重要的作用,大家要好好体会,希望能帮助到学习OpenHarmony的伙伴们。
- 相关推荐
- 热点推荐
- 内核
- 开发板
- OpenHarmony
-
OpenHarmony轻量系统书籍推荐《OpenHarmony轻量设备开发理论与实战》2023-07-20 2268
-
Python编程实战(源代码)2023-06-06 678
-
OpenHarmony瘦设备内核移植实战(一)2023-04-24 1316
-
OpenHarmony内核学习[1]--单独编译OpenHarmony标准系统内核2023-02-03 2592
-
OpenHarmony内核任务间IPC原理2022-07-12 2395
-
OpenHarmony技术论坛:内核增强特性介绍2022-04-25 1399
-
OpenHarmony支持的系统类型及内核2022-04-19 4624
-
OpenHarmony LiteOS-A内核介绍2021-08-19 2631
-
openharmony内核分析2021-06-24 4313
-
Python数据可视化编程实战2021-06-01 948
-
[HarmonyOS][鸿蒙专栏开篇]快速入门OpenHarmony的LiteOS微内核2020-09-14 2874
-
Java并发编程实战2017-03-19 651
全部0条评论

快来发表一下你的评论吧 !

