

HarmonyOS开发案例:【购物车app】
电子说
描述
| ---------------------------------------------------------------------------------------- |# 概述
OpenHarmony ArkUI框架提供了丰富的动画组件和接口,开发者可以根据实际场景和开发需求,选用丰富的动画组件和接口来实现不同的动画效果。
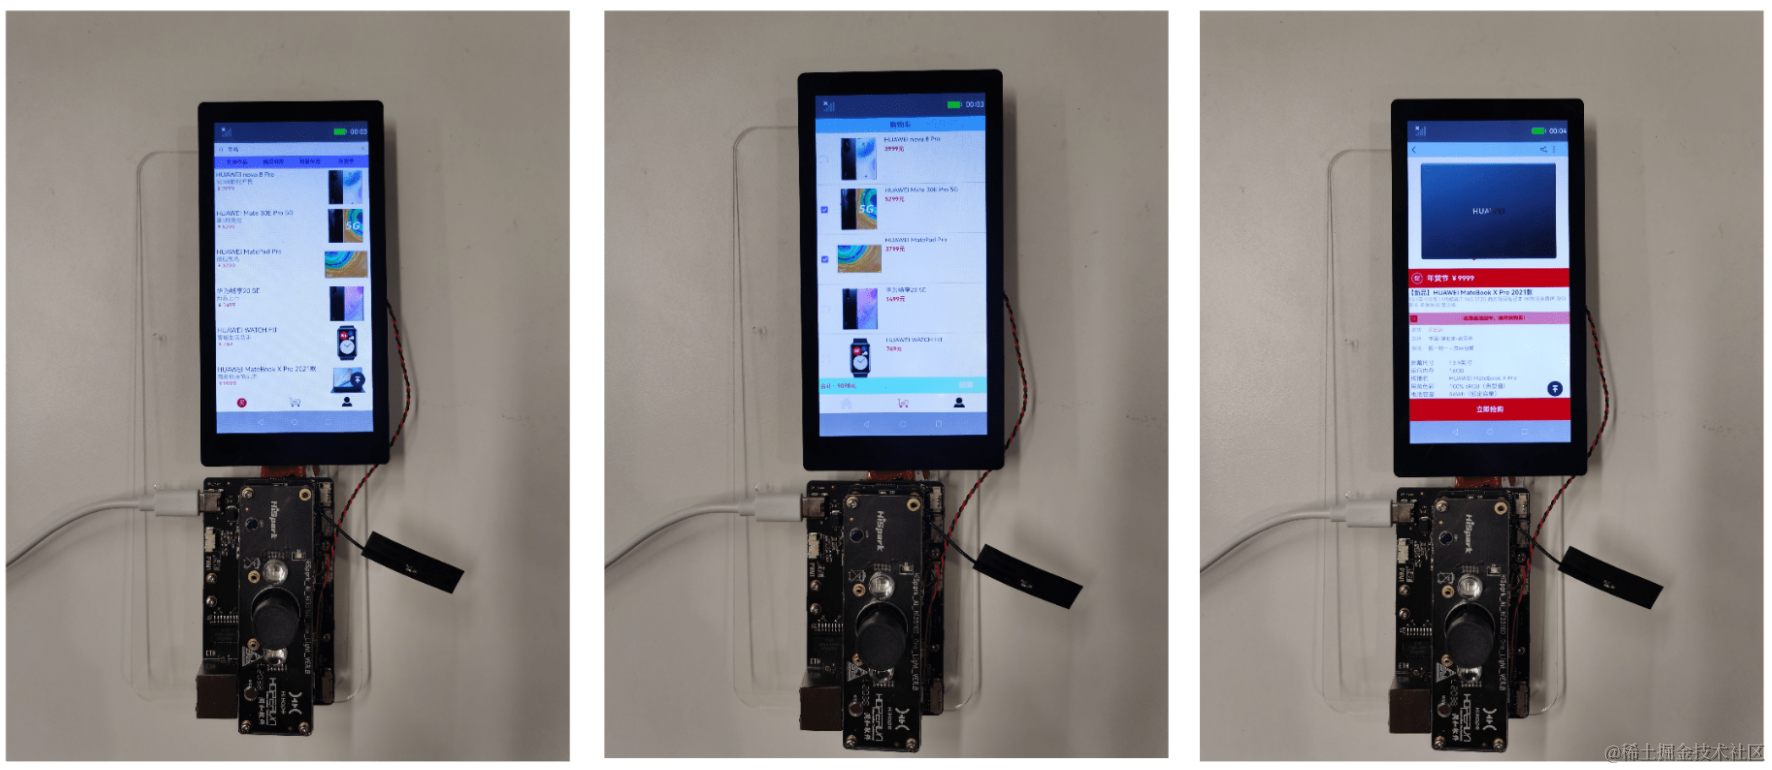
本Codelab中,我们会构建一个简易的购物应用。应用包含两级页面,分别是主页(“商品浏览”页签、“购物车”页签、“我的”页签)和商品详情页面。效果如下图所示:
代码结构解读
本篇Codelab只对核心代码进行讲解,首先来介绍下整个工程的代码结构:

- model:存放封装好的数据实体。
- ArsData:我的页签相关参数实体。
- GoodsData:商品列表页商品实体。
- GoodsDataModels:各种实体的具体数据以及获取数据的方法。
- Menu:我的页签菜单实体。
- pages:存放页面。
- HomePage:应用主页面,包含商品列表页签。
- MyPage:我的页签。
- ShoppingCartPage:购物车页签。
- ShoppingDetail:商品详情页。
- resources :存放工程使用到的资源文件。
- resources/base/media:存放工程中使用的图片资源。
- config.json:配置文件。
- 鸿蒙开发指导文档:[
gitee.com/li-shizhen-skin/harmony-os/blob/master/README.md]
搭建OpenHarmony环境
完成本篇Codelab我们首先要完成开发环境的搭建,本示例以Hi3516DV300开发板为例,参照以下步骤进行:
- [获取OpenHarmony系统版本]:标准系统解决方案(二进制)
以3.0版本为例: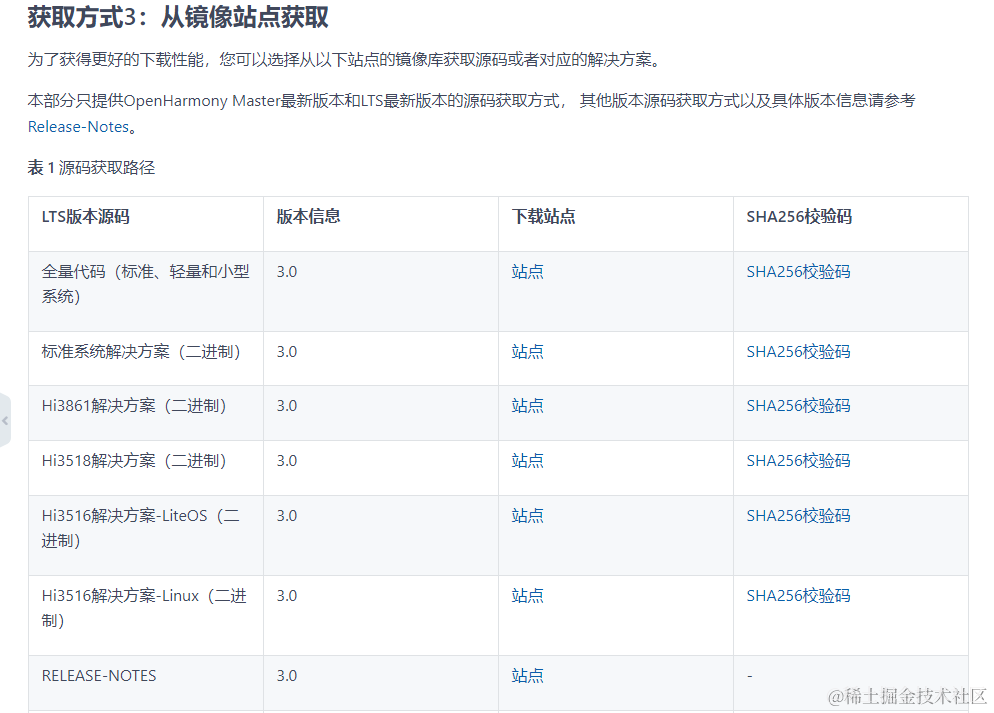
- 搭建烧录环境
- [完成DevEco Device Tool的安装]
- [完成Hi3516开发板的烧录]
- 搭建开发环境
- 开始前请参考[工具准备],完成DevEco Studio的安装和开发环境配置。
- 开发环境配置完成后,请参考[使用工程向导]创建工程(模板选择“Empty Ability”),选择JS或者eTS语言开发。
- 工程创建完成后,选择使用[真机进行调测]。
HarmonyOS与OpenHarmony鸿蒙文档籽料:mau123789是v直接拿
构建商品列表页签
在本节中,我们将完成商品列表页签的设计,效果图如下:
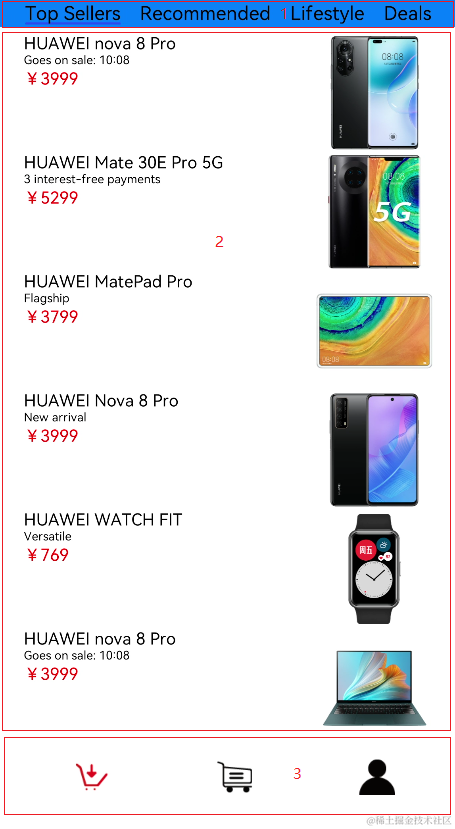
从效果图可以看出,商品列表页签主要由三个部分组成:
- 顶部的Tabs组件。
- 中间TabContent组件内包含List组件。其中List组件的item是一个水平布局,由一个垂直布局和一个Image组件组成;item中的垂直布局由3个Text组件组成。
- 底部的导航页签navigation组件。
实现步骤如下:
- 在pages目录下面新建一个ETS Page,命名为HomePage.ets,在config.json文件的pages属性中会自动添加“pages/HomePage”页面路由。

说明:
- 页面文件名不能使用组件名称,比如:Text.ets、Button.ets等。
- 每个页面文件中必须包含入口组件。
新建与pages文件夹同级的model文件夹,并在model目录下新建ArsData.ets、GoodsData.ets、Menu.ets和GoodsDataModels.ets文件,其中ArsData.ets、GoodsData.ets、Menu.ets是数据实体类,GoodsDataModels.ets是存放这三种实体数据集合,并定义了获取各种数据集合的方法。数据实体包含实体的属性和构造方法,可通过new ArsData(string,string) 来获取ArsData对象,ArsData.ets内容如下:
let NextId = 0;
export class ArsData {
  id: string;
  title: string;
  content: string;

  constructor(title: string, content: string) {
    this.id = `${NextId++}`;
    this.title = title;
    this.content = content;
  }
}
GoodsData.ets代码如下:
let NextId = 0;
export class GoodsData {
  id: string;
  title: string;
  content: string;
  price: number;
  imgSrc: Resource;

  constructor(title: string, content: string, price: number, imgSrc: Resource) {
    this.id = `${NextId++}`;
    this.title = title;
    this.content = content;
    this.price = price;
    this.imgSrc = imgSrc;
  }
}
一个文件中可以包含多个class ,Menu.ets中就包含了Menu类和ImageItem类,Menu.ets代码如下
let NextId = 0;
export class Menu {
  id: string;
  title: string;
  num: number;

  constructor(title: string, num: number) {
    this.id = `${NextId++}`;
    this.title = title;
    this.num = num;
  }
}

export class ImageItem {
  id: string;
  title: string;
  imageSrc: Resource;

  constructor(title: string, imageSrc: Resource) {
    this.id = `${NextId++}`;
    this.title = title;
    this.imageSrc = imageSrc;
  }
}
GoodsDataModels.ets代码如下:
import {GoodsData} from './GoodsData'

import {Menu, ImageItem} from './Menu'
import {ArsData} from './ArsData'
//获取商品列表数据
export function initializeOnStartup(): Array< GoodsData > {
  let GoodsDataArray: Array< GoodsData > = []
  GoodsComposition.forEach(item = > {
    console.log(item.title);
    GoodsDataArray.push(new GoodsData(item.title, item.content, item.price, item.imgSrc));
  })
  return GoodsDataArray;
}
//获取底部默认图片列表数据
export function getIconPath(): Array< string > {
  let IconPath: Array< string > = ['nav/icon-buy.png','nav/icon-shopping-cart.png','nav/icon-my.png']

  return IconPath;
}
//获取选中后图片列表数据
export function getIconPathSelect(): Array< string > {
  let IconPathSelect: Array< string > = ['nav/icon-home.png','nav/icon-shopping-cart-select.png','nav/icon-my-select.png']

  return IconPathSelect;
}
//获取商品详情页图片详情列表
export function getDetailImages(): Array< string > {
  let detailImages: Array< string > = ['computer/computer1.png','computer/computer2.png','computer/computer3.png','computer/computer4.png','computer/computer5.png','computer/computer6.png']

  return detailImages;
}

//获取菜单数据列表
export function getMenu(): Array< Menu > {
  let MenuArray: Array< Menu > = []
  MyMenu.forEach(item = > {
    MenuArray.push(new Menu(item.title,item.num));
  })
  return MenuArray;
}
//获取MyTrans数据列表
export function getTrans(): Array< ImageItem > {
  let ImageItemArray: Array< ImageItem > = []
  MyTrans.forEach(item = > {
    ImageItemArray.push(new ImageItem(item.title,item.imageSrc));
  })
  return ImageItemArray;
}
//获取More数据列表
export function getMore(): Array< ImageItem > {
  let ImageItemArray: Array< ImageItem > = []
  MyMore.forEach(item = > {
    ImageItemArray.push(new ImageItem(item.title,item.imageSrc));
  })
  return ImageItemArray;
}
//获取参数列表
export function getArs(): Array< ArsData > {
  let ArsItemArray: Array< ArsData > = []
  ArsList.forEach(item = > {
    ArsItemArray.push(new ArsData(item.title,item.content));
  })
  return ArsItemArray;
}
//数据集合部分
...
在HomePage.ets文件中创建商品列表页签相关的组件,其中GoodsHome效果图如下:
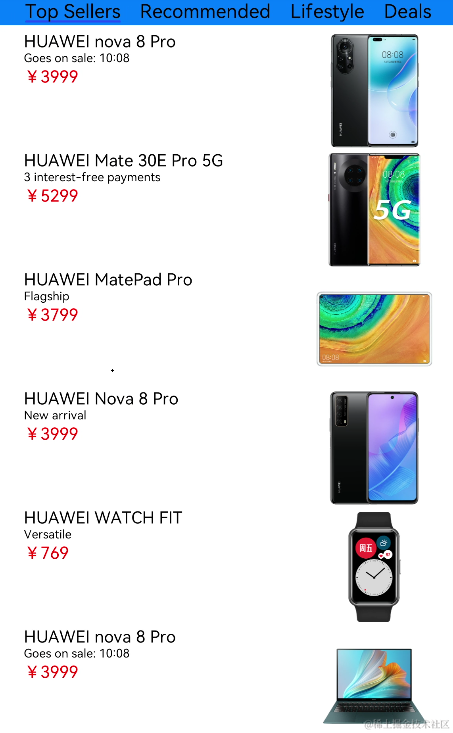
代码如下:@Component @Component struct GoodsHome { private goodsItems: GoodsData[] build() { Column() { Tabs() { TabContent() { GoodsList({ goodsItems: this.goodsItems }); } .tabBar("Top Sellers") .backgroundColor(Color.White) TabContent() { GoodsList({ goodsItems: this.goodsItems }); } .tabBar("Recommended") .backgroundColor(Color.White) TabContent() { GoodsList({ goodsItems: this.goodsItems }); } .tabBar("Lifestyle") .backgroundColor(Color.White) TabContent() { GoodsList({ goodsItems: this.goodsItems }); } .tabBar("Deals") .backgroundColor(Color.White) } .barWidth(540) .barHeight(50) .scrollable(true) .barMode(BarMode.Scrollable) .backgroundColor('#007DFF') .height('100%') } .alignItems(HorizontalAlign.Start) } }在GoodsHome中使用Tabs组件,在Tabs组件中设置4个TabContent,给每个TabContent设置tabBar属性,并设置TabContent容器中的内容GoodsList组件,GoodsList组件效果图如下:

代码如下:
@Component
struct GoodsList {
  private goodsItems: GoodsData[]

  build() {
    Column() {
      List() {
        ForEach(this.goodsItems, item = > {
          ListItem() {
            GoodsListItem({ goodsItem: item })
          }
        }, item = > item.id.toString())
      }
      .height('100%')
      .width('100%')
      .align(Alignment.Top)
      .margin({top: 5})
    }
  }
}
在GoodsList组件中遍历商品数据集合,ListItem组件中设置组件内容,并使用Navigator组件给每个Item设置顶级跳转路由,GoodsListItem组件效果图如下:

代码如下:
@Component
struct GoodsListItem {
  private goodsItem: GoodsData

  build() {
    Navigator({ target: 'pages/ShoppingDetail' }) {
      Row() {
        Column() {
          Text(this.goodsItem.title)
            .fontSize(18)
          Text(this.goodsItem.content)
            .fontSize(14)
          Text('¥' + this.goodsItem.price)
            .fontSize(18)
            .fontColor(Color.Red)
        }
        .height(130)
        .width('60%')
        .margin({ left: 20 })
        .alignItems(HorizontalAlign.Start)

        Image(this.goodsItem.imgSrc)
          .objectFit(ImageFit.ScaleDown)
          .height(130)
          .width('30%')
          .renderMode(ImageRenderMode.Original)
          .margin({ right: 10, left: 10 })

      }
      .backgroundColor(Color.White)

    }
    .params({ goodsData: this.goodsItem })
    .margin({ right: 5 })
  }
}
在HomePage.ets中创建文件入口组件(Index)以及底部页签导航组件(Navigation),导入需要使用到的数据实体类以及需要使用的方法和组件,每个page文件都必须包含一个入口组件,使用@Entry修饰,HomePage文件中的入口组件(Index)代码如下:
import { GoodsData, IconImage } from '../model/GoodsData'
import { initializeOnStartup, getIconPath, getIconPathSelect } from '../model/GoodsDataModels'
import { ShoppingCart } from './ShoppingCartPage.ets'
import { MyInfo } from './MyPage.ets'
import router from '@system.router';

@Entry
@Component
struct Index {
  @Provide currentPage: number = 1
  private goodsItems: GoodsData[] = initializeOnStartup()
  @State Build: Array< Object > = [
    {
      icon: $r('app.media.icon_home'),
      icon_after: $r('app.media.icon_buy1'),
      text: '首页',
      num: 0
    },
    {
      icon: $r('app.media.icon_shopping_cart'),
      icon_after: $r('app.media.icon_shopping_cart_select'),
      text: '购物车',
      num: 1
    },
    {
      icon: $r('app.media.icon_my'),
      icon_after: $r('app.media.icon_my_select'),
      text: '我的',
      num: 2
    }
  ]

  @Builder NavigationToolbar() {
    Flex({direction:FlexDirection.Row,wrap:FlexWrap.NoWrap,justifyContent:FlexAlign.SpaceAround}) {
      ForEach(this.Build, item = > {
        Column() {
          Image(this.currentPage == item.num ? item.icon_after : item.icon)
            .width(25)
            .height(25)
          Text(item.text)
            .fontColor(this.currentPage == item.num ? "#ff7500" : "#000000")
        }
        .onClick(() = > {
          this.currentPage = item.num
        })
      })
    }
  }

  build() {
    Column() {
      Navigation() {
        Flex() {
          if (this.currentPage == 0) {
            GoodsHome({ goodsItems: this.goodsItems })
          }
          if (this.currentPage == 1) {
            ShoppingCart() //购物车列表
          }
          if (this.currentPage == 2) {
            MyInfo() //我的
          }
        }
        .width('100%')
        .height('100%')
      }
      .toolBar(this.NavigationToolbar)
      .title("购物车")
      .hideTitleBar(this.currentPage == 1 ? false : true)
      .hideBackButton(true)
    }
  }
}
从入口组件的代码中可以看出,我们定义了一个全局变量currentPage ,当currentPage发生变化的时候,会显示不同的页签。在入口组件中,通initializeOnStartup获取商品列表数据(goodsItems)并传入GoodsHome组件中。效果图如下:

构建购物车页签
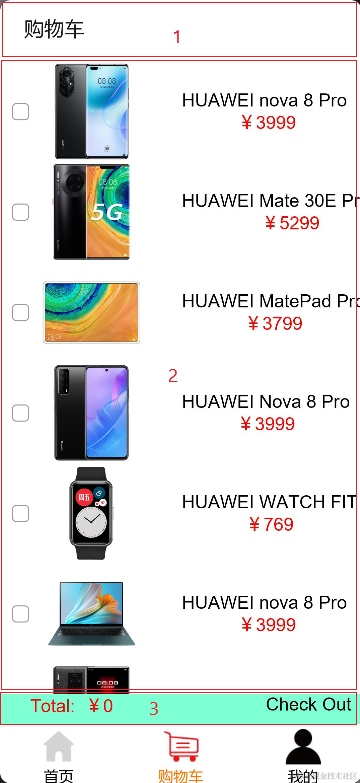
从上面效果图可以看出,主界面购物车页签主要由下面三部分组成:
- 顶部的title,由Navigation组件title属性设置。
- 中间的List组件,其中List组件的item是一个水平的布局内包含一个toggle组件,一个Image组件和一个垂直布局,其item中的垂直布局是由2个Text组件组成。
- 底部一个水平布局包含两个Text组件。
在本任务中我们主要是构建一个购物车页签,给商品列表的每个商品设置一个单选框,可以选中与取消选中,底部Total值也会随之增加或减少,点击Check Out时会触发弹窗。下面我们来完成ShoppingCart页签。
在pages目录下面新建一个ETS Page ,命名为ShoppingCart.ets,config.json文件pages属性中也会自动添加“pages/ShoppingCart”页面路由。
在ShoppingCartPage.ets文件中添加入口组件(ShoppingCart),并导入需要使用到的数据实体类、方法和组件。ShoppingCart组件代码如下:
import {GoodsData} from '../model/GoodsData'
import {initializeOnStartup} from '../model/GoodsDataModels'
import prompt from '@system.prompt';

@Entry
@Component
 export struct ShoppingCart {
  @Provide totalPrice: number = 0
  private goodsItems: GoodsData[] = initializeOnStartup()

  build() {
    Column() {
      ShopCartList({ goodsItems: this.goodsItems });
      ShopCartBottom()
    }
    .height('100%')
    .width('100%')
    .alignItems(HorizontalAlign.Start)
  }
}
新建ShopCartList组件用于存放购物车商品列表,ShopCartList组件效果图如下:

代码如下:@Component struct ShopCartList { private goodsItems: GoodsData[] build() { Column() { List() { ForEach(this.goodsItems, item = > { ListItem() { ShopCartListItem({ goodsItem: item }) } }, item = > item.id.toString()) } .height('100%') .width('100%') .align(Alignment.Top) .margin({ top: 5 }) } .height('90%') } }在ShopCartListItem中使用Toggle的单选框类型来实现每个item的选择和取消选择,在Toggle的onChage事件中来改变totalPrice的数值。ShopCartListItem组件效果图如下:

代码如下:
@Component
struct ShopCartListItem {
  @Consume totalPrice: number
  private goodsItem: GoodsData

  build() {
    Row() {
      Toggle({ type: ToggleType.Checkbox })
        .width(13)
        .height(13)
        .onChange((isOn: boolean) = > {
        if (isOn) {
          this.totalPrice += parseInt(this.goodsItem.price + '', 0)
        } else {
          this.totalPrice -= parseInt(this.goodsItem.price + '', 0)
        }
      })
      Image(this.goodsItem.imgSrc)
        .objectFit(ImageFit.ScaleDown)
        .height(130)
        .width(100)
        .renderMode(ImageRenderMode.Original)
      Column() {
        Text(this.goodsItem.title)
          .fontSize(18)
        Text('¥' + this.goodsItem.price)
          .fontSize(18)
          .fontColor(Color.Red)
      }
      .margin({left:40})
    }
    .height(100)
    .width('100%')
    .margin({ left: 20 })
    .alignItems(VerticalAlign.Center)
    .backgroundColor(Color.White)
  }
}
新建ShopCartBottom组件,ShopCartBottom组件效果图如下:

代码如下:@Component struct ShopCartBottom { @Consume totalPrice: number build() { Row() { Text('Total: ¥' + this.totalPrice) .fontColor(Color.Red) .fontSize(18) .margin({ left: 20 }) .width(150) Text('Check Out') .fontColor(Color.Black) .fontSize(18) .margin({ right: 20, left: 180 }) .onClick(() = > { prompt.showToast({ message: 'Checking Out', duration: 10, bottom: 100 }) }) } .height(30) .width('100%') .backgroundColor('#FF7FFFD4') .alignItems(VerticalAlign.Bottom) } }
构建我的页签

从上面效果图可以看出,主界面我的页签主要由下面四部分组成:
- 顶部的水平布局。
- 顶部下面的文本加数字的水平List。
- My Transactio模块,图片加文本的水平List。
- More模块,图片加文本的Grid。
在本任务中,我们构建主页我的页签,主要可以划分成下面几步:
在pages目录下面新建一个ETS Page 命名为MyPage.ets,在config.json文件pages属性中也会自动添加“pages/MyPage”页面路由。
在MyPage.ets文件中添加入口组件(MyInfo),组件内容如下:
import {getMenu,getTrans,getMore} from '../model/GoodsDataModels'
import {Menu, ImageItem} from '../model/Menu'
@Entry
@Component
export struct MyInfo {
  build() {
    Column() {
      Row() {
        Image($r('app.media.icon_user'))
          .objectFit(ImageFit.Contain)
          .height(50)
          .width(50)
          .margin({left:10})
          .renderMode(ImageRenderMode.Original)
        Column() {
          Text('John Doe')
            .fontSize(15)
          Text('Member Name : John Doe                     >')
            .fontSize(15)
        }
        .height(60)
        .margin({ left: 20, top: 10 })
        .alignItems(HorizontalAlign.Start)
      }

      TopList()
      MyTransList()
      MoreGrid()

    }
    .alignItems(HorizontalAlign.Start)
    .width('100%')
    .height('100%')
    .flexGrow(1)
  }
}
入口组件中还包含TopList,MyTransList和MoreGrid三个子组件。
在MyPage.ets文件中新建TopList组件,效果图如下:

代码如下:@Component struct TopList { private menus: Menu1[] = getMenu() build() { Row() { List() { ForEach(this.menus, item = > { ListItem() { MenuItem({ menu: item }) } }, item = > item.id.toString()) } .height('100%') .width('100%') .margin({ top: 5,left: 10}) .edgeEffect(EdgeEffect.None) .listDirection(Axis.Horizontal) } .width('100%') .height(50) } }getMenu()方法在上文中已有定义,是获取菜单列表的方法,TopList的子组件MenuItem内容如下:
@Component
struct MenuItem {
  private menu: Menu1

  build() {
    Column() {
      Text(this.menu.title)
        .fontSize(15)
      Text(this.menu.num + '')
        .fontSize(13)

    }
    .height(50)
    .width(100)
    .margin({ left: 8, right: 8 })
    .alignItems(HorizontalAlign.Start)
    .backgroundColor(Color.White)
  }
}
在MyPage.ets文件中新建MyTransList组件和MoreGrid组件,MyTransList组件效果如如下:

代码如下:@Component struct MyTransList { private imageItems: ImageItem[] = getTrans() build() { Column() { Text('My Transaction') .fontSize(20) .margin({ left: 10 }) .width('100%') .height(30) Row() { List() { ForEach(this.imageItems, item = > { ListItem() { DataItem({ imageItem: item }) } }, item = > item.id.toString()) } .height(70) .width('100%') .edgeEffect(EdgeEffect.None) .margin({ top: 5 }) .padding({ left: 16, right: 16 }) .listDirection(Axis.Horizontal) } } .height(120) } }MoreGrid组件效果图如下:

代码如下:
@Component
struct MoreGrid {
  private gridRowTemplate: string = ''
  private imageItems: ImageItem[] = getMore()
  private heightValue: number

  aboutToAppear() {
    var rows = Math.round(this.imageItems.length / 3);
    this.gridRowTemplate = '1fr '.repeat(rows);
    this.heightValue = rows * 75;
  }

  build() {
    Column() {
      Text('More')
        .fontSize(20)
        .margin({ left: 10 })
        .width('100%')
        .height(30)
      Scroll() {
        Grid() {
          ForEach(this.imageItems, (item: ImageItem) = > {
            GridItem() {
              DataItem({ imageItem: item })
            }
          }, (item: ImageItem) = > item.id.toString())
        }
        .rowsTemplate(this.gridRowTemplate)
        .columnsTemplate('1fr 1fr 1fr')
        .columnsGap(8)
        .rowsGap(8)
        .height(this.heightValue)
      }
      .padding({ left: 16, right: 16 })
    }
    .height(400)
  }
}
在MyTransList和MoreGrid组件中都包含子组件DataItem,为避免的重复代码,可以把多次要用到的结构体组件化,这里的结构体就是图片加上文本的上下结构体,DataItem组件内容如下:
@Component
struct DataItem {
  private imageItem: ImageItem

  build() {
    Column() {
      Image(this.imageItem.imageSrc)
        .objectFit(ImageFit.Contain)
        .height(50)
        .width(50)
        .renderMode(ImageRenderMode.Original)
      Text(this.imageItem.title)
        .fontSize(15)

    }
    .height(70)
    .width(150)
    .margin({ left: 10, right: 10 })
    .backgroundColor(Color.White)
  }
}
构建商品详情页面

从上面效果图可以看出,商品详情页面主要由下面五部分组成:
- 顶部的返回栏。
- Swiper组件。
- 中间多个Text组件组成的布局。
- 参数列表。
- 底部的Buy。
在本任务中,把上面每一部分都封装成一个组件,然后再放到入口组件内,当点击顶部返回图标时返回到主页面的商品列表页签,点击底部Buy时,会触发进度条弹窗
在pages目录下面新建一个ETS Page, 命名为ShoppingDetail.ets,config.json文件pages属性中也会自动添加“pages/ShoppingDetail”页面路由。
在ShoppingDetail.ets文件中创建入口组件,组件内容如下:
@Entry
@Component
struct ShoppingDetail {
  private arsItems: ArsData[] = getArs()

  build() {
    Column() {
      DetailTop()
      Scroll() {
        Column() {
          SwiperTop()
          DetailText()
          DetailArsList({ arsItems: this.arsItems })
          Image($r('app.media.computer1'))
            .height(220)
            .width('100%')
            .margin({ top: 30 })
          Image($r('app.media.computer2'))
            .height(220)
            .width('100%')
            .margin({ top: 30 })
          Image($r('app.media.computer3'))
            .height(220)
            .width('100%')
            .margin({ top: 30 })
          Image($r('app.media.computer4'))
            .height(220)
            .width('100%')
            .margin({ top: 30 })
          Image($r('app.media.computer5'))
            .height(220)
            .width('100%')
            .margin({ top: 30 })
          Image($r('app.media.computer6'))
            .height(220)
            .width('100%')
            .margin({ top: 30 })
        }
        .width('100%')
        .flexGrow(1)
      }
      .scrollable(ScrollDirection.Vertical)

      DetailBottom()
    }
    .height('90%')
    .width('100%')
  }
}
其中顶部DetailTop组件效果图如下:

代码如下:
@Component
struct DetailTop {
  build() {
    Column() {
      Row() {
        Image($r('app.media.icon_return'))
          .height(40)
          .width(40)
          .margin({left: 20})
          .onClick(() = > {
            router.push({
              uri: "pages/HomePage"
            })
          })

      }
      .width('100%')
      .height(35)
      .backgroundColor('#FF87CEEB')
    }
    .width('100%')
    .height(40)
  }
}
SwiperTop组件效果图如下:

代码如下:@Component struct SwiperTop { build() { Column() { Swiper() { Image($r('app.media.computer1')) .height(220) .width('100%') Image($r('app.media.computer2')) .height(220) .width('100%') Image($r('app.media.computer3')) .height(220) .width('100%') Image($r('app.media.computer4')) .height(220) .width('100%') Image($r('app.media.computer5')) .height(220) .width('100%') Image($r('app.media.computer6')) .height(220) .width('100%') } .index(0) .autoPlay(true) .interval(3000) .indicator(true) .loop(true) .height(250) .width('100%') } .height(250) .width('100%') } }DetailText组件效果图如下:

代码如下:@Component struct DetailText { build() { Column() { Row() { Image($r('app.media.icon_promotion')) .objectFit(ImageFit.Contain) .height(30) .width(30) .margin({ left: 10 }) Text('Special Offer: ¥9999') .fontColor(Color.White) .fontSize(20) .margin({ left: 10 }) } .width('100%') .height(35) .backgroundColor(Color.Red) Column() { Text('New Arrival: HUAWEI MateBook X Pro 2021') .fontSize(18) .margin({ left: 10 }) .alignSelf(ItemAlign.Start) Text('13.9-Inch, 11th Gen Intel® Core™ i7, 16 GB of Memory, 512 GB of Storage, Ultra-slim Business Laptop, 3K FullView Display, Multi-screen Collaboration, Emerald Green') .fontSize(14) .margin({ left: 10 }) Row() { Image($r('app.media.icon_buy')) .objectFit(ImageFit.Contain) .height(30) .width(30) .margin({ left: 10 }) Text('Limited offer') .fontSize(15) .fontColor(Color.Red) .margin({ left: 100 }) } .backgroundColor(Color.Pink) .width('100%') .height(45) .margin({ top: 10 }) Text(' Shipment: 2-day shipping') .fontSize(13) .fontColor(Color.Red) .margin({ left: 10, top: 5 }) .alignSelf(ItemAlign.Start) Text(' Ship To: Hubei,Wuhan,China') .fontSize(13) .fontColor(Color.Red) .margin({ left: 10, top: 5 }) .alignSelf(ItemAlign.Start) .onClick(() = > { prompt.showDialog({ title: 'select address', }) }) Text('Guarantee: Genuine guaranteed') .fontSize(13) .margin({ left: 10, top: 5 }) .alignSelf(ItemAlign.Start) } .height(170) .width('100%') } .height(180) .width('100%') } }DetailArsList组件效果图如下:
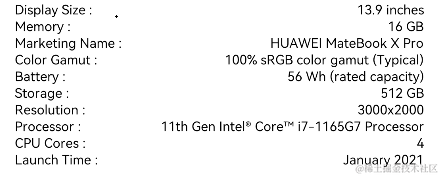
代码如下:
@Component
struct DetailArsList{
  private arsItems: ArsData[]
  build() {
    Scroll() {
      Column() {
        List() {
          ForEach(this.arsItems, item = > {
            ListItem() {
              ArsListItem({ arsItem: item })
            }
          }, item = > item.id.toString())
        }
        .height('100%')
        .width('100%')
        .margin({ top: 5 })
        .listDirection(Axis.Vertical)
      }
      .height(200)
    }
  }
}
ArsListItem组件代码如下:
@Component
struct ArsListItem {
  private arsItem: ArsData

  build() {
    Row() {
      Text(this.arsItem.title + " :")
        .fontSize(11)
        .margin({ left: 20 })
        .flexGrow(1)
      Text(this.arsItem.content)
        .fontSize(11)
        .margin({ right: 20 })

    }
    .height(14)
    .width('100%')
    .backgroundColor(Color.White)
  }
}
DetailBottom组件效果图如下:

代码如下:@Component struct DetailBottom { @Provide private value: number= 1 dialogController: CustomDialogController = new CustomDialogController({ builder: DialogExample({ action: this.onAccept }), cancel: this.existApp, autoCancel: true }); onAccept() { } existApp() { } build() { Column() { Text('Buy') .width(40) .height(25) .fontSize(20) .fontColor(Color.White) .onClick(() = > { this.value = 1 this.dialogController.open() }) } .alignItems(HorizontalAlign.Center) .backgroundColor(Color.Red) .width('100%') .height('10%') } }DialogExample自定义弹窗组件效果图如下:

代码如下:
@CustomDialog
struct DialogExample {
  @Consume
  private value: number
  controller: CustomDialogController;
  action: () = > void;

  build() {
    Column() {
      Progress({ value: this.value++ >= 100 ? 100 : this.value, total: 100, style: ProgressStyle.Capsule })
        .height(50)
        .width(100)
        .margin({ top: 5 })

    }
    .height(60)
    .width(100)
  }
}
审核编辑 黄宇
-
五步走 拥有专属无敌购物车!2023-04-06 1012
-
使用evive遥控购物车2022-11-11 1032
-
【开发样例】OpenHarmony分布式购物车2022-07-29 2043
-
智能购物车方案2022-07-20 4541
-
分享一个不错的Versa64购物车项目2022-07-08 2223
-
Versa64购物车开源资料分享2022-07-01 532
-
Facebook新增加“购物车”功能2020-12-11 3581
-
【uFun试用申请】基于uFun的智能跟随购物车2019-03-22 2495
-
【NXP LPC54110试用申请】一种基于语音控制的购物车控制系统2017-09-27 2597
-
新手上路,如何做一个点菜系统,点好的菜可以放到购物车中结账2017-02-10 7042
-
沃尔玛计划将超市购物车变为智能机器人2016-06-24 3145
-
【OK210申请】基于RFID的智能购物车2015-06-25 3308
-
智能自助服务超市购物车2013-11-16 4
-
ajax实现电子商务网站中的购物车系统+源码2008-10-14 770
全部0条评论

快来发表一下你的评论吧 !


