

 HarmonyOS开发案例:【电子相册】
电子说
1.4w人已加入
描述
介绍
如何实现一个简单的电子相册应用的开发,主要功能包括:
- 实现首页顶部的轮播效果。
- 实现页面跳转时共享元素的转场动画效果。
- 实现通过手势控制图片的放大、缩小、左右滑动查看细节等效果。

相关概念
- [Swiper]:滑块视图容器,提供子组件滑动轮播显示的能力。
- [Grid]:网格容器,由“行”和“列”分割的单元格所组成,通过指定“项目”所在的单元格做出各种各样的布局。
- [Navigation]:Navigation组件一般作为Page页面的根容器,通过属性设置来展示页面的标题、工具栏、菜单。
- [List]:列表包含一系列相同宽度的列表项。适合连续、多行呈现同类数据,例如图片和文本。
- [组合手势]:手势识别组,多种手势组合为复合手势,支持连续识别、并行识别和互斥识别。
环境搭建
软件要求
- [DevEco Studio]版本:DevEco Studio 3.1 Release。
- OpenHarmony SDK版本:API version 9。
硬件要求
- 开发板类型:[润和RK3568开发板]。
- OpenHarmony系统:3.2 Release。
环境搭建
完成本篇Codelab我们首先要完成开发环境的搭建,本示例以RK3568开发板为例,参照以下步骤进行:
- [获取OpenHarmony系统版本]:标准系统解决方案(二进制)。以3.2 Release版本为例:

- 搭建烧录环境。
- [完成DevEco Device Tool的安装]
- [完成RK3568开发板的烧录]
- 搭建开发环境。
- 开始前请参考[工具准备],完成DevEco Studio的安装和开发环境配置。
- 开发环境配置完成后,请参考[使用工程向导]创建工程(模板选择“Empty Ability”)。
- 工程创建完成后,选择使用[真机进行调测]。
- 开发前请熟悉鸿蒙开发指导文档:[
gitee.com/li-shizhen-skin/harmony-os/blob/master/README.md]

代码结构解读
本篇Codelab只对核心代码进行讲解,对于完整代码,我们会在gitee中提供。
├──entry/src/main/ets                // 代码区
│  ├──common
│  │  ├──constansts
│  │  │  └──Constants.ets            // 常量类
│  │  └──utils
│  │     └──Logger.ets               // Logger公共类
│  ├──entryability
│  │  └──EntryAbility.ts             // 程序入口类
│  ├──pages
│  │  ├──DetailListPage.ets          // 图片详情页面
│  │  ├──DetailPage.ets              // 查看大图页面
│  │  ├──IndexPage.ets               // 电子相册主页面
│  │  └──ListPage.ets                // 图片列表页面
│  └──view
│     └──PhotoItem.ets               // 首页相册Item组件
└──entry/src/main/resources          // 资源文件

`HarmonyOS与OpenHarmony鸿蒙文档籽料:mau123789是v直接拿`
构建应用页面
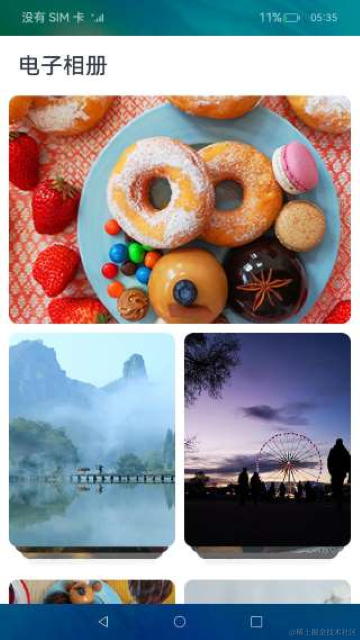
应用首页
应用首页用Column组件来实现纵向布局,从上到下依次是标题组件Text、轮播图Swiper、相册列表Grid。标题和轮播图均设置固定高度,底部相册列表通过layoutWeight属性实现自适应占满剩余空间。
// IndexPage.ets
Column() {
  Row() {
    Text($r('app.string.EntryAbility_label'))
  }

  Swiper(this.swiperController) {
    ForEach(Constants.BANNER_IMG_LIST, (item: Resource) = > {
      Row() {
        Image(item)
        ...
      }
    }, (item: Resource, index: number) = > JSON.stringify(item) + index)
  }
  ...

  Grid() {
    ForEach(IMG_ARR, (photoArr: Array< Resource >) = > {
      GridItem() {
        PhotoItem({ photoArr })
      }
      ...
      .onClick(() = > {
        router.pushUrl({
          url: Constants.URL_LIST_PAGE,
          params: { photoArr: JSON.stringify(photoArr) }
        }).catch((error: Error) = > {
          Logger.error(Constants.TAG_INDEX_PAGE, JSON.stringify(error));
        });
      })
    }, (item: Array< Resource >, index: number) = > JSON.stringify(item) + index)
  }
  ...
  .layoutWeight(1)
}
图片列表页面
图片列表页是网格状展开的图片列表,主要使用Grid组件和GridItem组件,GridItem高度通过aspectRatio属性设置为跟宽度一致。

// ListPage.ets
Navigation() {
  Grid() {
    ForEach(this.photoArr, (img: Resource, index: number) = > {
      GridItem() {
        Image(img)
          .onClick(() = > {
            this.selectedIndex = index;
            router.pushUrl({
              url: Constants.URL_DETAIL_LIST_PAGE,
              params: {
                photoArr: JSON.stringify(this.photoArr),
              }
            }).catch((error: Error) = > {
              Logger.error(Constants.TAG_LIST_PAGE, JSON.stringify(error));
            });
          })
      }
      ...
      .aspectRatio(1)
    }, (item: Resource) = > JSON.stringify(item))
  }
  .columnsTemplate(Constants.GRID_COLUMNS_TEMPLATE)
  .layoutWeight(1)
}
图片详情页面
图片详情页由两个横向滚动的List组件完成整体布局,两个组件之间有联动的效果。滚动底部的List,上边展示的图片会随着改变,同样左右滑动上边的图片时,底部List组件也会随之改变。
// DetailListPage.ets
Stack({ alignContent: Alignment.Bottom }) {
  List({ scroller: this.bigScroller, initialIndex: this.selectedIndex }) {
    ForEach(this.photoArr, (img: Resource, index: number) = > {
      ListItem() {
        Image(img)
          ...
          .gesture(PinchGesture({ fingers: Constants.DOUBLE_NUMBER })
            .onActionStart(() = > this.goDetailPage()))
          .onClick(() = > this.goDetailPage())
      }
    }, (item: Resource) = > JSON.stringify(item))
  }
  ...
  .onScroll((scrollOffset, scrollState) = > {
    if (scrollState === ScrollState.Fling) {
      this.bigScrollAction(scrollTypeEnum.SCROLL);
    }
  })
  .onScrollStop(() = > this.bigScrollAction(scrollTypeEnum.STOP))

  List({ scroller: this.smallScroller, space: Constants.LIST_ITEM_SPACE, initialIndex: this.selectedIndex }) {
    ForEach(this.smallPhotoArr, (img: Resource, index: number) = > {
      ListItem() {
        this.SmallImgItemBuilder(img, index)
      }
    }, (item: Resource, index: number) = > JSON.stringify(item) + index)
  }
  ...
  .listDirection(Axis.Horizontal)
  .onScroll((scrollOffset, scrollState) = > {
    if (scrollState === ScrollState.Fling) {
      this.smallScrollAction(scrollTypeEnum.SCROLL);
    }
  })
  .onScrollStop(() = > this.smallScrollAction(scrollTypeEnum.STOP))
}
查看大图页面
查看大图页面由一个横向滚动的List组件来实现图片左右滑动时切换图片的功能,和一个Row组件实现图片的缩放和拖动查看细节功能。对图片进行缩放时会从List组件切换成Row组件来实现对单张图片的操作,对单张图片进行滑动操作时,也会由Row组件转换为List组件来实现图片的切换功能。

// DetailPage.ets
Stack() {
  List({ scroller: this.scroller, initialIndex: this.selectedIndex }) {
    ForEach(this.photoArr, (img: Resource) = > {
      ListItem() {
        Image(img)
          ...
          .onClick(() = > router.back()
          )
      }
      .gesture(PinchGesture({ fingers: Constants.DOUBLE_NUMBER })
        .onActionStart(() = > {
          this.resetImg();
          this.isScaling = true;
          this.imgOffSetX = 0;
          this.imgOffSetY = 0;
        })
        .onActionUpdate((event: GestureEvent) = > {
          this.imgScale = this.currentScale * event.scale;
        })
        .onActionEnd(() = > {
          if (this.imgScale < 1) {
            this.resetImg();
            this.imgOffSetX = 0;
            this.imgOffSetY = 0;
          } else {
            this.currentScale = this.imgScale;
          }
        })
      )
    }, (item: Resource) = > JSON.stringify(item))
  }
  ...
  .onScrollStop(() = > {
    let currentIndex = Math.round((this.scroller.currentOffset()
      .xOffset + (this.imageWidth / Constants.DOUBLE_NUMBER)) / this.imageWidth);
    this.selectedIndex = currentIndex;
    this.scroller.scrollTo({ xOffset: currentIndex * this.imageWidth, yOffset: 0 });
  })
  .visibility(this.isScaling ? Visibility.Hidden : Visibility.Visible)

  Row() {
    Image(this.photoArr[this.selectedIndex])
    ...
  }
  .visibility(this.isScaling ? Visibility.Visible : Visibility.Hidden)
}
通过手势控制图片
大图浏览界面双指捏合时通过改变Image组件的scale来控制图片的缩放,单手拖动时通过改变Image的偏移量来控制图片的位置,手势操作调用组合手势GestureGroup实现。其中PinchGesture实现双指缩放手势,PanGesture实现单指拖动手势。
// DetailPage.ets
Row() {
    Image(this.photoArr[this.selectedIndex])
      .position({ x: this.imgOffSetX, y: this.imgOffSetY })
      .scale({ x: this.imgScale, y: this.imgScale })
  }
  .gesture(GestureGroup(GestureMode.Exclusive,
  PinchGesture({ fingers: Constants.DOUBLE_NUMBER })
    .onActionUpdate((event: GestureEvent) = > {
      this.imgScale = this.currentScale * event.scale;
    })
    .onActionEnd(() = > {
      if (this.imgScale < 1) {
        this.resetImg();
        this.imgOffSetX = 0;
        this.imgOffSetY = 0;
      } else {
        this.currentScale = this.imgScale;
      }
    }),
  PanGesture()
    .onActionStart(() = > {
      this.preOffsetX = this.imgOffSetX;
      this.preOffsetY = this.imgOffSetY;
    })
    .onActionUpdate((event: GestureEvent) = > {
      this.imgOffSetX = this.preOffsetX + event.offsetX;
      this.imgOffSetY = this.preOffsetY + event.offsetY;
    })
    .onActionEnd(() = > this.handlePanEnd())
  ))
审核编辑 黄宇
声明:本文内容及配图由入驻作者撰写或者入驻合作网站授权转载。文章观点仅代表作者本人,不代表电子发烧友网立场。文章及其配图仅供工程师学习之用,如有内容侵权或者其他违规问题,请联系本站处理。
举报投诉
- 相关推荐
- 热点推荐
- 鸿蒙
- OpenHarmony
-
基于STM32F103RC的电子相册(原理图、PCB源文件、程序源码及制作)2025-05-23 334
-
基于Java Web电子相册2023-06-26 597
-
ARM裸机开发之基于Mini2451开发板的电子相册开发步骤2022-05-19 4075
-
华为开发者分论坛HarmonyOS学生公开课-OpenHarmony Codelabs开发案例2021-10-24 2673
-
基于FATFS文件系统的电子相册2020-07-16 1616
-
视频电子相册制作中视频不清晰的原因和办法2019-08-08 6343
-
基于Web电子相册3D翻页效果实现2017-11-16 1086
-
51单片机TFT2.8 彩屏 -9325ok 电子相册2016-04-30 3807
-
JAVA教程之电子相册2016-04-11 582
-
求一个基于frambuffer电子相册制作的源程序?(基于linux高级编程的);2015-09-10 4270
-
51单片机2.8寸液晶开发板,运行游戏,电子相册,手写板,...2013-06-10 5690
-
单片机电子相册DIY2012-08-15 11145
-
如何制作儿童电子相册?(教程)2012-07-20 3392
-
一个非常不错的电子相册制作工具 MemoriesOnTV2009-05-14 4030
全部0条评论

快来发表一下你的评论吧 !
