
MCXN947与Zephyr的跨界合作 嵌入式技术的新飞跃
嵌入式技术
描述
MCX N947成功初步移植Zephyr,标志着嵌入式技术的新飞跃,为物联网应用注入更强动力与智能。
简介
搭建 Zephyr 环境
参考Zephyr Getting Started。在这篇 Zephyr 的官方文档中详细介绍了环境的搭建过程, 同时 NXP 也提供了工具解决 Zephyr 安装过程所需的依赖。
了解 Zephyr 架构
为了移植 Zephyr ,首先需要了解 Zephyr 的架构,理解其如何工作。在此处仅对其简单介绍,便于理解后续内容。
构建系统
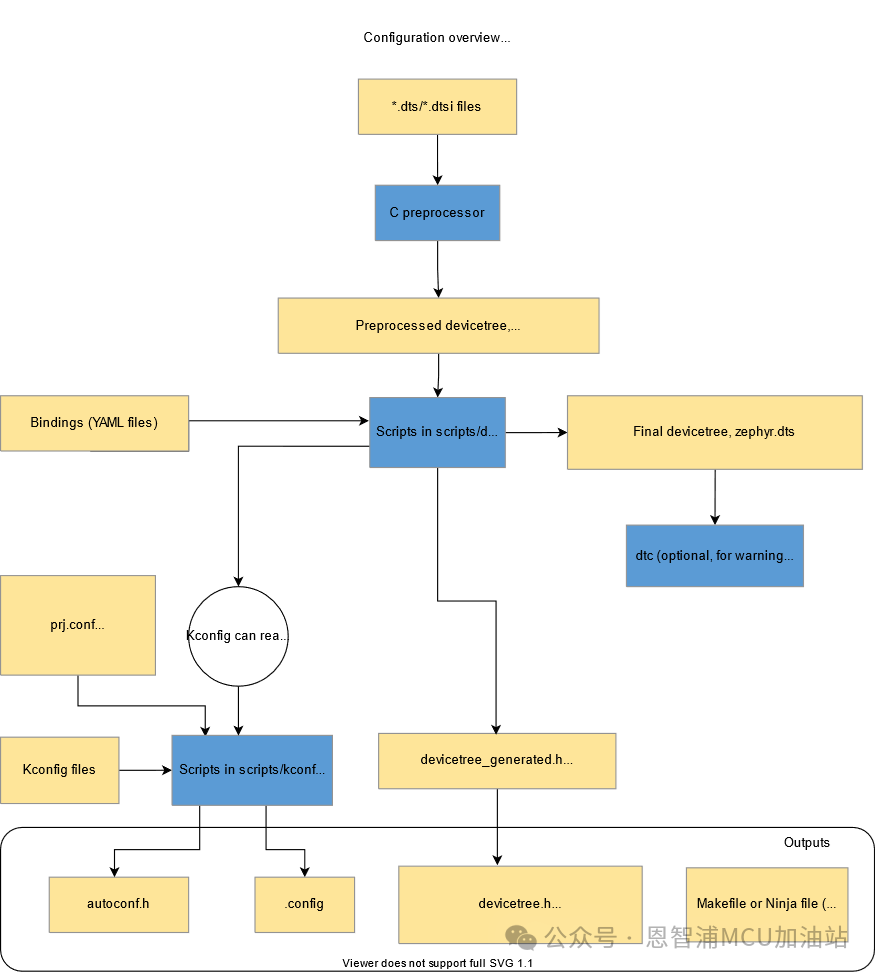
Zephyr 使用 CMake 作为其构建系统,使用 Kconfig 进行配置。首先 CMake 通过收集相应配置并执行对应脚本,生成对应的编译脚本。

Configuration Overflow
Devicetree
设备树是一种描述硬件及其配置的树形数据结构,如果对 MPU 开发领域有所深入对它可能会有所了解。Zephyr 使用设备树选择合适的驱动及配置。
使用设备树可以在编译阶段确定硬件的配置是否合理,定义同一外设的多种不同工作模式便于切换, 同时使用设备树也让整个系统的复杂度增加。
设备树的相关语法可参考 Zephyr Devicetree Syntax。
移植
对于适配新 SoC , Zephyr 官方目前资料不多。Zephyr SoC Porting,在该链接中简述了移植 Zephyr 的要求 。
虽然资料很少,但移植工作也并非毫无头绪。ZephyrGithub Repo本身便是一个详细的参考内容。
SoC
首先为新SoC建立相应目录
soc/arm/nxp_mcx/
|-- CMakeLists.txt
|-- Kconfig
|-- Kconfig.defconfig
|-- Kconfig.soc
`-- mcxnx4x
    |-- CMakeLists.txt
    |-- Kconfig.defconfig.mcxn947_cpu0
    |-- Kconfig.defconfig.mcxn947_cpu1
    |-- Kconfig.defconfig.series
    |-- Kconfig.series
    |-- Kconfig.soc
    |-- linker.ld
    |-- soc.c
    `-- soc.h
整个文件结构可以参考同目录下的其他文件夹。
Devicetree
soc 目录中主要为 Kconfig ,其中主要定义了 SoC 中的各种属性, 比如芯片的架构( Cortex-M33 )、有无 FPU ( CPU_HAS_FPU )等。
在完成 SoC 的移植后,我们需要定义 SoC 的相关外设,但在这个阶段, 我们只需要对 FLASH 与 SRAM 做出定义即可,相应的驱动支持在后期进行适配。mcx n947 是一颗 Cortex-M33 架构的 CPU , 芯片使用了 Cortex-M33 定义的 TrustZone 功能, 将外设分为 Secure 和 Non-Secure 两部分。因此,在定义设备树时,需要考虑安全外设与非安全外设的不同地址。
// dts/arm/nxp/nxp_mcxn947_common.dtsi
// 在该 dtsi ( device tree source include )文件中仅定义到目前为止移植所需要的外设
// 包括 SRAM 地址与大小, FLASH 地址与大小,中断优先级 BIT 数等等。
#include#include / { cpus: cpus { #address-cells = <1>; #size-cells = <0>; cpu@0 { compatible = "arm,cortex-m33f"; reg = <0>; }; cpu@1 { compatible = "arm,cortex-m33"; reg = <1>; }; }; }; &sram { #address-cells = <1>; #size-cells = <1>; sramx: memory@4000000 { compatible = "mmio-sram"; reg = <0x4000000 DT_SIZE_K(96)>; }; srama: memory@20000000 { compatible = "mmio-sram"; reg = <0x20000000 DT_SIZE_K(32)>; }; sramb: memory@20008000 { compatible = "mmio-sram"; reg = <0x20008000 DT_SIZE_K(32)>; }; sramc: memory@20010000 { compatible = "mmio-sram"; reg = <0x20010000 DT_SIZE_K(64)>; }; sramd: memory@20020000 { compatible = "mmio-sram"; reg = <0x20020000 DT_SIZE_K(64)>; }; srame: memory@20030000 { compatible = "mmio-sram"; reg = <0x20030000 DT_SIZE_K(64)>; }; sramf: memory@20040000 { compatible = "mmio-sram"; reg = <0x20040000 DT_SIZE_K(64)>; }; sramg: memory@20050000 { compatible = "mmio-sram"; reg = <0x20050000 DT_SIZE_K(64)>; }; sramh: memory@20060000 { compatible = "mmio-sram"; reg = <0x20060000 DT_SIZE_K(32)>; }; }; &peripheral { #address-cells = <1>; #size-cells = <1>; fmu: flash-controller@43000 { compatible = "flash-controller"; reg = <0x43000 0x1000>; #address-cells = <1>; #size-cells = <1>; status = "disabled"; flash0: flash@0 { compatible = "soc-nv-flash"; reg = <0x0 DT_SIZE_M(2)>; }; }; }; &nvic { arm,num-irq-priority-bits = <3>; }; // dts/arm/nxp/nxp_mcxn947_ns.dtsi // 在 ns ( None-Secure )配置中定义外设与 SRAM 的基础地址 / { soc { sram: sram@4000000 { ranges = <0x4000000 0x4000000 0x20000000>; }; peripheral: peripheral@40000000 { ranges = <0x0 0x40000000 0x10000000>; }; }; }; #include "nxp_mcxn947_common.dtsi"
Soc.c
以目前的进度, soc.c 与 soc.h 中需要定义的内容不多。其中 soc.c 中需要定义芯片启动后的流程,如时钟初始化等等,在此处直接调用 SystemInit 图个方便。nxp_mcxnx4x_init 中定义了芯片初始化行为, 以目前的进度,还不需要做什么特殊操作,暂时留空。
#include#include #include #include static int nxp_mcxnx4x_init(void) { return 0; } #ifdef CONFIG_PLATFORM_SPECIFIC_INIT void z_arm_platform_init(void) { SystemInit(); } #endif /* CONFIG_PLATFORM_SPECIFIC_INIT */ SYS_INIT(nxp_mcxnx4x_init, PRE_KERNEL_1, 0); #ifndef _SOC__H_ #define _SOC__H_ #endif /* _SOC__H_ */
Misc
在移植过程中,还需要使用 MCUX SDK , Zephyr 已经提供了一份,其位于 zephyrproject/modules/hal/nxp 中, 但该版本中并没有包括本次移植目标的相关驱动与配置文件,所以将我们下载好的 SDK 整理并入文件夹中。同时修改对应 CMake 文件,使项目能够自动包含相关驱动文件。
Board
接下来定义 board ,只有定义 board 才能进行编译测试。该过程以手上的 mcxn947-evk 为例。
最终创建的目录结构如下,在这仅仅创建了全部必须的配置文件,包括相应的配置与设备树, 为了方便测试,添加了 board.cmake ,该文件用来定义支持的下载方式与参数。
boards/arm/mcxn947_evk/
|-- Kconfig.board
|-- Kconfig.defconfig
|-- board.cmake
|-- mcxn947_evk_ns.dts
`-- mcxn947_evk_ns_defconfig
# Kconfig.board
config BOARD_MCXN947_EVK_CPU0
    bool "NXP MCXN947-EVK [CPU0]"
    depends on SOC_SERIES_MCXNX4X
    select SOC_PART_NUMBER_MCXN947VDF
# Kconfig.defconfig
if BOARD_MCXN947_EVK_CPU0


config BOARD
    default "mcxn947_evk_cpu0" if BOARD_MCXN947_EVK_CPU0


endif # BOARD_MCXN947_EVK_CPU0
# mcxn947_evk_ns_defconfig


CONFIG_SOC_SERIES_MCXNX4X=y
CONFIG_SOC_MCXN947_CPU0=y
CONFIG_BOARD_MCXN947_EVK_CPU0=y
CONFIG_UART_CONSOLE=n
CONFIG_CONSOLE=y
CONFIG_RTT_CONSOLE=y
CONFIG_USE_SEGGER_RTT=y


CONFIG_SYS_CLOCK_HW_CYCLES_PER_SEC=48000000u
/dts-v1/;


#include


/ {
    model = "NXP MCX N947 EVK";
    compatible = "nxp,mcxn947";


    cpus {
        /delete-node/ cpu@1;
    };


    chosen {
        zephyr,sram = &srama;
        zephyr,flash = &flash0;
    };
};


&flash0 {
    partitions {
        compatible = "fixed-partitions";
        #address-cells = <1>;
        #size-cells = <1>;


        boot_partition: partition@0 {
            label = "mcuboot";
            reg = <0x0 0x00008000>;
        };


        slot0_partition: partition@8000 {
            label = "image-0";
            reg = <0x00008000 0x00010000>;
        };
    };
};
# board.cmake
board_runner_args(jlink "--device=MCXN947")


include(${ZEPHYR_BASE}/boards/common/jlink.board.cmake)
到目前为止,我们仍未对时钟、引脚、串口等驱动进行适配,所以无法通过串口输出日志与 kprintf 。所以使用 RTT 进行输出, RTT 通过向特定内存区域buffer读写,结合调试器达成数据传输, 在目前无法驱动串口(后续工作)的情况下很有用,相关配置在 mcxn947_evk_ns_defconfig 中体现。默认情况下, CPU 时钟速度为 48MHz ,同样在 Kconfig 中定义。
结论
在全部移植完成后,使用 samples/hello_world 例子进行测试。执行指令 west build -b mcxn947_evk_nssamples/hello_world 进行编译。如果出现问题那就需要进行一些小修小改。
最终编译结果如下:
[133/133] Linking C executable zephyrzephyr.elf
Memory region         Used Size  Region Size  %age Used
           FLASH:       10844 B         2 MB      0.52%
             RAM:        4944 B        32 KB     15.09%
        IDT_LIST:          0 GB         2 KB      0.00%
因为在之前步骤中定义了下载方式,所以将硬件连接后直接执行指令 west flash 即可完成下载。
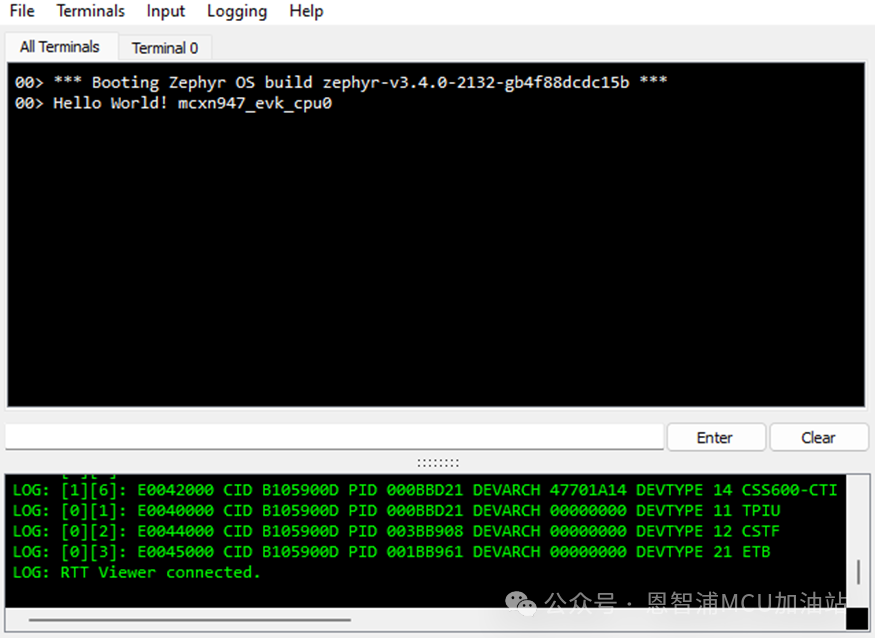
最后打开 J-Link RTT Viewer 观察 RTT 内容。

RTT Output
至此, Zephyr 的初步移植工作已经结束,后续将会对常用外设进行移植。
-
恩智浦MCU MCXN947 基于MCUXpresso Config tools创建IIC的教程步骤2025-05-22 1847
-
如何在MCXN947板的FlexSPI接口接HyperRAM2025-06-04 1781
-
如何在MCXN947微控制器上配置安全启动和生命周期2025-06-26 2133
-
在恩智浦FRDM-MCXN947开发板部署DeepSeek大语言模型2025-04-10 3290
-
FRDM-MCXN947的纯Linux命令行环境搭建2024-07-28 5690
-
关于将Flash写入FRDM-MCXN947的问题求解2025-03-17 776
-
MCXN947使用ADC并编写代码,总是报警告是怎么回事?2025-03-20 808
-
MCXN947如何配置和外扩PSRAM?2025-03-31 840
-
MCXN947怎么驱动FRDM-STBI-A8974三轴陀螺仪?2025-04-14 2621
-
飞凌嵌入式推出i.MX RT1052跨界开发板2018-08-31 2454
-
嵌入式跨界处理器资料分享2022-12-12 385
-
恩智浦MCX系列MCU的新品MCXN9472022-12-21 3323
-
《恩智浦FRDM-MCXN947开发实践指南》上线啦2024-05-13 3587
-
使用VSCode调试FRDM MCXN947开发板2024-05-16 1797
-
MCXN947系列高性能微控制器产品介绍2024-08-06 2410
全部0条评论

快来发表一下你的评论吧 !

