
基于XIAO SAMD21开发板的数字键盘制作方案
描述
今天小编给大家带来了来自印度的Arnov Sharma 制作的基于XIAO SAMD21的数字键盘项目,该项目可以通过按键在电脑和OLED的屏幕上输入0-9的阿拉伯数字,可以当作一个数字副键盘来使用。
这个项目的核心是 XIAO SAMD21 开发板和 XIAO 扩展板配对,其中包含一个板载 OLED 显示屏,我们在这个项目中使用它来显示按钮按下。扩展板固定在3D打印的特制外壳上。外壳内包含了 9个12x12 毫米的触觉按钮。这些按钮由在Fusion360中建模的支架部件牢固地固定。
材料清单
XIAO SAMD21开发板
XIAO扩展板
3D打印零件
12x12mm 点动按钮*9
第一步:代码实现
由Seeed Studio制造的 XIAO SAMD21 微控制器和 XIAO 扩展板构成了该项目的核心。它配备了丰富的外设,包括 OLED、RTC、SD 卡 Sot、无源蜂鸣器、复位/用户按钮、5V 伺服连接器和 Grove 连接器,用于将多个 Grove 设备与 XIAO 配对。它还包含一个电池充电 IC,用于将此设置与锂电池作为电源进行分级。
项目的第一步相当简单:我们将测试代码上传到 XIAO SAMD21 ,并利用扩展板的板载按钮(连接到 D1)用作输入数字 1 的小键盘。
#include         //TEST SKETCH
int buttonPin = 1;  // Set a button to any pin


void setup()
{
  pinMode(buttonPin, INPUT_PULLUP);  // Set the button as an input
  digitalWrite(buttonPin, HIGH);  // Pull the button high
}


void loop()
{
  if (digitalRead(buttonPin) == 0)  // if the button goes low
  {
    Keyboard.write('1');  // send a '1' to the computer via Keyboard HID
    delay(500);  // delay so there aren't a kajillion z's
  }
}
测试结束后,我们可以准备更多的功能,比如从 9 个按钮中获取输入,并通过 XIAO 内部 SAMD21 微控制器的 HID 协议输出数字。
以下为键盘中使用的主要代码
#include


#include
#include
#include


#define OLED_WIDTH 128
#define OLED_HEIGHT 64

#define OLED_ADDR   0x3C
Adafruit_SSD1306 display(OLED_WIDTH, OLED_HEIGHT);

int buttonPin1 = 0;
int buttonPin2 = 1;
int buttonPin3 = 2;
int buttonPin4 = 3;
int buttonPin5 = 6;
int buttonPin6 = 7;
int buttonPin7 = 8;
int buttonPin8 = 9;
int buttonPin9 = 10;


void setup()
{
  pinMode(buttonPin1, INPUT_PULLUP);  // Set the button as an input
  digitalWrite(buttonPin1, HIGH);  // Pull the bu11tton high


  pinMode(buttonPin2, INPUT_PULLUP);  // Set the button as an input
  digitalWrite(buttonPin2, HIGH);  // Pull the bu11tton high


  pinMode(buttonPin3, INPUT_PULLUP);  // Set the button as an input
  digitalWrite(buttonPin3, HIGH);  // Pull the bu11tton high


  pinMode(buttonPin4, INPUT_PULLUP);  // Set the button as an input
  digitalWrite(buttonPin4, HIGH);  // Pull the bu11tton high


  pinMode(buttonPin5, INPUT_PULLUP);  // Set the button as an input
  digitalWrite(buttonPin5, HIGH);  // Pull the bu11tton high


  pinMode(buttonPin6, INPUT_PULLUP);  // Set the button as an input
  digitalWrite(buttonPin6, HIGH);  // Pull the bu11tton high


  pinMode(buttonPin7, INPUT_PULLUP);  // Set the button as an input
  digitalWrite(buttonPin7, HIGH);  // Pull the bu11tton high


  pinMode(buttonPin8, INPUT_PULLUP);  // Set the button as an input
  digitalWrite(buttonPin8, HIGH);  // Pull the bu11tton high


  pinMode(buttonPin9, INPUT_PULLUP);  // Set the button as an input
  digitalWrite(buttonPin9, HIGH);  // Pull the bu11tton high

  display.begin(SSD1306_SWITCHCAPVCC, OLED_ADDR);
  display.clearDisplay();
}


void loop()
{
  if (digitalRead(buttonPin1) == 0) // 01
  {
    Keyboard.write('1');

  display.clearDisplay();
  display.setTextSize(4);
  display.setTextColor(WHITE);
  display.setCursor(55, 20);
  display.println("1");
  display.display();
  delay(500);
  }
    display.clearDisplay();


  if (digitalRead(buttonPin2) == 0) // 02
  {
    Keyboard.write('2');

  display.clearDisplay();
  display.setTextSize(4);
  display.setTextColor(WHITE);
  display.setCursor(55, 20);
  display.println("2");
  display.display();
  delay(500);
  }


display.clearDisplay();


  if (digitalRead(buttonPin3) == 0)  // 03
  {
    Keyboard.write('3');

  display.clearDisplay();
  display.setTextSize(4);
  display.setTextColor(WHITE);
  display.setCursor(55, 20);
  display.println("3");
  display.display();
  delay(500);
  }


display.clearDisplay();


  if (digitalRead(buttonPin4) == 0)  // 04
  {
    Keyboard.write('4');

  display.clearDisplay();
  display.setTextSize(4);
  display.setTextColor(WHITE);
  display.setCursor(55, 20);
  display.println("4");
  display.display();
  delay(500);
  }


display.clearDisplay();


  if (digitalRead(buttonPin5) == 0)  // 05
  {
    Keyboard.write('5');

  display.clearDisplay();
  display.setTextSize(4);
  display.setTextColor(WHITE);
  display.setCursor(55, 20);
  display.println("5");
  display.display();
  delay(500);
  }

display.clearDisplay();


  if (digitalRead(buttonPin6) == 0)  // 06
  {
    Keyboard.write('6');

  display.clearDisplay();
  display.setTextSize(4);
  display.setTextColor(WHITE);
  display.setCursor(55, 20);
  display.println("6");
  display.display();
  delay(500);
  }


display.clearDisplay();


  if (digitalRead(buttonPin7) == 0)  // 07
  {
    Keyboard.write('7');

  display.clearDisplay();
  display.setTextSize(4);
  display.setTextColor(WHITE);
  display.setCursor(55, 20);
  display.println("7");
  display.display();
  delay(500);
  }


display.clearDisplay();


  if (digitalRead(buttonPin8) == 0)  // 08
  {
    Keyboard.write('8');

  display.clearDisplay();
  display.setTextSize(4);
  display.setTextColor(WHITE);
  display.setCursor(55, 20);
  display.println("8");
  display.display();
  delay(500);
  }


display.clearDisplay();


  if (digitalRead(buttonPin9) == 0)  // 09
  {
    Keyboard.write('9');

  display.clearDisplay();
  display.setTextSize(4);
  display.setTextColor(WHITE);
  display.setCursor(55, 20);
  display.println("9");
  display.display();
  delay(500);
  }

display.clearDisplay();


}
此代码实质上充当一个简单的键盘输入系统,模拟在按下相应的物理按钮时按键盘上的按键。此外,它还在OLED显示屏上提供视觉反馈,以指示已按下哪个按钮。
我们使用的是 Adafruit SSD1306 OLED 库,您需要先下载并安装该库,然后再上传此草图。
第二步:外观设计
该项目的第二步从外观设计开始,它由首先创建的 XIAO 扩展板模型组成,该模型放置在一个矩形主体上,该主体从内部容纳了九个按钮。
XIAO扩展板使用四个M2螺钉从顶部安装。
我们从外壳内部安装了按钮,并创建了九个方形开口来放置开关同时创造了一个开关支架,它用四个 M2 螺钉固定到位,以便将开关固定在原位。
此外,我们还创建了一个盖子,可以从后面关闭设备。该设备通过盖子上的矩形延伸部分从顶部抬高,使其有点倾斜。
设计完成后,我们导出了设计的所有网格文件,并使用带有 0.4mm 喷嘴的 Ender 3 打印它们。
主体采用橙色PLA印刷,盖子和开关支架均采用透明PLA印刷。
组装过程:添加按钮
对于开关,我们将使用 12mm x 12mm 方形触觉按钮。
首先,我们只需在主体内一次一个地将每个开关拾取并插入其指定位置,将它们全部放入插槽中。
接下来,我们将 3D 打印的开关支架添加到其位置,并使用四个 M2 螺钉使其静止。该支架将保持所有开关完好无损地固定在原位。
接线方法
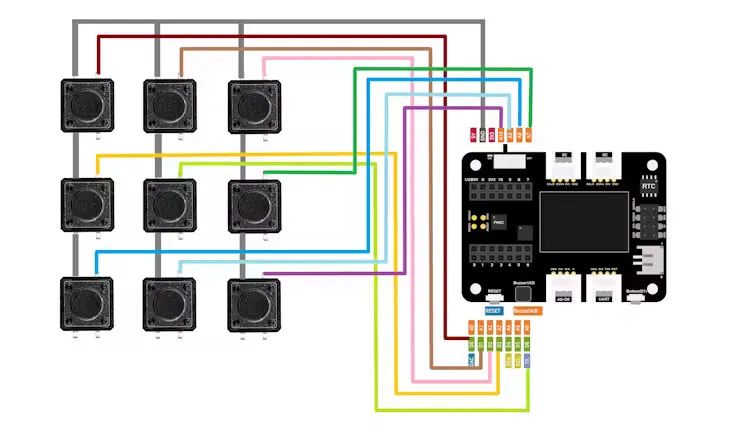
l每个开关的 GND 端子使用烙铁和银铜线相互连接。对于此阶段,我们坚持使用提供的接线图。
l接下来,我们在每个开关上放置连接线;该连接线将添加 XIAO 的数字引脚,用于开关输入。

XIAO 扩展板使用从顶部插入的四个 M2 螺钉安装在其适当的位置。接下来,我们开始最后一个接线步骤,该步骤涉及根据提供的接线图将 XIAO 上的数字引脚与每个开关上的连接线对齐。对于此过程,使用烙铁。最后,我们将盖子放在底部,并用六个 M2 螺钉将其固定到主体上。
该项目已完全组装完成。
总结
这是这个简单而实用的构建的结果:一个功能齐全的 HID 数字键盘,如果您的笔记本电脑缺少专用的数字键盘,您可以使用它来输入数字。您还可以修改此项目,通过为每个按钮分配字母或函数来代替数字来操作宏键盘。
-
如何制作字母数字键盘?2025-09-05 145
-
USB数字键盘的数据传输模式是什么?2011-04-27 2934
-
单机数值输入控件,弹出数字键盘,单击数字输入值2014-03-10 4793
-
如何用TJC串口屏去做一个数字键盘2021-10-25 1978
-
STM32F103ZET6数字键盘的代码分享2021-12-14 1335
-
LCD和数字键盘实现的人机交互式界面2021-12-22 1990
-
如何制作一个小数字键盘2022-01-25 1146
-
如何实现基于Arduino的HID数字键盘设计?2022-02-15 1319
-
如何利用HAL库去制作一种u***数字键盘呢2022-03-01 1214
-
如何利用CH549开发一款触摸的数字键盘?2022-05-26 1204
-
如何切换笔记本小键盘2012-10-08 24759
-
基于Raspberry Pi Pico实现的数字键盘设计方案2022-04-06 4659
-
减少数字键盘所需的引脚数量开源2022-10-28 665
-
数字键盘开源硬件2023-01-29 426
-
如何使用数字键盘控制7段显示器2023-02-03 906
全部0条评论

快来发表一下你的评论吧 !

