

基于Xilinx Zynq UtralScale+(MPSoC)ZCU102嵌入式评估板实现多个UIO开发并完成测试的实验
FPGA/ASIC技术
描述
当下最火的是AI,Machine Learning, Embedded Vision。FPGA老酒新装,在这个圈子里也可以掺和掺和。而谈到linux,这里从事传统嵌入式开发的朋友不在少数,八成都在谋求转型,寻个风口。急人所求,本篇软文以一个简单的实例来介绍一下FPGA的嵌入式linux里应用。隐去过多设计细节,重过程体验。新客们可以看个热闹,FPGA老玩家可以就此贵安。
这里的UIO即Userspace I/O,本文中UIO泛指UIO设备和UIO驱动。它在Linux kernel的世界里比较小众,主要是只一些定制设备和相应的驱动。UIO内核驱动指负责将中断和设备内存暴露给用户空间,再由UIO用户态驱动(Application)来实现具体的业务,随心所欲的玩。学术点叫做高度定制化,柔性设计。那怎么和FPGA扯上了关系?是的,FPGA在硬件世界里也是随心所欲的玩,这一硬一软还真是登对,在一起啊在一起。
本实验工程利用Xilinx Zynq UtralScale+(MPSoC)ZCU102嵌入式评估板上实现多个UIO,借助Xilinx的工具完成硬件工程和linux BSP的开发,最后通过测试应用程序完成测试。
ZCU102上的MPSOC集成固化了四核ARMCortex-A53,双核Cortex-R5以及Mali-400 MP2 GPU,这部分官方称为PS(processor system)。另外一部分就是FPGA,即PL(programming logical)。PS端实现控制,PL用来实现应用加速,两者通过AXI连接。跑这个小实验,呵呵,大材小用。只是本人手头正好有这个板子不得不装。筒子们可以去买了个ZYBO, ZED的板子试试身手。
实验报告
实验人员:
实验时间:
实验材料:
Xilinx Vivado 2017.2
硬件工程设计工具
有免费版本
Petalinux 2017.2
Linux BSP开发工具(基于yocto)
免费
ZCU102 EVB final v1.0
高端开发板一枚
收费,贵
PC
电脑一台
要快一点,空间大一点
硬件设计
建立Vivado工程,适配ZCU102 EVB。通过IP Integrator加入PS,在PL侧加入5个UIO输入,其中1个是GPIO模块(包含中断输出和设备内存),另外4个是PIN连接到ZCU102 EVB上的DIP开关,作为中断输入通过一个concat IP连接到PS的ps_pl_irq管脚。
板级细节请参考[1]UG1182,芯片资料参考[2]UG1085
IRQ source
Trigger type
IRQ number
Board Info
pl_irq_er
edge rising
121
SW13.8, DIP0
pl_irq_ef
edge falling
122
SW13.7, DIP1
pl_irq_lh
level high
123
SW13.6, DIP2
pl_irq_ll
level low
124
SW13.5, DIP3
axi_gpio_1
N/A
125
写好约束文件,

set_property PACKAGE_PIN AN13 [get_ports pl_irq_ll]
set_property IOSTANDARD LVCMOS33 [get_portspl_irq_ll]
set_property PACKAGE_PIN AM14 [get_ports pl_irq_lh]
set_property IOSTANDARD LVCMOS33 [get_portspl_irq_lh]
set_property PACKAGE_PIN AP14 [get_ports pl_irq_ef]
set_property IOSTANDARD LVCMOS33 [get_portspl_irq_ef]
set_property PACKAGE_PIN AN14 [get_ports pl_irq_er]
set_propertyIOSTANDARD LVCMOS33 [get_ports pl_irq_er]
Vivado的图形化的模块设计,丰富的IP库,加上可以上天的智能连接。有点数字电路设计的基础,很快就能完成这个小设计。整个设计如下图。点赞!

软件设计
这里用到Xilinx针对Linux BSP开发的Petalinux。它基于Yocto,加入Xilinx的Layers实现硬件工程的导入,将复杂的Yocto的设计流程打包简化,支持一定的用户自定义功能,如QEMU仿真运行,增加out-of-tree的驱动,Device tree修改,应用程序编译打包,等等。这里简单展示一下具体的命令过程。
$petalinux-create -t project --template zynqMP -n zcu102-pl2ps_irq
$cd ./ zcu102-pl2ps_irq
$petalinux-config --get-hw-description
$petalinux-config -c kernel
Enable UIO_PDRV_GENIRQ driver
CONFIG_UIO=y
# CONFIG_UIO_CIF is not set
CONFIG_UIO_PDRV_GENIRQ=y
$petalinux-build -c device-tree
PL侧的dtsi文件生成与./components/plnx_workspace/device-tree-generation/pl.dtsi
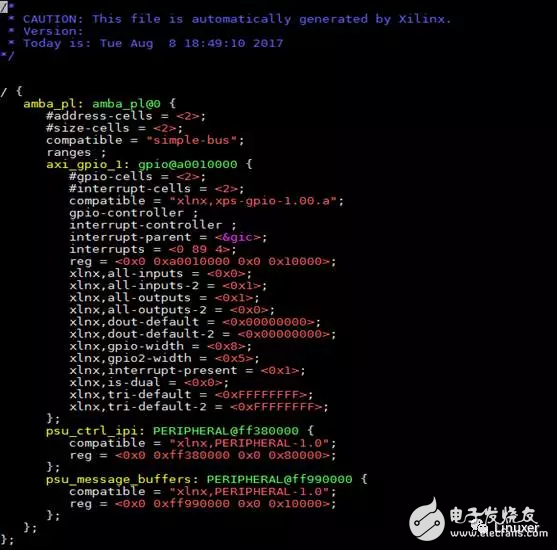
这里只有GPIO UIO。PIN UIO因为不是IP,所以相关信息无法由工具自动生成。所以要做如下修改,
1.修改GPIO UIO设备端点
a)将中断号改为93
b)将compatible改成“generic-uio” //我们后面要用Linux自带的UIO_PDRV_GENIRQ驱动
2.增加DIP UIO端点
a)将compatible改成“generic-uio”
b)依次设置中断值89到93
c)按照每个DIP PIN的interrupt trigger type设置属性值
*DTS里的中断号与硬件中断号有32的offset。
Petalinux提供了自定义DTS文件./project-spec/meta-user/recipes-bsp/device-tree/files/system-user.dtsi,将以上修改定义到system-user.dtsi.
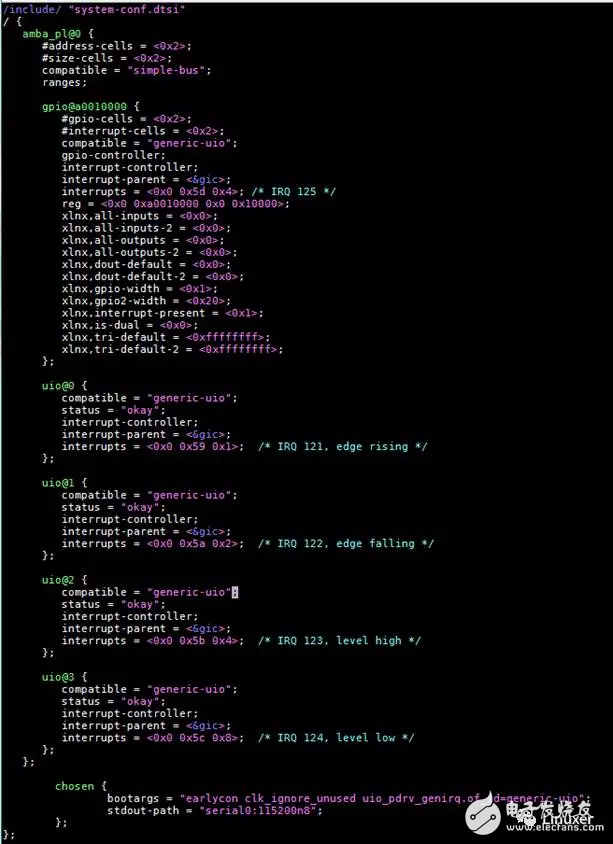
有两个方法来适配UIO端点和 UIO_PDRV_GENIRQ 驱动
1. bootargs use“uio_pdrv_genirq.of_id=generic-uio”,可以通过DTS定义。
2. insmod uio_pdrv_genirq.ko of_id=generic-uiowhen install the driver
修改完后,编译出Image.
$petalinu-build
$cd ./images/linux
$petalinux-package --boot--fsbl zynqmp_fsbl.elf --fpga --atf --pmufw --u-boot --force
将生成的BOOT.bin(bootloader)和image.ub(FIT uImage)拷贝到SD卡用于启动。
测试
这里引用下关于uio_pdrv_genirq驱动的介绍
https://01.org/linuxgraphics/gfx-docs/drm/driver-api/uio-howto.html
Using uio_pdrv_genirq for platform devices
Especially in embedded devices, you frequently find chips where the irq pin is tied to its own dedicated interrupt line. In such cases, where you can be really sure the interrupt is not shared, we can take the concept of uio_pdrv one step further and use a generic interrupt handler. That’s what uio_pdrv_genirq does.
The setup for this driver is the same as described above for uio_pdrv, except that you do not implement an interrupt handler. The .handler element of struct uio_info must remain NULL. The .irq_flags element must not contain IRQF_SHARED.
You will set the .name element of struct platform_device to "uio_pdrv_genirq" to use this driver.
The generic interrupt handler of uio_pdrv_genirq will simply disable the interrupt line using disable_irq_nosync(). After doing its work, userspace can reenable the interrupt by writing 0x00000001 to the UIO device file. The driver already implements an irq_control() to make this possible, you must not implement your own.
Using uio_pdrv_genirq not only saves a few lines of interrupt handler code. You also do not need to know anything about the chip’s internal registers to create the kernel part of the driver. All you need to know is the irq number of the pin the chip is connected to.
在结合驱动代码./drviver/uio/uio_pdrv_genirq.c)可知,每个UIO设备会有对应的/dev/uioX的设备节点。用户态驱动程序的读操作会阻塞直到UIO硬件中断发生。UIO的中断处理程序uio_pdrv_denirq_handler()会关闭该硬件中断。用户态驱动程序需要通过write函数来触发uio_pdrv_genirq_irqcontrol()以完成中断的使能和关闭。代码如下,
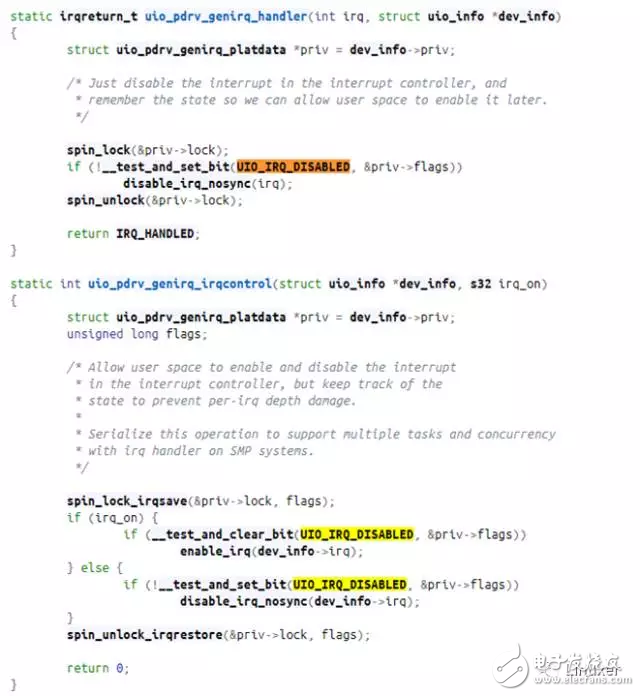
启动内核及加载uio_pdrv_genirq驱动

检查/proc/interrupts
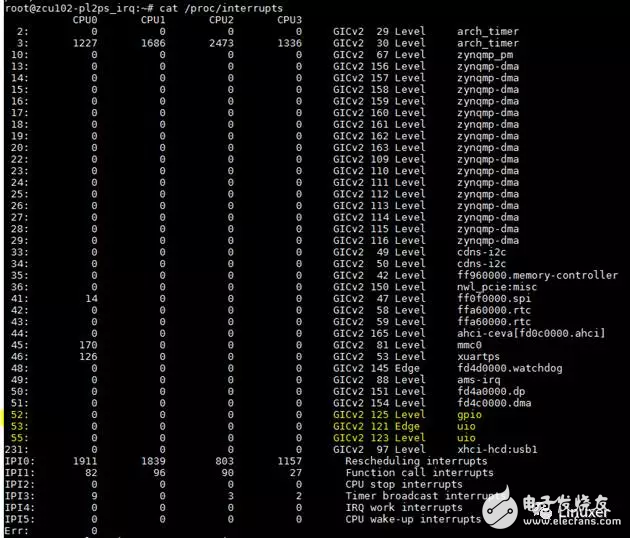
细心的你一定发现了一个坑,少了2个UIO中断(IRQ122和IRQ124),原来是硬件不支持Edge falling和Level Low的触发模式。kernel log如下。

测试DIP UIO方法一
通过拨动2个DIP,观察到
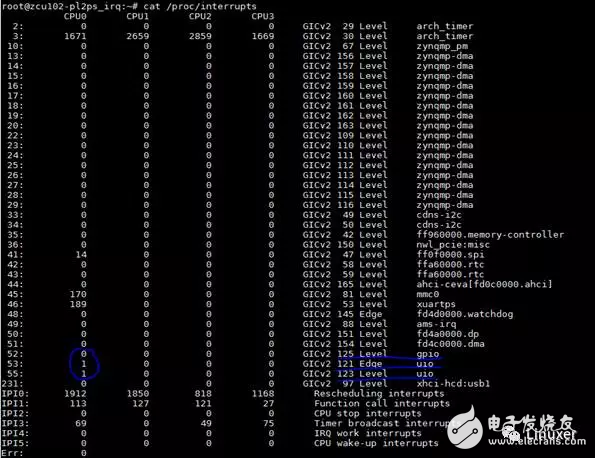
2个DIP中断发生了,可是不论怎么再拨动DIP开关,始终是1。上文铺过,这个中断在驱动的中断处理程序里会被关掉,需要通过应用程序调用write()来打开。这里有个easy way,使用万能的echo命令“echo 0x1 > /dev/uioX”,再配合DIP可以触发多次中断。
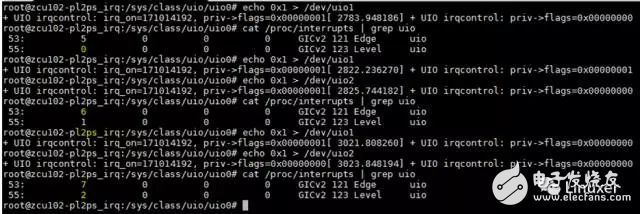
测试DIP UIO方法二
前面的方法比较low,这里有稍微高级的享受。写个简单的用户态驱动程序,上代码。
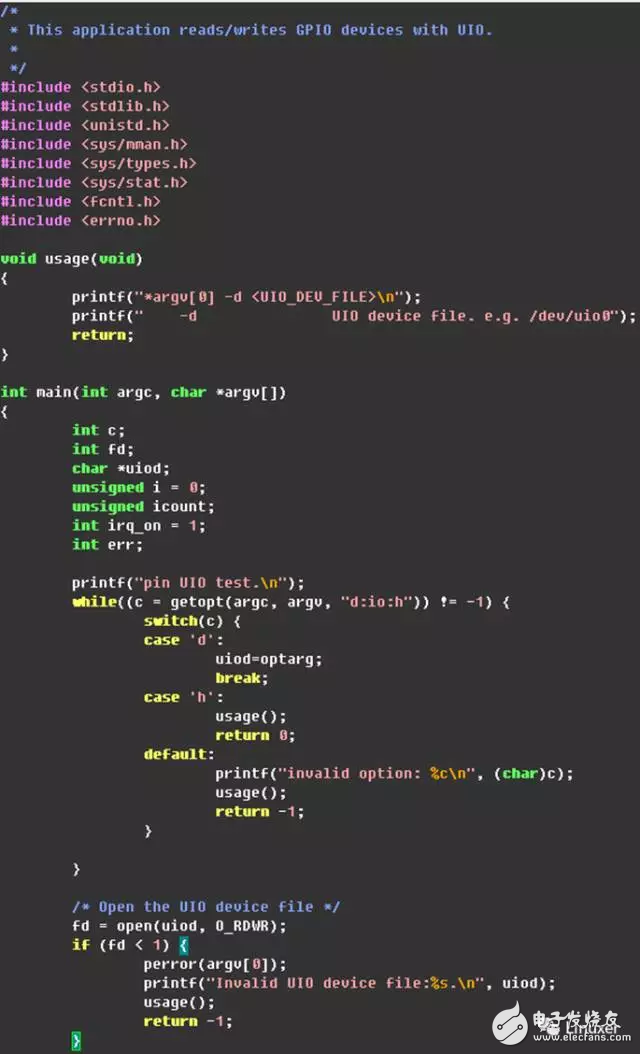
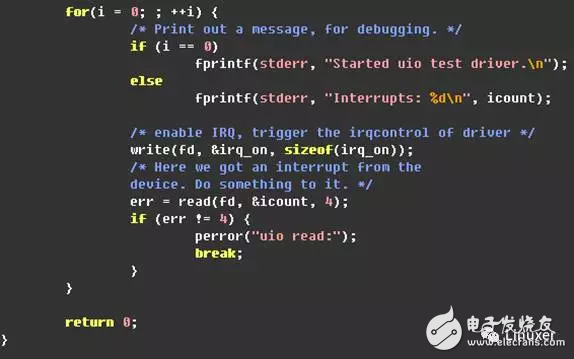
借助petalinux提供的交叉编译工具编译出bin文件,拷贝到启动SD卡。
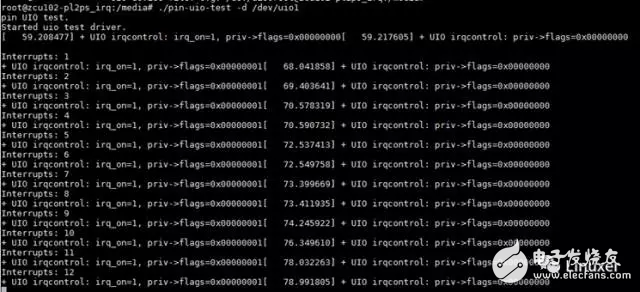
运行测试程序并配合DIP开关进程测试。(为了更好的体现测试运行情况,在UIO内核驱动里增加了irqcontrol的调用打印)
测试GPIO UIO
This test application mmap out the registers fromhardware to user space. Then enable all the IRQ bits in GIER and IP_IERregisters and dump out all the registers’ values. Please refer topg144-axi-gpio.pdf for the IP.
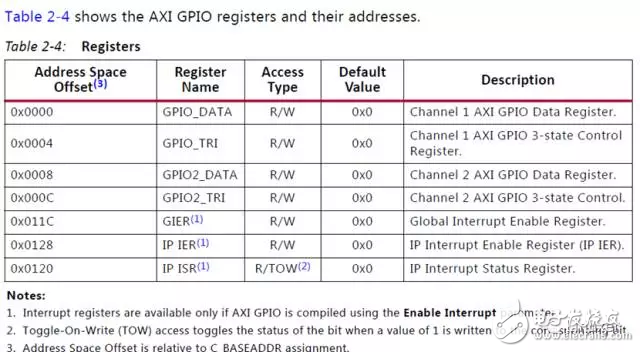
UIO驱动会将设备内存(寄存器)空间枚举出来,由用户态驱动程序通过mmap导出进行读写控制。参见AXI_GPIO IP的文档pg144-axi-gpio.pdf,其寄存器如下。
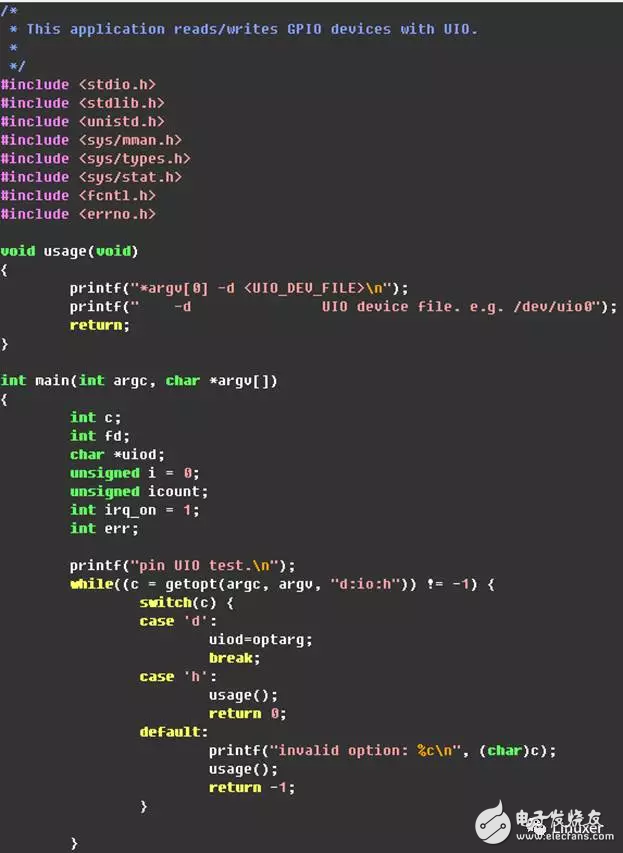
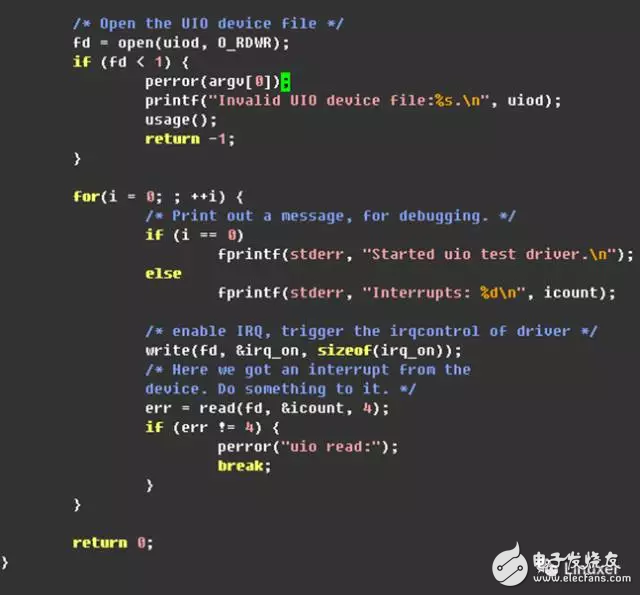
测试应用程序会通过设置GIER和IP_IER来使能中断。上代码。
测试过程
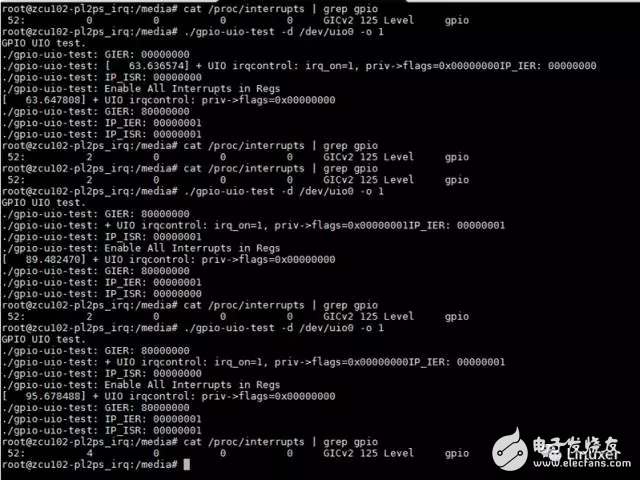
或许你觉得这么贴图代码不厚道而不能施展复制黏贴大法,可不知我拙与WORD,没try出好排版。莫急莫急,这里有GIT,https://gitenterprise.xilinx.com/AlexHe/UIO_Linux_Demo
硬件资源文件和Image,测试代码一个都不能少,统统献上。
实验结论
UIO这种可高度自定义的设备结合Xilinx的MPSoC可以实现非常灵活的应用。Xilinx提供的完备的工具集,给用户带来了高效的开发体验。本例虽然简单,但Xilinx所推崇的All Programming的概念和实际的FPGA加速应用的的确确是建立在这些软硬件协同技术之上。
作者简介:
何晔:做过学生也做过老师又做了学生后错入了IT门。接触linux也有十来个年头,辗转于各种驱动开发,无一精通。在AMD就职期间,曾提交过少量的xHCI和ACPI的patch,算是在linux内核留下点印记。现就职于Xilinx,从事与嵌入式FPGA的应用支持。FPGA的使用经验满打满算也不过半年,斗胆写下此篇分享一下经验,也是自己一个小小设计的总结。其中谬误,望指正并谅解。
参考文献
The Userspace I/O HOWTO https://01.org/linuxgraphics/gfx-docs/drm/driver-api/uio-howto.html
[Xilinx]
[1] UG1182 - ZCU102 Board User Guide
[2] UG1085 - Zynq UltraScale+ MPSoC Technical Reference Manual
[3] UG1144 - PetaLinux Tools Documentation: Reference Guide
[4] UG940 - Vivado Design Suite Tutorial: Embedded Processor HardwareDesign
[5] PG144 - AXI GPIO v2.0 Product Guide
-
异构多处理器产品系列在嵌入式评估板上实现2018-02-26 8691
-
ZCU102许可证凭证是否涵盖所有ZCU102版本2019-01-02 3840
-
Zynq UltraScale + MPSoC USB 3.0 CDC器件类设计2019-01-03 7613
-
请问Zynq Ultrascale + MPSOC本身是否存在问题?2019-10-14 2974
-
ZCU102评估板提供设计文件吗?2020-05-12 3907
-
在Xilinx ZCU102评估套件上启用NVMe SSD接口2020-09-03 6688
-
如何使用ZCU102评估板来运行应用2021-12-23 1405
-
Zynq UltraScale+ MPSoC ZCU102评估套件解决方案2018-07-04 9436
-
Zynq UltraScale+ MPSoC 上的多个Linux UIO设计2018-03-21 3673
-
针对Linux BSP开发的Petalinux,如何实现硬件工程导入2018-02-27 18624
-
Zynq UltraScale+ MPSoC的ZCU102开发套件的开发流程2018-11-27 5488
-
在Xilinx ZCU102评估套件上实现NVMe SSD接口2020-06-28 8294
-
在ZCU102评估套件上实现NVMe SSD接口的解决方案2022-11-28 3678
-
zcu102和zcu104有什么区别2024-01-04 5553
-
AMD/Xilinx Zynq® UltraScale+ ™ MPSoC ZCU102 评估套件2024-11-20 2424
全部0条评论

快来发表一下你的评论吧 !

