

利用eclipse连接数据库
编程实验
描述
利用eclipse连接数据库
第一步:先下载mysql
网址是:https://dev.mysql.com/downloads/installer/
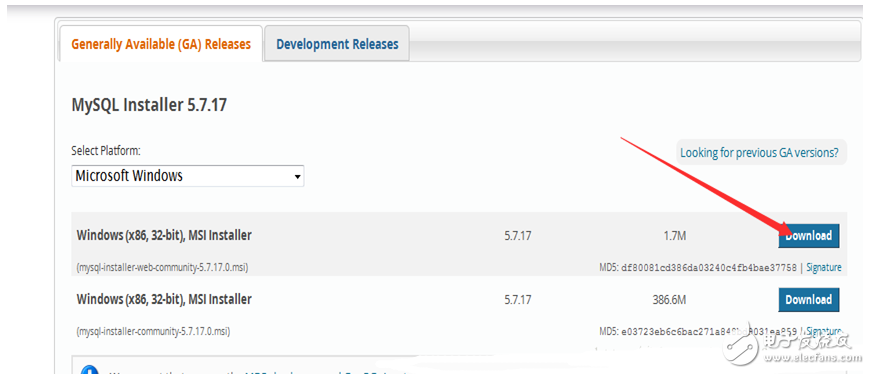
第二步:下载完成后就可以安装了
1.双击下载的mysql-installer-web-community-5.7.17.0.msi文件
进行安装。
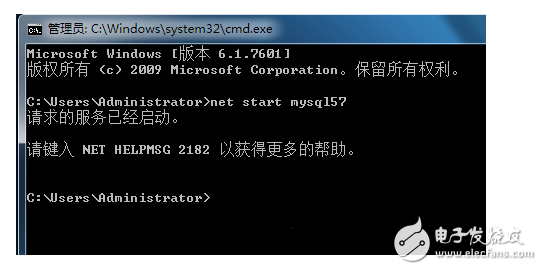
2.安装过后打开cmd输入net srart mysql57
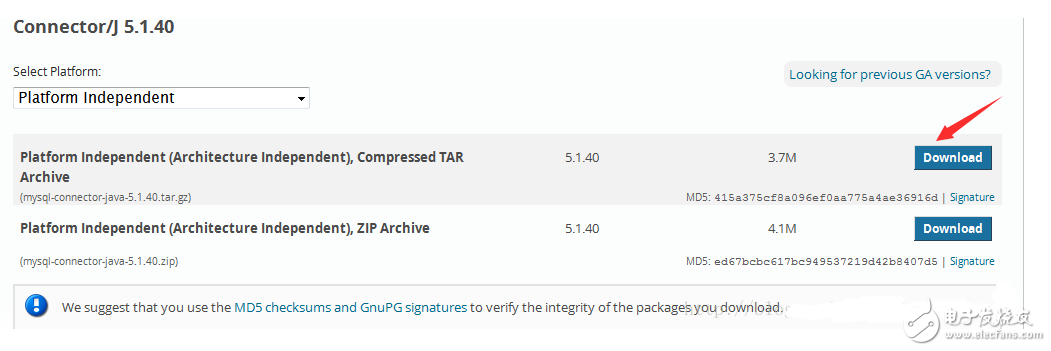
第三步:下载jdbc
1.这是下载jdbc的网址:https://www.mysql.com/products/connector/
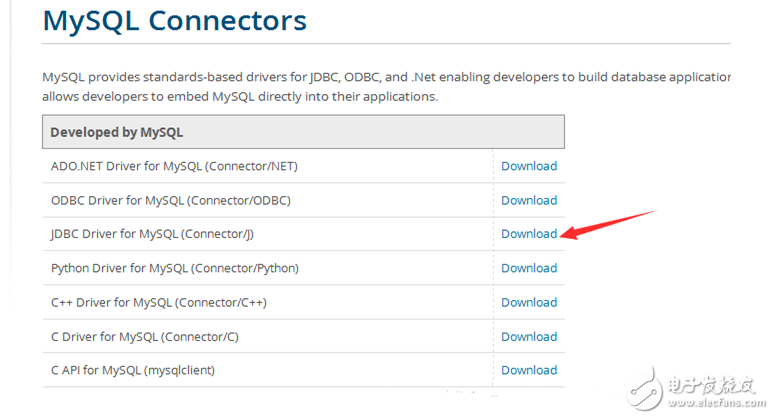
2.
第四步:下载成功后这里就要使用eclipse连接数据库了
1.Window-preferences-java-Build Path-User Libraries
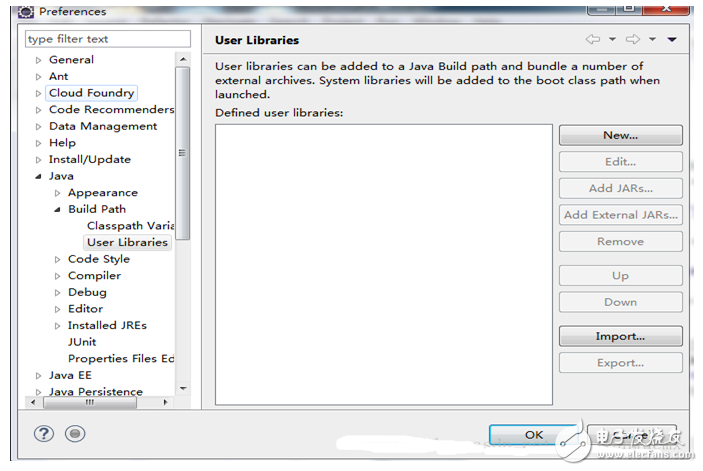
2.点击右侧的new按钮,
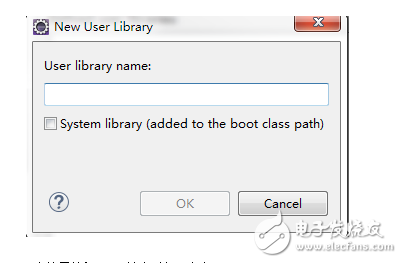
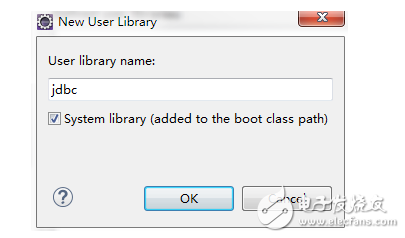
3.在这里输入jdbc,选中对勾,点击ok
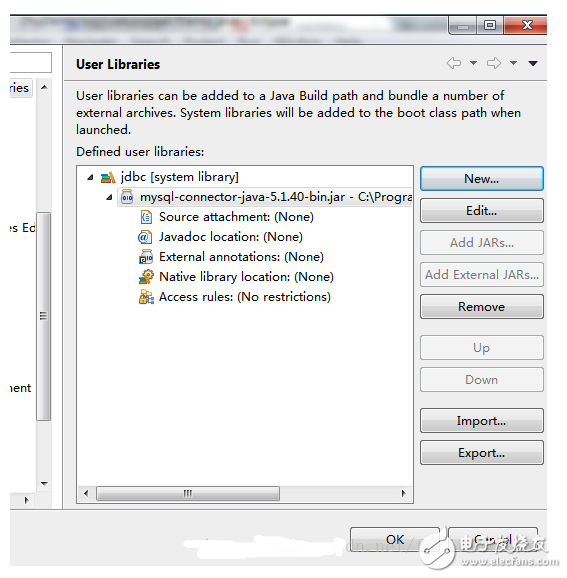
4.回到上一级界面,点击Add External JARs,打开到你的jdbc存放的目录,打开-ok。
5.接下来是项目导入jar包,项目右键-Build Path-Configure Build Path
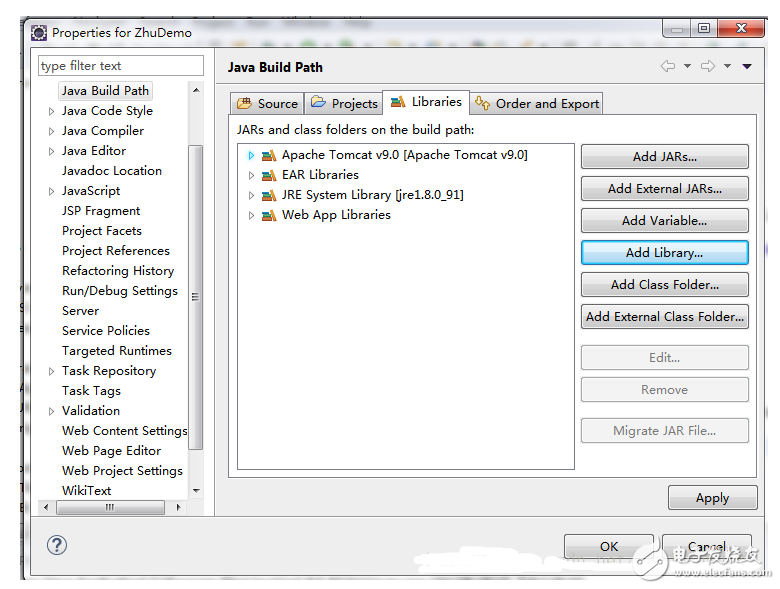
6.点击右侧Add Library… -User Library-Next。打上对勾点击finish

7.回到上一级界面就可以看到你添加的jdbc,点击Apply再点击ok。
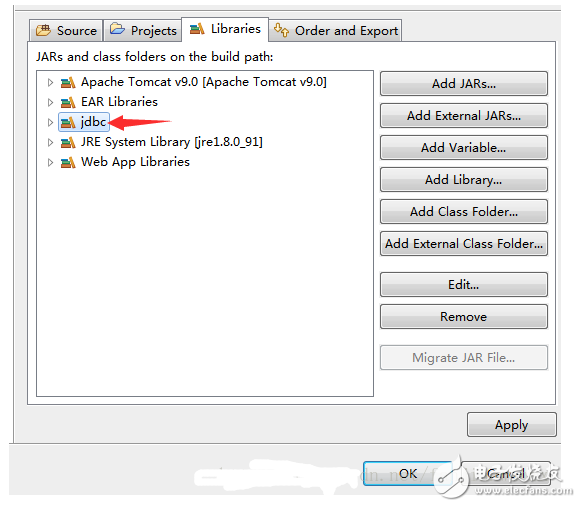
8.这样在你的项目下就可以看到你导入的jdbc了

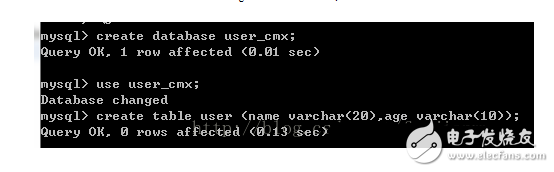
第五步就是利用cmd打开mysql创建一个表
1.打开cmd输入mysql -uroot -p123456
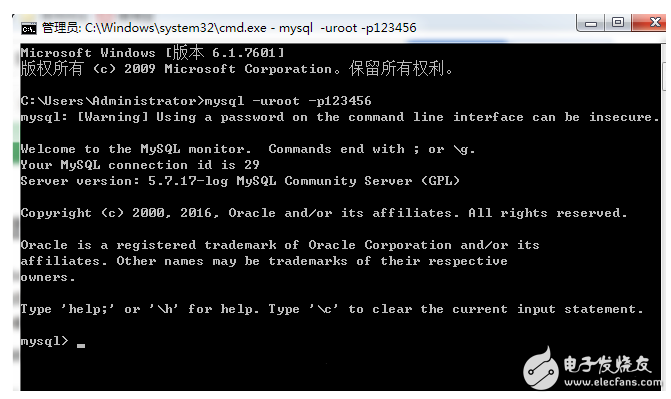
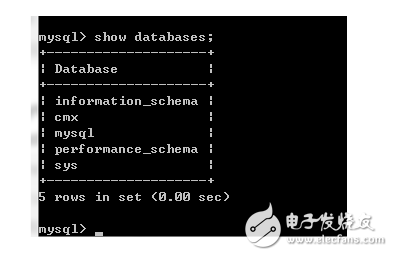
2.然后再输入show databases;
这里记着一定要加分号;英文状态下的分号。
3.创建一个数据库
create database user_cmx;
创建一个表
use user_cmx;
为数据库表添加字段
create table user(name varchar(20),age varchar(10));
第六步:创建完成后,我们就可以使用eclipse连接数据库了。
最后一步就是我们的代码了
import java.sql.Connection;
import java.sql.DriverManager;
import java.sql.PreparedStatement;
import java.sql.ResultSet;
import java.sql.ResultSetMetaData;
import java.sql.SQLException;
import java.util.ArrayList;
import java.util.HashMap;
import java.util.List;
import java.util.Map;
public class Demo {
// 加载数据库驱动 com.mysql.jdbc.Driver
private static String dbdriver = “com.mysql.jdbc.Driver”;
// 获取mysql连接地址
private static String dburl = “jdbc:mysql://127.0.0.1:3306/cmxDatabaseName?&useSSL=false”;
// 数据名称
private static String username = “root”;
// 数据库密码
private static String userpassword = “123456”;
// 获取一个数据的连接
public static Connection conn = null;
// 获取连接的一个状态
public static void main(String[] args) throws SQLException {
List《List《Object》》 x = getData(“user_cmx”,
“select name,age from user”);
System.out.println(“x=” + x);
}
/**
* 获取数据库连接
*
* @param myProjName
* @return
*/
private static Connection getConn(String myProjName) {
Connection conn = null;
try {
Class.forName(dbdriver);
String myjdbcUrl = dburl.replace(“cmxDatabaseName”, myProjName);
conn = DriverManager.getConnection(myjdbcUrl, username, userpassword);
} catch (ClassNotFoundException e) {
e.printStackTrace();
} catch (SQLException e) {
e.printStackTrace();
}
return conn;
}
/**
* 关闭数据库连接
*
* @param rs
* @param ps
* @param conn
*/
private static void closeAll(ResultSet rs, PreparedStatement ps,
Connection conn) {
if (rs != null) {
try {
rs.close();
} catch (SQLException e) {
e.printStackTrace();
}
}
if (ps != null) {
try {
ps.close();
} catch (SQLException e) {
e.printStackTrace();
}
}
if (conn == null)
return;
try {
conn.close();
} catch (SQLException e) {
e.printStackTrace();
}
}
/**
* 查表,返回行的列表,每个列表中包含列的列表。
*
* @param ProjName
* @param sql
* @return
*/
public static List《List《Object》》 getData(String ProjName, String sql) {
Connection conn = getConn(ProjName);
PreparedStatement ps = null;
List《List《Object》》 list = new ArrayList《List《Object》》();
ResultSet rs = null;
try {
ps = conn.prepareStatement(sql);
rs = ps.executeQuery();
ResultSetMetaData md = rs.getMetaData();
int columnCount = md.getColumnCount();
while (rs.next()) {
List《Object》 lst = new ArrayList《Object》();
for (int i = 1; i 《= columnCount; ++i) {
lst.add(rs.getObject(i) == null ? “” : rs.getObject(i));
}
list.add(lst);
}
} catch (SQLException e) {
e.printStackTrace();
} finally {
closeAll(rs, ps, conn);
}
return list;
}
}
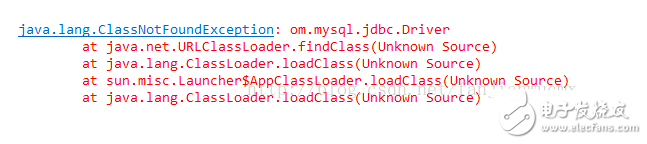
这里的dbdriver和dburl一定要写正确。如果驱动名称dbdriver写错会报一个异常,加入我少写了一个单词字母,异常如下
如果我的dburl出错了,会抛出以下异常

如果是dburl的最后“?&useSSL=false”没有写的话会报出一个警告,如下:

警告全部内容:
Sun Feb 05 17:15:15 CST 2017 WARN: Establishing SSL connection without server’s identity verification is not recommended. According to MySQL 5.5.45+, 5.6.26+ and 5.7.6+ requirements SSL connection must be established by default if explicit option isn’t set. For compliance with existing applications not using SSL the verifyServerCertificate property is set to ‘false’。 You need either to explicitly disable SSL by setting useSSL=false, or set useSSL=true and provide truststore for server certificate verification.
好了,到这里我们的数据库就连接成功了。
-
labview连接数据库不成功2013-12-21 3287
-
数据库连接2014-06-29 3914
-
建立与数据库的连接2014-07-01 2917
-
如何实现自动连接数据库2014-10-24 4695
-
labview连接数据库2015-12-13 3550
-
LABVIEW连接数据库如何处理并发竞争问题?2016-12-20 3449
-
lab view 连接数据库 access2017-09-20 6484
-
连接数据库时报错2019-04-12 2336
-
linux连接数据库的命令格式2019-07-15 1326
-
数据库连接问题2020-07-07 4058
-
JAVA教程之Servlet中连接数据库2016-04-13 1072
-
MFC用ADO连接数据库2017-01-14 742
-
jdbc连接数据库的五个步骤2018-02-05 31041
-
python读取数据库数据 python查询数据库 python数据库连接2023-08-28 3399
-
eclipse怎么连接数据库mysql2023-12-06 2278
全部0条评论

快来发表一下你的评论吧 !
