

ZPC显控一体机,精彩不止一面!
描述
显控一体机的应用,有很多场景会遇到自带显示屏固定不灵活、尺寸不够大等问题。扩展屏幕便是一个很好的解决方案!本文将带您解锁ZPC显控一体机的“多面精彩”。
 ZPC简介
ZPC简介
ZPC系列显控一体机 是广州致远电子全新研发的集“显示”+“控制”一体化的高性能显控终端产品。外框采用铝合金材质,简洁耐用;产品集成了多路隔离RS485、多路隔离CAN总线、多路千兆以太网等丰富外设。支持多种工业通信协议,工业互联超便捷!支持拖拽式开源AWTK GUI,版权无忧!支持AWFlow流图编程,应用开发很简单!还支持ZWS云,数据上云很轻松!更有HDMI输出4K@60fps显示,配合自带的10.1英寸高清屏可实现双屏异显,精彩不止一面!
ZPC系列显控一体机
• RK3568处理器
• 显控一体机
• 国产显控
• 工业自动化
 背景说明
背景说明
显控一体机的应用中,一般的场景下自带的显示屏即可满足。不过也有很多使用场景局限于自身屏幕固定不灵活、尺寸不够大等,得不到更好的使用。假如显控一体机也支持屏幕扩展,那这个问题将会迎刃而解。致远电子全新研发的ZPC显控一体机便具有该功能。
ZPC自身携带一块10.1英寸1280*800高分辨率屏幕,同时支持HDMI扩展输出4K@60fps画面,双屏同显、双屏异显都可以轻松拿捏。
双屏同显
插入HDMI外扩屏幕后,执行以下指令,将显示设置为双屏同显。双屏同显情况下两个显示屏会显示一样的内容,可以用于设备屏幕损坏临时调试,或需要外接显示器时使用。
xrandr --output HDMI-1 --auto --same-as LVDS-1
双屏异显
插入HDMI外扩屏幕后,执行以下指令,将显示设置为双屏同显。双屏同显情况下两个显示屏会显示不同的内容,默认情况下,HDMI显示屏会位于ZPC自带屏幕的右边,此时触摸屏无法直接操作HDMI屏幕内容,需要外接鼠标进行操作。
xrandr --output HDMI-1 --auto --right-of LVDS-1
双屏异显模式下支持右侧、左侧、上方、下方四种模式,设置方式分别如下:
/* 右侧异显 */xrandr --output HDMI-1 --right-of LVDS-1 --auto/* 左侧异显 */xrandr --output HDMI-1 --left-of LVDS-1 --auto/*上方异显 */xrandr --output HDMI-1 --above LVDS-1 --auto/* 下方异显 */xrandr --output HDMI-1 --below LVDS-1 --auto
配置修改
可以通过修改/vendor/scripts/setup-dual-display.sh,修改默认HDMI的规则来达成,修改DIFF_DIS的值即可。如果要修改异显模式,也可以按照下方示例修改。
#!/bin/bash
export DISPLAY=:0export XAUTHORITY=/home/zlg/.Xauthority
DIFF_DIS=1 #为1是为双屏异显,为其他值时为双屏同显
status=$(cat /sys/class/drm/card0-HDMI-A-1/status)if [ "$status" == "disconnected" ];then echo "HDMI disconnected"else HDMI_OUTPUT=$(xrandr | grep " connected " | grep "HDMI" | awk '{ print $1 }') if [ "${DIFF_DIS}" = "1" ];then xrandr --output ${HDMI_OUTPUT} --auto --right-of LVDS-1 #如果需要修改异显模式,修改此处即可 else xrandr --output ${HDMI_OUTPUT} --same-as LVDS-1 --auto fi echo "HDMI connected"fi
xinput map-to-output ns2009_ts LVDS-1
异显实例
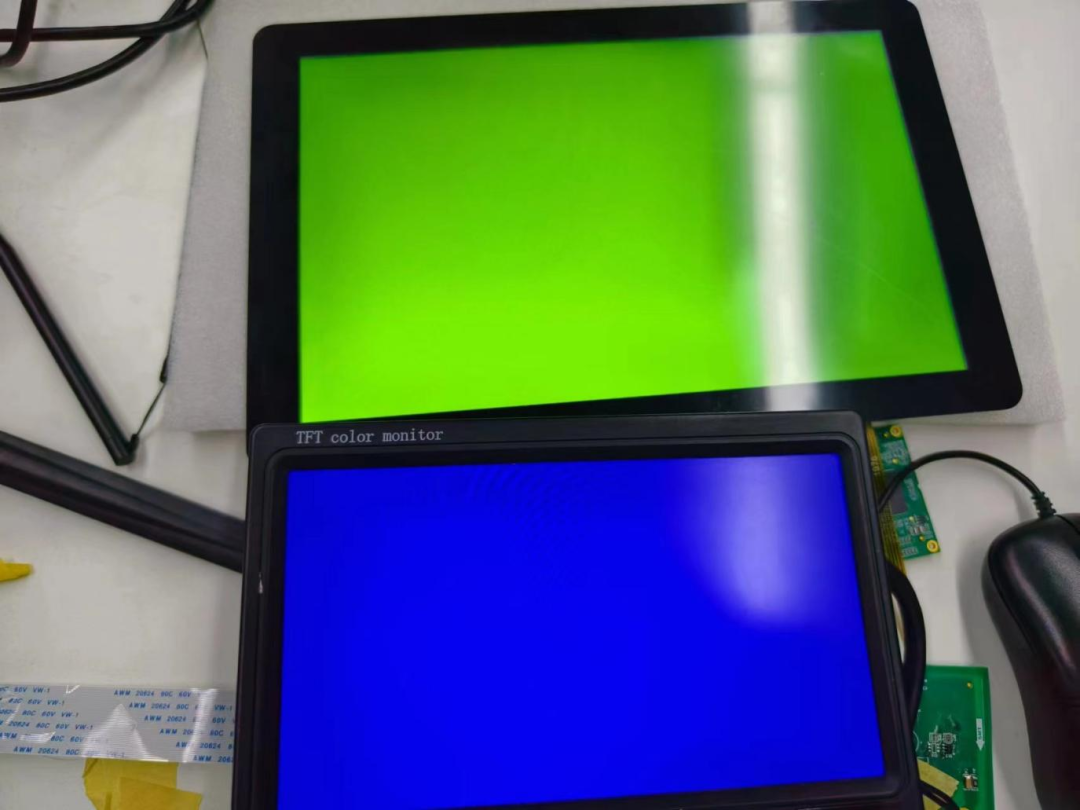
在Debian系统下通常使用X11窗口框架进行编程,以下是一个异显(右侧)的示例,在ZPC主屏上显示绿色全屏窗口,在HDMI副屏上显示蓝色全屏窗口。代码如程序清单1所示。
其中,窗口管理需要借助wmctrl工作进行,需要在zpc一体机上安装wmctrl工具。
程序清单1 测试程序清单
[root@zpc:~]# apt update[root@zpc:~]# apt install -y wmctrl#include #include #include #include #include #include // create_window: 创建窗口Window create_window(Display *display, int screen, int x, int y, unsigned long background, int width, int height) { Window window; XSetWindowAttributes attributes; attributes.background_pixel = background; window = XCreateWindow( display, RootWindow(display, screen), x, y, width, height, 0, CopyFromParent, InputOutput, CopyFromParent, CWBackPixel, &attributes ); XMapWindow(display, window); XFlush(display); return window;}// set_window_pos:设置窗口位置void set_window_pos(Window window, int x, int y){ char command[256]; snprintf(command, 256, "wmctrl -i -r 0x%lx -e 0,%d,%d,-1,-1", (unsigned long) window, x, y); system(command);}// set_window_fullscreen:设置窗口为全屏模式void set_window_fullscreen(Window window){ char command[256]; system(command); snprintf(command, 256, "wmctrl -ir 0x%lx -b add,fullscreen", (unsigned long) window); system(command);}int main() { Display *display; int screen; Window root; Window window1, window2; XRRScreenResources *res; XRROutputInfo *info; XRRCrtcInfo *crtc_info; int num_outputs; int screen_width, screen_height; // 获取X dispay display = XOpenDisplay(NULL); if (display == NULL) { fprintf(stderr, "Unable to open X display\n"); exit(1); } // 获取screen,注意这里两个显示器都位于同一screen下 screen = DefaultScreen(display); // 获取根窗口,也就是桌面 root = RootWindow(display, screen); // 获取屏幕资源个数,对应显示器个数 res = XRRGetScreenResources(display, root); num_outputs = res->noutput; if (num_outputs < 2) { fprintf(stderr, "Less than 2 screens detected\n"); XCloseDisplay(display); exit(1); } // 获取第一个显示器的CrtcInfo info = XRRGetOutputInfo(display, res, res->outputs[0]); crtc_info = XRRGetCrtcInfo(display, res, info->crtc); screen_width = crtc_info->width; screen_height = crtc_info->height; printf("first screen width = %d, screen height = %d\n", screen_width, screen_height); // 在第一个显示器上创建窗口,并显示绿色 window1 = create_window(display, screen, 0, 0, 0x00ff00, screen_width, screen_height); // 获取第二个显示器的CrtcInfo info = XRRGetOutputInfo(display, res, res->outputs[1]); crtc_info = XRRGetCrtcInfo(display, res, info->crtc); screen_width = crtc_info->width; screen_height = crtc_info->height; printf("second screen width = %d, screen height = %d\n", screen_width, screen_height); // 在第二个显示器上创建窗口并显示蓝色 // 但此时两个窗口会被窗口管理器叠加到主显示器 window2 = create_window(display, screen, crtc_info->x, crtc_info->y, 0x0000ff, screen_width, screen_height); // 将第二个窗口定位到HDMI显示屏 set_window_pos(window2, crtc_info->x, crtc_info->y); // 将两个窗口设置为全屏 set_window_fullscreen(window1); set_window_fullscreen(window2); // 保持应用程序运行 while (1) { sleep(1); } XCloseDisplay(display); return 0;}
将程序清单1保存为main.c,并在Ubuntu(主机或虚拟机)上安装对应库并进行编译。
host$ sudo apt install x11-xserver-utils:arm64 libx11-dev:arm64 host$ aarch64-linux-gnu-gcc -o dual_screen main.c -lX11 -lXrandr
将编译出来的测试程序dual_screen拷贝到ZPC一体机上,并执行测试。测试结果如下图所示。
-
触拓(CHUTO)户外广告一体机,无惧酷暑全天候在线# 触拓 #户外触摸一体机深圳市触拓科技有限公司 2026-04-08
-
触控一体机与毛绒玩具的联动,也太可爱了吧 # 触控一体机# 瑞芯微# RK3568 #工控一体机 #联动瑞迅科技 2025-02-14
-
ZPC是如何轻松拿捏严苛工况的?2024-09-06 1196
-
一文搞懂用ZPC轻松拿捏数据上云2024-09-05 2038
-
一文教你在ZPC上快速移植AWTK2024-09-04 1208
-
聚徽触控-工控一体机和 PLC 一体机有什么不同2024-06-21 2119
-
集特一体机jf_67464575 2024-05-22
-
人脸考勤打卡一体机jf_66410442 2024-01-09
-
工业平板电脑-工业一体机-微嵌7寸无壳触摸一体机jf_91874718 2023-07-05
-
扬宇光电人脸测温一体机jf_22764069 2023-06-27
-
嵌入式触摸一体机2014-04-09 4635
-
HDTV的一体机与分体机的区别2009-05-24 3566
全部0条评论

快来发表一下你的评论吧 !
