

树莓派项目实战:车牌识别系统开发全记录!
描述
介绍
本项目的目标是设计一个基于树莓派微电脑的自动车牌识别系统,用于控制停车场的道闸。
为什么?
我有一台闲置的树莓派,没有参与任何项目,还有一台摄像头,以及一个潜在的问题点——办公室停车场没有自动化的道闸控制系统。那么,为什么不利用这些设备来做一个有趣的项目呢?
本项目的目的并不是要创建一个生产就绪、稳定且具有竞争力的解决方案,而是要在使用有限设备解决实际问题的过程中享受乐趣,并创建一个可工作的产品。之后,还可以进一步优化这个解决方案,使其在轻量级边缘设备上运行得更快。
总体思路是使用树莓派摄像头以一定频率拍照,处理图像,检测车牌,识别字符,并与数据库中的允许车牌列表进行比较。如果匹配,道闸将打开。
在基础阶段,我们将使用以下工具:
图像源:树莓派摄像头模块v2
车牌检测器:使用PyTorch的YOLO v7
光学字符识别(OCR):EasyOCR
“数据库”:Google表格中的表格
所有处理任务和计算都应在树莓派4B上本地执行,解决方案必须能够自主运行。
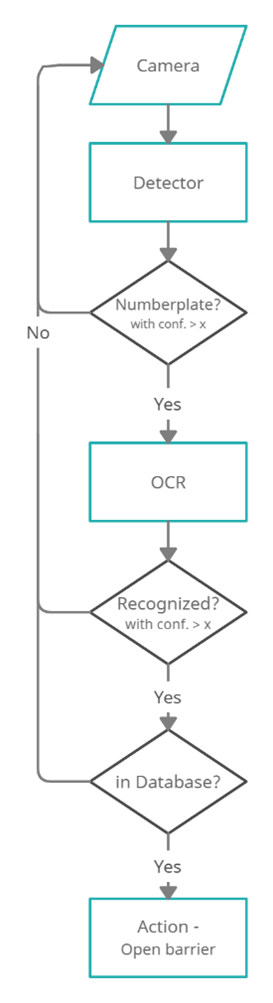
基础版本的简化流程图
树莓派将“近乎实时”地从摄像头连续读取帧。然后,使用在自定义数据集上微调的YOLOv7模型检测车牌区域。之后,如果需要,对图像进行预处理,然后EasyOCR模型将从裁剪后的帧中检测车牌号码。然后检查车牌字符串是否与“数据库”中存储的任何车牌匹配,并执行相应的操作。使用树莓派的GPIO(通用输入输出)控制的继电器开关,我们可以连接停车道闸和任何附加负载,如灯光等。
GPIO引脚还允许连接输入传感器(如红外、被动红外传感器),并在检测到车辆时触发摄像头。
再次强调,这个问题可以通过多种方式解决,也许其中一些方式在某些要求和使用场景下会更高效、更简单。例如,所有繁重的处理都可以在云端进行;我们可以使用基于GPU的边缘设备;可以使用其他模型;使用ONNX、TFLite等进行部署。但这个项目是作为一个实验来完成的,使用的是我目前拥有的设备,而且我并没有寻找简单的方法。
环境设置
硬件设计
必要的硬件:
摄像头:树莓派摄像头模块v2
边缘设备:树莓派4 Model B 4GB
SD卡(>8GB)
电源:5V 3A USB-C
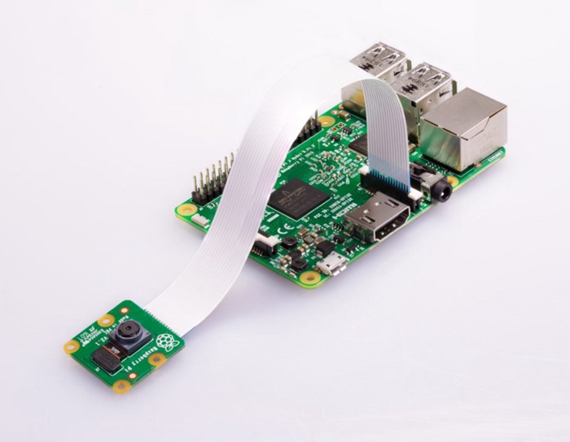
开始时的设备:带摄像头模块的树莓派
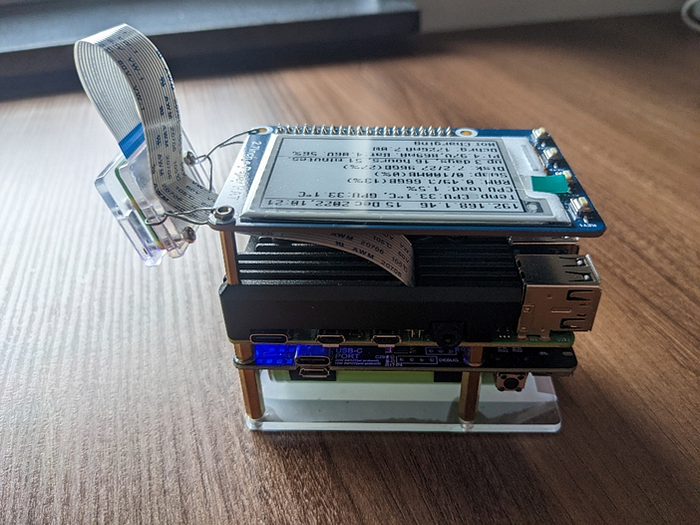
附加设备:
散热片、散热风扇
UPS
显示器
继电器/树莓派HAT:用于控制外部设备(道闸)
摄像头支架(“独特的金属线支架” )
*最好使用具有合适刷新时间的TFT或OLED屏幕,但当时我只有这个。
进行中的设备:带散热外壳的树莓派 + 摄像头模块V2 + UPS + 电子墨水屏
设置步骤
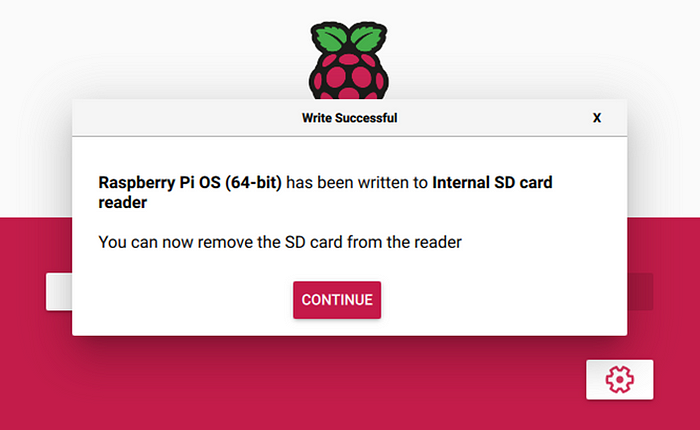
由于我决定使用PyTorch构建解决方案,而PyTorch只提供Arm 64位(aarch64)的pip包,因此我们需要安装64位的操作系统(Debian版本:11——“Bullseye”)。最新的arm64树莓派操作系统可以从官方网站下载,并通过rpi-imager安装。
完成安装后,应该如下所示:
将SD卡插入树莓派并启动后,应进行以下调整:
编辑/boot/config.txt文件以启用摄像头。
# This enables the extended features such as the camera.start_x=1# This needs to be at least 128M for the camera processing, if it's bigger you can just leave it as is.gpu_mem=128# You need to commment/remove the existing camera_auto_detect line since this causes issues with OpenCV/V4L2 capture.#camera_auto_detect=1
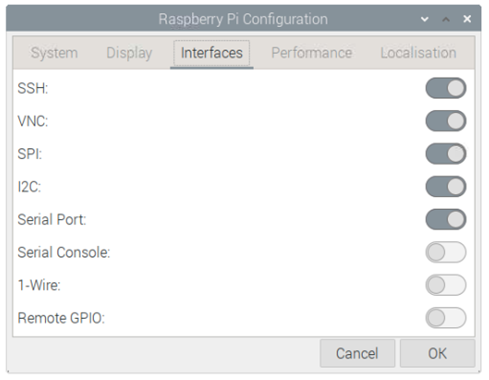
此外,你可能还需要通过raspi-config或GUI启用I2C、SSH和VNC。
树莓派配置设置如下:
安装依赖
我使用了Python 3.9和3.10版本,据报道,在某些情况下3.11版本的速度明显更快,但目前还没有稳定的PyTorch 3.11版本。
通过pip包管理器使用requirements.txt文件安装所有必要的库和模块:
matplotlib>=3.2.2numpy>=1.18.5opencv-python==4.5.4.60opencv-contrib-python==4.5.4.60Pillow>=7.1.2PyYAML>=5.3.1requests>=2.23.0scipy>=1.4.1torch>=1.7.0,!=1.12.0torchvision>=0.8.1,!=0.13.0tqdm>=4.41.0protobuf<4.21.3tensorboard>=2.4.1pandas>=1.1.4seaborn>=0.11.0easyocr>=1.6.2
如果你是手动安装或在现有环境中实现(请不要这样做 :) ),请注意当前OpenCV版本存在一些问题,为了正常工作,我们需要安装精确版本4.5.4.60。
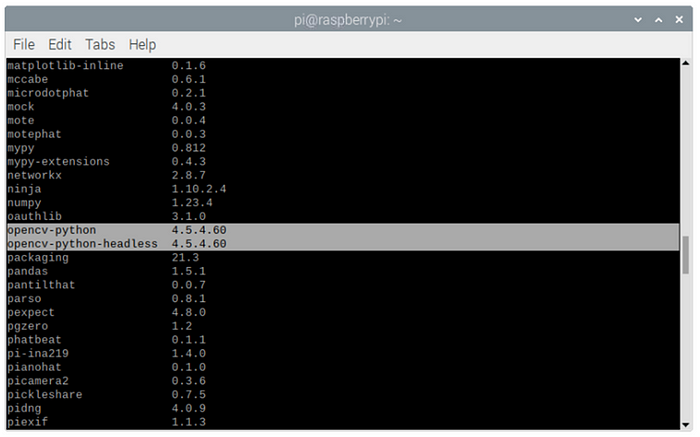
你可以使用pip list检查是否已正确安装所有包:
好了,我们已经设置了硬件和环境,现在可以开始编码了。
软件设计
图像捕获
对于图像捕获,我们将使用OpenCV来流式传输视频帧,而不是使用标准的picamera库,因为它在64位操作系统上不可用,而且速度较慢。OpenCV直接访问/dev/video0设备来捕获帧。
自定义的OpenCV摄像头读取简单包装器:
class PiCamera(): def __init__(self, src=0, img_size=(640,480), fps=36, rotate_180=False): self.img_size = img_size self.fps = fps self.cap = cv2.VideoCapture(src) #self.cap.set(cv2.CAP_PROP_BUFFERSIZE, 1) #self.cap.set(cv2.CAP_PROP_FPS, self.fps) self.cap.set(cv2.CAP_PROP_FRAME_WIDTH, self.img_size[0]) self.cap.set(cv2.CAP_PROP_FRAME_HEIGHT, self.img_size[1]) self.rotate_180 = rotate_180 def run(self): # read the frame ret, image = self.cap.read() if self.rotate_180: image = cv2.rotate(image, cv2.ROTATE_180) if not ret: raise RuntimeError("failed to read frame") return image
这里我使用image = cv2.rotate(image, cv2.ROTATE_180)是因为摄像头是倒置安装的。
缓冲区大小和FPS设置可以用于修复延迟并正确对齐帧流。但在我的情况下,它们不起作用,因为这取决于摄像头制造商和用于读取帧的后端。
一旦摄像头捕获到图像,我们就需要处理它,从车牌检测开始。
车牌检测模块
对于这个任务,我将使用YOLOv7的预训练模型,并在自定义车牌数据集上进行微调。
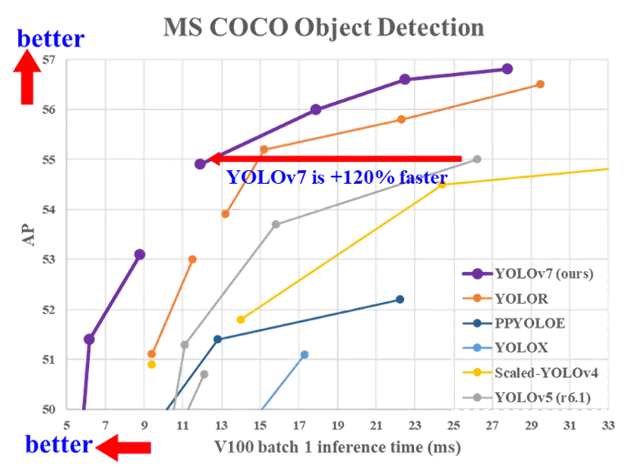
YOLOv7是目前在准确性和速度方面最先进的实时物体检测算法。它在COCO数据集上进行了预训练。
你可以在论文中阅读有关该算法的详细信息:YOLOv7:可训练的自由目标集为实时目标检测器树立了新的行业标准。https://arxiv.org/abs/2207.02696
YOLOv7基准测试如下:
从官方仓库克隆YOLOv7仓库。
git clone https://github.com/WongKinYiu/yolov7.gitcd yolov7
YOLO的要求已经包含在我们之前安装的项目要求中。
对于微调,我将使用预训练的YOLOv7 tiny版本,图像大小为640。
#Download pre-trained weights!wget https://github.com/WongKinYiu/yolov7/releases/download/v0.1/yolov7-tiny.pt
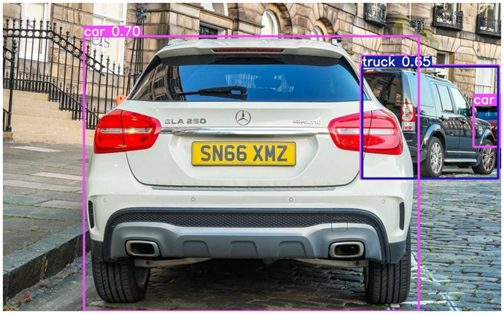
默认预训练物体检测:默认yolov7-tiny检测到的物体,标准COCO数据集类别
车牌检测模型训练
在自定义数据集上训练模型非常简单直接。
我将在Google Colab上使用一些不错的GPU进行模型微调。
在开始之前,我们需要创建并标注一个只包含一个车牌类别的适当数据集。
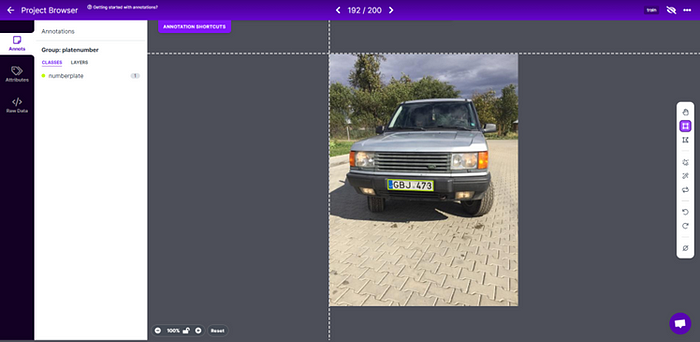
我的数据集部分基于我自己的照片,部分来自AUTO.RIA车牌数据集(向这些了不起的家伙致敬!),总共约2000张图像。https://nomeroff.net.ua/datasets/
使用roboflow服务以Yolo格式进行标注。
创建数据集.yaml文件:
train: dataset/trainval: dataset/valid# Classesnc: 1 # number of classesnames: ['numberplate'] # class names
训练模型
python train.py --epochs 25 --workers 8 --device 0 --batch-size 32 --data data/numberplates.yaml --img 640 640 --cfg cfg/training/yolov7.yaml --weights 'yolov7-tiny.pt' --name yolov7_tiny_numberplates --hyp data/hyp.scratch.tiny.yaml
对于基础版本,我决定25个epoch应该足够了。25个epoch的模型训练结果:

推理:微调后的yolov7-tiny检测到的物体,单一类别
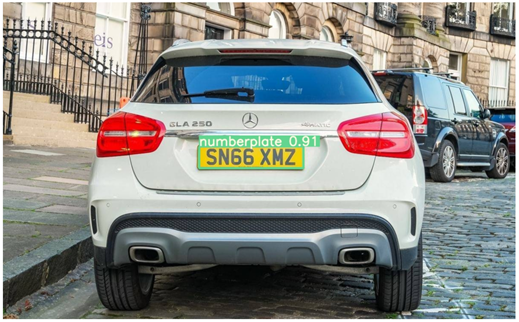
对于项目的第一版来说似乎足够了,以后可以根据实际应用中发现的边缘情况进行更新。
为YOLOv7检测器创建一个抽象的简单包装器类:
class Detector(): def __init__(self, model_weights, img_size=640, device='cpu', half=False, trace=True, log_level='INFO', log_dir = './logs/'): # Initialize self.model_weights = model_weights self.img_size = img_size self.device = torch.device(device) self.half = half # half = device.type != 'cpu' # half precision only supported on CUDA self.trace = trace # Convert model to Traced-model self.log_level = log_level if self.log_level: self.num_log_level = getattr(logging, self.log_level.upper(), 20) ##Translate the log_level input string to one of the accepted values of the logging module, if no 20 - INFO self.log_dir = log_dir log_formatter = logging.Formatter("%(asctime)s %(message)s") logFile = self.log_dir + 'detection.log' my_handler = RotatingFileHandler(logFile, mode='a', maxBytes=25 * 1024 * 1024, backupCount=10, encoding='utf-8', delay=False) my_handler.setFormatter(log_formatter) my_handler.setLevel(self.num_log_level) self.logger = logging.getLogger(__name__) self.logger.setLevel(self.num_log_level) self.logger.addHandler(my_handler) # Add path to yolo model as whenever load('weights.pt') is called, pytorch looks for model config in path enviornment variable (models/yolo) yolo_folder_dir = str(Path(__file__).parent.absolute()) +"\yolov7" # models folder path sys.path.insert(0, yolo_folder_dir) # Load model self.model = attempt_load(self.model_weights, map_location=self.device) # load FP32 model # Convert model to Traced-model if self.trace: self.model = TracedModel(self.model, self.device, self.img_size) # if half: # model.half() # to FP16 # Get names and colors self.names = self.model.module.names if hasattr(self.model, 'module') else self.model.names if len(self.names) > 1: self.colors = [[0, 255, 127]] + [[random.randint(0, 255) for _ in range(3)] for _ in self.names[1:]] else: self.colors = [[0, 255, 127]] sys.path.remove(yolo_folder_dir) def run(self, inp_image, conf_thres=0.25): # Run Inference # Load data dataset = LoadImage(inp_image, device=self.device, half=self.half) t0 = time.time() self.file_name, self.img, self.im0 = dataset.preprocess() # Inference t1 = time.time() with torch.no_grad(): # Calculating gradients would cause a GPU memory leak self.pred = self.model(self.img)[0] t2 = time.time() # Apply NMS self.pred = non_max_suppression(self.pred, conf_thres=conf_thres) t3 = time.time() # Process detections bbox = None # bounding boxe of detected object with max conf cropped_img = None # cropped detected object with max conf det_conf = None # confidence level for detected object with max conf self.det = self.pred[0] # pred[0] - NMX suppr returns list with 1 tensor per image; if len(self.det): # Rescale boxes from img_size to im0 size self.det[:, :4] = scale_coords(self.img.shape[2:], self.det[:, :4], self.im0.shape).round() # Print results print_strng = "" for c in self.det[:, -1].unique(): n = (self.det[:, -1] == c).sum() # detections per class print_strng += f"{n} {self.names[int(c)]}{'s' * (n > 1)}" # add to string # Print time (inference + NMS) print( f'{print_strng} detected. ({(1E3 * (t1 - t0)):.1f}ms)-Load data, ({(1E3 * (t2 - t1)):.1f}ms)-Inference, ({(1E3 * (t3 - t2)):.1f}ms)-NMS') # Write results to file if debug mode if self.log_level: self.logger.debug( f'{self.file_name} {print_strng} detected. ({(1E3 * (t1 - t0)):.1f}ms)-Load data, ({(1E3 * (t2 - t1)):.1f}ms)-Inference, ({(1E3 * (t3 - t2)):.1f}ms)-NMS') if self.logger.getEffectiveLevel() == 10: # level 10 = debug gn = torch.tensor(self.im0.shape)[[1, 0, 1, 0]] # normalization gain whwh for *xyxy, conf, cls in reversed(self.det): # save detections with bbox in xywh format xywh = (xyxy2xywh(torch.tensor(xyxy).view(1, 4)) / gn).view(-1).tolist() # normalized xywh line = (int(cls), np.round(conf, 3), *xywh) # label format self.logger.debug(f"{self.file_name} {('%g ' * len(line)).rstrip() % line}") # Find detection with max confidence: indx = self.pred[0].argmax(0)[ 4] # pred[0] - NMX suppr returns list with 1 tensor per image; argmax(0)[4] - conf has indx 4 in [x1,y1,x2,y2,conf,cls] max_det = self.pred[0][indx] # Collect detected bounding boxe and corresponding cropped img bbox = max_det[:4] cropped_img = save_crop(max_det[:4], self.im0) cropped_img = cropped_img[:, :, ::-1] # # BGR to RGB det_conf = max_det[4:5] print(f'Detection total time: {time.time() - t0:.3f}s') return {'file_name': self.file_name, 'orig_img': self.im0, 'cropped_img': cropped_img, 'bbox': bbox, 'det_conf': det_conf}
这里为了调试目的,我添加了将检测数据记录到文件的可能性,最多10个文件,每个文件25Mb,然后重写。
对于当前任务,我需要检测器只返回一个置信度最高的检测结果。此外,检测器输出原始图像、裁剪后的检测区域及其对应的边界框、置信度分数,以及为每个图像生成一个唯一名称以便于调试。
车牌区域图像预处理
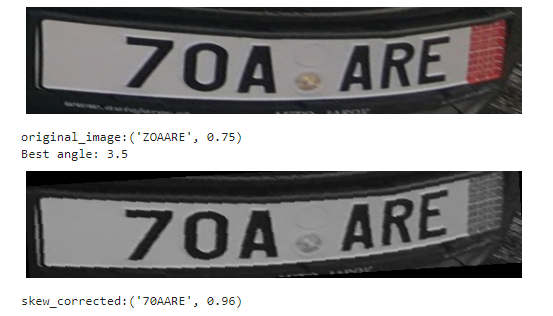
一般来说,下一步是对图像进行特定的预处理(如RGB转灰度、去噪、腐蚀+膨胀、阈值处理、直方图均衡化等),以便进行下一步的OCR。预处理在很大程度上取决于并针对具体的OCR解决方案和拍摄条件进行调整。但由于我正在使用EasyOCR构建基础版本(之后应该替换为自定义解决方案),我决定不深入进行预处理,只进行两个通用的步骤——灰度转换和使用投影轮廓法进行倾斜校正。
这里我使用的是平面角度校正,但之后应该更新为使用真实车牌角点检测器进行单应性计算和透视变换的校正。
# Skew Correction (projection profile)def _find_score(arr, angle): data = rotate(arr, angle, reshape=False, order=0) hist = np.sum(data, axis=1) score = np.sum((hist[1:] - hist[:-1]) ** 2) return hist, scoredef _find_angle(img, delta = 0.5, limit = 10): angles = np.arange(-limit, limit+delta, delta) scores = [] for angle in angles: hist, score = _find_score(img, angle) scores.append(score) best_score = max(scores) best_angle = angles[scores.index(best_score)] print(f'Best angle: {best_angle}') return best_angledef correct_skew(img): # correctskew best_angle =_find_angle(img) data = rotate(img, best_angle, reshape=False, order=0) return data
即使对于这样扭曲的图像,仅进行倾斜校正就足以让EasyOCR以高置信度正确读取车牌号码。
经过上述图像处理步骤后,我们可以认为图像已经足够好,可以进行识别了。
车牌识别(OCR)
对于基础版本,我决定使用EasyOCR解决方案,因为它易于使用、识别准确,而且可能是我所知道的唯一比无聊的tesseract更好的替代方案。
使用EasyOCR进行车牌识别的简单包装器类:
class EasyOcr(): def __init__(self, lang = ['en'], allow_list = '0123456789ABCDEFGHIJKLMNOPQRSTUVWXYZ', min_size=50, log_level='INFO', log_dir = './logs/'): self.reader = easyocr.Reader(lang, gpu=False) self.allow_list = allow_list self.min_size = min_size self.log_level = log_level if self.log_level: self.num_log_level = getattr(logging, log_level.upper(), 20) ##Translate the log_level input string to one of the accepted values of the logging module, if no 20 - INFO self.log_dir = log_dir # Set logger log_formatter = logging.Formatter("%(asctime)s %(message)s") logFile = self.log_dir + 'ocr.log' my_handler = RotatingFileHandler(logFile, mode='a', maxBytes=25 * 1024 * 1024, backupCount=10, encoding='utf-8', delay=False) my_handler.setFormatter(log_formatter) my_handler.setLevel(self.num_log_level) self.logger = logging.getLogger(__name__) self.logger.setLevel(self.num_log_level) self.logger.addHandler(my_handler) def run(self, detect_result_dict): if detect_result_dict['cropped_img'] is not None: t0 = time.time() img = detect_result_dict['cropped_img'] img = ocr_img_preprocess(img) file_name = detect_result_dict.get('file_name') ocr_result = self.reader.readtext(img, allowlist = self.allow_list, min_size=self.min_size) text = [x[1] for x in ocr_result] confid = [x[2] for x in ocr_result] text = "".join(text) if len(text) > 0 else None confid = np.round(np.mean(confid), 2) if len(confid) > 0 else None t1 = time.time() print(f'Recognized number: {text}, conf.:{confid}.\nOCR total time: {(t1 - t0):.3f}s') if self.log_level: # Write results to file if debug mode self.logger.debug(f'{file_name} Recognized number: {text}, conf.:{confid}, OCR total time: {(t1 - t0):.3f}s.') return {'text': text, 'confid': confid} else: return {'text': None, 'confid': None}
与检测器类似,这里为了调试目的,也添加了将OCR数据记录到文件的可能性。
识别模块返回检测到的字符串和置信度分数。
验证与操作
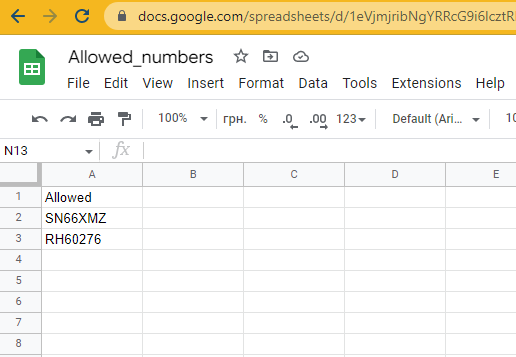
在我们成功从检测到的车牌中获取到识别文本后,是时候进行验证并采取一些行动了。对于车牌验证步骤,最合乎逻辑的做法是使用一个由客户更新的数据库,我们每次或每天读取一次,并将列表本地存储。对于当前的基础版本,我决定不设置数据库,以节省时间和金钱,因为这不是重点。我将使用Google表格作为示例。
“数据库”
截至目前,还没有配置操作步骤,只是显示在允许列表中的车牌号码检查结果。但对于树莓派来说,通过GPIO控制的继电器开关操作任何负载都非常容易。
可视化
为了能够舒适地监控和调试解决方案,我添加了一个可视化模块,用于处理车牌识别过程的显示、保存输入图像、裁剪后的车牌区域和输出结果图像。此外,我还添加了一个函数,用于在电子墨水屏上显示车牌区域和识别文本。
目前,为了方便起见,图像以压缩的JPG格式存储在日志文件夹中,数量限制为10800张,随后进行覆盖(文件夹最大大小约为500Mb)。在生产解决方案中,可视化并不是必需的,用于调试的图像最好存储在NumPy ndarrays或二进制字符串中。
class Visualize(): def __init__(self, im0, file_name, cropped_img=None, bbox=None, det_conf=None, ocr_num=None, ocr_conf=None, num_check_response=None, out_img_size=(720,1280), outp_orig_img_size = 640, log_dir ='./logs/', save_jpg_qual = 65, log_img_qnt_limit = 10800): self.im0 = im0 self.input_img = im0.copy() self.file_name = file_name self.cropped_img = cropped_img self.bbox = bbox self.det_conf = det_conf self.ocr_num = ocr_num self.ocr_conf = ocr_conf self.num_check_response = num_check_response self.out_img_size = out_img_size self.save_jpg_qual = save_jpg_qual self.log_dir = log_dir self.imgs_log_dir = self.log_dir + 'imgs/' os.makedirs(os.path.dirname(self.imgs_log_dir), exist_ok=True) self.crop_imgs_log_dir = self.log_dir + 'imgs/crop/' os.makedirs(os.path.dirname(self.crop_imgs_log_dir), exist_ok=True) self.orig_imgs_log_dir = self.log_dir + 'imgs/inp/' os.makedirs(os.path.dirname(self.orig_imgs_log_dir), exist_ok=True) self.log_img_qnt_limit = log_img_qnt_limit # Create blank image h, w = self.out_img_size self.img = np.zeros((h, w, 3), np.uint8) self.img[:, :] = (255, 255, 255) # Draw bounding box on top the image if (self.bbox is not None) and (self.det_conf is not None): label = f'{self.det_conf.item():.2f}' color = [0, 255, 127] plot_one_box(self.bbox, self.im0, label=label, color=color, line_thickness=3) # Resize img width to fit the plot, keep origin aspect ratio h0, w0 = im0.shape[:2] aspect = w0 / h0 if aspect > 1: # horizontal image new_w = outp_orig_img_size new_h = np.round(new_w / aspect).astype(int) elif aspect < 1: # vertical image new_h = outp_orig_img_size new_w = np.round(new_h * aspect).astype(int) else: # square image new_h, new_w = outp_orig_img_size, outp_orig_img_size self.im0 = cv2.resize(self.im0, (new_w, new_h), interpolation=cv2.INTER_AREA) im0_h, im0_w = self.im0.shape[:2] # Add original full image im0_offset = 0 self.img[im0_offset:im0_h + im0_offset, im0_offset:im0_w + im0_offset] = self.im0 # Add cropped image with detected number bbox if self.cropped_img is not None: # Resize cropped img target_width = int((w - (im0_w + im0_offset)) / 3) r = target_width / self.cropped_img.shape[1] dim = (target_width, int(self.cropped_img.shape[0] * r)) self.cropped_img = cv2.resize(self.cropped_img, dim, interpolation=cv2.INTER_AREA) crop_h, crop_w = self.cropped_img.shape[:2] # Add cropped img crop_h_y1 = int(h/7) crop_w_x1 = im0_w + im0_offset + int((w - (im0_w + im0_offset) - crop_w) / 2) self.img[crop_h_y1:crop_h + crop_h_y1, crop_w_x1:crop_w + crop_w_x1] = self.cropped_img # Add `_det` to filename self.file_name = Path(self.file_name).stem + "_det" + Path(self.file_name).suffix # Add ocr recognized number if self.ocr_num is not None: label = f"{self.ocr_num} ({self.ocr_conf})" t_thickn = 2 # text font thickness in px font = cv2.FONT_HERSHEY_SIMPLEX # font fontScale = 1.05 # calculate position text_size = cv2.getTextSize(label, font, fontScale=fontScale, thickness=t_thickn)[0] w_center = int((im0_w + im0_offset + w)/2) ocr_w_x1 = int(w_center - text_size[0]/2) ocr_h_y1 = int(crop_h_y1 + crop_h + 55) org = (ocr_w_x1, ocr_h_y1) # position # Plot text on img cv2.putText(self.img, label, org, font, fontScale, color=(0, 0, 0), thickness=t_thickn, lineType=cv2.LINE_AA) # Add number check response if in allowed list if self.num_check_response == 'Allowed': label = "-=Allowed=-" fontColor = (0,255,0) else: label = "-=Prohibited!=-" fontColor = (0,0,255) t_thickn = 2 # text font thickness in px font = cv2.FONT_HERSHEY_SIMPLEX # font fontScale = 1.05 # calculate position text_size = cv2.getTextSize(label, font, fontScale=fontScale, thickness=t_thickn)[0] w_center = int((im0_w + im0_offset + w) / 2) response_w_x1 = int(w_center - text_size[0] / 2) response_h_y1 = int(h*3/7) #TBD org = (response_w_x1, response_h_y1) # position # Plot text on img cv2.putText(self.img, label, org, font, fontScale, color=fontColor, thickness=t_thickn, lineType=cv2.LINE_AA) def show(self): # Show the image cv2.imshow('image', self.img) def save(self): # Remove oldest file if reach quantity limit if self.get_dir_file_quantity(self.imgs_log_dir) > self.log_img_qnt_limit: oldest_file = sorted([self.imgs_log_dir+f for f in os.listdir(self.imgs_log_dir)])[ 0] # , key=os.path.getctime os.remove(oldest_file) # Write compressed jpeg with results cv2.imwrite(f"{self.imgs_log_dir}{self.file_name}", self.img, [int(cv2.IMWRITE_JPEG_QUALITY), self.save_jpg_qual]) # TBD Write in byte string format def save_input(self): if self.input_img is not None: # Remove oldest file if reach quantity limit if self.get_dir_file_quantity(self.orig_imgs_log_dir) > self.log_img_qnt_limit: oldest_file = sorted([self.orig_imgs_log_dir+f for f in os.listdir(self.orig_imgs_log_dir)])[ 0] # , key=os.path.getctime os.remove(oldest_file) # Write compressed jpeg with results cv2.imwrite(f"{self.orig_imgs_log_dir}orig_inp_{self.file_name}", self.input_img) # TBD Write in byte string format def save_crop(self): if self.cropped_img is not None: # Remove oldest file if reach quantity limit if self.get_dir_file_quantity(self.crop_imgs_log_dir) > self.log_img_qnt_limit: oldest_file = sorted([self.crop_imgs_log_dir+f for f in os.listdir(self.crop_imgs_log_dir)])[ 0] # , key=os.path.getctime os.remove(oldest_file) # Write compressed jpeg with results cv2.imwrite(f"{self.crop_imgs_log_dir}crop_{self.file_name}", self.cropped_img) # TBD Write in byte string format # Display img on e-ink display 176*264. def display(self): # Create blank image disp_img = np.zeros((epd2in7.EPD_WIDTH, epd2in7.EPD_HEIGHT,3), np.uint8) disp_img[:, :] = (255, 255, 255) if self.cropped_img is not None: # Add cropped number crop_resized = cv2.resize(self.cropped_img, (epd2in7.EPD_HEIGHT-4, 85), interpolation=cv2.INTER_AREA) crop_resized_h, crop_resized_w = crop_resized.shape[:2] crop_w_x1 = int(epd2in7.EPD_HEIGHT/2 - crop_resized_w/2) disp_img[2:crop_resized_h+2, crop_w_x1:crop_resized_w+crop_w_x1] = crop_resized if self.ocr_num is not None: # Add recognized label label = f"{self.ocr_num}({self.ocr_conf})" t_thickn = 2 # text font thickness in px font = cv2.FONT_HERSHEY_SIMPLEX # font fontScale = 0.8 text_size = cv2.getTextSize(label, font, fontScale=fontScale, thickness=t_thickn)[0] ocr_w_x1 = int(epd2in7.EPD_HEIGHT / 2 - text_size[0] / 2) ocr_h_y1 = int(crop_resized_h/2 +2 + epd2in7.EPD_WIDTH/2) # Plot text on img cv2.putText(disp_img, label, (ocr_w_x1, ocr_h_y1), font, fontScale, color=(0, 0, 0), thickness=t_thickn, lineType=cv2.LINE_AA) Himage = cv2.resize(disp_img, (epd2in7.EPD_HEIGHT, epd2in7.EPD_WIDTH), interpolation=cv2.INTER_AREA) print(f"###Himage:{Himage.shape}") # convert to PIL format Himage = Image.fromarray(Himage) tic = time.perf_counter() epd = epd2in7.EPD() # get the display epd.init() # initialize the display epd.Clear(0xFF) # clear the display toc = time.perf_counter() print(f"Init, clean display - {toc - tic:0.4f} seconds") tic = time.perf_counter() epd.display(epd.getbuffer(Himage)) toc = time.perf_counter() print(f"Display image - {toc - tic:0.4f} seconds") epd.sleep() # Power off display @staticmethod def get_dir_file_quantity(dir_path): list_of_files = os.listdir(dir_path) return len(list_of_files)
演示
测试解决方案
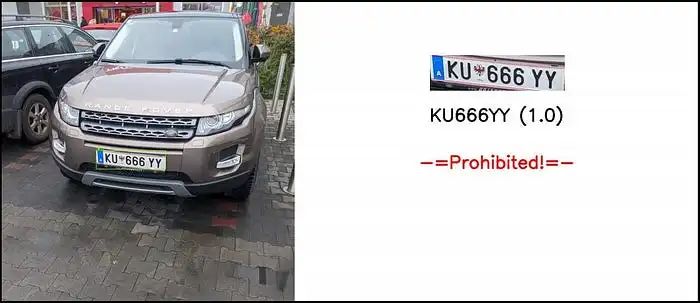
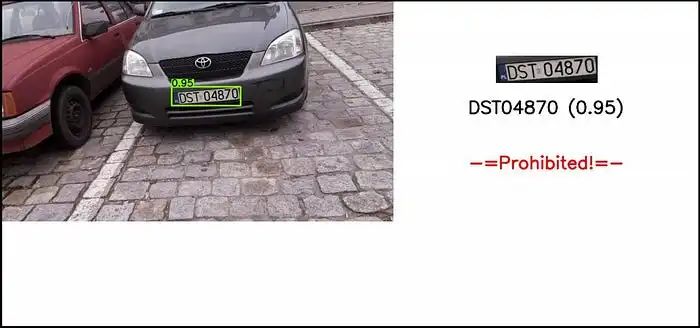
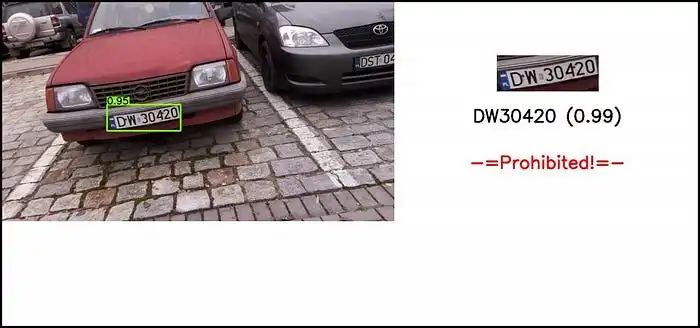
让我们测试一下我们现在已经完成的内容。在静态图像上的检测和识别流程:
从手机上传的图像结果。
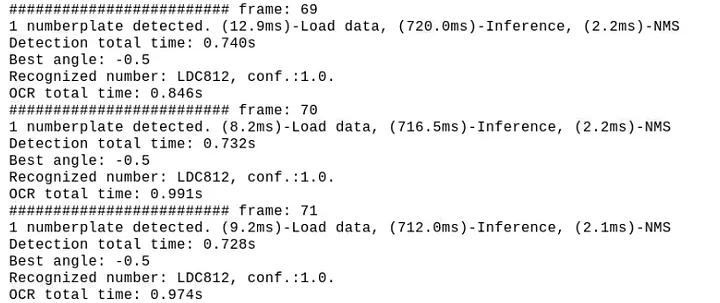
使用设备摄像头在街道上进行端到端解决方案测试:
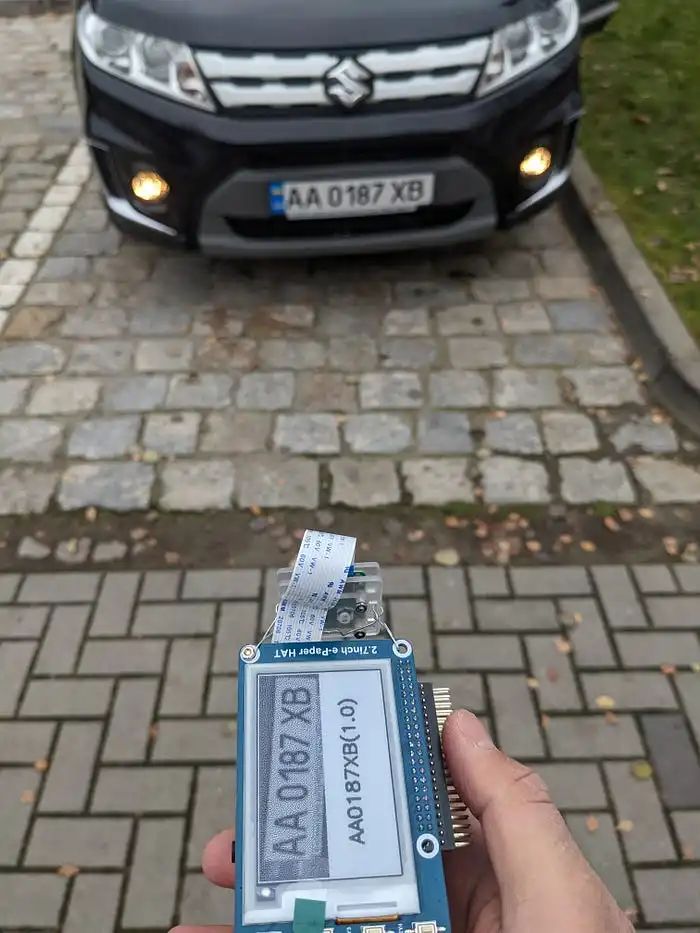
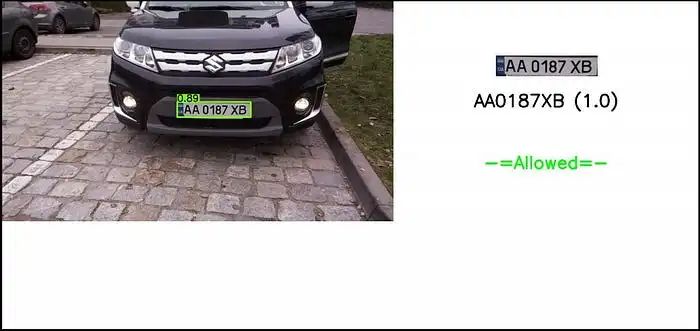
如我们所见,这里倾斜校正派上了用场。
性能
在当前配置下,检测大约需要700..800ms,OCR步骤大约需要900..1200ms,平均FPS约为0.4..0.5
虽然这样的帧率值对于当前的停车道闸自动化项目来说并不关键,但显然还有很大的改进空间。
从htop我们可以看到,CPU利用率接近满负荷:
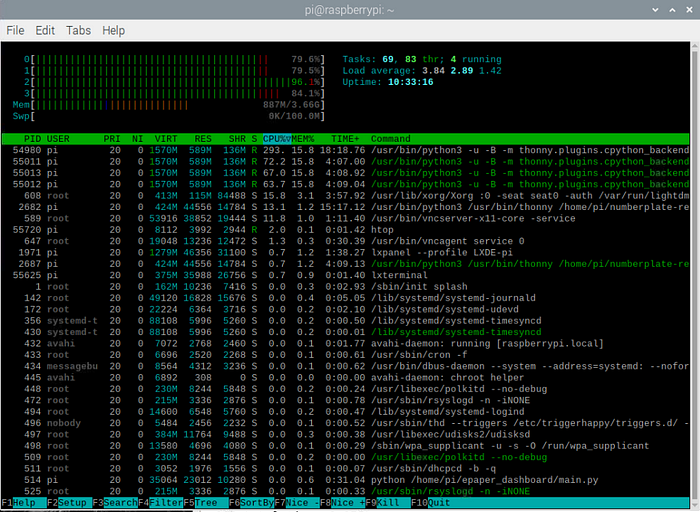
所有测试都是在树莓派操作系统的默认设置下进行的。如果你禁用UI和所有其他默认启用的后台服务,性能将更加稳定和高效。
额外收获
事实证明,我们的检测器模块即使没有任何额外的调整,也能完美地检测乐高汽车的车牌。
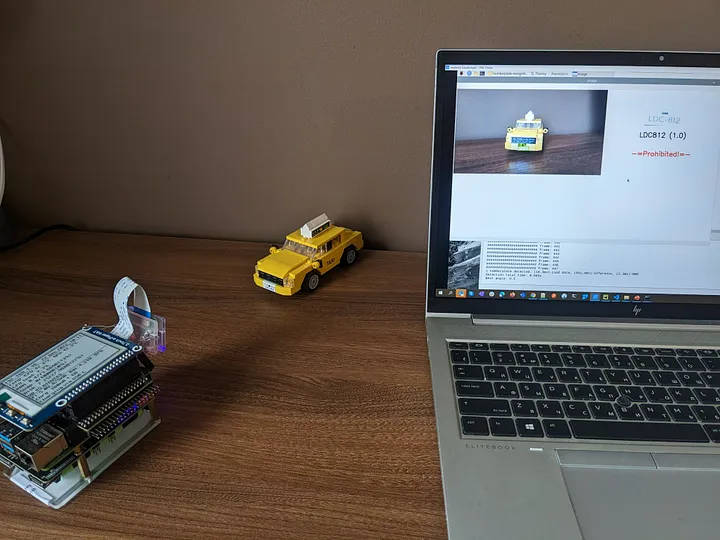
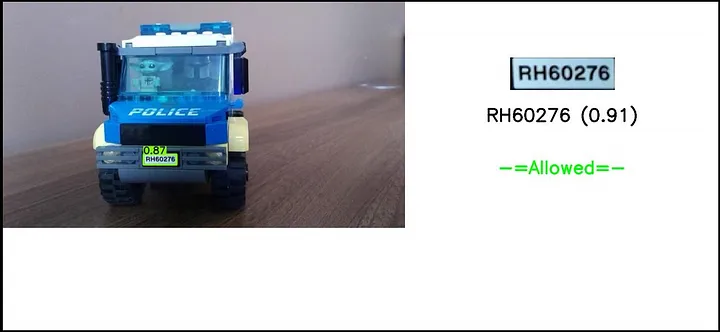
因此,有了树莓派Build Hat和我从儿子那里借来的乐高积木,我决定搭建自己的停车道闸,并在“真实”条件下进行完整的端到端测试。
基于乐高Build Hat专有库的简单操作模块包装器:
class Action(): def __init__(self): self.motor = Motor('A') self.motor.set_default_speed(25) self.matrix = Matrix('B') self.ok_color = [[(6, 10) for x in range(3)] for y in range(3)] self.nok_color = [[(9, 10) for x in range(3)] for y in range(3)] self.matrix.set_transition(2) #fade-in/out self.matrix.set_pixel((1, 1), ("blue", 10)) def _handle_motor(self, speed, pos, apos): print("Motor:", speed, pos, apos) def run(self, action_status): while True: if action_status[0] == 'Allowed': self.matrix.set_pixels(self.ok_color) time.sleep(1) self.motor.run_for_degrees(-90, blocking=False) time.sleep(5) self.motor.run_for_degrees(90, blocking=False) time.sleep(1) elif action_status[0] == 'Prohibited': self.matrix.set_pixels(self.nok_color) time.sleep(3) else: self.matrix.clear() self.matrix.set_pixel((1, 1), ("blue", 10)) time.sleep(1) self.matrix.set_pixel((1, 1), (0, 10)) time.sleep(1)
我在一个并行线程中运行这个模块,当检测到车牌且action_status发生变化时,从主程序中触发操作。
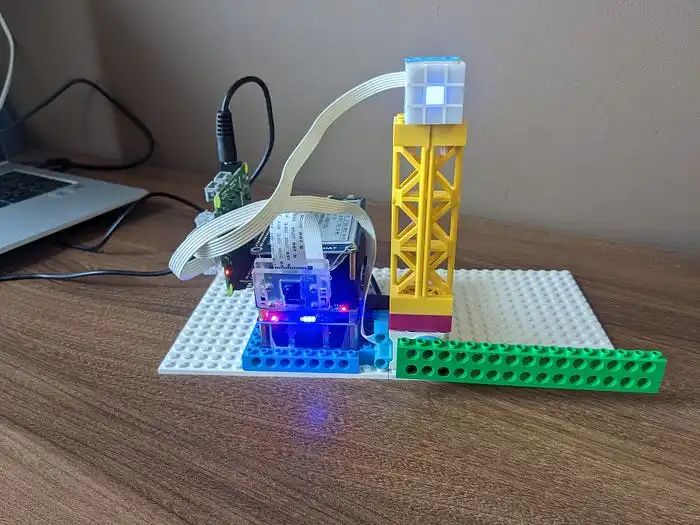
“弗兰肯斯坦的怪物”——树莓派 + UPS + 摄像头v2 + 电子墨水屏 + 带有连接的乐高电机和LED矩阵的Build HAT。
我将其中一个乐高车牌号码添加到了Google表格“数据库”中,现在我们可以将所有部分组合在一起并运行它:
“真实”自动化停车道闸控制系统的端到端演示

最终思考
总的来说,我们已经成功实现了使用树莓派进行自动车牌识别以控制停车道闸的完全功能系统。
需要强调的问题之一是——由于处理速度较慢,我们可能会遇到图像延迟,因为摄像头有自己的缓冲区,而我们以较慢的速度抓取图像,即使场景已经改变,一段时间内我们仍然从缓冲区中读取“旧”帧。对于当前的使用案例来说,这并不是非常关键,但为了改进它,我添加了帧跳过功能,间隔大约等于我们的总处理时间。这样可以更快地读取帧并清理缓冲区,同时也减轻了CPU的负载,因为我们不会处理每一帧。但是,如果我们需要近乎实时的流畅图像流而不出现延迟,最好的选择是将摄像头读取设置为一个单独的并行线程,该线程将以最大速度从缓冲区中读取帧,而我们的主程序只在需要时从该进程中抓取帧。然而,需要注意的是,在Python中,多线程并不是真正的多进程,而是一种模拟,它有助于从架构的角度更清晰地组织和运行你的代码。
后续步骤
OCR:加速OCR,因为它是当前的瓶颈。我倾向于开发一个自定义的小型基于RNN的模型。如果时间不是问题,而你只需要准确性——你可以尝试在EasyOCR中使用不同的模型并进行微调。或者你可以尝试其他解决方案,如WPOD-NET。此外,提高识别质量的一个重要点是——针对具体的使用案例(摄像头位置、光照条件等)调整图像预处理。
检测器:为了加速,我们可以使用更小的帧大小——如果摄像头应该只对近处的车辆工作,就不需要高分辨率的图像。另一个选项是,如果摄像头和车辆的可能位置大致固定,我们可以只抓取车牌预期出现的区域,而不是整个帧。
对于这两个模型,我们之后可以使用迁移学习、量化、剪枝和其他方法,使其在边缘设备上更轻量、更快。
但无论如何,如果实时处理是关键(显然对于自动化停车道闸案例来说不是),没有配备张量核心的设备是无法实现的。在仅配备CPU的设备上,速度和质量之间总是需要权衡。
另一个改进选项是——对于当前案例来说,没有必要24/7让CPU全速运行,摄像头可以在车辆接近时通过PIR或红外传感器触发。
我将在下一次迭代中尝试实现的最后一点是——将解决方案切换到微服务,并实现生产者-消费者数据流模式。
好了,感谢你阅读这篇关于项目实施经验的冗长而枯燥的描述。
原文地址:
https://medium.com/@alexey.yeryomenko/automatic-number-plate-recognition-with-raspberry-pi-e1ac8a804c79
-
基于LabVIEW的车牌识别系统2013-06-11 22760
-
【TL6748 DSP申请】基于DSP的车牌识别系统2015-09-09 2142
-
怎么用FPGA做车牌识别系统?2015-11-25 15420
-
基于labview vision的机动车车牌识别系统2016-02-26 45764
-
【Rico Board申请】基于SoC的车牌识别系统2016-11-10 3535
-
【MediaTek X20开发板申请】小区车牌自动识别系统2016-12-29 3395
-
【HarmonyOS HiSpark AI Camera】车牌识别系统2020-11-18 1517
-
怎么实现基于MATLAB的车牌识别系统的设计?2021-05-12 1926
-
车牌识别系统的设计与实现2010-02-21 809
-
基于MATLAB的车牌识别系统的研究2009-12-10 3361
-
车牌识别技术的发展及意义_车牌识别系统原理介绍2018-01-02 17807
-
基于MATLAB的车牌识别系统2021-04-16 1810
-
基于LABVIEW的车牌识别系统资料2022-01-11 1261
-
项目分享|基于ELF 1开发板的车牌识别系统2024-03-12 1789
-
车牌识别新花样:树莓派打造智能车牌监控系统!2025-04-26 857
全部0条评论

快来发表一下你的评论吧 !
