

如何在树莓派 AI HAT+上进行YOLO姿态估计?
描述
大家好,接下来会为大家开一个树莓派5和YOLO的连载专题。
内容包括四个部分:
在树莓派5上使用YOLO进行物体和动物识别-入门指南
在树莓派5上开启YOLO姿态估计识别之旅!
如何在树莓派 AI HAT+上进行YOLO目标检测?
如何在树莓派 AI HAT+上进行YOLO姿态估计?
今天是第四部分:如何在树莓派 AI HAT+上进行YOLO姿态估计?
如果大家对这个专题感兴趣,记得关注树莓派开发者,这样你将会第一时间收到我们的内容更新通知。
在本指南中,我们将介绍如何在树莓派AI HAT上进行YOLO姿态估计设置,并探讨如何将其与您自己的Python代码结合使用,以便在项目中应用姿态估计。我们将介绍如何安装所需的硬件和固件,以及如何设置和使用姿态估计流程。完成本指南后,您将了解整个设置过程,并掌握我们准备好的三个不同示例脚本。借助这些演示脚本,我们将使用手势控制媒体播放器、根据手臂角度控制伺服电机,以及用身体玩水果忍者游戏。
与我们的其他大多数计算机视觉指南一样,本指南也十分有趣,让我们开始吧!
考验你英语听力的时候到了,你可以选择观看视频演示。
目录:
所需材料
硬件组装
安装树莓派操作系统
安装AI HAT软件和Python流程
运行姿态估计演示
示例代码1:基础姿态估计代码
更改相机分辨率
示例代码2:手势媒体控制
示例代码3:伺服控制
示例代码4:水果忍者
接下来做什么?
所需材料
要完成本指南,您需要准备以下物品:
树莓派5 - 2GB或更大容量的型号均可。
AI HAT+板 - 本指南适用于13 TOPS和26 TOPS两个版本。TOPS是衡量AI加速器速度的指标,因此26 TOPS版本的AI Hat+速度大约是13 TOPS版本的两倍。这意味着26 TOPS版本能够以更高的帧率运行比13 TOPS版本更复杂、更强大的模型。
引脚扩展器(视情况而定)- AI Hat+附带了一个树莓派引脚扩展器,但通常长度不足以完全穿过HAT。如果您打算在树莓派上插入其他硬件或以其他方式使用引脚,则需要一个这样的扩展器来访问它们。
树莓派摄像头模块 - 我们使用的是摄像头模块V3,但几乎任何官方摄像头模块均可使用。
摄像头适配器线 - 树莓派5使用的CSI摄像头线尺寸与之前型号不同,您的摄像头可能附带的是较旧的宽线,因此请仔细检查。摄像头模块V3肯定需要一根适配器线。您还可以选择更长的线,如300mm和500mm!
散热解决方案 - 对于树莓派5本身,我们使用的是主动散热器。虽然AI Hat+可以在不使用散热器的情况下运行,但如果您长时间运行它,一个小型的自粘散热片可能是一项值得的投资。一点散热措施可能会大有帮助。
电源
Micro SD卡 - 容量至少为16GB。
显示器和Micro-HDMI转HDMI线
鼠标和键盘
*所需物品可以直接联系我们进行购买。
硬件安装
步骤1:安装引脚扩展器
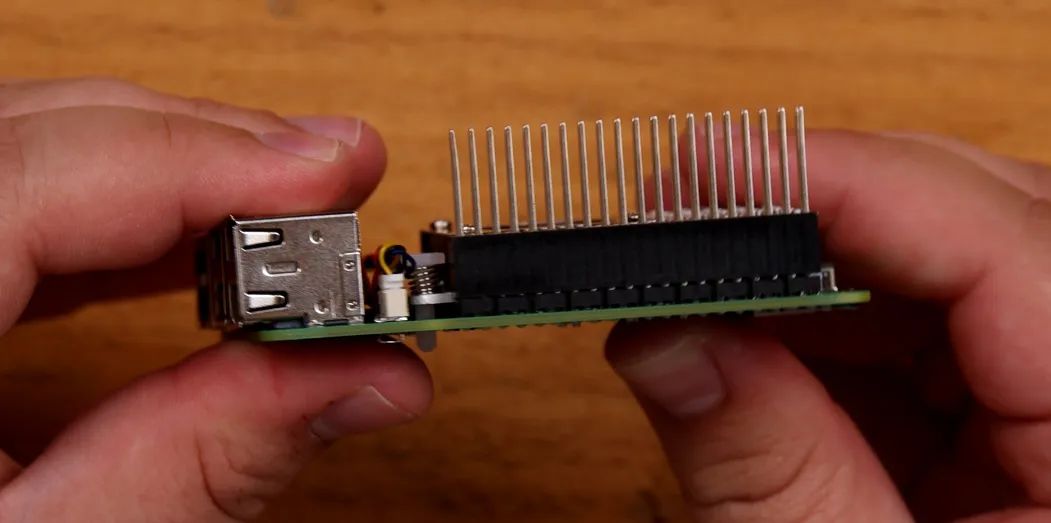
在树莓派上安装任何硬件之前,请确保已关闭电源并断开与任何电源的连接。
首先将GPIO引脚扩展器安装在树莓派的引脚上。如果您使用的是更长的引脚扩展器,请在此处使用。注意不要弯曲这些引脚,因为它们很长,很容易弯曲。
如果您在树莓派上使用散热片或散热器,现在是安装的时候了。
步骤2:安装支柱
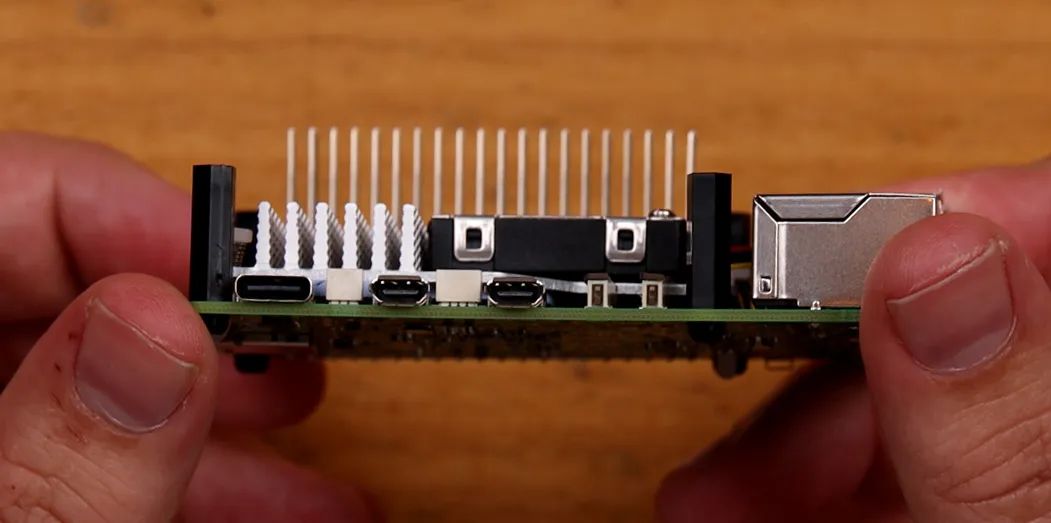
安装随AI HAT附带的4个支架。支架附带4个长螺丝和4个短螺丝,使用哪一种都无妨。
步骤3:连接PCIe线
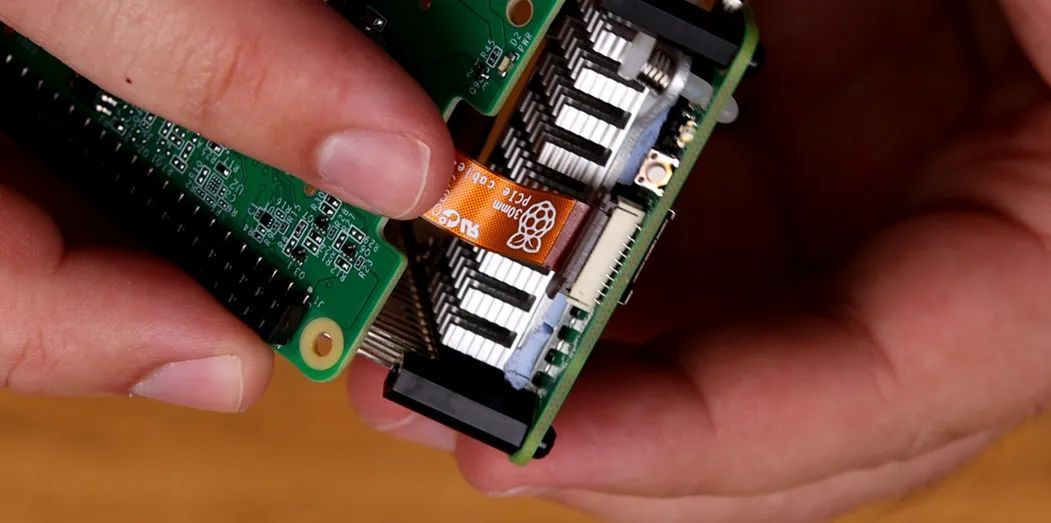
要将HAT上的PCIe电缆安装到树莓派上,请先抬起树莓派PCIe插槽上的棕色卡扣。将电缆插入插槽,确保其牢固且垂直地固定在插槽内。然后将卡扣推回原位以固定电缆。
注意:避免过度弯曲或扭曲此电缆,因为它可能较为脆弱。
步骤4:放置AI HAT
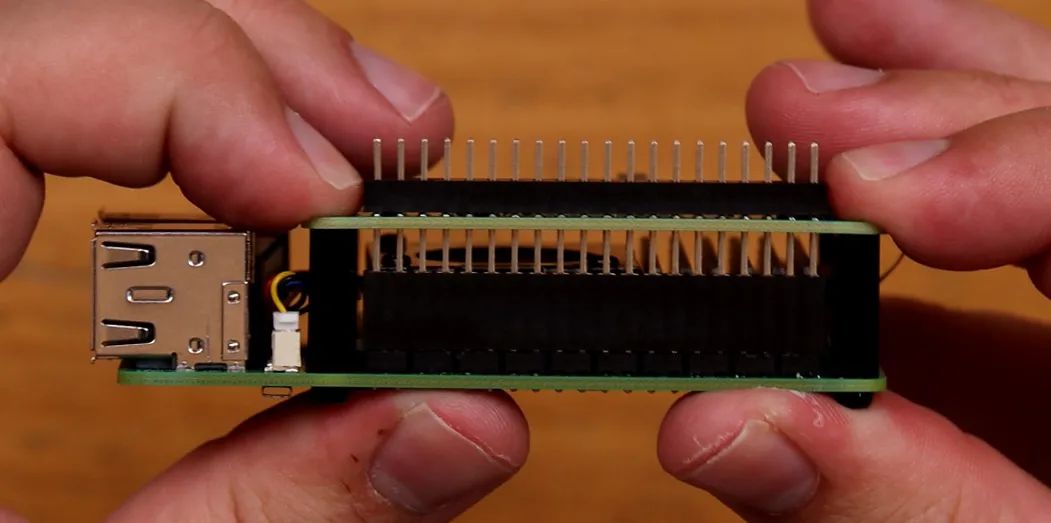
现在将HAT滑动到针脚延长器上,直到它平放在支架上。在此过程中请小心不要损坏PCIe电缆。
您的树莓派在HAT下方可能会露出部分GPIO接口——这是正常现象。
步骤5:安装摄像头
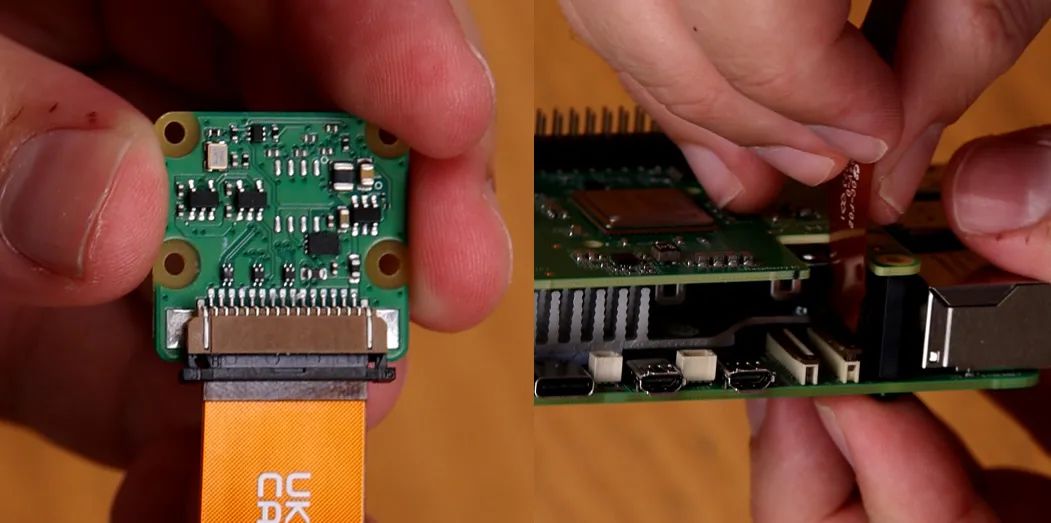
相机使用的连接器与PCIe连接器采用类似的卡扣式连接设计。在相机和树莓派的连接器插槽上,先抬起卡扣,将电缆插入并确保其垂直对齐,然后将连接器按下固定到位。
步骤6:拧紧螺丝

最后,用剩下的4颗螺丝将HAT固定好。如果你选择使用自粘式散热片在AI HAT上,将其放置在电路板中央的银色处理单元上。
就这样,我们完成了!
安装树莓派操作系统
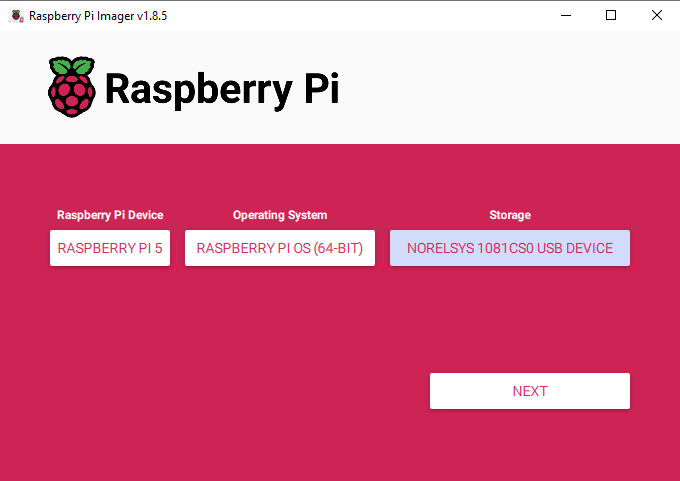
首先,我们需要将树莓派操作系统安装到Micro SD卡上。使用树莓派烧录工具,选择树莓派5作为设备,选择树莓派 OS(64位)作为操作系统,并选择您的microSD卡作为存储设备。
https://www.raspberrypi.com/software/
注意:在MicroSD卡上安装树莓派操作系统将清除卡上的所有数据。
此过程可能需要几分钟时间来下载操作系统并安装。完成后,将卡插入树莓派并启动。树莓派将进行首次安装,请确保将其连接到互联网。
安装AI HAT软件和Python流程
如果您之前按照我们的目标检测指南设置过这些流程,则无需重复这些步骤,可以直接进入演示代码部分。

首先安装运行AI HAT所需的固件和软件。打开一个新的终端窗口,首先使用以下命令更新树莓派:
sudo apt update && sudo apt full-upgrade
在这些步骤中,系统可能会询问您是否要安装某些内容,只需按“y”并回车即可。
现在使用以下命令安装HAT固件:
sudo apt install hailo-all
此安装过程可能需要5到10分钟才能完成。完成后重启树莓派。如果您想成为高级用户,可以在终端中输入以下命令重启:
reboot
现在我们将安装Hailo的Python流程软件和示例,但什么是流程呢?
与AI HAT硬件本身通信非常复杂,所需的代码也相当复杂。我们将设置并安装一个姿态估计流程,它只是一组代码和软件,使我们能够更轻松地与HAT交互。它本质上是将我们更简单、更易读的代码转换为后台的所有操作,以使HAT运行。
要安装流程及其所需的库,首先通过在终端中输入以下命令来复制它们的GitHub存储库:
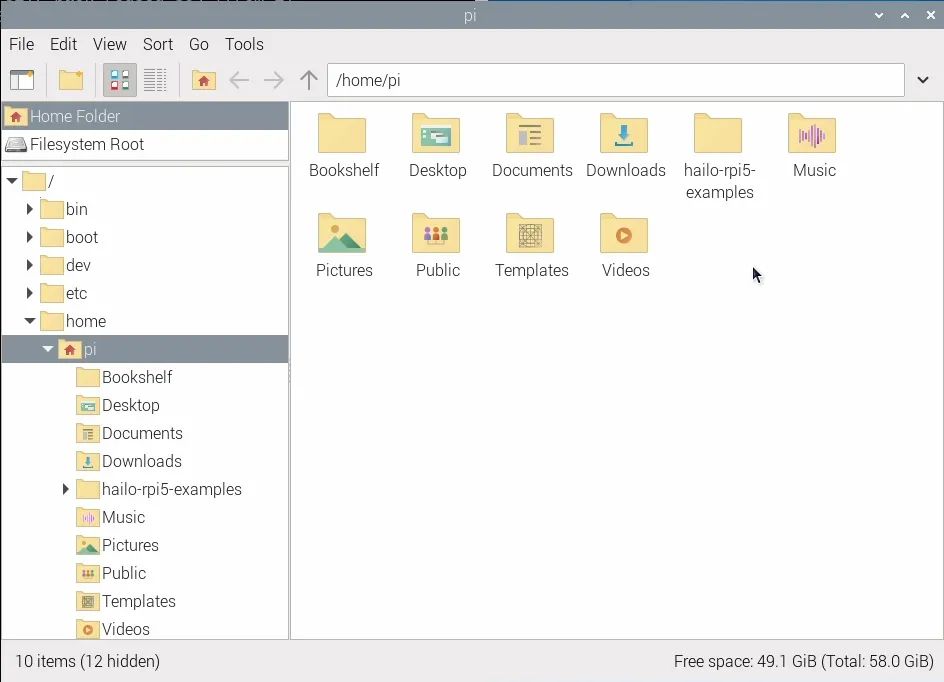
git clone https://github.com/hailo-ai/hailo-rpi5-examples.git
这将在树莓派的主文件夹中下载一个名为“hailo-rpi5-examples”的文件夹,这将是我们要使用的一个重要位置。
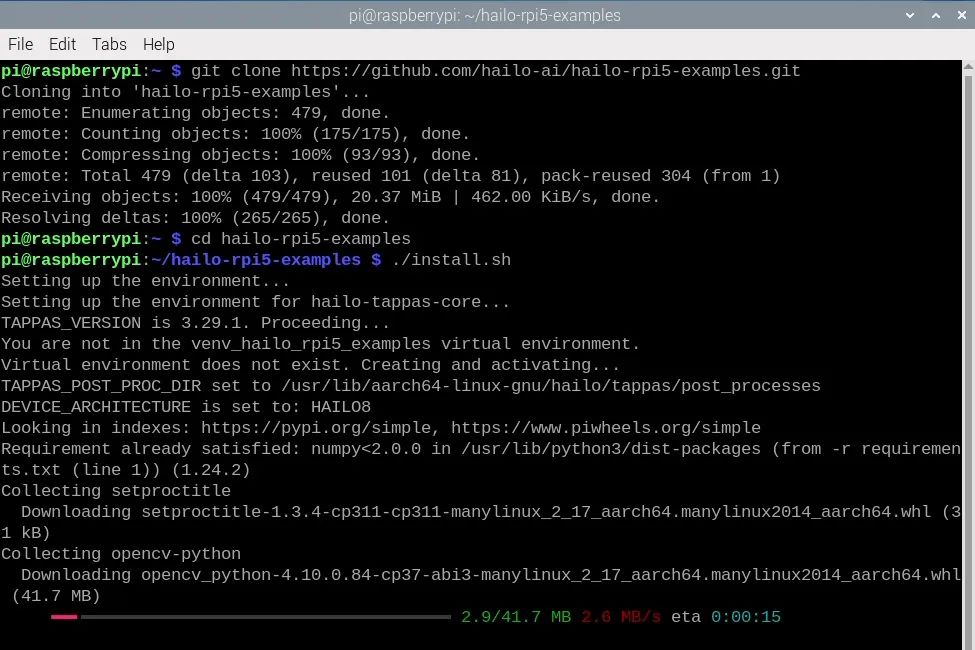
在安装流程之前,我们需要使用更改目录命令告诉终端从该文件夹中工作:
cd hailo-rpi5-examples
终端中的蓝色文本显示文件位置,表明您已成功运行此命令。现在我们将运行shell脚本安装程序:
./install.sh
此安装过程可能需要10 - 20分钟,因为它还会安装我们将使用的所有YOLO模型。
安装完成后,再次重启树莓派。
运行姿态估计演示
让我们运行一些演示代码!在之前的步骤中,我们从Hailo下载了一些示例流程以及使用这些流程的示例Python脚本。在本教程中,我们将使用姿态估计流程 - 它被称为“pose_estimation_pipeline.py”,位于hailo_rpi5-examples/basic_pipelines下。
运行这些Python脚本的最简单方法是通过终端。首先使用更改目录命令更改终端的工作位置,这与我们之前使用的命令相同:
cd hailo-rpi5-examples
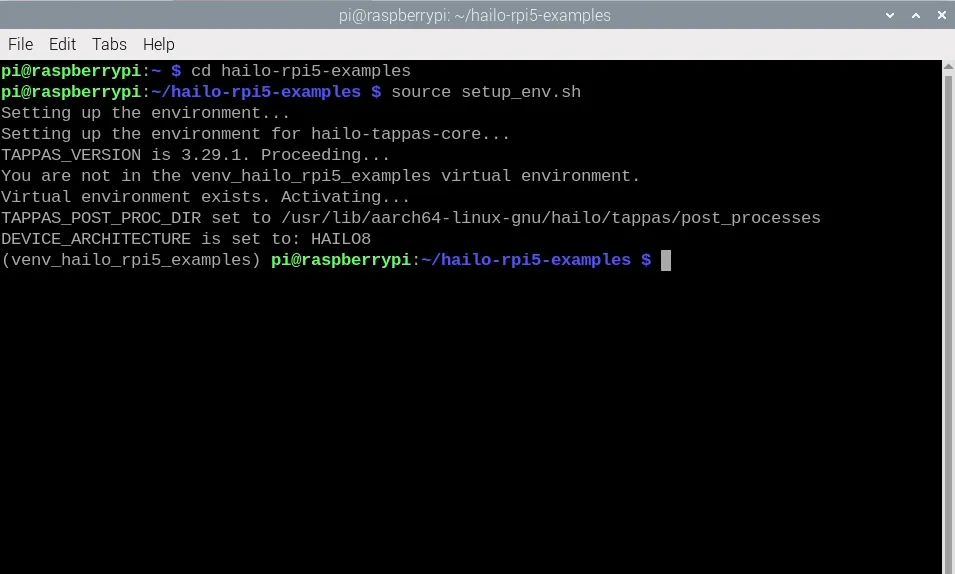
安装步骤还创建了一个虚拟环境(也称为Venv)。这本质上是一个隔离的虚拟工作空间,我们可以在其中安装软件包并进行实验,而不会影响树莓派操作系统的其他部分。我们需要使用的所有软件包都已安装在此Venv中,我们可以通过在终端中输入以下命令来进入:
source setup_env.sh
您可以通过查看终端左侧括号中的Venv名称来确认您正在Venv中工作,如右侧图像所示。如果您已进入Venv并看到更改目录命令的蓝色文本,那么您现在就可以运行Python脚本了。如果您关闭终端或重启树莓派,则需要再次运行这些命令以返回此状态。
我们将运行名为“pose_estimation.py”的演示Python代码,该代码位于“basic_pipelines”文件夹中,因此命令如下:
python basic_pipelines/pose_estimation.py
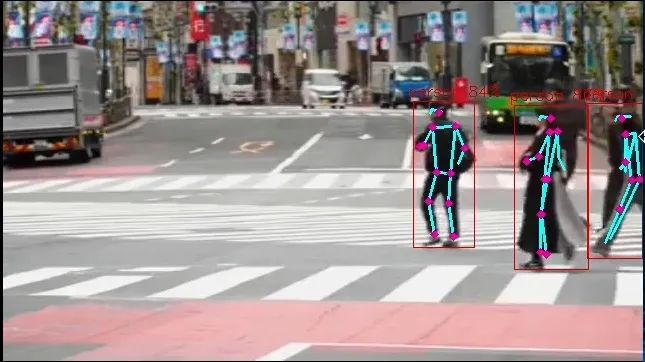
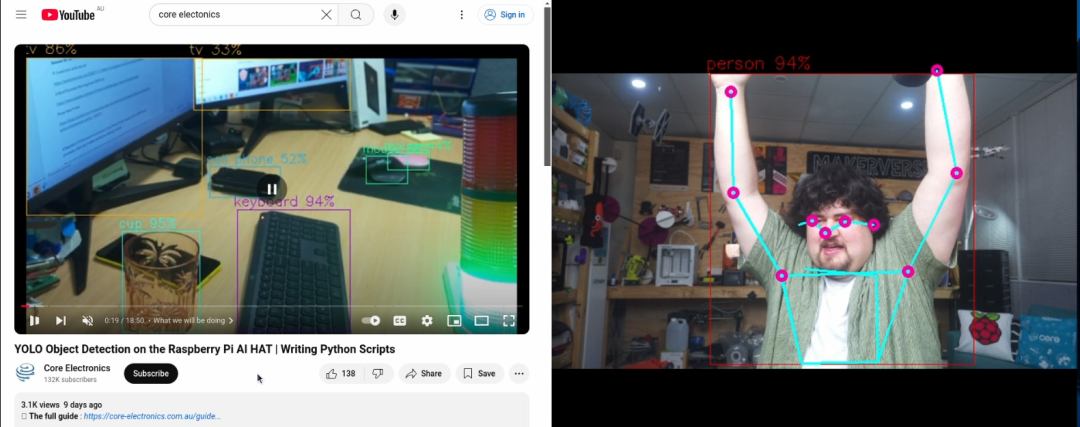
您应该会看到一个新窗口弹出,显示人们过马路的视频,以及YOLO姿态估计模型识别人体并进行姿态估计。恭喜!您已成功在AI HAT上设置并运行计算机视觉。
如图所示,HAT应输出一些内容。首先,它应识别人体,在其周围绘制一个边界框,并在边界框上方显示识别的置信度。然后,对于每个检测到的人,它将在身体的特定部位放置紫色点,并在这些点之间绘制线条,以可视化人的方向。这些点被称为关键点,它们是我们在代码中将使用的基本元素。
要使用摄像头作为输入视频源来运行Python代码,我们需要将其指定为参数或选项。我们可以通过输入以下命令来获取姿态估计流程的所有可用选项列表:
python basic_pipelines/pose_estimation.py --help
这里有一些有用的选项可供探索,您应该找个时间看看,但我们感兴趣的是使用“--input”选项更改源。在这里,我们可以看到我们可以指定文件或摄像头作为输入,并且我们可以使用以下命令使用摄像头模块运行检测脚本:
python basic_pipelines/pose_estimation.py --input rpi
示例代码1:基础姿态估计代码
现在,我们已经使用摄像头运行了姿态估计,让我们深入了解如何修改此代码以在我们的项目中应用。这里涉及很多复杂性,有数千行代码在后台运行,但其中大部分都在流程中完成。由于大部分操作都在后台完成,这意味着我们只需要处理一个相当精简且易于理解的单个文件(我们称之为高级代码)。在上一节中,我们运行了这个高级文件,它被称为“pose_estimation.py”。尽管它已经简化,但仍然相当复杂,包含许多移动部分,因此我们进一步简化了代码,以便在本节中查看演示代码。如果您想深入研究原始代码,我们在目标检测指南中对其进行了详细介绍 - 虽然是针对目标检测的,但足以让您入门。
打开Thonny,创建一个新脚本,将以下代码粘贴进去,然后将其保存到包含我们所有其他脚本的“basic_pipelines”文件夹中。请确保以.py结尾命名,以确保它保存为Python脚本。如果您需要帮助完成此步骤,视频演示了此过程。以下是完整代码:
import gigi.require_version('Gst', '1.0')from gi.repository import Gst, GLibimport osimport numpy as npimport cv2import hailoimport threadingimport timefrom queue import Queue, Emptyfrom hailo_apps_infra.hailo_rpi_common import ( get_caps_from_pad, get_numpy_from_buffer, app_callback_class,)from hailo_apps_infra.pose_estimation_pipeline import GStreamerPoseEstimationApp# Import your libraries up here as usual# Inside this function is where you place the rest of your code as usualdef custom_processing_thread(pose_estimator): # This sleep gives enough time for the HAT to fire up and start detecting - important but not ma mandatory time.sleep(2)
while True: # We can call this function to get the latest position of a specific keypoint position = pose_estimator.get_body_part_coordinates('left_wrist') print(position)
# Another function but this time we input 3 different keypoints and get the angle between then angle = pose_estimator.calculate_body_part_angle('left_shoulder', 'left_elbow', 'left_wrist') print(angle)
time.sleep(0.1) # The rest of the code starts here and handles the operation of the hat and all other neccesary calculations# The hat should update all of its detection data 30 times a second.class PoseDataManager: def __init__(self): """ Manages pose estimation data across threads Allows safe access to the latest detection data """ self.latest_detection_lock = threading.Lock() self.latest_detection = None self.latest_width = None self.latest_height = None
def update_detection(self, detection, width, height): """ Update the latest detection data thread-safely
:param detection: Hailo detection object :param width: Frame width :param height: Frame height """ with self.latest_detection_lock: self.latest_detection = detection self.latest_width = width self.latest_height = height
def get_latest_detection(self): """ Retrieve the latest detection data thread-safely
Tuple of (detection, width, height) or (None, None, None) """ with self.latest_detection_lock: return ( self.latest_detection, self.latest_width, self.latest_height )class PoseEstimator: def __init__(self, pose_data_manager): """ Initialize PoseEstimator with a PoseDataManager
:param pose_data_manager: Shared data management object """ self.pose_data_manager = pose_data_manager self.keypoints = self._get_keypoints()
def _get_keypoints(self): """Get the COCO keypoints correspondence map.""" return { 'nose': 0, 'left_eye': 1, 'right_eye': 2, 'left_ear': 3, 'right_ear': 4, 'left_shoulder': 5, 'right_shoulder': 6, 'left_elbow': 7, 'right_elbow': 8, 'left_wrist': 9, 'right_wrist': 10, 'left_hip': 11, 'right_hip': 12, 'left_knee': 13, 'right_knee': 14, 'left_ankle': 15, 'right_ankle': 16, }
def get_body_part_coordinates(self, body_part, significant_figures=4): """ Get normalized coordinates for a specific body part from latest detection
:param body_part: Name of the body part (e.g., 'left_eye') :param significant_figures: Number of decimal places to round to Tuple of normalized (x, y) coordinates or None """ # Get latest detection detection, width, height = self.pose_data_manager.get_latest_detection()
if detection is None or width is None or height is None: return None
# If no landmarks, return None landmarks = detection.get_objects_typed(hailo.HAILO_LANDMARKS) if len(landmarks) == 0: return None
# Get bbox and points bbox = detection.get_bbox() points = landmarks[0].get_points()
# Get the specific keypoint keypoint_index = self.keypoints[body_part] point = points[keypoint_index]
# Directly use the normalized coordinates from the point # Clamp the values between 0 and 1, then round to specified significant figures norm_x = round(max(0, min(1, point.x())), significant_figures) norm_y = round(max(0, min(1, point.y())), significant_figures)
return (norm_x, norm_y)
def calculate_body_part_angle(self, point_a_name, point_b_name, point_c_name): """ Calculate angle between three body parts directly by name, returning an angle in the full 0 to 360 degree range.
:param point_a_name: First body part name (e.g., 'left_shoulder') :param point_b_name: Vertex body part name (e.g., 'left_elbow') :param point_c_name: Third body part name (e.g., 'left_wrist') Angle in degrees or None if coordinates can't be retrieved """ # Get coordinates for each body part point_a = self.get_body_part_coordinates(point_a_name) point_b = self.get_body_part_coordinates(point_b_name) point_c = self.get_body_part_coordinates(point_c_name)
# Check if any coordinates are None if any(point is None for point in [point_a, point_b, point_c]): return None
# Convert to numpy arrays a = np.array(point_a) b = np.array(point_b) c = np.array(point_c)
# Calculate vectors ba = a - b bc = c - b
# Calculate angle using arctan2 for full 360-degree range angle = np.degrees(np.arctan2(np.linalg.det([ba, bc]), np.dot(ba, bc)))
# Ensure the angle is between 0 and 360 degrees if angle < 0: angle += 360
return angleclass user_app_callback_class(app_callback_class): def __init__(self, pose_data_manager): """ Initialize with a PoseDataManager
:param pose_data_manager: Shared data management object """ super().__init__() self.pose_data_manager = pose_data_managerdef app_callback(pad, info, user_data): # Get the GstBuffer from the probe info buffer = info.get_buffer() if buffer is None: return Gst.PadProbeReturn.OK # Get the caps from the pad format, width, height = get_caps_from_pad(pad) # Get the detections from the buffer roi = hailo.get_roi_from_buffer(buffer) detections = roi.get_objects_typed(hailo.HAILO_DETECTION) # Find the person detection person_detection = None for detection in detections: if detection.get_label() == "person": person_detection = detection break # If a person is detected, update the shared data if person_detection is not None: user_data.pose_data_manager.update_detection(person_detection, width, height) return Gst.PadProbeReturn.OKif __name__ == "__main__": # Create PoseDataManager first pose_data_manager = PoseDataManager()
# Create an instance of the user app callback class with pose_data_manager user_data = user_app_callback_class(pose_data_manager)
# Create pose estimator pose_estimator = PoseEstimator(pose_data_manager)
# Start the custom processing thread processing_thread = threading.Thread( target=custom_processing_thread, args=(pose_estimator,), daemon=True ) processing_thread.start() # Run the GStreamer pipeline app = GStreamerPoseEstimationApp(app_callback, user_data) app.run()
要运行此代码,我们将使用与之前相同的命令行,但这次使用我们保存的文件名。我们将此代码保存为“pose_simple.py”,因此命令如下:
python basic_pipelines/pose_simple.py --input rpi
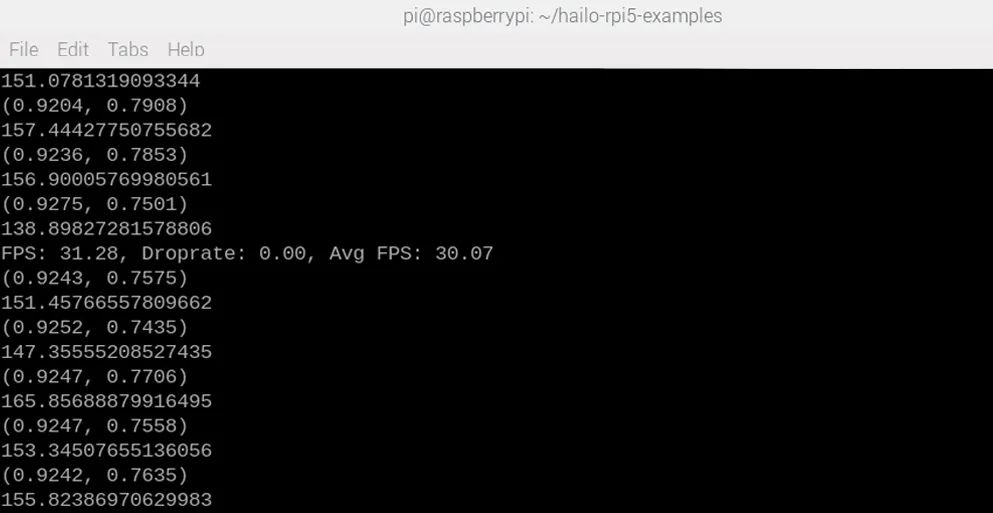
如果一切正常,您应该会看到与之前相同的窗口弹出,但这次在shell中会额外打印两样东西。这是代码中两个实用函数的结果 - 一个用于查找特定关键点(默认情况下代码会跟踪您的左手腕)的位置,另一个用于计算3个点之间的角度(默认情况下计算您的肘部角度)。
让我们深入代码,了解如何使用这些内容以及它们的含义。
代码像所有Python代码一样,以一个区域开始,用于放置所有导入行。在此处导入您的库,就像您通常所做的那样。
import gigi.require_version('Gst', '1.0')from gi.repository import Gst, GLibimport osimport numpy as npimport cv2import hailoimport threadingimport timefrom queue import Queue, Emptyfrom hailo_rpi_common import ( get_caps_from_pad, get_numpy_from_buffer, app_callback_class,)from pose_estimation_pipeline import GStreamerPoseEstimationApp# Import your libraries up here as usual
然后我们进入这个名为“custom_processing_thread”的函数。您将在此处放置所有常规代码。此函数内部有一个while True循环,可以像您通常使用的while True循环一样处理,并且在其上方,您可以放置所有通常在导入部分之后出现的代码 - 所有只运行一次的代码,如设置引脚和硬件、声明变量等。非常重要的一点是,此部分有一个2秒的休眠,这给了HAT启动并开始运行姿态估计的时间。如果您在HAT启动之前尝试获取关键点或角度数据,可能会出错,因此这确保了不会发生这种情况。
# Inside this function is where you place the rest of your code as usualdef custom_processing_thread(pose_estimator): # This sleep gives enough time for the HAT to fire up and start detecting - important but not ma mandatory time.sleep(2)
while True: # We can call this function to get the latest position of a specific keypoint position = pose_estimator.get_body_part_coordinates('left_wrist') print(position)
# Another function but this time we input 3 different keypoints and get the angle between then angle = pose_estimator.calculate_body_part_angle('left_shoulder', 'left_elbow', 'left_wrist') print(angle)
time.sleep(0.1)
在此内部,有两个函数用于获取我们打印到shell的信息。第一个函数允许您获取特定关键点的x和y坐标位置。因此,在代码中,我们获取左手腕的位置,这将检索HAT最新计算的姿态数据(每秒约30次更新新数据):
position = pose_estimator.get_body_part_coordinates('left_wrist')
此函数可用于获取17个可用关键点中任何一个的位置数据,只需输入关键点名称即可。如果您在演示代码中向下滚动一点,可以找到这些关键点的列表,但为了方便起见,这里也列出了。请注意,每个关键点还与一个数字相关联,您可能会遇到使用此编号系统的代码,但在此代码中不需要。
'nose': 0,'left_eye': 1,'right_eye': 2,'left_ear': 3,'right_ear': 4,'left_shoulder': 5,'right_shoulder': 6,'left_elbow': 7,'right_elbow': 8,'left_wrist': 9,'right_wrist': 10,'left_hip': 11,'right_hip': 12,'left_knee': 13,'right_knee': 14,'left_ankle': 15,'right_ankle': 16,
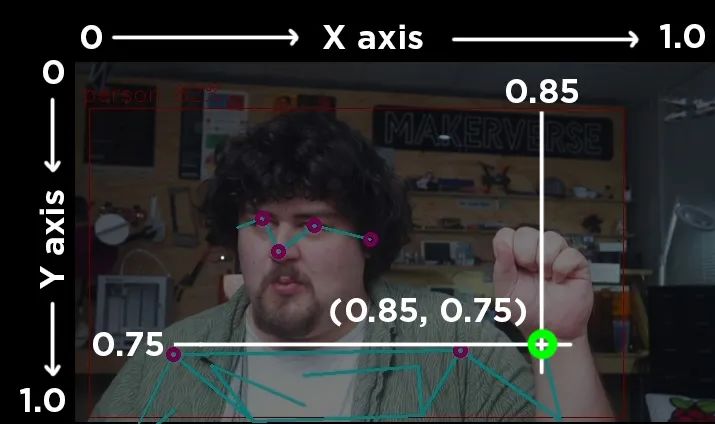
这些关键点使用相对坐标,范围从0到1。在横跨屏幕的x轴上,屏幕左侧为0,右侧为1,中间为0.5。在上下移动的y轴上,屏幕顶部为0,底部为1。右侧图像展示了帧中左手腕的坐标。
第二个函数接受3个关键点名称,并允许您计算由身体上这3个不同部位形成的角度:
angle = pose_estimator.calculate_body_part_angle('left_shoulder', 'left_elbow', 'left_wrist')
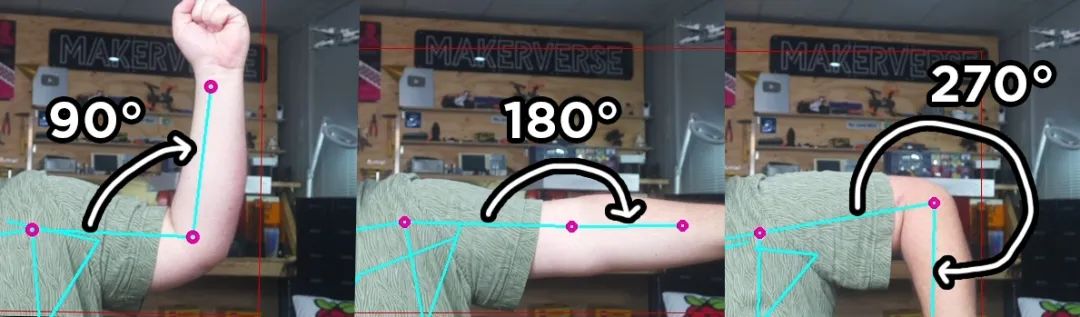
它返回的角度是基于第二个关键点作为参考,第一个和最后一个关键点之间的角度。它也总是从摄像头的角度顺时针测量。以下是左肩、左肘和左手腕之间测量的3个角度:
此部分之后是另外200行代码,幸运的是,您无需触摸或理解这些代码。所有这些代码都用于操作HAT并运行所有必要的计算,以便我们可以使用上述两个函数来获取基本数据。我们将上述所有代码放在一个函数中的原因是,此第二部分在一个线程中运行它。这本质上是一种同时运行多个代码部分的方式 - 从此处开始的200行代码和我们的custom_processing_thread内部的代码同时运行,当我们调用其中一个函数时,我们只是获取这200行代码中最新计算的数据。
这就是关于此基础演示代码您需要了解的所有内容!对于大多数人来说,这应该足以开始在您自己的项目中应用姿态估计。从这里开始,我们将添加一些额外功能,并查看一些以不同方式利用此基础代码的代码示例。
更改相机分辨率
您可能已经注意到,摄像头的视野相当狭窄 - 看起来有点缩放,因此让我们快速看看如何修改这一点。在basic_pipelines文件夹中,有一个名为“hailo_rpi_common”的文件。此文件包含HAT的一些基本操作,如摄像头输入分辨率。请注意,您在此处所做的任何更改也将影响从此文件夹中运行的其他流程,因此,如果您还使用此流程中的目标检测脚本,则此处所做的更改也将影响它。
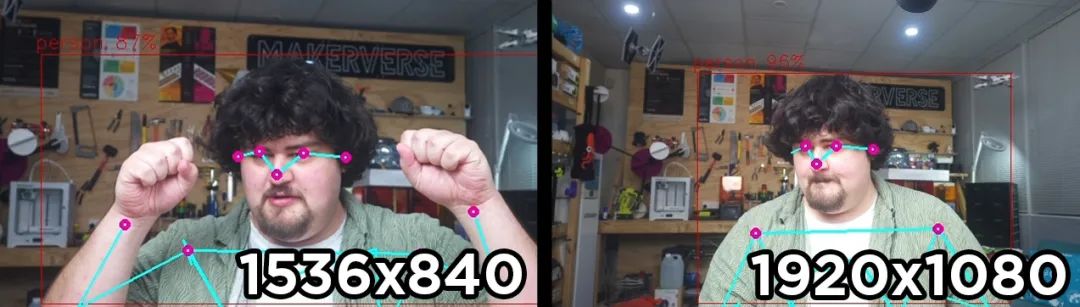
在大约第195行,您将找到负责更改摄像头输入分辨率的行。请注意,这不会更改YOLO处理的分辨率,而只是更改摄像头最初捕获的分辨率。默认情况下,分辨率为1536x840,但您可以将其更改为另一个标准分辨率大小。我们在某些分辨率下遇到了性能问题和崩溃,因此您可能需要一些试错。但是,我们发现1920x1080是一个稳定且足够高的分辨率。以下是结果:
if source_type == 'rpi': source_element = ( f'libcamerasrc name={name} ! ' f'video/x-raw, format={video_format}, width=1920, height=1080 ! '
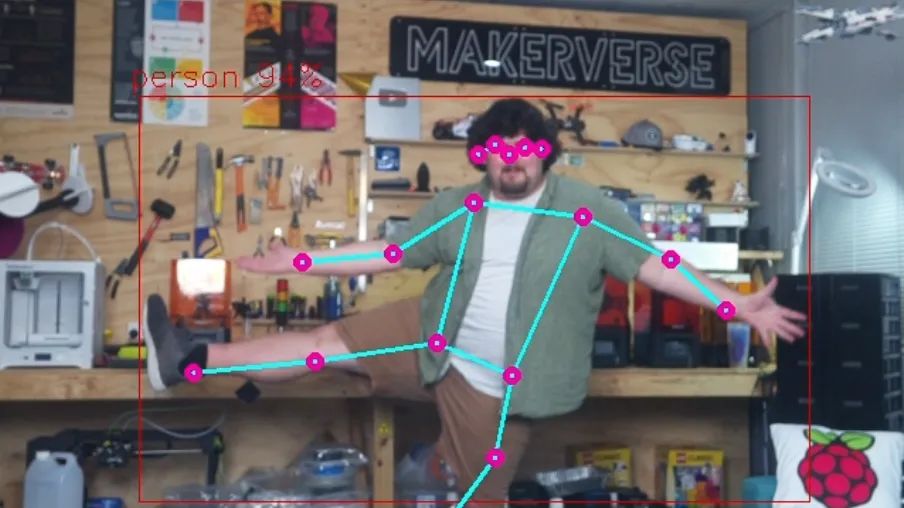
更改分辨率后,我们的视野会更宽,如下所示。
在此部分中,我们可以做的另一件方便的事情是删除占用shell空间的FPS打印输出。在大约第385行,您将找到一个名为“on_fps_measurement”的函数(您也可以按ctrl + F搜索此函数)。此行正在将FPS读数打印到shell,您可以通过像这样注释掉它来禁用它:
def on_fps_measurement(self, sink, fps, droprate, avgfps): #print(f"FPS: {fps:.2f}, Droprate: {droprate:.2f}, Avg FPS: {avgfps:.2f}") return True
示例代码2:手势媒体控制
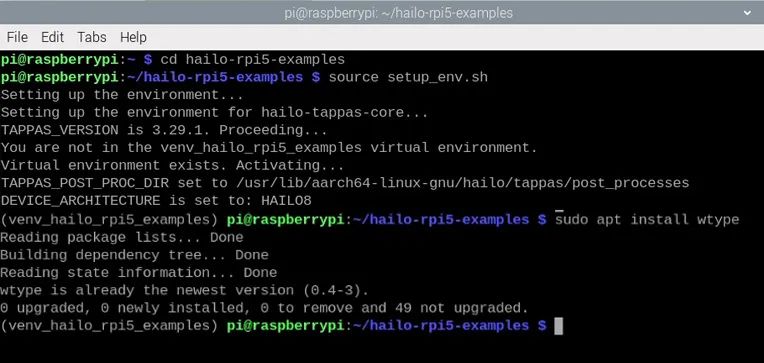
在此示例代码中,我们将使用一个名为wtype的库,根据特定手势模拟键盘输入。要使用wtype,需要先安装它。我们需要将其安装到我们一直使用的同一个虚拟环境中。为此,我们需要确保终端处于我们通常运行脚本之前所需的状态:
cd hailo-rpi5-examplessource setup_env.sh
进入此状态后,我们可以使用以下命令安装wtype:
sudo apt install wtype
现在创建一个新脚本,粘贴以下代码,并将其保存到与上一个脚本相同的basic_pipelines文件夹中。要运行此脚本,您需要使用与之前相同的命令行,但更改为您保存此脚本的名称。
import gigi.require_version('Gst', '1.0')from gi.repository import Gst, GLibimport osimport numpy as npimport cv2import hailoimport threadingimport timefrom queue import Queue, Emptyfrom hailo_apps_infra.hailo_rpi_common import ( get_caps_from_pad, get_numpy_from_buffer, app_callback_class,)from hailo_apps_infra.pose_estimation_pipeline import GStreamerPoseEstimationAppimport subprocessdef custom_processing_thread(pose_estimator):
# This gives enough time for the HAT to fire up and start detecting time.sleep(2)
while True: # get the positions of all the relevant body parts left_wrist = pose_estimator.get_body_part_coordinates('left_wrist') right_wrist = pose_estimator.get_body_part_coordinates('right_wrist') nose = pose_estimator.get_body_part_coordinates('nose')
# if the second element (the y coordinate) of the wrists are higher than the if left_wrist[1] < nose[1] and right_wrist[1] < nose [1]:
# Pause Youtube subprocess.run(['wtype', 'k']) # sleep for 2 seconds so we don't trigger this hundreds of times when we raise arms time.sleep(2)
time.sleep(0.1)
class PoseDataManager: def __init__(self): """ Manages pose estimation data across threads Allows safe access to the latest detection data """ self.latest_detection_lock = threading.Lock() self.latest_detection = None self.latest_width = None self.latest_height = None
def update_detection(self, detection, width, height): """ Update the latest detection data thread-safely
:param detection: Hailo detection object :param width: Frame width :param height: Frame height """ with self.latest_detection_lock: self.latest_detection = detection self.latest_width = width self.latest_height = height
def get_latest_detection(self): """ Retrieve the latest detection data thread-safely
Tuple of (detection, width, height) or (None, None, None) """ with self.latest_detection_lock: return ( self.latest_detection, self.latest_width, self.latest_height )class PoseEstimator: def __init__(self, pose_data_manager): """ Initialize PoseEstimator with a PoseDataManager
:param pose_data_manager: Shared data management object """ self.pose_data_manager = pose_data_manager self.keypoints = self._get_keypoints()
def _get_keypoints(self): """Get the COCO keypoints correspondence map.""" return { 'nose': 0, 'left_eye': 1, 'right_eye': 2, 'left_ear': 3, 'right_ear': 4, 'left_shoulder': 5, 'right_shoulder': 6, 'left_elbow': 7, 'right_elbow': 8, 'left_wrist': 9, 'right_wrist': 10, 'left_hip': 11, 'right_hip': 12, 'left_knee': 13, 'right_knee': 14, 'left_ankle': 15, 'right_ankle': 16, }
def get_body_part_coordinates(self, body_part, significant_figures=4): """ Get normalized coordinates for a specific body part from latest detection
:param body_part: Name of the body part (e.g., 'left_eye') :param significant_figures: Number of decimal places to round to Tuple of normalized (x, y) coordinates or None """ # Get latest detection detection, width, height = self.pose_data_manager.get_latest_detection()
if detection is None or width is None or height is None: return None
# If no landmarks, return None landmarks = detection.get_objects_typed(hailo.HAILO_LANDMARKS) if len(landmarks) == 0: return None
# Get bbox and points bbox = detection.get_bbox() points = landmarks[0].get_points()
# Get the specific keypoint keypoint_index = self.keypoints[body_part] point = points[keypoint_index]
# Directly use the normalized coordinates from the point # Clamp the values between 0 and 1, then round to specified significant figures norm_x = round(max(0, min(1, point.x())), significant_figures) norm_y = round(max(0, min(1, point.y())), significant_figures)
return (norm_x, norm_y)
def calculate_body_part_angle(self, point_a_name, point_b_name, point_c_name): """ Calculate angle between three body parts directly by name, returning an angle in the full 0 to 360 degree range.
:param point_a_name: First body part name (e.g., 'left_shoulder') :param point_b_name: Vertex body part name (e.g., 'left_elbow') :param point_c_name: Third body part name (e.g., 'left_wrist') Angle in degrees or None if coordinates can't be retrieved """ # Get coordinates for each body part point_a = self.get_body_part_coordinates(point_a_name) point_b = self.get_body_part_coordinates(point_b_name) point_c = self.get_body_part_coordinates(point_c_name)
# Check if any coordinates are None if any(point is None for point in [point_a, point_b, point_c]): return None
# Convert to numpy arrays a = np.array(point_a) b = np.array(point_b) c = np.array(point_c)
# Calculate vectors ba = a - b bc = c - b
# Calculate angle using arctan2 for full 360-degree range angle = np.degrees(np.arctan2(np.linalg.det([ba, bc]), np.dot(ba, bc)))
# Ensure the angle is between 0 and 360 degrees if angle < 0: angle += 360
return angleclass user_app_callback_class(app_callback_class): def __init__(self, pose_data_manager): """ Initialize with a PoseDataManager
:param pose_data_manager: Shared data management object """ super().__init__() self.pose_data_manager = pose_data_managerdef app_callback(pad, info, user_data): # Get the GstBuffer from the probe info buffer = info.get_buffer() if buffer is None: return Gst.PadProbeReturn.OK # Get the caps from the pad format, width, height = get_caps_from_pad(pad) # Get the detections from the buffer roi = hailo.get_roi_from_buffer(buffer) detections = roi.get_objects_typed(hailo.HAILO_DETECTION) # Find the person detection person_detection = None for detection in detections: if detection.get_label() == "person": person_detection = detection break # If a person is detected, update the shared data if person_detection is not None: user_data.pose_data_manager.update_detection(person_detection, width, height) return Gst.PadProbeReturn.OKif __name__ == "__main__": # Create PoseDataManager first pose_data_manager = PoseDataManager()
# Create an instance of the user app callback class with pose_data_manager user_data = user_app_callback_class(pose_data_manager)
# Create pose estimator pose_estimator = PoseEstimator(pose_data_manager)
# Start the custom processing thread processing_thread = threading.Thread( target=custom_processing_thread, args=(pose_estimator,), daemon=True ) processing_thread.start() # Run the GStreamer pipeline app = GStreamerPoseEstimationApp(app_callback, user_data) app.run()
此代码旨在解决我在工作室中遇到的一个问题。我经常在观看YouTube时需要暂停,但我可能在房间的另一边,双手都拿着东西。此代码通过在我将双手举过头顶时按下“K”键(YouTube的暂停/播放快捷键)来解决此问题。
以下是我们如何修改基础脚本以实现此功能。首先,我们需要导入subprocess库,我们将使用它来运行wtype。像往常一样,在顶部导入。
import subprocess
然后,在custom_processing_thread中,我们保留了重要的2秒休眠。然后,在while True循环开始时,我们首先获取左手腕、右手腕和鼻子的关键点位置:
def custom_processing_thread(pose_estimator): # This gives enough time for the HAT to fire up and start detecting time.sleep(2) while True: # get the positions of all the relevant body parts left_wrist = pose_estimator.get_body_part_coordinates('left_wrist') right_wrist = pose_estimator.get_body_part_coordinates('right_wrist') nose = pose_estimator.get_body_part_coordinates('nose')
然后,我们有一个if语句比较这些关键点的坐标。当我们使用上述函数获取坐标时,它实际上返回一个包含两个数字的列表,第一个是x,第二个是y。如果我们只想处理其中一个坐标,可以提取第一个或第二个元素。例如,要获取左手腕的x坐标,我们可以使用:
left_wrist_x = left_wrist[0]
要获取y坐标,我们可以使用:
left_wrist_y = left_wrist[1]
因此,在代码的下一部分中,我们比较这些关键点的y坐标(都使用[1]获取),如果左手腕和右手腕的y坐标都小于鼻子的y坐标,则按下k键。请记住,屏幕顶部为0,底部为1,因此如果y坐标较小,则位置较高。
# if the second element (the y coordinate) of the wrists are higher than the if left_wrist[1] < nose[1] and right_wrist[1] < nose [1]: # Pause Youtube subprocess.run(['wtype', 'k']) # sleep for 2 seconds so we don't trigger this hundreds of times when we raise arms time.sleep(2)
示例代码3:舵机控制
在这个演示中,我们将根据人物身上关键点所生成的角度来控制舵机。以下是完整代码:
import gigi.require_version('Gst', '1.0')from gi.repository import Gst, GLibimport osimport numpy as npimport cv2import hailoimport threadingimport timefrom queue import Queue, Emptyfrom hailo_apps_infra.hailo_rpi_common import ( get_caps_from_pad, get_numpy_from_buffer, app_callback_class,)from hailo_apps_infra.pose_estimation_pipeline import GStreamerPoseEstimationAppfrom gpiozero import AngularServodef custom_processing_thread(pose_estimator):
elbow_servo = AngularServo(18, min_pulse_width=0.0006, max_pulse_width=0.0023)
shoulder_servo = AngularServo(19, min_pulse_width=0.0006, max_pulse_width=0.0023)
# This gives enough time for the HAT to fire up and start detecting time.sleep(2)
while True:
elbow_angle = pose_estimator.calculate_body_part_angle('left_shoulder', 'left_elbow', 'left_wrist') elbow_angle = max(0, min(elbow_angle, 180))
shoulder_angle = pose_estimator.calculate_body_part_angle('right_shoulder', 'left_shoulder', 'left_elbow') shoulder_angle = max(0, min(shoulder_angle, 180))
print(elbow_angle, shoulder_angle)
elbow_servo.angle = elbow_angle shoulder_servo.angle = shoulder_angle
time.sleep(0.05) class PoseDataManager: def __init__(self): """ Manages pose estimation data across threads Allows safe access to the latest detection data """ self.latest_detection_lock = threading.Lock() self.latest_detection = None self.latest_width = None self.latest_height = None
def update_detection(self, detection, width, height): """ Update the latest detection data thread-safely
:param detection: Hailo detection object :param width: Frame width :param height: Frame height """ with self.latest_detection_lock: self.latest_detection = detection self.latest_width = width self.latest_height = height
def get_latest_detection(self): """ Retrieve the latest detection data thread-safely
Tuple of (detection, width, height) or (None, None, None) """ with self.latest_detection_lock: return ( self.latest_detection, self.latest_width, self.latest_height )class PoseEstimator: def __init__(self, pose_data_manager): """ Initialize PoseEstimator with a PoseDataManager
:param pose_data_manager: Shared data management object """ self.pose_data_manager = pose_data_manager self.keypoints = self._get_keypoints()
def _get_keypoints(self): """Get the COCO keypoints correspondence map.""" return { 'nose': 0, 'left_eye': 1, 'right_eye': 2, 'left_ear': 3, 'right_ear': 4, 'left_shoulder': 5, 'right_shoulder': 6, 'left_elbow': 7, 'right_elbow': 8, 'left_wrist': 9, 'right_wrist': 10, 'left_hip': 11, 'right_hip': 12, 'left_knee': 13, 'right_knee': 14, 'left_ankle': 15, 'right_ankle': 16, }
def get_body_part_coordinates(self, body_part, significant_figures=4): """ Get normalized coordinates for a specific body part from latest detection
:param body_part: Name of the body part (e.g., 'left_eye') :param significant_figures: Number of decimal places to round to Tuple of normalized (x, y) coordinates or None """ # Get latest detection detection, width, height = self.pose_data_manager.get_latest_detection()
if detection is None or width is None or height is None: return None
# If no landmarks, return None landmarks = detection.get_objects_typed(hailo.HAILO_LANDMARKS) if len(landmarks) == 0: return None
# Get bbox and points bbox = detection.get_bbox() points = landmarks[0].get_points()
# Get the specific keypoint keypoint_index = self.keypoints[body_part] point = points[keypoint_index]
# Directly use the normalized coordinates from the point # Clamp the values between 0 and 1, then round to specified significant figures norm_x = round(max(0, min(1, point.x())), significant_figures) norm_y = round(max(0, min(1, point.y())), significant_figures)
return (norm_x, norm_y)
def calculate_body_part_angle(self, point_a_name, point_b_name, point_c_name): """ Calculate angle between three body parts directly by name, returning an angle in the full 0 to 360 degree range.
:param point_a_name: First body part name (e.g., 'left_shoulder') :param point_b_name: Vertex body part name (e.g., 'left_elbow') :param point_c_name: Third body part name (e.g., 'left_wrist') Angle in degrees or None if coordinates can't be retrieved """ # Get coordinates for each body part point_a = self.get_body_part_coordinates(point_a_name) point_b = self.get_body_part_coordinates(point_b_name) point_c = self.get_body_part_coordinates(point_c_name)
# Check if any coordinates are None if any(point is None for point in [point_a, point_b, point_c]): return None
# Convert to numpy arrays a = np.array(point_a) b = np.array(point_b) c = np.array(point_c)
# Calculate vectors ba = a - b bc = c - b
# Calculate angle using arctan2 for full 360-degree range angle = np.degrees(np.arctan2(np.linalg.det([ba, bc]), np.dot(ba, bc)))
# Ensure the angle is between 0 and 360 degrees if angle < 0: angle += 360
return angleclass user_app_callback_class(app_callback_class): def __init__(self, pose_data_manager): """ Initialize with a PoseDataManager
:param pose_data_manager: Shared data management object """ super().__init__() self.pose_data_manager = pose_data_managerdef app_callback(pad, info, user_data): # Get the GstBuffer from the probe info buffer = info.get_buffer() if buffer is None: return Gst.PadProbeReturn.OK # Get the caps from the pad format, width, height = get_caps_from_pad(pad) # Get the detections from the buffer roi = hailo.get_roi_from_buffer(buffer) detections = roi.get_objects_typed(hailo.HAILO_DETECTION) # Find the person detection person_detection = None for detection in detections: if detection.get_label() == "person": person_detection = detection break # If a person is detected, update the shared data if person_detection is not None: user_data.pose_data_manager.update_detection(person_detection, width, height) return Gst.PadProbeReturn.OKif __name__ == "__main__": # Create PoseDataManager first pose_data_manager = PoseDataManager()
# Create an instance of the user app callback class with pose_data_manager user_data = user_app_callback_class(pose_data_manager)
# Create pose estimator pose_estimator = PoseEstimator(pose_data_manager)
# Start the custom processing thread processing_thread = threading.Thread( target=custom_processing_thread, args=(pose_estimator,), daemon=True ) processing_thread.start() # Run the GStreamer pipeline app = GStreamerPoseEstimationApp(app_callback, user_data) app.run()
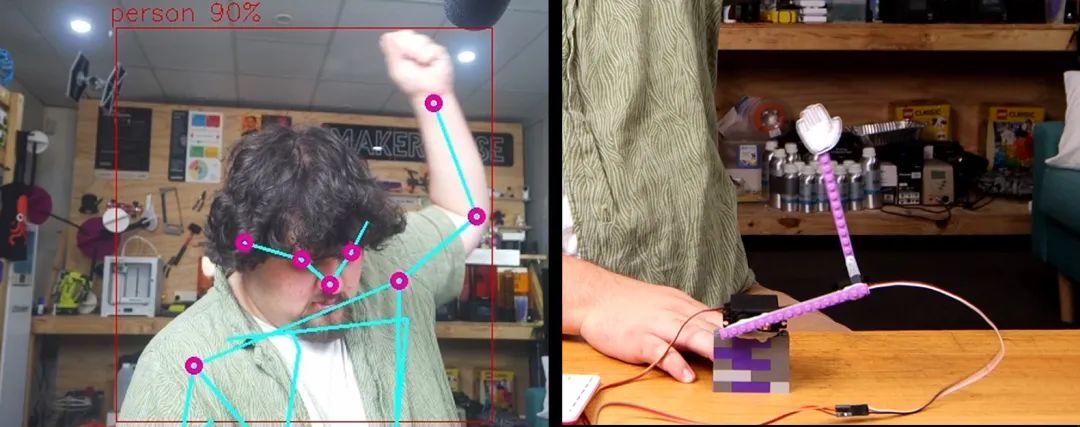
这段代码被设置为控制连接到GPIO引脚18和19的两个舵机,在我们的示例中,我们用乐高积木搭建了一个由两部分组成的机械臂,并将这两个舵机安装其上。随后,代码会获取一个人左肩和左肘的角度,并将舵机调整至这些角度,从而使机械臂能够模仿人的动作。
为实现这一功能,我们首先从gpiozero库中导入AngularServo,这是一个控制舵机的便捷方法:
from gpiozero import AngularServo
接着,在custom_processing_thread函数中,我们设置两个舵机:
def custom_processing_thread(pose_estimator): elbow_servo = AngularServo(18, min_pulse_width=0.0006, max_pulse_width=0.0023) shoulder_servo = AngularServo(19, min_pulse_width=0.0006, max_pulse_width=0.0023) # This gives enough time for the HAT to fire up and start detecting time.sleep(2)
然后,在我们的while True循环中,我们获取左肘(通过左肩、左肘和左手腕关键点)和左肩(通过右肩、左肩和左肘关键点)的角度。在每行代码之后,我们都设置了一个最大值和最小值的限制。这确保了我们的角度保持在0到180度之间,防止我们将像190或300这样的角度意外输入到舵机中,从而避免错误。之后,我们只需将舵机设置为这些角度。
while True: elbow_angle = pose_estimator.calculate_body_part_angle('left_shoulder', 'left_elbow', 'left_wrist') elbow_angle = max(0, min(elbow_angle, 180)) shoulder_angle = pose_estimator.calculate_body_part_angle('right_shoulder', 'left_shoulder', 'left_elbow') shoulder_angle = max(0, min(shoulder_angle, 180)) print(elbow_angle, shoulder_angle) elbow_servo.angle = elbow_angle shoulder_servo.angle = shoulder_angle time.sleep(0.05)
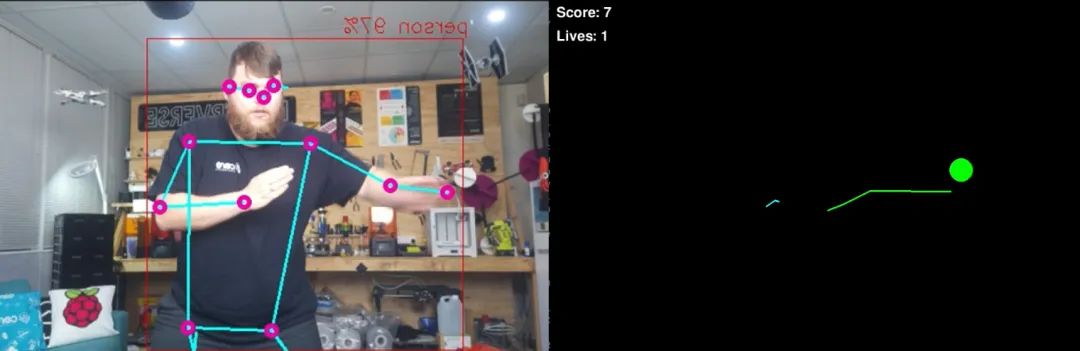
示例代码4:水果忍者
在这个最后的代码示例中,我们创建了一个通过姿态估计控制的水果忍者游戏,所有功能都集成在这个单一的Python脚本中:
import threadingimport queueimport pygameimport randomimport mathfrom collections import namedtupleimport gigi.require_version('Gst', '1.0')from gi.repository import Gst, GLibimport numpy as npimport cv2import hailofrom hailo_apps_infra.hailo_rpi_common import (get_caps_from_pad,get_numpy_from_buffer,app_callback_class,)from hailo_apps_infra.pose_estimation_pipeline import GStreamerPoseEstimationAppimport time# Game constantsWINDOW_WIDTH = 900WINDOW_HEIGHT = 600FPS = 60GRAVITY = 0.5FRUIT_TYPES = ['apple', 'orange', 'watermelon']BLADE_TRAIL_LENGTH = 8POSITION_QUEUE_SIZE = 1INITIAL_SPAWN_RATE = 120# Higher number means slower spawningMIN_SPAWN_RATE = 10# Fastest spawn rate possibleSPAWN_RATE_DECREASE = 1# How much to decrease spawn rate per fruitSTARTING_LIVES = 3GAME_OVER_COUNTDOWN = 5# Seconds before new game starts# ColorsWHITE = (255, 255, 255)RED = (255, 0, 0)GREEN = (0, 255, 0)BLUE = (0, 255, 255)BLACK = (0, 0, 0)# Game objectsFruit = namedtuple('Fruit', ['x', 'y', 'vel_x', 'vel_y', 'radius', 'type', 'sliced'])BladePoint = namedtuple('BladePoint', ['x', 'y'])class PoseNinjaCallback(app_callback_class):def __init__(self):super().__init__()self.left_hand_pos = (WINDOW_WIDTH // 4, WINDOW_HEIGHT // 2)self.right_hand_pos = (3 * WINDOW_WIDTH // 4, WINDOW_HEIGHT // 2)self.use_frame = Trueself.position_queue = queue.Queue(maxsize=POSITION_QUEUE_SIZE)class PoseNinja:def __init__(self):pygame.init()self.screen = pygame.display.set_mode((WINDOW_WIDTH, WINDOW_HEIGHT))pygame.display.set_caption("Pose Ninja")self.clock = pygame.time.Clock()# Initialize game stateself.reset_game()# Initialize pose estimationself.user_data = PoseNinjaCallback()self.app = GStreamerPoseEstimationApp(self.pose_callback, self.user_data)def reset_game(self):self.fruits = []self.score = 0self.lives = STARTING_LIVESself.frame_count = 0self.left_blade_trail = []self.right_blade_trail = []self.current_spawn_rate = INITIAL_SPAWN_RATEself.game_over = Falseself.game_over_timer = 0self.running = Truedef pose_callback(self, pad, info, user_data):buffer = info.get_buffer()if buffer is None:return Gst.PadProbeReturn.OKroi = hailo.get_roi_from_buffer(buffer)detections = roi.get_objects_typed(hailo.HAILO_DETECTION)for detection in detections:if detection.get_label() == "person":landmarks = detection.get_objects_typed(hailo.HAILO_LANDMARKS)if len(landmarks) != 0:points = landmarks[0].get_points()bbox = detection.get_bbox()format, width, height = get_caps_from_pad(pad)# Constants for y-axis scaling relative to frame heightY_MIN = 0.22 * heightY_MAX = 0.78 * heightY_RANGE = Y_MAX - Y_MIN# Left wrist (index 9)left_point = points[9]left_x = WINDOW_WIDTH - int((left_point.x() * bbox.width() + bbox.xmin()) * width * WINDOW_WIDTH / width)raw_y = (left_point.y() * bbox.height() + bbox.ymin()) * heightnormalized_y = (raw_y - Y_MIN) / Y_RANGEleft_y = int(normalized_y * WINDOW_HEIGHT)# Right wrist (index 10)right_point = points[10]right_x = WINDOW_WIDTH - int((right_point.x() * bbox.width() + bbox.xmin()) * width * WINDOW_WIDTH / width)raw_y = (right_point.y() * bbox.height() + bbox.ymin()) * heightnormalized_y = (raw_y - Y_MIN) / Y_RANGEright_y = int(normalized_y * WINDOW_HEIGHT)try:while not self.user_data.position_queue.empty():self.user_data.position_queue.get_nowait()self.user_data.position_queue.put_nowait(((left_x, left_y), (right_x, right_y)))except queue.Full:passreturn Gst.PadProbeReturn.OKdef spawn_fruit(self):x = random.randint(200, WINDOW_WIDTH-200)y = WINDOW_HEIGHT + 50vel_x = random.uniform(-3, 3)vel_y = random.uniform(-25, -16)radius = random.randint(20, 40)fruit_type = random.choice(FRUIT_TYPES)return Fruit(x, y, vel_x, vel_y, radius, fruit_type, False)def update_fruits(self):new_fruits = []for fruit in self.fruits:if not fruit.sliced:new_x = fruit.x + fruit.vel_xnew_y = fruit.y + fruit.vel_ynew_vel_y = fruit.vel_y + GRAVITY# Check if fruit is droppedif new_y > WINDOW_HEIGHT + 100:if not fruit.sliced:self.lives -= 1if self.lives <= 0:self.game_over = Trueself.game_over_timer = GAME_OVER_COUNTDOWN * FPS# Convert to frameselse:new_fruits.append(Fruit(new_x, new_y, fruit.vel_x, new_vel_y,fruit.radius, fruit.type, False))self.fruits = new_fruitsdef update_blade_trails(self):try:left_pos, right_pos = self.user_data.position_queue.get_nowait()self.user_data.left_hand_pos = left_posself.user_data.right_hand_pos = right_posexcept queue.Empty:passself.left_blade_trail.append(BladePoint(*self.user_data.left_hand_pos))self.right_blade_trail.append(BladePoint(*self.user_data.right_hand_pos))while len(self.left_blade_trail) > BLADE_TRAIL_LENGTH:self.left_blade_trail.pop(0)while len(self.right_blade_trail) > BLADE_TRAIL_LENGTH:self.right_blade_trail.pop(0)def check_slices(self):for blade_trail in [self.left_blade_trail, self.right_blade_trail]:if len(blade_trail) < 2:continuefor i in range(len(blade_trail) - 1):p1 = blade_trail[i]p2 = blade_trail[i + 1]for j, fruit in enumerate(self.fruits):if not fruit.sliced:dist = self.point_line_distance(fruit.x, fruit.y, p1.x, p1.y, p2.x, p2.y)if dist < fruit.radius:self.fruits[j] = fruit._replace(sliced=True)self.score += 1# Increase difficultyif self.current_spawn_rate > MIN_SPAWN_RATE:self.current_spawn_rate = max(MIN_SPAWN_RATE, self.current_spawn_rate - SPAWN_RATE_DECREASE)def point_line_distance(self, x, y, x1, y1, x2, y2):A = x - x1B = y - y1C = x2 - x1D = y2 - y1dot = A * C + B * Dlen_sq = C * C + D * Dif len_sq == 0:return math.sqrt(A * A + B * B)param = dot / len_sqif param < 0:return math.sqrt(A * A + B * B)elif param > 1:return math.sqrt((x - x2) * (x - x2) + (y - y2) * (y - y2))else:return abs(A * D - C * B) / math.sqrt(len_sq)def draw(self):self.screen.fill(BLACK)# Draw fruitsfor fruit in self.fruits:if not fruit.sliced:color = RED if fruit.type == 'apple' else \GREEN if fruit.type == 'watermelon' else \(255, 165, 0)# Orangepygame.draw.circle(self.screen, color, (int(fruit.x), int(fruit.y)), fruit.radius)# Draw blade trailsif len(self.left_blade_trail) >= 2:pygame.draw.lines(self.screen, BLUE, False, [(p.x, p.y) for p in self.left_blade_trail], 3)if len(self.right_blade_trail) >= 2:pygame.draw.lines(self.screen, GREEN, False, [(p.x, p.y) for p in self.right_blade_trail], 3)# Draw score and livesfont = pygame.font.Font(None, 36)score_text = font.render(f'Score: {self.score}', True, WHITE)lives_text = font.render(f'Lives: {self.lives}', True, WHITE)self.screen.blit(score_text, (10, 10))self.screen.blit(lives_text, (10, 50))# Draw game over countdownif self.game_over:seconds_left = self.game_over_timer // FPScountdown_text = font.render(f'New game in: {seconds_left}', True, WHITE)text_rect = countdown_text.get_rect(center=(WINDOW_WIDTH//2, WINDOW_HEIGHT//2))self.screen.blit(countdown_text, text_rect)pygame.display.flip()def run_pose_estimation(self):self.app.run()def run(self):# Start pose estimation in a separate threadpose_thread = threading.Thread(target=self.run_pose_estimation)pose_thread.daemon = Truepose_thread.start()# Step 1: Wait for pose estimation to initialize (we can use a sleep or a check here)# We are ensuring pose estimation has started before opening the game windowtime.sleep(1)# Give pose estimation a bit of time to start (adjust as necessary)# Step 2: Now, create the game window after pose estimation has startedself.screen = pygame.display.set_mode((WINDOW_WIDTH, WINDOW_HEIGHT))pygame.display.set_caption("Pose Ninja")# Step 3: Run the game loopwhile self.running:for event in pygame.event.get():if event.type == pygame.QUIT:self.running = Falseelif event.type == pygame.KEYDOWN:if event.key == pygame.K_ESCAPE:self.running = Falseif self.game_over:self.game_over_timer -= 1if self.game_over_timer <= 0:self.reset_game()else:# Spawn new fruits based on current spawn rateif self.frame_count % self.current_spawn_rate == 0:self.fruits.append(self.spawn_fruit())# Update game stateself.update_fruits()self.update_blade_trails()self.check_slices()# Draw everything on the game screenself.draw()# Update frame counterself.frame_count += 1self.clock.tick(FPS)# Cleanup: Close game and pose estimation app when donepygame.quit()self.app.quit()if __name__ == "__main__":game = PoseNinja()game.run()
当我提到“我们”创建了这个水果忍者游戏时,实际上是指我和Claude共同编写的。Claude是一个像Chat GPT一样的大型语言模型,像大多数LLM一样,它非常擅长编写Python代码。为了创建这个游戏,我粘贴了原始的演示代码,并简单地要求它生成一个水果忍者游戏,使用以下提示:
“这是一段在树莓派 AI HAT上运行的姿态估计代码。修改这段代码,创建并控制一个水果忍者游戏。将左右手腕设为刀刃。让水果跳跃并落下,包含一个生命系统,游戏结束后在5秒倒计时后开始新游戏。请让刀刃留下轨迹。随着时间推移,通过增加水果生成速度使游戏逐渐变得更难。为了实现这一点,请使用Pygame,并且不需要额外的库或资源——我应该只需要粘贴你生成的代码并运行它。”
虽然需要几次尝试才能生成正确的代码,并在之后进行了一些微调,但让LLM执行这样的高级任务并利用这种姿态估计代码是完全可能的,这可能超出了你的技能范围(即使我对pygame也不是很精通)。此外,如果你希望学习这段代码,LLM也非常擅长分解和解释它生成的代码——只需询问它即可!
我们不会详细解释这段代码的工作原理,因为它相当复杂,我们也不期望任何人都能理解。我们只是将其作为一个很酷的示例包含在内,展示了可以实现的功能、这段代码的用途,以及它如何与LLM结合使用——这是2020年代“创客”的一项非常“酷”的技能。
接下来做什么?
现在,我们已经设置好了树莓派和AI HAT,并运行了几个示例代码,为你提供了一些关于如何在项目中应用姿态估计的想法。现在唯一需要做的就是弄清楚如何利用它。我们有一些关于Pi的通用指南可以帮助你入门,例如,如何控制直流电机和步进电机、舵机,甚至通过继电器控制电磁阀(你可以使用继电器控制几乎任何东西)。
-
完整指南:如何使用树莓派5、Hailo AI Hat、YOLO、Docker进行自定义数据集训练?2025-06-28 5252
-
MCC推出用于树莓派的MCC 118电压测量HAT模块2018-08-30 3655
-
MCC基于树莓派的HAT模块2018-09-05 2857
-
树莓派MCC1182019-01-21 3796
-
【POE HAT扩展板试用连载】树莓派3B+电路板POE供电应用2020-01-09 2904
-
树莓派新推AI HAT+:26 TOPS高性能版本震撼登场2024-11-07 2838
-
如何将 M.2 HAT+ 与 Raspberry Pi 5 一起使用?2025-03-25 1292
-
在树莓派5上使用YOLO进行物体和动物识别-入门指南2025-07-17 2517
-
在树莓派5上开启YOLO姿态估计识别之旅!2025-07-18 2956
-
如何在树莓派 AI HAT+上进行YOLO目标检测?2025-07-19 2114
-
这个套件让树莓派5运行几乎所有YOLO模型!Conda 与 Ultralytics!2025-07-31 6144
-
如何使用树莓派+OpenCV实现姿态估计和面部特征点追踪?2025-08-13 1632
-
如何使用树莓派与OpenCV实现面部和运动追踪的云台系统?2025-08-14 2974
-
零成本钢铁侠手套!树莓派+OpenCV 秒变手势遥控器!2025-08-16 1804
-
推理<2ms!Ultralytics最新YOLO26+树莓派+国产AI加速卡实现 500 FPS 端侧 AI 性能巅峰!2026-01-30 7564
全部0条评论

快来发表一下你的评论吧 !
