

【干货分享】基于QT和ffmpeg硬解码的多路摄像头取流
描述
目前QT和ffmpeg都已经安装好了,接下来将会使用QT和ffmpeg来进行编程。
https://bbs.elecfans.com/jishu_2496310_1_1.html
前言
其实官方为我们已经提供了三个官方实例,我打开学习了一下,QT实例虽然也用到了信号槽,是点击按钮的信号槽,我觉的QT妙就妙在了信号槽和多线程,而且官方的是QT5;多路摄像头取流案例使用的是采流使用的是GStreamer,UI采用的是GTK库;所以我做了一个QT6+多线程+ffmpeg的多路摄像头取流案例供参考。
代码编写
test.pro 这个地方比较重要的改动主要在于添加ffmpeg要使用的库
QT += core guigreaterThan(QT_MAJOR_VERSION, 4): QT += widgetsCONFIG += c++17# You can make your code fail to compile if it uses deprecated APIs.# In order to do so, uncomment the following line.#DEFINES += QT_DISABLE_DEPRECATED_BEFORE=0x060000 # disables all the APIs deprecated before Qt 6.0.0SOURCES += \ camera.cpp \ main.cpp \ mainwindow.cppHEADERS += \ camera.h \ mainwindow.hFORMS += \ mainwindow.uiLIBS += -lavdevice \-lavformat \-ldrm \-lavfilter \-lavcodec \-lavutil \-lswresample \-lswscale \-lm \-lrga \-lpthread \-lrt \-lrockchip_mpp \-lz# Default rules for deployment.qnx: target.path = /tmp/$${TARGET}/binelse: unix target.path = /opt/$${TARGET}/bin!isEmpty(target.path): INSTALLS += target
camera.h:采集线程的头文件,无需多言
#ifndef CAMERA_H#define CAMERA_H// 显示画面的大小#define DISPLAY_WIDTH 640#define DISPLAY_HEIGHT 360#include #include #include extern "C"{#include "libavdevice/avdevice.h"#include "libavcodec/avcodec.h"#include "libavdevice/avdevice.h"#include "libavfilter/avfilter.h"#include "libavfilter/buffersink.h"#include "libavfilter/buffersrc.h"#include "libavformat/avformat.h"#include "libavutil/pixdesc.h"#include "libavutil/opt.h"#include "libavutil/avassert.h"#include "libavutil/imgutils.h"#include "libavutil/avutil.h"#include "libavutil/audio_fifo.h"#include "libavutil/file.h"#include "libavutil/imgutils.h"#include "libavutil/mathematics.h"#include "libavutil/pixfmt.h"#include "libavutil/time.h"#include "libswscale/swscale.h"#include "libswresample/swresample.h"#include "libavutil/hwcontext.h"#include "libavutil/hwcontext_drm.h"#include #include #include #include #include }class Camera : public QThread { Q_OBJECTpublic: Camera(QObject *parent = 0); virtual ~Camera(); void set_para(int index, const char *rtsp_str);signals: void update_video_label(int, QImage *);protected: virtual void run();private: int index; char *rtsp_str = nullptr; uint8_t *dst_data_main[4]; int dst_linesize_main[4]; QImage *p_image_main = nullptr;};#endif // CAMERA_H
camera.cpp 这部分是代码的关键,是取流的线程,具体的解释已经写好在注释里
#include "camera.h"Camera::Camera(QObject *parent) : QThread(parent) { // 创建显示图像的内存 av_image_alloc(dst_data_main, dst_linesize_main, DISPLAY_WIDTH, DISPLAY_HEIGHT, AV_PIX_FMT_RGB24, 1); p_image_main = new QImage(dst_data_main[0], DISPLAY_WIDTH, DISPLAY_HEIGHT, QImage::Format_RGB888);}Camera::~Camera() {}void Camera::set_para(int index, const char *rtsp_str) { // 配置线程的参数 this->index = index; this->rtsp_str = new char[255]; strcpy(this->rtsp_str, rtsp_str);}void Camera::run() { // 线程执行函数 int src_width, src_height; AVFormatContext *av_fmt_ctx = NULL; AVStream *av_stream = NULL; AVCodecContext* av_codec_ctx; // 设置RTSP连接参数 AVDictionary *options = NULL; av_dict_set(&options, "rtsp_transport", "tcp", 0); av_dict_set(&options, "buffer_size", "1024000", 0); av_dict_set(&options, "stimeout", "2000000", 0); av_dict_set(&options, "max_delay", "500000", 0); // 创建AVFormatContext av_fmt_ctx = avformat_alloc_context(); if (avformat_open_input(&av_fmt_ctx, rtsp_str, NULL, &options) != 0) { qDebug() << "Couldn't open input stream.\n"; } if (avformat_find_stream_info(av_fmt_ctx, NULL) < 0) { qDebug() << "Couldn't find stream information.\n"; } // 选取视频流 for (int i = 0; i < av_fmt_ctx->nb_streams; i++) { if (av_fmt_ctx->streams[i]->codecpar->codec_type == AVMEDIA_TYPE_VIDEO) { av_stream = av_fmt_ctx->streams[i]; break; } } if (av_stream == NULL) { qDebug() << "Couldn't find stream information.\n"; } // 第一句是使用的ffmpeg默认的软编码,第二句是使用的rkmpp硬编码// const AVCodec *av_codec = avcodec_find_decoder(av_stream->codecpar->codec_id); const AVCodec *av_codec = avcodec_find_decoder_by_name("h264_rkmpp"); if (av_codec == nullptr) { qDebug() << "Couldn't find decoder codec.\n"; return; } // 创建CodecContext av_codec_ctx = avcodec_alloc_context3(av_codec); if (av_codec_ctx == nullptr) { qDebug() << "Couldn't find alloc codec context.\n"; } avcodec_parameters_to_context(av_codec_ctx, av_stream->codecpar); // 打开解码器 if (avcodec_open2(av_codec_ctx, av_codec, NULL) < 0) { qDebug() << "Could not open codec.\n"; } // 在调试栏显示使用的解码器 qDebug() << av_codec->long_name << " " << av_codec->name; src_width = av_codec_ctx->width; src_height = av_codec_ctx->height; // 创建AVFrame和AVPacket供解码使用 AVFrame *av_frame = av_frame_alloc(); AVPacket *av_packet = (AVPacket *)av_malloc(sizeof(AVPacket)); // 创建SwsContext,将解码出来的YUV格式,转换成供界面显示的RGB格式,同时对图像进行缩放,缩放成显示大小 struct SwsContext* img_ctx = sws_getContext(src_width, src_height, av_codec_ctx->pix_fmt, DISPLAY_WIDTH, DISPLAY_HEIGHT, AV_PIX_FMT_RGB24, SWS_BILINEAR, 0, 0, 0); while (true) { // 解码流程 if (av_read_frame(av_fmt_ctx, av_packet) >= 0){ avcodec_send_packet(av_codec_ctx, av_packet); while (avcodec_receive_frame(av_codec_ctx, av_frame) == 0) { // 转换画面 sws_scale(img_ctx, (const uint8_t* const*)av_frame->data, av_frame->linesize, 0, src_height, dst_data_main, dst_linesize_main); // 发送信号,将QImage图像地址发送到主线程,供更新界面 // 一般情况下,界面的更新都不允许在子线程进行 // 同时,一些耗时长的操作也一般不允许在主线程进行,例如网络操作,IO操作以及解码等,防止主线程卡死,画面卡顿 emit update_video_label(index, p_image_main); } av_frame_unref(av_frame); av_packet_unref(av_packet); } else { msleep(10); } } return;}
mainwindow.h 这个文件也不必多说,button的点击事件是自动添加的,增加4个采集线程和4个状态。
#ifndef MAINWINDOW_H#define MAINWINDOW_H#include #include "camera.h"QT_BEGIN_NAMESPACEnamespace Ui { class MainWindow; }QT_END_NAMESPACEclass MainWindow : public QMainWindow{ Q_OBJECTpublic: MainWindow(QWidget *parent = nullptr); ~MainWindow();public slots: void update_video_label(int index, QImage *image);private slots: void on_pushButton_1_clicked(); void on_pushButton_2_clicked(); void on_pushButton_3_clicked(); void on_pushButton_4_clicked();private: Ui::MainWindow *ui; Camera **camera = new Camera*[4]; bool status[4] = {false};};#endif // MAINWINDOW_H
mainwindow.cpp 对采集线程进行初始化并绑定更新视图槽
#include "mainwindow.h"#include "ui_mainwindow.h"MainWindow::MainWindow(QWidget *parent) : QMainWindow(parent), ui(new Ui::MainWindow) { ui->setupUi(this); // 对采集线程进行初始化并绑定更新视图槽 camera[0] = new Camera(); camera[1] = new Camera(); camera[2] = new Camera(); camera[3] = new Camera(); connect(camera[0], SIGNAL(update_video_label(int, QImage *)), this, SLOT(update_video_label(int, QImage *))); connect(camera[1], SIGNAL(update_video_label(int, QImage *)), this, SLOT(update_video_label(int, QImage *))); connect(camera[2], SIGNAL(update_video_label(int, QImage *)), this, SLOT(update_video_label(int, QImage *))); connect(camera[3], SIGNAL(update_video_label(int, QImage *)), this, SLOT(update_video_label(int, QImage *)));}MainWindow::~MainWindow() { delete ui;}void MainWindow::on_pushButton_1_clicked() { // 如果已经开始播放,那么就不必继续了,后期可以添加先停止原链接采集再开启新链接采集 if (status[0]) { return; } status[0] = true; camera[0]->set_para(0, ui->lineEdit_1->text().toStdString().c_str()); // 启动采集 camera[0]->start();}void MainWindow::on_pushButton_2_clicked() { // 同button1的点击事件处理 if (status[1]) { return; } status[1] = true; camera[1]->set_para(1, ui->lineEdit_2->text().toStdString().c_str()); camera[1]->start();}void MainWindow::on_pushButton_3_clicked() { // 同button1的点击事件处理 if (status[2]) { return; } status[2] = true; camera[2]->set_para(2, ui->lineEdit_3->text().toStdString().c_str()); camera[2]->start();}void MainWindow::on_pushButton_4_clicked() { // 同button1的点击事件处理 if (status[3]) { return; } status[3] = true; camera[3]->set_para(3, ui->lineEdit_4->text().toStdString().c_str()); camera[3]->start();}void MainWindow::update_video_label(int code, QImage *image) { // 将采集回来的画面显示到对应的界面 switch (code) { case 0: ui->label_video_1->setPixmap(QPixmap::fromImage(*image)); break; case 1: ui->label_video_2->setPixmap(QPixmap::fromImage(*image)); break; case 2: ui->label_video_3->setPixmap(QPixmap::fromImage(*image)); break; case 3: ui->label_video_4->setPixmap(QPixmap::fromImage(*image)); break; default: break; }}
还需要更改的地方
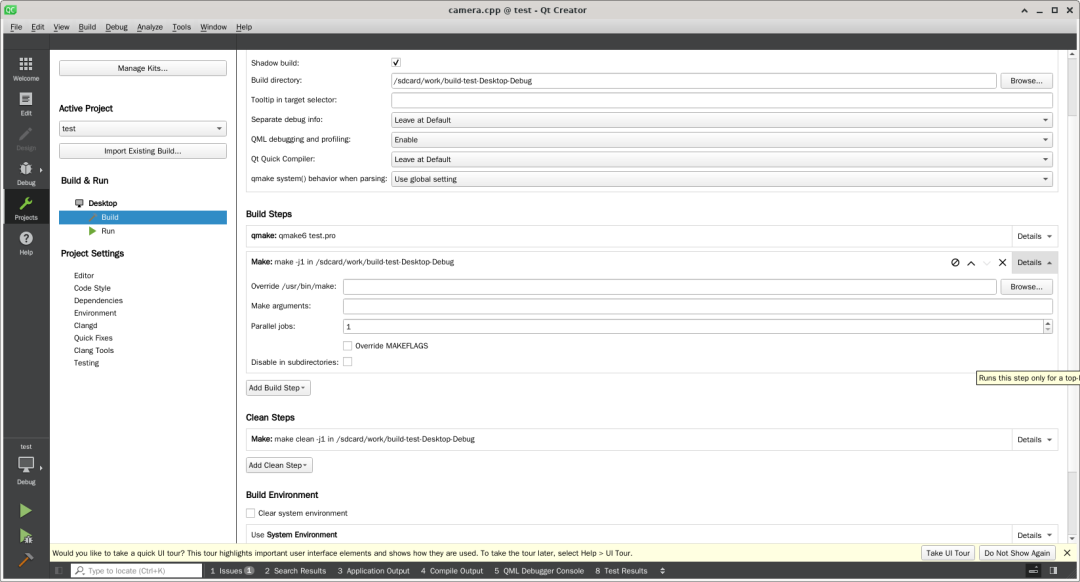
首先第一个更改的地方是吧QT编译的线程降低一些,线程太多容易搞死机,我这里改成了1,可以像我这样修改,就可以了。
第二个问题,让我整整花费了一整天进行修改,我在安装自己编译的ffmpeg前就已经测试过ffmpeg板子没有安装,所以我就默认ffmpeg的库也没有安装,等到我编译完成后总是无法找到h264_rkmpp的解码器,但是偏偏使用ffmpeg来查看时,却拥有h264_rkmpp的解码器,我整整找了一天的问题关键所在。首先,我怀疑的是不是ffmpeg需要开启 --enable-shared 进行动态编译,于是按照猜想执行
./configure --prefix=/usr --enable-gpl --enable-version3 --enable-libdrm --enable-rkmpp --enable-rkrga --enable-sharedmake -j 6sudo make install
但是执行完毕后,依旧没有解决问题,直到花了一天的时间后,我再次使用ldd test的时候突然发现一个问题,明明我的安装路径是在/usr,理论上动态连接库应该是在/usr/lib当中,但是为何是在/lib/aarch64-linux-gnu/下面呢?于是我怀疑虽然没有安装ffmpeg,但是很有可能把ffmpeg的库已经安装上了,所以使用apt search ffmpeg搜索,然后就看到avformat avcodec avutil等库都已经安装好了,所以有时候不要想当然,当把该排除的都排除了,那可能就是最简单的原因,简单到压根都想不起来的程度,发现问题那就解决问题吧。
第一种解决办法,把自带的ffmpeg卸载掉,缺点是依赖比较多,卸载起来还是比较麻烦,但是强烈推荐。
sudo apt remove libavformat-dev libopencv-dev libgstreamer-plugins-bad1.0-dev libcheese-dev libcheese-gtk-dev libopencv-highgui-dev libopencv-contrib-dev libopencv-features2d-dev libopencv-objdetect-dev libopencv-calib3d-dev libopencv-stitching-dev libopencv-videostab-dev libavcodec-dev libavutil-dev libavdevice-dev libswresample-dev libswscale-dev libswresample4 libswscale6 libavutil57 libavformat59 libavcodec59 libchromaprint1 libfreerdp2-2 libopencv-videoio406 gstreamer1.0-plugins-bad libopencv-superres406 libopencv-videoio-dev libopencv-videostab406 libweston-10-0 gnome-video-effects gstreamer1.0-plugins-bad-apps gstreamer1.0-plugins-bad-dbgsym libcheese8 libgstrtspserver-1.0-0 libopencv-superres-dev libweston-10-0-dbgsym libweston-10-dev weston cheese gir1.2-cheese-3.0 gir1.2-gst-rtsp-server-1.0 gstreamer1.0-plugins-bad-apps-dbgsym libcheese-gtk25 libcheese8-dbgsym libgstrtspserver-1.0-dev weston-dbgsym cheese-dbgsym libcheese-gtk25-dbgsym
如果你需要里面的很多库,比如像测试官方的案例,那么就试试第二种解决办法:
首先,我们不能让qt编译时选择默认的include和lib路径,这也就是为什么在.pro中没有写路径也可以找到ffmpeg的头文件和库文件,我们需要添加路径,修改test.pro文件如下:
QT += core guigreaterThan(QT_MAJOR_VERSION, 4): QT += widgetsCONFIG += c++17# You can make your code fail to compile if it uses deprecated APIs.# In order to do so, uncomment the following line.#DEFINES += QT_DISABLE_DEPRECATED_BEFORE=0x060000 # disables all the APIs deprecated before Qt 6.0.0SOURCES += \ camera.cpp \ main.cpp \ mainwindow.cppHEADERS += \ camera.h \ mainwindow.hFORMS += \ mainwindow.uiINCLUDEPATH += /usr/includeLIBS += -L/usr/lib \-lavdevice \-lavformat \-ldrm \-lavfilter \-lavcodec \-lavutil \-lswresample \-lswscale \-lm \-lrga \-lpthread \-lrt \-lrockchip_mpp \-lz# Default rules for deployment.qnx: target.path = /tmp/$${TARGET}/binelse: unix target.path = /opt/$${TARGET}/bin!isEmpty(target.path): INSTALLS += target
这样我们就强制让qt使用我们指定的ffmpeg的头文件和库文件了,但是仅仅有这些还不够,我们还需要在编译后,运行时指定动态链接库:
LD_LIBRARY_PATH=/usr/lib ./test
运行,对比及分析
首先我们尝试使用软解码来看看接入4路1080P 25FPS RTSP流,显示画面如下:
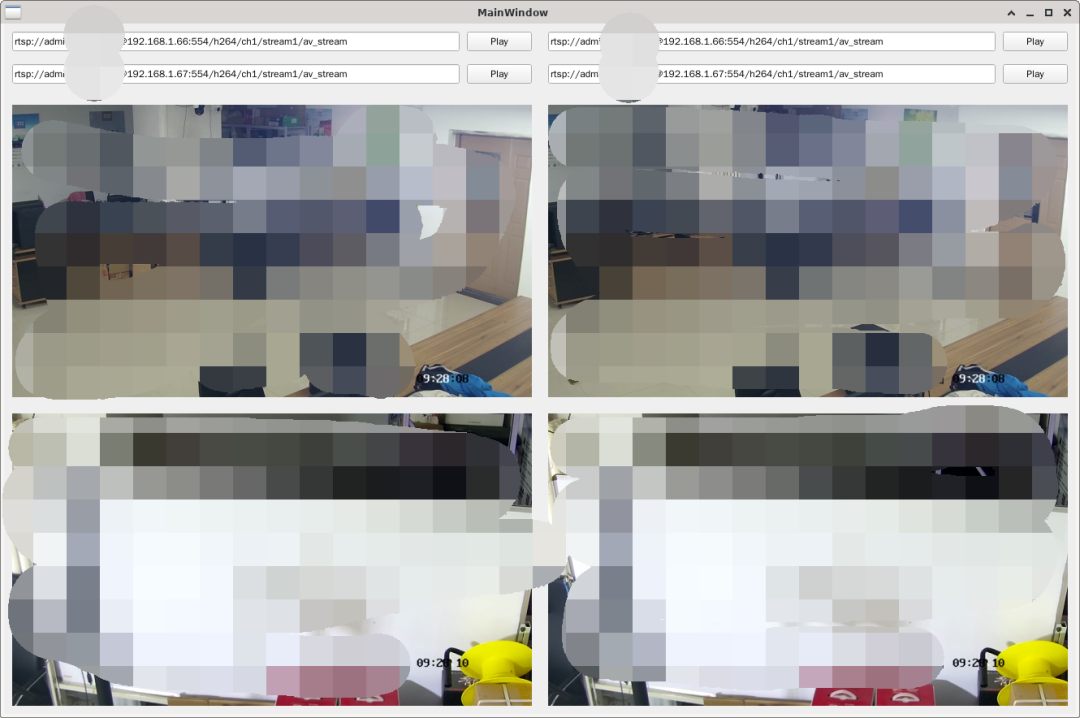
CPU占用:
然后我们看看用硬解码接入相同的码流,甚至清晰度还要好过软解码: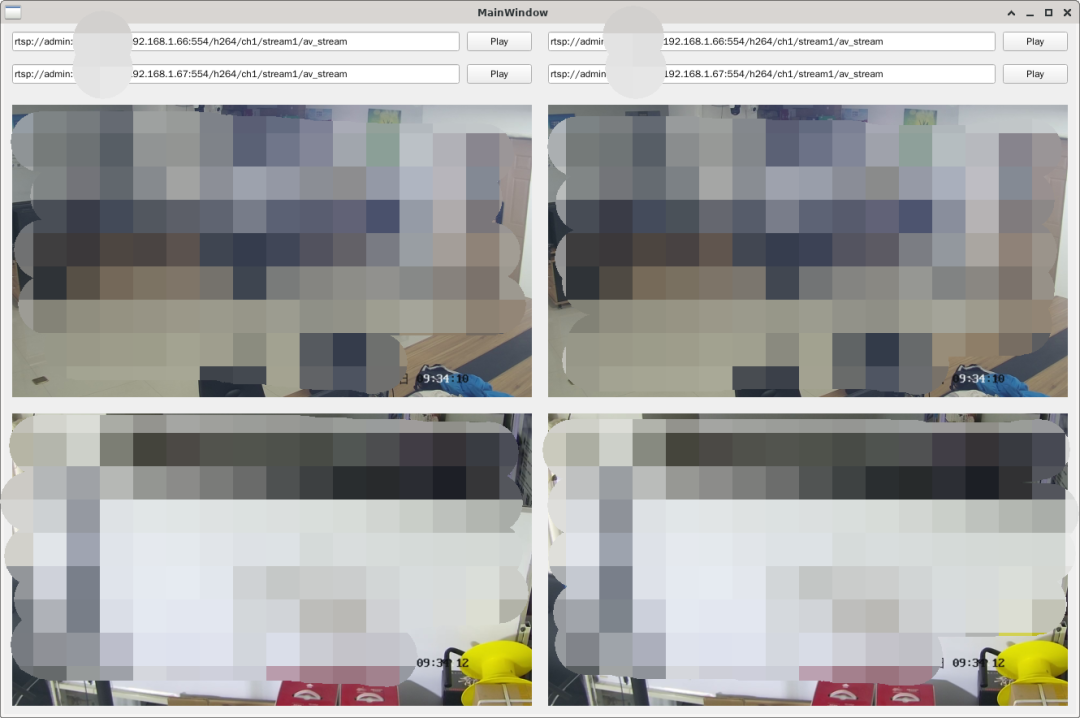
CPU占用: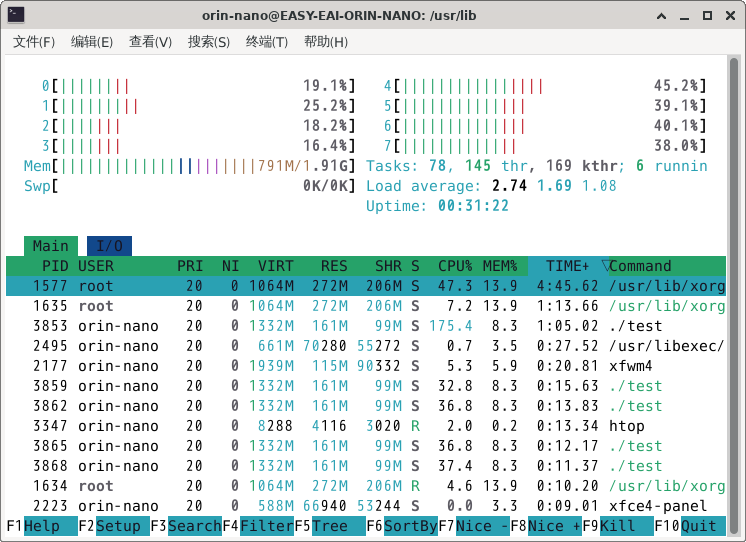
可以看到硬解码接入后直接降低至少一般的CPU占用率,其实降低的要远远超过一半,因为从GPU把解码后的视频数据拷贝到内存当中、对图像进行缩放以及显示图像都是CPU占用率极高的地方,所以这也是后期优化的方向。
 声明:本文由电子发烧友社区发布,转载请注明以上来源。如需平台(包括:试用+专栏+企业号+学院+技术直播+共建社区)合作及入群交流,请咨询18925255684(微信同号:elecfans123),谢谢!
-
【EASY EAI Orin Nano开发板试用体验】05-基于QT和ffmpeg硬解码的多路摄像头取流2025-07-25 1610
-
基于RV1126开发板实现多路网络摄像头取流方案2025-04-11 1660
-
《深入理解FFmpeg阅读体验》FFmpeg摄像头测试2024-04-17 783
-
RV1126通过v4l2拉取usb摄像头mjpeg流解码耗时很长如何解决2022-11-23 1822
-
基于FFMPEG采集摄像头图像编码MP4视频+时间水印2022-09-29 5685
-
嵌入式Qt-简易网络监控摄像头2022-09-14 3179
-
在QT上构建ffmpeg环境实现音频的解码2022-06-09 1894
-
在RK3288主板Debian 9.13系统上如何调用CPU硬解进行网络摄像头视频流解码?2022-03-03 2604
-
英创信息技术ESM6802支持Qt摄像头应用简介2020-02-06 1880
-
labview如何连接多路网络摄像头采集视频2019-12-26 5402
-
安防摄像头的过流保护2017-12-29 2845
-
ESM6802支持Qt摄像头应用2017-10-20 2268
-
nanopi m1最新rom支持摄像头模块CAM500A2016-09-08 4170
-
LabVIEW获取网络摄像头方法2013-04-14 154997
全部0条评论

快来发表一下你的评论吧 !
