
Vivado软件仿真DDS核的过程中应该注意的问题
模拟技术
描述
本人需要利用Vivado软件中的DDS核生成一个正弦信号。由于后期还要生成线性调频信号,如果直接编写代码生成比特流文件下载到板子上进行验证会使工作的效率大大下降,所有想利用Vivado软件功能仿真,这样可以极大的提高效率。Vivado软件自带仿真功能,不需要对IP核进行特别的处理,所以很方便。
DDS核的基本原理,看以下一个链接: https://www.xilinx.com/support/documentation/ip_documentation/dds_compil.。。
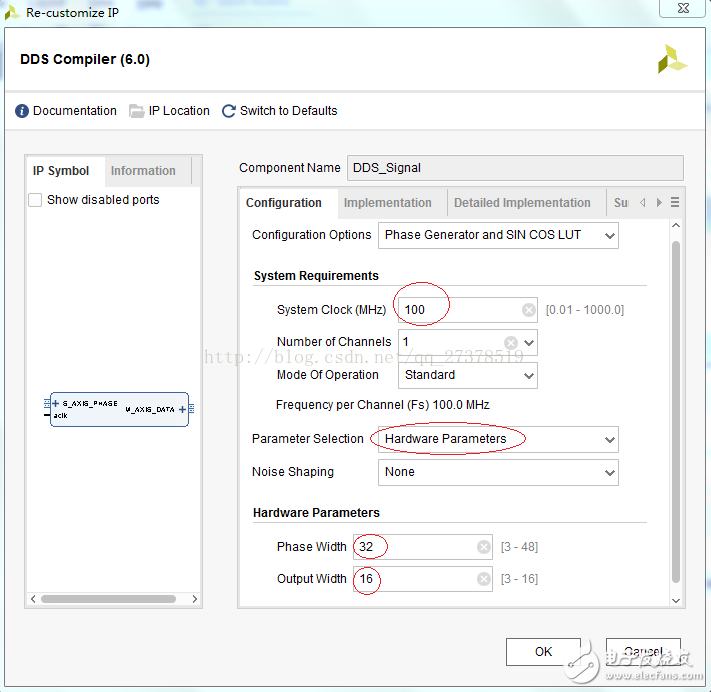
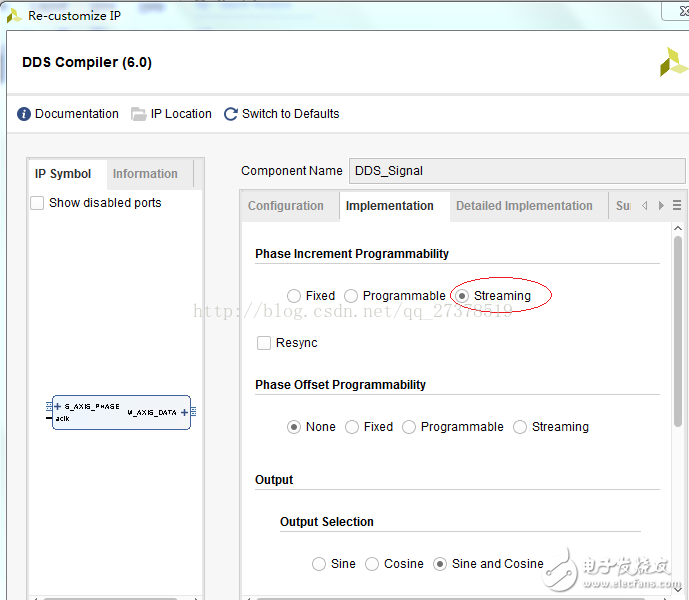
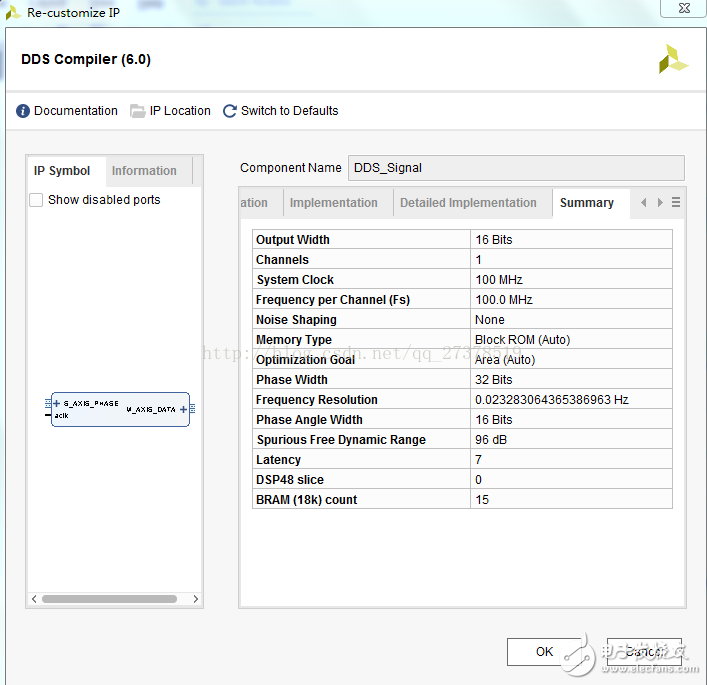
此处对DDS核的配置如下:DDS核命名DDS_Signal


注意:上图中红色标记是更改的配置的参数,其他都默认设置。
生成DDS核后,自己利用Verilog写了一个很简单的测试平台,频率控制字配置好。
`timescale 1ns / 1ps
//////////////////////////////////////////////////////////////////////////////////
// Company:
// Engineer:
//
// Create Date: 2017/10/14 14:43:25
// Design Name:
// Module Name: Signal_DDS_tb
// Project Name:
// Target Devices:
// Tool Versions:
// Description:
//
// Dependencies:
//
// Revision:
// Revision 0.01 - File Created
// Additional Comments:
//
//////////////////////////////////////////////////////////////////////////////////
module Signal_DDS_tb(
);
parameter PERIOD=10;
reg CLK=0;
always begin
#(PERIOD/2) CLK=~CLK;
end
reg s_axis_phase_tvalid = 1‘d1;
reg [31:0] s_axis_phase_tdata = 32’d42949673;//此处是频率控制字,生成1M的正余弦信号
wire m_axis_data_tvalid;
wire [31:0] m_axis_data_tdata;
DDS_Signal DDS_Signal_inst (
.aclk (CLK ), // input wire aclk
.s_axis_phase_tvalid (s_axis_phase_tvalid), // input wire s_axis_phase_tvalid
.s_axis_phase_tdata (s_axis_phase_tdata ), // input wire [31 : 0] s_axis_phase_tdata
.m_axis_data_tvalid (m_axis_data_tvalid ), // output wire m_axis_data_tvalid
.m_axis_data_tdata (m_axis_data_tdata ) // output wire [31 : 0] m_axis_data_tdata
);
endmodule
至此,认为任务完成,进行仿真。
仿真结果如下:
输出的结果m_axis_data_tdata[31:0]的没有数据。
开始查找原因,抓取DDS核的输入是否正确即s_axis_phase_tvalid和s_axis_phase_tdata是否正确,抓取的结果如下:
上图的中DDS核的输入不是绿色,而是橙色(目前还不知道橙色是什么,需要查资料)说明有问题,DDS核的输入没有拿到数据。
刚开始认为是IP库哪里没有配置对,于是决定下载到项目组正在调试的板子上进行验证程序是否有问题,将没有改动的代码下载到板子上进行调试,发现结果是正确的。
询问了单位中资历老师父也不知道为什么会出现这个问题。
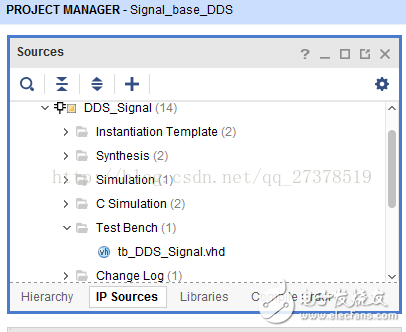
后来发现DDS核有自己的testbench文件

于是利用它的测试平台去测试这个IP。
--------------------------------------------------------------------------------
-- (c) Copyright 2010 - 2013 Xilinx, Inc. All rights reserved.
--
-- This file contains confidential and proprietary information
-- of Xilinx, Inc. and is protected under U.S. and
-- international copyright and other intellectual property
-- laws.
--
-- DISCLAIMER
-- This disclaimer is not a license and does not grant any
-- rights to the materials distributed herewith. Except as
-- otherwise provided in a valid license issued to you by
-- Xilinx, and to the maximum extent permitted by applicable
-- law: (1) THESE MATERIALS ARE MADE AVAILABLE “AS IS” AND
-- WITH ALL FAULTS, AND XILINX HEREBY DISCLAIMS ALL WARRANTIES
-- AND CONDITIONS, EXPRESS, IMPLIED, OR STATUTORY, INCLUDING
-- BUT NOT LIMITED TO WARRANTIES OF MERCHANTABILITY, NON-
-- INFRINGEMENT, OR FITNESS FOR ANY PARTICULAR PURPOSE; and
-- (2) Xilinx shall not be liable (whether in contract or tort,
-- including negligence, or under any other theory of
-- liability) for any loss or damage of any kind or nature
-- related to, arising under or in connection with these
-- materials, including for any direct, or any indirect,
-- special, incidental, or consequential loss or damage
-- (including loss of data, profits, goodwill, or any type of
-- loss or damage suffered as a result of any action brought
-- by a third party) even if such damage or loss was
-- reasonably foreseeable or Xilinx had been advised of the
-- possibility of the same.
--
-- CRITICAL APPLICATIONS
-- Xilinx products are not designed or intended to be fail-
-- safe, or for use in any application requiring fail-safe
-- performance, such as life-support or safety devices or
-- systems, Class III medical devices, nuclear facilities,
-- applications related to the deployment of airbags, or any
-- other applications that could lead to death, personal
-- injury, or severe property or environmental damage
-- (individually and collectively, “Critical
-- Applications”)。 Customer assumes the sole risk and
-- liability of any use of Xilinx products in Critical
-- Applications, subject only to applicable laws and
-- regulations governing limitations on product liability.
--
-- THIS COPYRIGHT NOTICE AND DISCLAIMER MUST BE RETAINED AS
-- PART OF THIS FILE AT ALL TIMES.
--------------------------------------------------------------------------------
-- Description:
-- This is an example testbench for the DDS Compiler IP core.
-- The testbench has been generated by Vivado to accompany the IP core
-- instance you have generated.
--
-- This testbench is for demonstration purposes only. See note below for
-- instructions on how to use it with your core.
--
-- See the DDS Compiler product guide for further information
-- about this core.
--
--------------------------------------------------------------------------------
-- Using this testbench
--
-- This testbench instantiates your generated DDS Compiler core
-- instance named “DDS_Signal”。
--
-- Use Vivado‘s Run Simulation flow to run this testbench. See the Vivado
-- documentation for details.
--------------------------------------------------------------------------------
library ieee;
use ieee.std_logic_1164.all;
use ieee.numeric_std.all;
use ieee.math_real.all;
entity tb_DDS_Signal is
end tb_DDS_Signal;
architecture tb of tb_DDS_Signal is
-----------------------------------------------------------------------
-- Timing constants
-----------------------------------------------------------------------
constant CLOCK_PERIOD : time := 100 ns;
constant T_HOLD : time := 10 ns;
constant T_STROBE : time := CLOCK_PERIOD - (1 ns);
-----------------------------------------------------------------------
-- DUT input signals
-----------------------------------------------------------------------
-- General inputs
signal aclk : std_logic := ’0‘; -- the master clock
-- Phase slave channel signals
signal s_axis_phase_tvalid : std_logic := ’0‘; -- payload is valid
signal s_axis_phase_tdata : std_logic_vector(31 downto 0) := (others =》 ’0‘); -- data payload
-- Data master channel signals
signal m_axis_data_tvalid : std_logic := ’0‘; -- payload is valid
signal m_axis_data_tdata : std_logic_vector(31 downto 0) := (others =》 ’0‘); -- data payload
-----------------------------------------------------------------------
-- Aliases for AXI channel TDATA and TUSER fields
-- These are a convenience for viewing data in a simulator waveform viewer.
-- If using ModelSim or Questa, add “-voptargs=+acc=n” to the vsim command
-- to prevent the simulator optimizing away these signals.
-----------------------------------------------------------------------
-- Phase slave channel alias signals
signal s_axis_phase_tdata_inc : std_logic_vector(31 downto 0) := (others =》 ’0‘);
-- Data master channel alias signals
signal m_axis_data_tdata_cosine : std_logic_vector(15 downto 0) := (others =》 ’0‘);
signal m_axis_data_tdata_sine : std_logic_vector(15 downto 0) := (others =》 ’0‘);
signal end_of_simulation : boolean := false;
begin
-----------------------------------------------------------------------
-- Instantiate the DUT
-----------------------------------------------------------------------
dut : entity work.DDS_Signal
port map (
aclk =》 aclk
,s_axis_phase_tvalid =》 s_axis_phase_tvalid
,s_axis_phase_tdata =》 s_axis_phase_tdata
,m_axis_data_tvalid =》 m_axis_data_tvalid
,m_axis_data_tdata =》 m_axis_data_tdata
);
-----------------------------------------------------------------------
-- Generate clock
-----------------------------------------------------------------------
clock_gen : process
begin
aclk 《= ’0‘;
if (end_of_simulation) then
wait;
else
wait for CLOCK_PERIOD;
loop
aclk 《= ’0‘;
wait for CLOCK_PERIOD/2;
aclk 《= ’1‘;
wait for CLOCK_PERIOD/2;
end loop;
end if;
end process clock_gen;
-----------------------------------------------------------------------
-- Generate inputs
-----------------------------------------------------------------------
stimuli : process
begin
-- Drive inputs T_HOLD time after rising edge of clock
wait until rising_edge(aclk);
wait for T_HOLD;
-- Input a constant phase increment each cycle, and run for long enough to produce 5 periods of outputs
for cycle in 0 to 159 loop
s_axis_phase_tvalid 《= ’1‘;
s_axis_phase_tdata 《= (others =》 ’0‘); -- set unused TDATA bits to zero
s_axis_phase_tdata(31 downto 0) 《= “00000010100011110101110000101001”; -- constant phase increment//频率控制字,需要改动的参数,原来为全为0
wait for CLOCK_PERIOD;
end loop;
s_axis_phase_tvalid 《= ’0‘;
-- End of test
end_of_simulation 《= true;
report “Not a real failure. Simulation finished successfully. Test completed successfully” severity failure;
wait;
end process stimuli;
-----------------------------------------------------------------------
-- Check outputs
-----------------------------------------------------------------------
check_outputs : process
variable check_ok : boolean := true;
begin
-- Check outputs T_STROBE time after rising edge of clock
wait until rising_edge(aclk);
wait for T_STROBE;
-- Do not check the output payload values, as this requires the behavioral model
-- which would make this demonstration testbench unwieldy.
-- Instead, check the protocol of the data master channel:
-- check that the payload is valid (not X) when TVALID is high
if m_axis_data_tvalid = ’1‘ then
if is_x(m_axis_data_tdata) then
report “ERROR: m_axis_data_tdata is invalid when m_axis_data_tvalid is high” severity error;
check_ok := false;
end if;
end if;
assert check_ok
report “ERROR: terminating test with failures.” severity failure;
end process check_outputs;
-----------------------------------------------------------------------
-- Assign TDATA fields to aliases, for easy simulator waveform viewing
-----------------------------------------------------------------------
-- Phase slave channel alias signals
s_axis_phase_tdata_inc 《= s_axis_phase_tdata(31 downto 0);
-- Data master channel alias signals: update these only when they are valid
m_axis_data_tdata_cosine 《= m_axis_data_tdata(15 downto 0) when m_axis_data_tvalid = ’1‘;
m_axis_data_tdata_sine 《= m_axis_data_tdata(31 downto 16) when m_axis_data_tvalid = ’1‘;
end tb;
利用软件给的测试平台仿真如下:
发现用他的仿真平台是正确的,通过对比发现,模板的仿真平台的valid信号是在仿真后有数个clock才有效。于是自己修改自己的测试平台,加入一个rst信号,让仿真运行起来后10clock后在进行工作。修改后的测试平台代码如下:
`timescale 1ns / 1ps
//////////////////////////////////////////////////////////////////////////////////
// Company:
// Engineer:
//
// Create Date: 2017/10/14 14:43:25
// Design Name:
// Module Name: Signal_DDS_tb
// Project Name:
// Target Devices:
// Tool Versions:
// Description:
//
// Dependencies:
//
// Revision:
// Revision 0.01 - File Created
// Additional Comments:
//
//////////////////////////////////////////////////////////////////////////////////
module Signal_DDS_tb(
);
parameter PERIOD=10;
reg CLK=0;
always begin
#(PERIOD/2) CLK=~CLK;
end
reg rst=1’d1;
reg [4:0] rst_cnt = 4‘d0;
always @ (posedge CLK)
begin
if(rst_cnt《= 4’d9)begin
rst_cnt 《= rst_cnt +1‘d1;
end
else begin
rst_cnt 《= rst_cnt;
end
end
always @ (posedge CLK)
begin
if(rst_cnt==10)begin
rst 《= 1’d0;
end
else begin
rst 《= rst;
end
end
reg s_axis_phase_tvalid = 1‘d0;
reg [31:0] s_axis_phase_tdata = 32’d0;
wire m_axis_data_tvalid;
wire [31:0] m_axis_data_tdata;
always @ (posedge CLK)
begin
if(rst == 0)begin
s_axis_phase_tvalid 《= 1‘d1;
s_axis_phase_tdata 《= 32’d42949673;
end
else begin
s_axis_phase_tvalid 《= 1‘d0;
s_axis_phase_tdata 《= 32’d0;
end
end
DDS_Signal DDS_Signal_inst (
.aclk (CLK ), // input wire aclk
.s_axis_phase_tvalid (s_axis_phase_tvalid ), // input wire s_axis_phase_tvalid
.s_axis_phase_tdata (s_axis_phase_tdata ), // input wire [31 : 0] s_axis_phase_tdata
.m_axis_data_tvalid (m_axis_data_tvalid ), // output wire m_axis_data_tvalid
.m_axis_data_tdata (m_axis_data_tdata ) // output wire [31 : 0] m_axis_data_tdata
);
endmodule
修改代码后仿真的结果:
至此,找到问题原因。得出结论:现在仿真软件做的都尽可能的接近实际情况,在实际的电路中IP核要正常工作需要消耗一定的clock,所以以后在对IP进行仿真时需要加入rst信号即要仿真运行数个clock后再对IP核进行操作。
-
vcs和vivado联合仿真2025-10-24 182
-
感应焊接的优点,高频焊接过程中应该注意哪些问题?2023-12-21 2259
-
如何读懂FPGA开发过程中的Vivado时序报告?2023-06-26 2276
-
VCS独立仿真Vivado IP核的问题补充2023-06-06 2835
-
Vivado生成IP核2023-04-24 3406
-
直线模组运行过程中抖动应该怎么处理?2023-03-31 1640
-
使用VCS仿真Vivado IP核时遇到的问题及解决方案2022-08-29 4622
-
高压差分探头选择过程中应该注意什么2022-05-06 2748
-
STM32使用过程中应该注意哪些事项?2021-12-21 1419
-
浅析Vivado的IP核DDS使用方式及注意事项2021-04-27 12283
-
VCS独立仿真Vivado IP核的一些方法总结2021-03-22 5334
-
Vivado下的仿真详细过程2018-11-10 38359
-
vivado调用IP核详细介绍2018-05-28 38547
-
了解Vivado中IP核的原理与应用2017-11-15 10492
全部0条评论

快来发表一下你的评论吧 !

