

 最新MCP规范解读,看这篇就够了!
电子说
描述
一、MCP是什么? 为什么需要它?
想象一下,你正在开发一个 AI 编程助手,它需要:
读取和修改项目文件
查询数据库Schema
搜索代码仓库
执行Git操作
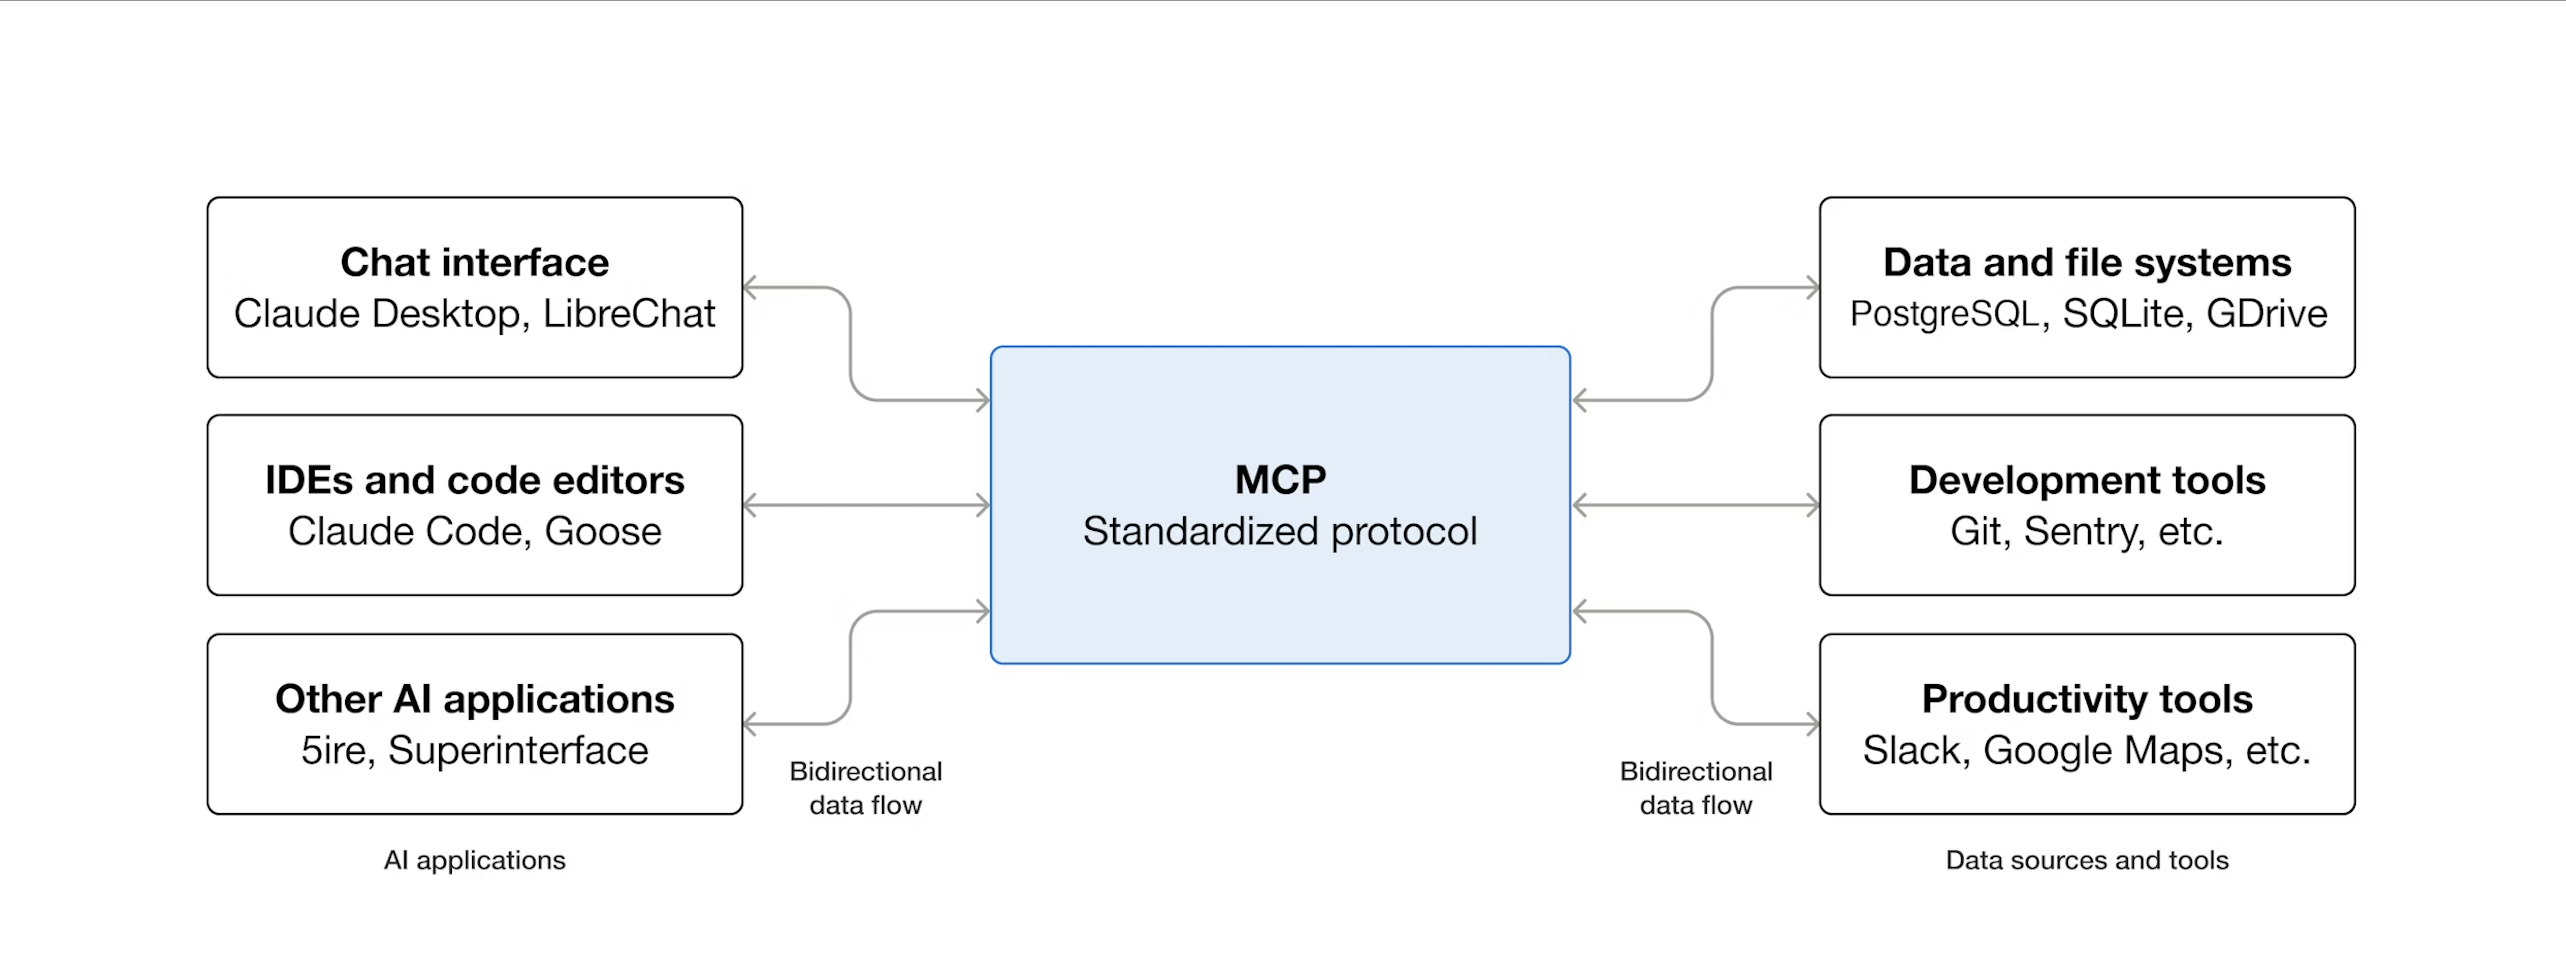
传统做法是为每个数据源写一套专用代码,不同团队重复造轮子。Model Context Protocol(MCP) 就是为了解决这个问题而生的开放标准协议。
通俗理解: MCP就像是「AI应用的USB接口标准」。就像USB让不同设备都能接入电脑一样,MCP让不同的数据源和工具都能以统一方式接入AI应用。
实际案例: 在Claude Desktop中,你可以配置多个官方MCP服务器:
Filesystem服务器: 安全地读写本地文件,有权限控制
SQLite服务器: 查询和分析SQLite数据库,自动生成SQL
GitHub服务器: 搜索仓库、创建Issue、管理PR
你的AI应用只需实现一个MCP客户端,就能连接所有服务器,无需为每个服务器写专用代码。
二、架构设计: 三个角色的分工
MCP采用宿主-客户端-服务器三层架构,就像一家公司的组织结构:
宿主(Host) = 总经理
管理所有客户端
控制安全策略和权限
负责AI模型的调用
客户端(Client) = 部门经理
客户端负责连接服务器
负责双方的沟通协调
转发消息和通知
服务器(Server) = 业务专员
提供具体功能(资源、工具、提示模板)
可以是本地程序或远程服务
不知道其他服务器的存在
三、协议约定:统一规范与个性化扩展
每个MCP服务器提供的工具、资源都不一样,但它们都遵循相同的MCP协议规范。
3.1 协议的分层设计
MCP采用 基础协议 + 功能扩展 的设计,就像HTTP协议一样:
核心层(所有实现必须支持):
JSON-RPC 2.0消息格式
初始化握手流程(initialize/initialized)
基本错误处理
功能层(按需选择):
Resources、Prompts、Tools(服务器端)
Roots、Sampling、Elicitation(客户端)
这样设计的好处:
统一的基础协议 → 保证互操作性
     +
灵活的功能选择 → 满足不同场景需求
     ↓
既标准化又可扩展
3.2 协议约定的过程
步骤1: 基础协议是固定的
所有MCP服务器和客户端都遵循相同的JSON-RPC 2.0格式:
// 请求格式(固定)
{
  "jsonrpc": "2.0",      // 必须是2.0
  "id": 1,                // 唯一标识
  "method": "方法名",     // 要调用的方法
  "params": {...}         // 参数对象
}

// 响应格式(固定)
{
  "jsonrpc": "2.0",
  "id": 1,                // 对应请求的ID
  "result": {...}         // 成功结果
  // 或 "error": {...}    // 错误信息
}
步骤2: 能力在初始化时协商
// 客户端发起初始化
{
  "method": "initialize",
  "params": {
    "protocolVersion": "2024-11-05",
    "capabilities": {
      "sampling": {},       // 我支持LLM采样
      "roots": {}           // 我支持根目录
    },
    "clientInfo": {"name": "MyClient", "version": "1.0"}
  }
}

// 服务器响应
{
  "result": {
    "protocolVersion": "2024-11-05",
    "capabilities": {
      "tools": {},          // 我提供工具
      "resources": {}       // 我提供资源
    },
    "serverInfo": {"name": "SQLiteServer", "version": "2.0"}
  }
}
协商完成后,双方都知道对方支持什么功能,只使用交集部分。
步骤3: 方法名称是标准化的
MCP规范定义了标准方法名:
| 功能 | 方法名 | 说明 |
|---|---|---|
| 列出资源 | resources/list | 固定方法名 |
| 读取资源 | resources/read | 固定方法名 |
| 列出工具 | tools/list | 固定方法名 |
| 调用工具 | tools/call | 固定方法名 |
| 列出提示 | prompts/list | 固定方法名 |
| 获取提示 | prompts/get | 固定方法名 |
步骤4: 具体内容是个性化的
虽然方法名固定,但每个服务器返回的具体数据不同:
// SQLite服务器的工具
{
  "tools": [
    {"name": "query", "description": "执行SQL查询"},
    {"name": "list_tables", "description": "列出所有表"}
  ]
}

// Filesystem服务器的工具
{
  "tools": [
    {"name": "read_file", "description": "读取文件"},
    {"name": "write_file", "description": "写入文件"},
    {"name": "search_files", "description": "搜索文件"}
  ]
}
3.3 协议发现机制
客户端如何知道服务器有哪些工具?
第一步:列举
客户端 → 服务器: {"method": "tools/list"}
服务器 → 客户端: {
  "tools": [
    {
      "name": "query",
      "description": "执行SQL查询",
      "inputSchema": {           // JSON Schema定义输入格式
        "type": "object",
        "properties": {
          "sql": {"type": "string"}
        }
      }
    }
  ]
}
第二步:调用
客户端 → 服务器: {
  "method": "tools/call",
  "params": {
    "name": "query",           // 使用第一步获得的工具名
    "arguments": {"sql": "SELECT * FROM users"}
  }
}
关键点:通过JSON Schema,客户端知道如何正确调用工具,无需硬编码。
四、协议基础:如何通信?
MCP基于JSON-RPC 2.0构建,这是一个成熟的远程过程调用协议。理解这一层对掌握MCP至关重要。
4.1 JSON-RPC 2.0基础
消息类型
MCP中有三种基本消息类型。
1. 请求(Request) - 期待响应
{
  "jsonrpc": "2.0",           // 协议版本,必须是"2.0"
  "id": 1,                     // 请求唯一标识(字符串或数字)
  "method": "tools/list",     // 要调用的方法名
  "params": {                  // 可选的参数对象
    "cursor": "page2"
  }
}
2. 响应(Response) - 对请求的回复
// 成功响应
{
  "jsonrpc": "2.0",
  "id": 1,                     // 必须与请求的id相同
  "result": {                  // 成功结果
    "tools": [
      {"name": "query", "description": "执行查询"}
    ]
  }
}

// 错误响应
{
  "jsonrpc": "2.0",
  "id": 1,
  "error": {                   // 错误对象
    "code": -32602,            // 错误码(整数)
    "message": "参数无效",      // 错误描述
    "data": {                  // 可选的额外信息
      "field": "cursor",
      "reason": "格式错误"
    }
  }
}
3. 通知(Notification) - 单向消息,无需响应
{
  "jsonrpc": "2.0",
  "method": "notifications/resources/updated",  // 通知方法名
  "params": {                                   // 通知参数
    "uri": "file:///project/data.json"
  }
  // 注意:没有id字段
}
标准错误码
MCP使用JSON-RPC 2.0的标准错误码:
| 错误码 | 含义 | 说明 |
|---|---|---|
| -32700 | Parse error | JSON解析错误 |
| -32600 | Invalid Request | 无效的请求格式 |
| -32601 | Method not found | 方法不存在 |
| -32602 | Invalid params | 参数无效 |
| -32603 | Internal error | 服务器内部错误 |
| -32002 | Resource not found | 资源未找到(MCP扩展) |
4.2 能力协商详解
能力协商是MCP连接建立的第一步,决定了整个会话中可用的功能。
初始化流程详解
阶段1: 客户端发起初始化
{
  "jsonrpc": "2.0",
  "id": 1,
  "method": "initialize",
  "params": {
    "protocolVersion": "2024-11-05",  // 客户端支持的协议版本
    "capabilities": {                  // 客户端能力声明
      "roots": {                       // 支持根目录
        "listChanged": true            // 支持根目录变更通知
      },
      "sampling": {},                  // 支持LLM采样
      "elicitation": {},               // 支持用户询问
      "experimental": {                // 实验性功能
        "customFeature": {}            // 自定义功能
      }
    },
    "clientInfo": {                    // 客户端信息
      "name": "MyAIApp",               // 程序名(必填)
      "version": "1.2.0",              // 版本号(必填)
      "title": "我的AI应用"             // 显示名称(可选)
    }
  }
}
阶段2: 服务器响应能力
{
  "jsonrpc": "2.0",
  "id": 1,
  "result": {
    "protocolVersion": "2024-11-05",  // 服务器选择的协议版本
    "capabilities": {                  // 服务器能力声明
      "resources": {                   // 支持资源
        "subscribe": true,             // 支持资源订阅
        "listChanged": true            // 支持资源列表变更通知
      },
      "tools": {                       // 支持工具
        "listChanged": true
      },
      "prompts": {                     // 支持提示模板
        "listChanged": false           // 不支持列表变更通知
      },
      "logging": {}                    // 支持日志输出
    },
    "serverInfo": {                    // 服务器信息
      "name": "sqlite-mcp-server",
      "version": "2.1.0",
      "title": "SQLite MCP服务器"
    },
    "instructions": "此服务器提供SQLite数据库访问能力"  // 可选的使用说明
  }
}
阶段3: 客户端确认就绪
{
  "jsonrpc": "2.0",
  "method": "notifications/initialized"  // 无id,这是通知
}
协议版本协商规则
客户端请求版本: "2024-11-05"
         ↓
    服务器支持?
    ↙        ↘
  支持        不支持
   ↓            ↓
返回相同版本  返回服务器支持的最新版本
   ↓            ↓
协商成功    客户端检查是否支持
              ↙        ↘
           支持        不支持
            ↓            ↓
         协商成功     断开连接
实际示例:
// 场景1: 版本匹配
客户端: "protocolVersion": "2024-11-05"
服务器: "protocolVersion": "2024-11-05"  ✅ 成功

// 场景2: 服务器版本更新
客户端: "protocolVersion": "2024-06-01"
服务器: "protocolVersion": "2024-11-05"
→ 客户端检查是否支持2024-11-05 → 如果不支持则断开

// 场景3: 客户端版本更新
客户端: "protocolVersion": "2025-01-01"
服务器: "protocolVersion": "2024-11-05"
→ 客户端检查是否支持2024-11-05 → 如果支持则降级使用
能力交集计算
初始化后,双方只能使用共同支持的能力:
客户端能力: {roots, sampling, elicitation}
服务器能力: {resources, tools, prompts}
         ↓
   可用功能集合
   ├─ 客户端 → 服务器: resources, tools, prompts
   └─ 服务器 → 客户端: roots, sampling, elicitation
示例:
# 客户端代码示例
if server_capabilities.get("tools"):
    # 服务器支持工具,可以调用
    tools = await session.list_tools()
else:
    # 服务器不支持工具,跳过
    print("服务器不提供工具功能")

if client_capabilities.get("sampling"):
    # 客户端支持采样,服务器可以请求
    # (服务器端会检查这个能力)
    pass
4.3 连接生命周期深入
完整的消息时序图
客户端                                            服务器
  │                                              │
  │  1. initialize (请求)                         │
  ├────────────────────────────────────── >│
  │     {protocolVersion, capabilities}          │
  │                                              │
  │  2. initialize (响应)                         │
  │< ──────────────────────────────────────┤
  │     {protocolVersion, capabilities}          │
  │                                              │
  │  3. initialized (通知)                        │
  ├────────────────────────────────────── >│
  │                                              │
  │═══════════ 正常操作阶段 ════════════        │
  │                                              │
  │  4. tools/list (请求)                         │
  ├────────────────────────────────────── >│
  │                                              │
  │  5. tools/list (响应)                         │
  │< ──────────────────────────────────────┤
  │     {tools: [...]}                           │
  │                                              │
  │  6. tools/call (请求)                         │
  ├────────────────────────────────────── >│
  │     {name: "query", arguments: {...}}        │
  │                                              │
  │  7. notifications/progress (通知)             │
  │< ──────────────────────────────────────┤
  │     {progress: 50, total: 100}               │
  │                                              │
  │  8. tools/call (响应)                         │
  │< ──────────────────────────────────────┤
  │     {content: [...]}                         │
  │                                              │
  │  9. notifications/resources/updated          │
  │< ──────────────────────────────────────┤
  │     {uri: "file://..."}                      │
  │                                              │
  │═══════════ 关闭阶段 ═══════════           │
  │                                              │
  │  10. 关闭stdin                               │
  ├─────────────X                             │
  │                                             │
  │                                          服务器退出
初始化前的限制
在initialized通知发送前:
客户端只能发送:
✅ initialize请求
✅ ping请求(用于保活)
❌ 其他任何请求
服务器只能发送:
✅ initialize响应
✅ ping请求
✅ logging通知(日志)
❌ 其他任何消息
违反限制的后果:
// 客户端在初始化前调用tools/list
请求: {"method": "tools/list"}
响应: {
  "error": {
    "code": -32600,
    "message": "会话未初始化"
  }
}
超时和重试机制
请求超时:
import asyncio

# 设置30秒超时
try:
    result = await asyncio.wait_for(
        session.call_tool("slow_operation", {}),
        timeout=30.0
    )
except asyncio.TimeoutError:
    # 发送取消通知
    await session.send_notification(
        "notifications/cancelled",
        {"requestId": "123", "reason": "超时"}
    )
进度通知重置超时:
# 当收到进度通知时,可以重置超时计时器
timeout = 30  # 基础超时
max_timeout = 300  # 最大超时(5分钟)

while True:
    try:
        msg = await wait_for_message(timeout)
        if msg.method == "notifications/progress":
            # 收到进度,重置超时
            timeout = 30
    except TimeoutError:
        # 超时处理
        break
4.4 传输方式对比
stdio传输详解
优点:
✅ 简单直接,适合本地开发
✅ 进程隔离,安全性好
✅ 自动管理生命周期
✅ 无需网络配置
缺点:
❌ 只能本地使用
❌ 不支持多客户端
❌ 调试相对困难
消息格式:
消息1n
消息2n
消息3n
每个JSON对象占一行,以n分隔。
HTTP传输详解
架构:
┌─────────┐         HTTP POST         ┌─────────┐
│         ├────────────────────────── >│         │
│ 客户端  │  请求/通知/响应(JSON-RPC) │ 服务器  │
│         │< ──────────────────────────┤         │
└─────────┘     HTTP 响应/SSE流       └─────────┘
             (application/json 或
              text/event-stream)
发送消息(POST):
POST /mcp HTTP/1.1
Host: localhost:8080
Content-Type: application/json
Accept: application/json, text/event-stream
Mcp-Session-Id: abc123

{"jsonrpc":"2.0","id":1,"method":"tools/list"}
立即响应(JSON):
HTTP/1.1 200 OK
Content-Type: application/json

{"jsonrpc":"2.0","id":1,"result":{"tools":[...]}}
流式响应(SSE):
HTTP/1.1 200 OK
Content-Type: text/event-stream
Mcp-Session-Id: abc123

id: 1
data: {"jsonrpc":"2.0","method":"notifications/progress","params":{"progress":25}}

id: 2
data: {"jsonrpc":"2.0","method":"notifications/progress","params":{"progress":50}}

id: 3
data: {"jsonrpc":"2.0","id":1,"result":{"content":[...]}}
接收服务器消息(GET):
GET /mcp HTTP/1.1
Host: localhost:8080
Accept: text/event-stream
Mcp-Session-Id: abc123
Last-Event-ID: 42
会话管理:
# 服务器端设置会话ID
@app.post("/mcp")
async def handle_mcp(request):
    if request.method == "initialize":
        session_id = generate_session_id()
        return Response(
            content=json.dumps(result),
            headers={"Mcp-Session-Id": session_id}
        )

# 客户端后续请求携带会话ID
@client.request
async def send_request(method, params):
    headers = {}
    if self.session_id:
        headers["Mcp-Session-Id"] = self.session_id

    return await http.post(
        "/mcp",
        json={"jsonrpc": "2.0", "method": method, "params": params},
        headers=headers
    )
断线重连:
async def connect_sse(last_event_id=None):
    headers = {"Accept": "text/event-stream"}
    if last_event_id:
        headers["Last-Event-ID"] = last_event_id

    async with httpx.stream("GET", "/mcp", headers=headers) as stream:
        async for line in stream.aiter_lines():
            if line.startswith("id:"):
                last_event_id = line[3:].strip()
            elif line.startswith("data:"):
                data = json.loads(line[5:])
                yield data, last_event_id
4.5 实际通信示例
让我们看一个完整的SQLite查询场景:
// 1. 列出工具
客户端 → 服务器:
{
  "jsonrpc": "2.0",
  "id": 1,
  "method": "tools/list"
}

服务器 → 客户端:
{
  "jsonrpc": "2.0",
  "id": 1,
  "result": {
    "tools": [
      {
        "name": "query",
        "description": "执行SQL查询",
        "inputSchema": {
          "type": "object",
          "properties": {
            "sql": {"type": "string"}
          },
          "required": ["sql"]
        }
      }
    ]
  }
}

// 2. 调用查询工具
客户端 → 服务器:
{
  "jsonrpc": "2.0",
  "id": 2,
  "method": "tools/call",
  "params": {
    "name": "query",
    "arguments": {
      "sql": "SELECT COUNT(*) FROM users WHERE active = 1"
    },
    "_meta": {
      "progressToken": "query-123"  // 请求进度通知
    }
  }
}

// 3. 服务器发送进度(异步通知)
服务器 → 客户端:
{
  "jsonrpc": "2.0",
  "method": "notifications/progress",
  "params": {
    "progressToken": "query-123",
    "progress": 50,
    "total": 100,
    "message": "正在扫描users表..."
  }
}

// 4. 返回查询结果
服务器 → 客户端:
{
  "jsonrpc": "2.0",
  "id": 2,
  "result": {
    "content": [
      {
        "type": "text",
        "text": "查询结果: 1,234个活跃用户"
      }
    ],
    "isError": false
  }
}

// 5. 如果查询出错
服务器 → 客户端(错误情况):
{
  "jsonrpc": "2.0",
  "id": 2,
  "error": {
    "code": -32603,
    "message": "SQL语法错误",
    "data": {
      "sql": "SELECT COUNT(*) FROM users WHERE active = 1",
      "error": "near "WHERE": syntax error",
      "position": 35
    }
  }
}
这就是MCP通信的完整过程!通过JSON-RPC 2.0,客户端和服务器可以进行结构化、类型安全的通信。
五、服务器能力:三种核心功能
MCP服务器可以提供三种功能。
5.1 Resources(资源):应用决定用什么
资源就是数据,比如文件内容、数据库记录、API响应。
谁控制: 应用程序决定把哪些资源提供给AI
如何使用:
// 列出所有可用资源
{"method": "resources/list"}

// 读取某个资源
{
  "method": "resources/read",
  "params": {"uri": "file:///project/main.py"}
}
资源URI示例:
file:///project/src/main.py - 文件
db://schema/users - 数据库表结构
git://commits/main - Git提交历史
https://api.example.com/data - Web API
订阅变更: 可以订阅资源,当它变化时自动收到通知。
实际案例: Filesystem服务器暴露资源
{
  "uri": "file:///Users/alice/project/src/main.py",  // Python源文件
  "name": "main.py",                                  // 文件名
  "mimeType": "text/x-python",                        // 文件类型
  "text": "import osndef main()..."                  // 文件内容
}
客户端AI可以读取这个资源,理解代码结构后提供重构建议或生成测试。
5.2 Prompts(提示模板):用户选择用什么
什么是Prompt?
Prompt就像是「对话模板」或「快捷指令」,把常用的复杂指令预设好,用户一键调用。用生活中的例子类比,就像微信的「快捷回复」或IDE中的「代码片段(Snippet)」。
为什么需要Prompt?
场景1:没有Prompt时
用户每次都要输入:
"请分析这个Git仓库最近一周的提交,统计:
1. 总提交次数
2. 每个作者的贡献
3. 修改的主要文件
4. 是否有破坏性变更
请用表格格式输出"
场景2:有Prompt后
用户只需:
1. 点击 "/analyze-commits" 命令
2. 选择分支 "main"
3. AI自动执行完整分析
Prompt的数据结构
定义一个Prompt:
{
  "name": "analyze_commits",              // Prompt的唯一标识
  "title": "提交历史分析",                  // 用户界面显示的名称
  "description": "分析Git提交并生成报告",    // 功能说明
  "arguments": [                          // 需要的参数列表
    {
      "name": "branch",                   // 参数名
      "description": "要分析的分支名",      // 参数说明
      "required": true                    // 是否必填
    },
    {
      "name": "since",                    // 时间范围
      "description": "起始日期(如:7 days ago)",
      "required": false                   // 可选参数
    },
    {
      "name": "author",                   // 作者过滤
      "description": "只看某个作者的提交",
      "required": false
    }
  ]
}
实际使用示例
步骤1: 列出所有可用的Prompt
// 客户端请求
{
  "jsonrpc": "2.0",
  "id": 1,
  "method": "prompts/list"
}

// 服务器响应
{
  "jsonrpc": "2.0",
  "id": 1,
  "result": {
    "prompts": [
      {
        "name": "analyze_commits",
        "title": "


审核编辑 黄宇
- 相关推荐
- 热点推荐
- MCP
-
MCP661 线路驱动器演示板用户指南解读2026-06-06 342
-
MCP1650/1/2/3评估板用户指南解读2026-04-07 294
-
Murata DFE2MCPH□□□□JL□□ 片式线圈参考规范解读2025-12-16 786
-
技术解读:MCP协议以及SmartBear API Hub在MCP开发中的关键作用2025-08-21 1687
-
DDS通信中间件——DCPS规范(下)2024-11-27 2486
-
DDS通信中间件——DCPS规范(上)2024-09-26 3411
-
MCP19214/5闪存编程规范2021-05-12 614
-
从ECMAScript规范怎么解读this2020-04-23 1175
-
MCP19214/5闪存编程规范免费下载.pdf2018-06-28 808
-
系统设计人员如何解读产品说明书规范2017-04-08 2618
-
MCP6546/6R/6U/MCP6547/MCP6548/2008-08-14 1839
全部0条评论

快来发表一下你的评论吧 !
