
介绍MATLAB一种算法实现方式
电子说
描述
本篇文章要分享的是基于MATLAB的腐蚀膨胀算法实现,腐蚀膨胀是形态学图像处理的基础,腐蚀在二值图像的基础上做“收缩”或“细化”操作,膨胀在二值图像的基础上做“加长”或“变粗”的操作。
什么是二值图像呢?把一幅图片看做成一个二维的数组,那么二值图像是一个只有0和1的逻辑数组,我们前面Sobel边缘检测后的图像输出边缘效果,设置个阈值,大于阈值输出为1,小于阈值输出为0,最后输出就是一幅二值图像了。
腐蚀
腐蚀是一种消除边界点,使边界向内部收缩的过程。可以用来消除小且无意义的物体。用3X3的结构元素,扫描图像的每一个像素,用结构元素与其覆盖的二值图像做“与”操作,如果都为1,结果图像的该像素为1。否则为0。结果会使二值图像小一圈。
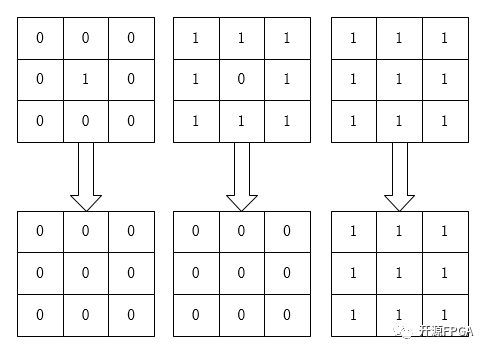
有一个形象的比喻来可以说明该运算,用0表示蛀虫,1表示大米。蛀虫腐蚀大米的过程便是腐蚀运算,

腐蚀
如图所示,对于一个像素矩阵而言,只要有蛀虫(0)的存在,大米(1)就会被腐蚀掉了,即使只存在一个蛀虫(0),但是还是会被蛀虫腐蚀完毕,最后一幅图上面由于没有蛀虫(0)所以大米完好无损。
关于算法的实现,可以用下式子来表示,即3x3像素的运算:
P = P11 & P12 & P13 & P21 & P22 & P23 & P31 & P32 & P33
在FPGA中,为了通过面积去换速度,我们将上式改变如下:
P1 = P11 & P12 & P13
P2 = P21 & P22 & P23
P3 = P31 & P32 & P33
P = P1 & P2 & P3
MATLAB中可以直接写一个按位或运算。
膨胀
膨胀是将与物体接触的所有背景点合并到该物体中,使边界向外部扩张的过程。可以用来填补物体中的空洞。用3X3的结构元素,扫描图像的每一个像素,用结构元素与其覆盖的二值图像做“与”操作,如果都为0,结果图像的该像素为0,。否则为1。结果使二值图像扩大一圈。
先腐蚀后膨胀的过程称为开运算。用来消除小物体、在纤细点处分离物体、平滑较大物体的边界的同时并不明显的改变其面积。先膨胀后腐蚀的过程称为比运算,用来填充物体内细小空间、连接邻近物体、平滑其边界的同时并不明显改变其面积。
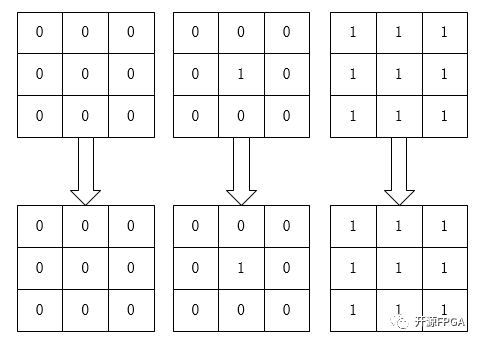
膨胀算法用最简单的比喻来描述:0表示害虫,1表示青蛙,青蛙吃了害虫表示膨胀运算,我们用3*3像素阵列来解释:

膨胀
如图所示,图左只有害虫(0),所以害虫都活着,中间那个图,虽然只有一个害虫,但是还是会被青蛙全部吃掉,最右边的那幅图,都是青蛙,所以青蛙始终是青蛙。
关于算法的实现,可以用下式子来表示,即3x3像素的运算:
P = P11 | P12 | P13 | P21 | P22 | P23 | P31 | P32 | P33
在HDL中,为了通过面积去换速度,我们将上式改变如下:
P1 = P11 | P12 | P13
P2 = P21 | P22 | P23
P3 = P31 | P32 | P33
P = P1 | P2 | P3
MATLAB中可以直接写一个按位与运算。
开运算闭运算
先腐蚀后膨胀叫开运算,开运算的作用是清除图像边缘周围非边缘的细小的点。先膨胀后腐蚀为闭运算,闭运算的作用是清除图像内部的空洞,
如果我们的目标物体外面有很多无关的小区域,就用开运算去除掉;如果物体内部有很多小黑洞,就用闭运算填充掉。
MATLAB逻辑运算函数
bitand(), 对十进制数进行逐位逻辑与运算:先将十进制数转换成二进制数,然后逐位与运算,其运算结果转换为十进制。
bitor(), 对十进制数进行逐位逻辑或运算:先将十进制数转换成二进制数,然后逐位与运算,其运算结果转换为十进制。
MATLAB代码实现
1 %RGB_YCbCr    2 clc;    3 clear all;    4 close all;    5     6 RGB_data = imread('lena.jpg');    7     8 R_data =    RGB_data(:,:,1);    9 G_data =    RGB_data(:,:,2);  10 B_data =    RGB_data(:,:,3);  11   12 %imshow(RGB_data);  13   14 [ROW,COL, DIM] = size(RGB_data);
 15   16 Y_data = zeros(ROW,COL);  17 Cb_data = zeros(ROW,COL);  18 Cr_data = zeros(ROW,COL);  19 Gray_data = RGB_data;  20   21 for r = 1:ROW
 22     for c = 1:COL  23         Y_data(r, c) = 0.299*R_data(r, c) + 0.587*G_data(r, c) + 0.114*B_data(r, c);  24         Cb_data(r, c) = -0.172*R_data(r, c) - 0.339*G_data(r, c) + 0.511*B_data(r, c) + 128;  25         Cr_data(r, c) = 0.511*R_data(r, c) - 0.428*G_data(r, c) - 0.083*B_data(r, c) + 128;  26     end  27 end
 28   29 Gray_data(:,:,1)=Y_data;  30 Gray_data(:,:,2)=Y_data;  31 Gray_data(:,:,3)=Y_data;  32   33 figure;  34 imshow(Gray_data);  35   36 %Median Filter  37 imgn = imnoise(Gray_data,'salt & pepper',0.02);
 38   39 figure;  40 imshow(imgn);  41   42 Median_Img = Gray_data;  43 for r = 2:ROW-1  44     for c = 2:COL-1  45         median3x3 =[imgn(r-1,c-1)    imgn(r-1,c) imgn(r-1,c+1)  46                     imgn(r,c-1)      imgn(r,c)      imgn(r,c+1)  47                     imgn(r+1,c-1)      imgn(r+1,c) imgn(r+1,c+1)];  48         sort1 = sort(median3x3, 2, 'descend'); 49         sort2 = sort([sort1(1), sort1(4), sort1(7)], 'descend');  50         sort3 = sort([sort1(2), sort1(5), sort1(8)], 'descend');  51         sort4 = sort([sort1(3), sort1(6), sort1(9)], 'descend');  52         mid_num = sort([sort2(3), sort3(2), sort4(1)], 'descend');  53         Median_Img(r,c) = mid_num(2);  54     end  55 end  56   57 figure;  58 imshow(Median_Img);  59   60 %Sobel_Edge_Detect  61   62 Median_Img = double(Median_Img);  63 Sobel_Threshold = 150;  64 Sobel_Img = zeros(ROW,COL);  65   66 for r = 2:ROW-1  67     for c = 2:COL-1  68         Sobel_x = Median_Img(r-1,c+1) + 2*Median_Img(r,c+1) + Median_Img(r+1,c+1) - Median_Img(r-1,c-1) - 2*Median_Img(r,c-1) - Median_Img(r+1,c-1);  69         Sobel_y = Median_Img(r-1,c-1) + 2*Median_Img(r-1,c) + Median_Img(r-1,c+1) - Median_Img(r+1,c-1) - 2*Median_Img(r+1,c) - Median_Img(r+1,c+1);  70         Sobel_Num = abs(Sobel_x) + abs(Sobel_y);  71         %Sobel_Num = sqrt(Sobel_x^2 + Sobel_y^2);  72         if(Sobel_Num > Sobel_Threshold)  73             Sobel_Img(r,c)=255;  74         else  75             Sobel_Img(r,c)=0;  76         end  77     end  78 end  79   80 figure;  81 imshow(Sobel_Img);  82   83 %imopen Erosion_Dilation  84 %Erosion  85 % Erosion_img = zeros(ROW,COL);  86 % for r = 2:ROW-1  87     % for c = 2:COL-1  88         % and1 = bitand(Sobel_Img(r-1, c-1), bitand(Sobel_Img(r-1, c), Sobel_Img(r-1, c+1)));  89         % and2 = bitand(Sobel_Img(r, c-1), bitand(Sobel_Img(r, c), Sobel_Img(r, c+1)));  90         % and3 = bitand(Sobel_Img(r+1, c-1), bitand(Sobel_Img(r+1, c), Sobel_Img(r+1, c+1)));  91         % Erosion_img(r, c) = bitand(and1, bitand(and2, and3));  92     % end  93 % end  94   95 % figure;  96 % imshow(Erosion_img);  97   98 % %Dilation  99 % Dilation_img = zeros(ROW,COL);100 % for r = 2:ROW-1101     % for c = 2:COL-1102         % or1 = bitor(Erosion_img(r-1, c-1), bitor(Erosion_img(r-1, c), Erosion_img(r-1, c+1)));103         % or2 = bitor(Erosion_img(r, c-1), bitor(Erosion_img(r, c), Erosion_img(r, c+1)));104         % or3 = bitor(Erosion_img(r+1, c-1), bitor(Erosion_img(r+1, c), Erosion_img(r+1, c+1)));105         % Dilation_img(r, c) = bitor(or1, bitor(or2, or3));106     % end107 % end108 109 % figure;110 % imshow(Dilation_img);111 112 %imclose Erosion_Dilation113 %Dilation114 Dilation_img = zeros(ROW,COL);115 for r = 2:ROW-1116     for c = 2:COL-1117         or1 = bitor(Sobel_Img(r-1, c-1), bitor(Sobel_Img(r-1, c), Sobel_Img(r-1, c+1)));118         or2 = bitor(Sobel_Img(r, c-1), bitor(Sobel_Img(r, c), Sobel_Img(r, c+1)));119         or3 = bitor(Sobel_Img(r+1, c-1), bitor(Sobel_Img(r+1, c), Sobel_Img(r+1, c+1)));120         Dilation_img(r, c) = bitor(or1, bitor(or2, or3));121     end122 end123 124 figure;125 imshow(Dilation_img);126 127 %Erosion128 Erosion_img = zeros(ROW,COL);129 for r = 2:ROW-1130     for c = 2:COL-1131         and1 = bitand(Dilation_img(r-1, c-1), bitand(Dilation_img(r-1, c), Dilation_img(r-1, c+1)));132         and2 = bitand(Dilation_img(r, c-1), bitand(Dilation_img(r, c), Dilation_img(r, c+1)));133         and3 = bitand(Dilation_img(r+1, c-1), bitand(Dilation_img(r+1, c), Dilation_img(r+1, c+1)));134         Erosion_img(r, c) = bitand(and1, bitand(and2, and3));135     end136 end137 138 figure;139 imshow(Erosion_img);
处理后结果对比
为了可以清晰的看到图像边缘的变化,我们把黑色作为背景,白色作为边缘。
Sobel边缘检测后的lena
腐蚀后的lena
膨胀后的lena
先腐蚀后膨胀开运算lena
先膨胀后腐蚀闭运算lena
- 相关推荐
- 热点推荐
- matlab
-
在MATLAB/simulink中建模时的两种不同实现方式2022-09-15 2809
-
一文详解限流算法的实现方式2022-05-25 1933
-
果蝇优化算法MATLAB实现2021-08-17 2382
-
如何去实现一种方波控制算法2021-08-10 1499
-
如何去实现一种错误控制编码的算法?2021-06-21 1852
-
介绍一种基于Winpcap的网络视频流识别算法2021-06-03 2126
-
介绍一种防止相位假信号的具体算法2021-04-30 969
-
如何实现一种改进的Bayer图像彩色恢复差值算法2021-04-02 821
-
一种基于FPGA的实时视频图像处理算法研究与实现2019-06-28 3880
-
Matlab关于Apriori算法设计2018-02-02 5435
-
BP算法及其matlab实现2017-12-02 546
-
FFT 算法的一种 FPGA 实现2017-11-21 4071
-
一种多核混合分区调度算法设计与实现2017-01-07 603
-
一种解决函数优化问题的免疫算法2009-11-08 787
全部0条评论

快来发表一下你的评论吧 !

