

基于RK3506的监控系统
描述
1 简介
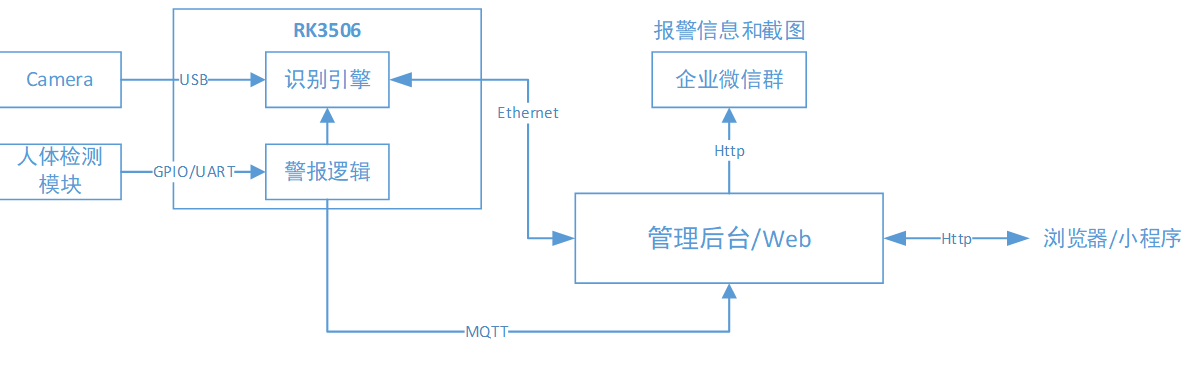
本文基于 RK3506开发板的监控系统的详细方案与实现流程,结合硬件选型、软件部署、算法优化和系统集成实现一套“低功耗、可离线、可远程”的轻量级智能监控系统。系统架构如下所示。
2 系统功能
1、识别能力
• 识别速度:< 300 ms(含活体)
• 准确率:≥ 99.5 %
2、监控逻辑
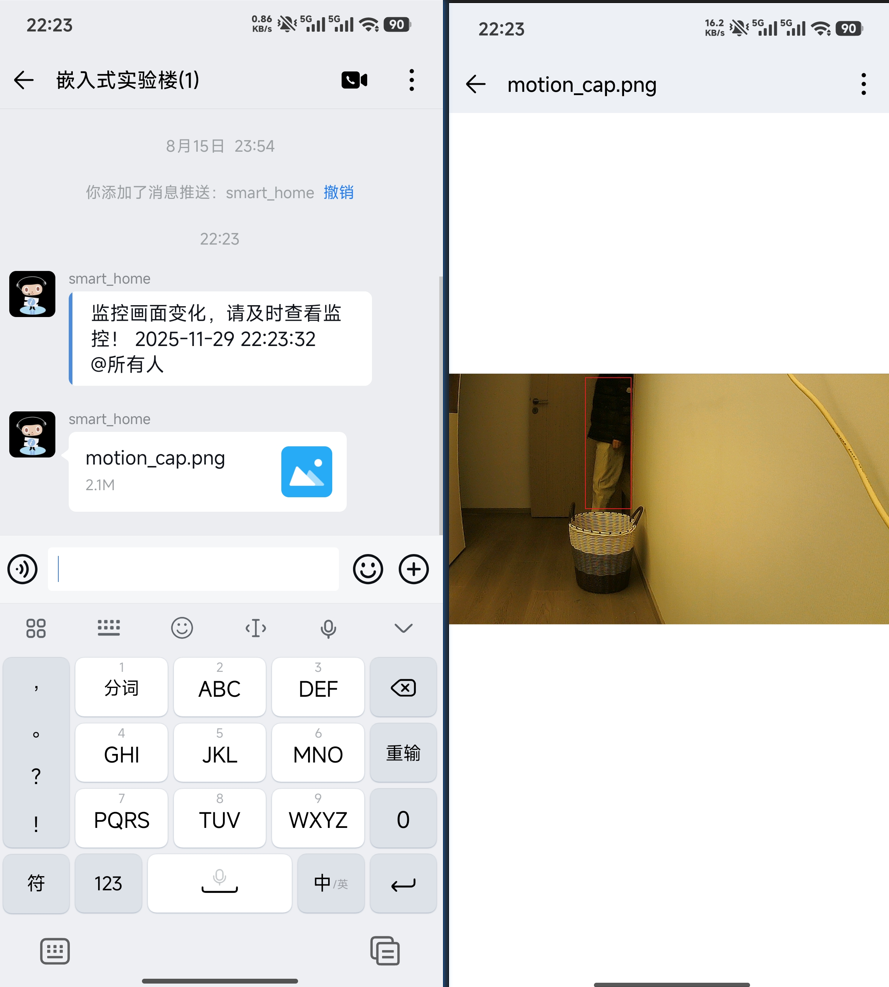
• 事件触发 → 本地 JPG 截图并保存 + MQTT 告警 → 微信群通知
• MQTT 上报记录(JSON:ID、时间、抓拍图 base64)
• 与安防系统联动:安防信号输入→触发视频监控→上传报警视频
3、管理后台
• Web 端(Python+ Django)
• 支持 HTTPS Web 端、微信小程序、企业微信推送
• HTTP RESTful API(远程监控、参数配置)
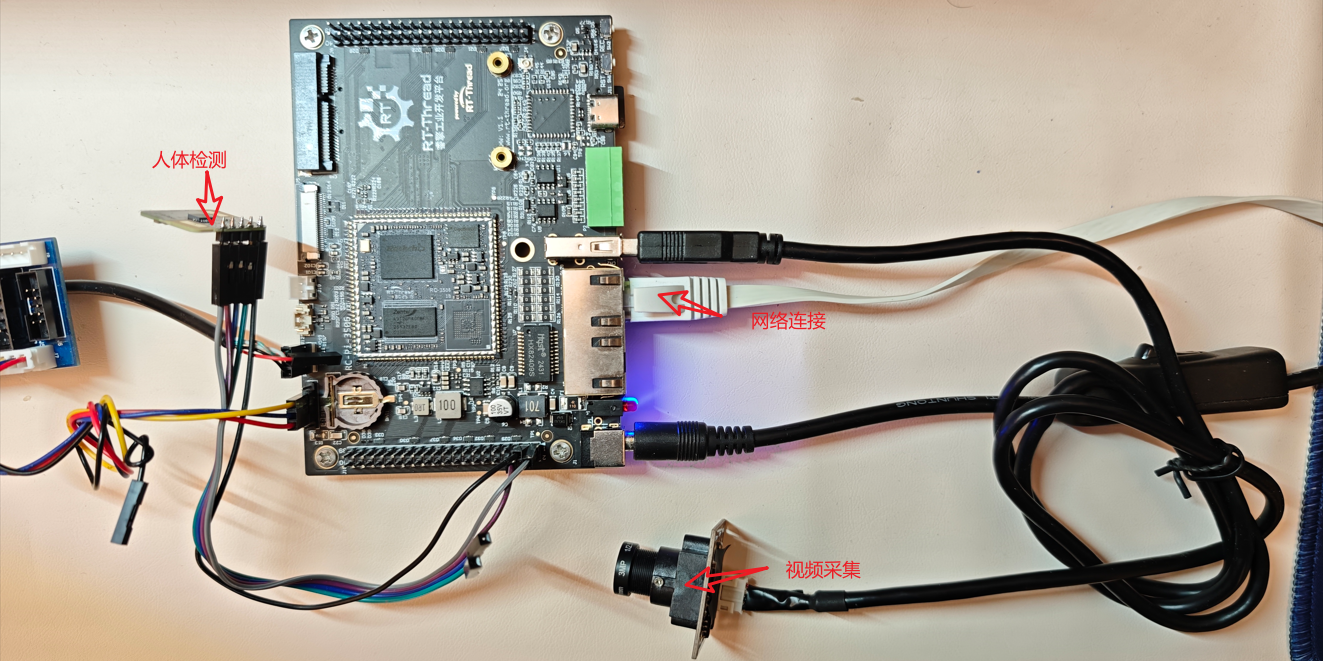
3 硬件架构
1、计算平台
• 睿擎派,采用 Rockchip处理器 RK3506(三核 Cortex-A7+单核Cortex-M0, 主频最高1.5GHz),
2、视觉采集
• USB 摄像头,视频数据采集入口
3、网络与交互
• 100 M 以太网
4、人体检测模块
• 安信可RD-03_V2雷达模组,感应警报、配合摄像头触发联动
4 软件与算法栈
4.1 系统镜像
• RuiChing_RC-Pi-3506_Firmware_SMP_FACTORY_V1.5.0.img
4.2 视频推流实现
这里使用USB摄像头作为视频流。核心组件如下:
- WebNet HTTP 服务器:处理 HTTP 请求和响应
- UVC 设备驱动:USB 视频类设备采集
- MJPEG 流协议:基于 multipart/x-mixed-replace 的流式传输
核心代码如下:
#include < rtthread.h >
#include < stdio.h >
#include < stdlib.h >
#include < string.h >
#include < webnet.h >
#include < wn_module.h >
#include < fcntl.h >
#include < unistd.h >

#define DBG_TAG "webnet.video"
#define DBG_LVL DBG_INFO
#include < rtdbg.h >

#define RT_UVC_CTRL_SET_CALLBACK          0x0             /**< Set the callback control command */
#define RT_UVC_CTRL_START_STREAM          0x1             /**< Start the video stream control command */
#define RT_UVC_CTRL_STOP_STREAM           0x2             /**< Stop the video stream control command */

struct usbh_videoframe
{
    uint8_t *frame_buf;
    uint32_t frame_size;
};

static struct webnet_session* g_session = RT_NULL;
static struct rt_device *uvc_device = RT_NULL;
static rt_bool_t stream_running = RT_FALSE;

static const char* boundary = "frame";
static const char* mimetype = "multipart/x-mixed-replace; boundary=";

static void video_frame_callback(struct usbh_videoframe *frame)
{
    if (stream_running && g_session)
    {
        webnet_session_printf(g_session, "Content-Type: image/jpegrnrn");
        webnet_session_write(g_session, frame- >frame_buf, frame- >frame_size);
        webnet_session_printf(g_session, "rn--%srn", boundary);
    }
}

static void cgi_mjpeg_stream_handler(struct webnet_session* session)
{
    uint8_t type = 1;

    g_session = session;
    RT_ASSERT(g_session != NULL);

    /*Initialize the UVC device*/
    if (!uvc_device)
    {
        uvc_device = rt_device_find("uvc");
        if (!uvc_device)
        {
            LOG_E("uvc equipment cannot be found");
            return;
        }
        rt_device_init(uvc_device);
        rt_device_open(uvc_device, RT_DEVICE_FLAG_RDWR);
    }

    /*Set the response header*/
    char content_type[64];
    rt_snprintf(content_type, sizeof(content_type), "%s%s", mimetype, boundary);
    g_session- >request- >result_code = 200;
    webnet_session_set_header(g_session, content_type, 200, "OK", -1);
    webnet_session_printf(g_session, "--%srn", boundary);

    /* Start the UVC stream */
    rt_device_control(uvc_device, RT_UVC_CTRL_SET_CALLBACK, (void *) video_frame_callback);
    rt_device_control(uvc_device, RT_UVC_CTRL_START_STREAM, &type);

    stream_running = RT_TRUE;
    LOG_I("The video stream has been started");

    while (stream_running)
    {
        char read_buf[32];
        int read_len;
        read_len = webnet_session_read(g_session, read_buf, sizeof(read_buf) - 1);
        if (read_len < 0)
        {
            LOG_I("The client connection has been disconnected(read_len = %d,errno = %d)", read_len, errno);
            stream_running = RT_FALSE;
        }
        rt_thread_mdelay(33);
    }

    g_session = RT_NULL;
    LOG_I("cgi_mjpeg_stream_handler exits");

}

/* WebNet initialization function */
void webnet_video_init(void)
{

#ifdef WEBNET_USING_CGI
    /* Register for video processing CGI */
    webnet_cgi_register("mjpeg_stream", cgi_mjpeg_stream_handler);
#endif

    webnet_init();

}

#ifdef FINSH_USING_MSH
MSH_CMD_EXPORT(webnet_video_init, initialize video stream server);
#endif
4.3 人体检测
安信可Rd-03_V2搭载矽典微的 S1KM0000芯片、 高性能 24GHz 一发一收天线和外围电路。 S1KM0000 是一种基于 FMCW 雷达收发器技术的集成单片机毫米波传感器 SoC。 利用 FMCW 调频连续波, 对设定空间内的目标进行探测。 结合雷达信号处理, 实现高灵敏度的运动检测和微动检测。Rd-03_V2 版模组对运动人体的最远感应距离为 7m, 可感知区域内是否有运动或者微动的人体,实现实时检测结果。
核心代码如下:
#define INPUT_GPIO  0 // 定义.0号为输入引脚
static rt_ssize_t g_pin_value =  0;

static void gpio_isr(void *args) // gpio 中断回调函数
{
    g_pin_value = rt_pin_read((INPUT_GPIO));
    if(g_pin_value > 0)
    {
        LOG_I("input gpio %d irq trigger, level is %d", INPUT_GPIO, g_pin_value);
    }
}

static void gpio_interrupt_enable(void)
{
    rt_pin_mode(INPUT_GPIO, PIN_MODE_INPUT);   // 设置引脚为输入模式

    // 设置 引脚为中断模式,并且绑定中断触发回调函数
    rt_pin_attach_irq(INPUT_GPIO, PIN_IRQ_MODE_RISING_FALLING, gpio_isr, RT_NULL);
    rt_pin_irq_enable(INPUT_GPIO, PIN_IRQ_ENABLE);
}

static void gpio_interrupt_disable(void)
{
    // 取消 0 号引脚的中断绑定
    rt_pin_detach_irq(INPUT_GPIO);
    rt_pin_irq_enable(INPUT_GPIO, PIN_IRQ_DISABLE);
}
当检测到人体会,会将该事件传递给RK3506。
4.4 MQTT客户端
当检测到人体时,会触发中断事件,RK3506则将打开摄像头截图并保存到本地,同时推送到云端和微信群,提醒用户及时查看监控情况。核心代码如下:
#include < rtthread.h >
#include < rtdevice.h >
#include "paho_mqtt.h"
#include < stdint.h >
#include < stdlib.h >
#include < string.h >

#define DBG_TAG "example.mqtt"
#define DBG_LVL DBG_LOG
#include < rtdbg.h >

/* Private typedef -----------------------------------------------------------*/
/* Private define ------------------------------------------------------------*/
/**
 * MQTT URI farmat:
 * domain mode
 * tcp://iot.eclipse.org:1883
 *
 * ipv4 mode
 * tcp://192.168.10.1:1883
 * ssl://192.168.10.1:1884
 *
 * ipv6 mode
 * tcp://[fe80::20c:29ff:fe9a:a07e]:1883
 * ssl://[fe80::20c:29ff:fe9a:a07e]:1884
 */
#define MQTT_URI               "tcp://192.168.101.222:1883"
#define MQTT_CLIENTID          "rk3506_mqtt"
#define MQTT_USERNAME          "admin"
#define MQTT_PASSWORD          "admin"
#define MQTT_SUBTOPIC          "/rk3506_mqtt/sub"
#define MQTT_PUBTOPIC          "/rk3506_mqtt/pub"
#define MQTT_WILLMSG            "Goodbye!"
#define MQTT_QOS                1
#define MQTT_PUB_SUB_BUF_SIZE   1024
#define MAX_PAYLOAD             128
#define CMD_INFO                "'mqtt_thread_cmd < start|stop >'"
#define PUB_CYCLE_TM            1000


/* Private macro -------------------------------------------------------------*/
/* Private variables ---------------------------------------------------------*/
static rt_thread_t pub_thread_tid = RT_NULL;

/* define MQTT client context */
static MQTTClient client;

static rt_uint32_t pub_count = 0, sub_count = 0;
static int recon_count = -1;
static int is_started = 0;

/* Private function prototypes -----------------------------------------------*/
/* Private functions ---------------------------------------------------------*/

static void mqtt_sub_callback(MQTTClient *c, MessageData *msg_data)
{
    sub_count ++;
    return;
}

static void mqtt_connect_callback(MQTTClient *c)
{
    LOG_I("Start to connect mqtt server");
    return;
}

static void mqtt_online_callback(MQTTClient *c)
{
    LOG_D("Connect mqtt server success");
    recon_count ++;
    return;
}

static void mqtt_offline_callback(MQTTClient *c)
{
    LOG_I("Disconnect from mqtt server");
    return;
}

/**
 * This function create and config a mqtt client.
 *
 * @param void
 *
 * @return none
 */
static void mq_start(void)
{
    /* init condata param by using MQTTPacket_connectData_initializer */
    MQTTPacket_connectData condata = MQTTPacket_connectData_initializer;

    rt_memset(&client, 0, sizeof(MQTTClient));

    /* config MQTT context param */
    {
        client.uri = MQTT_URI;

        /* config connect param */
        rt_memcpy(&client.condata, &condata, sizeof(condata));
        client.condata.clientID.cstring = MQTT_CLIENTID;
        client.condata.keepAliveInterval = 30;
        client.condata.cleansession = 1;
        client.condata.username.cstring = MQTT_USERNAME;
        client.condata.password.cstring = MQTT_PASSWORD;

        /* config MQTT will param. */
        client.condata.willFlag = 1;
        client.condata.will.qos = MQTT_QOS;
        client.condata.will.retained = 0;
        client.condata.will.topicName.cstring = MQTT_PUBTOPIC;
        client.condata.will.message.cstring = MQTT_WILLMSG;

        /* rt_malloc buffer. */
        client.buf_size = client.readbuf_size = MQTT_PUB_SUB_BUF_SIZE;
        client.buf = rt_malloc(client.buf_size);
        client.readbuf = rt_malloc(client.readbuf_size);
        if (!(client.buf && client.readbuf))
        {
            rt_kprintf("no memory for MQTT client buffer!n");
            goto _exit;
        }

        /* set event callback function */
        client.connect_callback = mqtt_connect_callback;
        client.online_callback = mqtt_online_callback;
        client.offline_callback = mqtt_offline_callback;

        /* set subscribe table and event callback */
        client.messageHandlers[0].topicFilter = rt_strdup(MQTT_SUBTOPIC);
        client.messageHandlers[0].callback = mqtt_sub_callback;
        client.messageHandlers[0].qos = MQTT_QOS;

        /* set default subscribe event callback */
        client.defaultMessageHandler = mqtt_sub_callback;
    }

    /* run mqtt client */
    paho_mqtt_start(&client);

    return;

_exit:
    if (client.buf)
    {
        rt_free(client.buf);
        client.buf = RT_NULL;
    }
    if (client.readbuf)
    {
        rt_free(client.readbuf);
        client.readbuf = RT_NULL;
    }
    return;
}

static void show_mqtt_info(void)
{
    char temp[50] = {0};
    LOG_D("r==== MQTT Stability ====n");
    LOG_D("Server: "MQTT_URI"n");
    LOG_D("QoS   : %dn", MQTT_QOS);
    LOG_D("Number of published  packages : %dn", pub_count);
    LOG_D("Number of subscribed packages : %dn", sub_count);
    LOG_D(temp, sizeof(temp), "Packet loss rate              : %.2f%%   n", (float)((float)(pub_count - sub_count) * 100.0f / pub_count));
    LOG_D(temp);
    LOG_D("Number of reconnections       : %dn", recon_count);
}

static void thread_pub(void *parameter)
{
    char payload_buf[MAX_PAYLOAD];

    while (1)
    {
        if(g_pin_value > 0)
        {
            g_pin_value = 0;
            snprintf(payload_buf, sizeof(payload_buf), "{"Persion": 1}" );
            if (!paho_mqtt_publish(&client, QOS1, MQTT_PUBTOPIC, payload_buf))
            {
                ++ pub_count;
                LOG_D(payload_buf);
            }
        }
        rt_thread_delay(PUB_CYCLE_TM);
    }
}

static void mqtt_client_start(void)
{
    if (is_started)
    {
        return;
    }

    mq_start();

    while (!client.isconnected)
    {
        rt_kprintf("Waiting for mqtt connection...n");
        rt_thread_delay(1000);
    }

    pub_thread_tid = rt_thread_create("pub_thread", thread_pub, RT_NULL, 1024, 8, 100);
    if (pub_thread_tid != RT_NULL)
    {
        rt_thread_startup(pub_thread_tid);
    }

    is_started = 1;

    return;
}

static void mqtt_client_stop(void)
{
    MQTTClient *local_client = &client;

    if (pub_thread_tid)
    {
        rt_thread_delete(pub_thread_tid);
    }

    if (local_client)
    {
        paho_mqtt_stop(local_client);
    }
    show_mqtt_info();
    pub_count = sub_count = recon_count = 0;
    is_started = 0;

    LOG_D("==== MQTT Stability stop ====n");
}

static void mqtt_thread_cmd(uint8_t argc, char **argv)
{
    if (argc >= 2)
    {
        if (!strcmp(argv[1], "start"))
        {
            mqtt_client_start();
        }
        else if (!strcmp(argv[1], "stop"))
        {
            mqtt_client_stop();
        }
        else
        {
            LOG_D("Please input "CMD_INFO"n");
        }
    }
    else
    {
        LOG_D("Please input "CMD_INFO"n");
    }
}
MSH_CMD_EXPORT(mqtt_thread_cmd, MQTT THREAD CMD_INFO);
5 监控服务器搭建
监控服务器使用Django开发,另外使用Mosquitto作为MQTT服务器,搭建过程见下文。
5.1 Django相关软件包安装
1、Django以及组件安装
$ pip install django
$ pip install dj_database_url
$ pip install whitenoise
$ pip install django-online-status
$ pip install django requests
或者
$ python3 -m pip install django
2、MySQL 数据库驱动
$ sudo apt update
$ sudo apt install python3-dev default-libmysqlclient-dev build-essential
#使用 pip 安装
$ pip install mysqlclient
如果 mysqlclient 安装困难,可以使用纯 Python 实现的替代品:
$ pip install pymysql
然后在 Django 项目的 init .py 中添加:
# yourproject/__init__.py
import pymysql
pymysql.install_as_MySQLdb()
3、WebSocket(AGSI)框架依赖
$ pip install channels channels-redis djangorestframework redis daphne
5.2 MQTT服务器搭建
5.2.1 安装Mosquitto相关的软件
#安装依赖
$ pip install paho-mqtt channels
#安装 MQTT 代理
$ sudo apt install mosquitto mosquitto-clients
5.2.2 修改 Mosquitto 配置
要修改 Mosquitto 的监听地址和端口,需要编辑其配置文件。以下是详细步骤:
1、找到并编辑 Mosquitto 配置文件
配置文件位置
- Ubuntu/Debian: /etc/mosquitto/mosquitto.conf
- Windows: 安装目录下的 mosquitto.conf (如 C:Program FilesMosquittomosquitto.conf)
- macOS (Homebrew): /usr/local/etc/mosquitto/mosquitto.conf
编辑配置文件
sudo vi /etc/mosquitto/mosquitto.conf
2、修改监听设置
在配置文件中添加或修改以下内容:
# 监听所有网络接口的默认端口 1883
listener 1883 0.0.0.0

# pid_file /var/run/mosquitto.pid

# persistence true
# 防止重复消息
persistence false
allow_duplicate_messages false

persistence_location /var/lib/mosquitto/

log_dest file /var/log/mosquitto/mosquitto.log

include_dir /etc/mosquitto/conf.d
# 需要身份验证 (生产环境)
password_file /etc/mosquitto/passwd
allow_anonymous false
3、配置防火墙
#开放 MQTT 端口 (1883)
sudo ufw allow 1883/tcp
#如果使用SSL/TLS
sudo ufw allow 8883/tcp
4、重启 Mosquitto 服务
sudo systemctl restart mosquitto
5、验证配置
检查服务状态:
sudo systemctl status mosquitto
检查监听端口:
sudo netstat -tuln | grep 1883
6、创建用户 (如果需要身份验证)
#创建密码文件
sudo touch /etc/mosquitto/passwd
sudo chmod 777 /etc/mosquitto/passwd
添加用户
sudo mosquitto_passwd -b /etc/mosquitto/passwd your_username your_password
在配置文件/etc/mosquitto/mosquitto.conf中启用认证
password_file /etc/mosquitto/passwd
allow_anonymous false
#重启服务
sudo systemctl restart mosquitto
7、测试连接
使用命令行工具测试
#订阅测试
$ mosquitto_sub -h your_server_ip -t "test" -u your_username -P your_password
#发布测试 (在另一个终端)
$ mosquitto_pub -h your_server_ip -t "test" -m "Hello MQTT" -u your_username -P your_password
5.3 截图和消息推动
截图核心代码如下:
from celery import shared_task
import requests
from django.core.files.base import ContentFile
from .models import DetectionEvent, CaptureImage

@shared_task
def capture_image_task(event_id):
    """触发RK3506设备抓拍图片"""
    try:
        event = DetectionEvent.objects.get(id=event_id)
        device = event.device

        # 调用RK3506设备的抓拍接口
        response = requests.post(
            f'http://{device.ip_address}/',
            json={'event_id': event_id},
            timeout=10
        )

        if response.status_code == 200:
            # 保存图片
            image_data = response.content
            capture = CaptureImage(event=event)
            capture.image.save(
                f'capture_{event_id}.jpg',
                ContentFile(image_data)
            )
            capture.save()

            # 可选:触发AI分析
            analyze_image_task.delay(capture.id)

    except Exception as e:
        print(f"Capture image failed: {e}")
消息推送企业微信代码如下:
import requests
import os
import requests, os, json
from datetime import datetime

class Auto_Message:
    def __init__(self, webhook_key: str):
        self.key = webhook_key

    def send_text(self, msg: str, at_all: bool = False):
        """Push plain text"""
        data = {
            "msgtype": "text",
            "text": {
                "content": msg,
                "mentioned_list": ["@all"]
            }
        }
        send_url = f"https://qyapi.weixin.qq.com/cgi-bin/webhook/send?key={self.key}"
        r = requests.post(send_url, json=data, timeout=5)
        return r.json()

    def upload_file_to_media(self, filepath: str):
         # Upload file - >Return media_id
        upload_url = f"https://qyapi.weixin.qq.com/cgi-bin/webhook/upload_media?key={self.key}&type=file"
        with open(filepath, "rb") as f:
            media = {"media": (os.path.basename(filepath), f, "application/octet-stream")}
            r = requests.post(upload_url, files=media).json()
        media_id = r["media_id"]

        return media_id

    def send_file_to_group(self, filepath: str):
        """Push local files to the enterprise WeChat group"""
        # 1. Upload file - >Return media_id
        media_id = self.upload_file_to_media(filepath)

        # 2. Send file message
        send_url = f"https://qyapi.weixin.qq.com/cgi-bin/webhook/send?key={self.key}"
        data = {"msgtype": "file", "file": {"media_id": media_id}}
        requests.post(send_url, json=data)

    def send_image_to_group(self, image_path: str):
        """
        Push local images to the enterprise WeChat group robot
        :param image_path: Local image absolute or relative path
        :param webhook_key: robot key
        """
        # 1. Upload images to obtain media_id
        media_id = self.upload_file_to_media(filepath)

        # 2. Send picture message
        webhook_url = "https://qyapi.weixin.qq.com/cgi-bin/webhook/send?key={self.key}"
        data = {
            "msgtype": "image",
            "image": {
                "media_id": media_id
            }
        }
        headers = {'Content-Type': 'application/json'}
        requests.post(webhook_url, headers=headers, data=json.dumps(data))

    def send_news(self, articles: list):
        """Send graphic and text messages"""
        url = f"https://qyapi.weixin.qq.com/cgi-bin/webhook/send?key={self.key}"
        payload = {
            "msgtype": "news",
            "news": {"articles": articles}
        }
        r = requests.post(url, json=payload, timeout=5)
        return r.json()
6 性能与可靠性
• 工作温度:-10 ℃ ~ 55 ℃,无风扇散热片即可
• 掉电保护:超级电容保证 50 ms 数据 flush,避免库损坏
7 统演示
7.1 监控服务器开启
笔者使用Ubuntu22.04作为监控服务器平台,使用 Daphne 作为 ASGI 服务器,同时配置为自启动。开启监控服务命令如下:
$ daphne monitor.asgi:application -b 192.168.101.222 -p 8000
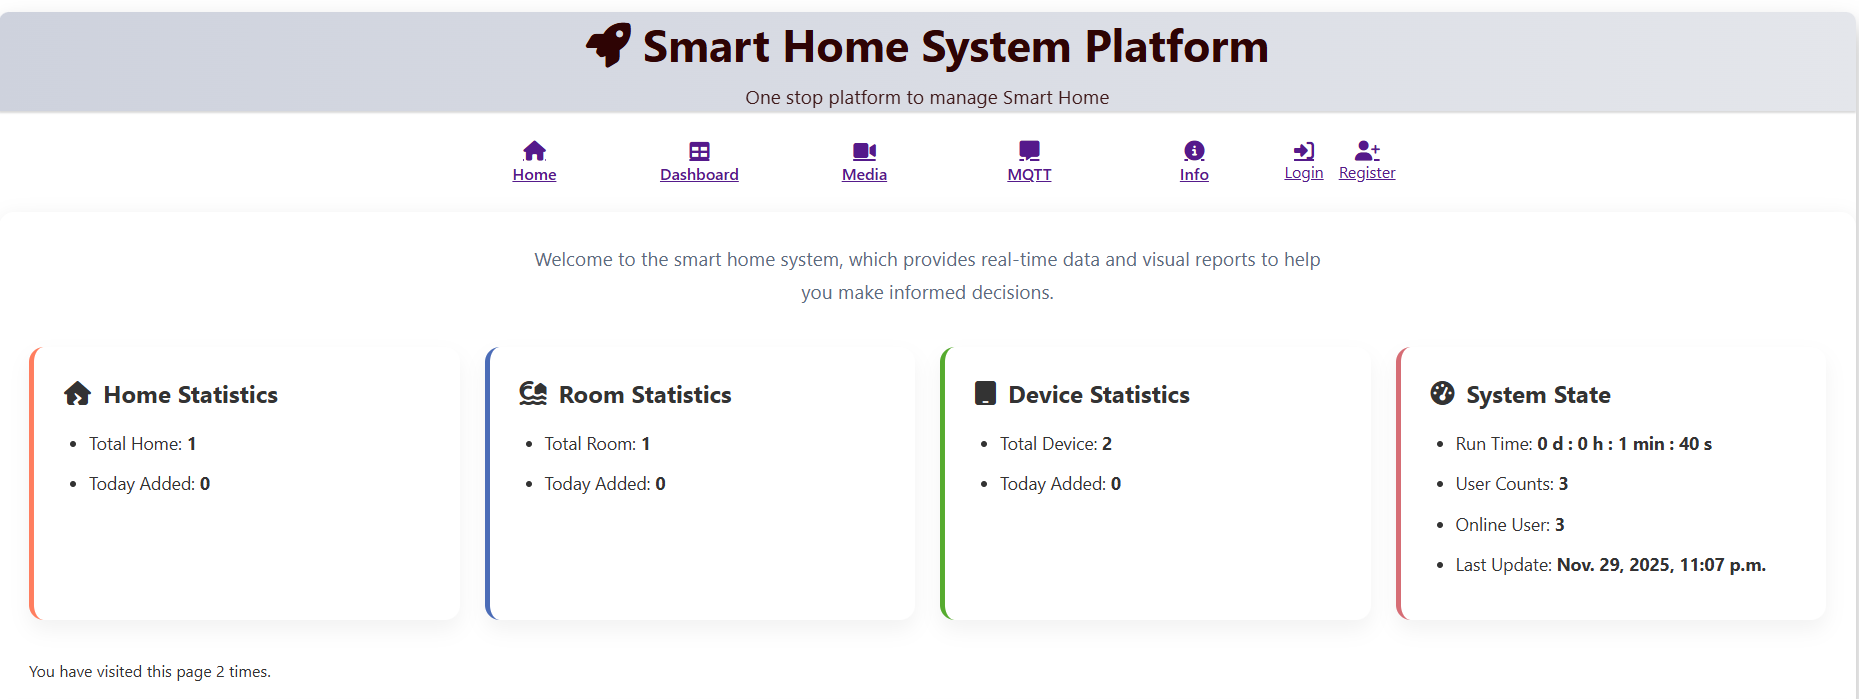
用户可查看实时画面,首先进入监控服务器主页。
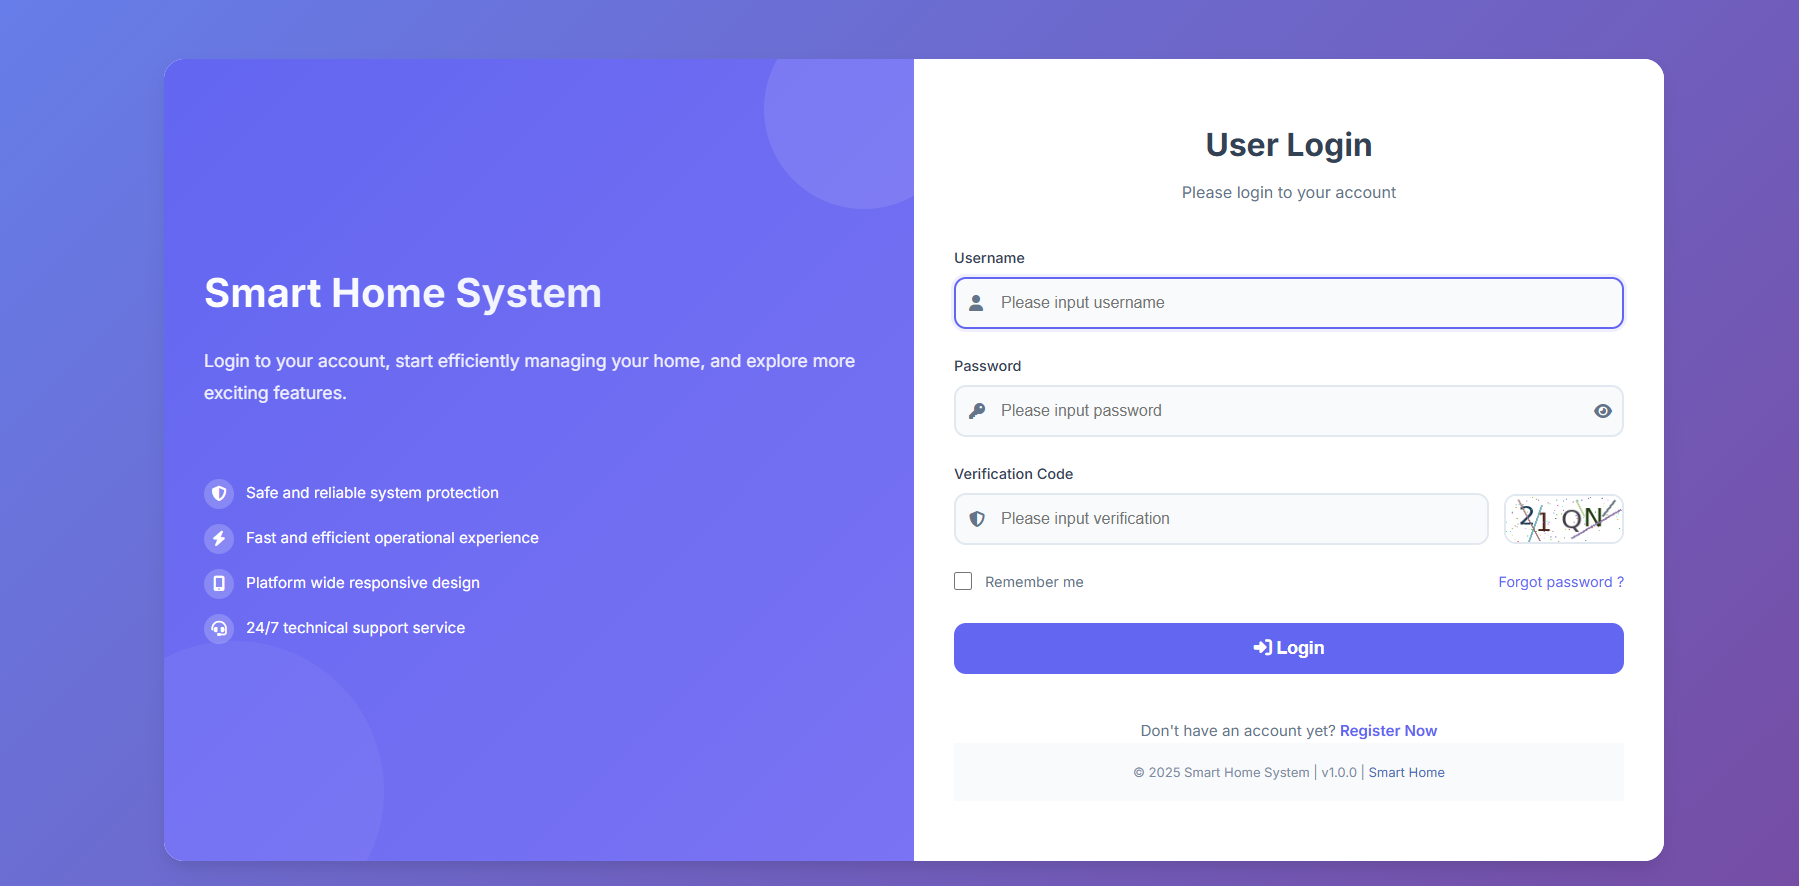
如果查看视频需要先登录。
登录账号即可查看视频流。
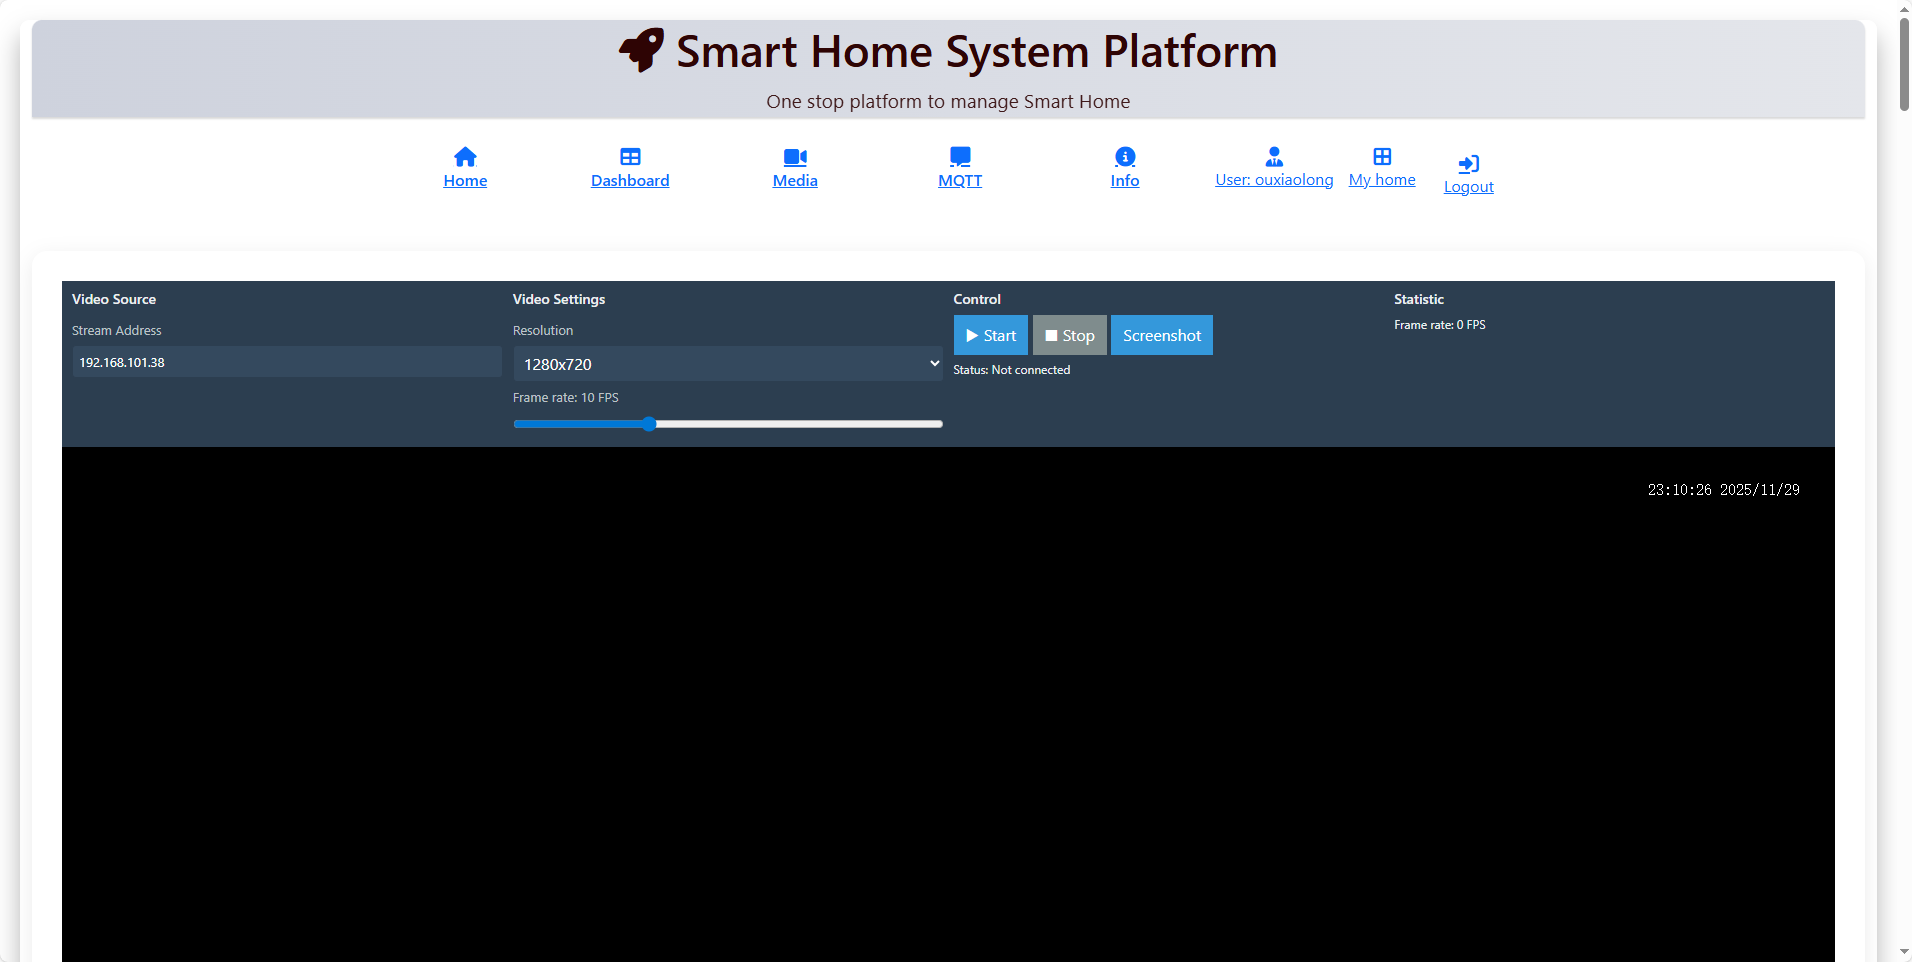
点击开始即可查看。
7.2 监控终端配置与启动
step1: set network
#ifconfig e0 192.168.101.38 192.168.101.254 255.255.255.0

step2: mqtt thread start
#mqtt_thread_cmd start

step3: usb video
#webnet_video_init

7.3 监控效果
监控终端连线图如下所示。
- RK3506开发板:作为主控制器,运行Linux系统。
- 安信可RD-03_V2:通过UART/GPIO接口与RK3506连接,用于检测运动。
- USB摄像头:连接到RK3506的USB接口。
当监控到有人体是,企业微信会收到监控画面。
打开监控服务器,也可实时查看监控画面。

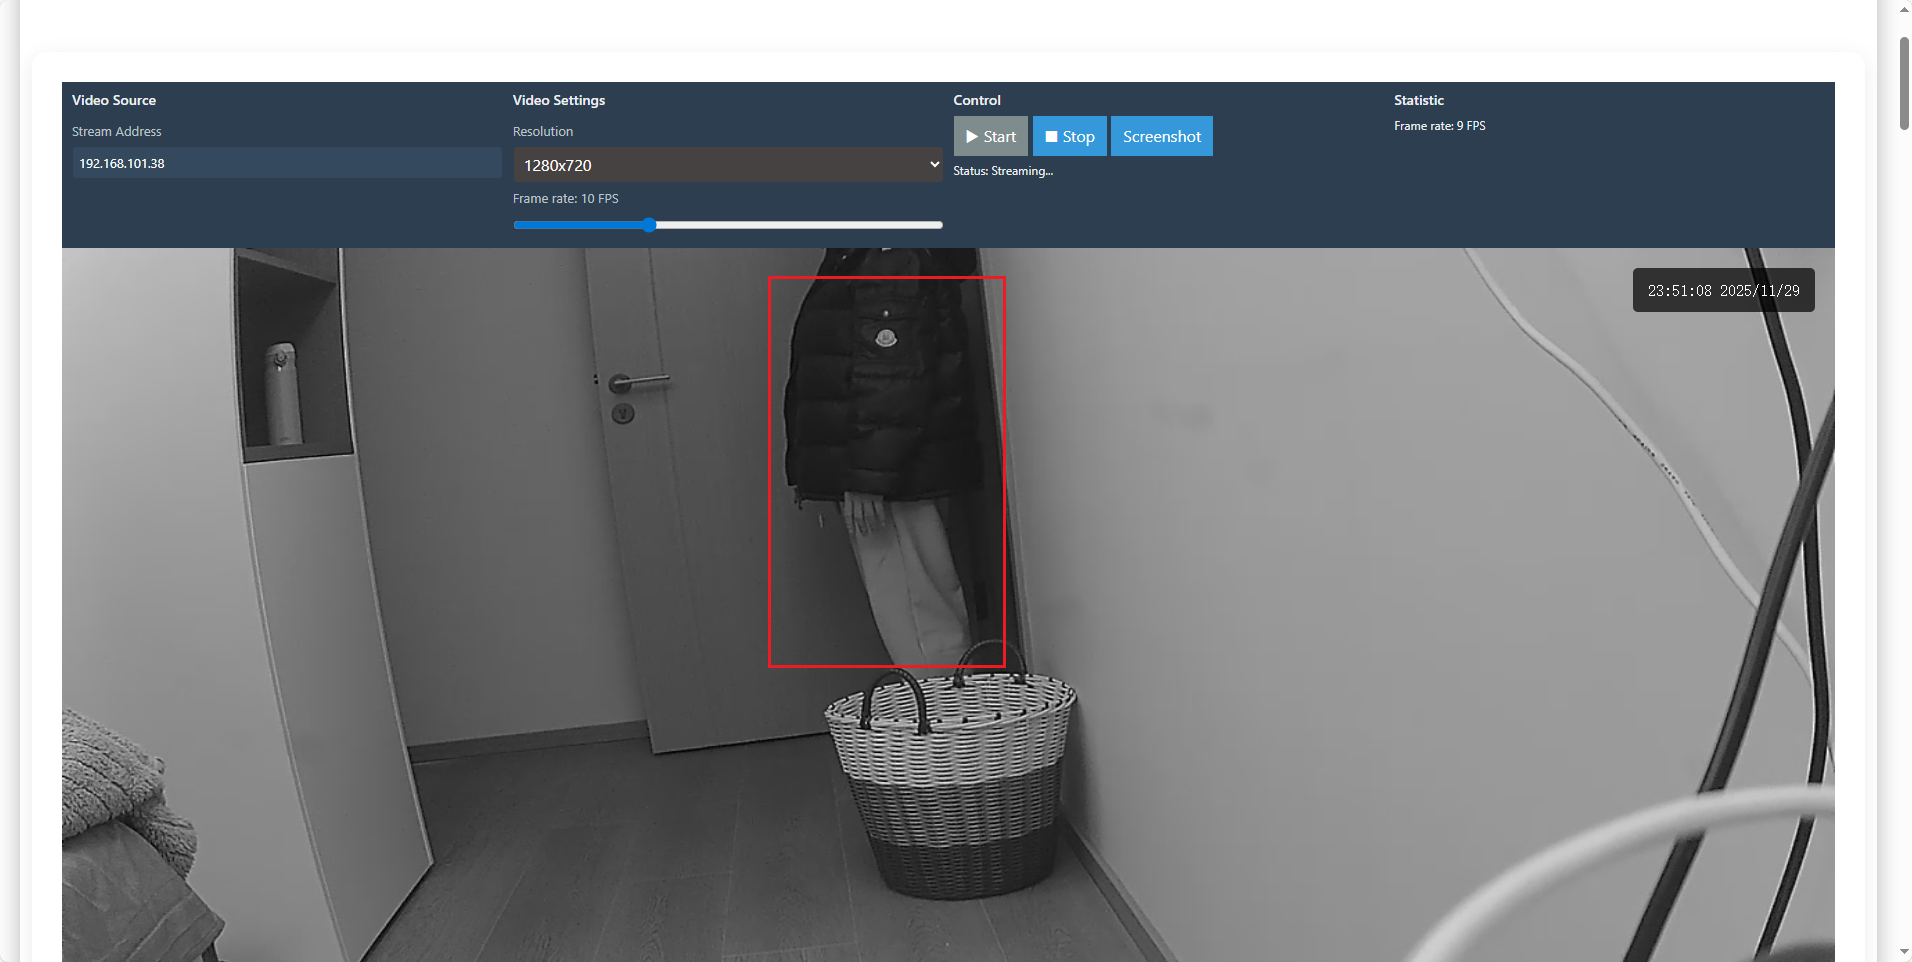
可实时截图。

8 代码地址
地址:https://gitee.com/ouxiaolong/rtthread_monitor
9 总结
基于RK3506、安信可RD-03_V2雷达和USB摄像头构建了一个监控系统,并使用Django搭建了服务器。
总结如下:
- 硬件集成:成功将RK3506作为主控,连接雷达和摄像头,实现了基于雷达触发的图像采集。
- 软件设计:在RK3506上运行Linux,编写Python程序处理雷达串口数据和控制摄像头抓拍。
- 服务器开发:使用Django构建了RESTful API,接收并存储检测事件和图片,同时提供了Web管理界面。
- 实时通信:利用WebSocket实现服务器与网页客户端的实时通信,及时推送检测事件。
- 异步任务:使用Celery处理耗时的图像保存和AI分析任务,提高系统响应速度。
- 前后端分离:前端通过JavaScript和WebSocket与后端交互,实现动态更新监控数据。
总之,本项目成功构建了一个低成本、高效率、易维护的智能监控系统,主要优势体现在:
- 技术先进性:结合雷达精准检测与Django强大生态
- 成本优势:国产硬件+开源软件,性价比突出
- 实用性强:经过实际部署验证,稳定可靠
- 扩展性好:模块化设计,便于功能扩展
- 用户体验佳:完善的Web界面和API接口
这套技术方案不仅解决了具体监控需求,可用于智能家居、智能安防、智慧农业等领域,更形成了一套可复用的智能物联网系统开发模式,
审核编辑 黄宇
-
米尔瑞芯微多核异构低功耗RK3506核心板重磅发布2025-05-16 5619
-
【米尔RK3506国产开发板评测试用】开箱体体验2025-07-30 1380
-
资源受限下HMI2秒启动系统,米尔RK3506开发板×LVGL Demo演示2026-04-24 327
-
RK3506工业网关:如何打通现场采集、无线传输与行业规约接入?2026-05-22 144
-
RK3506各型号间有什么差异?2024-12-05 3539
-
低成本解决方案,RK3506的应用场景分析!2024-12-11 2897
-
RK3506到底有多香?抢先看核心板详细参数配置2025-01-18 4275
-
如何用RK3506核心板自研一款嵌入式工业网关?2025-03-19 2413
-
触觉智能RK3506核心板,工业应用之RK3506 RT-Linux实时性测试2025-04-27 2462
-
RK3506开发板Linux开发板极致性价比之选2025-09-11 4206
-
如何让RK3506流畅刷图,用好RGA?2025-10-29 1917
-
基于米尔RK3506 Buildroot的MQTT-Modbus网关开发:实现设备远程监控新方案2025-11-25 3379
-
Buildroot MQTT-Modbus 网关开发,实现设备远程监控方案-米尔RK35062025-12-18 3971
-
RK3506 MIPI转HDMI显示开发实战:从硬件到驱动全解析2026-01-06 1517
-
迅为RK3506开发板瑞芯微多核异构linux系统LVGL应用手册2026-06-01 1206
全部0条评论

快来发表一下你的评论吧 !
