

PROFET™ +2 12V 演示板快速入门指南
电子说
1.4w人已加入
描述
PROFET™ +2 12V 演示板快速入门指南
在电子设计领域,PROFET™ +2 12V 高端开关是一款备受关注的产品。今天,我们就来详细探讨一下 PROFET™ +2 12V 演示板的快速入门指南,希望能对各位工程师在实际应用中有所帮助。
文件下载:Infineon Technologies BTS7004-1EPP PROFET™+2子板.pdf
应用设置
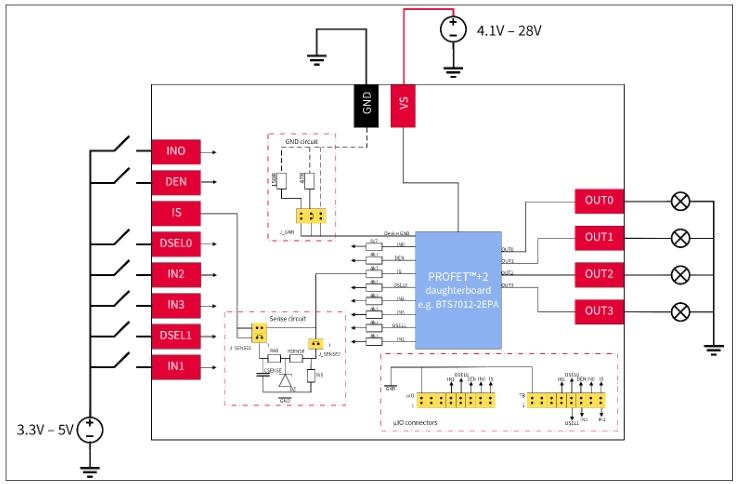
在进行测试之前,我们需要完成应用设置。这个过程主要是将通用主板(MB)和 PROFET™ +2 12V 子板(DB,有 1 通道、2 通道或 4 通道可选)连接起来进行台架测试。需要注意的是,所需的设备包括两个电源轨(+ 13.5 V 和 + 3.3 V/+ 5 V)、数字电压表(DVM)和/或示波器。图 1 展示了 PROFET™ +2 12V 设备快速入门设置的实现。
刚刚在搜索相关内容时遇到了网络问题,暂时未能获取到关于“PROFET™ +2 12V 演示板应用设置注意事项”的额外信息。我们接着了解后续的操作内容。
如何运行 PROFET™ +2 12V 演示板
连接步骤
- 将 PROFET™ +2 12V 子板插入主板。
- 将电源连接到 VS(4.1 V – 28 V)和 GND。
- 根据不同通道的设备,连接数字电源:
- 对于 1 通道设备,连接 DEN 和 IN0。
- 对于 2 通道设备,连接 DEN、DSEL0、IN0 和 IN1。
- 对于 4 通道设备,连接 DEN、DSEL0、DSEL1、IN0、IN1、IN2 和 IN3。
- 根据设备数据表,将负载连接到相应的输出引脚:
- 对于 1 通道设备,连接到 OUT0。
- 对于 2 通道设备,连接到 OUT0 和 OUT2。
- 对于 4 通道设备,连接到 OUT0、OUT1、OUT2 和 OUT3。
检查要点
- 将电源电流限制设置为高于演示板上预期的负载电流,避免因电流不足导致设备无法正常工作。
- 确保 OUTx 引脚与 GND 之间没有短路情况,这是保障设备安全运行的关键步骤。
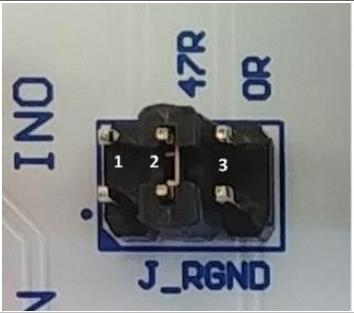
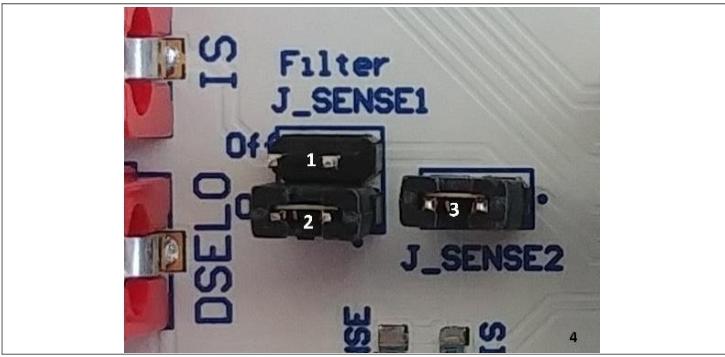
这里有两个重要的跳线设置,我们来详细了解一下:
J_RGND 跳线位置
| # | Description |
|---|---|
| 1 | The PROFETM +2 12V DB ground is connected to the MB module ground via 150 resistor |
| 2 | The PROFETM +2 12V DB ground is connected to the MB module ground via 47 resistor |
| 3 | The PROFETM +2 12V DB ground is connected to the MB module ground via o resistor |
不同的跳线位置会对设备的接地情况产生影响,大家在实际操作中要根据具体需求进行选择。
J_SENSE 跳线位置
| # | Description |
|---|---|
| 1 | It connects the IS pin of the device directly to the banana connector of the MB and disables the on-board filter of the IS |
| 2 | It connects the IS pin of the device after the on-board filter to the banana connector of the MB |
| 3 | It connects the IS pin of the device to the 1.2 kΩ sense resistor RIS and to the μIO connector |
不同的跳线设置会影响设备的电流检测方式,工程师们要结合实际的测试需求来设置。
激活操作
- 打开电源和数字电源,让设备开始运行。
- 如果需要更详细的信息,可以查阅相关的数据表。
| 最后,对于 4 通道设备,还有一个 DEN 和 DSELx 引脚到 IS 引脚的真值表: | DEN | DSEL0 | DSEL1 | IS pin |
|---|---|---|---|---|
| Low | Not relevant | Not relevant | Z | |
| High | Low | Low | Sense output 0 | |
| High | High | Low | Sense output 1 | |
| High | Low | High | Sense output 2 | |
| High | High | High | Sense output 3 |
这个真值表对于我们理解和控制设备的电流检测输出非常重要。
在实际应用中,大家要仔细按照这些步骤进行操作,同时也要注意文档最后的重要通知和警告。各位工程师在使用 PROFET™ +2 12V 演示板的过程中遇到过哪些有趣的问题呢?欢迎在评论区分享交流。
声明:本文内容及配图由入驻作者撰写或者入驻合作网站授权转载。文章观点仅代表作者本人,不代表电子发烧友网立场。文章及其配图仅供工程师学习之用,如有内容侵权或者其他违规问题,请联系本站处理。
举报投诉
- 相关推荐
- 热点推荐
-
探索DC665:±12V 2A热插拔控制器演示电路的快速启动指南2026-05-26 326
-
PROFET™+智能高端功率开关演示板:功能与应用解析2026-05-19 382
-
EPC9107演示板:高效28V降压转换器的快速入门指南2026-03-28 422
-
PROFET™ +2 12V 演示板快速上手指南2025-12-21 964
-
探索Arduino Shield Power PROFET™ + 12V:强大的高侧开关评估板2025-12-20 1399
-
PROFET™ +2 12V 客户评估套件深度解析2025-12-19 629
-
PROFET™ +2 12V客户评估套件:设计与应用全解析2025-12-18 653
-
Stream-it!-RZ-V2快速入门指南2023-03-23 473
-
DC533A LT3436EFE演示板 | 3.2V ≤ V ≤ to 12V,V = 12V (最高可达2A)2021-06-18 1026
-
LTC1068-200演示板快速入门指南2021-05-17 961
-
LTC1067演示板快速入门指南2021-05-11 758
-
关于英飞凌推出PROFET+2和大电流PROFET的分析和介绍2019-09-24 4102
全部0条评论

快来发表一下你的评论吧 !
