我们使用dmoz.org这个网站来作为小抓抓一展身手的对象。
首先先要回答一个问题。
问:把网站装进爬虫里,总共分几步?
答案很简单,四步:
新建项目 (Project):新建一个新的爬虫项目
明确目标(Items):明确你想要抓取的目标
制作爬虫(Spider):制作爬虫开始爬取网页
存储内容(Pipeline):设计管道存储爬取内容
好的,基本流程既然确定了,那接下来就一步一步的完成就可以了。
1.新建项目(Project)
在空目录下按住Shift键右击,选择“在此处打开命令窗口”,输入一下命令:

其中,tutorial为项目名称。
可以看到将会创建一个tutorial文件夹,目录结构如下:

下面来简单介绍一下各个文件的作用:
scrapy.cfg:项目的配置文件
tutorial/:项目的Python模块,将会从这里引用代码
tutorial/items.py:项目的items文件
tutorial/pipelines.py:项目的pipelines文件
tutorial/settings.py:项目的设置文件
tutorial/spiders/:存储爬虫的目录
2.明确目标(Item)
在Scrapy中,items是用来加载抓取内容的容器,有点像Python中的Dic,也就是字典,但是提供了一些额外的保护减少错误。
一般来说,item可以用scrapy.item.Item类来创建,并且用scrapy.item.Field对象来定义属性(可以理解成类似于ORM的映射关系)。
接下来,我们开始来构建item模型(model)。
首先,我们想要的内容有:
名称(name)
链接(url)
描述(description)
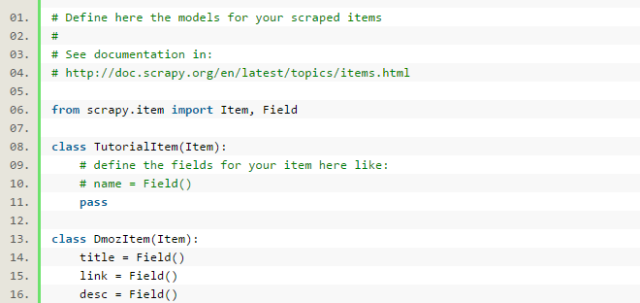
修改tutorial目录下的items.py文件,在原本的class后面添加我们自己的class。
因为要抓dmoz.org网站的内容,所以我们可以将其命名为DmozItem:

刚开始看起来可能会有些看不懂,但是定义这些item能让你用其他组件的时候知道你的 items到底是什么。
可以把Item简单的理解成封装好的类对象。
3.制作爬虫(Spider)
制作爬虫,总体分两步:先爬再取。
也就是说,首先你要获取整个网页的所有内容,然后再取出其中对你有用的部分。
3.1爬
Spider是用户自己编写的类,用来从一个域(或域组)中抓取信息。
他们定义了用于下载的URL列表、跟踪链接的方案、解析网页内容的方式,以此来提取items。
要建立一个Spider,你必须用scrapy.spider.BaseSpider创建一个子类,并确定三个强制的属性:
name:爬虫的识别名称,必须是唯一的,在不同的爬虫中你必须定义不同的名字。
start_urls:爬取的URL列表。爬虫从这里开始抓取数据,所以,第一次下载的数据将会从这些urls开始。其他子URL将会从这些起始URL中继承性生成。
parse():解析的方法,调用的时候传入从每一个URL传回的Response对象作为唯一参数,负责解析并匹配抓取的数据(解析为item),跟踪更多的URL。
这里可以参考宽度爬虫教程中提及的思想来帮助理解,教程传送:[Java] 知乎下巴第5集:使用HttpClient工具包和宽度爬虫。
也就是把Url存储下来并依此为起点逐步扩散开去,抓取所有符合条件的网页Url存储起来继续爬取。
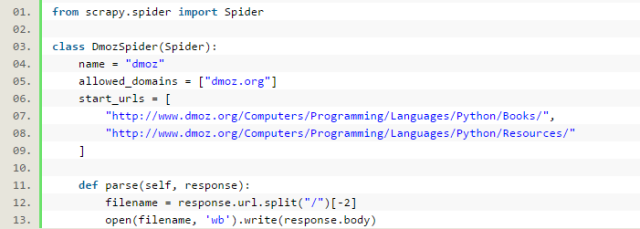
下面我们来写第一只爬虫,命名为dmoz_spider.py,保存在tutorial\spiders目录下。
dmoz_spider.py代码如下:

allow_domains是搜索的域名范围,也就是爬虫的约束区域,规定爬虫只爬取这个域名下的网页。
从parse函数可以看出,将链接的最后两个地址取出作为文件名进行存储。
然后运行一下看看,在tutorial目录下按住shift右击,在此处打开命令窗口,输入:

运行结果如图:

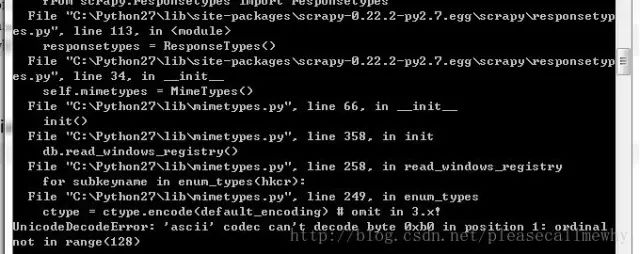
报错了:
UnicodeDecodeError: 'ascii' codec can't decode byte 0xb0 in position 1: ordinal not in range(128)
运行第一个Scrapy项目就报错,真是命运多舛。
应该是出了编码问题,谷歌了一下找到了解决方案:
在python的Lib\site-packages文件夹下新建一个sitecustomize.py:

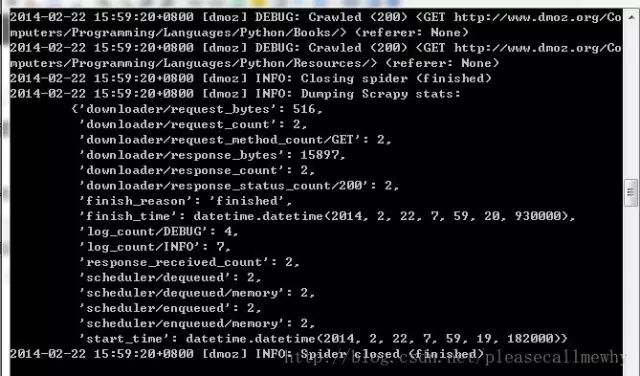
再次运行,OK,问题解决了,看一下结果:

最后一句INFO: Closing spider (finished)表明爬虫已经成功运行并且自行关闭了。
包含 [dmoz]的行 ,那对应着我们的爬虫运行的结果。
可以看到start_urls中定义的每个URL都有日志行。
还记得我们的start_urls吗?
http://www.dmoz.org/Computers/Programming/Languages/Python/Bookshttp://www.dmoz.org/Computers/Programming/Languages/Python/Resources
因为这些URL是起始页面,所以他们没有引用(referrers),所以在它们的每行末尾你会看到 (referer: )。
在parse 方法的作用下,两个文件被创建:分别是 Books 和 Resources,这两个文件中有URL的页面内容。
那么在刚刚的电闪雷鸣之中到底发生了什么呢?
首先,Scrapy为爬虫的 start_urls属性中的每个URL创建了一个 scrapy.http.Request 对象 ,并将爬虫的parse 方法指定为回调函数。
然后,这些 Request被调度并执行,之后通过parse()方法返回scrapy.http.Response对象,并反馈给爬虫。
3.2取
爬取整个网页完毕,接下来的就是的取过程了。
光存储一整个网页还是不够用的。
在基础的爬虫里,这一步可以用正则表达式来抓。
在Scrapy里,使用一种叫做 XPath selectors的机制,它基于 XPath表达式。
如果你想了解更多selectors和其他机制你可以查阅相关资料。
这是一些XPath表达式的例子和他们的含义
/html/head/title: 选择HTML文档
元素下面的
标签。</p>
<p style="text-indent: 2em;">
/html/head/title/text(): 选择前面提到的<title> 元素下面的文本内容</p>
<p style="text-indent: 2em;">
//td: 选择所有 <td> 元素</p>
<p style="text-indent: 2em;">
//div[@class="mine"]: 选择所有包含 class="mine" 属性的div 标签元素</p>
<p style="text-indent: 2em;">
以上只是几个使用XPath的简单例子,但是实际上XPath非常强大。</p>
<p style="text-indent: 2em;">
为了方便使用XPaths,Scrapy提供XPathSelector 类,有两种可以选择,HtmlXPathSelector(HTML数据解析)和XmlXPathSelector(XML数据解析)。</p>
<p style="text-indent: 2em;">
必须通过一个 Response 对象对他们进行实例化操作。</p>
<p style="text-indent: 2em;">
你会发现Selector对象展示了文档的节点结构。因此,第一个实例化的selector必与根节点或者是整个目录有关 。</p>
<p style="text-indent: 2em;">
在Scrapy里面,Selectors 有四种基础的方法(点击查看API文档):</p>
<p style="text-indent: 2em;">
xpath():返回一系列的selectors,每一个select表示一个xpath参数表达式选择的节点</p>
<p style="text-indent: 2em;">
css():返回一系列的selectors,每一个select表示一个css参数表达式选择的节点</p>
<p style="text-indent: 2em;">
extract():返回一个unicode字符串,为选中的数据</p>
<p style="text-indent: 2em;">
re():返回一串一个unicode字符串,为使用正则表达式抓取出来的内容</p>
<p style="text-indent: 2em;">
3.3xpath实验</p>
<p style="text-indent: 2em;">
下面我们在Shell里面尝试一下Selector的用法。</p>
<p style="text-indent: 2em;">
实验的网址:http://www.dmoz.org/Computers/Programming/Languages/Python/Books/</p>
<p align="center">
<img src='http://file.elecfans.com/web1/M00/7D/BB/pIYBAFwKK3OAMag2AAB7_dZ30Cg048.png' alt='爬虫' /></p>
<p style="text-indent: 2em;">
熟悉完了实验的小白鼠,接下来就是用Shell爬取网页了。</p>
<p style="text-indent: 2em;">
进入到项目的顶层目录,也就是第一层tutorial文件夹下,在cmd中输入:</p>
<p style="text-indent: 2em;">
<img src='http://file.elecfans.com/web1/M00/7D/BB/pIYBAFwKK3OAUgvEAAAvjyHSf78514.png' alt='爬虫' /></p>
<p style="text-indent: 2em;">
回车后可以看到如下的内容:</p>
<p align="center">
<img src='http://file.elecfans.com/web1/M00/7D/BB/pIYBAFwKK3SATik7AAHbS5Z2YkQ587.png' alt='爬虫' /></p>
<p style="text-indent: 2em;">
在Shell载入后,你将获得response回应,存储在本地变量 response中。</p>
<p style="text-indent: 2em;">
所以如果你输入response.body,你将会看到response的body部分,也就是抓取到的页面内容:</p>
<p align="center">
<img src='http://file.elecfans.com/web1/M00/7D/BB/pIYBAFwKK3aAFYdPAALND72cYfk023.png' alt='爬虫' /></p>
<p style="text-indent: 2em;">
或者输入response.headers 来查看它的 header部分:</p>
<p align="center">
<img src='http://file.elecfans.com/web1/M00/7D/BB/pIYBAFwKK3mAe8tVAALBJa2ARnE086.png' alt='爬虫' /></p>
<p style="text-indent: 2em;">
现在就像是一大堆沙子握在手里,里面藏着我们想要的金子,所以下一步,就是用筛子摇两下,把杂质出去,选出关键的内容。</p>
<p style="text-indent: 2em;">
selector就是这样一个筛子。</p>
<p style="text-indent: 2em;">
在旧的版本中,Shell实例化两种selectors,一个是解析HTML的 hxs 变量,一个是解析XML 的 xxs 变量。</p>
<p style="text-indent: 2em;">
而现在的Shell为我们准备好的selector对象,sel,可以根据返回的数据类型自动选择最佳的解析方案(XML or HTML)。</p>
<p style="text-indent: 2em;">
然后我们来捣弄一下!~</p>
<p style="text-indent: 2em;">
要彻底搞清楚这个问题,首先先要知道,抓到的页面到底是个什么样子。</p>
<p style="text-indent: 2em;">
比如,我们要抓取网页的标题,也就是<title>这个标签:</p>
<p align="center">
<img src='http://file.elecfans.com/web1/M00/7D/BB/pIYBAFwKK3mAYZubAAAMzxt2yJ4194.png' alt='爬虫' /></p>
<p style="text-indent: 2em;">
可以输入:</p>
<p style="text-indent: 2em;">
<img src='http://file.elecfans.com/web1/M00/7D/BB/pIYBAFwKK3mAdRyfAAAHpvVtoOo344.png' alt='爬虫' /></p>
<p style="text-indent: 2em;">
结果就是:</p>
<p style="text-indent: 2em;">
<img src='http://file.elecfans.com/web1/M00/7D/BB/pIYBAFwKK3qAQejMAAAvPB0_p9g042.png' alt='爬虫' /></p>
<p style="text-indent: 2em;">
这样就能把这个标签取出来了,用extract()和text()还可以进一步做处理。</p>
<p style="text-indent: 2em;">
备注:简单的罗列一下有用的xpath路径表达式:</p>
<p style="text-indent: 2em;">
表达式</p>
<p style="text-indent: 2em;">
描述</p>
<p style="text-indent: 2em;">
nodename 选取此节点的所有子节点。 </p>
<p style="text-indent: 2em;">
/ 从根节点选取。 </p>
<p style="text-indent: 2em;">
// 从匹配选择的当前节点选择文档中的节点,而不考虑它们的位置。 </p>
<p style="text-indent: 2em;">
. 选取当前节点。 </p>
<p style="text-indent: 2em;">
.. 选取当前节点的父节点。 </p>
<p style="text-indent: 2em;">
@ 选取属性。 </p>
<p style="text-indent: 2em;">
全部的实验结果如下,In[i]表示第i次实验的输入,Out[i]表示第i次结果的输出:</p>
<p align="center">
<img src='http://file.elecfans.com/web1/M00/7D/BB/pIYBAFwKK3qAVtJSAABq5y-5nTo180.png' alt='爬虫' /></p>
<p style="text-indent: 2em;">
当然title这个标签对我们来说没有太多的价值,下面我们就来真正抓取一些有意义的东西。</p>
<p style="text-indent: 2em;">
使用火狐的审查元素我们可以清楚地看到,我们需要的东西如下:</p>
<p align="center">
<img src='http://file.elecfans.com/web1/M00/7D/BB/pIYBAFwKK3uAdCiqAABSVCIAudw253.png' alt='爬虫' /></p>
<p style="text-indent: 2em;">
我们可以用如下代码来抓取这个<li>标签:</p>
<p style="text-indent: 2em;">
<img src='http://file.elecfans.com/web1/M00/7D/BB/pIYBAFwKK3uAEGbvAAAGwo7Xx3w887.png' alt='爬虫' /></p>
<p style="text-indent: 2em;">
从<li>标签中,可以这样获取网站的描述:</p>
<p style="text-indent: 2em;">
<img src='http://file.elecfans.com/web1/M00/7D/BB/pIYBAFwKK3yAVaxqAAALDd45q6Y420.png' alt='爬虫' /></p>
<p style="text-indent: 2em;">
可以这样获取网站的标题:</p>
<p style="text-indent: 2em;">
<img src='http://file.elecfans.com/web1/M00/7D/BB/pIYBAFwKK3yALz5oAAALFMU58tc217.png' alt='爬虫' /></p>
<p style="text-indent: 2em;">
可以这样获取网站的超链接:</p>
<p style="text-indent: 2em;">
<img src='http://file.elecfans.com/web1/M00/7D/BB/pIYBAFwKK3yAb7ArAAALbImHF8A623.png' alt='爬虫' /></p>
<p style="text-indent: 2em;">
当然,前面的这些例子是直接获取属性的方法。</p>
<p style="text-indent: 2em;">
我们注意到xpath返回了一个对象列表,</p>
<p style="text-indent: 2em;">
那么我们也可以直接调用这个列表中对象的属性挖掘更深的节点</p>
<p style="text-indent: 2em;">
(参考:Nesting selectors andWorking with relative XPaths in the Selectors):</p>
<p align="center">
<img src='http://file.elecfans.com/web1/M00/7D/BB/pIYBAFwKK3yAKXYOAAAFlcs_O2Q945.png' alt='爬虫' /></p>
<p style="text-indent: 2em;">
3.4xpath实战</p>
<p style="text-indent: 2em;">
我们用shell做了这么久的实战,最后我们可以把前面学习到的内容应用到dmoz_spider这个爬虫中。</p>
<p style="text-indent: 2em;">
在原爬虫的parse函数中做如下修改:</p>
<p align="center">
<img src='http://file.elecfans.com/web1/M00/7D/BB/pIYBAFwKK32APDm_AABf9RQ21Ug644.png' alt='爬虫' /></p>
<p style="text-indent: 2em;">
注意,我们从scrapy.selector中导入了Selector类,并且实例化了一个新的Selector对象。这样我们就可以像Shell中一样操作xpath了。</p>
<p style="text-indent: 2em;">
我们来试着输入一下命令运行爬虫(在tutorial根目录里面):</p>
<p style="text-indent: 2em;">
scrapy crawl dmoz</p>
<p style="text-indent: 2em;">
运行结果如下:</p>
<p align="center">
<img src='http://file.elecfans.com/web1/M00/7D/BB/pIYBAFwKK36Acd2dAAFYpLNs00Y419.png' alt='爬虫' /></p>
<p style="text-indent: 2em;">
果然,成功的抓到了所有的标题。但是好像不太对啊,怎么Top,Python这种导航栏也抓取出来了呢?</p>
<p style="text-indent: 2em;">
我们只需要红圈中的内容:</p>
<p align="center">
<img src='http://file.elecfans.com/web1/M00/7D/BB/pIYBAFwKK36AOjgYAACr0aW5qJA726.png' alt='爬虫' /></p>
<p style="text-indent: 2em;">
看来是我们的xpath语句有点问题,没有仅仅把我们需要的项目名称抓取出来,也抓了一些无辜的但是xpath语法相同的元素。</p>
<p style="text-indent: 2em;">
审查元素我们发现我们需要的<ul>具有class='directory-url'的属性,</p>
<p style="text-indent: 2em;">
那么只要把xpath语句改成sel.xpath('//ul[@class="directory-url"]/li')即可</p>
<p style="text-indent: 2em;">
将xpath语句做如下调整:</p>
<p align="center">
<img src='http://file.elecfans.com/web1/M00/7D/BB/pIYBAFwKK3-ACJoMAABs7DrGtok960.png' alt='爬虫' /></p>
<p style="text-indent: 2em;">
成功抓出了所有的标题,绝对没有滥杀无辜:</p>
<p align="center">
<img src='http://file.elecfans.com/web1/M00/7D/BB/pIYBAFwKK4CAHGdkAAGerLsr9Lo332.png' alt='爬虫' /></p>
<p style="text-indent: 2em;">
3.5使用Item</p>
<p style="text-indent: 2em;">
接下来我们来看一看如何使用Item。</p>
<p style="text-indent: 2em;">
前面我们说过,Item 对象是自定义的python字典,可以使用标准字典语法获取某个属性的值:</p>
<p align="center">
<img src='http://file.elecfans.com/web1/M00/7D/BB/pIYBAFwKK4GASXyKAAAbv4i09k4540.png' alt='爬虫' /></p>
<p style="text-indent: 2em;">
作为一只爬虫,Spiders希望能将其抓取的数据存放到Item对象中。为了返回我们抓取数据,spider的最终代码应当是这样:</p>
<p align="center">
<img src='http://file.elecfans.com/web1/M00/7D/BB/pIYBAFwKK4GASocHAACB7Ri1uLE782.png' alt='爬虫' /></p>
<p style="text-indent: 2em;">
4.存储内容(Pipeline)</p>
<p style="text-indent: 2em;">
保存信息的最简单的方法是通过Feed exports,主要有四种:JSON,JSON lines,CSV,XML。</p>
<p style="text-indent: 2em;">
我们将结果用最常用的JSON导出,命令如下:</p>
<p style="text-indent: 2em;">
<img src='http://file.elecfans.com/web1/M00/7D/BB/pIYBAFwKK4GAHhJ1AAAJ_lLGWaQ037.png' alt='爬虫' /></p>
<p style="text-indent: 2em;">
-o 后面是导出文件名,-t 后面是导出类型。</p>
<p style="text-indent: 2em;">
然后来看一下导出的结果,用文本编辑器打开json文件即可(为了方便显示,在item中删去了除了title之外的属性):</p>
<p align="center">
<img src='http://file.elecfans.com/web1/M00/7D/BB/pIYBAFwKK4KACVqfAAIE9eyo2bQ297.png' alt='爬虫' /></p>
<p style="text-indent: 2em;">
因为这个只是一个小型的例子,所以这样简单的处理就可以了。</p>
<p style="text-indent: 2em;">
如果你想用抓取的items做更复杂的事情,你可以写一个 Item Pipeline(条目管道)。</p>
<!-- copy 原来页面的推送 -->
<script type="application/ld+json">
{
"@context": "https://zhanzhang.baidu.com/contexts/cambrian.jsonld",
"@id": "https://m.elecfans.com/article/828560.html",
"title": "python爬虫框架Scrapy实战案例",
"images": [
"https://file.elecfans.com/web1/M00/7D/4F/o4YBAFwKKwuAXN0BAAAFnWruwQQ459.png"
],
"description": "tart_urls:爬取的URL列表。爬虫从这里开始抓取数据,所以,第一次下载的数据将会从这些urls开始。其他子URL将会从这些起始URL中继承性生成。",
"pubDate": "2018-12-07T16:12:33"
}
</script>
<!-- end copy 原来页面的推送 -->
</div>
<!-- <a href="javascript:" target="_blank"></a> -->
<!-- <a href="https://www.elecfans.com/app/download.html" class="open_app_arc baidu_click_tongji2 inAppHide" target="_blank">打开APP阅读更多精彩内容</a> -->
<span class="open_app_arc baidu_click_tongji2 downAppBtn inAppHide">打开APP阅读更多精彩内容</span>
<div class="see_more_arc hide">
<div class="arrow_more show_more">
<i></i>
<i></i>
</div>
<button class="read_more">点击阅读全文</button>
</div>
</div>
</div>
<!--声明-无论是否原创都显示此声明-->
<div class="statement">
声明:本文内容及配图由入驻作者撰写或者入驻合作网站授权转载。文章观点仅代表作者本人,不代表电子发烧友网立场。文章及其配图仅供工程师学习之用,如有内容侵权或者其他违规问题,请联系本站处理。
<a class="complaint handleJumpBy" href="/about/tousu.html" target="_self">举报投诉</a>
</div>
<!--评论-->
<div class="arc_comment comment">
</div>
<!--查看电子发烧友网-->
<div class="openx-hero inAppHide" style="text-align: center;">
<div class="advertWrap">
<a href="" target="_blank">
<img src="">
</a>
</div>
</div>
<div class="rela_article">
<div class="rela_article_title flex">
<ul class="tab_lis flex">
<li class="tab_lis_item active"><span class="tab-list-title">相关推荐</span></li>
<li class="tab_lis_item"><span class="tab-list-title">热点推荐</span></li>
<li><a href="/tags/python.html" target="_self" class="handleJumpBy advertTagId" data-id="42127">python</a></li><li><a href="/tags/爬虫.html" target="_self" class="handleJumpBy advertTagId" data-id="187495">爬虫</a></li> </ul>
</div>
<ul class="rela_article_content active">
<li
>
<a href="https://bbs.elecfans.com/jishu_1583155_1_1.html" target="_self" class="handleJumpBy">
<div class="rela_article_ct"><b class='flag-m-1'>Python</b>数据<b class='flag-m-1'>爬虫</b>学习内容</div>
<div class="time_and_hot flex">
<span>2018-05-09</span> <span>2072</span> </div>
</a>
</li><li
>
<a href="https://bbs.elecfans.com/jishu_1583549_1_1.html" target="_self" class="handleJumpBy">
<div class="rela_article_ct"><b class='flag-m-1'>Python</b><b class='flag-m-1'>爬虫</b>与Web开发库盘点</div>
<div class="time_and_hot flex">
<span>2018-05-10</span> <span>2566</span> </div>
</a>
</li><li
>
<a href="https://bbs.elecfans.com/jishu_1602253_1_1.html" target="_self" class="handleJumpBy">
<div class="rela_article_ct"><b class='flag-m-1'>Python</b><b class='flag-m-1'>爬虫</b>初学者需要准备什么?</div>
<div class="time_and_hot flex">
<span>2018-06-20</span> <span>2916</span> </div>
</a>
</li><li
>
<a href="https://bbs.elecfans.com/jishu_1752355_1_1.html" target="_self" class="handleJumpBy">
<div class="rela_article_ct"><b class='flag-m-1'>爬虫</b><b class='flag-m-1'>框架</b><b class='flag-m-1'>scrapy</b>包括了以下组件</div>
<div class="time_and_hot flex">
<span>2019-04-03</span> <span>2256</span> </div>
</a>
</li><li
>
<a href="https://bbs.elecfans.com/jishu_1807300_1_1.html" target="_self" class="handleJumpBy">
<div class="rela_article_ct"><b class='flag-m-1'>python</b>学习笔记-安装<b class='flag-m-1'>scrapy</b></div>
<div class="time_and_hot flex">
<span>2019-07-10</span> <span>1608</span> </div>
</a>
</li><li
>
<a href="https://bbs.elecfans.com/jishu_1854821_1_1.html" target="_self" class="handleJumpBy">
<div class="rela_article_ct"><b class='flag-m-1'>Scrapy</b><b class='flag-m-1'>爬虫</b>架构流程图详解</div>
<div class="time_and_hot flex">
<span>2019-09-25</span> <span>1952</span> </div>
</a>
</li><li
>
<a href="https://bbs.elecfans.com/jishu_1912468_1_1.html" target="_self" class="handleJumpBy">
<div class="rela_article_ct">使用<b class='flag-m-1'>scrapy</b>-Redis的<b class='flag-m-1'>爬虫</b>项目</div>
<div class="time_and_hot flex">
<span>2020-03-24</span> <span>1693</span> </div>
</a>
</li><li
>
<a href="https://bbs.elecfans.com/jishu_1940317_1_1.html" target="_self" class="handleJumpBy">
<div class="rela_article_ct">Ubuntu 1604后台如何运行<b class='flag-m-1'>scrapy</b><b class='flag-m-1'>爬虫</b>程序</div>
<div class="time_and_hot flex">
<span>2020-05-25</span> <span>1290</span> </div>
</a>
</li><li
>
<a href="https://bbs.elecfans.com/jishu_1947224_1_1.html" target="_self" class="handleJumpBy">
<div class="rela_article_ct">如何通过网页开启<b class='flag-m-1'>scrapy</b><b class='flag-m-1'>爬虫</b>?</div>
<div class="time_and_hot flex">
<span>2020-06-05</span> <span>2167</span> </div>
</a>
</li><li
>
<a href="https://bbs.elecfans.com/jishu_2129989_1_1.html" target="_self" class="handleJumpBy">
<div class="rela_article_ct">0基础入门<b class='flag-m-1'>Python</b><b class='flag-m-1'>爬虫</b><b class='flag-m-1'>实战</b>课</div>
<div class="time_and_hot flex">
<span>2021-07-25</span> <span>2373</span> </div>
</a>
</li><li
>
<a href="https://www.elecfans.com/soft/study/net/2017/20171207596641.html" target="_self" class="handleJumpBy">
<div class="rela_article_ct">基于<b class='flag-m-1'>Scrapy</b>的<b class='flag-m-1'>爬虫</b><b class='flag-m-1'>框架</b>的Web应用程序漏洞检测方法</div>
<div class="time_and_hot flex">
<span>2017-12-07</span> <span>940</span> </div>
</a>
</li><li
>
<a href="https://www.elecfans.com/d/889110.html" target="_self" class="handleJumpBy">
<div class="rela_article_ct"><b class='flag-m-1'>python</b><b class='flag-m-1'>爬虫</b><b class='flag-m-1'>框架</b>有哪些</div>
<div class="time_and_hot flex">
<span>2019-03-22</span> <span>7295</span> </div>
</a>
</li><li
>
<a href="https://www.elecfans.com/d/1436835.html" target="_self" class="handleJumpBy">
<div class="rela_article_ct">windows下如何新建<b class='flag-m-1'>爬虫</b>虚拟环境和进行<b class='flag-m-1'>Scrapy</b>安装</div>
<div class="time_and_hot flex">
<span>2020-12-25</span> <span>849</span> </div>
</a>
</li><li
>
<a href="https://www.elecfans.com/d/2018353.html" target="_self" class="handleJumpBy">
<div class="rela_article_ct"><b class='flag-m-1'>Scrapy</b>怎么爬取<b class='flag-m-1'>Python</b>文件</div>
<div class="time_and_hot flex">
<span>2023-02-24</span> <span>1157</span> </div>
</a>
</li><li
>
<a href="https://www.elecfans.com/d/2299204.html" target="_self" class="handleJumpBy">
<div class="rela_article_ct">feapder:一款功能强大的<b class='flag-m-1'>爬虫</b><b class='flag-m-1'>框架</b></div>
<div class="time_and_hot flex">
<span>2023-11-01</span> <span>2113</span> </div>
</a>
</li> </ul>
<ul class="qyh-recommend-list rela_article_content">
</ul>
</div>
<div class="go_elecfans ad-demo inAppHide"></div>
<!-- 全部评论 -->
<div class="all-comment comment">
<div class="all-comment-content">
<div class="all-com-close flex">
<p class="ph">全部<i>0</i>条评论</p>
<span class="close_com"></span>
<!-- <span class="edit_com">写评论</span> -->
</div>
<div class="all_words comment_content" id="all_words">
<div id="scroller"></div>
</div>
<div class="all_no_comment" class="hide">
<img src="https://staticm.elecfans.com/images/newdetail/all_no_bg.png" alt="">
<p>快来发表一下你的评论吧 !</p>
</div>
</div>
<div class="ft">
<input type="text" placeholder="发评论" maxlength="10000">
<button>发送</button>
</div>
</div>
<input type="hidden" id="cover_desc" value=" 我们使用dmoz.org这个网站来作为小抓抓一展身手的对象。 首先先要回答一个问题。 问:把网站装进爬虫里,总共分几步? 答案很简单,四步: 新建项目 (Project):新建一个新的爬虫项目 明确目标(Items):明确你想要抓取的目标 制作爬虫(Spider):制作爬虫开始爬取网页 存储内容(Pipeline):设计管道存储爬取内容 好的,基本流程既然确定了,那接下来就一步一步的完成就可以了">
<input type="hidden" id="current_url" value="https://m.elecfans.com/article/828560.html">
<input type="hidden" id="title" value="python爬虫框架Scrapy实战案例!">
<input type="hidden" id="pc_domain" value="https://www.elecfans.com">
<input type="hidden" id="aid" value="828560">
<input type="hidden" id="pid" value="">
<!-- 文章作者id -->
<input type="hidden" id="column_uid" value="2737481">
<!-- 企业号文章id -->
<input type="hidden" id="evip_article_id" value="">
<!-- 是企业号文章 store_flag =15 -->
<input type="hidden" id="store_flag" value="0">
<input type="hidden" id="evip_type" value="0">
<!-- 是企业号文章 store_flag =15 -->
<input type="hidden" id="evip_id" value="0">
<!--打开APP底部悬浮按钮-->
<!-- <div class="open_app_btn">打开APP</div> -->
<footer class="art_footer flex">
<input type="text" placeholder="发评论" maxlength="10000" id="commentTxt">
<div class="flex">
<span class="ft_comment" data-com="发评论">
<i class="sups"></i>
</span>
<span class="ft_give_up ">
<!-- -->
</span>
<span class="ft_star ">
<!-- -->
</span>
<span class="ft_share btn-createCover"></span>
</div>
</footer>
<div class="login-reg-fixed inAppHide" data-uid="0">
<a href="/login.html" class="login-reg-btn">
登录/注册
</a> </div>
<!--二维码-->
<img src="" alt="" id="qrious" style="display: none;">
<!--老的底部 隐藏 -->
<div class="new-footer inAppHide">
<div class="flex-center"><a href="https://www.elecfans.com/app/download.html" target="_blank">下载APP</a></div>
<div class="flex-center">
<a href="/login.html" class="login-reg-btn">
登录注册
</a>
<span class="line">|</span><a href="https://m.elecfans.com/about/tousu.html">投诉反馈</a><span class="line">|</span><a href="https://author.baidu.com/home/1563378682824805?from=dusite_artdetailh5">电子发烧友网</a>
</div>
<div class="flex-center">© 2021 elecfans.com</div>
<div class="flex-center"><a href="https://beian.miit.gov.cn/">湘ICP备2023018690号</a></div>
<div><input type="hidden" value="0" name="arc_relate_vid"></div>
</div>
</div>
<!--微信分享图片地址-->
<input type="hidden" id="shareWxImg" value="https://file.elecfans.com/web1/M00/7D/4F/o4YBAFwKKwuAXN0BAAAFnWruwQQ459.png">
<!--微信分享图片地址-->
<script>
/**
* 判断是否微信浏览器
* @return {Boolean} [description]
*/
function is_weixin() {
var ua = navigator.userAgent.toLowerCase();
if (ua.match(/MicroMessenger/i) == "micromessenger") {
return true;
} else {
return false;
}
}
$(function () {
$(window).scroll(function (e) {
var window_w = window.innerWidth || document.documentElement.clientWidth || document.body.clientWidth;
var window_h = window.innerHeight || document.documentElement.clientHeight || document.body.clientHeight;
if (document.body.scrollTop + document.documentElement.scrollTop > window_h * 2) {
$('.go_top').show();
}
else {
$('.go_top').hide();
}
});
$('.go_top').on('click', function () {
document.body.scrollTop = 0;
document.documentElement.scrollTop = 0;
return false;
});
// 添加广告链接的Google Analytics事件跟踪
$('a').on('click', function () {
var href = $(this).attr('href');
if (href) {
var bannerArr = href.match(/__bannerid=(\d+)__/);
var zoneidArr = href.match(/__zoneid=(\d+)__/);
if ((bannerArr instanceof Array) && bannerArr.length == 2) {
var bannerid = bannerArr[1];
var zoneid = zoneidArr[1];
ga('send', 'event', 'mElecfansAd', 'click', 'zoneid:' + zoneid + ',bannerid: ' + bannerid, 1);
gtag('event', 'mElecfansAd', { 'zoneid': zoneid, 'bannerid': 'bannerid', 'describe': 'click' });
}
}
});
// 微信浏览器底部显示关注微信
/* if (is_weixin()) {
$('#foot-fixed').hide();
$('#foot-fixed-wx').show();
}*/
$('#foot-img-wx-small').click(function () {
$('#body-wx-big img').toggle();
});
});
</script>
<!-- 是否完善资料代码 s -->
<div class="perfect_infomation_tip">
<span class="no_tip_day3">×</span>
<div class="perfect_infomation_tip_box go_perfect_btn">
<span class="tip_jifen_text">20</span>
<div>
<img class="tip_jifen" src="https://staticm.elecfans.com/images/tip_jifen.png">
</div>
<div>
完善资料,<br>赚取积分
</div>
</div>
</div>
<!-- 是否完善资料代码 e -->
<script type="text/javascript" src="https://staticm.elecfans.com/weixinPrize/js/layer_mobile/layer.js"></script>
<script type="text/javascript" src="https://staticm.elecfans.com/organizing/js/organizing.js?20230825"></script>
<script type="text/javascript" src="https://staticm.elecfans.com/js/captchaValidator.js" defer></script>
<script type="text/javascript" src="https://staticm.elecfans.com/hqAdvert.js?v2"></script>
<script type="text/javascript" src="https://staticm.elecfans.com/xgPlayer.js"></script>
<script>
$(function(){
var scrollTimer
$(window).on("scroll",function(){
//滚动的时候悬浮缩回去 否则正常展示
$(".perfect_infomation_tip_box").css("right","0px")
clearTimeout(scrollTimer);
scrollTimer=setTimeout(function(){
$(".perfect_infomation_tip_box").css("right"," -70px");
},300)
})
// 用户下载附件判断登录
$("a[data-annex]").click(function(){
if($("#uid").attr("data-uid")== "0" || !$("#uid").attr("data-uid")){
window.location.href="/login.html"
}else{
var down_id= $(this).attr("data-annex");
var down_href= $('#'+down_id).val();
window.open(down_href);
}
return false
})
/* //判断当天是否弹出手机验证如果弹出这
if(typeof isVerification_new === "function"){
if(window.localStorage.getItem("m_verification")!==newDate_current()){
//弹出是否手机验证
//弹出是否手机验证
isVerification_new(function(){
//完成手机号验证 后判断是否完善资料
isPerfectInfo_phone($)
})
}
}*/
});
(function () {
//百度推广
var bp = document.createElement('script');
var curProtocol = window.location.protocol.split(':')[0];
if (curProtocol === 'https') {
bp.src = 'https://zz.bdstatic.com/linksubmit/push.js';
} else {
bp.src = 'http://push.zhanzhang.baidu.com/push.js';
}
var s = document.getElementsByTagName("script")[0];
s.parentNode.insertBefore(bp, s);
//add sunjinliang 2021.1.11 copy 原来的统计
var user_uname = $('input[name="column-type-name"]').val();
//发烧友增加百度统计自定义变量统计单一用户数据访问量
var _hmt = _hmt || [];
if (_hmt && user_uname == '发烧友学院') {
_hmt.push(['_setCustomVar', 1, 'ChannelID', '发烧友学院', 3]);
}
var google_title = user_uname;
ga('send', { hitType: 'pageview', title: google_title, dimension0: 'Mobile' });
gtag('event', 'pageview', { 'title': google_title, 'dimension0': 'Mobile', 'describe': 'pageview' });
$(".baidu_click_tongji1").click(function(){
sendGA("头部")
})
$(".baidu_click_tongji2").click(function(){
sendGA("中部")
})
$(".baidu_click_tongji3").click(function(){
sendGA("尾部")
})
function sendGA(content){
//向百度发送数据
if(typeof(_hmt)!="undefined"){
//时间分类===_trackEvent 详情专题页面==zt_detail 点击事件==='click' 哪一个部分点击(content)==== 头部中部尾部
_hmt.push(['_trackEvent', "zt_detail", 'click', content]);
}
}
})();
</script>
<script src="https://staticm.elecfans.com/artilePartjs.js" type="text/javascript" ></script>
</body>
</html> 


