
资料下载


带有Seeed reTerminal的表面裂纹检测和定位
刘丹
分享资料个
描述
概述
2022 年 1 月 28 日,匹兹堡(宾夕法尼亚州)一座有 50 年历史的桥梁倒塌。混凝土桥等坚固结构突然倒塌的原因只有一个:磨损。
混凝土结构通常在大约 40 到 50 年后开始恶化。因此,忽视磨损迹象可能会导致严重事故,这就是为什么混凝土结构的检查和维修对于保护我们的生活方式至关重要。裂缝是用于诊断混凝土结构劣化的重要标准之一。通常,专家会通过目视检查裂缝、勾画检查结果,然后根据他们的发现准备检查数据来检查此类结构。像这样的检查方法不仅非常耗时和昂贵,而且不能准确地检测到裂缝。在这个项目中,我使用机器学习构建了一个表面裂纹检测应用程序。
为什么要本地化?
为什么我们要使用图像分类模型来定位检测?我们不能使用对象检测模型吗?是的,我们可以使用对象检测模型,但我们需要手动将边界框添加到数千个样本中。现有的对象检测模型可能不是自动注释这些裂缝的好选择,因为它们是在确定形状的对象上训练的。重新利用分类模型来定位检测可以节省大量精力,并且仍然能够识别感兴趣的区域。
它是如何工作的?
具有已针对分类任务训练的 GAP(全局平均池化)层的 CNN(卷积神经网络)也可用于对象定位。也就是说,GAP-CNN 不仅可以告诉我们图像中包含什么对象 - 它还可以告诉我们对象在图像中的位置,并且无需我们进行额外的工作!定位表示为热图(类激活图),其中颜色编码方案识别对 GAP-CNN 执行对象识别任务相对重要的区域。
硬件设置
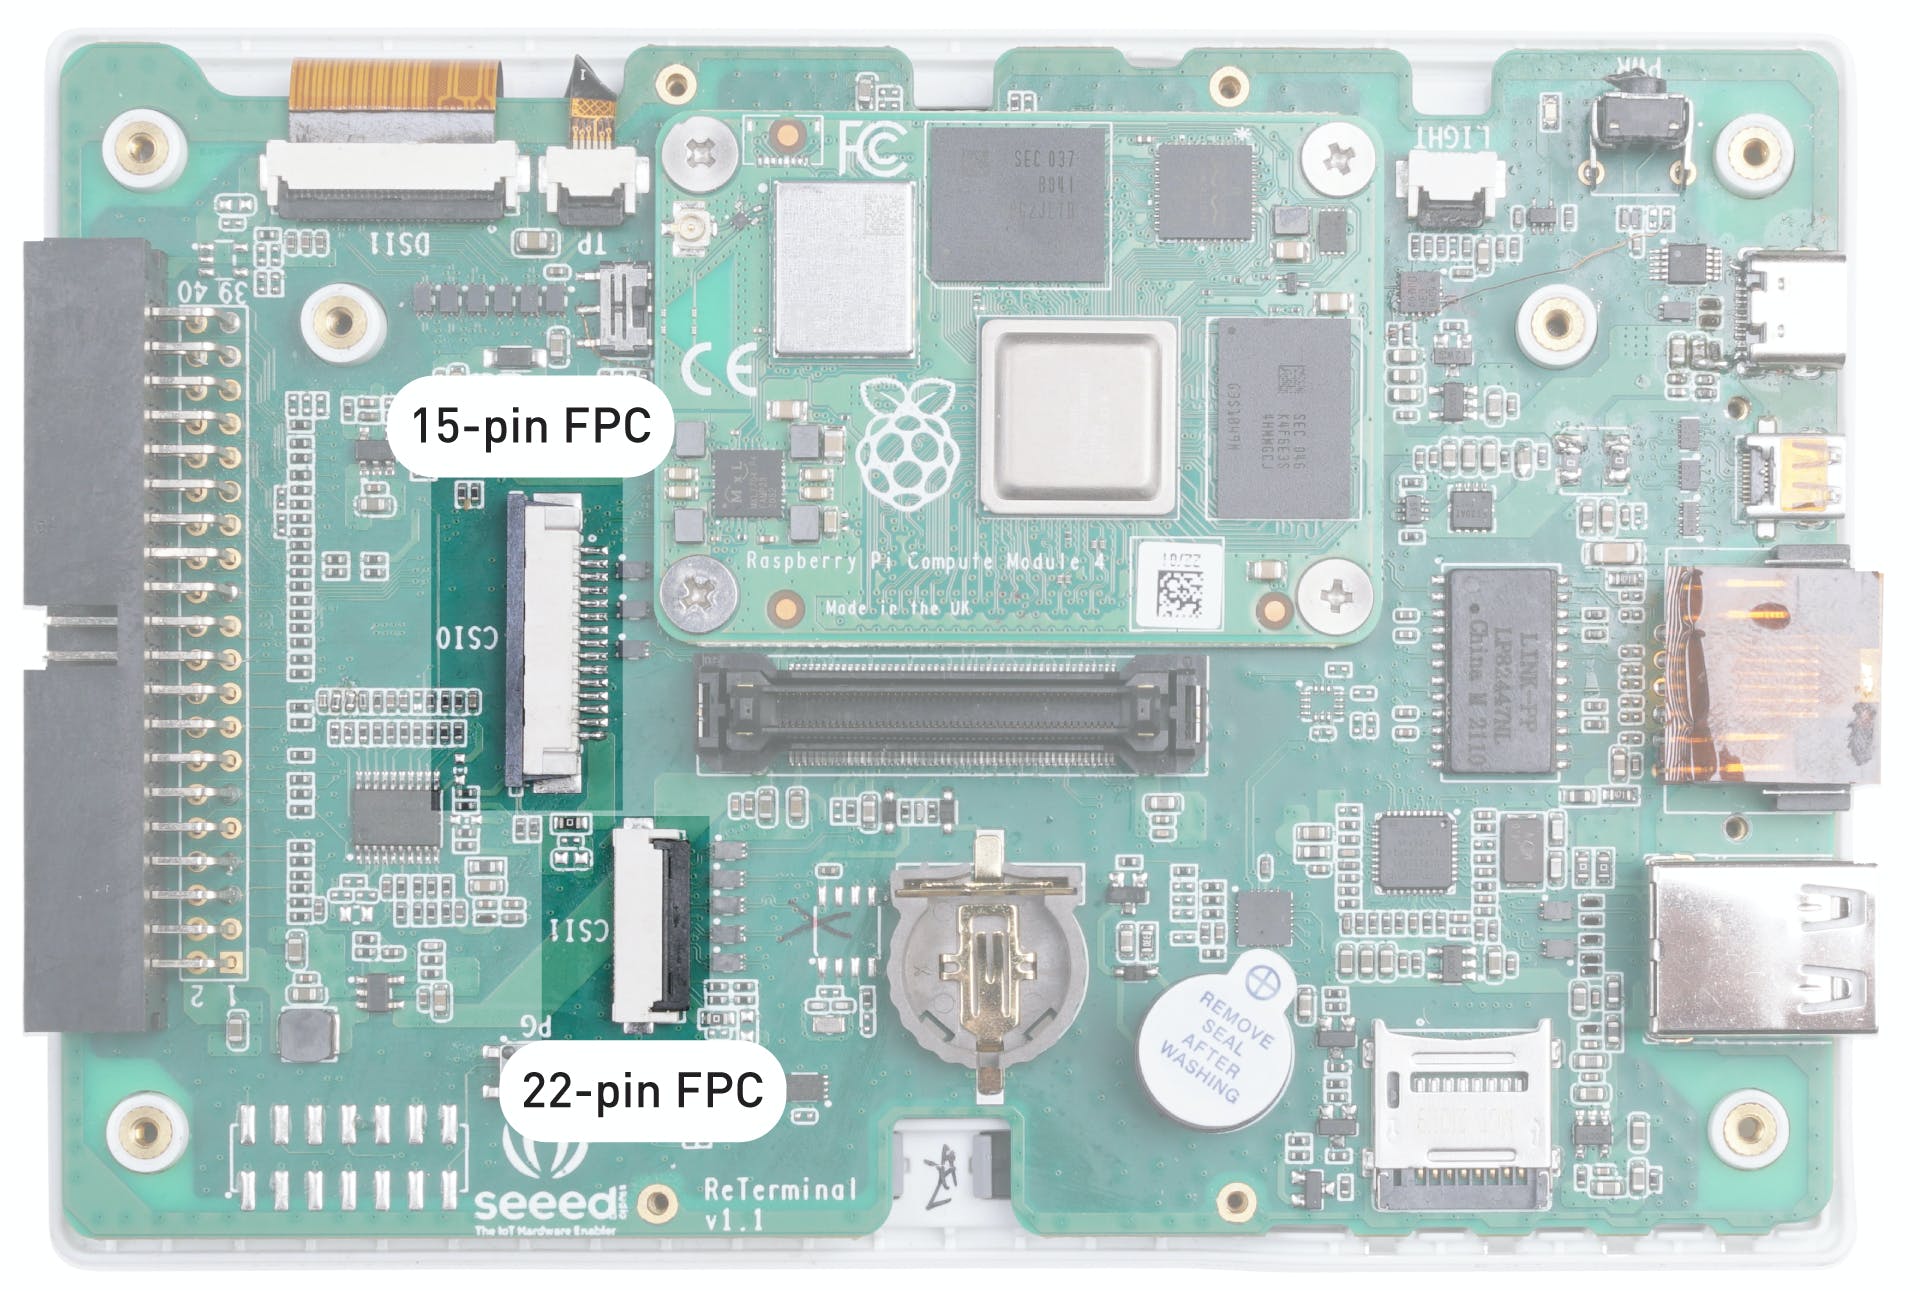
由于我想要一个紧凑且便携的硬件设置,我们将使用 Seeed reTerminal,它带有一个紧凑形式的 LCD 和按钮。它由具有 4 GB RAM 的 Raspberry Pi 4 Compute 模块提供支持,这对于这个概念验证项目来说已经足够了。我们需要 Raspberry Pi Camera V2 和一个亚克力支架。

我们需要打开 reTerminal 的后盖才能访问 15 针 FPC 摄像头连接器。请按照此处的分步说明进行操作:https://wiki.seeedstudio.com/reTerminal。
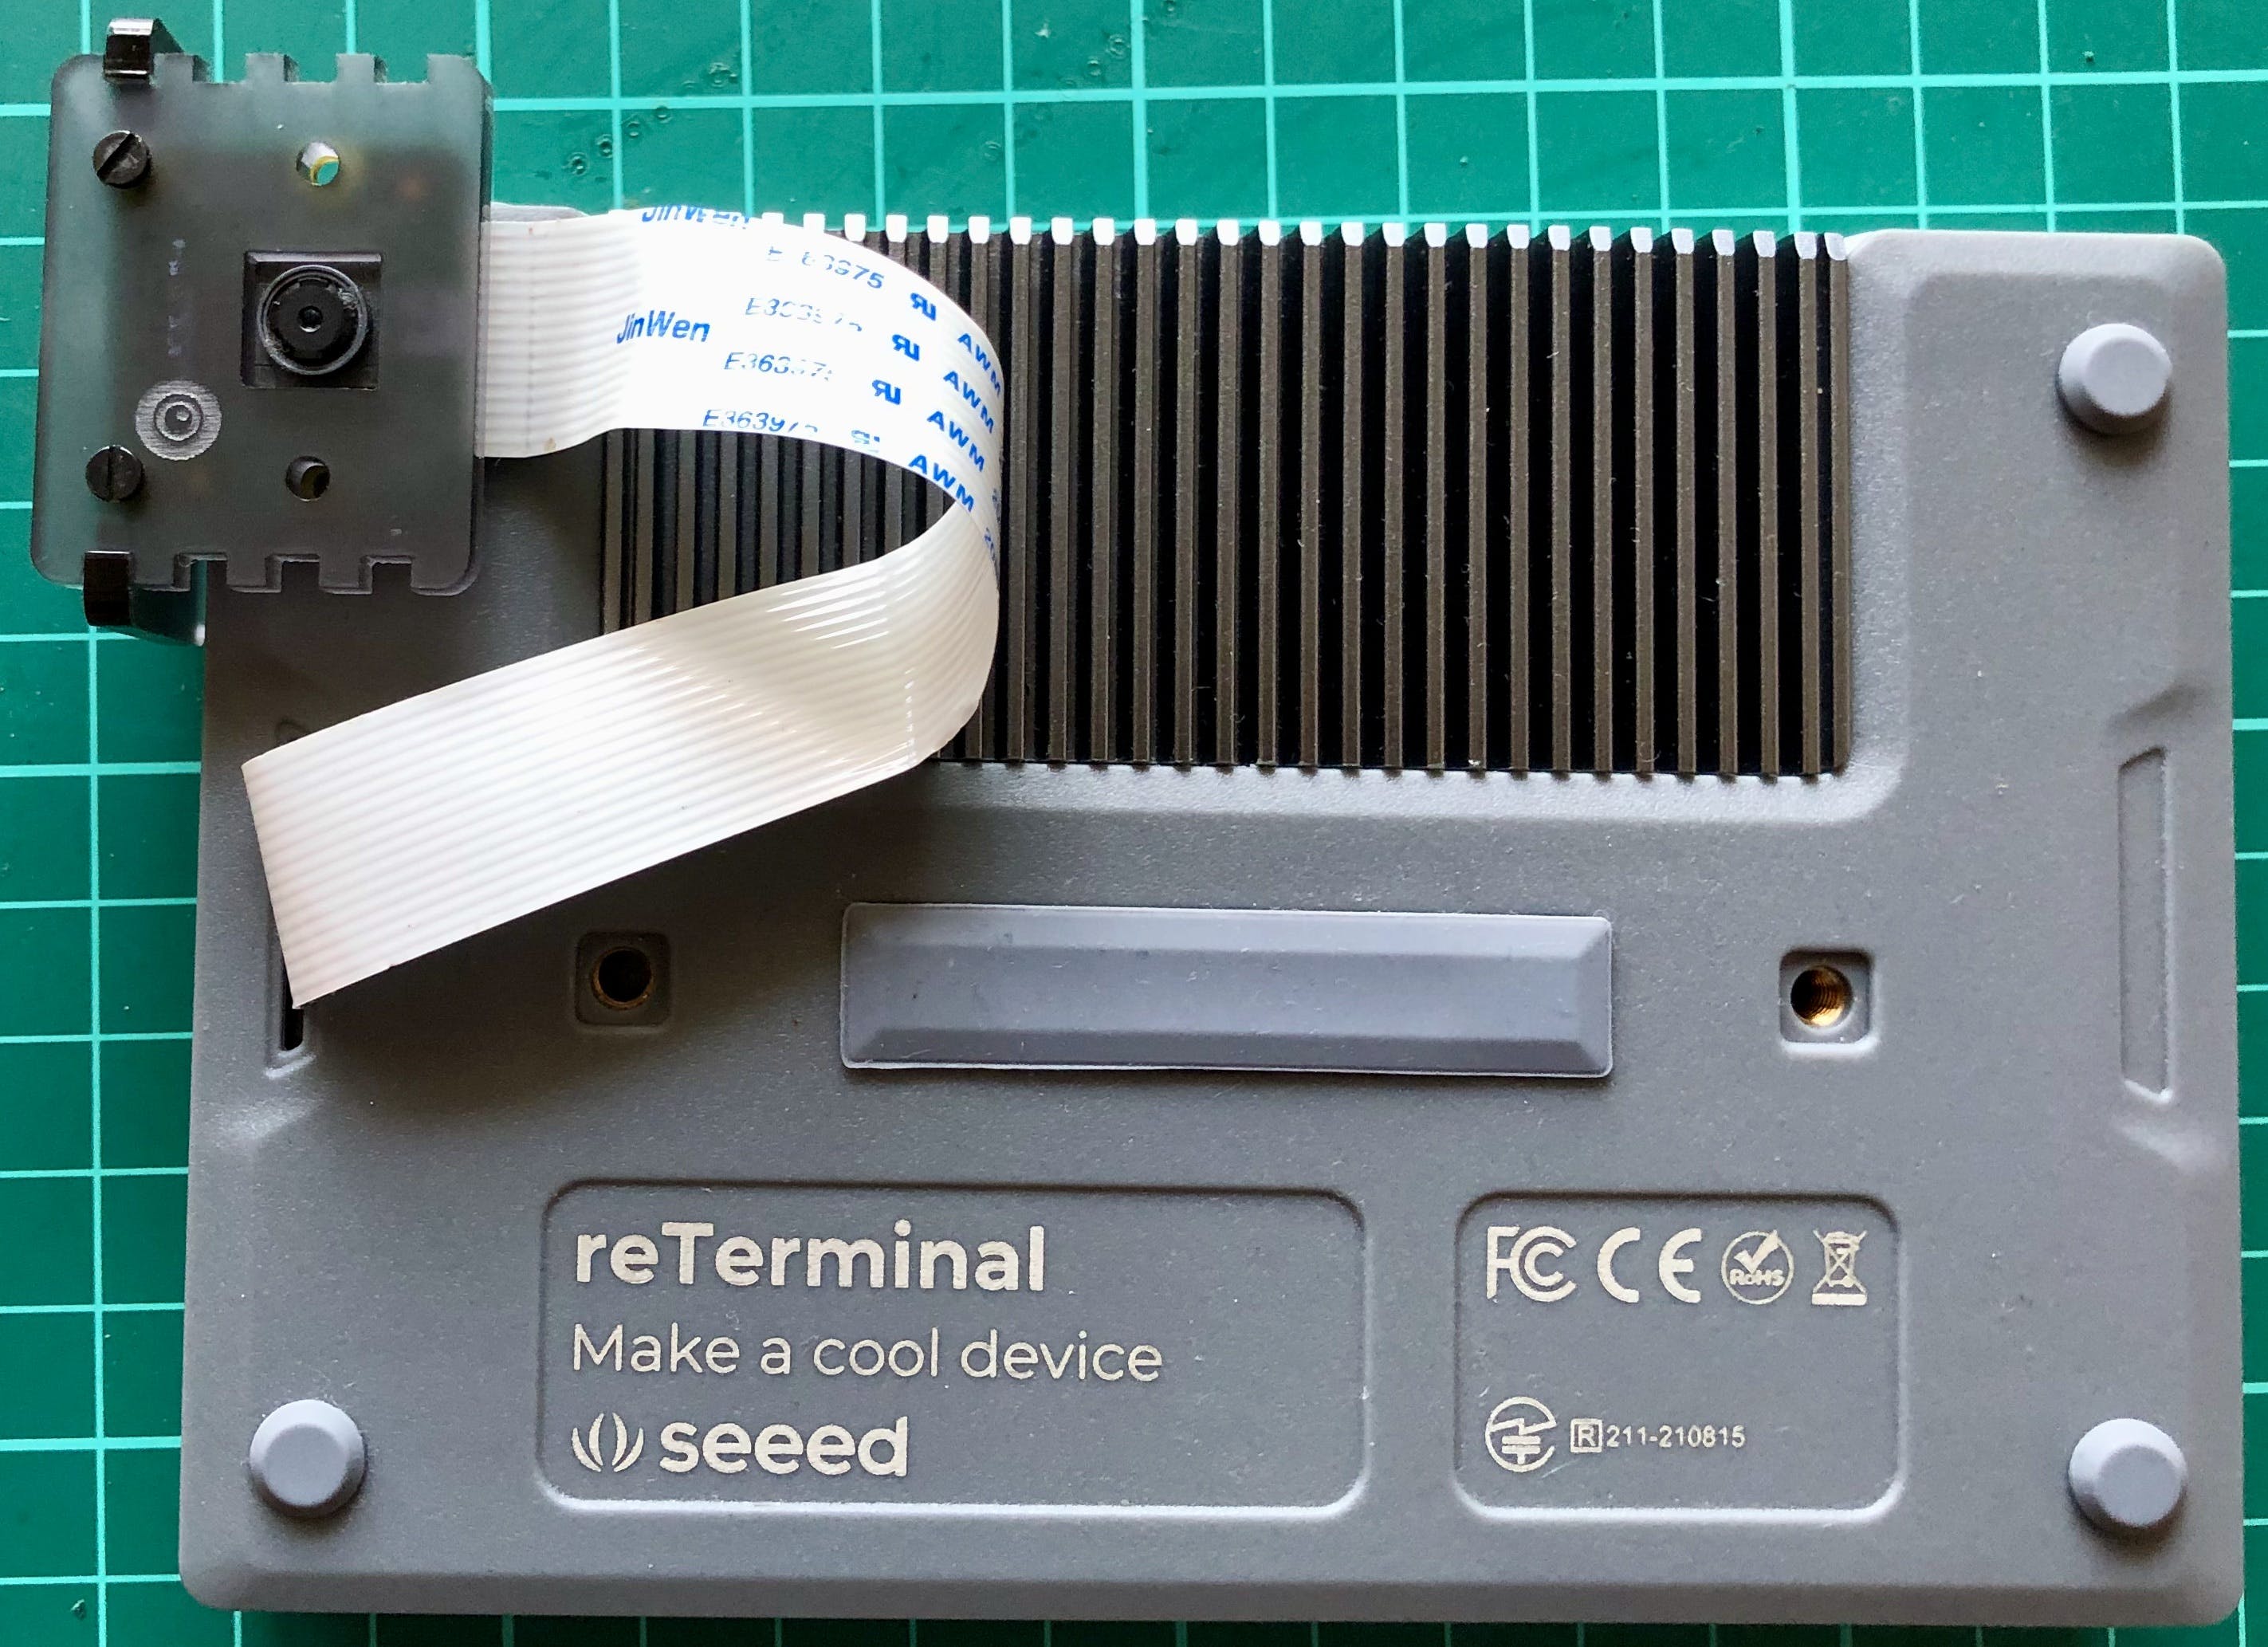
相机使用 FPC 带状电缆连接,并使用底座连接到重新终端。
设置开发环境
reTerminal 配备 32 位 Raspberry Pi 操作系统,但我们将使用 64 位 Raspberry Pi 操作系统以获得更好的性能。
要安装我们将在推理代码中使用的 python 包,请执行以下命令。
$ sudo pip3 install seeed-python-reterminal
$ sudo apt install -y libhdf5-dev python3-pyqt5 libatlas-base-dev
$ pip3 install opencv-contrib-python==4.5.3.56
$ pip3 install matplotlib
数据采集
数据集是从 Mendeley Data (Concrete Crack Images for Classification) 下载的。数据集包含有裂缝和没有裂缝的各种混凝土表面。数据是从多个 METU 校园建筑中收集的。将数据集分为正反两幅裂纹图像进行图像分类。每个类有 20,000 张图像,总共 40,000 张图像,227 x 227 像素,RGB 通道。

为了将裂纹和非裂纹表面图像与其他自然世界场景区分开来,下载了来自 COCO-Minitrain(COCO train2017 数据集的子集)的 80 个对象类别的 25,000 张随机采样图像。可以从下面的链接访问数据。
- 表面裂纹数据集:
- COCO-Minitrain 数据集:
将数据上传到 Edge Impulse Studio
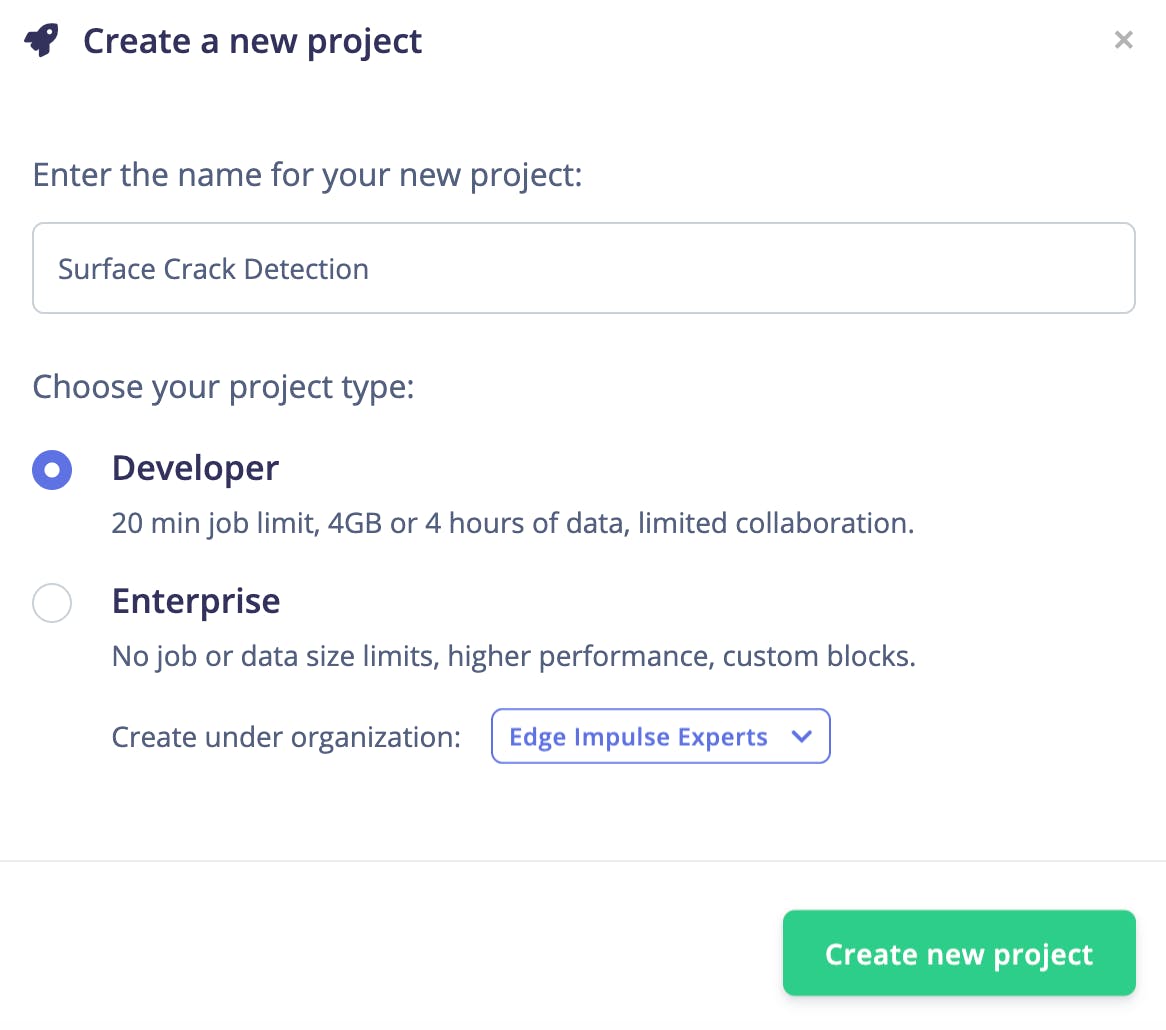
我们需要创建一个新项目来将数据上传到 Edge Impulse Studio。
使用 Edge Impulse CLI 上传数据。请按照说明在此处安装 CLI:
下载的图像被标记为 3 类,并保存到带有标签名称的目录中。
- 正面- 有裂纹的表面
- 负片——表面无裂纹
- 未知- 来自 80 个对象的图像
执行以下命令将图像上传到 Edge Impulse Studio。数据集会自动拆分为训练和测试数据集。
$ edge-impulse-uploader --category split  --label positive positive/*.jpg
$ edge-impulse-uploader --category split  --label negative negative/*.jpg
$ edge-impulse-uploader --category split  --label unknown  unknown/*.jpg
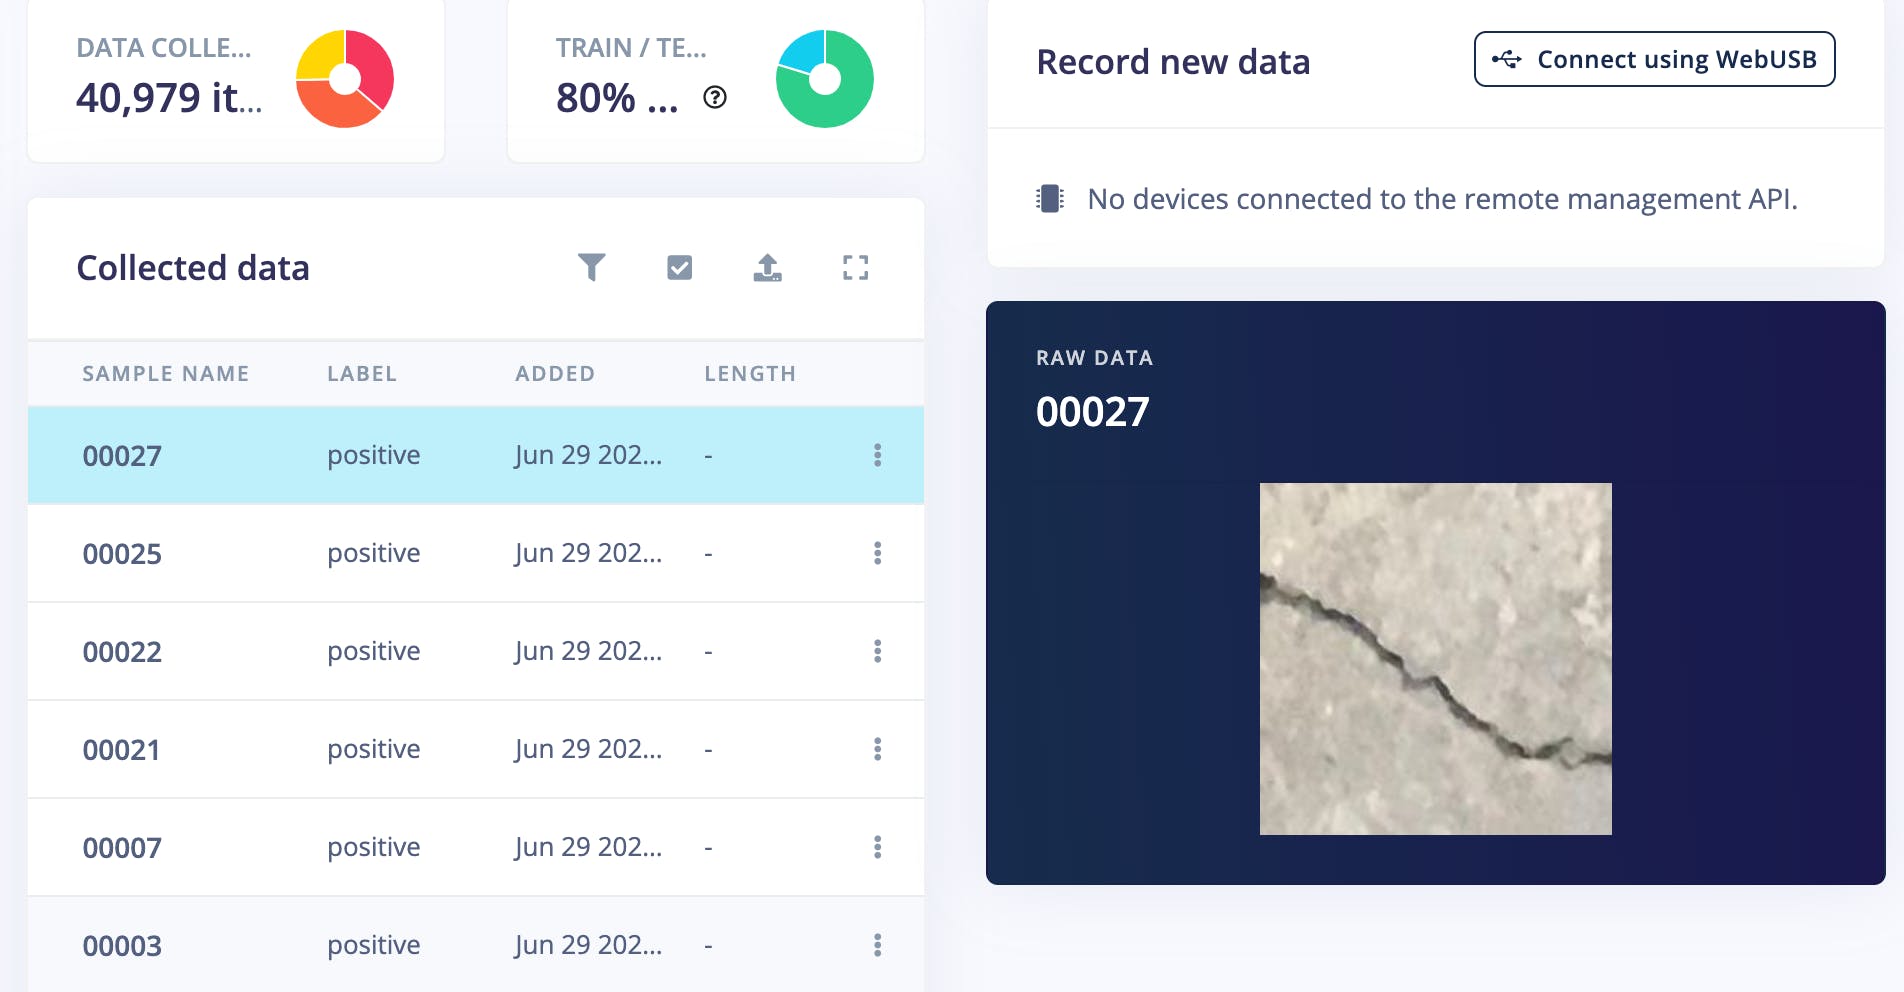
我们可以在 Edge Impulse Studio 的数据采集页面上看到上传的数据集。
训练
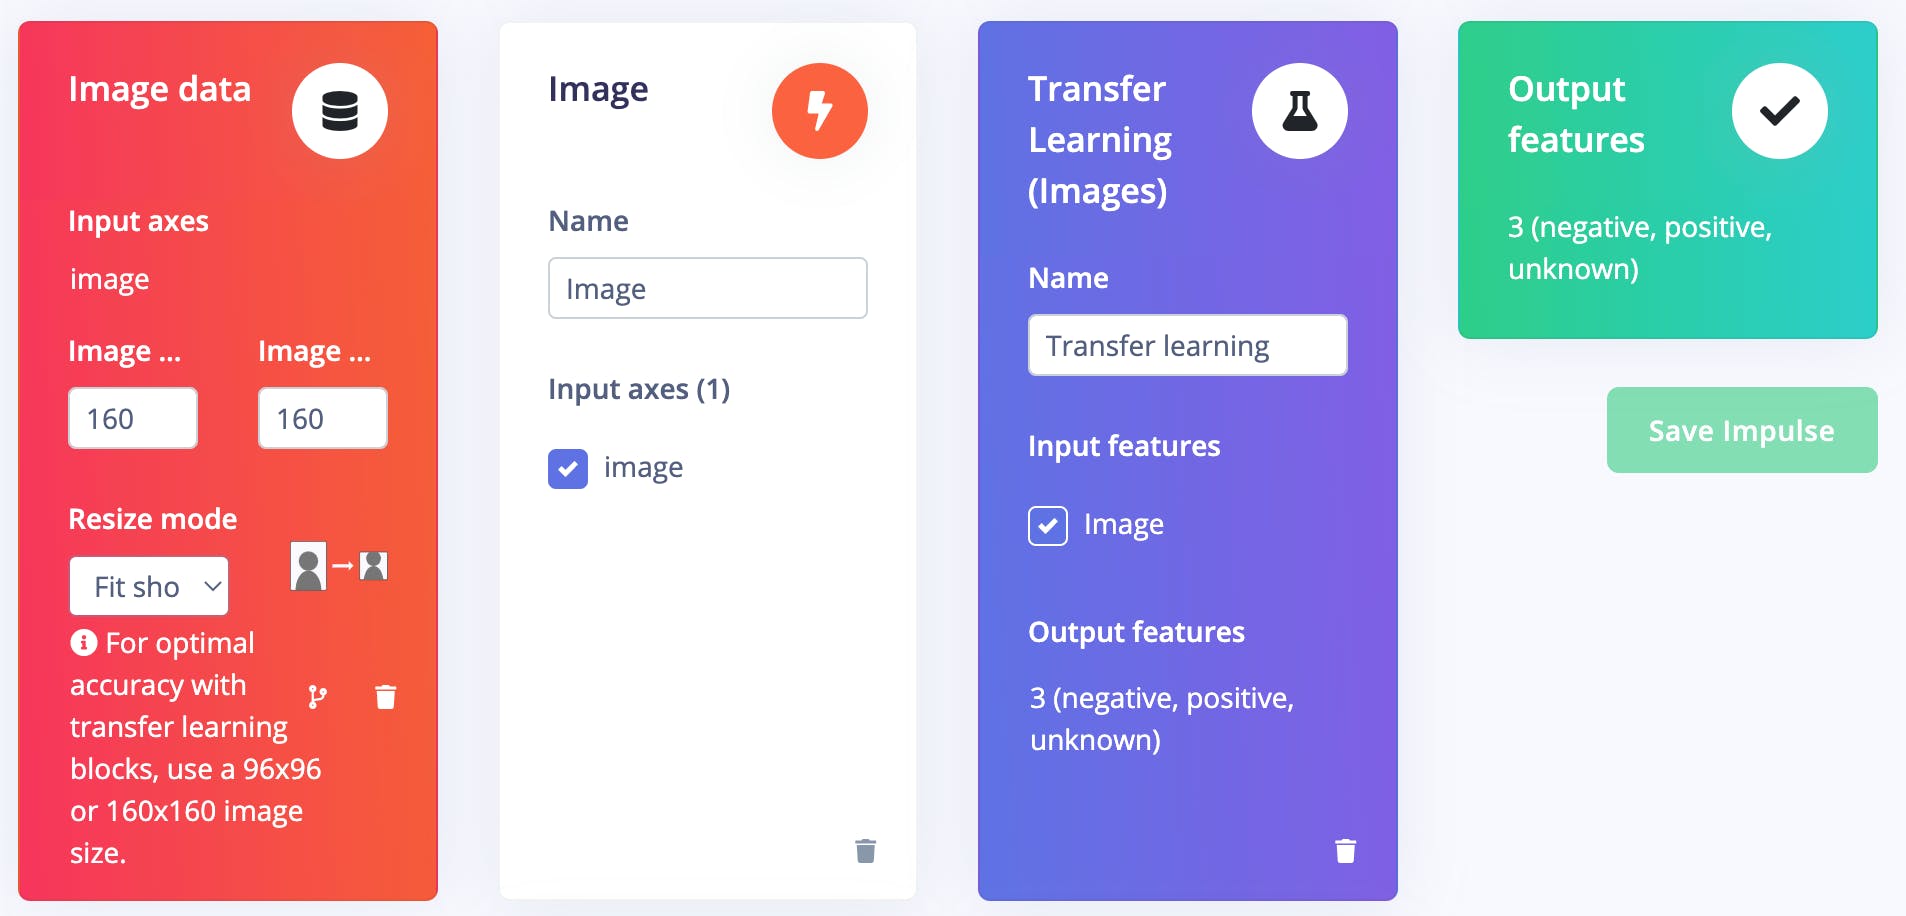
进入Impulse Design > Create Impulse页面,单击Add a processing block ,然后选择Image ,它对图像数据进行预处理和标准化,并可选择降低颜色深度。此外,在同一页面上,单击Add a learning block ,然后选择Transfer Learning (Images ),这会在数据上微调预训练的图像分类模型。我们使用的是 160x160 的图像尺寸。现在单击保存脉冲按钮。
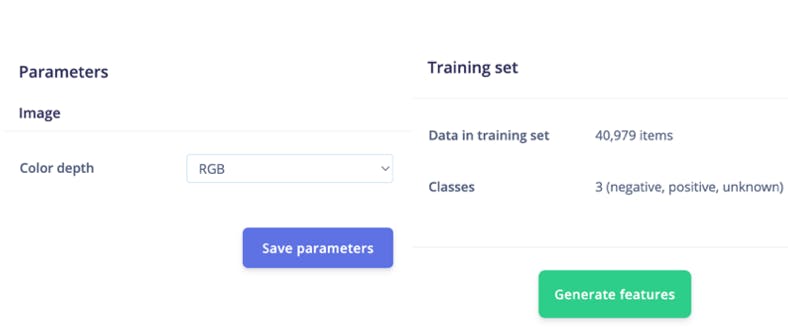
接下来,转到Impulse Design > Image页面并将颜色深度参数设置为 RGB,然后单击Save parameters按钮,该按钮将重定向到另一个页面,我们应该单击Generate Feature按钮。完成特征生成通常需要几分钟。
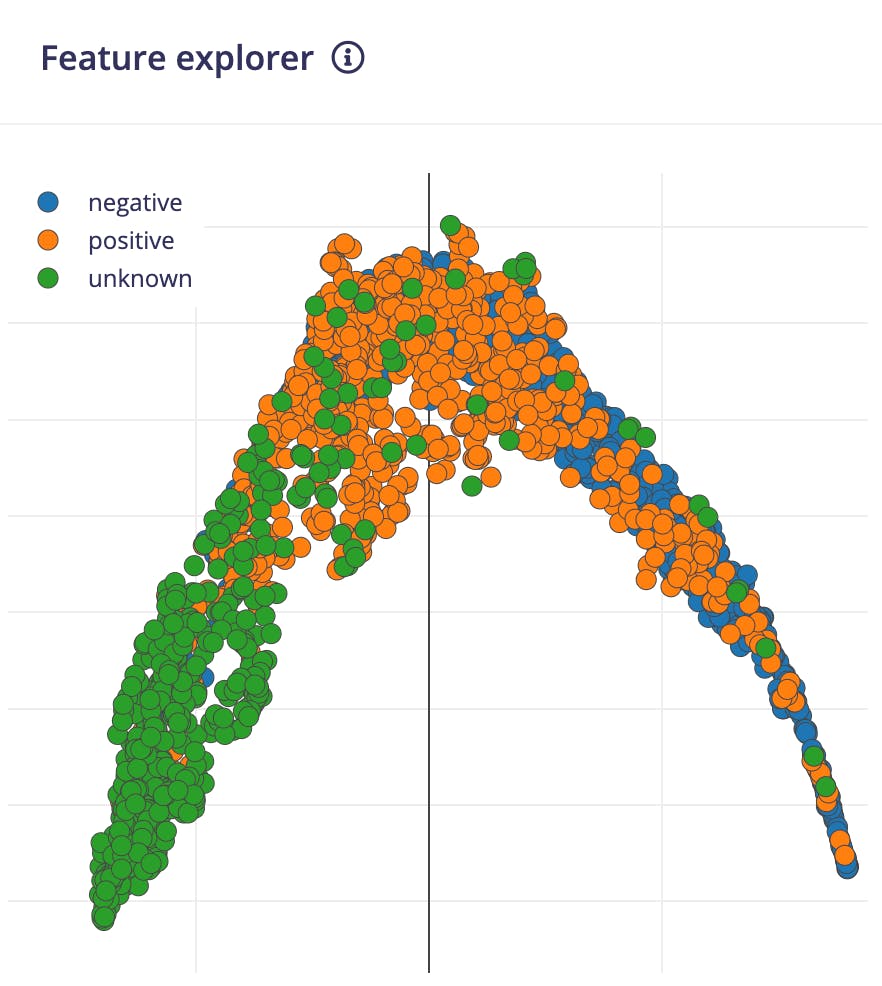
我们可以在 Feature Explorer 中看到生成的特征的 2D 可视化。
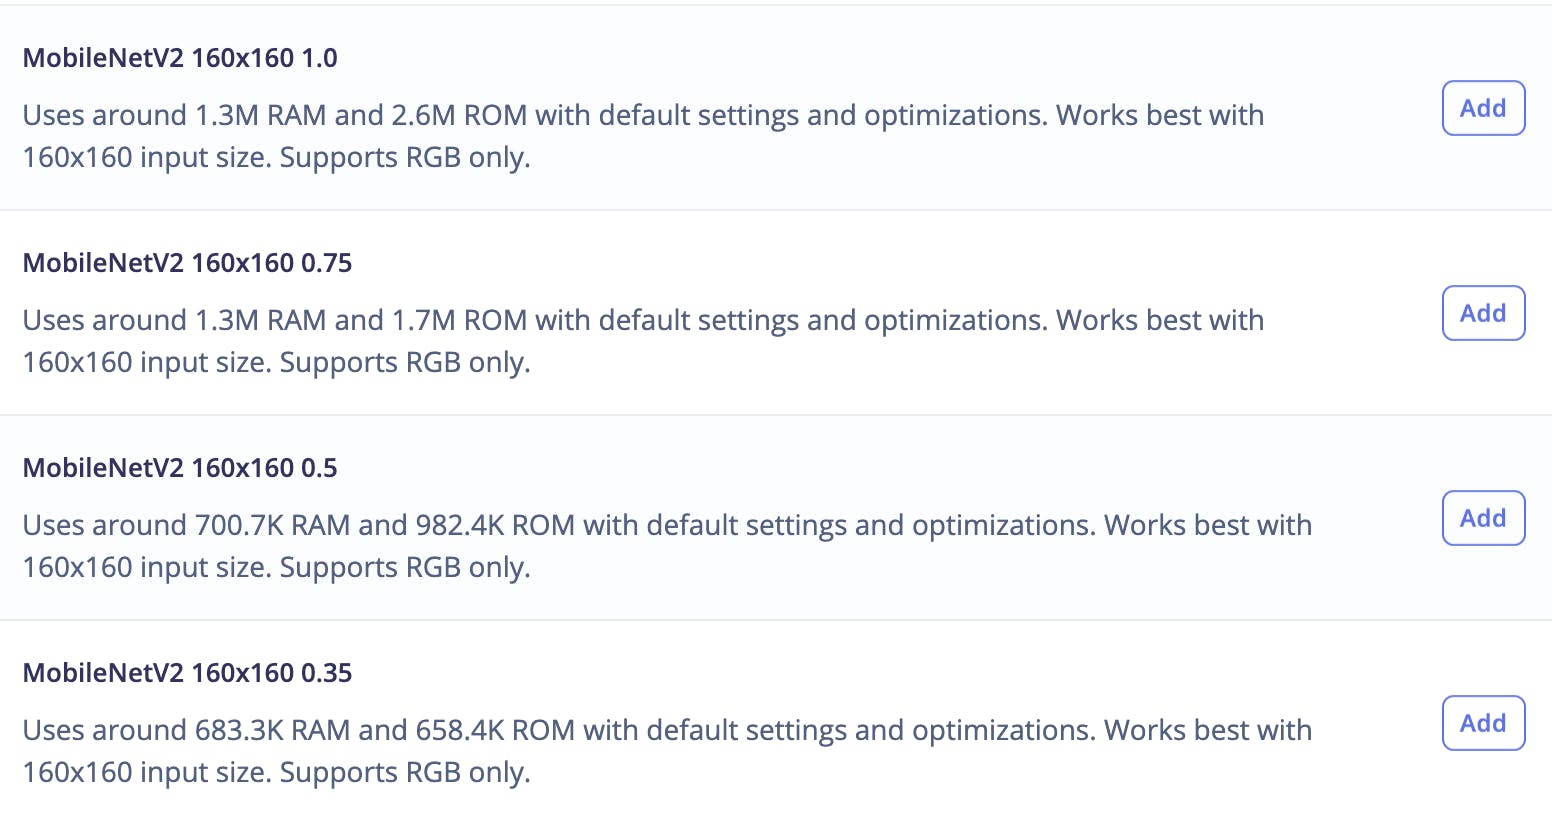
现在转到Impulse Design > Transfer Learning页面并选择神经网络架构。我们使用MobileNetV2 160x160 1.0迁移学习模型和 Edge Impulse Studio 提供的预训练权重。
预训练模型输出类预测概率。要获得类激活图,我们需要修改模型并使其成为多输出模型。要自定义模型,我们需要切换到Keras(专家)模式。
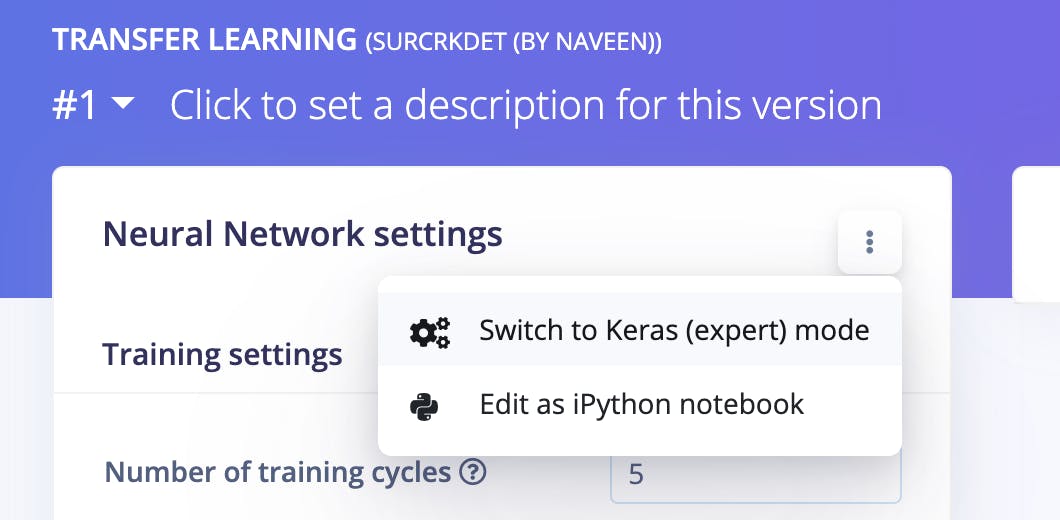
我们可以在文本编辑器中修改生成的代码,如下所示。

我们将使用 3 个神经元(在我们的例子中为 3 个类)将作为 GAP 层的最后第二层连接到 Dense 层。稍后我们将使用这个 Dense 层权重来生成类激活图。
base_model = tf.keras.applications.MobileNetV2(
    input_shape = INPUT_SHAPE, alpha=1,
    weights = WEIGHTS_PATH
)
last_layer  = base_model.layers[-2].output
dense_layer = Dense(classes)
output_pred = Softmax(name="prediction")(dense_layer(last_layer))
对于类激活图,我们需要计算最后一个卷积块输出和最终密集层权重的点积。Keras Dot 层不广播具有动态批量大小的乘数向量,因此我们不能使用它。但是我们可以利用Dense 层,它在内部将内核权重与输入进行点积。这种方法有一个副作用,密集层将偏置权重添加到每个点积。但是这个偏差权重非常小,不会改变类激活图的最终归一化值,所以我们可以毫无问题地使用它。
conv_layer  = base_model.layers[-4].output
reshape_layer = Reshape((conv_layer.shape[1] * conv_layer.shape[2] , -1))(conv_layer)
dot_output = dense_layer(reshape_layer)
我们需要将点积输出重新采样到与输入图像(160x160)相同的大小,以便我们可以覆盖热图。为此,我们使用UpSampling2D 层。
transpose = Permute((2, 1))(dot_output)
reshape_2_layer = Reshape((-1, conv_layer.shape[1] , conv_layer.shape[2]))(transpose)
SIZE = (int(INPUT_SHAPE[1] / conv_layer.shape[2]),
 int(INPUT_SHAPE[0] / conv_layer.shape[1]))
output_act_map = UpSampling2D(size=SIZE, interpolation="bilinear", data_format="channels_first", name="activation_map")(reshape_2_layer)
model = Model(inputs=base_model.inputs, outputs=[output_pred, output_act_map])
此外,我们将从最后两个卷积块训练模型,并在此之前冻结所有层。
TRAINABLE_START_IDX = -12
for layer in model.layers[:TRAINABLE_START_IDX]:
    layer.trainable = False
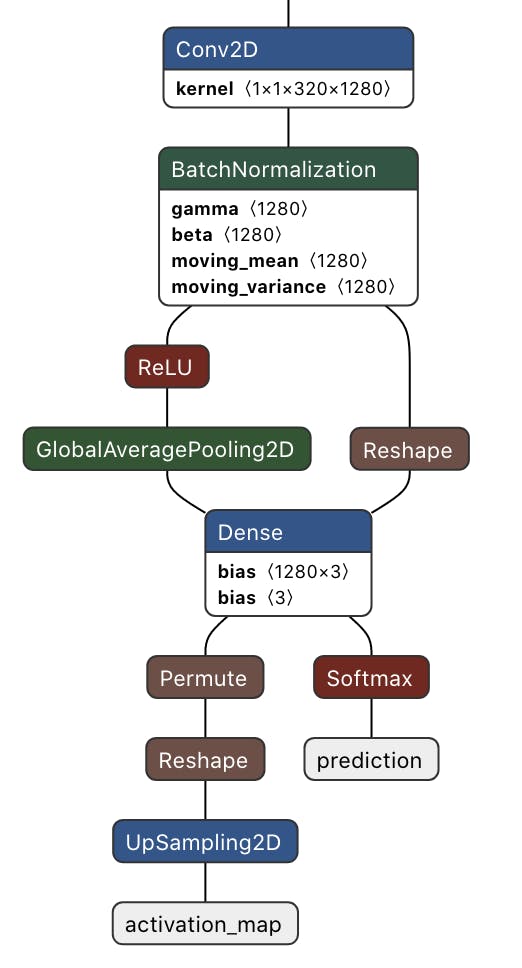
下面给出了最后一个卷积块之后的修改网络架构。这是一个多输出模型,其中第一个输出提供预测类概率,第二个输出提供类激活图。
完整修改后的训练代码如下。
import math
from pathlib import Path
import tensorflow as tf
from tensorflow.keras import Model
from tensorflow.keras.layers import Dense, UpSampling2D, Permute, Reshape, Softmax
from tensorflow.keras.optimizers import Adam
from tensorflow.keras.losses import categorical_crossentropy

sys.path.append('./resources/libraries')
import ei_tensorflow.training

WEIGHTS_PATH = './transfer-learning-weights/keras/mobilenet_v2_weights_tf_dim_ordering_tf_kernels_1.0_160.h5'

INPUT_SHAPE = (160, 160, 3)

base_model = tf.keras.applications.MobileNetV2(
    input_shape = INPUT_SHAPE, alpha=1,
    weights = WEIGHTS_PATH
)

last_layer  = base_model.layers[-2].output
dense_layer = Dense(classes)
output_pred = Softmax(name="prediction")(dense_layer(last_layer))


conv_layer  = base_model.layers[-4].output
reshape_layer = Reshape((conv_layer.shape[1] * conv_layer.shape[2] , -1))(conv_layer)

dot_output = dense_layer(reshape_layer)
transpose = Permute((2, 1))(dot_output)
reshape_2_layer = Reshape((-1, conv_layer.shape[1] , conv_layer.shape[2]))(transpose)

SIZE = (int(INPUT_SHAPE[1] / conv_layer.shape[2]),
 int(INPUT_SHAPE[0] / conv_layer.shape[1]))

output_act_map = UpSampling2D(size=SIZE, interpolation="bilinear", data_format="channels_first", name="activation_map")(reshape_2_layer)

model = Model(inputs=base_model.inputs, outputs=[output_pred, output_act_map])

TRAINABLE_START_IDX = -12
for layer in model.layers[:TRAINABLE_START_IDX]:
    layer.trainable = False

model.compile(optimizer=tf.keras.optimizers.Adam(learning_rate=0.0005),
      loss={'prediction': 'categorical_crossentropy', 'activation_map': None},
      metrics={'prediction': ['accuracy'], 'activation_map': [None]})

BATCH_SIZE = 32
EPOCHS=5

train_dataset = train_dataset.batch(BATCH_SIZE, drop_remainder=False)

validation_dataset = validation_dataset.batch(BATCH_SIZE, drop_remainder=False)

callbacks.append(BatchLoggerCallback(BATCH_SIZE, train_sample_count, epochs=EPOCHS))

model.fit(train_dataset, validation_data=validation_dataset, epochs=EPOCHS, verbose=2, callbacks=callbacks)
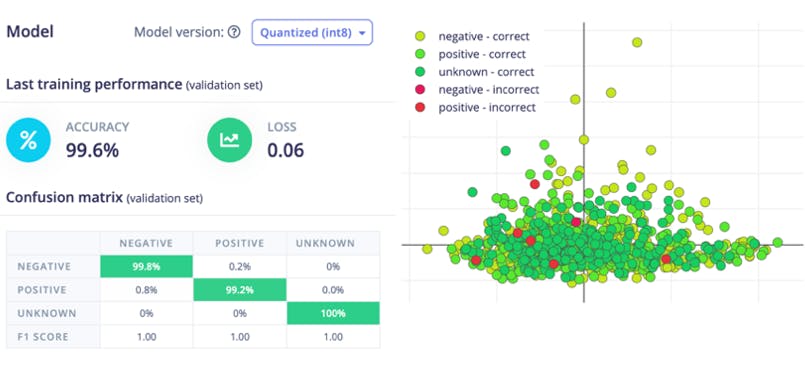
现在单击“开始训练”按钮并等待大约 30 分钟,直到训练完成。我们可以在下面看到训练输出。量化的(int8)模型有 99.6% 的准确率,相当不错。
模型部署
目前,Edge Impulse for Linux SDK 不支持多输出模型,因此我们将使用编译后的 TensorFlow Lite 运行时进行推理。这个仅解释器的包是完整 TensorFlow 包大小的一小部分,并且包含使用 TensorFlow Lite 运行推理所需的最少代码。为了加速推理,TFLite 解释器可以与 XNNPACK 一起使用,XNNPACK是针对 ARM 和其他平台的高度优化的神经网络推理算子库。要为 64 位 Raspberry Pi OS启用XNNPACK ,我们需要从源代码构建 TFLite Runtime Python 包。我们需要在速度更快的 Debian/Ubuntu Linux 机器上使用 Docker 执行以下命令来交叉编译和构建包。
$ git clone -b v2.9.0 https://github.com/tensorflow/tensorflow.git
cd tensorflow/

$ curl -L -o tensorflow/tools/ci_build/Dockerfile.pi-python37 https://github.com/tensorflow/tensorflow/raw/v2.8.0/tensorflow/tools/ci_build/Dockerfile.pi-python37

$ sed -i -e 's/FROM ubuntu:16.04/FROM ubuntu:18.04/g' tensorflow/tools/ci_build/Dockerfile.pi-python37

$ sed -i '30a apt-get update && apt-get install -y dirmngr' tensorflow/tools/ci_build/install/install_deb_packages.sh

$ sed -i -e 's/xenial/bionic/g' tensorflow/tools/ci_build/install/install_pi_python3x_toolchain.sh
要为浮点 (F32) 和量化 (INT8) 模型启用XNNPACK ,请将以下行(以粗体显示)添加到 tensorflow/lite/tools/pip_package/build_pip_package_with_bazel.sh 文件中。
aarch64)
BAZEL_FLAGS="--config=elinux_aarch64
--define tensorflow_mkldnn_contraction_kernel=0
--define=tflite_with_xnnpack=true
--define=tflite_with_xnnpack_qs8=true
--copt=-O3"
;;
执行以下命令构建 pip 包。
$ sudo CI_DOCKER_EXTRA_PARAMS="-e CI_BUILD_PYTHON=python3.7 -e CROSSTOOL_PYTHON_INCLUDE_PATH=/usr/include/python3.7" tensorflow/tools/ci_build/ci_build.sh PI-PYTHON37 tensorflow/lite/tools/pip_package/build_pip_package_with_bazel.sh aarch64
将 pip 包复制到 reTerminal。
$ scp tensorflow/lite/tools/pip_package/gen/tflite_pip/python3.7/dist/tflite_runtime-2.9.0-cp37-cp37m-linux_aarch64.whl pi@raspberrypi.local:/home/pi
要安装软件包,请执行以下命令。
$ pip3 install -U tflite_runtime-2.9.0-cp37-cp37m-linux_aarch64.whl
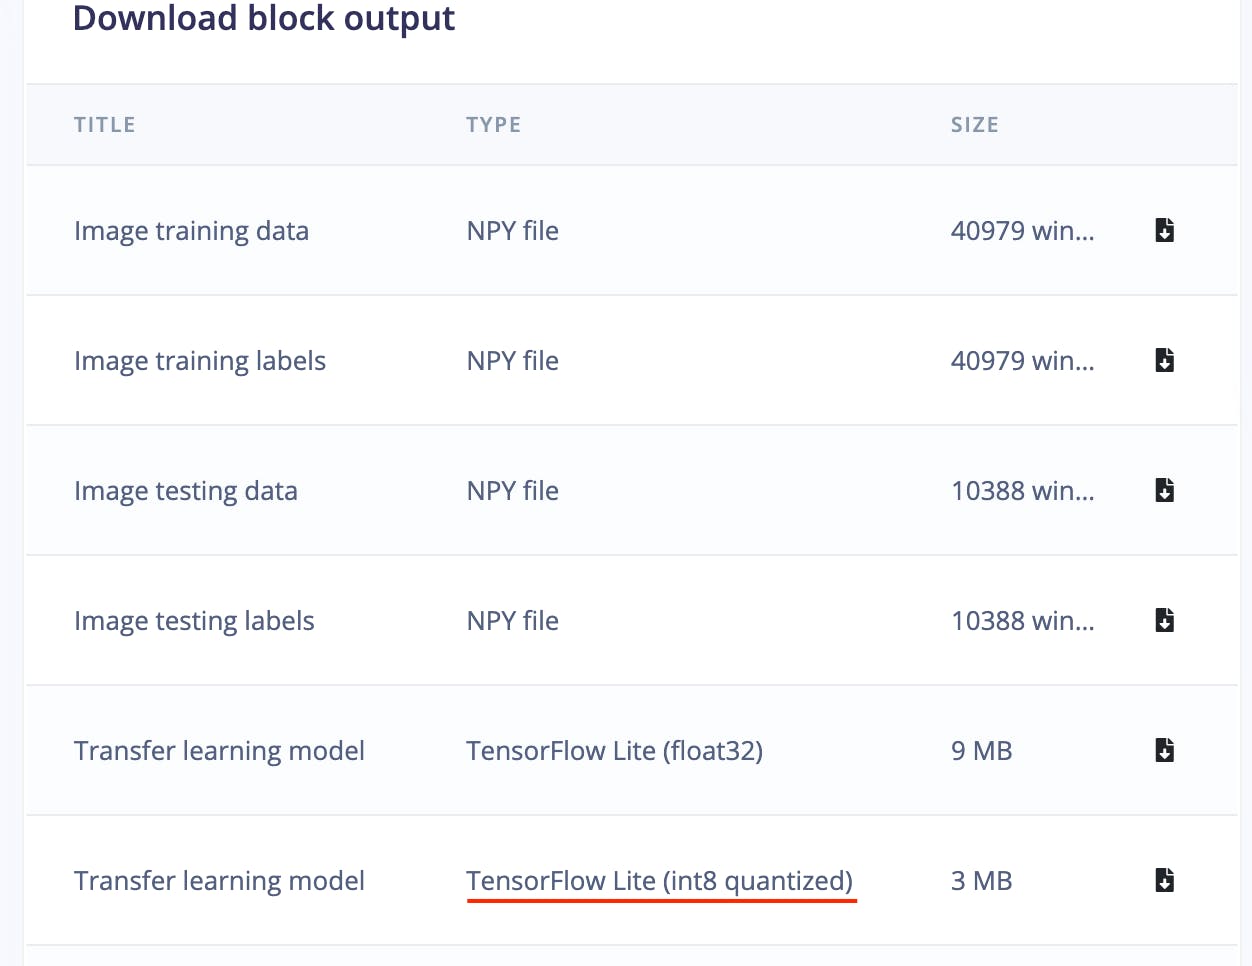
现在我们可以从 Edge Impulse Studio Dashboard 下载量化模型。
下面是用于推理的完整 Python 脚本。
#!/usr/bin/python3

import sys
import signal
import time
import cv2
import numpy as np
import traceback
import threading
import logging
import queue
import collections
import matplotlib.pyplot as plt
from matplotlib import cm
from tflite_runtime.interpreter import Interpreter

def avg_fps_counter(window_size):
    window = collections.deque(maxlen=window_size)
    prev = time.monotonic()
    yield 0.0  # First fps value.

    while True:
        curr = time.monotonic()
        window.append(curr - prev)
        prev = curr
        yield len(window) / sum(window)

def sigint_handler(sig, frame):
    logging.info('Interrupted')
    sys.exit(0)

signal.signal(signal.SIGINT, sigint_handler)

def capture(queueIn):
    global terminate
    global zoom
    videoCapture = cv2.VideoCapture(0)

    if not videoCapture.isOpened():
        logging.error("Cannot open camera")
        sys.exit(-1)

    while True:
        if terminate:
            logging.info("Capture terminate")
            break

        prev = time.time()
        try:
            success, frame = videoCapture.read()
            if success:
                frame = cv2.rotate(frame, cv2.ROTATE_90_CLOCKWISE)
                img = cv2.cvtColor(frame, cv2.COLOR_BGR2RGB)

                if zoom:
                    w, h = 320, 320
                    x = (img.shape[1] - w) / 2
                    y = (img.shape[0] - h)/ 2
                    img = img[int(y):int(y+h), int(x):int(x+w)]

                img = cv2.resize(img, (width, height))
                img = img / 255.0
                img = img.astype(np.float32)
                img_scaled = (img / input_scale) + input_zero_point
                input_data = np.expand_dims(img_scaled, axis=0).astype(input_details[0]["dtype"])

                if not queueIn.full():
                    queueIn.put((img, input_data))
                    logging.info('Image Captured')
            else:
                raise RuntimeError('Failed to get frame!')
        except Exception as inst:
            logging.error("Exception", inst)
            logging.error(traceback.format_exc())
            videoCapture.release()
            break

def inferencing(interpreter, queueIn, queueOut):
    global terminate
    global show_heatmap

    while True:
        if terminate:
            logging.info("Inferencing terminate")
            break
        start_time = time.time()
        try:
            if queueIn.empty():
                time.sleep(0.01)
                continue

            img, input_data = queueIn.get()
            interpreter.set_tensor(input_details[0]['index'], input_data)
            interpreter.invoke()

            output_0_tensor = interpreter.tensor(output_details[0]['index'])
            output_1_tensor = interpreter.tensor(output_details[1]['index'])

            output_1 = output_1_scale * ((output_1_tensor()).astype(np.float32) - output_1_zero_point)

            pred_class = np.argmax(np.squeeze(output_1))
            pred_score = np.squeeze(output_1)[pred_class]

            dp_out = None

            if pred_class == 1 and show_heatmap is True :
                dp_out = output_0_scale * (np.squeeze(output_0_tensor())[pred_class].astype(np.float32) - output_0_zero_point)

            if not queueOut.full():
                queueOut.put((img, pred_class, pred_score, dp_out))
        except Exception as inst:
            logging.error("Exception", inst)
            logging.error(traceback.format_exc())
            break

        logging.info('Inferencing time: {:.3f}ms'.format((time.time() - start_time) * 1000))

def display(queueOut):
    global show_heatmap
    global zoom
    global terminate

    dimension = (960, 720)
    ei_logo = cv2.imread('/home/pi/surface_crack_detection/ei_logo.jpg')
    ei_logo = cv2.cvtColor(ei_logo, cv2.COLOR_BGR2RGB)
    ei_logo = ei_logo / 255.0
    ei_logo = ei_logo.astype(np.float32)
    ei_logo = cv2.copyMakeBorder(ei_logo, 0, dimension[1] - ei_logo.shape[0], 70, 70, cv2.BORDER_CONSTANT, None, (255, 255, 255))
    ei_logo = cv2.copyMakeBorder(ei_logo, 0, dimension[1] - ei_logo.shape[0], 70, 70, cv2.BORDER_CONSTANT, None, (255, 255, 255))

    fps_counter = avg_fps_counter(30)

    while True:
        if queueOut.empty():
            time.sleep(0.2)
            continue

        start_time = time.time()
        img, pred_class, pred_score, dp_out = queueOut.get()

        if pred_class == 1:
            label = 'Crack'
            color = (0, 0, 255)

            if show_heatmap and dp_out is not None:
                heatmap = None
                heatmap = cv2.normalize(dp_out, heatmap, alpha=0, beta=255, norm_type=cv2.NORM_MINMAX, dtype=cv2.CV_8U)
                colormap = plt.get_cmap('jet')
                img = cv2.addWeighted(img, 1.0, colormap(heatmap).astype(np.float32)[:,:,:3], 0.4, 0)
        else:
            if pred_class == 0:
                label = 'No Crack'
                color = (0, 0, 0)
            else:
                label = 'Unknown'
                color = (255, 0,  0)

        final_img = cv2.resize(img, dimension, interpolation=cv2.INTER_CUBIC)

        font  = cv2.FONT_HERSHEY_SIMPLEX
        final_img = np.hstack((final_img, ei_logo))
        final_img = cv2.cvtColor(final_img, cv2.COLOR_RGB2BGR)
        final_img = cv2.putText(final_img, label, (980, 200), font, 2, color, 3, cv2.LINE_AA)
        final_img = cv2.putText(final_img, f'({pred_score*100:0.1f}%)', (980, 280), font, 2, (0, 0, 0), 3, cv2.LINE_AA)

        fps = round(next(fps_counter))

        final_img = cv2.putText(final_img, f'Fps:{fps}', (980, 360), font, 2, (0, 0, 0), 3, cv2.LINE_AA)
        final_img = cv2.putText(final_img, f'Heat:{"On" if show_heatmap else "Off"}', (980, 440), font, 2, (0, 0, 0), 3, cv2.LINE_AA)
        final_img = cv2.putText(final_img, f'Crop:{"On" if zoom else "Off"}', (980, 520), font, 2, (0, 0, 0), 3, cv2.LINE_AA)

        window_name = "Edge Impulse Inferencing"
        cv2.imshow(window_name, final_img)


        key = cv2.waitKey(1)
        if key == ord('a'):
            show_heatmap  = not show_heatmap
            logging.info(f"Heatmap: {show_heatmap}")

        if key == ord('s'):
            zoom  = not zoom
            logging.info(f"Zoom: {zoom}")

        if key == ord('f'):
            terminate = True
            logging.info("Display Terminate")
            break

        logging.info('Display time: {:.3f}ms'.format((time.time() - start_time) * 1000))


if __name__ == '__main__':
    log_fmt = "%(asctime)s: %(message)s"
    logging.basicConfig(format=log_fmt, level=logging.ERROR,)

    model_file = '/home/pi/surface_crack_detection/model/quantized-model.lite'
    interpreter = Interpreter(model_path=model_file, num_threads=2)
    interpreter.allocate_tensors()

    input_details  = interpreter.get_input_details()
    #logging.debug(input_details)
    output_details = interpreter.get_output_details()

    height = input_details[0]['shape'][1]
    width  = input_details[0]['shape'][2]
    input_scale, input_zero_point = input_details[0]['quantization']
    output_0_scale, output_0_zero_point = output_details[0]['quantization']
    output_1_scale, output_1_zero_point = output_details[1]['quantization']

    queueIn  = queue.Queue(maxsize=1)
    queueOut  = queue.Queue(maxsize=1)
    show_heatmap = False
    zoom = False
    terminate = False

    t1 = threading.Thread(target=capture, args=(queueIn,), daemon=True)
    t2 = threading.Thread(target=inferencing, args=(interpreter, queueIn, queueOut), daemon=True)
    t3 = threading.Thread(target=display, args=(queueOut,), daemon=True)

    t1.start()
    logging.info("Thread start: 1")
    t2.start()
    logging.info("Thread start: 2")
    t3.start()
    logging.info("Thread start: 3")

    t1.join()
    t2.join()
    t3.join()
申请工作流程图
该应用程序使用多线程来使用 Raspberry Pi 4 计算模块上的所有可用 4 核,以实现低延迟和更好的 FPS。

桌面应用程序
通过单击桌面应用程序图标来执行推理脚本,该图标是通过在 /home/pi/Desktop 目录中添加 ei.desktop 文件而创建的。
[Desktop Entry]
Version=1.0
Comment=Run Inferencing Quantized Model
Terminal=false
Name=Surface Crack Detection
Exec=/home/pi/surface_crack_detection/surface_crack_detection_quant.py
Type=Application
Icon=/home/pi/surface_crack_detection/images/ei_logo.jpg

此外,reTerminal 前面板按钮(在上图中)用于以下功能。
- F1按钮:切换热图
- F2按钮:切换中心裁剪(放大)预览图像
- O按钮:关闭应用程序
推理演示
结论
该项目展示了可用于预测性维护的表面裂纹检测工业用例。该项目具有以下主要特点。
- 在 Edge Impulse Studio 专家模式下自定义预训练的迁移学习模型
- 演示如何使用使用 Edge Impulse 训练的多输出模型
- 运行时热图可视化以定位检测到的裂缝。
- 多线程应用程序以提高 FPS
- 可扩展的便携式解决方案
尽管该项目是使用 Raspberry Pi 4 计算模块创建的,但它可以轻松移植到更高规格的边缘设备,以提高 FPS 和实时检测。

声明:本文内容及配图由入驻作者撰写或者入驻合作网站授权转载。文章观点仅代表作者本人,不代表电子发烧友网立场。文章及其配图仅供工程师学习之用,如有内容侵权或者其他违规问题,请联系本站处理。 举报投诉
- 相关下载
- 相关文章


