
资料下载


Raspberry Pi零Dynamixel帽子
笑过就走
分享资料个
描述
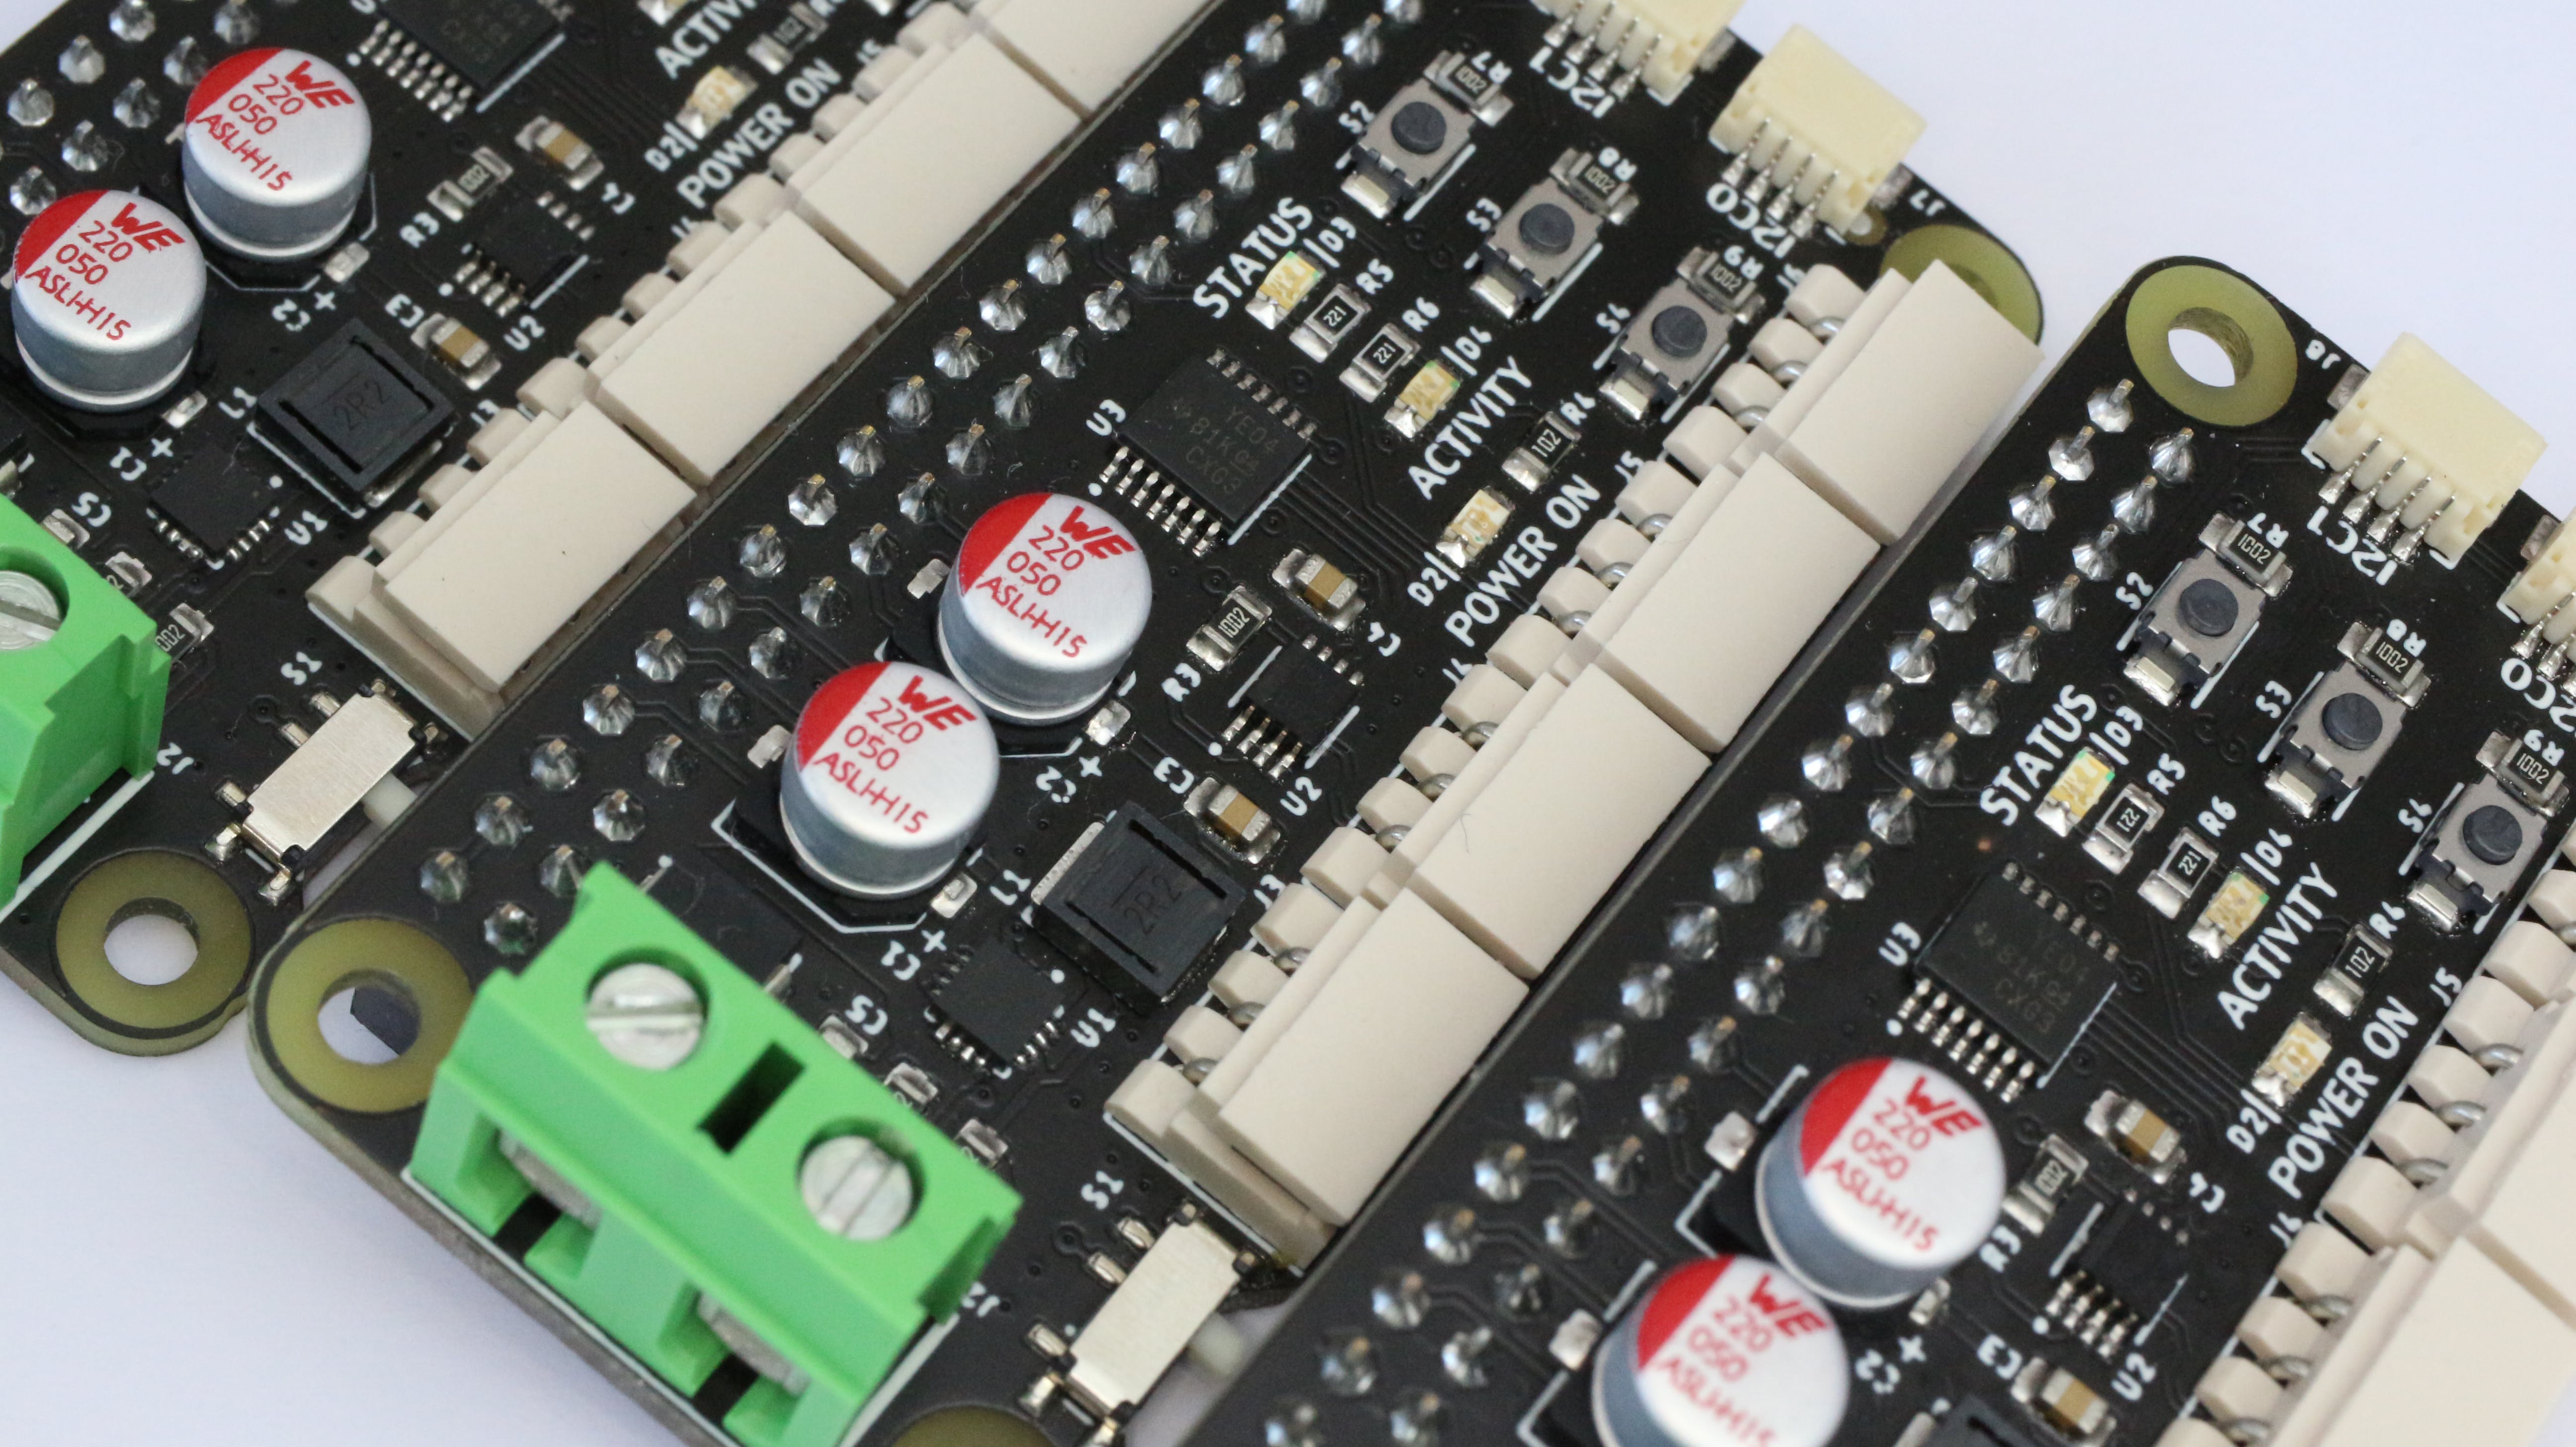
Raspberry Pi 零 Dynamixel 帽子
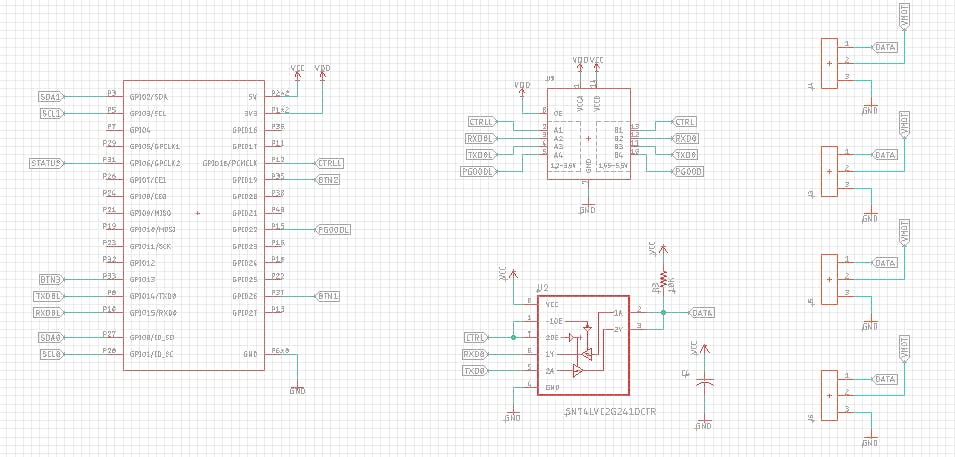
Dynamixel Hat 是一块板卡,能够通过使用连接到 3 针 Molex 连接器的 74LS241 三态缓冲器将树莓派(串行)与 Dynamixel 伺服系统进行通信。
该板包含一个 TI TPS62143 稳压器,可降低电压以启动 Raspberry Pi Zero,可以通过板载滑动开关打开或关闭电源。TPS62143 是一款同步降压 DC-DC 转换器,针对高功率密度应用进行了优化。
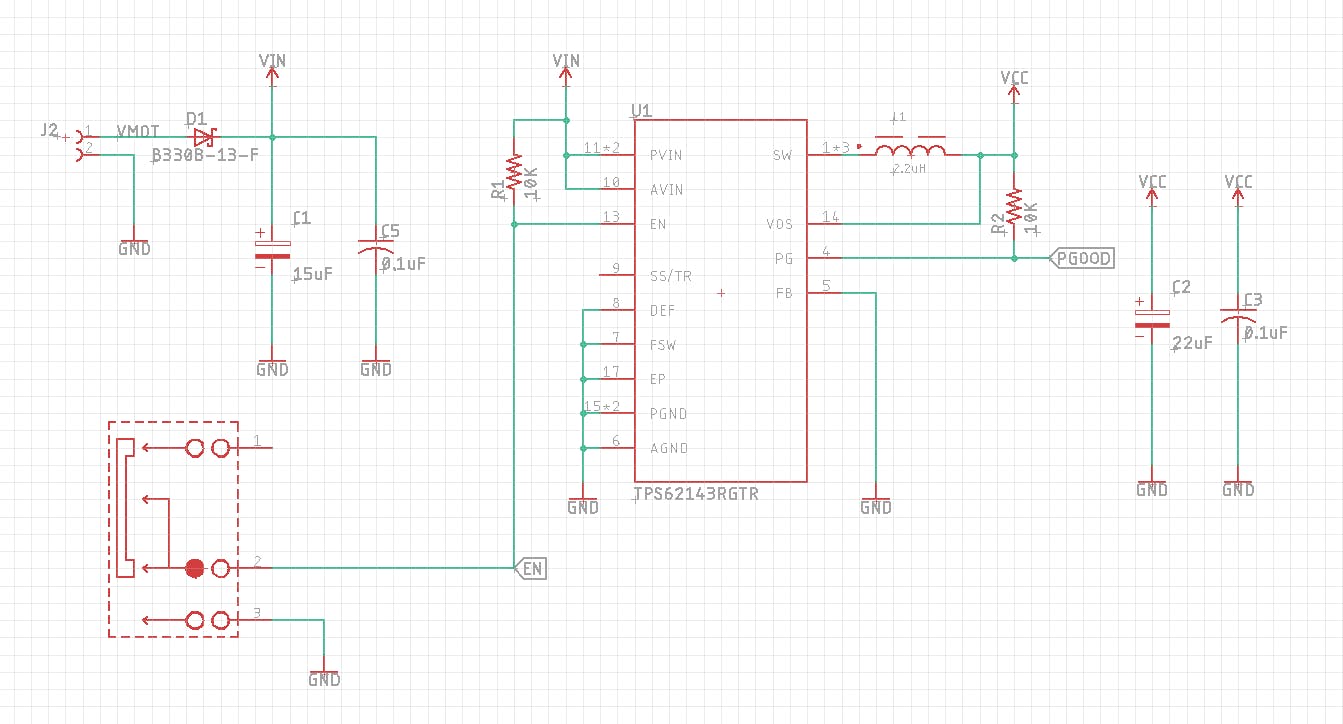
该板接受 2S 和 3S Lipo 电池,DC-DC 转换器接受高达 17 V,但电机推荐电压为 11.1V (3S Lipo),因为 MAX 输入电压约为 16 V。
这些板包含两个 I2C 端口,用于您的机器人项目的传感器。这些 JST 1 mm 间距和 4 针连接器与 QWIIC 系列中的许多板兼容。

还有 3 个 LED 和 3 个按钮用于通知和与电子设备交互,这些按钮可通过 Raspberry GPIO 进行编程,1 个 LED 也可配置 GPIO,另外 2 个 LED 是活动和开机通知。
装配视频
引脚排列

测试代码(Python):
import RPi.GPIO as GPIO
import serial
import time

GPIO.setwarnings(False)
GPIO.setmode(GPIO.BCM)
GPIO.setup(18,GPIO.OUT)     # Control Data Direction Pin
GPIO.setup(6,GPIO.OUT)      # Blue LED Pin

GPIO.setup(26,GPIO.IN)      # S2 Push Button Pin
GPIO.setup(19,GPIO.IN)      # S3 Push Button Pin
GPIO.setup(13,GPIO.IN)      # S4 Push Button Pin


Dynamixel=serial.Serial("/dev/ttyS0",baudrate=1000000,timeout=0.1, bytesize=8)   # UART in ttyS0 @ 1Mbps


while True:

    if GPIO.input(26):
        GPIO.output(6,GPIO.LOW)
    else:
        GPIO.output(6,GPIO.HIGH)
        GPIO.output(18,GPIO.HIGH)
        Dynamixel.write(bytearray.fromhex("FF FF 01 05 03 1E CD 00 0B"))  # Move Servo with ID = 1 to position 205
        GPIO.output(18,GPIO.LOW)
        startDynamixel = Dynamixel.read()
        startDynamixel = Dynamixel.read()
        idDynamixel = Dynamixel.read()
        lenghtDynamixel = Dynamixel.read()
        errorDynamixel = Dynamixel.read()
        chkDynamixel = Dynamixel.read()
        print("Servo ID = " , int.from_bytes(idDynamixel,byteorder='big') , " Errors = ", int.from_bytes(errorDynamixel,byteorder='big'))
        time.sleep(1)

    if GPIO.input(19):
        GPIO.output(6,GPIO.LOW)
    else:
        GPIO.output(6,GPIO.HIGH)
        GPIO.output(18,GPIO.HIGH)
        Dynamixel.write(bytearray.fromhex("FF FF 01 04 02 2A 01 CD"))   # Read Voltage of Servo with ID = 1
        GPIO.output(18,GPIO.LOW)
        startDynamixel = Dynamixel.read()
        startDynamixel = Dynamixel.read()
        idDynamixel = Dynamixel.read()
        lenghtDynamixel = Dynamixel.read()
        errorDynamixel = Dynamixel.read()
        voltDynamixel = Dynamixel.read()
        chkDynamixel = Dynamixel.read()
        print("Servo Voltage = " , int.from_bytes(voltDynamixel,byteorder='big'))
        GPIO.output(18,GPIO.HIGH)
        Dynamixel.write(bytearray.fromhex("FF FF 01 04 02 2B 01 CC"))   # Read Temperature of Servo with ID = 1
        GPIO.output(18,GPIO.LOW)
        startDynamixel = Dynamixel.read()
        startDynamixel = Dynamixel.read()
        idDynamixel = Dynamixel.read()
        lenghtDynamixel = Dynamixel.read()
        errorDynamixel = Dynamixel.read()
        tempDynamixel = Dynamixel.read()
        chkDynamixel = Dynamixel.read()
        print("Servo Temperature = " , int.from_bytes(tempDynamixel,byteorder='big'))
        GPIO.output(18,GPIO.HIGH)
        Dynamixel.write(bytearray.fromhex("FF FF 01 04 02 24 02 D2"))   # Read Position of Servo with ID = 1
        GPIO.output(18,GPIO.LOW)
        startDynamixel = Dynamixel.read()
        startDynamixel = Dynamixel.read()
        idDynamixel = Dynamixel.read()
        lenghtDynamixel = Dynamixel.read()
        errorDynamixel = Dynamixel.read()
        posDynamixel = Dynamixel.read(2)
        chkDynamixel = Dynamixel.read()
        print("Servo Position = " , int.from_bytes(posDynamixel,byteorder='little'))
        time.sleep(1)

    if GPIO.input(13):
        GPIO.output(6,GPIO.LOW)
    else:
        GPIO.output(6,GPIO.HIGH)
        GPIO.output(18,GPIO.HIGH)
        Dynamixel.write(bytearray.fromhex("FF FF 01 05 03 1E 32 03 A3"))    # Move Servo with ID = 1 to position 816
        GPIO.output(18,GPIO.LOW)
        startDynamixel = Dynamixel.read()
        startDynamixel = Dynamixel.read()
        idDynamixel = Dynamixel.read()
        lenghtDynamixel = Dynamixel.read()
        errorDynamixel = Dynamixel.read()
        chkDynamixel = Dynamixel.read()
        print("Servo ID = " , int.from_bytes(idDynamixel,byteorder='big') , " Errors = ", int.from_bytes(errorDynamixel,byteorder='big'))
        time.sleep(1)
在您的 Raspberry Pi Zero 中启用 1Mbps 的 UART
确保将以下内容添加到 /boot/config.txt 的 Raspberry 配置文件中:
enable_uart=1
init_uart_clock=16000000
为什么我做到了?
很多人将 Dynamixel Servos 用于机器人项目,将 Raspberry 用于高控制器,并且一直要求我重新进货,因为他们想使用这些很棒的电机,但又不想弄乱电子设备部分,这就是为什么我决定根据这个令人敬畏的机器人社区的反馈生产一小批。
是什么让它特别?
它实现了 Savage Electronics Dynamixel 接口。电源直接从电池提供给电机和 Raspberry Pi Zero。易于安装。

声明:本文内容及配图由入驻作者撰写或者入驻合作网站授权转载。文章观点仅代表作者本人,不代表电子发烧友网立场。文章及其配图仅供工程师学习之用,如有内容侵权或者其他违规问题,请联系本站处理。 举报投诉
- 相关下载
- 相关文章


