
资料下载


通过蓝牙将消息发送到连接到STM32板的LCD显示器
h1654155275.6483
分享资料个
描述
该项目的目的是使用网络浏览器或智能手机通过蓝牙将消息发送到连接到 STM32 板的 LCD 显示器。
一、简介
低功耗蓝牙项目基于STM32 Nucleo-144 ,它使用 BleuIO控制LCD 显示。
对于这个项目,我们需要两个 BleuIO USB 加密狗,一个连接到 Nucleo 板,另一个连接到计算机,运行 Web 脚本。当 BleuIO Dongle 连接到 Nucleo 板的 USB 端口时,STM32 将识别它并直接开始广播。这允许计算机端口上的加密狗与网络脚本连接。
使用电脑上的网页脚本,我们可以使用 BleuIO 向连接到 STM32 的 LCD 屏幕发送消息。
在本示例中,我们使用了 STM32 Nucleo-144 开发板和 STM32H743ZI MCU(支持 STM32H743ZI micro mbed 的开发 Nucleo-144 系列 ARM® Cortex®-M7 MCU 32 位嵌入式评估板)。该开发板有一个 USB 主机,用于连接 BleuIO 加密狗。
如果要使用其他设置,则必须确保它支持 USB 主机,并注意 GPIO 设置可能不同,可能需要在 .ioc 文件中重新配置。
关于守则
项目源代码可在 Github 上获得。
https://github.com/smart-sensor-devices-ab/stm32_bleuio_lcd.git
克隆项目,或将其下载为 zip 文件并解压缩到您的 STM32CubeIDE 工作区。
如果您将项目下载为 zip 文件,则需要将项目文件夹从“stm32_bleuio_lcd-master”重命名为“stm32_bleuio_lcd”

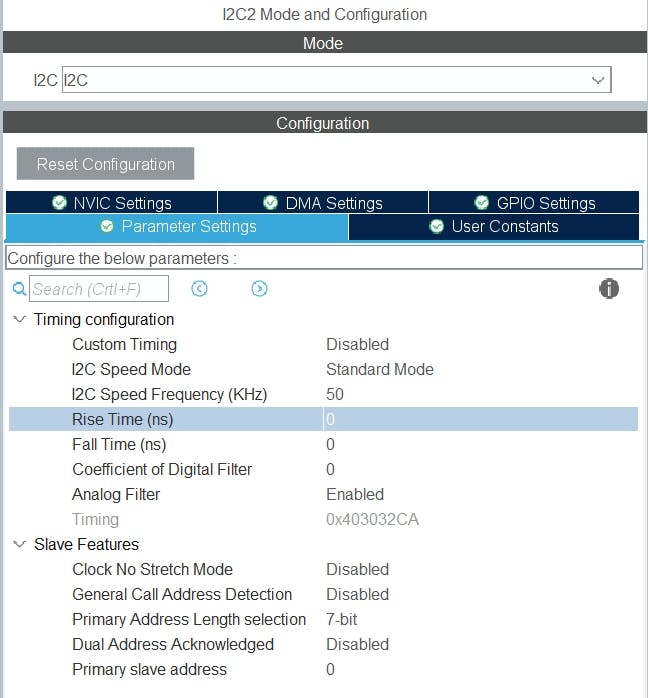
将 SDA 连接到 Nucleo 板上的 PF0,将 SCL 连接到 PF1。
然后在 STM32Cube ioc 文件中设置 I2C2,如下所示。(确保根据 LCD 显示要求将 I2C 速度频率更改为 50 KHz。)


在 USB_HOST\usb_host.c 中的 USBH_CDC_ReceiveCallback 函数中,我们将 CDC_RX_Buffer 复制到一个名为 dongle_response 的外部变量中,该变量可从 main.c 文件访问。
void USBH_CDC_ReceiveCallback(USBH_HandleTypeDef * phost) {
  if (phost == & hUsbHostFS) {
    // Handles the data recived from the USB CDC host, here just printing it out to UART
    rx_size = USBH_CDC_GetLastReceivedDataSize(phost);
    HAL_UART_Transmit( & huart3, CDC_RX_Buffer, rx_size, HAL_MAX_DELAY);

    // Copy buffer to external dongle_response buffer
    strcpy((char * ) dongle_response, (char * ) CDC_RX_Buffer);

    // Reset buffer and restart the callback function to receive more data
    memset(CDC_RX_Buffer, 0, RX_BUFF_SIZE);
    USBH_CDC_Receive(phost, CDC_RX_Buffer, RX_BUFF_SIZE);
  }

  return;
}
在 main.c 中,我们创建了一个简单的解释器,这样我们就可以对从加密狗收到的数据做出反应。
void dongle_interpreter(uint8_t * input) {

  if (strlen((char * ) input) != 0) {
    if (strstr((char * ) input, "\r\nADVERTISING...") != NULL) {
      isAdvertising = true;
    }
    if (strstr((char * ) input, "\r\nADVERTISING STOPPED") != NULL) {
      isAdvertising = false;
    }
    if (strstr((char * ) input, "\r\nCONNECTED") != NULL) {
      isConnected = true;
      HAL_GPIO_WritePin(GPIOE, GPIO_PIN_1, GPIO_PIN_SET);
    }
    if (strstr((char * ) input, "\r\nDISCONNECTED") != NULL) {
      isConnected = false;
      HAL_GPIO_WritePin(GPIOE, GPIO_PIN_1, GPIO_PIN_RESET);
    }

    if (strstr((char * ) input, "L=0") != NULL) {

      isLightBulbOn = false;
      //HAL_GPIO_WritePin(Lightbulb_GPIO_Port, Lightbulb_Pin, GPIO_PIN_RESET);
      lcd_clear();

      writeToDongle((uint8_t * ) DONGLE_SEND_LIGHT_OFF);

      uart_buf_len = sprintf(uart_tx_buf, "\r\nClear screen\r\n");
      HAL_UART_Transmit( & huart3, (uint8_t * ) uart_tx_buf, uart_buf_len, HAL_MAX_DELAY);
    }

    if (strstr((char * ) input, "L=1") != NULL) {
      isLightBulbOn = true;
      writeToDongle((uint8_t * ) DONGLE_SEND_LIGHT_ON);

      lcd_clear();

      lcd_write(input);

    }

  }
  memset( & dongle_response, 0, RSP_SIZE);
}
我们将解释器函数放在主循环中。
/* Infinite loop */
/* USER CODE BEGIN WHILE */
while (1) {
  /* USER CODE END WHILE */
  MX_USB_HOST_Process();

  /* USER CODE BEGIN 3 */
  // Simple handler for uart input
  handleUartInput(uartStatus);

  // Inteprets the dongle data
  dongle_interpreter(dongle_response);

  // Starts advertising as soon as the Dongle is ready.
  if (!isAdvertising && !isConnected && isBleuIOReady) {
    HAL_Delay(200);
    writeToDongle((uint8_t * ) DONGLE_CMD_AT_ADVSTART);
    isAdvertising = true;
  }
}
/* USER CODE END 3 */
使用示例项目
我们需要什么
- 两个 BleuIO 加密狗(https://www.bleuio.com/)
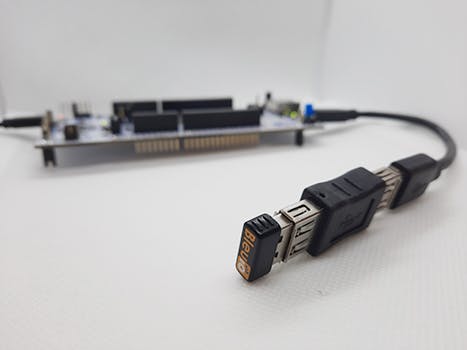
- 带有 STM32 微控制器和 USB 端口的板。(Nucleo-144 开发板:NUCLEO-H743ZI2,用于开发此示例。(https://www.st.com/en/evaluation-tools/nucleo-h743zi.html)将加密狗连接到 Nucleo 板可以使用带有 USB A 母对母适配器的“USB A 到 Micro USB B”电缆。)
- STM32CubeIDE(https://www.st.com/en/development-tools/stm32cubeide.html)
- 液晶显示模块 – NHD-0420D3Z-NSW-BBW-V3 ( https://www.digikey.com/en/products/detail/newhaven-display-intl/NHD-0420D3Z-NSW-BBW-V3/2626390?s =N4IgTCBcDAIHIAkAiBaADAFjGpBmAWinAMoDqKAQheQGq4gC6AvkA)
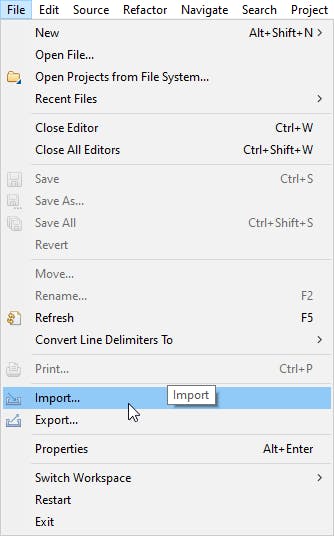
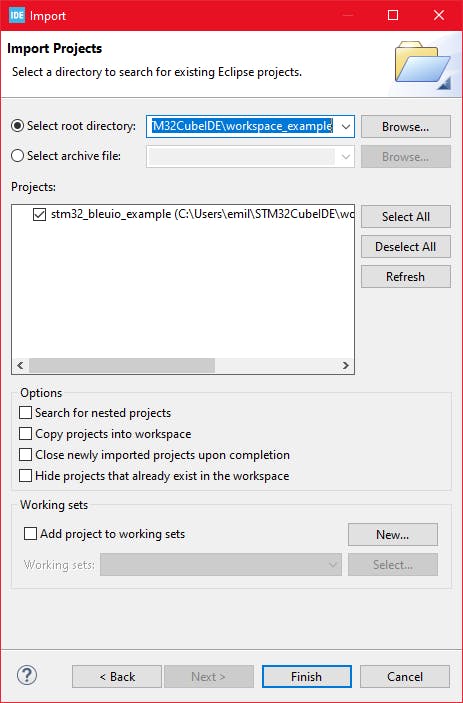
作为现有项目导入
从 STM32CubeIDE 中选择 File>Import…
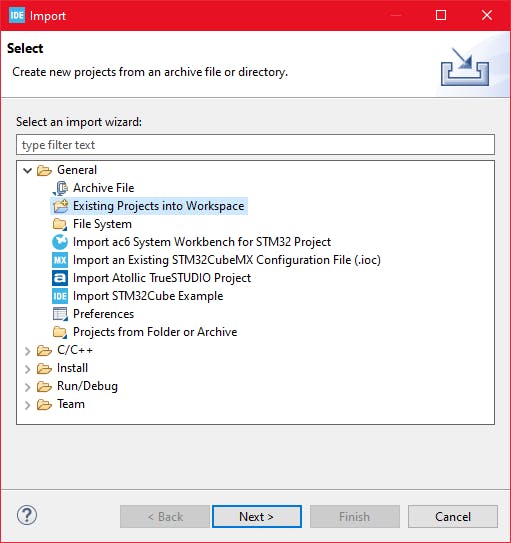
然后选择 General>Existing Projects into Workspace 然后点击“Next >”
确保您在“选择根目录:”中选择了您的工作区
您应该会看到项目“stm32_bleuio_SHT85_example”,选中它并单击“完成”。
运行示例
将代码上传到 STM32 并运行示例。连接到 STM32 的 USB 加密狗将自动开始广播。
从网络浏览器向 LCD 屏幕发送消息
将 BleuIO 加密狗连接到计算机。运行 Web 脚本以连接到 STM32 上的另一个 BleuIO 加密狗。现在您可以将消息发送到 LCD 屏幕。
为了让这个脚本工作,我们需要
- BleuIO USB 加密狗连接到计算机。
- BleuIO JavaScript 库
- Chrome 78 或更高版本,您需要在 chrome://flags 中启用#enable-experimental-web-platform-features标志
- 一个网络捆绑器——(包裹 js)
创建一个名为 index.html 的简单 Html 文件,该文件将用作脚本的前端。此 Html 文件包含一些按钮,可帮助连接和读取来自远程加密狗的广告数据,该加密狗连接到 stm32。
html>
<html lang="en">
  <head>
    <meta charset="UTF-8" />
    <meta http-equiv="X-UA-Compatible" content="IE=edge" />
    <meta name="viewport" content="width=device-width, initial-scale=1.0" />
    <link
      href="https://cdn.jsdelivr.net/npm/bootstrap@5.1.3/dist/css/bootstrap.min.css"
      rel="stylesheet"
      integrity="sha384-1BmE4kWBq78iYhFldvKuhfTAU6auU8tT94WrHftjDbrCEXSU1oBoqyl2QvZ6jIW3"
      crossorigin="anonymous"
    />
    <title>Send message to STM32 LCD display using Bluetooth LEtitle>
  head>
  <body class="mt-5">
    <div class="container mt-5">
      <h1 class="mb-5">Send message to STM32 LCD display using Bluetooth LEh1>
      <button class="btn btn-success" id="connect">Connectbutton>
      <div class="row">
        <div class="col-md-4">
          <form method="post" id="sendMsgForm" name="sendMsgForm">
            <div class="mb-3">
              <label for="msgToSend" class="form-label">Your Messagelabel>
              <input
                type="text"
                class="form-control"
                name="msgToSend"
                id="msgToSend"
                required
                maxlength="60"
              />
            div>

            <button type="submit" class="btn btn-primary">Submitbutton>
          form>
        div>
      div>

      <br />
      <button class="btn btn-danger" id="clearScreen" disabled>
        Clear screen
      button>
    div>

    <script src="script.js">script>
  body>
html>
创建一个名为 script.js 的 js 文件并将其包含在 Html 文件的底部。这个 js 文件使用 BleuIO js 库来编写 AT 命令并与其他加密狗进行通信。
import * as my_dongle from 'bleuio'
const dongleToConnect = '[0]40:48:FD:E5:2F:17'
document.getElementById('connect').addEventListener('click', function() {
	my_dongle.at_connect()
	document.getElementById("clearScreen").disabled = false;
	document.getElementById("connect").disabled = true;
	document.getElementById("sendMsgForm").hidden = false;
})

document.getElementById("sendMsgForm").addEventListener("submit", function(event) {
	event.preventDefault()
	console.log('here')


	my_dongle.ati().then((data) => {
			//make central if not
			if (JSON.stringify(data).includes("Peripheral")) {
				console.log('peripheral')
				my_dongle.at_central().then((x) => {
					console.log('central now')
				})
			}
		})
		.then(() => {
			// connect to dongle
			my_dongle.at_getconn().then((y) => {
					if (JSON.stringify(y).includes(dongleToConnect)) {
						console.log('already connected')
					} else {
						my_dongle.at_gapconnect(dongleToConnect).then(() => {
							console.log('connected successfully')
						})
					}
				})
				.then(() => {
					var theVal = "L=1 " + document.getElementById('msgToSend').value;
					console.log('Message Send 1 ' + theVal)
					// send command to show data
					my_dongle.at_spssend(theVal).then(() => {
						console.log('Message Send ' + theVal)
					})
				})

		})
});


document.getElementById('clearScreen').addEventListener('click', function() {
	my_dongle.ati().then((data) => {
			//make central if not
			if (JSON.stringify(data).includes("Peripheral")) {
				console.log('peripheral')
				my_dongle.at_central().then((x) => {
					console.log('central now')
				})
			}
		})
		.then(() => {
			// connect to dongle
			my_dongle.at_getconn().then((y) => {
					if (JSON.stringify(y).includes(dongleToConnect)) {
						console.log('already connected')
					} else {
						my_dongle.at_gapconnect(dongleToConnect).then(() => {
							console.log('connected successfully')
						})
					}
				})
				.then(() => {
					// send command to clear the screen
					my_dongle.at_spssend('L=0').then(() => {
						console.log('Screen Cleared')
					})
				})

		})
})
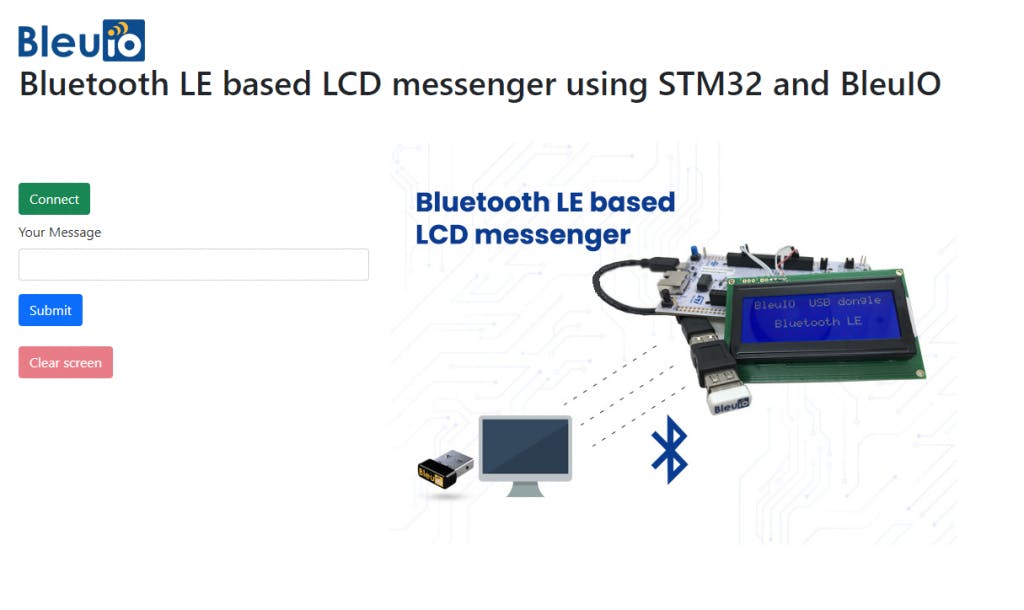
该脚本有一个按钮可以连接到计算机上的 COM 端口。有一个文本字段,您可以在其中编写消息。您的消息将显示在连接到 STM32 开发板的 LCD 屏幕上。
要连接到 STM32 上的 BleuIO 加密狗,请确保 STM32 已通电并连接了 BleuIO 加密狗。
获取 MAC 地址
按照步骤获取连接到STM32的加密狗的MAC地址
- Open this site https://bleuio.com/web_terminal.html and click connect to dongle.
- Select the appropriate port to connect.
- Once it says connected, type ATI. This will show dongle information and current status.
- If the dongle is on peripheral role, set it to central by typing AT+CENTRAL
- Now do a gap scan by typing AT+GAPSCAN
- Once you see your dongle on the list ,stop the scan by pressing control+c
- Copy the ID and paste it into the script (script.js) line #2
运行网页脚本
您将需要一个网络捆绑程序。您可以使用parcel.js
安装 parcel js 后,转到 web 脚本的根目录并输入“parcel index.html” 。这将启动您的开发环境。

在浏览器上打开脚本。对于这个例子,我们打开http://localhost:1234
您可以轻松连接到加密狗并将消息发送到 LCD 屏幕。响应将显示在浏览器控制台屏幕上。
网络脚本看起来像这样
输出
信息将显示在液晶显示屏上。


声明:本文内容及配图由入驻作者撰写或者入驻合作网站授权转载。文章观点仅代表作者本人,不代表电子发烧友网立场。文章及其配图仅供工程师学习之用,如有内容侵权或者其他违规问题,请联系本站处理。 举报投诉
- 相关下载
- 相关文章


