
资料下载


Walabot AI锁舌开源分享
分享资料个
描述
什么是AI人脸识别锁?
iPhone X Face ID 让人们大吃一惊,人们开始通过 AI 深度学习意识到他们的脸比他们的指纹更加独特和准确。
但有些人没有意识到 iPhone X 面部识别之所以起作用,是因为它只检测到你或不检测到你,因此它比使用 AI 检测多个目标的准确度要高得多。
我们构建了一个平台,展示 AI 如何在英特尔 Movidius NCS 上运行,使用开发套件随附的所有默认摄像头。这个项目可以扩展到使用面部识别来解锁门栓、记录条目、打开不同的灯光主题等等。
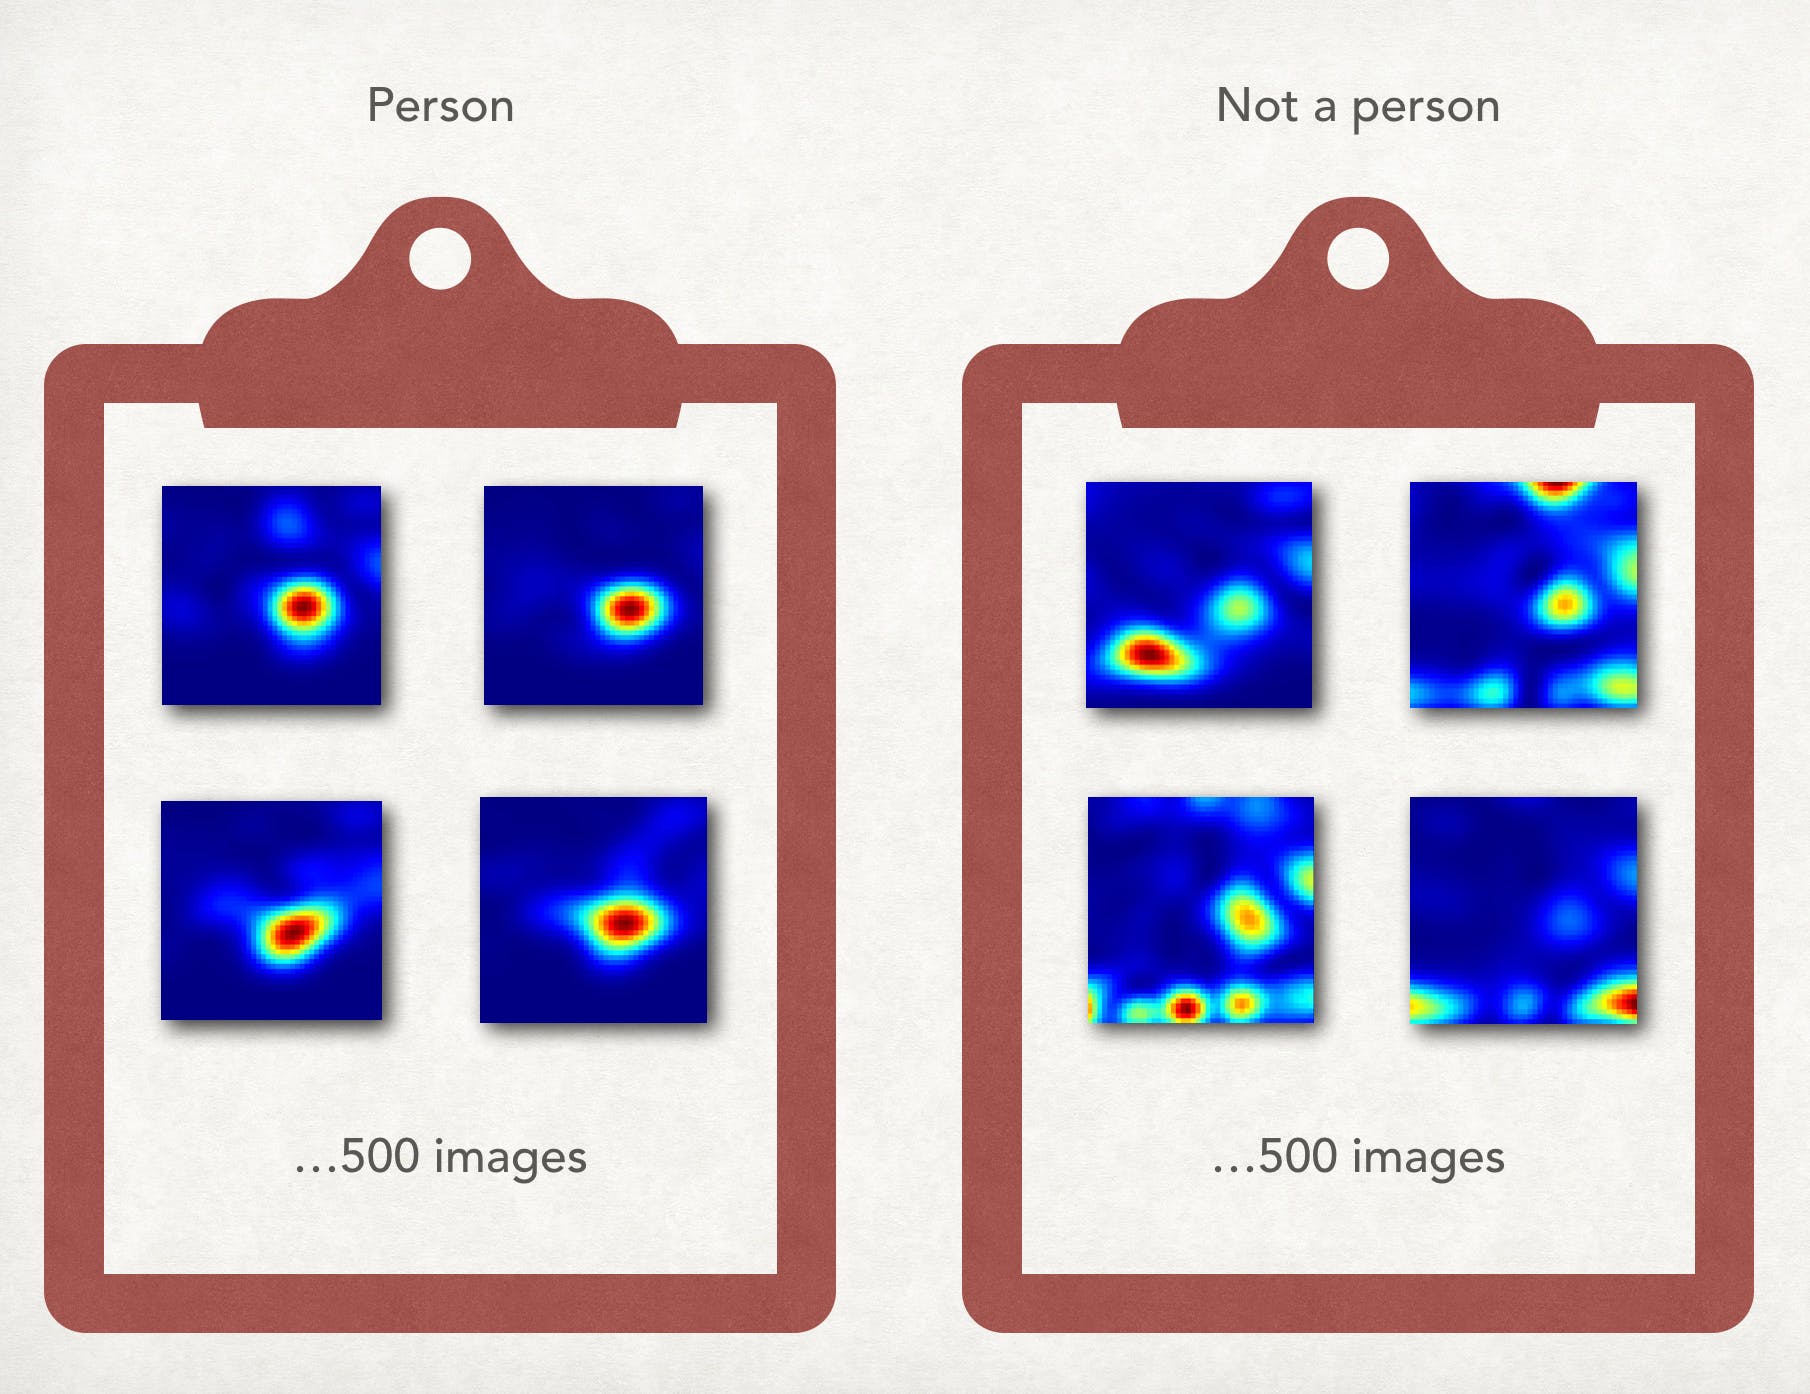
我们已经在 caffe 上训练了整个网络,使用“me or not me”方法达到了 99% 以上的准确率。额外的雷达(Walabot)将被添加到项目中,以确保简单的图像无法通过测试。
在本指南中,我们将使用卷积神经网络创建面部识别网络并通过 Walabot 保护它以检测距离和用户呼吸,然后通过 alexa 打开锁舌。
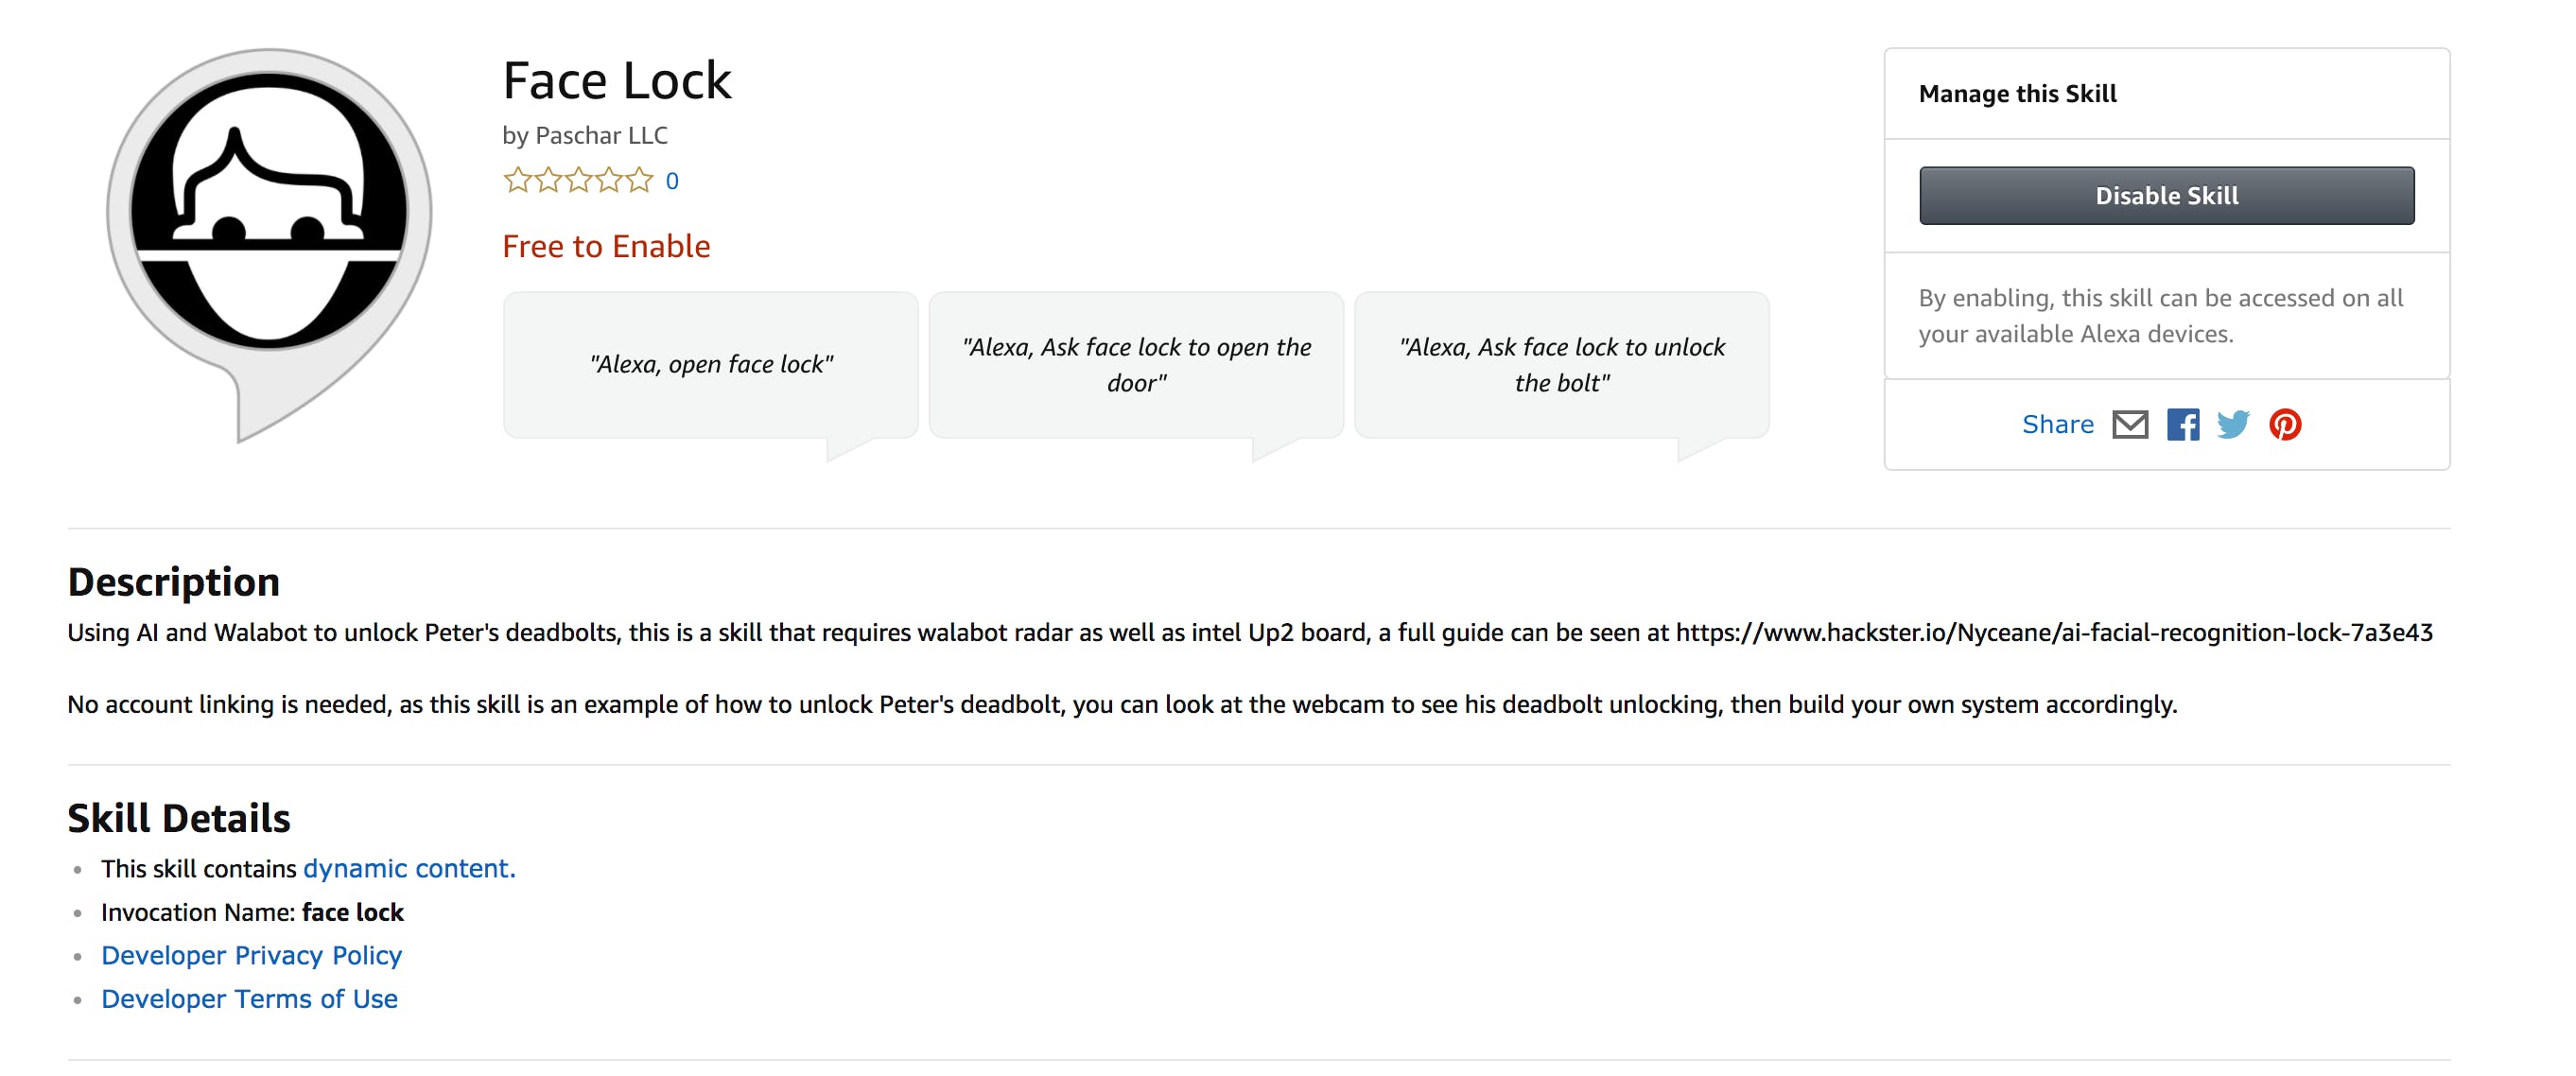
Alexa技能
我们的 Alexa 技能在技能 ID
您还可以按照系统指南中的用户链接链接,通过帐户链接设置多个用户。
此处不需要帐户关联。 要在您自己的设备上使用公共Alexa 技能,您可以将 {YOUR_SERVER} ,因为这是连接到用于测试的服务器alexa技能。为了提高安全性,您还可以按照本指南使用您自己的服务器,因为所有服务器代码也是开源的。
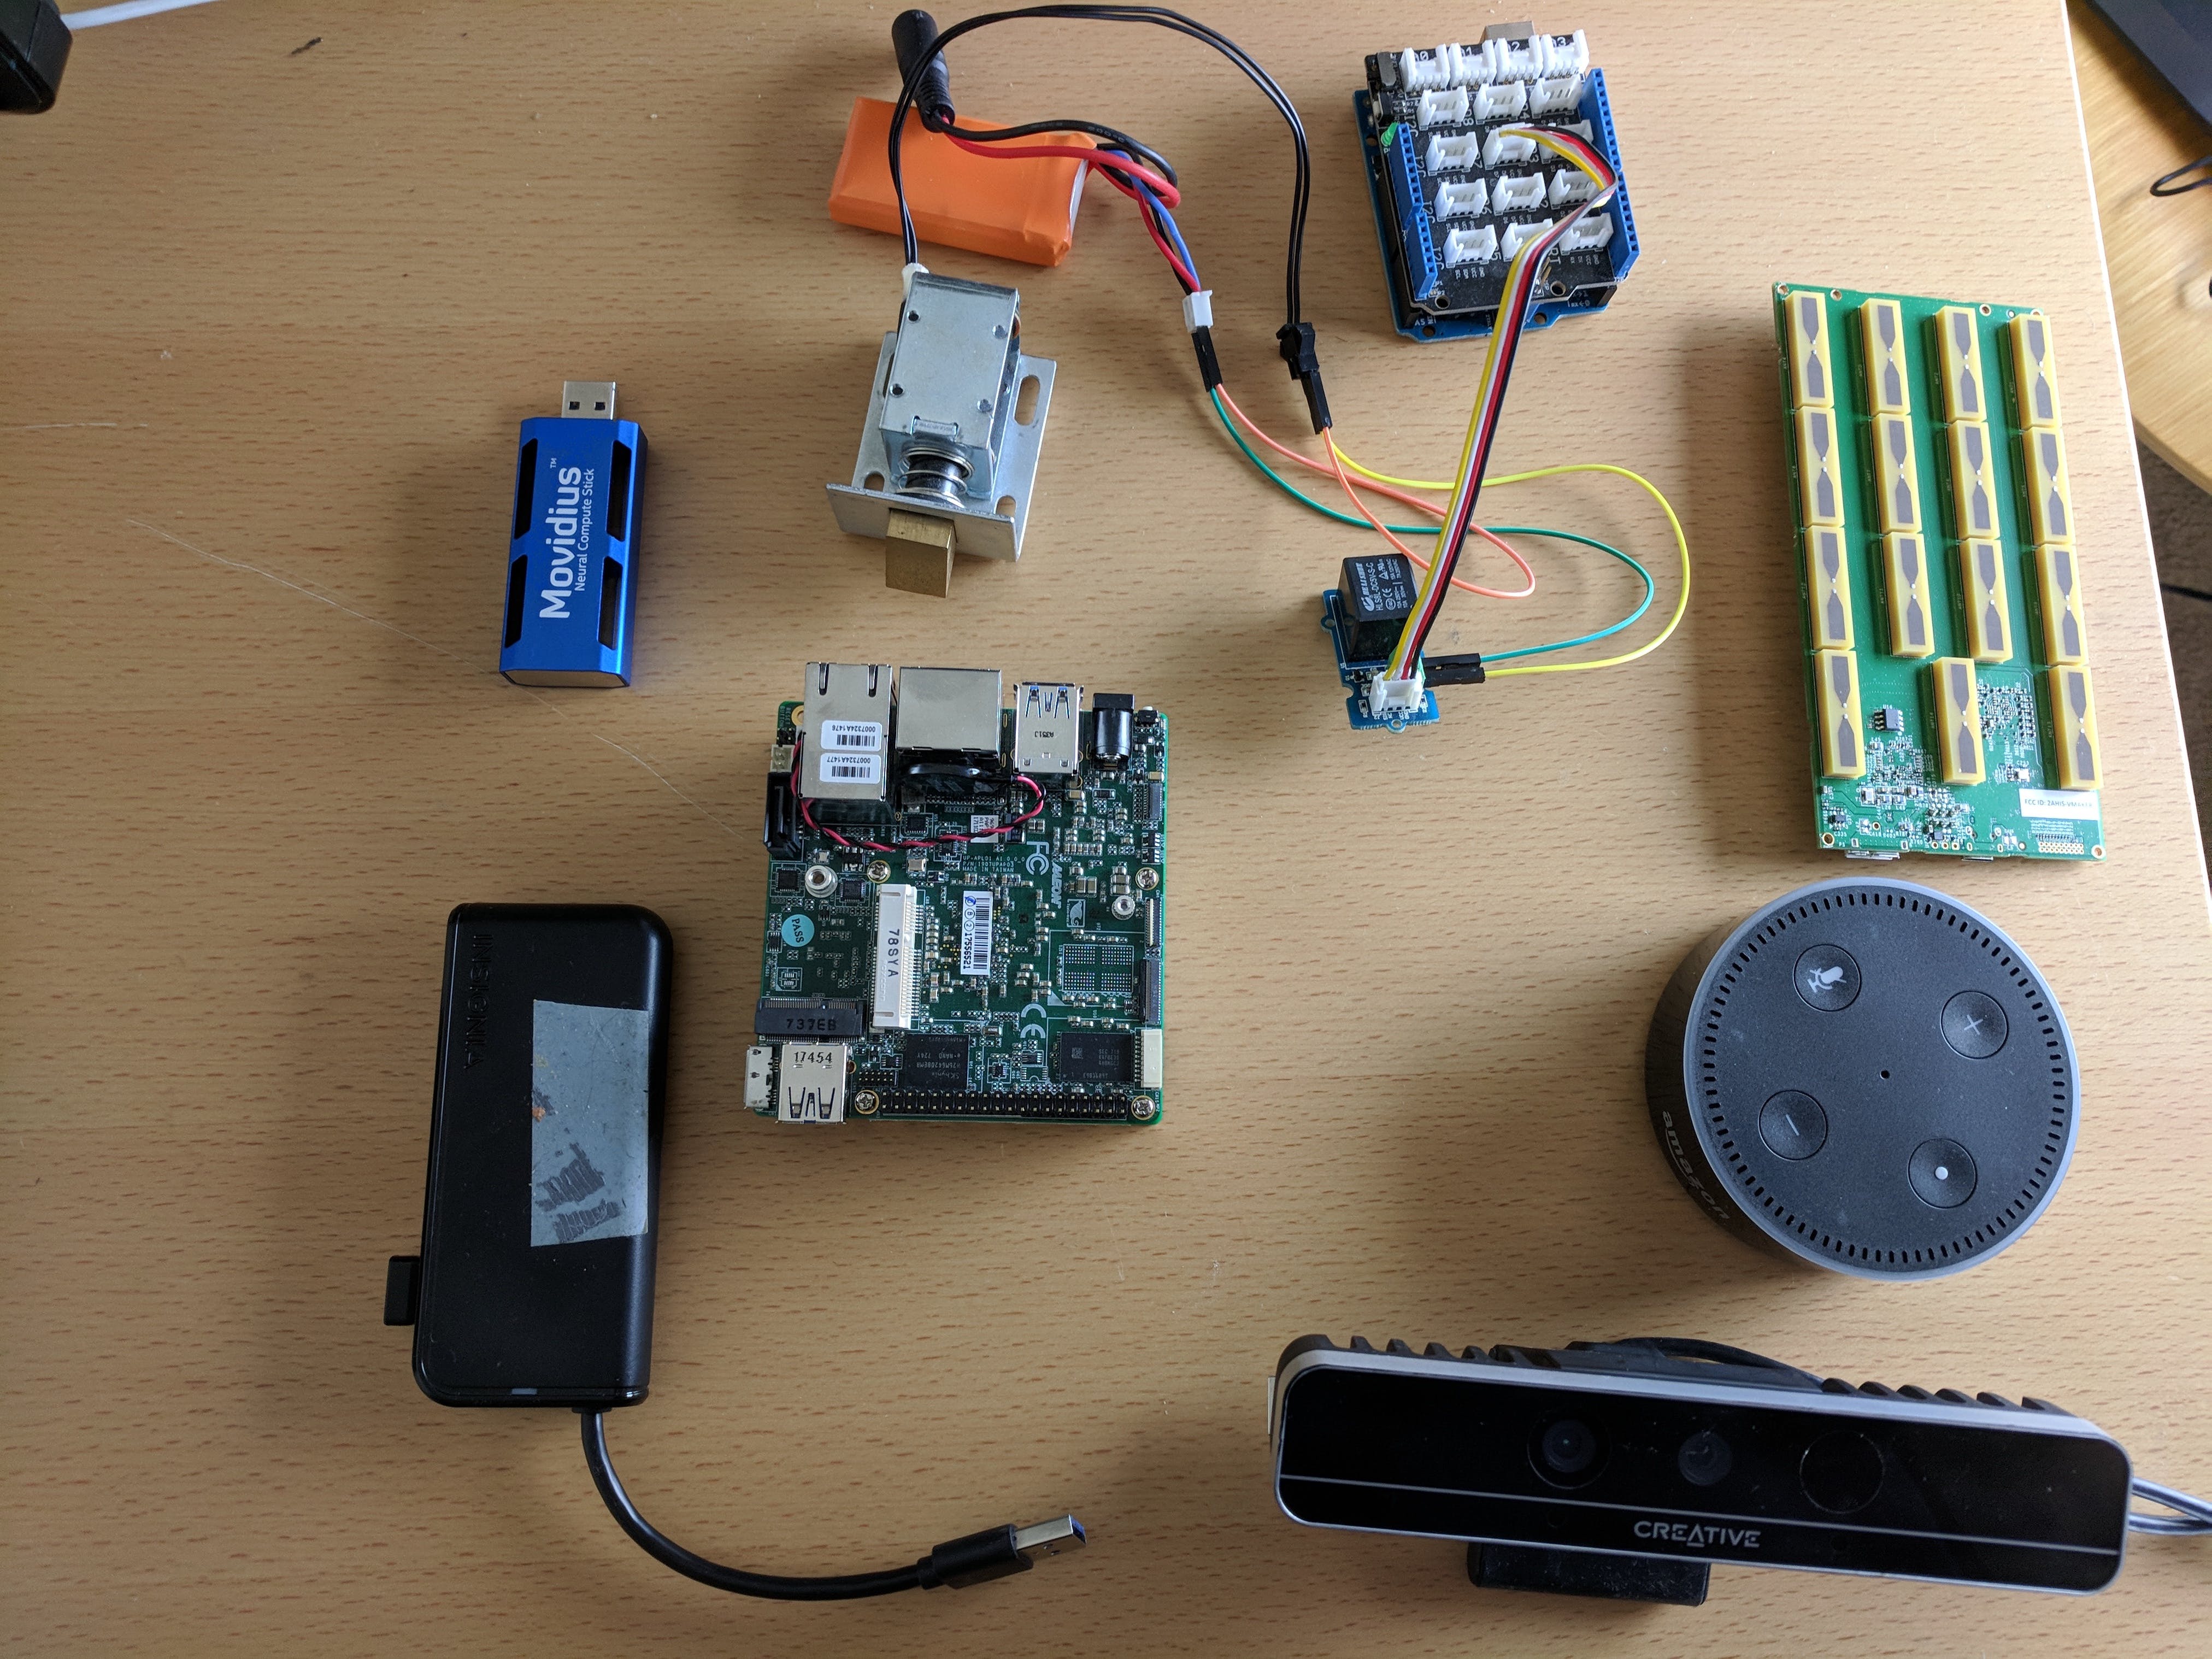
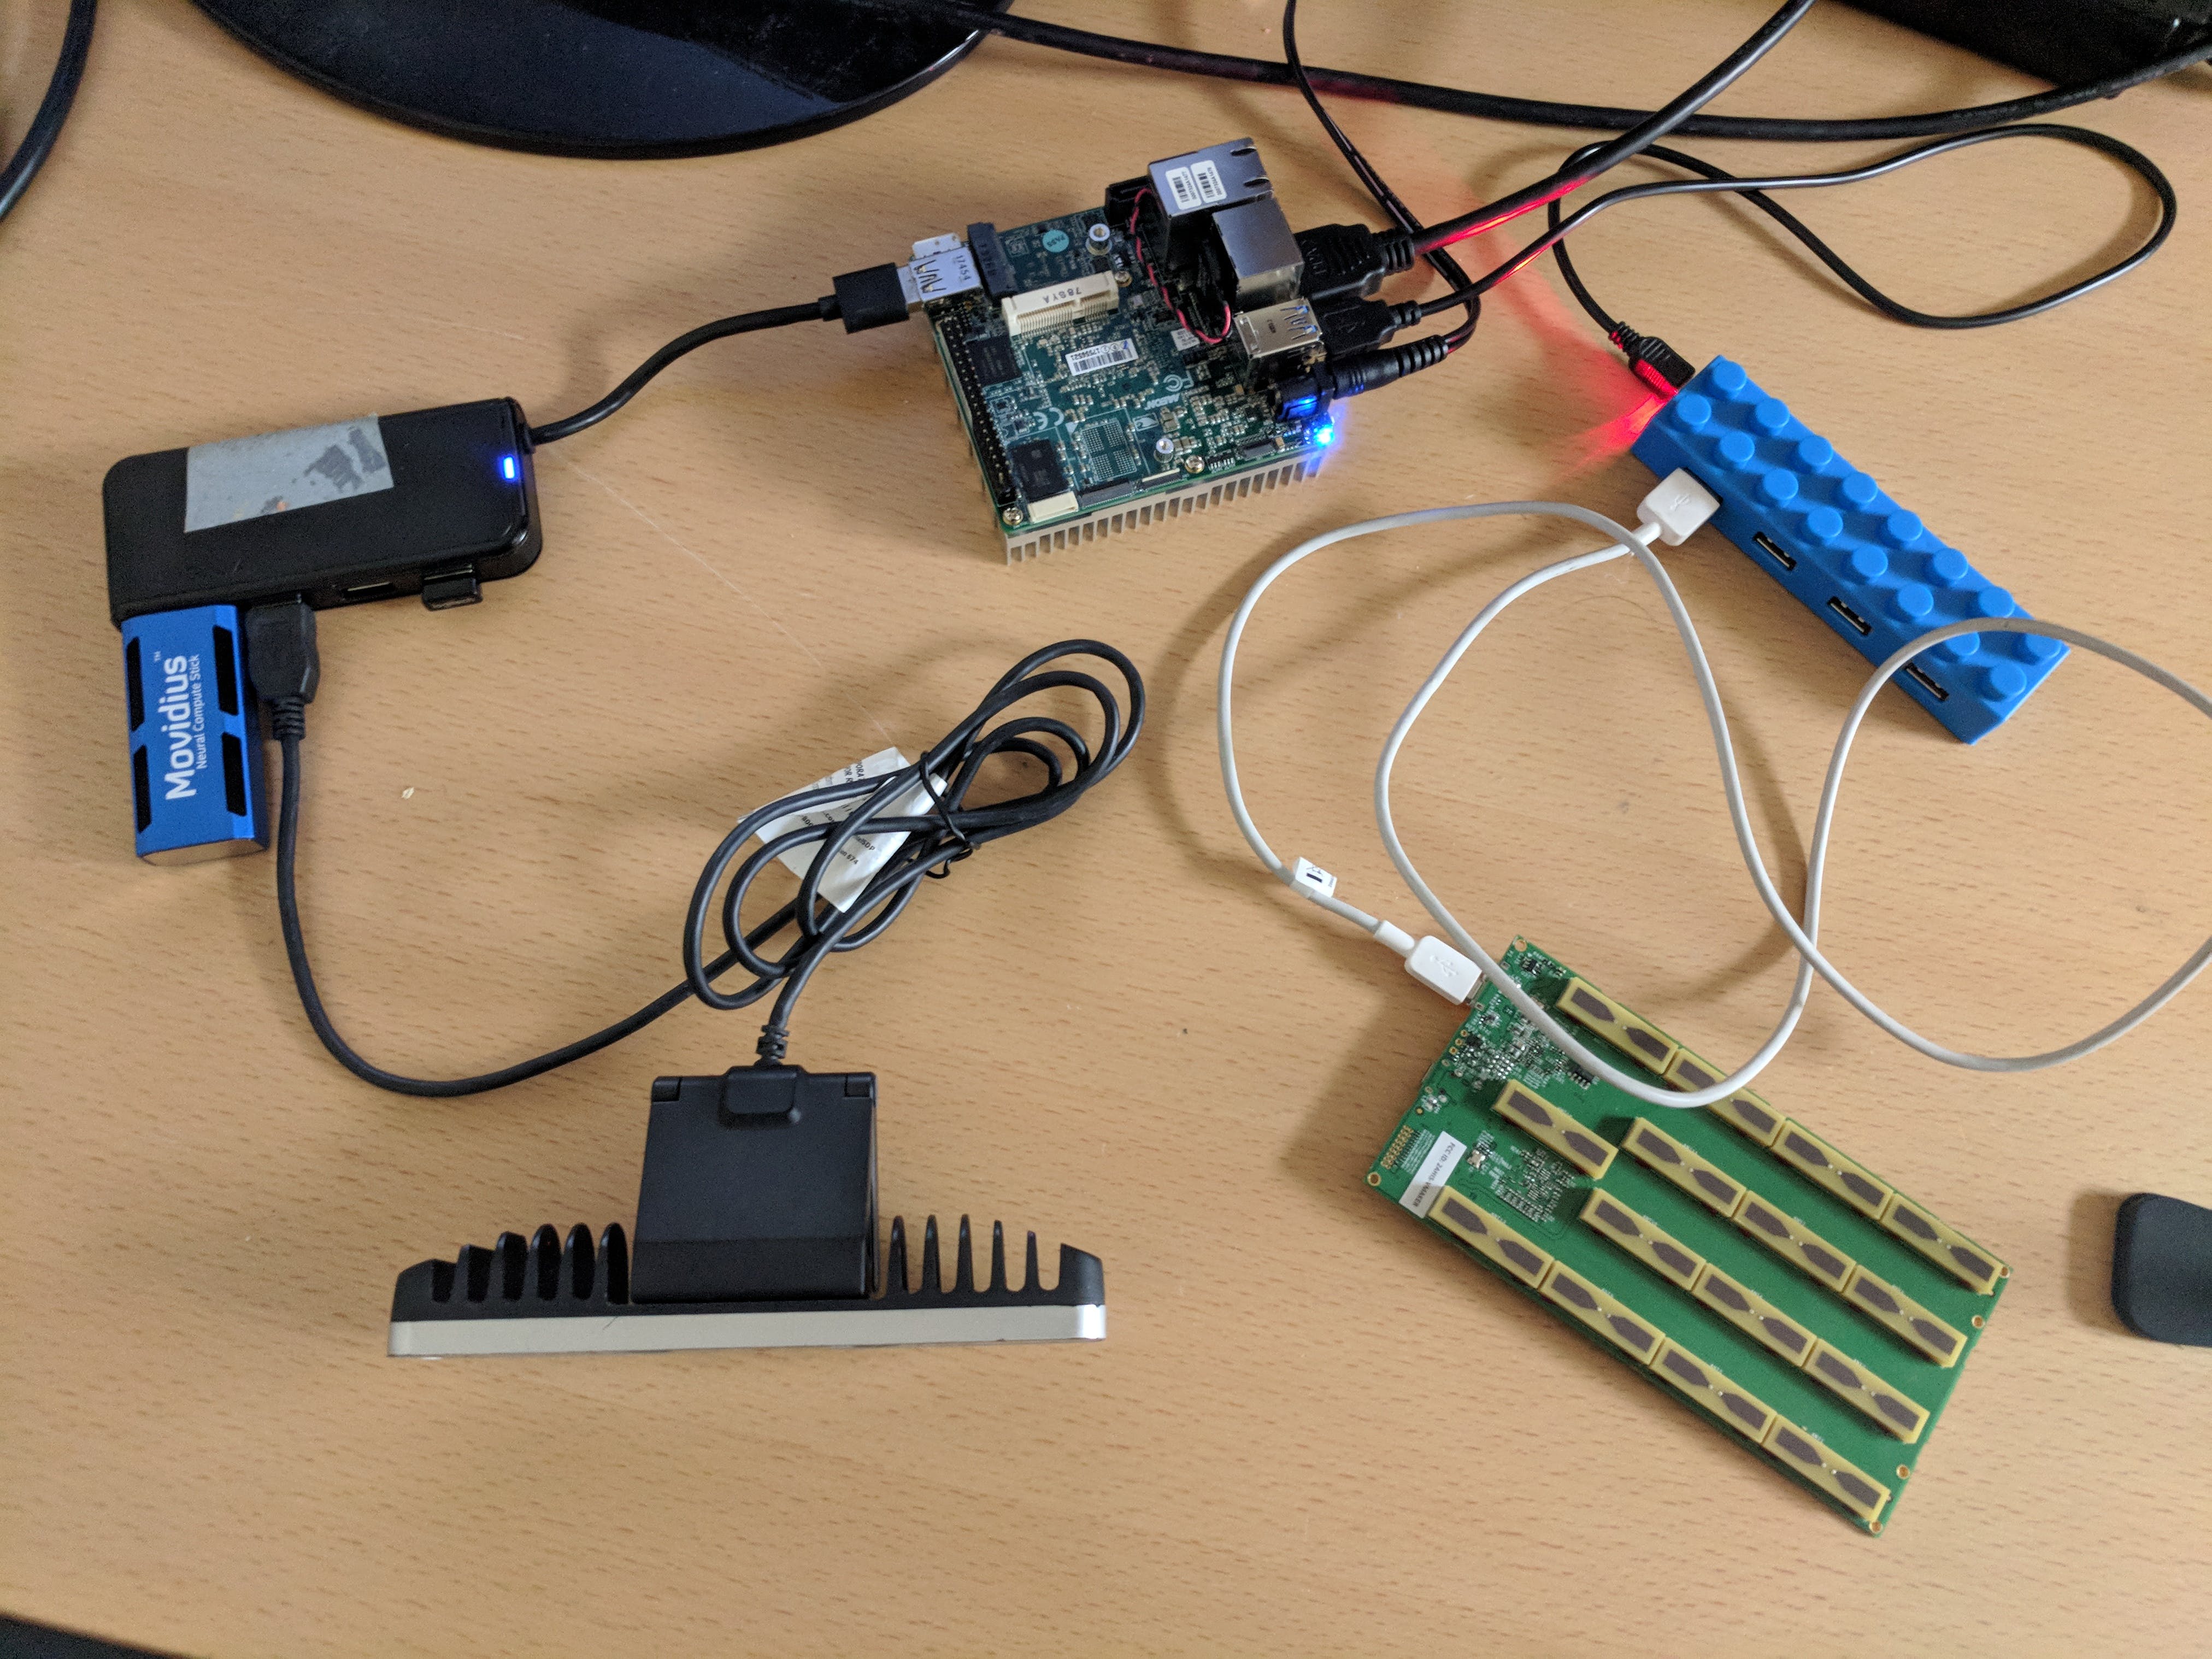
第 1 步:所需设备
- Up2 Board 供电的 Intel x86(运行 Ubuntu 的设备)
- Movidius 神经计算棒
- Walabot 创作者版
- 带锁舌锁的 Arduino Uno
- 任何亚马逊 Echo
- 任何 USB 相机
注意:尝试在 Nvidia Jetson 上安装 Walabot 软件时出现问题,因为它不支持基于 arm64 的芯片。这个例子我们将使用 Up2 board + Movidius NCS。
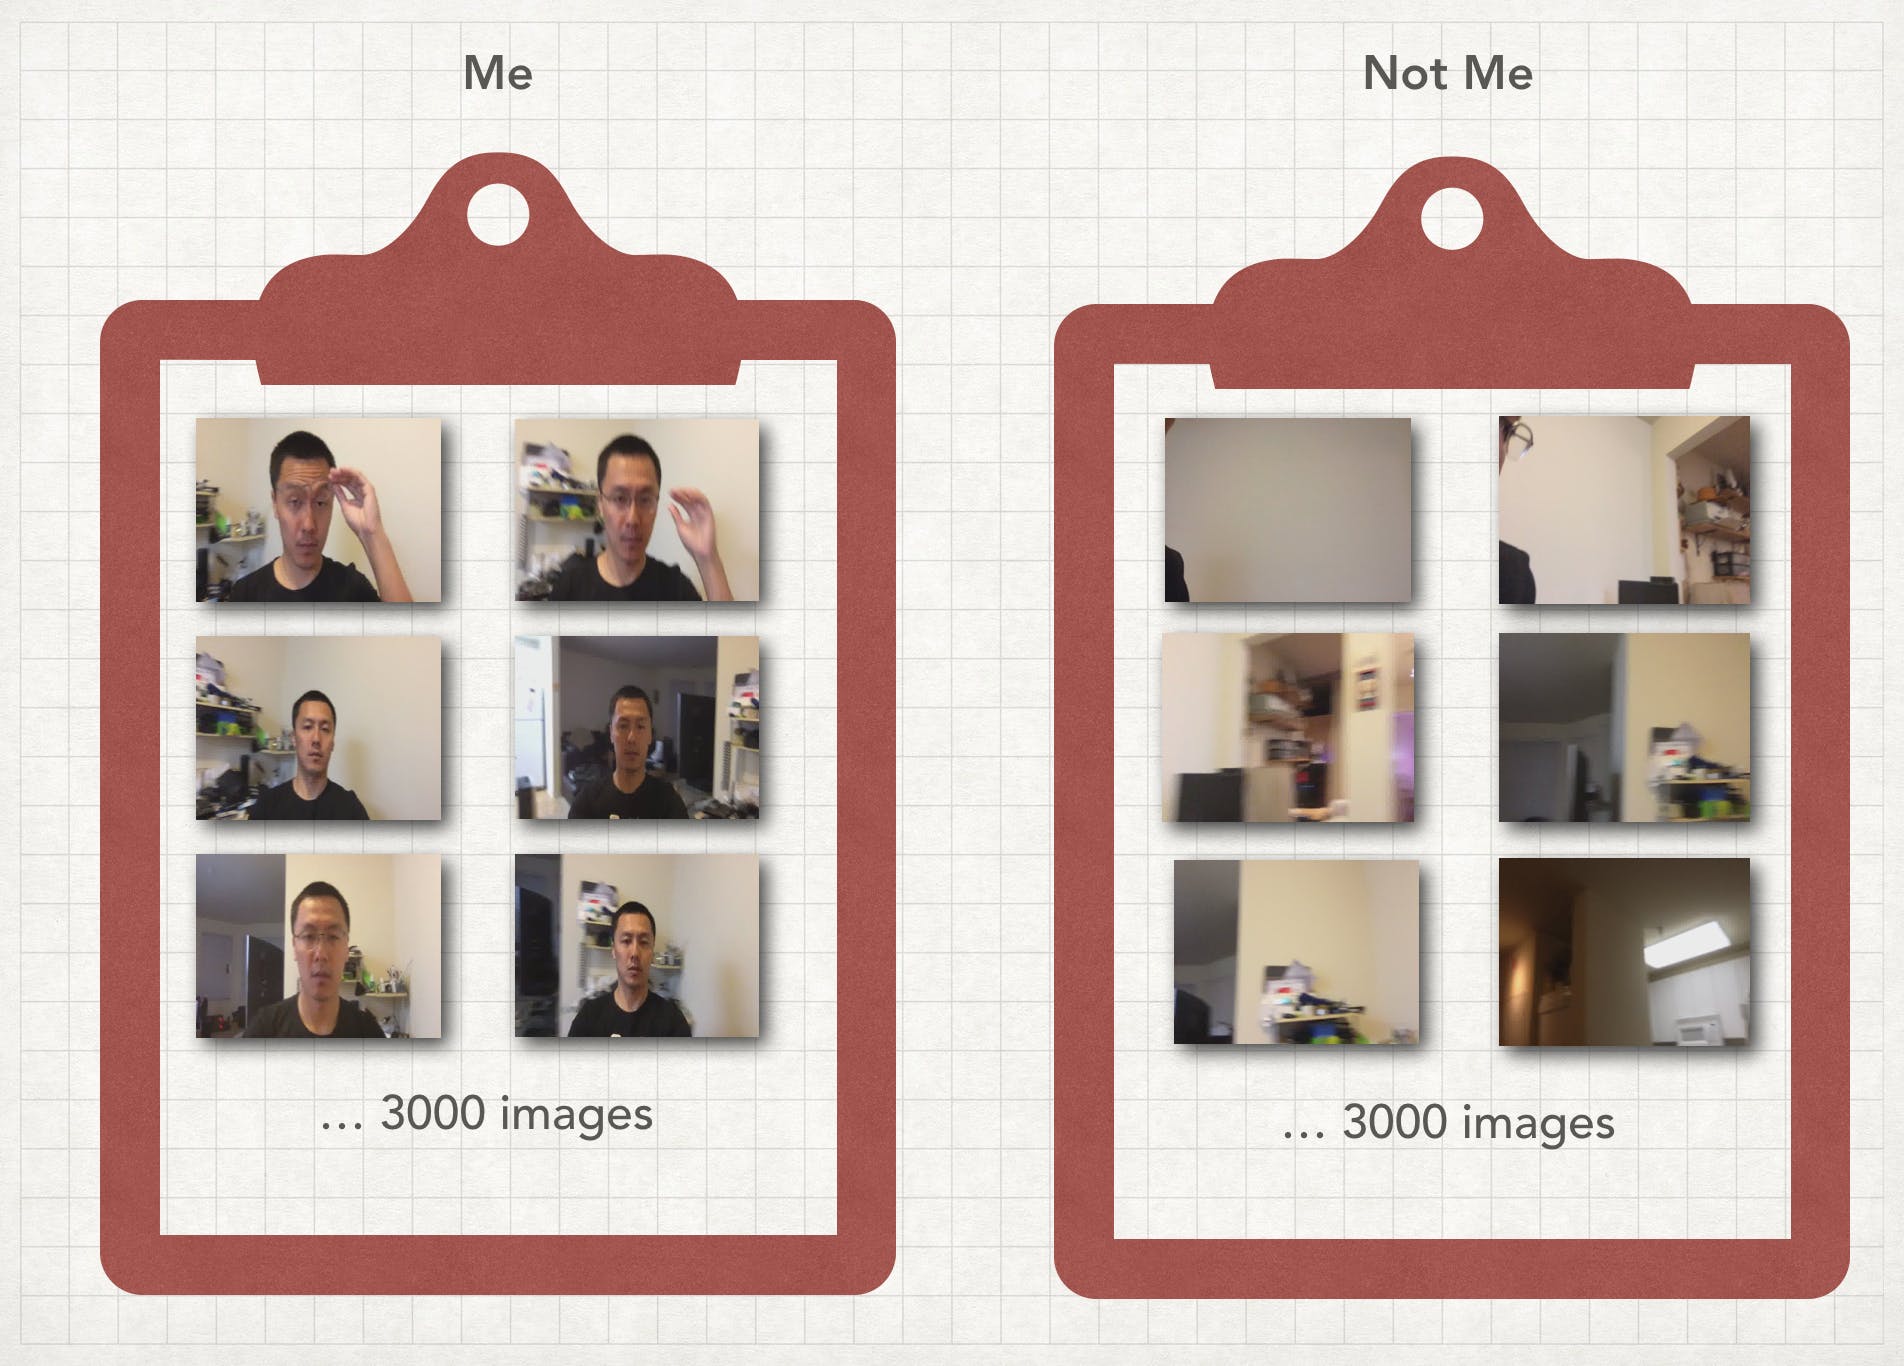
第 2 步:拍摄脸部照片
没有办法绕过它,我们需要成千上万张你自己的脸图像。您可以尝试通过 Google Photos 或 Facebook 获取它们。但是另一种训练你的脸的简单方法是简单地使用你的电脑拍摄你不同情绪的视频。
在拍摄了大约 5 分钟的自拍电影后,您可以使用Total Video Converter等软件将它们制作成图像进行训练。在此过程中,请将视频制作为 640x480,以免占用太多空间。在本指南中,我使用了大约 3000 张自己的图像,并进行了近 1 分钟的训练。
需要明确的是,我自己的 3000 张图像和环境周围随机其他物体的 3000 张图像供您测试。可能是其他人的脸,也可能是空白处。因此,本指南总共使用了 6,000 张图像。
第三步:训练你的脸
现在你有了自己的图像,。
我们使用的具体框架是 caffe,有很多方法可以训练模型,但我们可以使用一些具有正确参数的开源方法。对于这个项目,我利用了一个位于https://github.com/hqli/face_recognition的开源项目
因此,要使其正常工作,您将需要一个安装了 GPU 或 CPU 的 Linux 操作系统。我们更喜欢使用专门为机器学习构建的 AWS 或 Azure 机器。 英特尔 Devcloud还提供免费集群供您训练。
将图像上传到服务器,首先我们可以训练 3000 个自己的人脸图像和 3000 个别人的人脸图像。让我们将文件夹放在 face_training 下,以便我们轻松理解它。
/home/ubuntu/face_training
使用代码中附带的 train_lmdb.py,您将能够创建训练所需的 LMDB 图像数据库。
我们还可以通过以下命令获取模型,以在 png 视图中获取 caffe 模型
python /opt/caffe/build/tools/draw_net.py /home/ubuntu/face_training/deepID_solver.prototxt /home/ubuntu/face_training/caffe_model_face.png

之后我们需要计算平均图像(请使用您自己的 caffe 文件夹来启动 caffe)。这用于从每个输入图像中减去平均图像,以确保每个特征像素的均值为零。
/opt/caffe/build/tools/compute_image_mean -backend=lmdb /home/ubuntu/face_training/input/train_lmdb /home/ubuntu/face_training/input/mean.binaryproto
我们可以更改 face_recognition 的求解器和 deepID_train_test_2.prototxt,可以看到源代码文件并运行以下命令。
/opt/caffe/build/tools/caffe train --solver /home/ubuntu/face_training/deepID_solver.prototxt 2>&1 | tee /home/ubuntu/face_training/deepID_model_train.log
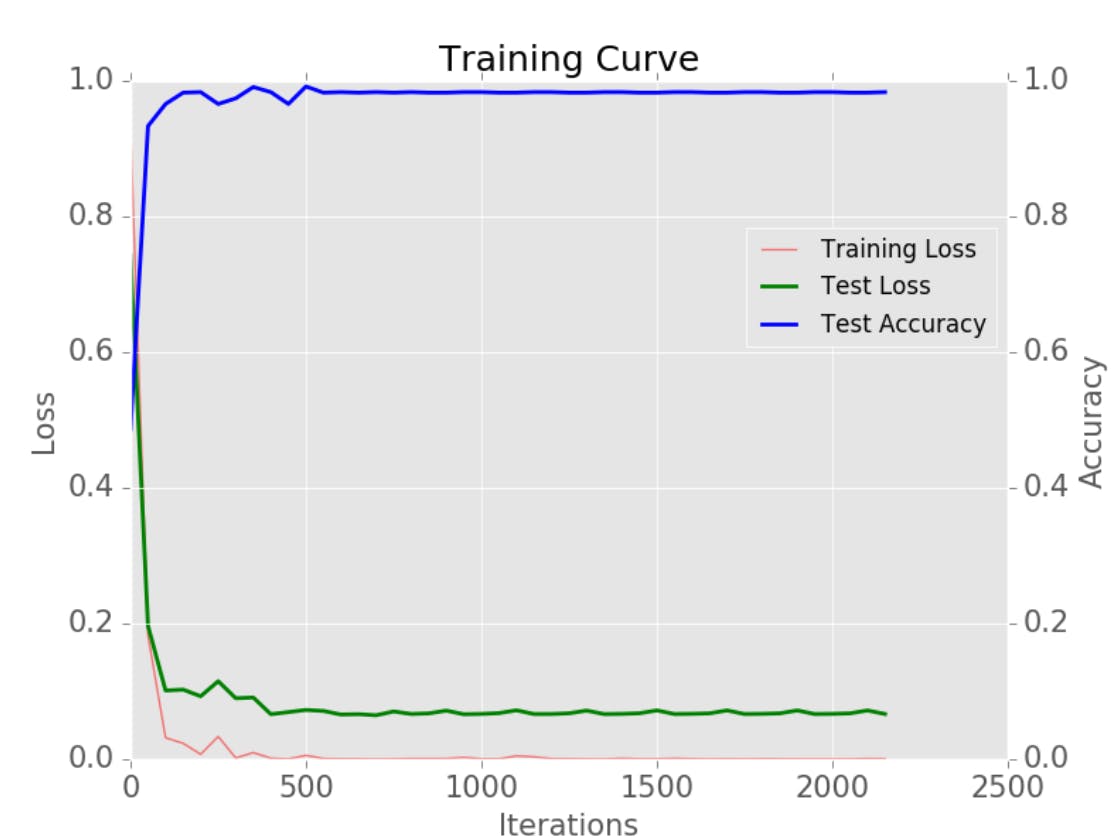
经过 2000 次迭代后,您应该拥有一个可用于训练的 AI 快照模型。
运行以下命令以获取训练曲线
python plot_learning_curve.py ~/caffe_model_face/model_face_train.log ~/caffe_model_face/caffe_model_face_learning_curve.png
第 4 步:使用 Movidius NCS SDK 设置 Up2 Board
Up2 板已经安装在 Ubuntu 上。但万一您想要全新安装,您可以按照以下说明进行操作
设置好 Up2 板后,我们可以登录到 Ubuntu 并从以下位置安装 movidius
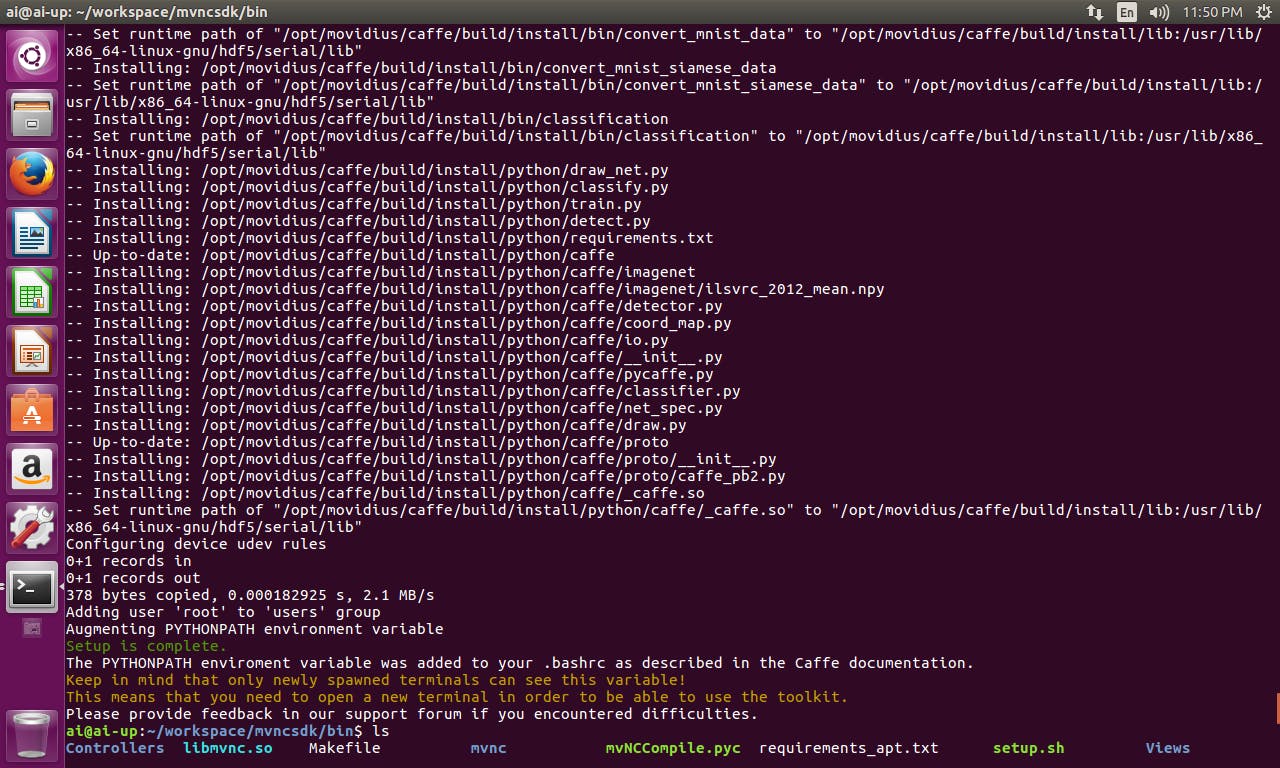
这一步需要我们为 Up2 板做好准备,从安装 NCS SDK 开始,我们已经安装了 caffe 并准备好运行。我们需要以下文件
deepID_deploy.prototxt 来自源代码(最初来自 https://github.com/hqli/face_recognition),更改 num_output: 2 或您正在使用的任何面部数量。
categories.txt创建一个文件,使第一行未知,第二行您。
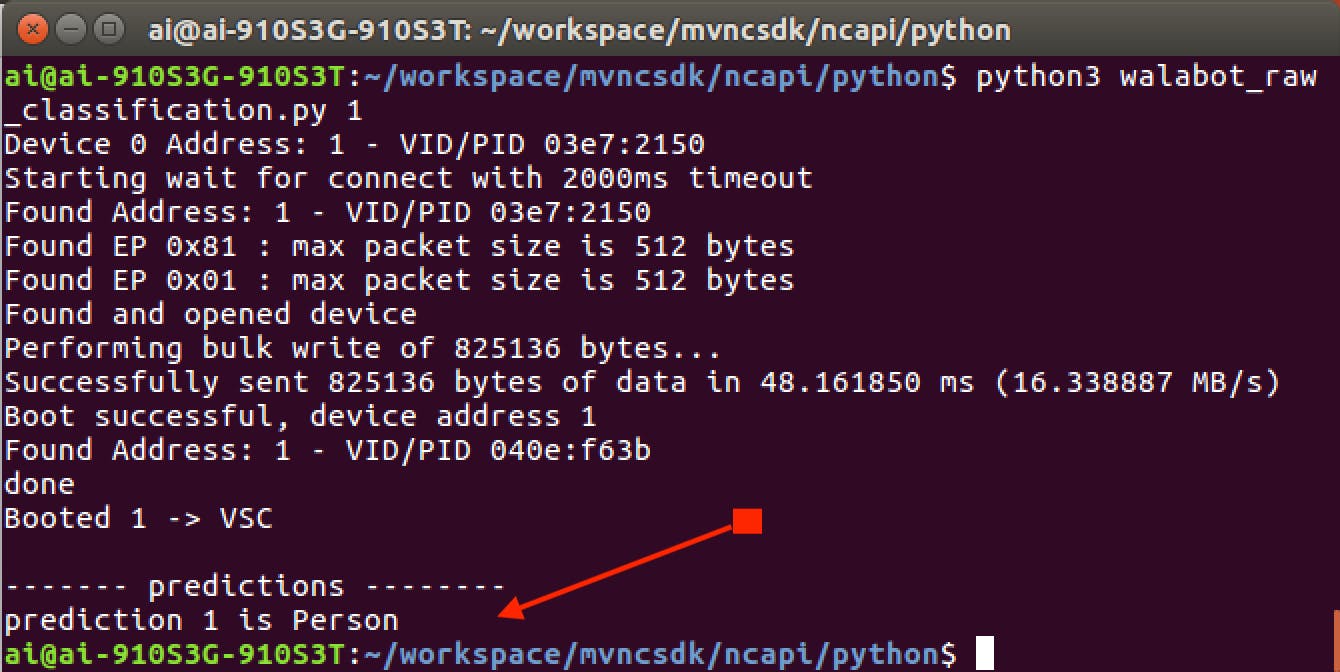
转到 FaceNet 文件夹并从 bin 文件夹运行 mvNCCompile.pyc
python3 ../../../bin/mvNCCompile.pyc deepID_deploy.prototxt -w snapshot_iter_300.caffemodel
这将为您生成您需要的图形文件,只需复制 inputsize.txt 和 stat.txt,我们就可以试一试,我们的程序将运行
python ncs_face.py
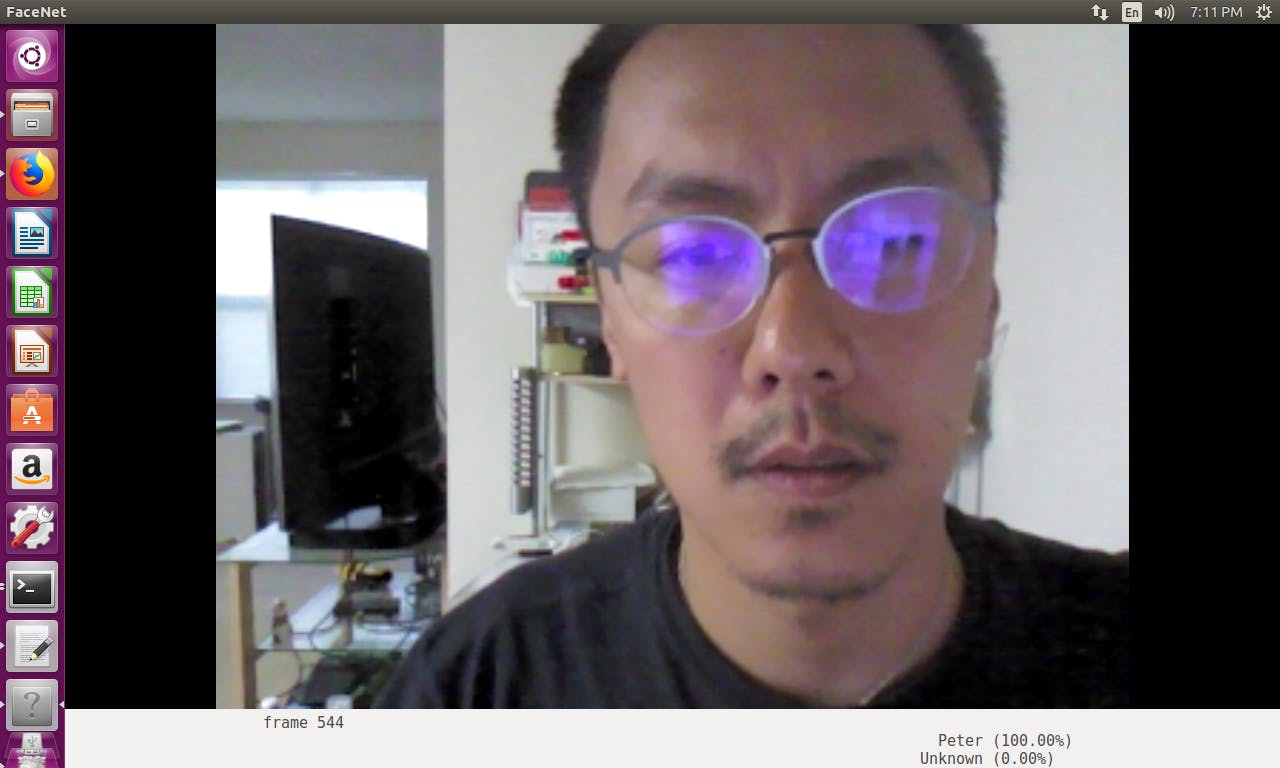
第 5 步:设置 Walabot 进行人员检测
目前最大的问题之一是人工智能可以在 2 维空间中识别你的脸,但在 3 维空间中它不知道你的脸。Walabot 在这里发挥着至关重要的作用,以确保有人不只是展示您的照片并解锁门闩。
Walabot API,以便将其导入 python 项目。网站上安装 Walabot API 的部分存在错误https://api.walabot.com/_pythonapi.html#_installingwalabotapi它指出
python -m pip “/usr/share/walabot/python/WalabotAPI-1.0.21.tar.gz”
那应该是
python3 -m pip install "/usr/share/walabot/python/WalabotAPI-1.0.21.zip"
通过 USB 2 连接 Walabot Maker,我无法让 usb3 工作,但 usb2 可以正常连接到 linux。由于 Joule 只有一个 USB3 端口,因此在此处连接一个额外的 USB2 端口以容纳 Walabot Maker。
通过在文件夹中运行以下命令来测试 Walabot 项目,例如https://github.com/Walabot-Projects/Walabot-SensorTargets
python SensorTargets.py
这应该给你一个很好的测试,看看 Walabot 是否正确运行,以及如何测量你想要的东西的距离。
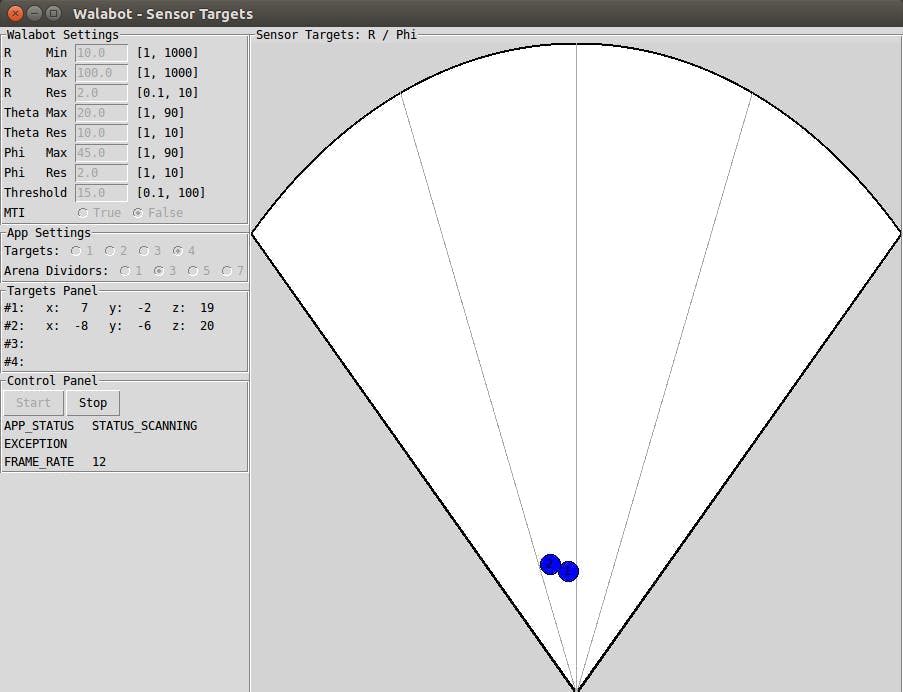
DistanceMeasure 示例在测量上并不太一致,zPosCm 似乎非常准确,因此我决定使用 zPosCM 进行演示。因为假面部不会通过相同的 zPosCM,而且在它之上,我们还可以检测呼吸,以确保那里有人。但是对于这个例子,我们只是要尝试 zPosCM。在这种情况下,将修改 ncs_thread_model.py 以便我们可以使用 Walabot Radar 信息以及 ncs_thread AI 信息。

步骤 5B 可选:使用 Walabot 雷达添加呼吸检测
或者,我们可以使用 Walabot 来检测人是否在呼吸,这样我们可以为用户增加额外的安全性。
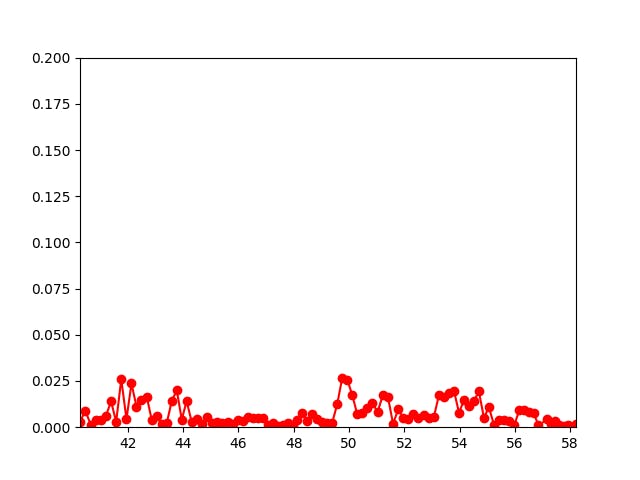
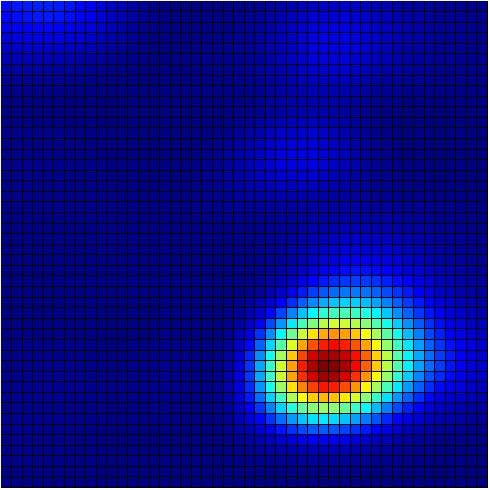
当一个人呼吸时,我们会通过 Walabot Radar 检测到上下波动的能量峰值,如下图所示。特别是在雷达的近距离内。
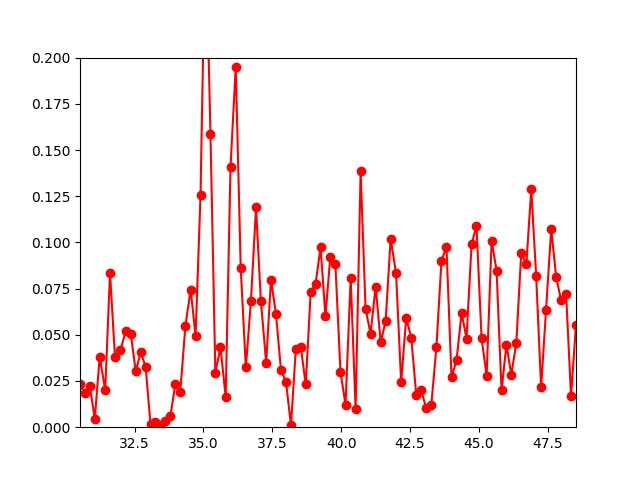
当物体假装在雷达前面时,它会显示在能级上。下图是通过将计算机屏幕直接放在雷达前面来完成的。
代码作为“Walabot Breath Detection”附加,您可以使用以下代码。首先,我们可以通过检查数据的上下波动而不是保持平稳来检测人是否在呼吸。
#!/usr/bin/env python3
from __future__ import print_function # WalabotAPI works on both Python 2 an 3.
from sys import platform
from os import system
from imp import load_source
from os.path import join
import time, random
import math
from collections import deque
import urllib.request
modulePath = join('/usr', 'share', 'walabot', 'python', 'WalabotAPI.py')
wlbt = load_source('WalabotAPI', modulePath)
wlbt.Init()
start = time.time()
class RealtimePlot:
  def __init__(self, axes, max_entries =100):
      self.axis_x = deque(maxlen=max_entries)
      self.axis_y = deque(maxlen=max_entries)
      self.axes = axes
      self.max_entries = max_entries
      self.lineplot, = axes.plot([], [], "ro-")
      self.axes.set_autoscaley_on(True)
  def add(self, x, y):
      self.axis_x.append(x)
      self.axis_y.append(y)
      self.lineplot.set_data(self.axis_x, self.axis_y)
      self.axes.set_xlim(self.axis_x[0], self.axis_x[-1] + 1e-15)
      self.axes.set_ylim(0, 0.2)
      self.axes.relim(); self.axes.autoscale_view() # rescale the y-axis
  def animate(self, figure, callback, interval = 50):
      import matplotlib.animation as animation
      def wrapper(frame_index):
          self.add(*callback(frame_index))
          self.axes.relim(); self.axes.autoscale_view() # rescale the y-axis
          return self.lineplot
      animation.FuncAnimation(figure, wrapper, interval=interval)
def main():
  from matplotlib import pyplot as plt
  # Walabot_SetArenaR - input parameters
  minInCm, maxInCm, resInCm = 30, 150, 1
  # Walabot_SetArenaTheta - input parameters
  minIndegrees, maxIndegrees, resIndegrees = -4, 4, 2
  # Walabot_SetArenaPhi - input parameters
  minPhiInDegrees, maxPhiInDegrees, resPhiInDegrees = -4, 4, 2
  # Configure Walabot database install location (for windows)
  wlbt.SetSettingsFolder()
  # 1) Connect : Establish communication with walabot.
  wlbt.ConnectAny()
  # 2) Configure: Set scan profile and arena
  # Set Profile - to Sensor-Narrow.
  wlbt.SetProfile(wlbt.PROF_SENSOR_NARROW)
  # Setup arena - specify it by Cartesian coordinates.
  wlbt.SetArenaR(minInCm, maxInCm, resInCm)
  # Sets polar range and resolution of arena (parameters in degrees).
  wlbt.SetArenaTheta(minIndegrees, maxIndegrees, resIndegrees)
  # Sets azimuth range and resolution of arena.(parameters in degrees).
  wlbt.SetArenaPhi(minPhiInDegrees, maxPhiInDegrees, resPhiInDegrees)
  # Dynamic-imaging filter for the specific frequencies typical of breathing
  wlbt.SetDynamicImageFilter(wlbt.FILTER_TYPE_DERIVATIVE)
  # 3) Start: Start the system in preparation for scanning.
  wlbt.Start()
  fig, axes = plt.subplots()
  display = RealtimePlot(axes)
  display.animate(fig, lambda frame_index: (time.time() - start, random.random() * 100))
  #plt.show()
  #fig, axes = plt.subplots()
  #display = RealtimePlot(axes)
  while True:
      appStatus, calibrationProcess = wlbt.GetStatus()
      # 5) Trigger: Scan(sense) according to profile and record signals
      # to be available for processing and retrieval.
      wlbt.Trigger()
      # 6) Get action: retrieve the last completed triggered recording
      energy = wlbt.GetImageEnergy()
      display.add(time.time() - start, energy * 100)
      #This is just for prototype purposes, we will gather the data in bulk and send them to the server in the future
      plt.pause(0.001)
if __name__ == "__main__": main()
这是机器学习和深度学习之间的区别,在机器学习中,我们可以在这里编写一个算法来确定什么是呼吸,什么不是,随着时间的推移改进算法。我们也可以使用深度学习神经网络,按照步骤 1 到 3,使用神经计算棒让 AI 判断哪个在呼吸,哪个没有。
步骤 5C 可选:为 Walabot 添加能量
如前所述,我们可以在原始图像上运行深度学习算法来检测能量,也可以按照步骤 1 到 3 进行。
您可以使用以下代码获取原始图像,然后使用 NCS 对图像本身进行分类。这将需要第二个 Movidius NCS,因为第一个 NCS 正在运行面部分类。
在这种情况下需要的特定代码是,这允许将 jpg 流式传输到 raw.jpg
   def update(self, rawImage, lenOfPhi, lenOfR):
       """ Updates the canvas cells colors acorrding to a given rawImage
           matrix and it's dimensions.
           Arguments:
               rawImage    A 2D matrix contains the current rawImage slice.
               lenOfPhi    Number of cells in Phi axis.
               lenOfR      Number of cells in R axis.
       """
       for i in range(lenOfPhi):
           for j in range(lenOfR):
               self.canvas.itemconfigure(
                   self.cells[lenOfPhi-i-1][j],
                   fill='#'+COLORS[rawImage[i][j]])
       ps = self.canvas.postscripot(colormode = 'color')
       im = Image.open(io.Bytes.IO(ps.encode('utf-8)))
       im.save('raw.jpg')
RawImage 的完整代码可以在
from __future__ import print_function, division
import WalabotAPI as wlbt
import io
from PIL import Image
try:  # for Python 2
   import Tkinter as tk
except ImportError:  # for Python 3
   import tkinter as tk
try:  # for Python 2
   range = xrange
except NameError:
   pass
COLORS = [
   "000083", "000087", "00008B", "00008F", "000093", "000097", "00009B",
   "00009F", "0000A3", "0000A7", "0000AB", "0000AF", "0000B3", "0000B7",
   "0000BB", "0000BF", "0000C3", "0000C7", "0000CB", "0000CF", "0000D3",
   "0000D7", "0000DB", "0000DF", "0000E3", "0000E7", "0000EB", "0000EF",
   "0000F3", "0000F7", "0000FB", "0000FF", "0003FF", "0007FF", "000BFF",
   "000FFF", "0013FF", "0017FF", "001BFF", "001FFF", "0023FF", "0027FF",
   "002BFF", "002FFF", "0033FF", "0037FF", "003BFF", "003FFF", "0043FF",
   "0047FF", "004BFF", "004FFF", "0053FF", "0057FF", "005BFF", "005FFF",
   "0063FF", "0067FF", "006BFF", "006FFF", "0073FF", "0077FF", "007BFF",
   "007FFF", "0083FF", "0087FF", "008BFF", "008FFF", "0093FF", "0097FF",
   "009BFF", "009FFF", "00A3FF", "00A7FF", "00ABFF", "00AFFF", "00B3FF",
   "00B7FF", "00BBFF", "00BFFF", "00C3FF", "00C7FF", "00CBFF", "00CFFF",
   "00D3FF", "00D7FF", "00DBFF", "00DFFF", "00E3FF", "00E7FF", "00EBFF",
   "00EFFF", "00F3FF", "00F7FF", "00FBFF", "00FFFF", "03FFFB", "07FFF7",
   "0BFFF3", "0FFFEF", "13FFEB", "17FFE7", "1BFFE3", "1FFFDF", "23FFDB",
   "27FFD7", "2BFFD3", "2FFFCF", "33FFCB", "37FFC7", "3BFFC3", "3FFFBF",
   "43FFBB", "47FFB7", "4BFFB3", "4FFFAF", "53FFAB", "57FFA7", "5BFFA3",
   "5FFF9F", "63FF9B", "67FF97", "6BFF93", "6FFF8F", "73FF8B", "77FF87",
   "7BFF83", "7FFF7F", "83FF7B", "87FF77", "8BFF73", "8FFF6F", "93FF6B",
   "97FF67", "9BFF63", "9FFF5F", "A3FF5B", "A7FF57", "ABFF53", "AFFF4F",
   "B3FF4B", "B7FF47", "BBFF43", "BFFF3F", "C3FF3B", "C7FF37", "CBFF33",
   "CFFF2F", "D3FF2B", "D7FF27", "DBFF23", "DFFF1F", "E3FF1B", "E7FF17",
   "EBFF13", "EFFF0F", "F3FF0B", "F7FF07", "FBFF03", "FFFF00", "FFFB00",
   "FFF700", "FFF300", "FFEF00", "FFEB00", "FFE700", "FFE300", "FFDF00",
   "FFDB00", "FFD700", "FFD300", "FFCF00", "FFCB00", "FFC700", "FFC300",
   "FFBF00", "FFBB00", "FFB700", "FFB300", "FFAF00", "FFAB00", "FFA700",
   "FFA300", "FF9F00", "FF9B00", "FF9700", "FF9300", "FF8F00", "FF8B00",
   "FF8700", "FF8300", "FF7F00", "FF7B00", "FF7700", "FF7300", "FF6F00",
   "FF6B00", "FF6700", "FF6300", "FF5F00", "FF5B00", "FF5700", "FF5300",
   "FF4F00", "FF4B00", "FF4700", "FF4300", "FF3F00", "FF3B00", "FF3700",
   "FF3300", "FF2F00", "FF2B00", "FF2700", "FF2300", "FF1F00", "FF1B00",
   "FF1700", "FF1300", "FF0F00", "FF0B00", "FF0700", "FF0300", "FF0000",
   "FB0000", "F70000", "F30000", "EF0000", "EB0000", "E70000", "E30000",
   "DF0000", "DB0000", "D70000", "D30000", "CF0000", "CB0000", "C70000",
   "C30000", "BF0000", "BB0000", "B70000", "B30000", "AF0000", "AB0000",
   "A70000", "A30000", "9F0000", "9B0000", "970000", "930000", "8F0000",
   "8B0000", "870000", "830000", "7F0000"]
APP_X, APP_Y = 50, 50  # location of top-left corner of window
CANVAS_LENGTH = 650  # in pixels
class RawImageApp(tk.Frame):
   """ Main app class.
   """
   def __init__(self, master):
       """ Init the GUI components and the Walabot API.
       """
       tk.Frame.__init__(self, master)
       self.canvasPanel = CanvasPanel(self)
       self.wlbtPanel = WalabotPanel(self)
       self.ctrlPanel = ControlPanel(self)
       self.canvasPanel.pack(side=tk.RIGHT, anchor=tk.NE)
       self.wlbtPanel.pack(side=tk.TOP, anchor=tk.W, fill=tk.BOTH, pady=10)
       self.ctrlPanel.pack(side=tk.TOP, anchor=tk.W, fill=tk.BOTH, pady=10)
       self.wlbt = Walabot()
   def initAppLoop(self):
       if self.wlbt.isConnected():
           self.ctrlPanel.statusVar.set('STATUS_CONNECTED')
           self.update_idletasks()
           params = self.wlbtPanel.getParams()
           self.wlbt.setParams(*params)
           self.wlbtPanel.setParams(*self.wlbt.getArenaParams())
           if not params[4]:  # equals: if not mtiMode
               self.ctrlPanel.statusVar.set('STATUS_CALIBRATING')
               self.update_idletasks()
               self.wlbt.calibrate()
           self.lenOfPhi, self.lenOfR = self.wlbt.getRawImageSliceDimensions()
           self.canvasPanel.setGrid(self.lenOfPhi, self.lenOfR)
           self.wlbtPanel.changeEntriesState('disabled')
           self.loop()
       else:
           self.ctrlPanel.statusVar.set('STATUS_DISCONNECTED')
   def loop(self):
       self.ctrlPanel.statusVar.set('STATUS_SCANNING')
       rawImage = self.wlbt.triggerAndGetRawImageSlice()
       self.canvasPanel.update(rawImage, self.lenOfPhi, self.lenOfR)
       self.ctrlPanel.fpsVar.set(self.wlbt.getFps())
       self.cyclesId = self.after_idle(self.loop)
class WalabotPanel(tk.LabelFrame):
   class WalabotParameter(tk.Frame):
       """ The frame that sets each Walabot parameter line.
       """
       def __init__(self, master, varVal, minVal, maxVal, defaultVal):
           """ Init the Labels (parameter name, min/max value) and entry.
           """
           tk.Frame.__init__(self, master)
           tk.Label(self, text=varVal).pack(side=tk.LEFT, padx=(0, 5), pady=1)
           self.minVal, self.maxVal = minVal, maxVal
           self.var = tk.StringVar()
           self.var.set(defaultVal)
           self.entry = tk.Entry(self, width=7, textvariable=self.var)
           self.entry.pack(side=tk.LEFT)
           self.var.trace("w", lambda a, b, c, var=self.var: self.validate())
           txt = "[{}, {}]".format(minVal, maxVal)
           tk.Label(self, text=txt).pack(side=tk.LEFT, padx=(5, 20), pady=1)
       def validate(self):
           """ Checks that the entered value is a valid number and between
               the min/max values. Change the font color of the value to red
               if False, else to black (normal).
           """
           num = self.var.get()
           try:
               num = float(num)
               if num < self.minVal or num > self.maxVal:
                   self.entry.config(fg='#'+COLORS[235])
                   return
               self.entry.config(fg='gray1')
           except ValueError:
               self.entry.config(fg='#'+COLORS[235])
               return
       def get(self):
           """ Returns the entry value as a float.
           """
           return float(self.var.get())
       def set(self, value):
           """ Sets the entry value according to a given one.
           """
           self.var.set(value)
       def changeState(self, state):
           """ Change the entry state according to a given one.
           """
           self.entry.configure(state=state)
   class WalabotParameterMTI(tk.Frame):
       """ The frame that control the Walabot MTI parameter line.
       """
       def __init__(self, master):
           """ Init the MTI line (label, radiobuttons).
           """
           tk.Frame.__init__(self, master)
           tk.Label(self, text="MTI      ").pack(side=tk.LEFT)
           self.mtiVar = tk.IntVar()
           self.mtiVar.set(0)
           self.true = tk.Radiobutton(
               self, text="True", variable=self.mtiVar, value=2)
           self.false = tk.Radiobutton(
               self, text="False", variable=self.mtiVar, value=0)
           self.true.pack(side=tk.LEFT)
           self.false.pack(side=tk.LEFT)
       def get(self):
           """ Returns the value of the pressed radiobutton.
           """
           return self.mtiVar.get()
       def set(self, value):
           """ Sets the pressed radiobutton according to a given value.
           """
           self.mtiVar.set(value)
       def changeState(self, state):
           """ Change the state of the radiobuttons according to a given one.
           """
           self.true.configure(state=state)
           self.false.configure(state=state)
   def __init__(self, master):
       tk.LabelFrame.__init__(self, master, text='Walabot Configuration')
       self.rMin = self.WalabotParameter(self, 'R     Min', 1, 1000, 10.0)
       self.rMax = self.WalabotParameter(self, 'R     Max', 1, 1000, 100.0)
       self.rRes = self.WalabotParameter(self, 'R     Res', 0.1, 10, 2.0)
       self.tMin = self.WalabotParameter(self, 'Theta Min', -90, 90, -20.0)
       self.tMax = self.WalabotParameter(self, 'Theta Max', -90, 90, 20.0)
       self.tRes = self.WalabotParameter(self, 'Theta Res', 0.1, 10, 10.0)
       self.pMin = self.WalabotParameter(self, 'Phi   Min', -90, 90, -45.0)
       self.pMax = self.WalabotParameter(self, 'Phi   Max', -90, 90, 45.0)
       self.pRes = self.WalabotParameter(self, 'Phi   Res', 0.1, 10, 2.0)
       self.thld = self.WalabotParameter(self, 'Threshold', 0.1, 100, 15.0)
       self.mti = self.WalabotParameterMTI(self)
       self.parameters = (
           self.rMin, self.rMax, self.rRes, self.tMin, self.tMax, self.tRes,
           self.pMin, self.pMax, self.pRes, self.thld, self.mti)
       for param in self.parameters:
           param.pack(anchor=tk.W)
   def getParams(self):
       rParams = (self.rMin.get(), self.rMax.get(), self.rRes.get())
       tParams = (self.tMin.get(), self.tMax.get(), self.tRes.get())
       pParams = (self.pMin.get(), self.pMax.get(), self.pRes.get())
       thldParam, mtiParam = self.thld.get(), self.mti.get()
       return rParams, tParams, pParams, thldParam, mtiParam
   def setParams(self, rParams, thetaParams, phiParams, threshold):
       self.rMin.set(rParams[0])
       self.rMax.set(rParams[1])
       self.rRes.set(rParams[2])
       self.tMin.set(thetaParams[0])
       self.tMax.set(thetaParams[1])
       self.tRes.set(thetaParams[2])
       self.pMin.set(phiParams[0])
       self.pMax.set(phiParams[1])
       self.pRes.set(phiParams[2])
       self.thld.set(threshold)
   def changeEntriesState(self, state):
       for param in self.parameters:
           param.changeState(state)
class ControlPanel(tk.LabelFrame):
   """ This class is designed to control the control area of the app.
   """
   def __init__(self, master):
       """ Initialize the buttons and the data labels.
       """
       tk.LabelFrame.__init__(self, master, text='Control Panel')
       self.buttonsFrame = tk.Frame(self)
       self.runButton, self.stopButton = self.setButtons(self.buttonsFrame)
       self.statusFrame = tk.Frame(self)
       self.statusVar = self.setVar(self.statusFrame, 'APP_STATUS', '')
       self.errorFrame = tk.Frame(self)
       self.errorVar = self.setVar(self.errorFrame, 'EXCEPTION', '')
       self.fpsFrame = tk.Frame(self)
       self.fpsVar = self.setVar(self.fpsFrame, 'FRAME_RATE', 'N/A')
       self.buttonsFrame.grid(row=0, column=0, sticky=tk.W)
       self.statusFrame.grid(row=1, columnspan=2, sticky=tk.W)
       self.errorFrame.grid(row=2, columnspan=2, sticky=tk.W)
       self.fpsFrame.grid(row=3, columnspan=2, sticky=tk.W)
   def setButtons(self, frame):
       """ Initialize the 'Start' and 'Stop' buttons.
       """
       runButton = tk.Button(frame, text='Start', command=self.start)
       stopButton = tk.Button(frame, text='Stop', command=self.stop)
       runButton.grid(row=0, column=0)
       stopButton.grid(row=0, column=1)
       return runButton, stopButton
   def setVar(self, frame, varText, default):
       """ Initialize the data frames.
       """
       strVar = tk.StringVar()
       strVar.set(default)
       tk.Label(frame, text=(varText).ljust(12)).grid(row=0, column=0)
       tk.Label(frame, textvariable=strVar).grid(row=0, column=1)
       return strVar
   def start(self):
       """ Applied when 'Start' button is pressed. Starts the Walabot and
           the app cycles.
       """
       self.master.initAppLoop()
   def stop(self):
       """ Applied when 'Stop' button in pressed. Stops the Walabot and the
           app cycles.
       """
       if hasattr(self.master, 'cyclesId'):
           self.master.after_cancel(self.master.cyclesId)
           self.master.wlbtPanel.changeEntriesState('normal')
           self.master.canvasPanel.reset()
           self.statusVar.set('STATUS_IDLE')
class CanvasPanel(tk.LabelFrame):
   """ This class is designed to control the canvas area of the app.
   """
   def __init__(self, master):
       """ Initialize the label-frame and canvas.
       """
       tk.LabelFrame.__init__(self, master, text='Raw Image Slice: R / Phi')
       self.canvas = tk.Canvas(
           self, width=CANVAS_LENGTH, height=CANVAS_LENGTH)
       self.canvas.pack()
       self.canvas.configure(background='#'+COLORS[0])
   def setGrid(self, sizeX, sizeY):
       """ Set the canvas components (rectangles), given the size of the axes.
           Arguments:
               sizeX       Number of cells in Phi axis.
               sizeY       Number of cells in R axis.
       """
       recHeight, recWidth = CANVAS_LENGTH/sizeX, CANVAS_LENGTH/sizeY
       self.cells = [[
           self.canvas.create_rectangle(
               recWidth*col, recHeight*row,
               recWidth*(col+1), recHeight*(row+1),
               width=0)
           for col in range(sizeY)] for row in range(sizeX)]
   def update(self, rawImage, lenOfPhi, lenOfR):
       """ Updates the canvas cells colors acorrding to a given rawImage
           matrix and it's dimensions.
           Arguments:
               rawImage    A 2D matrix contains the current rawImage slice.
               lenOfPhi    Number of cells in Phi axis.
               lenOfR      Number of cells in R axis.
       """
       for i in range(lenOfPhi):
           for j in range(lenOfR):
               self.canvas.itemconfigure(
                   self.cells[lenOfPhi-i-1][j],
                   fill='#'+COLORS[rawImage[i][j]])
       ps = self.canvas.postscripot(colormode = 'color')
       im = Image.open(io.Bytes.IO(ps.encode('utf-8)))
       im.save('raw.jpg')
   def reset(self):
       """ Deletes all the canvas components (colored rectangles).
       """
       self.canvas.delete('all')
class Walabot:
   """ Control the Walabot using the Walabot API.
   """
   def __init__(self):
       """ Init the Walabot API.
       """
       self.wlbt = wlbt
       self.wlbt.Init()
       self.wlbt.SetSettingsFolder()
   def isConnected(self):
       """ Try to connect the Walabot device. Return True/False accordingly.
       """
       try:
           self.wlbt.ConnectAny()
       except self.wlbt.WalabotError as err:
           if err.code == 19:  # "WALABOT_INSTRUMENT_NOT_FOUND"
               return False
           else:
               raise err
       return True
   def setParams(self, r, theta, phi, threshold, mti):
       """ Set the arena Parameters according given ones.
       """
       self.wlbt.SetProfile(self.wlbt.PROF_SENSOR)
       self.wlbt.SetArenaR(*r)
       self.wlbt.SetArenaTheta(*theta)
       self.wlbt.SetArenaPhi(*phi)
       self.wlbt.SetThreshold(threshold)
       self.wlbt.SetDynamicImageFilter(mti)
       self.wlbt.Start()
   def getArenaParams(self):
       """ Returns the Walabot parameters from the Walabot SDK.
           Returns:
               params      rParams, thetaParams, phiParams, threshold as
                           given from the Walabot SDK.
       """
       rParams = self.wlbt.GetArenaR()
       thetaParams = self.wlbt.GetArenaTheta()
       phiParams = self.wlbt.GetArenaPhi()
       threshold = self.wlbt.GetThreshold()
       return rParams, thetaParams, phiParams, threshold
   def calibrate(self):
       """ Calibrates the Walabot.
       """
       self.wlbt.StartCalibration()
       while self.wlbt.GetStatus()[0] == self.wlbt.STATUS_CALIBRATING:
           self.wlbt.Trigger()
   def getRawImageSliceDimensions(self):
       """ Returns the dimensions of the rawImage 2D list given from the
           Walabot SDK.
           Returns:
               lenOfPhi    Num of cells in Phi axis.
               lenOfR      Num of cells in Theta axis.
       """
       return self.wlbt.GetRawImageSlice()[1:3]
   def triggerAndGetRawImageSlice(self):
       """ Returns the rawImage given from the Walabot SDK.
           Returns:
               rawImage    A rawImage list as described in the Walabot docs.
       """
       self.wlbt.Trigger()
       return self.wlbt.GetRawImageSlice()[0]
   def getFps(self):
       """ Returns the Walabot current fps as given from the Walabot SDK.
           Returns:
               fpsVar      Number of frames per seconds.
       """
       return int(self.wlbt.GetAdvancedParameter('FrameRate'))
def rawImage():
   """ Main app function. Init the main app class, configure the window
       and start the mainloop.
   """
   root = tk.Tk()
   root.title('Walabot - Raw Image Slice Example')
   RawImageApp(root).pack(side=tk.TOP, fill=tk.BOTH, expand=True)
   root.geometry("+{}+{}".format(APP_X, APP_Y))  # set window location
   root.update()
   root.minsize(width=root.winfo_reqwidth(), height=root.winfo_reqheight())
   root.mainloop()
if __name__ == '__main__':
   rawImage()
建立 caffe 模型后,您可以使用以下代码获取原始图像并保存到 raw.jpg。之后使用以下代码运行 NCS 对图像进行分类
import os
import sys
import numpy
import ntpath
import argparse
import skimage.io
import skimage.transform
import mvnc.mvncapi as mvnc
# Number of top prodictions to print
NUM_PREDICTIONS		= 5
# Variable to store commandline arguments
ARGS                = None
# ---- Step 1: Open the enumerated device and get a handle to it -------------
def open_ncs_device():
   # Look for enumerated NCS device(s); quit program if none found.
   devices = mvnc.EnumerateDevices()
   if len( devices ) == 0:
       print( "No devices found" )
       quit()
   # Get a handle to the first enumerated device and open it
   device = mvnc.Device( devices[0] )
   device.OpenDevice()
   return device
# ---- Step 2: Load a graph file onto the NCS device -------------------------
def load_graph( device ):
   # Read the graph file into a buffer
   with open( ARGS.graph, mode='rb' ) as f:
       blob = f.read()
   # Load the graph buffer into the NCS
   graph = device.AllocateGraph( blob )
   return graph
# ---- Step 3: Pre-process the images ----------------------------------------
def pre_process_image():
   # Read & resize image [Image size is defined during training]
   img = skimage.io.imread( ARGS.image )
   img = skimage.transform.resize( img, ARGS.dim, preserve_range=True )
   # Convert RGB to BGR [skimage reads image in RGB, but Caffe uses BGR]
   if( ARGS.colormode == "BGR" ):
       img = img[:, :, ::-1]
   # Mean subtraction & scaling [A common technique used to center the data]
   img = img.astype( numpy.float16 )
   img = ( img - numpy.float16( ARGS.mean ) ) * ARGS.scale
   return img
# ---- Step 4: Read & print inference results from the NCS -------------------
def infer_image( graph, img ):
   # Load the labels file
   labels =[ line.rstrip('\n') for line in
                  open( ARGS.labels ) if line != 'classes\n']
   # The first inference takes an additional ~20ms due to memory
   # initializations, so we make a 'dummy forward pass'.
   graph.LoadTensor( img, 'user object' )
   output, userobj = graph.GetResult()
   # Load the image as a half-precision floating point array
   graph.LoadTensor( img, 'user object' )
   # Get the results from NCS
   output, userobj = graph.GetResult()
   # Sort the indices of top predictions
   order = output.argsort()[::-1][:NUM_PREDICTIONS]
   # Get execution time
   inference_time = graph.GetGraphOption( mvnc.GraphOption.TIME_TAKEN )
   # Print the results
   print( "\n==============================================================" )
   print( "Top predictions for", ntpath.basename( ARGS.image ) )
   print( "Execution time: " + str( numpy.sum( inference_time ) ) + "ms" )
   print( "--------------------------------------------------------------" )
   for i in range( 0, NUM_PREDICTIONS ):
       print( "%3.1f%%\t" % (100.0 * output[ order[i] ] )
              + labels[ order[i] ] )
   print( "==============================================================" )
   # If a display is available, show the image on which inference was performed
   if 'DISPLAY' in os.environ:
       skimage.io.imshow( ARGS.image )
       skimage.io.show()
# ---- Step 5: Unload the graph and close the device -------------------------
def close_ncs_device( device, graph ):
   graph.DeallocateGraph()
   device.CloseDevice()
# ---- Main function (entry point for this script ) --------------------------
def main():
   device = open_ncs_device()
   graph = load_graph( device )
   img = pre_process_image()
   infer_image( graph, img )
   close_ncs_device( device, graph )
# ---- Define 'main' function as the entry point for this script -------------
if __name__ == '__main__':
   parser = argparse.ArgumentParser(
                        description="Image classifier using \
                        Intel® Movidius™ Neural Compute Stick." )
   parser.add_argument( '-g', '--graph', type=str,
                        default='/WalabotRawNet/graph',
                        help="Absolute path to the neural network graph file." )
   parser.add_argument( '-i', '--image', type=str,
                        default='raw.jpg',
                        help="Absolute path to the image that needs to be inferred." )
   parser.add_argument( '-l', '--labels', type=str,
                        default='raw_classifies.txt',
                        help="Absolute path to labels file." )
   parser.add_argument( '-M', '--mean', type=float,
                        nargs='+',
                        default=[104.00698793, 116.66876762, 122.67891434],
                        help="',' delimited floating point values for image mean." )
   parser.add_argument( '-S', '--scale', type=float,
                        default=1,
                        help="Absolute path to labels file." )
   parser.add_argument( '-D', '--dim', type=int,
                        nargs='+',
                        default=[224, 224],
                        help="Image dimensions. ex. -D 224 224" )
   parser.add_argument( '-c', '--colormode', type=str,
                        default="BGR",
                        help="RGB vs BGR color sequence. TensorFlow = RGB, Caffe = BGR" )
   ARGS = parser.parse_args()
   main()
# ==== End of file ===========================================================
第 6 步:解锁锁舌
硬件设置的最后一部分是锁舌本身,我们必须使用 mraa 库来设置它。我们先把 Grove Shield 放在 Up2 板上,如图,然后安装 mraa 库
sudo add-apt-repository ppa:mraa/mraa
sudo apt-get update
sudo apt-get install libmraa1 libmraa-dev libmraa-java python-mraa python3-mraa node-mraa mraa-tools
然后我们可以从https://github.com/intel-iot-devkit/mraa运行示例
理想情况下,我们可以直接从 Up2 板上运行它,但由于目前 GPIO 没有将足够的电流推到外面,我们可以做一个额外的步骤,将锁添加到 arduino 并通过 mraa 控制它。
Arduino 端的代码相当简单,只需接收 0 来锁定,接收 1 来解锁。这是通过USB(UART)通道发送的,使用起来很简单。
const int ledPin =  7;      // the number of the LED pin
int incomingByte = 0;   // for incoming serial data
void setup() {
 // initialize the LED pin as an output:
 pinMode(ledPin, OUTPUT);
 Serial.begin(9600);     // opens serial port, sets data rate to 9600 bps
}
void loop() {
         // send data only when you receive data:
       if (Serial.available() > 0) {
               // read the incoming byte:
               incomingByte = Serial.read();
          if(incomingByte == 48)
          {
           digitalWrite(ledPin, LOW);
          }
          else if(incomingByte == 49)
          {
           digitalWrite(ledPin, HIGH);
          }
               // say what you got:
               Serial.print("I received: ");
               Serial.println(incomingByte, DEC);
       }
}
我们可以使用 Up2 板上的以下代码测试锁舌
import mraa
import time
import sys
mraa.addSubplatform(mraa.GROVEPI,"0")
# serial port
port = "/dev/ttyACM0"
data_on = "1"
data_off = "0"
# initialise UART
uart = mraa.Uart(port)
while True:
   uart.write(bytearray(data_on, 'utf-8'))
   print("on")
   time.sleep(3)
   uart.write(bytearray(data_off, 'utf-8'))
   print("off")
   time.sleep(3)
最后,我们可以将所有这部分集成到我们的主应用程序中。
第七步:服务器数据存储
为了跟踪面部和 walabot 传感器数据,我们将数据存储在云中是一个好主意。在这个例子中,我们在一个文件中设置了一个简单的文件存储,但将来我们可以将它存储到 mongodb 中。
当前的示例是一种非常简单的概念证明形式,我们只跟踪面部识别、walabot 距离和walabot 呼吸,所有这些都是布尔形式。当alexa意识到所有这些都是真的时,它会标记alexa解锁。在更新服务器数据时,我们将获取 alexa 标志,以确定是否解锁锁舌。
对于这个例子,我们将使用 node.js 并通过heroku 托管。如果您想测试自己的 alexa,
设置服务器后,使用附加的以下代码作为您的基础。您可以选择托管在其他地方,例如 Amazon、Azure 或 IBM Bluemix;这只是一个启动服务器并使其运行的快速示例。
我们正在根据 UserId 保存文件,以便可以将其分开,将来我们可以为它建立一个数据库。
const express = require('express')
const path = require('path')
const PORT = process.env.PORT || 5000
var fs = require('fs');
var PubNub = require('pubnub')
var app = express()
var http = require("http");
setInterval(function() {
   http.get("{your own url}/test");
}, 300000);
// respond with "hello world" when a GET request is made to the homepage
app.get('/', function (req, res) {
	fs.readFile('data.txt', 'utf8', function readFileCallback(err, data){
	    if (err){
	        console.log(err);
	    } else {
	    obj = JSON.parse(data); //now it an object
	    res.send(JSON.stringify(obj));
	}});
})
app.get('/test', function (req, res) {
	/*
	fs.readFile('data.txt', 'utf8', function readFileCallback(err, data){
	    if (err){
	        console.log(err);
	    } else {
	    obj = JSON.parse(data); //now it an object
	    res.send(JSON.stringify(obj));
	}});*/
	res.send("200");
})
app.get('/input', function (req, res)
{	var fs = require('fs');
	var faceid = req.query.faceid;
	var distance = req.query.distance;
	var breathing = req.query.breathing;
	fs.readFile('data.txt', 'utf8', function readFileCallback(err, data){
	    if (err){
	        console.log(err);
	    } else {
	    obj = JSON.parse(data); //now it an object
	    obj.faceid = parseInt(faceid);
	    obj.distance = parseInt(distance); //add some data
	    obj.breathing = parseInt(breathing); //add some data
	    json = JSON.stringify(obj); //convert it back to json
	    fs.writeFile('data.txt', json, 'utf8', null); // write it back
	    fs.readFile('alexa.txt', 'utf8', function readFileCallback(err, data){
		    if (err){
		        console.log(err);
		    } else {
		    obj = JSON.parse(data); //now it an object
		    json = JSON.stringify(obj); //convert it back to json
		    res.send(json)
		}});
	}});
})
app.get('/alexa', function (req, res)
{	var fs = require('fs');
	var alexa = 1;
	fs.readFile('alexa.txt', 'utf8', function readFileCallback(err, data){
	    if (err){
	        console.log(err);
	    } else {
	    obj = JSON.parse(data); //now it an object
	    obj.alexa = 1;
	    json = JSON.stringify(obj); //convert it back to json
	    fs.writeFile('alexa.txt', json, 'utf8', null); // write it back
		setTimeout(function() {
			//Reset back to lock mode after 10 seconds, enough for client side to unlock
			var obj = new Object()
		    obj.alexa = 0;
			json = JSON.stringify(obj); //convert it back to json
	    	fs.writeFile('alexa.txt', json, 'utf8', null); // write it back
		}, 10000);
	    res.send('success')
	}});
})
app.listen(PORT, () => console.log(`Listening on ${ PORT }`))
一旦达到阈值,让 Walabot 更新服务器。
if
    distance = 1
else distance = 0
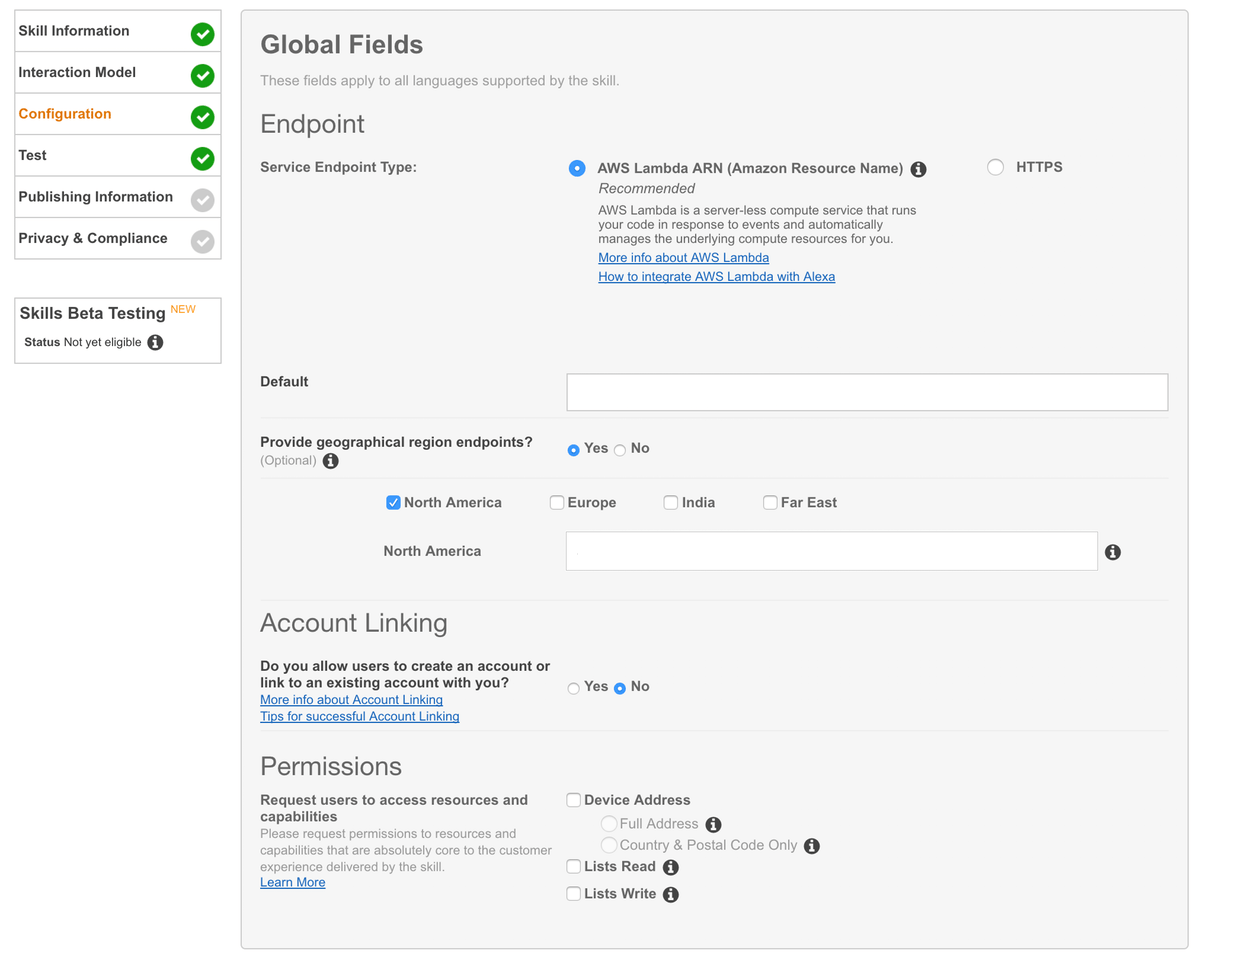
第 8 步:设置 Alexa
用户现在可以使用 Alexa 解锁锁舌。我们将按照本指南使用 Alexa 快速技能套件:https ://developer.amazon.com/alexa-skills-kit/alexa-skill-quick-start-tutorial
该指南将教您:
- 在 AWS 上创建 Lambda 函数
- 在 Alexa 技能上创建 Alexa 技能
Lambda 托管 Alexa 可以与之交互的无服务器函数。使用 node.js 而不是按照指南创建一个空的。我们可以从下面复制/粘贴 Alexa node.js 代码。
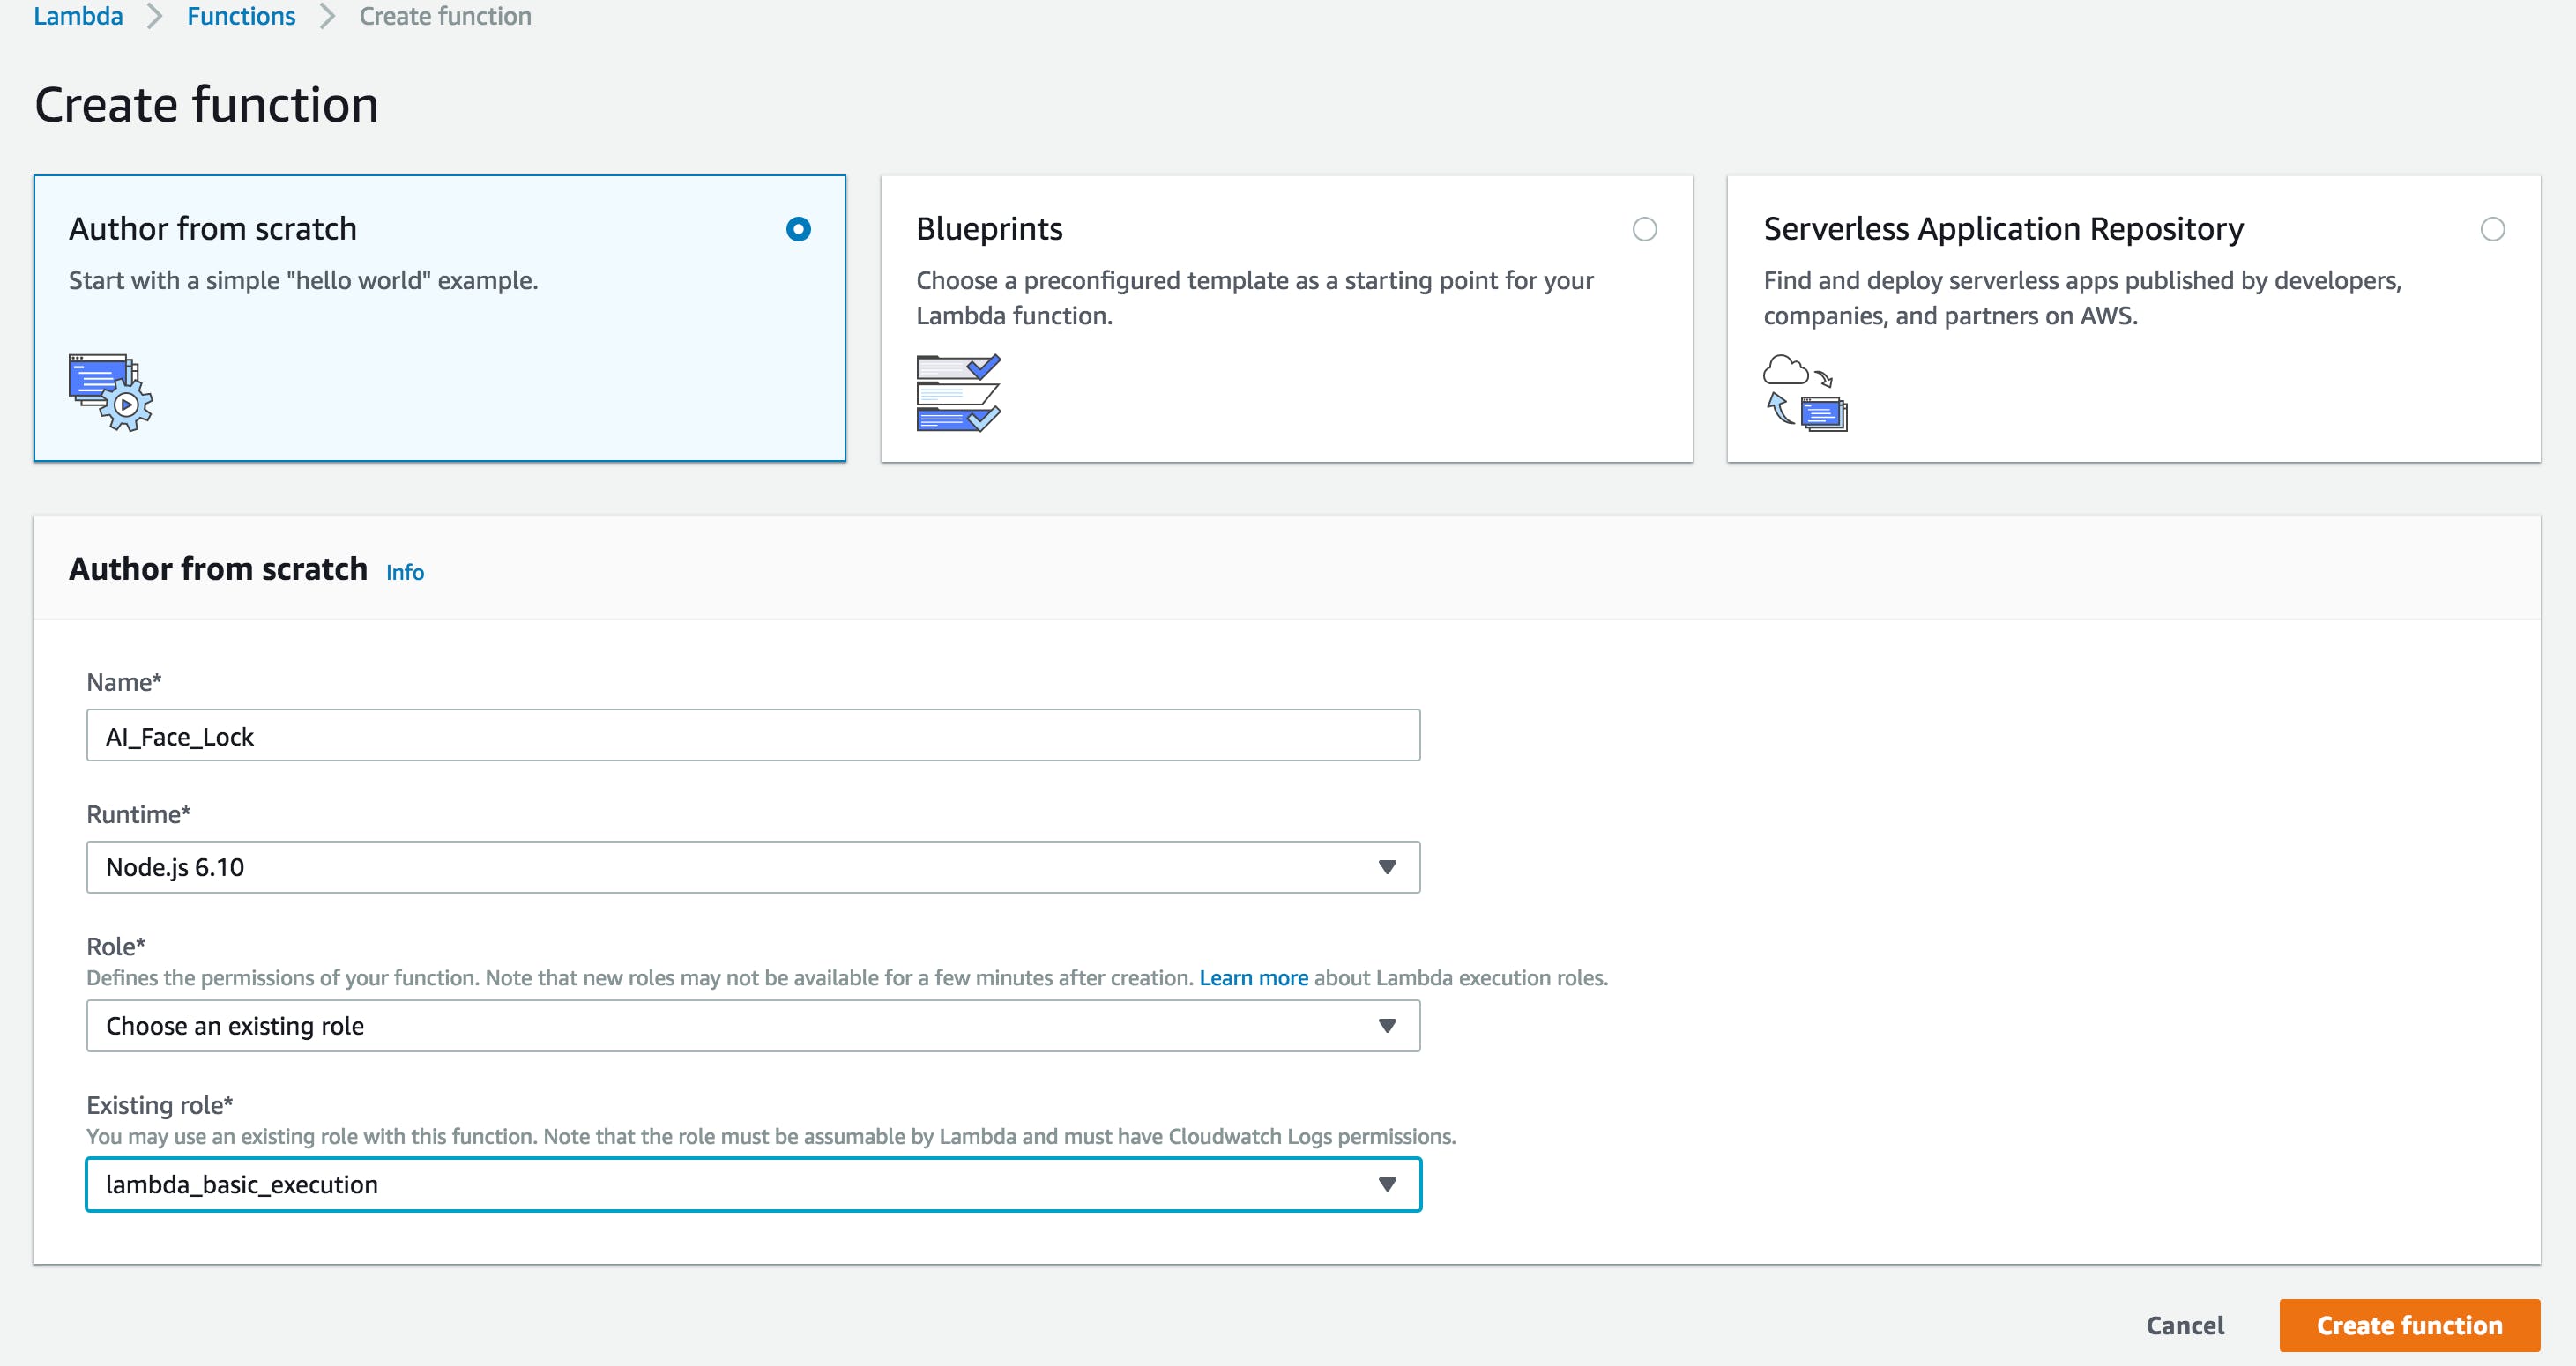
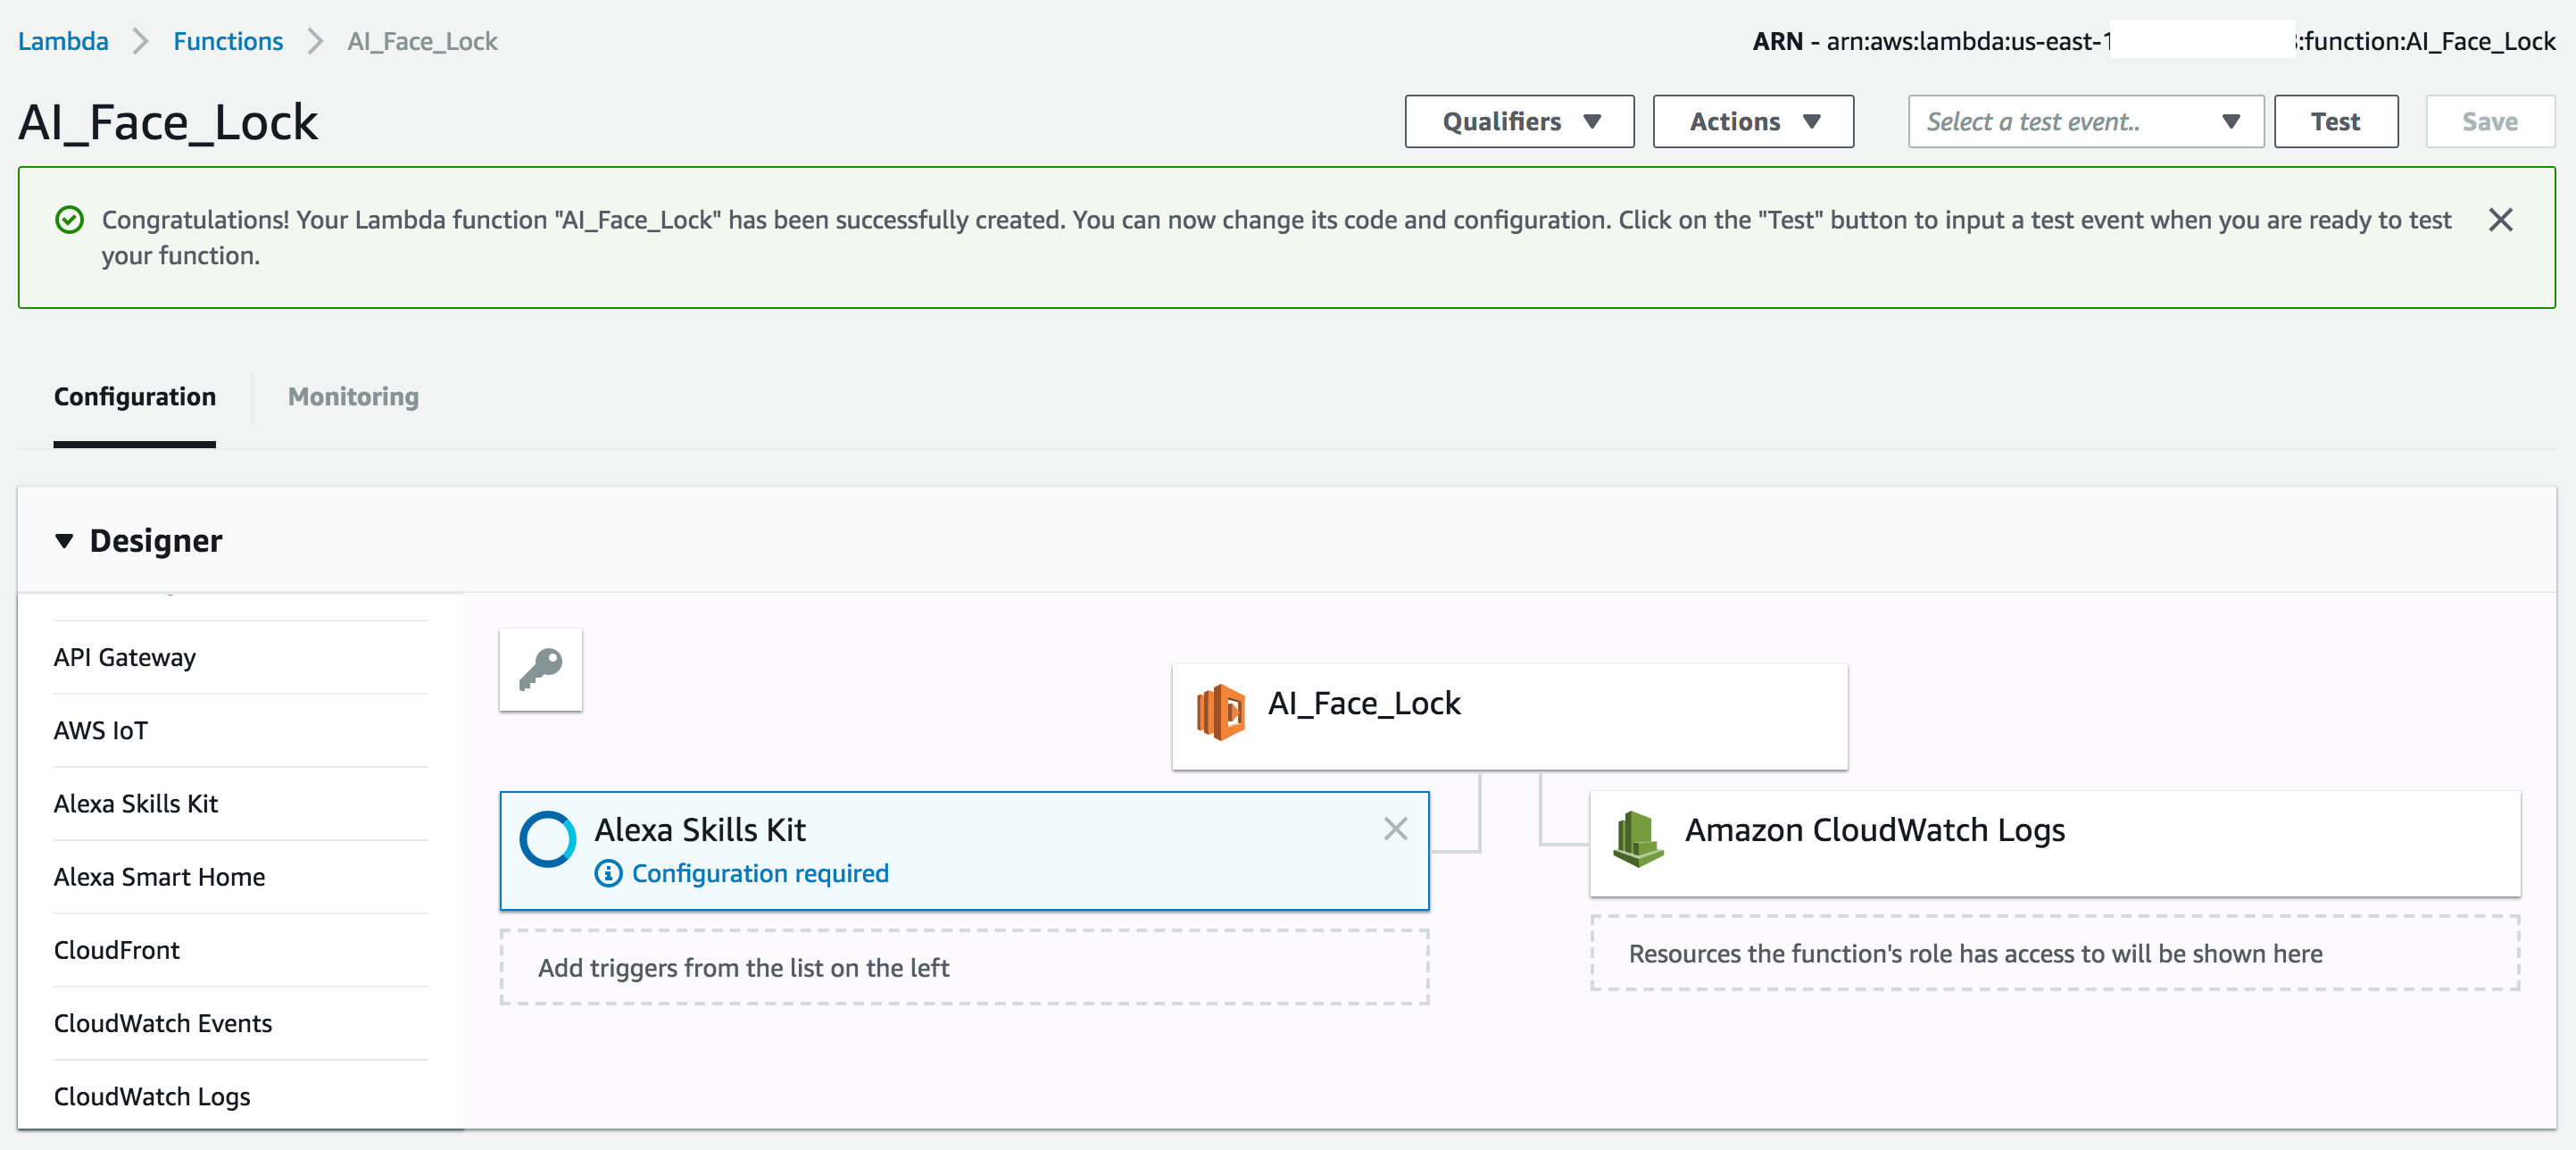
创建函数后,我们将获得 ARN 编号。把它写下来,这样我们就可以在 Alexa Skill 工具包的配置中使用它。我们还必须将 Alexa Skill 工具包添加到 AI Face Lock - 复制并粘贴整个 node.js 代码,该代码作为 LAMBDA 代码附加,
目前的情报托管在 Alexa 中,它会检查是否四处走动和是否经常移动,例如起床。这样我们就可以减轻服务器的负担。
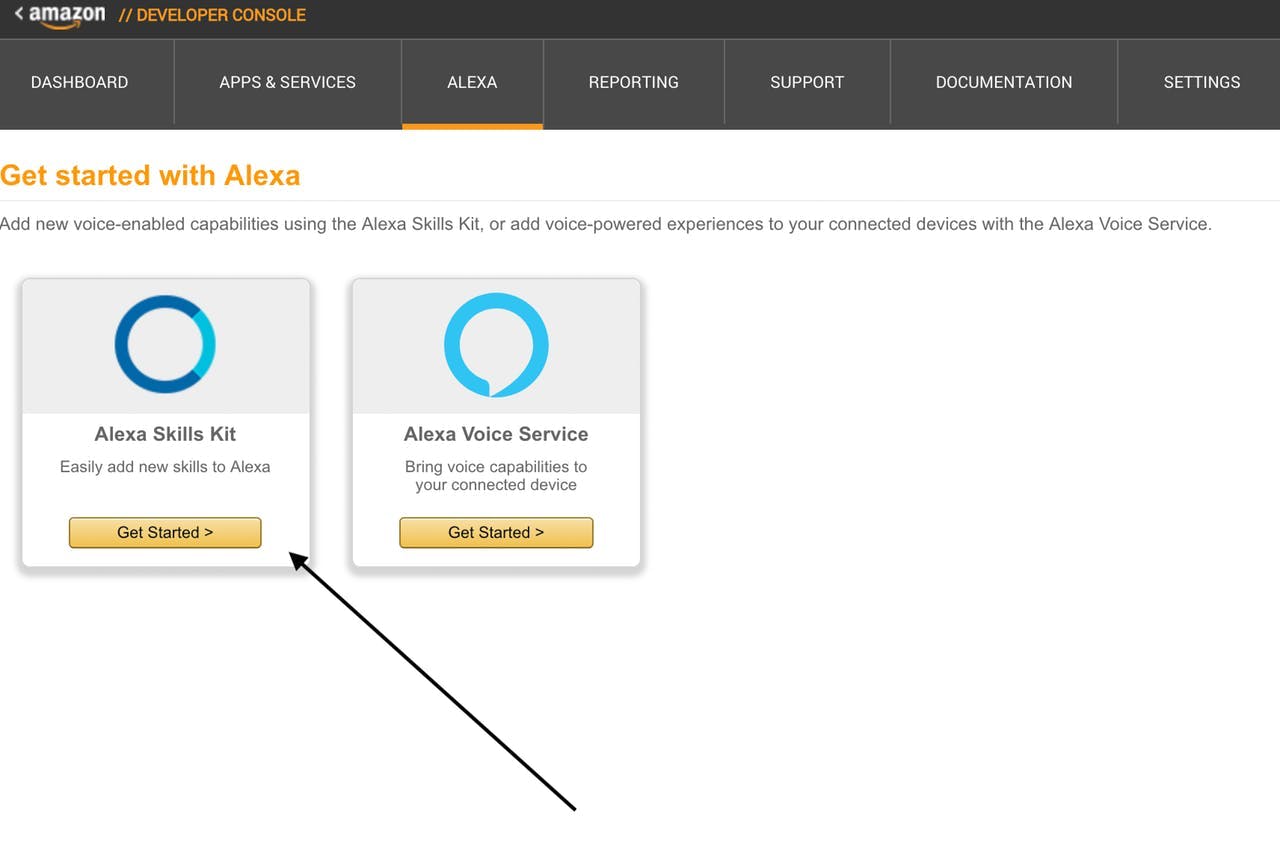
现在我们正在转向 Alexa 技能套件:
在交互模型中,将以下锁定意图模式放在那里:
Intent Schema:
{
"intents": [
  {
    "intent": "AILockIntent"
  },
  {
    "intent": "AMAZON.HelpIntent"
  }
]
}
Sample Utterances:
AILockIntent Unlock the bolt
AILockIntent Open the bolt
之后,在配置中,我们可以把我们之前使用的 ARN:

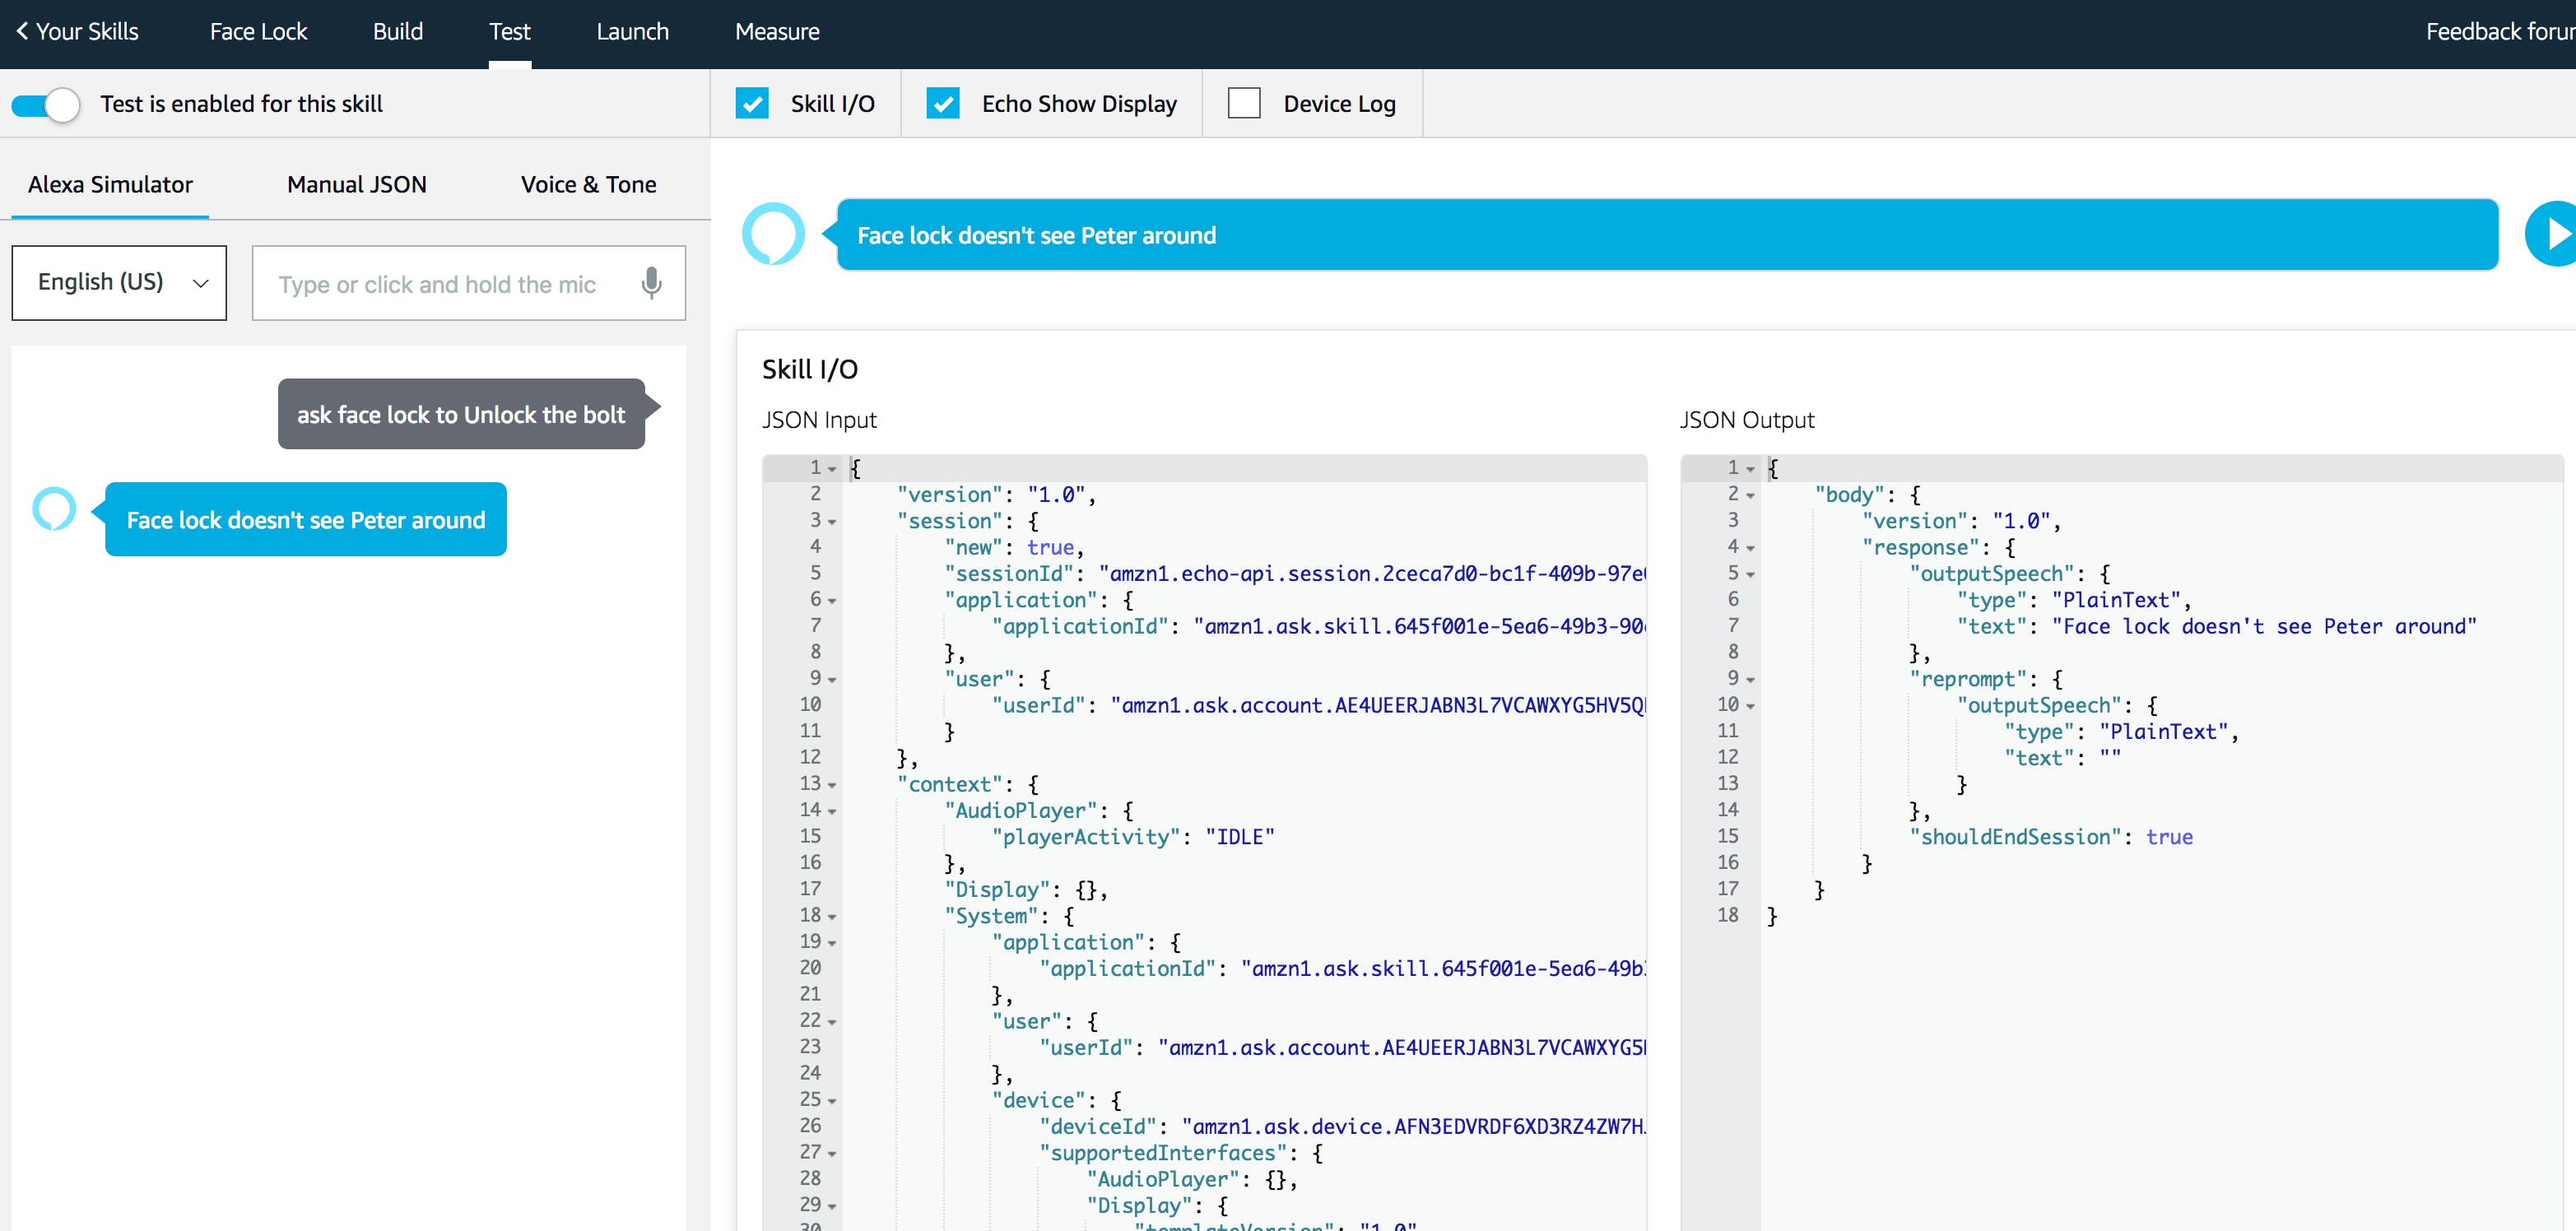
第 9 步:“Alexa,询问面部锁以解锁螺栓”
现在您可以通过询问“Alexa,让 Face Lock 解锁螺栓”来测试您的 Alexa 技能。或者使用任何亚马逊回声来测试它
第 10 步:你完成了
大功告成,现在 AI 可以检测 3 种场景,什么时候不是你,什么时候你在用照片或假装自己,什么时候是你。
第 11 步:Android 部分
这是使 android 工作的额外步骤,我们将制作一个简单的 Pubnub 应用程序,当我们在其他人激活应用程序时收到警报时连接到 android,以便用户可以流式传输到他们的网络摄像头。我们使用 opentok 做简单的网络摄像头集成
这是接收通知以及打开锁的android代码
import android.app.Notification;
import android.app.NotificationChannel;
import android.app.NotificationManager;
import android.app.PendingIntent;
import android.content.Context;
import android.content.Intent;
import android.graphics.Color;
import android.media.RingtoneManager;
import android.opengl.GLSurfaceView;
import android.os.Build;
import android.support.v4.app.NotificationCompat;
import android.support.v4.app.TaskStackBuilder;
import android.support.v7.app.AppCompatActivity;
import android.support.annotation.NonNull;
import android.Manifest;
import android.os.Bundle;
import android.util.Log;
import android.widget.FrameLayout;
import android.app.AlertDialog;
import android.content.DialogInterface;
import android.widget.Toast;
import com.opentok.android.Session;
import com.opentok.android.Stream;
import com.opentok.android.Publisher;
import com.opentok.android.PublisherKit;
import com.opentok.android.Subscriber;
import com.opentok.android.BaseVideoRenderer;
import com.opentok.android.OpentokError;
import com.opentok.android.SubscriberKit;
import com.pubnub.api.PNConfiguration;
import com.pubnub.api.PubNub;
import com.pubnub.api.callbacks.PNCallback;
import com.pubnub.api.callbacks.SubscribeCallback;
import com.pubnub.api.enums.PNStatusCategory;
import com.pubnub.api.models.consumer.PNPublishResult;
import com.pubnub.api.models.consumer.PNStatus;
import com.pubnub.api.models.consumer.pubsub.PNMessageResult;
import com.pubnub.api.models.consumer.pubsub.PNPresenceEventResult;
import com.tokbox.android.tutorials.basicvideochat.R;
import java.util.Arrays;
import java.util.List;
import pub.devrel.easypermissions.AfterPermissionGranted;
import pub.devrel.easypermissions.AppSettingsDialog;
import pub.devrel.easypermissions.EasyPermissions;
public class MainActivity extends AppCompatActivity
                            implements EasyPermissions.PermissionCallbacks,
                                        WebServiceCoordinator.Listener,
                                        Session.SessionListener,
                                        PublisherKit.PublisherListener,
                                        SubscriberKit.SubscriberListener{
    private static final String LOG_TAG = MainActivity.class.getSimpleName();
    private static final int RC_SETTINGS_SCREEN_PERM = 123;
    private static final int RC_VIDEO_APP_PERM = 124;
    // Suppressing this warning. mWebServiceCoordinator will get GarbageCollected if it is local.
    @SuppressWarnings("FieldCanBeLocal")
    private WebServiceCoordinator mWebServiceCoordinator;
    private Session mSession;
    private Publisher mPublisher;
    private Subscriber mSubscriber;
    private FrameLayout mPublisherViewContainer;
    private FrameLayout mSubscriberViewContainer;
    @Override
    protected void onCreate(Bundle savedInstanceState) {
        Log.d(LOG_TAG, "onCreate");
        super.onCreate(savedInstanceState);
        setContentView(R.layout.activity_main);
        // initialize view objects from your layout
        mPublisherViewContainer = (FrameLayout)findViewById(R.id.publisher_container);
        mSubscriberViewContainer = (FrameLayout)findViewById(R.id.subscriber_container);
        requestPermissions();
        PNConfiguration pnConfiguration = new PNConfiguration();
        pnConfiguration.setSubscribeKey("sub-c-777d4466-c823-11e6-b045-02ee2ddab7fe");
        pnConfiguration.setPublishKey("pub-c-99f0375f-cc13-46fb-9b30-d1772c531f3a");
        PubNub pubnub = new PubNub(pnConfiguration);
        pubnub.addListener(new SubscribeCallback() {
            @Override
            public void status(PubNub pubnub, PNStatus status) {
                if (status.getCategory() == PNStatusCategory.PNUnexpectedDisconnectCategory) {
                    // This event happens when radio / connectivity is lost
                }
                else if (status.getCategory() == PNStatusCategory.PNConnectedCategory) {
                    // Connect event. You can do stuff like publish, and know you'll get it.
                    // Or just use the connected event to confirm you are subscribed for
                    // UI / internal notifications, etc
                    /*
                    if (status.getCategory() == PNStatusCategory.PNConnectedCategory){
                        pubnub.publish().channel("awesomeChannel").message("hello!!").async(new PNCallback() {
                            @Override
                            public void onResponse(PNPublishResult result, PNStatus status) {
                                // Check whether request successfully completed or not.
                                if (!status.isError()) {
                                    // Message successfully published to specified channel.
                                }
                                // Request processing failed.
                                else {
                                    // Handle message publish error. Check 'category' property to find out possible issue
                                    // because of which request did fail.
                                    //
                                    // Request can be resent using: [status retry];
                                }
                            }
                        });
                    }*/
                }
                else if (status.getCategory() == PNStatusCategory.PNReconnectedCategory) {
                    // Happens as part of our regular operation. This event happens when
                    // radio / connectivity is lost, then regained.
                }
                else if (status.getCategory() == PNStatusCategory.PNDecryptionErrorCategory) {
                    // Handle messsage decryption error. Probably client configured to
                    // encrypt messages and on live data feed it received plain text.
                }
            }
            @Override
            public void message(PubNub pubnub, PNMessageResult message) {
                // Handle new message stored in message.message
                if (message.getChannel() != null) {
                    // Message has been received on channel group stored in
                    // message.getChannel()
                    Log.e("doh", "Doh");
                    NotificationManager mNotificationManager =
                            (NotificationManager) getSystemService(Context.NOTIFICATION_SERVICE);
                    if (Build.VERSION.SDK_INT >= Build.VERSION_CODES.O) {
                        NotificationChannel notificationChannel = new NotificationChannel("facelock", "My Notifications", NotificationManager.IMPORTANCE_DEFAULT);
                        // Configure the notification channel.
                        notificationChannel.setDescription("Channel description");
                        notificationChannel.enableLights(true);
                        notificationChannel.setLightColor(Color.RED);
                        notificationChannel.setVibrationPattern(new long[]{0, 1000, 500, 1000});
                        notificationChannel.enableVibration(true);
                        mNotificationManager.createNotificationChannel(notificationChannel);
                    }
                    Notification.Builder mBuilder =
                            new Notification.Builder(MainActivity.this, "facelock")
                                    .setSmallIcon(R.mipmap.ic_launcher_small)
                                    .setContentTitle("Face lock")
                                    .setContentText("Face lock is detecting unusual activity, click to see security cam.");
                    Intent notificationIntent = new Intent(MainActivity.this, MainActivity.class);
                    notificationIntent.setFlags(Intent.FLAG_ACTIVITY_CLEAR_TOP
                            | Intent.FLAG_ACTIVITY_SINGLE_TOP);
                    PendingIntent intent = PendingIntent.getActivity(MainActivity.this, 0,
                            notificationIntent, 0);
                    mBuilder.setContentIntent(intent);
                    mNotificationManager.notify(001, mBuilder.build());
//                    Intent intent = new Intent(MainActivity.this, MainActivity.class);
//                    MainActivity.this.startActivity(intent);
                }
                else {
                    // Message has been received on channel stored in
                    // message.getSubscription()
                }
            /*
                log the following items with your favorite logger
                    - message.getMessage()
                    - message.getSubscription()
                    - message.getTimetoken()
            */
            }
            @Override
            public void presence(PubNub pubnub, PNPresenceEventResult presence) {
            }
        });
        pubnub.subscribe().channels(Arrays.asList("facelock")).execute();
    }
     /* Activity lifecycle methods */
    @Override
    protected void onPause() {
        Log.d(LOG_TAG, "onPause");
        super.onPause();
        if (mSession != null) {
            mSession.onPause();
        }
    }
    @Override
    protected void onResume() {
        Log.d(LOG_TAG, "onResume");
        super.onResume();
        if (mSession != null) {
            mSession.onResume();
        }
    }
    @Override
    public void onRequestPermissionsResult(int requestCode, @NonNull String[] permissions, @NonNull int[] grantResults) {
        super.onRequestPermissionsResult(requestCode, permissions, grantResults);
        EasyPermissions.onRequestPermissionsResult(requestCode, permissions, grantResults, this);
    }
    @Override
    public void onPermissionsGranted(int requestCode, List perms) {
        Log.d(LOG_TAG, "onPermissionsGranted:" + requestCode + ":" + perms.size());
    }
    @Override
    public void onPermissionsDenied(int requestCode, List perms) {
        Log.d(LOG_TAG, "onPermissionsDenied:" + requestCode + ":" + perms.size());
        if (EasyPermissions.somePermissionPermanentlyDenied(this, perms)) {
            new AppSettingsDialog.Builder(this)
                    .setTitle(getString(R.string.title_settings_dialog))
                    .setRationale(getString(R.string.rationale_ask_again))
                    .setPositiveButton(getString(R.string.setting))
                    .setNegativeButton(getString(R.string.cancel))
                    .setRequestCode(RC_SETTINGS_SCREEN_PERM)
                    .build()
                    .show();
        }
    }
    @AfterPermissionGranted(RC_VIDEO_APP_PERM)
    private void requestPermissions() {
        String[] perms = { Manifest.permission.INTERNET, Manifest.permission.CAMERA, Manifest.permission.RECORD_AUDIO };
        if (EasyPermissions.hasPermissions(this, perms)) {
            // if there is no server URL set
            if (OpenTokConfig.CHAT_SERVER_URL == null) {
                // use hard coded session values
                if (OpenTokConfig.areHardCodedConfigsValid()) {
                    initializeSession(OpenTokConfig.API_KEY, OpenTokConfig.SESSION_ID, OpenTokConfig.TOKEN);
                } else {
                    showConfigError("Configuration Error", OpenTokConfig.hardCodedConfigErrorMessage);
                }
            } else {
                // otherwise initialize WebServiceCoordinator and kick off request for session data
                // session initialization occurs once data is returned, in onSessionConnectionDataReady
                if (OpenTokConfig.isWebServerConfigUrlValid()) {
                    mWebServiceCoordinator = new WebServiceCoordinator(this, this);
                    mWebServiceCoordinator.fetchSessionConnectionData(OpenTokConfig.SESSION_INFO_ENDPOINT);
                } else {
                    showConfigError("Configuration Error", OpenTokConfig.webServerConfigErrorMessage);
                }
            }
        } else {
            EasyPermissions.requestPermissions(this, getString(R.string.rationale_video_app), RC_VIDEO_APP_PERM, perms);
        }
    }
    private void initializeSession(String apiKey, String sessionId, String token) {
        mSession = new Session.Builder(this, apiKey, sessionId).build();
        mSession.setSessionListener(this);
        mSession.connect(token);
    }
    /* Web Service Coordinator delegate methods */
    @Override
    public void onSessionConnectionDataReady(String apiKey, String sessionId, String token) {
        Log.d(LOG_TAG, "ApiKey: "+apiKey + " SessionId: "+ sessionId + " Token: "+token);
        initializeSession(apiKey, sessionId, token);
    }
    @Override
    public void onWebServiceCoordinatorError(Exception error) {
        Log.e(LOG_TAG, "Web Service error: " + error.getMessage());
        Toast.makeText(this, "Web Service error: " + error.getMessage(), Toast.LENGTH_LONG).show();
        finish();
    }
    /* Session Listener methods */
    @Override
    public void onConnected(Session session) {
        Log.d(LOG_TAG, "onConnected: Connected to session: "+session.getSessionId());
        // initialize Publisher and set this object to listen to Publisher events
        mPublisher = new Publisher.Builder(this).build();
        mPublisher.setPublisherListener(this);
        // set publisher video style to fill view
        mPublisher.getRenderer().setStyle(BaseVideoRenderer.STYLE_VIDEO_SCALE,
                BaseVideoRenderer.STYLE_VIDEO_FILL);
        mPublisherViewContainer.addView(mPublisher.getView());
        if (mPublisher.getView() instanceof GLSurfaceView) {
            ((GLSurfaceView) mPublisher.getView()).setZOrderOnTop(true);
        }
        mSession.publish(mPublisher);
    }
    @Override
    public void onDisconnected(Session session) {
        Log.d(LOG_TAG, "onDisconnected: Disconnected from session: "+session.getSessionId());
    }
    @Override
    public void onStreamReceived(Session session, Stream stream) {
        Log.d(LOG_TAG, "onStreamReceived: New Stream Received "+stream.getStreamId() + " in session: "+session.getSessionId());
        if (mSubscriber == null) {
            mSubscriber = new Subscriber.Builder(this, stream).build();
            mSubscriber.getRenderer().setStyle(BaseVideoRenderer.STYLE_VIDEO_SCALE, BaseVideoRenderer.STYLE_VIDEO_FILL);
            mSubscriber.setSubscriberListener(this);
            mSession.subscribe(mSubscriber);
            mSubscriberViewContainer.addView(mSubscriber.getView());
        }
    }
    @Override
    public void onStreamDropped(Session session, Stream stream) {
        Log.d(LOG_TAG, "onStreamDropped: Stream Dropped: "+stream.getStreamId() +" in session: "+session.getSessionId());
        if (mSubscriber != null) {
            mSubscriber = null;
            mSubscriberViewContainer.removeAllViews();
        }
    }
    @Override
    public void onError(Session session, OpentokError opentokError) {
        Log.e(LOG_TAG, "onError: "+ opentokError.getErrorDomain() + " : " +
                opentokError.getErrorCode() + " - "+opentokError.getMessage() + " in session: "+ session.getSessionId());
        showOpenTokError(opentokError);
    }
    /* Publisher Listener methods */
    @Override
    public void onStreamCreated(PublisherKit publisherKit, Stream stream) {
        Log.d(LOG_TAG, "onStreamCreated: Publisher Stream Created. Own stream "+stream.getStreamId());
    }
    @Override
    public void onStreamDestroyed(PublisherKit publisherKit, Stream stream) {
        Log.d(LOG_TAG, "onStreamDestroyed: Publisher Stream Destroyed. Own stream "+stream.getStreamId());
    }
    @Override
    public void onError(PublisherKit publisherKit, OpentokError opentokError) {
        Log.e(LOG_TAG, "onError: "+opentokError.getErrorDomain() + " : " +
                opentokError.getErrorCode() +  " - "+opentokError.getMessage());
        showOpenTokError(opentokError);
    }
    @Override
    public void onConnected(SubscriberKit subscriberKit) {
        Log.d(LOG_TAG, "onConnected: Subscriber connected. Stream: "+subscriberKit.getStream().getStreamId());
    }
    @Override
    public void onDisconnected(SubscriberKit subscriberKit) {
        Log.d(LOG_TAG, "onDisconnected: Subscriber disconnected. Stream: "+subscriberKit.getStream().getStreamId());
    }
    @Override
    public void onError(SubscriberKit subscriberKit, OpentokError opentokError) {
        Log.e(LOG_TAG, "onError: "+opentokError.getErrorDomain() + " : " +
                opentokError.getErrorCode() +  " - "+opentokError.getMessage());
        showOpenTokError(opentokError);
    }
    private void showOpenTokError(OpentokError opentokError) {
        Toast.makeText(this, opentokError.getErrorDomain().name() +": " +opentokError.getMessage() + " Please, see the logcat.", Toast.LENGTH_LONG).show();
        finish();
    }
    private void showConfigError(String alertTitle, final String errorMessage) {
        Log.e(LOG_TAG, "Error " + alertTitle + ": " + errorMessage);
        new AlertDialog.Builder(this)
                .setTitle(alertTitle)
                .setMessage(errorMessage)
                .setPositiveButton("ok", new DialogInterface.OnClickListener() {
                    public void onClick(DialogInterface dialog, int which) {
                        MainActivity.this.finish();
                    }
                })
                .setIcon(android.R.drawable.ic_dialog_alert)
                .show();
    }
}
服务器端很简单,我们只需要更新我们的 lambda 代码
'use strict';
var http = require('https');
var PubNub = require('pubnub')
exports.handler = function (event, context) {
   try {
       console.log("event.session.application.applicationId=" + event.session.application.applicationId);
       /**
        * Uncomment this if statement and populate with your skill's application ID to
        * prevent someone else from configuring a skill that sends requests to this function.
        */
    if (event.session.application.applicationId !== "amzn1.ask.skill.645f001e-5ea6-49b3-90ef-a0d9c0ef25a1") {
        context.fail("Invalid Application ID");
     }
       if (event.session.new) {
           onSessionStarted({requestId: event.request.requestId}, event.session);
       }
       if (event.session.user.accessToken == undefined) {
               var cardTitle = "Welcome to AI Face Lock"
               var speechOutput = "Your axcount is not linked, to start using this skill, please use the companion app to authenticate on Amazon"
               buildSpeechletResponse(cardTitle, speechOutput, "", true);
       }
       if (event.request.type === "LaunchRequest") {
           onLaunch(event.request,
               event.session,
               function callback(sessionAttributes, speechletResponse) {
                   context.succeed(buildResponse(sessionAttributes, speechletResponse));
               });
       } else if (event.request.type === "IntentRequest") {
           onIntent(event.request,
               event.session,
               function callback(sessionAttributes, speechletResponse) {
                   context.succeed(buildResponse(sessionAttributes, speechletResponse));
               });
       } else if (event.request.type === "SessionEndedRequest") {
           onSessionEnded(event.request, event.session);
           context.succeed();
       }
   } catch (e) {
       context.fail("Exception: " + e);
   }
};
/**
* Called when the session starts.
*/
function onSessionStarted(sessionStartedRequest, session) {
   console.log("onSessionStarted requestId=" + sessionStartedRequest.requestId
       + ", sessionId=" + session.sessionId);
   // add any session init logic here
}
/**
* Called when the user invokes the skill without specifying what they want.
*/
function onLaunch(launchRequest, session, callback) {
   console.log("onLaunch requestId=" + launchRequest.requestId
       + ", sessionId=" + session.sessionId);
   var cardTitle = "Welcome to AI Face Lock"
   var speechOutput = "Welcome to AI Face Lock"
   callback(session.attributes,
       buildSpeechletResponse(cardTitle, speechOutput, "", false));
}
/**
* Called when the user specifies an intent for this skill.
*/
function onIntent(intentRequest, session, callback) {
   console.log("onIntent requestId=" + intentRequest.requestId
       + ", sessionId=" + session.sessionId);
   var intent = intentRequest.intent,
       intentName = intentRequest.intent.name;
   // dispatch custom intents to handlers here
   if (intentName == 'AILockIntent') {
       handleTrackRequest(intent, session, callback);
   }
   else if(intentName == 'AMAZON.HelpIntent')
   {
       callback(session.attributes, buildSpeechletResponseWithoutCard("Please follow hackter.io guide and build out the Face Lock and unlock your bolt, afterwards, just ask face lock to unlock the deadbolt", "", false));
       //buildSpeechletResponseWithoutCard("Please follow hackter.io guide and build out the Face Lock and unlock your bolt", "", false);
   }
   else if (intentName =='AMAZON.CancelIntent' || intentName == 'AMAZON.StopIntent')
   {
       callback(session.attributes, buildSpeechletResponseWithoutCard("Exiting AI Face Lock", "", true));
       //buildSpeechletResponseWithoutCard("Exiting AI Face Lock", "", false);
   }
   else {
       throw "Invalid intent";
   }
}
/**
* Called when the user ends the session.
* Is not called when the skill returns shouldEndSession=true.
*/
function onSessionEnded(sessionEndedRequest, session) {
   console.log("onSessionEnded requestId=" + sessionEndedRequest.requestId
       + ", sessionId=" + session.sessionId);
   // Add any cleanup logic here
}
function handleTrackRequest(intent, session, callback) {
   var url = "https://murmuring-bayou-68628.herokuapp.com/"; //you can use your own
               http.get(url, function(res){
                   res.setEncoding('utf8');
                   res.on('data', function (chunk) {
                       console.log('BODY: ' + chunk);
                       var chunk = JSON.parse(chunk);
                       var pubnub = new PubNub({
                           publishKey : '{your own key}',
                           subscribeKey : '{your own key}'
                       })
                       var publishConfig = {
                           channel : "facelock",
                           message : {
                               title: "Face lock",
                               description: "Face lock is detecting unusual activity, click to see security cam."
                           }
                       };
                       if(parseInt(chunk.faceid) == 0)
                       {
                           callback(session.attributes, buildSpeechletResponseWithoutCard("Face lock doesn't recognize any user around", "", "true"));
                           pubnub.publish(publishConfig, function(status, response) {
                                   console.log(status, response);
                           });
                       }
                       else if (parseInt(chunk.distance) == 0 || parseInt(chunk.breahting) == 0)
                       {
                           callback(session.attributes, buildSpeechletResponseWithoutCard("Walabot is not detecting people's presence", "", "true"));
                           pubnub.publish(publishConfig, function(status, response) {
                                   console.log(status, response);
                           });
                       }
                       else
                       {
                           var urlalexa = "https://murmuring-bayou-68628.herokuapp.com/alexafalse"; //you can use your own
                           http.get(urlalexa, function(res1){
                               res1.setEncoding('utf8');
                               res1.on('data', function (chunk1) {
                                   console.log('BODY: ' + chunk1);
                               })})
                           callback(session.attributes, buildSpeechletResponseWithoutCard("Unlocking deadbolt...", "", "true"));
                       }
                   })
               }).on('error', function (e) {
                       callback(session.attributes, buildSpeechletResponseWithoutCard("There was a problem Connecting to your AI Lock", "", "true"));
               })
   //callback(session.attributes, buildSpeechletResponseWithoutCard("test", "", "true"));
   //callback(session.attributes, buildSpeechletResponseWithoutCard("Face lock doesn't see you around", "", "true"));
}
// ------- Helper functions to build responses -------
function buildSpeechletResponse(title, output, repromptText, shouldEndSession) {
   return {
       outputSpeech: {
           type: "PlainText",
           text: output
       },
       card: {
           type: "Simple",
           title: title,
           content: output
       },
       reprompt: {
           outputSpeech: {
               type: "PlainText",
               text: repromptText
           }
       },
       shouldEndSession: shouldEndSession
   };
}
function buildSpeechletResponseWithoutCard(output, repromptText, shouldEndSession) {
   return {
       outputSpeech: {
           type: "PlainText",
           text: output
       },
       reprompt: {
           outputSpeech: {
               type: "PlainText",
               text: repromptText
           }
       },
       shouldEndSession: shouldEndSession
   };
}
function buildResponse(sessionAttributes, speechletResponse) {
   return {
       version: "1.0",
       sessionAttributes: sessionAttributes,
       response: speechletResponse
   };
}
在物联网方面,在网页上注入 tokbox 代码,它应该按如下方式工作
声明:本文内容及配图由入驻作者撰写或者入驻合作网站授权转载。文章观点仅代表作者本人,不代表电子发烧友网立场。文章及其配图仅供工程师学习之用,如有内容侵权或者其他违规问题,请联系本站处理。 举报投诉
- 相关下载
- 相关文章


