
资料下载

综合家庭自动化系统
描述
一、简介:
曾经梦想住在一个全自动的家中吗?无论您身在世界的哪个地方,都可以通过指尖或声音控制的房子。如果有人闯入,可以直接向您的手机发送安全警报的住宅。无论您是否关灯,都能让您无忧无虑。
今天,我将向您展示一个原型,您可以通过它创建、设计和建造一个满足您需求的梦想家园。那么,让我们开始吧!
2、演示:
在此处查看集成家庭自动化的工作原型:
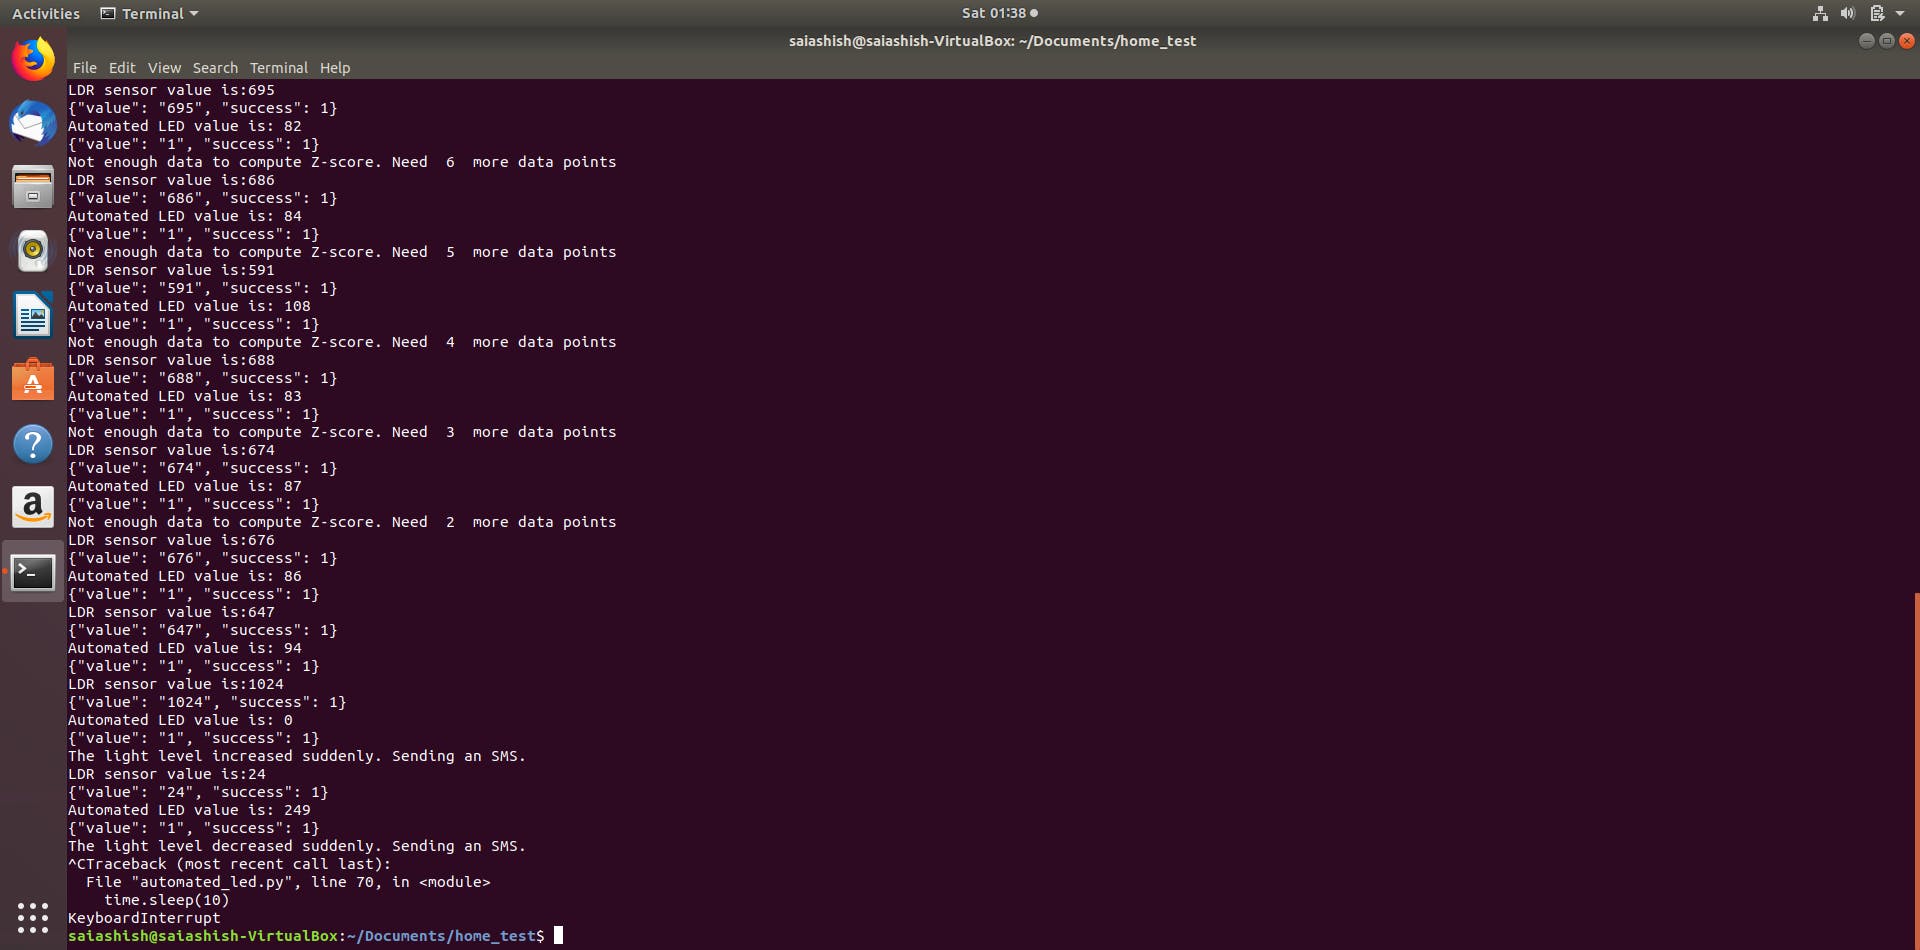
程序和警报:
3.配置设备控制设置:
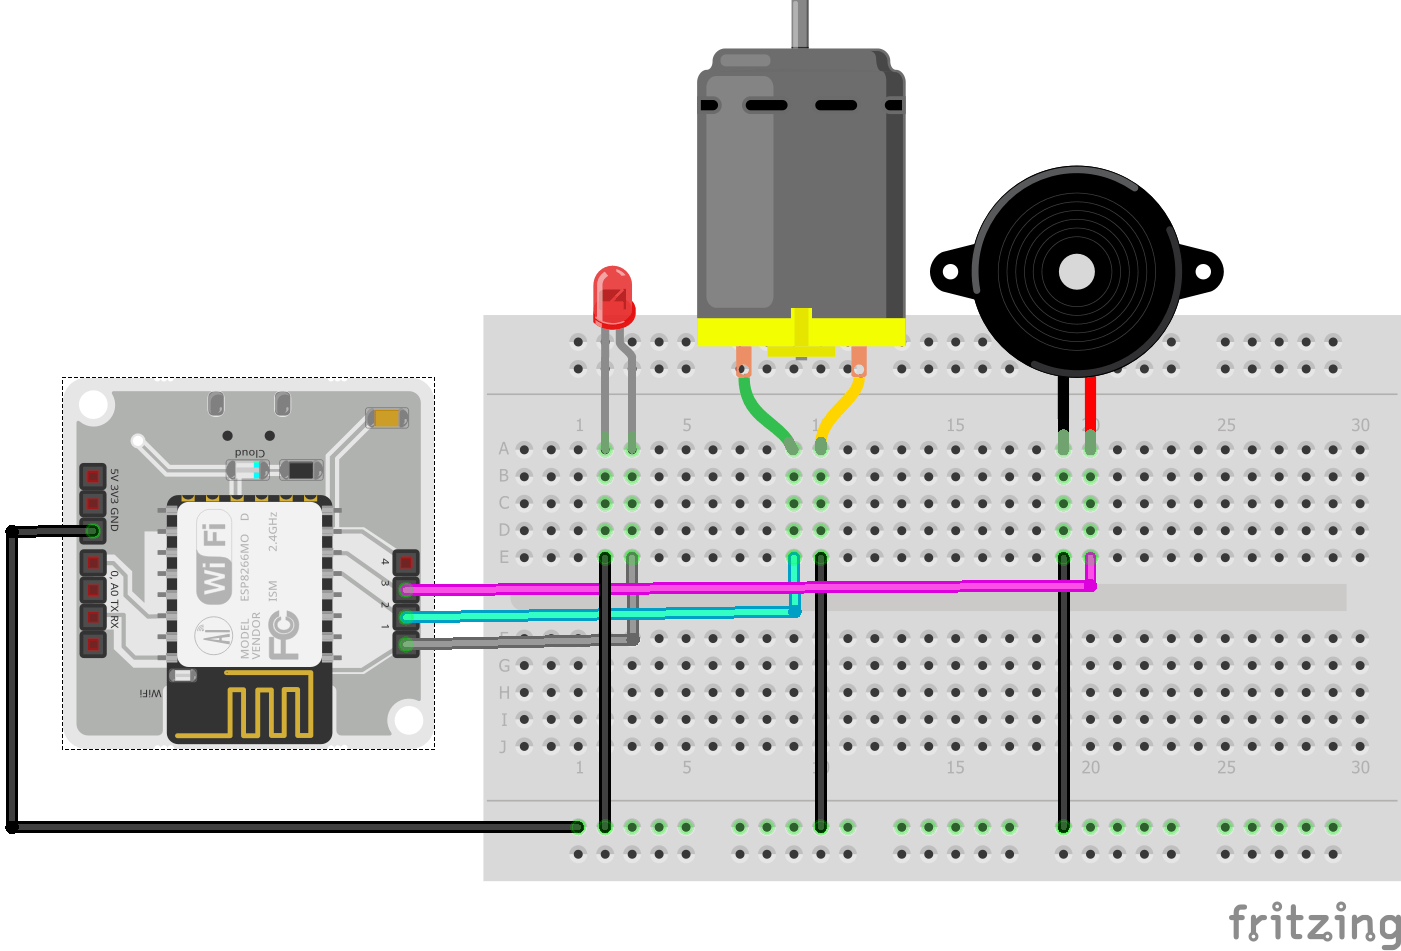
硬件设置:
- 将 LED 的阳极(较长的引脚)连接到 Bolt WiFi 模块的引脚 1。
- 将直流电机的正极连接到模块的引脚 2。
- 将蜂鸣器的正极连接到模块的引脚 3。
- 如图所示,将每个设备的负极连接到公共地。
软件设置:
在开始创建界面的第一步之前,我们必须在 Bolt Cloud 上配置一些设置。所以让我们开始吧!
- 登录到您的Bolt 云帐户。单击“产品”选项卡,然后单击“+ 添加产品”。
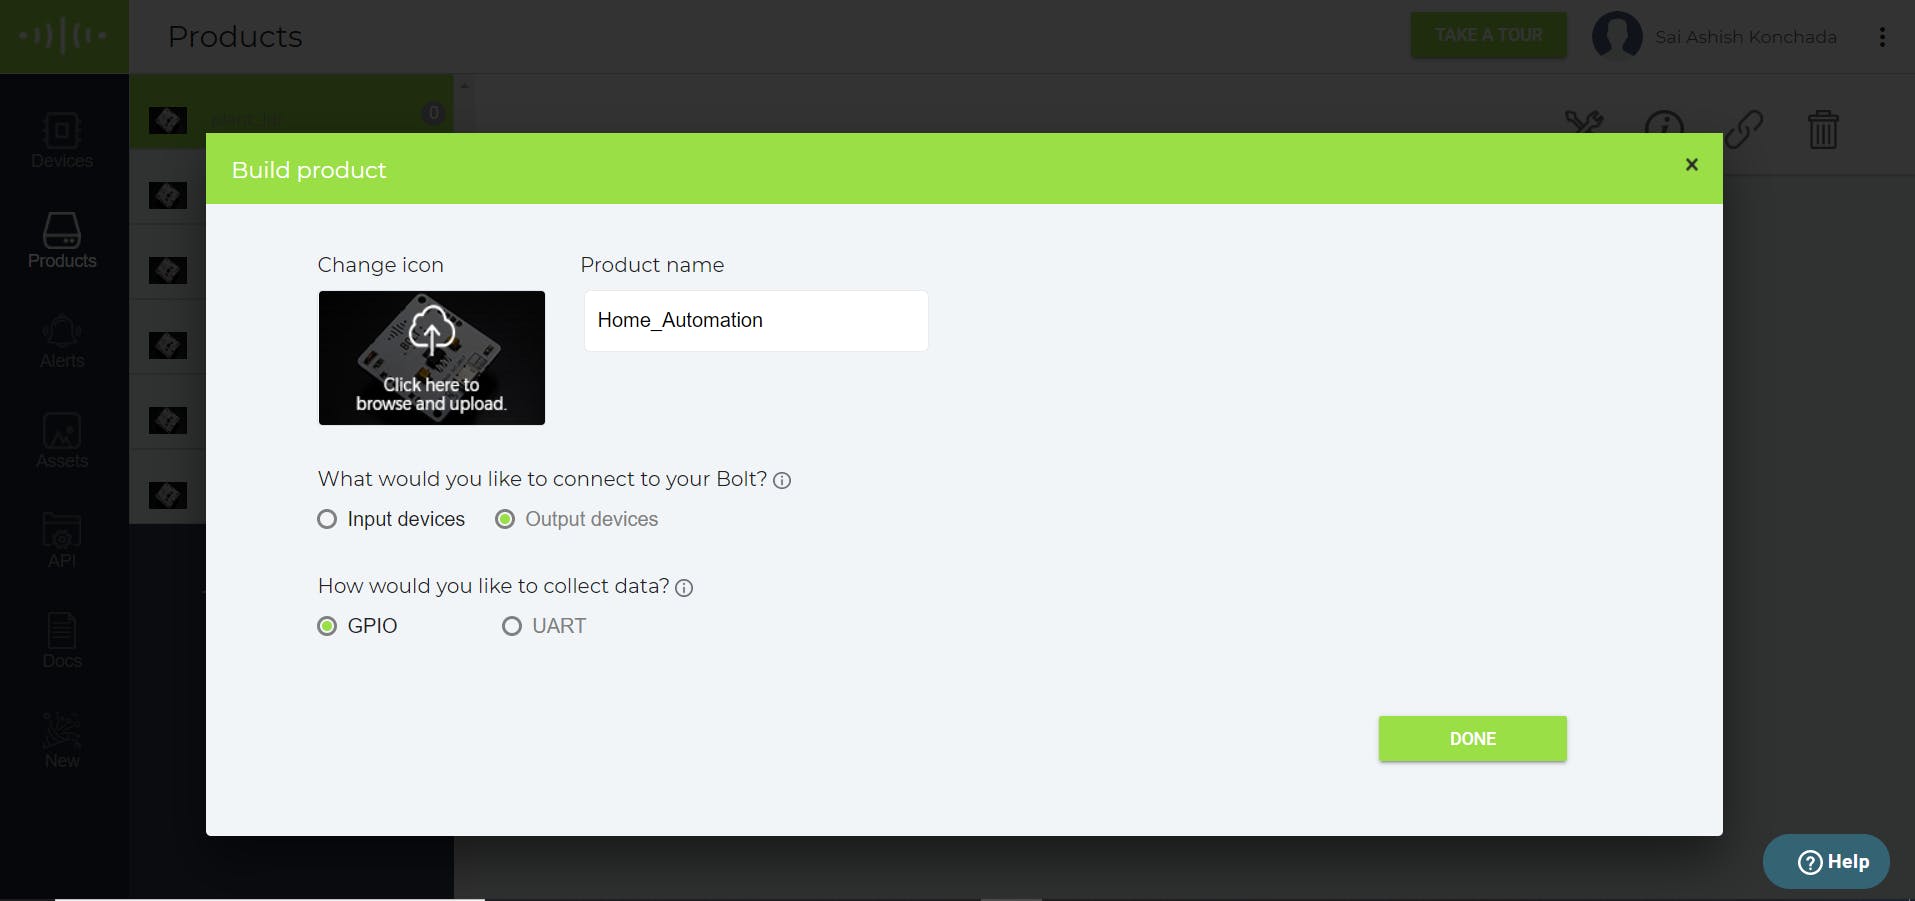
- 选择连接作为输出设备和数据收集方法作为 GPIO
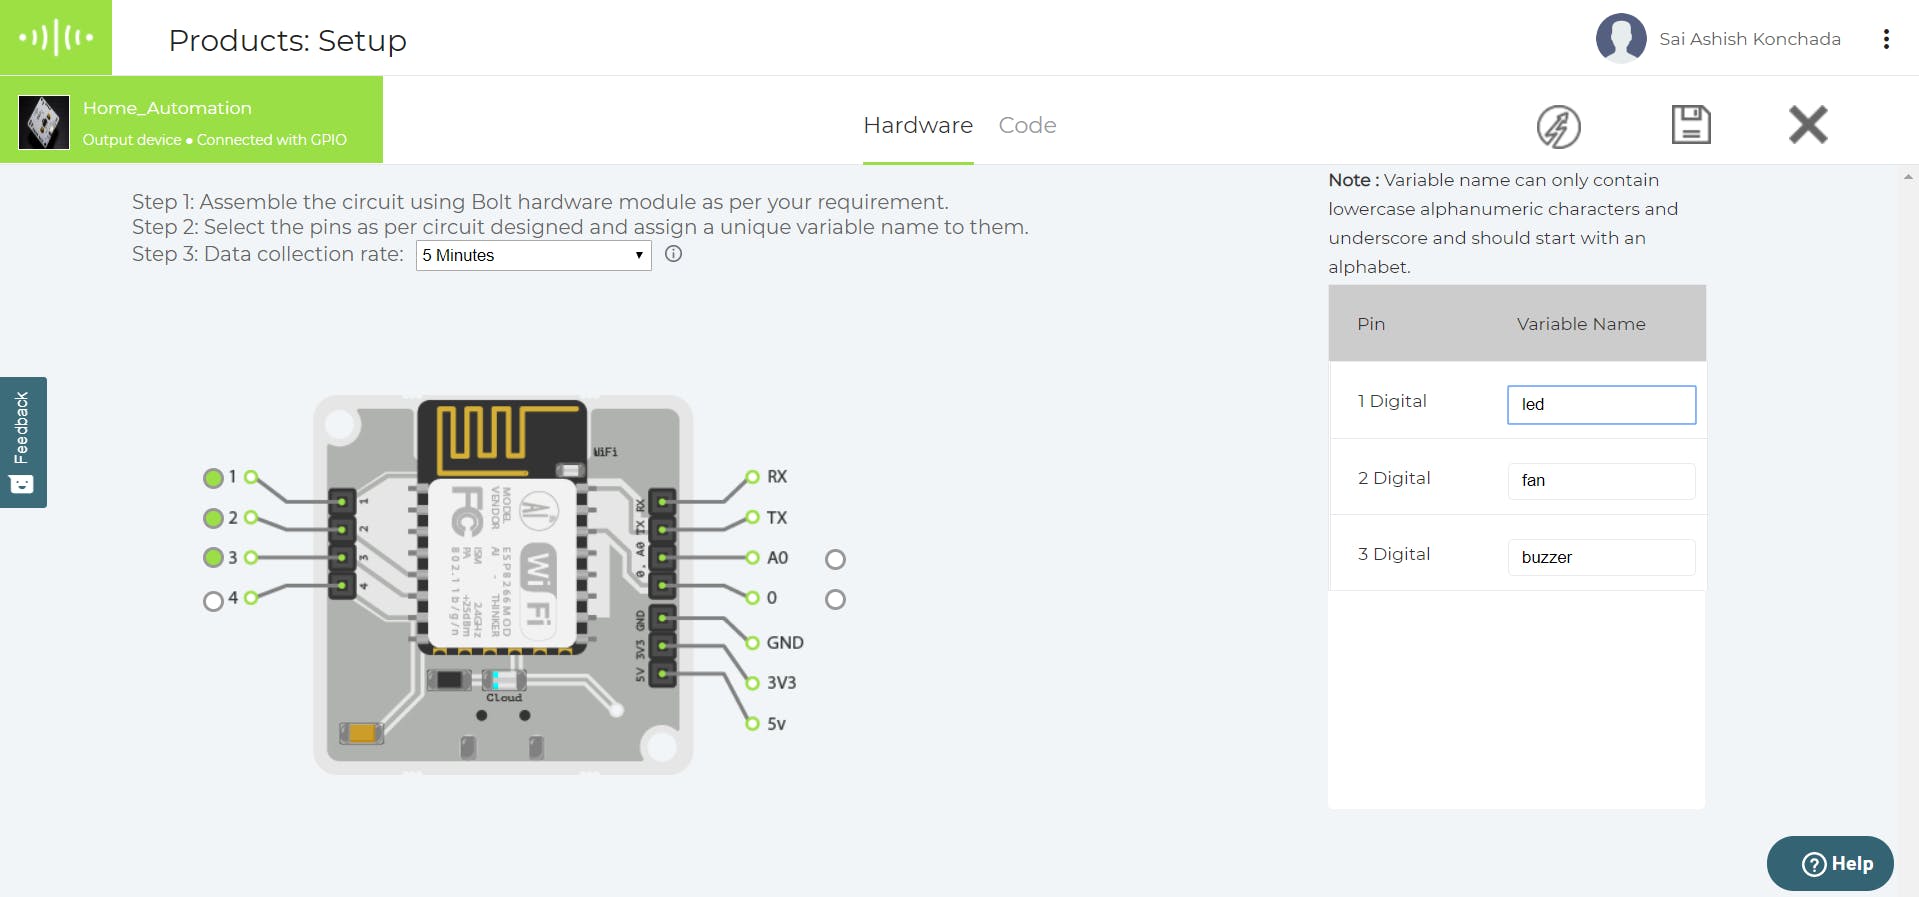
- 单击“配置此产品”并如上所示配置硬件设置并保存。
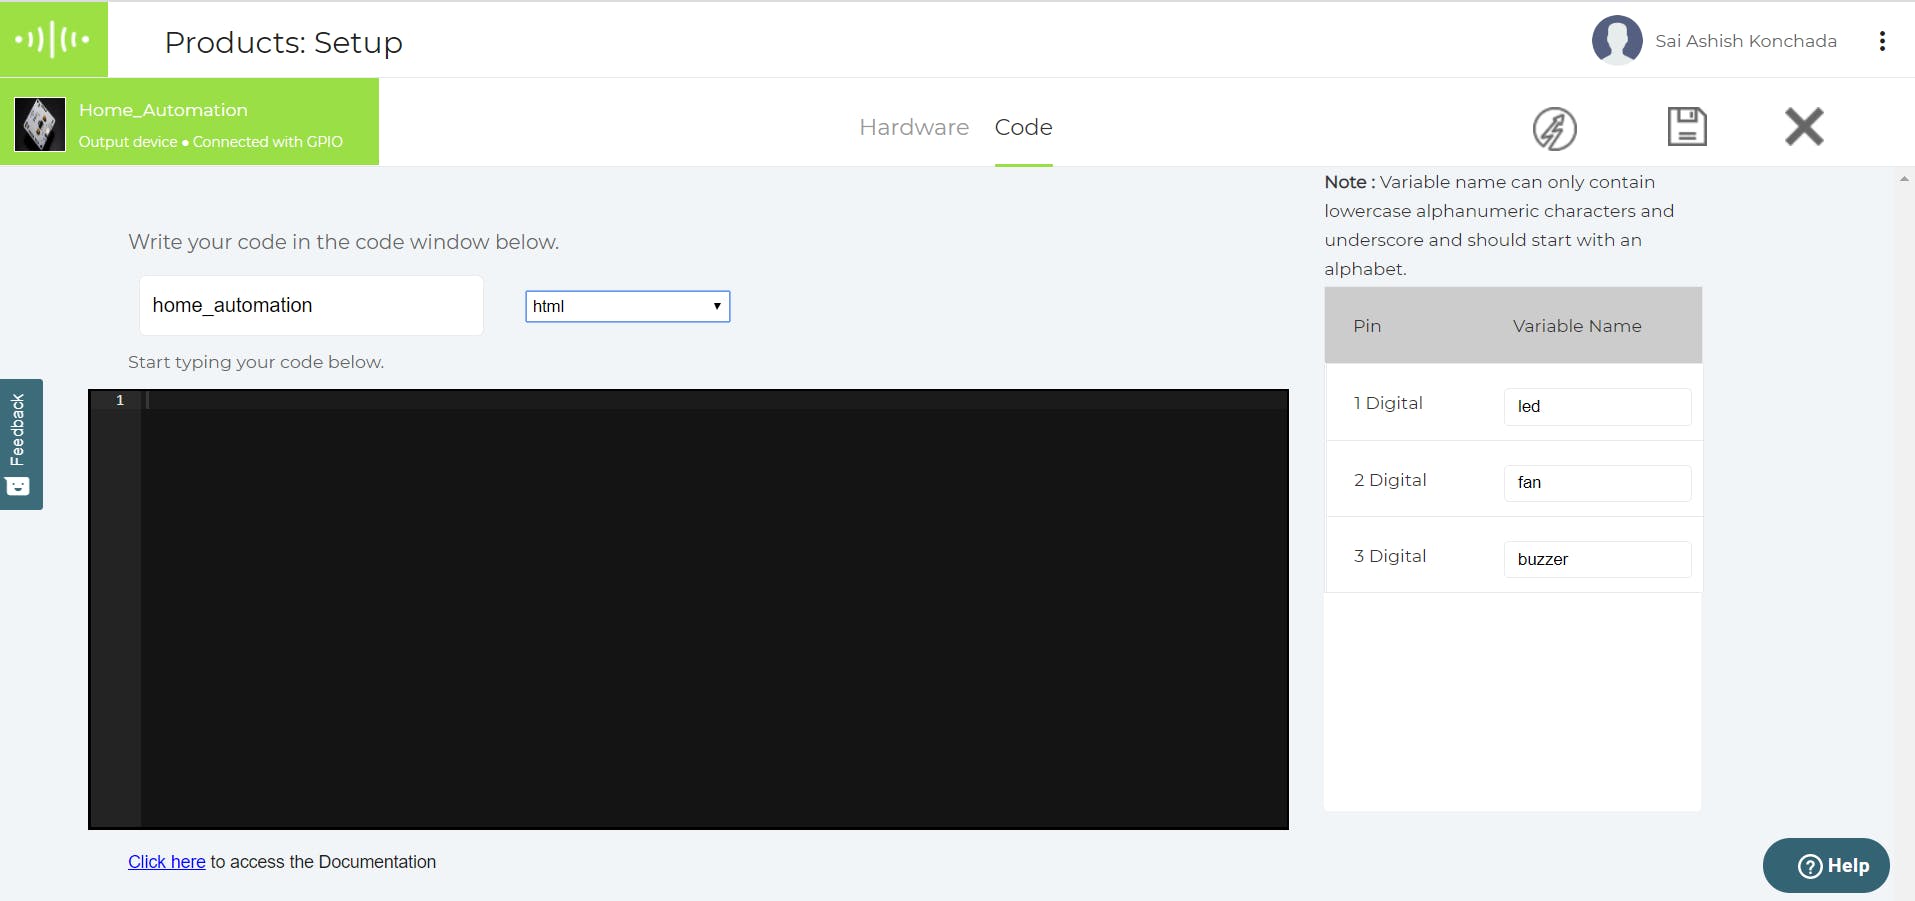
- 现在单击代码选项。将文件名指定为“home_automation”并选择文件扩展名作为 html。输入代码(在下一节中给出)并点击保存按钮。
我们将在下一节中学习对接口进行编码。
4. 创建界面
在本节中,我将帮助您使用 HTML、Javascript 和 CSS 设计一个界面网站,它也可以用于您的手机上的应用程序。
单击“开灯”按钮将打开您房间的灯。同样,“关灯”关闭灯。“风扇开启”和“风扇关闭”按钮将分别打开和关闭电机。“Alarm On”按钮打开蜂鸣器以发出求救信号。可以使用“警报关闭”按钮将其关闭。“自动灯”关闭所有其他灯并根据周围的亮度改变其强度。
最终外观如下所示:
相同的代码如下所示:
html>
<html>
    <head>
        <title>Smart Home Interfacetitle>
		<script type="text/javascript" src="https://cloud.boltiot.com/static/js/boltCommands.js">script>
        <script>
        setKey('{{ApiKey}}','{{Name}}');
        script>
		<style>
		body
		{
		background:url("https://images.unsplash.com/photo-1522444195799-478538b28823?ixlib=rb-1.2.1&ixid=eyJhcHBfaWQiOjEyMDd9&auto=format&fit=crop&w=334&q=80");
		background-size: cover;
		background-repeat:no-repeat;
		background-position:center;
                margin: 0px;
                padding: 0px;
        }
		.space { margin-top: 120px; }
		div
		{
		background-color:#ffffff;
		width: 420px;
		display: flex;
		justify-content: center;
		align-items: center;
		opacity: .8;
		}
		h3
		{
		font-size:22px;
		font-family: "Times New Roman", cursive, sans-serif;
		style>
    head>
<body>
<center>
<div class="space">div>

<div><br>
 <center>
<h3>Experience Automation <br> at your fingertips!h3>center>
div>

<br><br><br>
<input type="button" value="Light On" onClick="digitalWrite(1, 'HIGH');" />
<input type="button" value="Light Off" onClick="digitalWrite(1, 'LOW');" /> <br> <br>
<input type="button" value="Fan On" onClick="digitalWrite(2, 'HIGH');" />
<input type="button" value="Fan Off" onClick="digitalWrite(2, 'LOW');" /> <br> <br>
<input type="button" value="Alarm On" onClick="digitalWrite(3, 'HIGH');" />
<input type="button" value="Alarm off" onClick="digitalWrite(3, 'LOW');" /> <br> <br>
<input type="button" value="Automated Light" onClick="digitalWrite(1, 'LOW');" /><br><br>
<br/><br/>center>

body>
html>
代码说明:
用于表示代码是以 HTML 格式编写的。
HTML 标记标记 HTML 文件的开始和结束。
标题标签定义了我们网页的标题,它显示在浏览器的选项卡上。
将预定义的 JavaScript 导入到我们的 HTML 代码中,该代码配置和设置我们 WiFi 模块的 API 密钥和设备名称。它还提供了读取和写入我们设备的开和关值的功能。
样式标签帮助我们通过 CSS 个性化网页的外观和感觉。它设置背景图像、间距、字体和所有相关设置。
body 标签包含我们界面的实际内容。它包含我们按钮的设计及其号召性用语命令。
5. 设置语音模块:
对于这个项目,我在我们的智能手机中使用了 Google 助手,并搭配 IFTTT 服务来管理触发命令并按照它们进行操作。
从Google Playstore下载 IFTTT 应用程序,或从此处访问 IFTTT 网站。按照如图所示的说明进行注册。现在;
对于应用程序:
点击右上角的“+”按钮。
对于网站:
前往ifttt.com/create并按照如下所示的常见步骤操作。

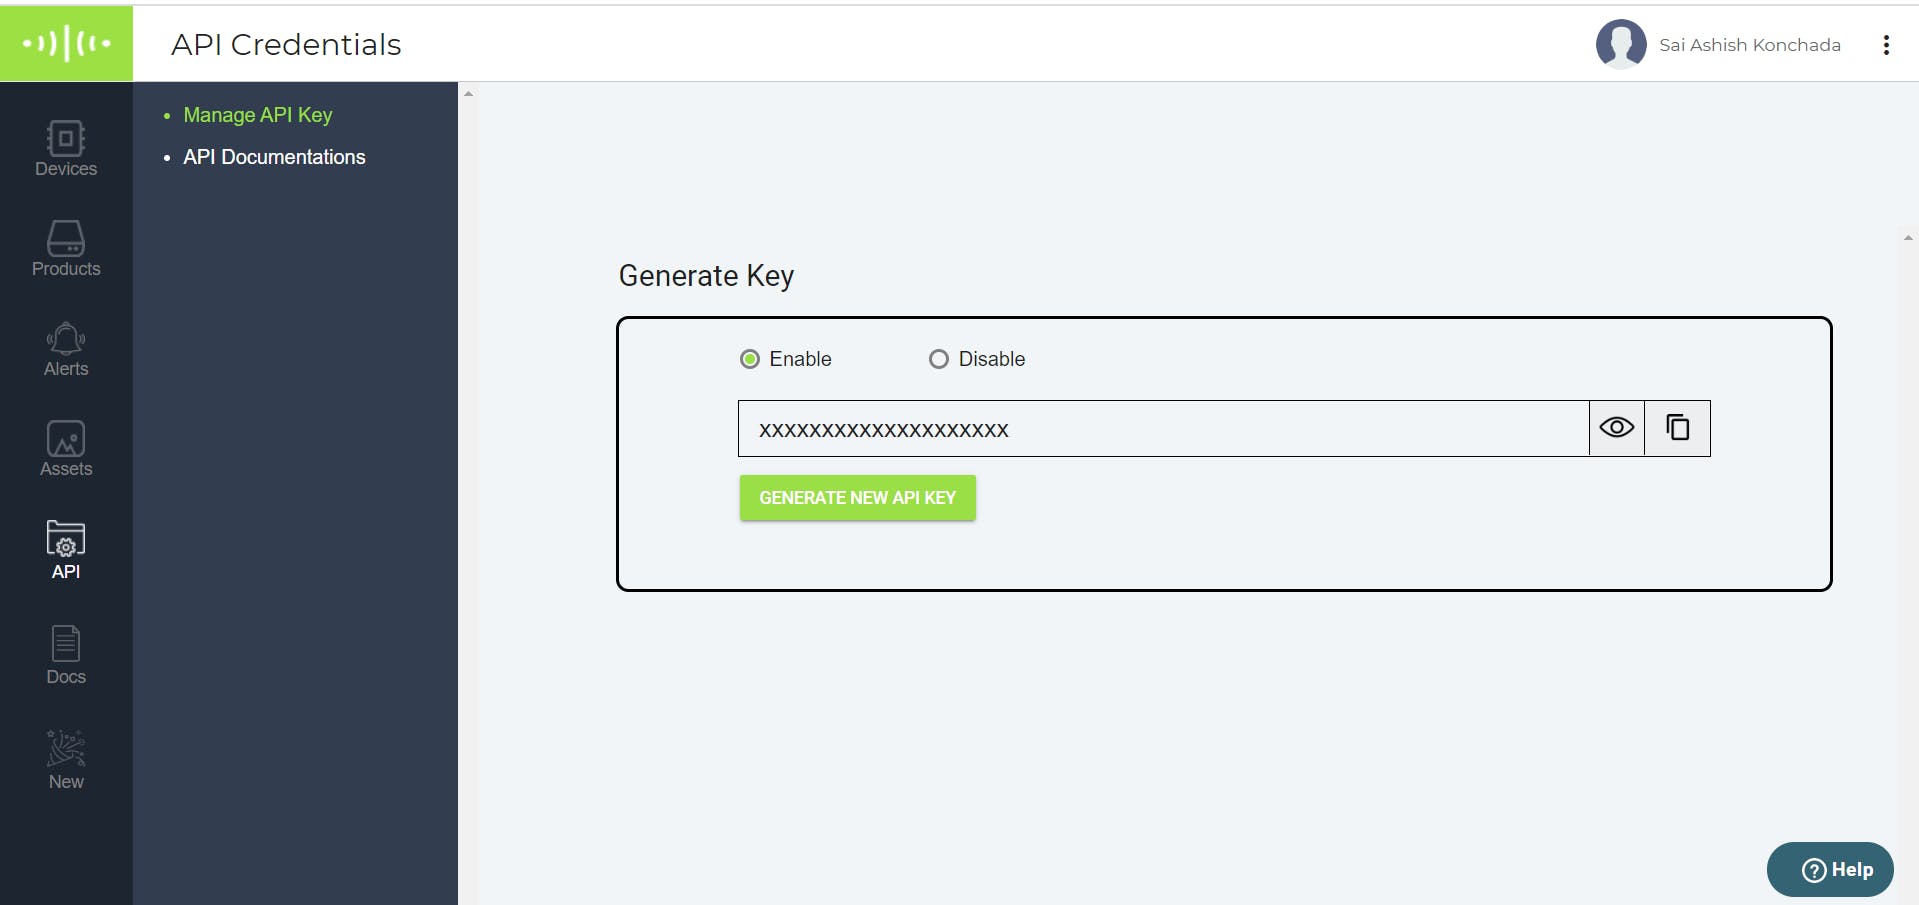
对所有其他命令也遵循相同的过程。将 URL 的 pin 替换为 2(风扇)和 3(蜂鸣器)和状态分别为 HIGH 或 LOW。要查找您设备的 API,请登录您的Bolt Cloud 帐户并前往 API 选项卡。选择启用并复制 API。对于设备 ID,您可以从设备选项卡复制 ID。
设置说明:
'IFTTT' 代表 If This then That 和听起来完全一样。它是一种创建简单条件语句链的服务,称为小程序。它由其他网络服务(例如 Gmail、Google 助手、按钮按下等)中发生的更改触发。如果检测到触发器,它将按照您上面的编程进行操作。
在这里,我们的语音命令 - 'Lights On' 被我们手机的麦克风检测到,然后被 Google Assistant 拾取和分析。当检测到触发动作时,Webhooks 会发出 Web 请求,以从用户输入的 URL 中获取所请求的网页。然后,它以 JSON 格式发送响应。云解码数字引脚电压必须设置为高或低的响应,从而打开或关闭设备。
6.设置警报:
在着手解开更多功能之前,我建议为项目设置警报系统。为了便于访问,我使用了最流行的警报媒介——SMS、Whatsapp 和电子邮件。
对于 SMS 和 Whatsapp,我们需要第三方应用程序的帮助。Twilio巧妙地帮助我们集成触发器以通过其任何渠道发送自动消息。注册并分别获取 SMS 和 Whatsapp 的 SID、AUTH_TOKEN 和手机号码。
对于电子邮件,我们使用简单邮件传输协议 (SMTP) 模块。不需要第三方应用程序,但您需要打开不太安全的应用程序访问,这可以从这里完成。
7.自动灯
一种根据周围环境的亮度改变其强度的光。多么酷啊?灯光将在黑暗中以最大强度发光,并随着早晨的升起而逐渐变暗,它的光芒照耀着我们的大厅。另外,如果周围的光线突然增加或减少,它也会向我们发送消息,从而表明房间里有人。所以,让我们开始建造吧!
这是如何运作的?
为了制造自动灯,我们需要一个可以检测光强度变化的传感器。光敏电阻 (LDR) 就是为此目的而设计的。它根据光的强度改变其电阻 - 光越多,其电阻值越大,反之亦然。
螺栓模块可以借助其 A0(模拟引脚)监控电压变化。现在,为了将这种电阻变化转换为电压变化,我们使用了分压器电路。因此,LDR 上拉一个与电阻变化成比例的电压。
LDR 的取值范围为 0-255,而 LED 的取值范围为 0 到 1024。为了同步这些变化,我们遵循 4:1 映射。我们将 LED 的值设置为 255 - (intensity_value_of_LDR/4),遵循逆映射。因此,环境较暗时,LED 会比以往更亮!
异常检测:
该项目实施 Z 分数分析方法来检测周围环境中光强度行为的任何异常。

Z-score 的计算如上所示:
- 平均值是最后一个帧大小 (r) 值的平均值。
- Z 分数等于乘法因子 (c) * 最后帧大小值变化的均值的平方根。
- 阈值设置为当前值加上或减去的 Z 分数
通过这个数学公式,我们计算出阈值,即哪些光强值落入标准区域,哪些值导致异常。如果在该区域之外检测到一个点,则会通过 SMS 发送警报,指示光强度值突然增加或减少。
我们通过hit and trial方法获得乘法因子和帧大小。更多的 c 意味着更大的边界范围,更多的 r 意味着检测模式的变化。
硬件设置:
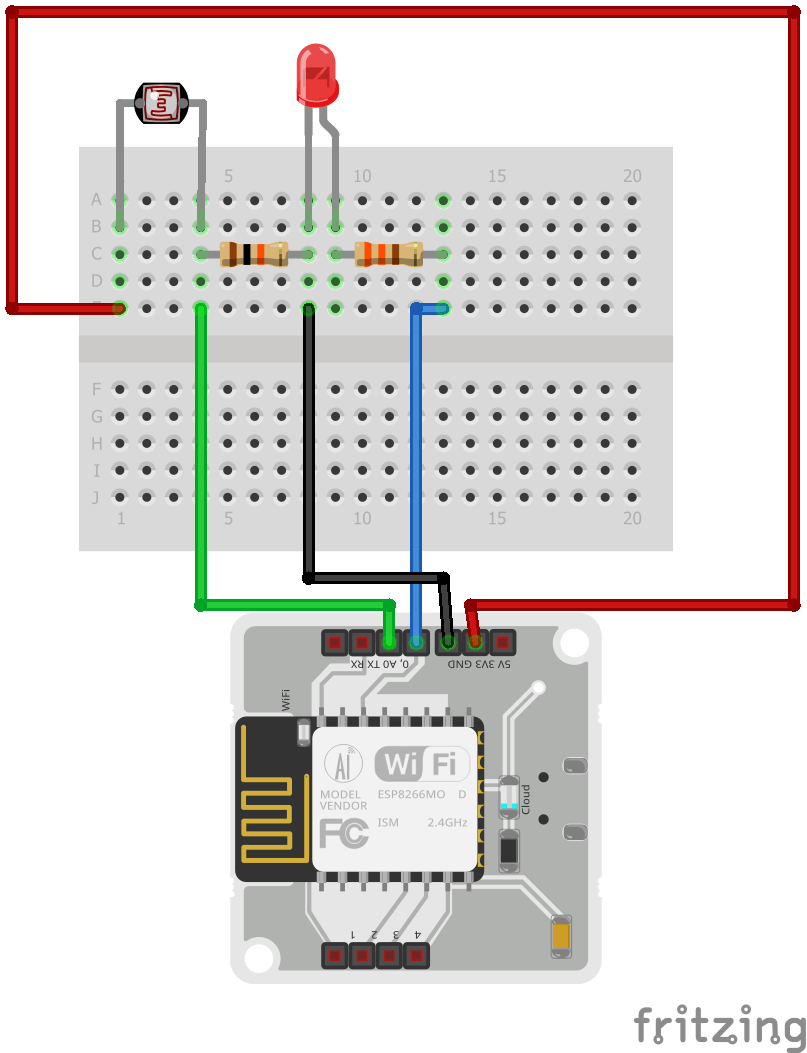
- 将 LDR 的一个引脚连接到引脚 3V3,另一端连接到 Bolt WiFi 模块的引脚 A0。
- 在 LDR 的腿和 LED 的阴极(较短)腿之间连接一个 10k 欧姆电阻器(棕色、黑色、橙色、金色)。
- 如图所示,在 LED 的阳极(较长)引脚和模块的引脚 0 之间连接 300 欧姆(橙色、橙色、棕色、金色)。
- 将阴极(较短)引脚连接到模块的 GND。
软件设置:
在本节中,我们将使用 Python 进行一些操作。我们必须创建 2 个 Python 文件。首先,我们将为我们的主程序创建一个名为conf.py的配置文件,并对其进行编码,如下所示:
SSID = 'You can find SSID in your Twilio Dashboard'
AUTH_TOKEN = 'You can find  on your Twilio Dashboard'
FROM_NUMBER = 'This is the no. generated by Twilio. You can find this on your Twilio Dashboard'
TO_NUMBER = 'This is your number. Make sure you are adding +91 in beginning'
API_KEY = 'This is your Bolt Cloud account API key'
DEVICE_ID = 'This is the ID of your Bolt device'
FROM_WHATSAPP= 'whatsapp: followed by the whatsapp no. generated by Twilio. You can find this in the Programmable SMS's Whatasapp Beta tab'
TO_WHATSAPP= 'whatsapp: followed by your whatsapp number. Make sure you are adding +91 in beginning'
FRAME_SIZE = 10
MUL_FACTOR = 6
创建单独文件的好处是用户可以在此处编辑这些凭据,它将应用于我们与警报系统集成的所有文件。
主程序名为automated_led.py,编码如下:
#importing_the_necessary_packages
import conf, json, time, math, requests, statistics
from boltiot import Sms, Bolt

#defining function to calculate the upper and lower bounds by Z score analysis
def compute_bounds(history_data,frame_size,factor):
    if len(history_data)        return None

    if len(history_data)>frame_size :
        del history_data[0:len(history_data)-frame_size]
    Mn=statistics.mean(history_data)
    Variance=0
    for data in history_data :
        Variance += math.pow((data-Mn),2)
    Zn = factor * math.sqrt(Variance / frame_size)
    High_bound = history_data[frame_size-1]+Zn
    Low_bound = history_data[frame_size-1]-Zn
    return [High_bound,Low_bound] #returns the upper and lower bound

#importing configurations from the conf.py file
mybolt = Bolt(conf.API_KEY, conf.DEVICE_ID)
sms = Sms(conf.SSID, conf.AUTH_TOKEN, conf.TO_NUMBER, conf.FROM_NUMBER)
history_data=[] #list to store the data sensed by LDR


while True:
    response_ldr = mybolt.analogRead('A0') #reading response from analog pin connected to LDR
    ldr_data = json.loads(response_ldr) #response is decoded from the JSON format
    if ldr_data['success'] != 1: #for errors
        print("There was an error while retrieving the data.")
        print("This is the error:"+ldr_data['value'])
        time.sleep(10)
        continue

    try:
        sensor_value = int(ldr_data['value'])
    except Exception as e:
        print("There was an error while parsing the response: ",e)
        continue

    print("LDR sensor value is:" + str(sensor_value)) #prints LDR value on screen
    print(response_ldr)

    led_value_1 = int(sensor_value/4)
    if led_value_1 > 255:
        led_value_1 = 255
    led_value = 255 - led_value_1 #calculating intensity of LED in accordance with LDR
    response_led = mybolt.analogWrite('0', led_value) #setting instensity as calculated from above"""
    print("Automated LED value is: "+str(led_value)) #printing value of LED on screen
    print(response_led)

#invoking function to calculated and return the bounds
    bound = compute_bounds(history_data,conf.FRAME_SIZE,conf.MUL_FACTOR)
    if not bound:
        required_data_count=conf.FRAME_SIZE-len(history_data)
        if(required_data_count!=0 and required_data_count!=1):
            print("Not enough data to compute Z-score. Need ",required_data_count," more data points")
        history_data.append(int(ldr_data['value'])) #appends to list of input data
        time.sleep(10)
        continue

    try:
        if sensor_value > bound[0] : #if sensor value is greater than Higher bound
            print ("The light level increased suddenly. Sending an SMS.")
            #sends SMS as programmed
            response = sms.send_sms("Someone turned on the lights")
            print("This is the response ",response)
        elif sensor_value < bound[1]: #if sensor value is lesser than Lesser Bound
            print ("The light level decreased suddenly. Sending an SMS.")
            #sends SMS as programmed
            response = sms.send_sms("Someone turned off the lights")
            print("This is the response ",response)
        history_data.append(sensor_value) #appends to list of input data
    except Exception as e:
        print ("Error",e)
    time.sleep(10)
8.安全系统
安全不是所有人都关心的问题吗?你所有的贵重物品、漫画书和电子游戏都在你的公寓里。如果有人篡改您的门锁并进入您的家怎么办。你可以有一个闭路电视摄像机,但它不能给你实时通知,并且会造成损害。为了克服这个困境,我向您介绍了这个简单的入侵警报安全系统。
这是如何运作的?
每当有人打开门时,它都会穿过 PIR 传感器的视野。它检测到它发出的红外辐射,并在它的两半之间产生一个正的差异变化。Bolt WiFi 模块会接收此更改,然后将警报直接发送到我们的手机中。
硬件设置:
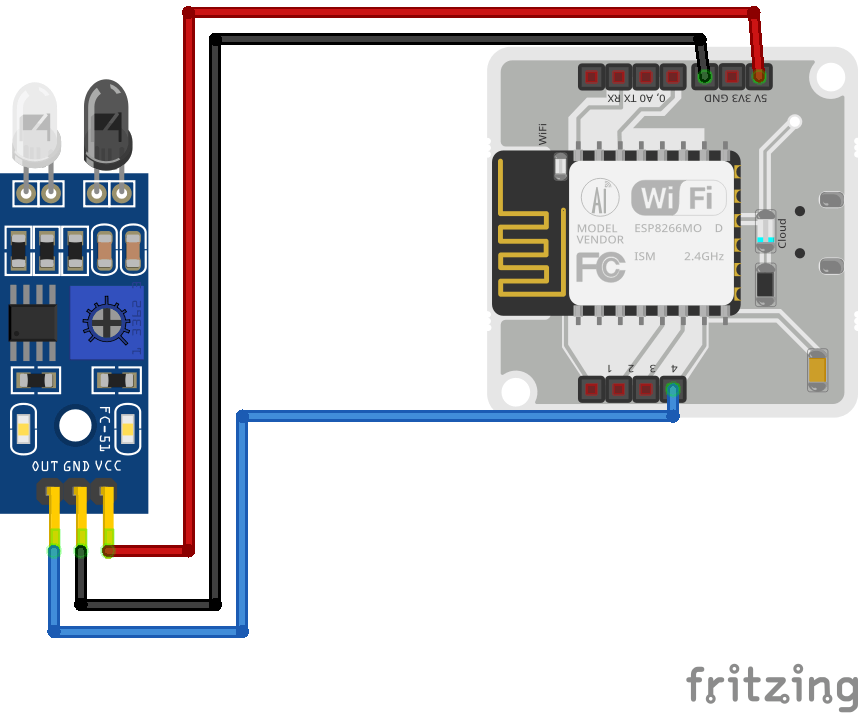
- 将 IR 传感器的 VCC 连接到螺栓模块的 5V。
- 将 IR 传感器的 GND 连接到螺栓模块的 GND。
- 将 IR 传感器的 OUT/DATA 连接到螺栓模块的引脚 4。
注意:您可以使用具有与所示相同连接的 PIR 传感器。
软件设置:
创建一个名为 intruder_alert_system.py 的 python 文件并将其编码如下所示:
import conf, json, time, requests #importing the required packages
from boltiot import Sms, Bolt
import smtplib
from email.mime.text import MIMEText
from email.mime.multipart import MIMEMultipart

#configuring the email settings
email = 'Your_email_id'
password = 'Your_email_password'
send_to_email = 'Recipient's_Email '
subject = 'Intrusion'
message = 'Someone Entered!'

msg = MIMEMultipart()
msg['From'] = email
msg['To'] = send_to_email
msg['Subject'] = subject

msg.attach(MIMEText(message, 'plain'))

#SMS configuration
sms = Sms(conf.SSID, conf.AUTH_TOKEN, conf.TO_NUMBER, conf.FROM_NUMBER)
#Whatsapp configuration
sms_whatsapp= Sms(conf.SSID, conf.AUTH_TOKEN, conf.TO_WHATSAPP, conf.FROM_WHATSAPP)

while True:
    response = requests.get('http://cloud.boltiot.com/remote/your_api_key/digitalRead?pin=4&deviceName=your_device_id') #getting response from PIR sensor
    data=json.loads(response.text) #decoding the response obtained in JSON format
    print(data)
    sensor_value = int(data['value'])
    if sensor_value == 1: #Sensor picked up reading
        print("Motion Detected!")
        print("Sending SMS...")
        server = smtplib.SMTP('smtp.gmail.com', 587)
        server.starttls()
        server.login(email, password)
        text = msg.as_string()
        server.sendmail(email, send_to_email, text) #Email Delivered
        sms.send_sms("Intruder Alert!") #SMS sent
        sms_whatsapp.send_sms("Intruder Alert!") #Whatsapp Successful
        server.quit()
    elif sensor_value ==0:
        print("SENSOR IS READY")
    time.sleep(5)
9. 整合一切:
在舒适的休息室休息时,您可以通过指尖和语音命令体验自动化的力量。您可以通过运行automated_led.py 来享受您的个人自动灯的乐趣
当您因日常事务而离开家时,您可以运行 intruder_alert_system.py,在野外无忧无虑地游荡,知道您的个人系统会提醒您任何闯入事件。
最终的集成电路和所有代码如下所示。
声明:本文内容及配图由入驻作者撰写或者入驻合作网站授权转载。文章观点仅代表作者本人,不代表电子发烧友网立场。文章及其配图仅供工程师学习之用,如有内容侵权或者其他违规问题,请联系本站处理。 举报投诉
- 相关下载
- 相关文章


