资料下载

通过Web服务器控制双直流电机和伺服电机
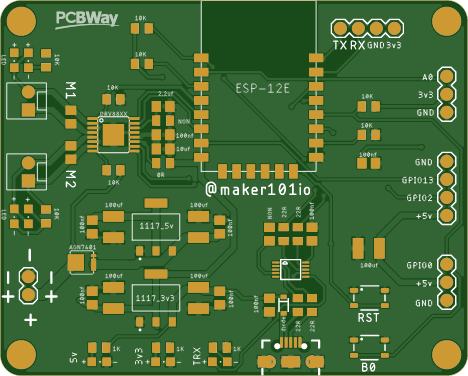
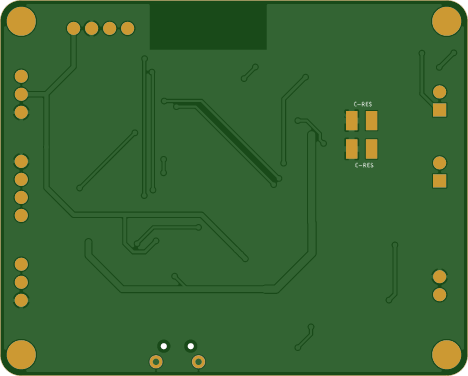
pcb图:

描述
通过 Web 服务器控制双直流电机和伺服电机 - ESP8266 DRV8848 电机驱动板
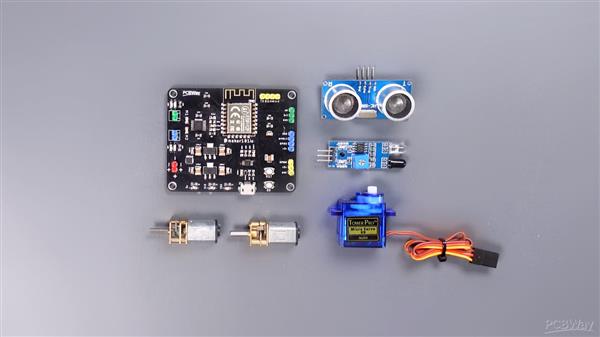
在这个项目中,您将看到如何使用 ESP 构建一个 Web 服务器,该服务器使用四个按钮和一个滑块控制双直流电机方向和一个伺服电机位置。我将使用我上次设计的基于 ESP8266 的 DRV8848 电机驱动器开发板,但该项目的源代码兼容 L298N 和 L293D 等电机驱动器。

如果您需要一款可以驱动双直流电机的ESP8266 WiFi开发板,您可以从PCBWay订购这款PCB,质优价廉。您可以从链接中了解该板的特性,包括焊接和组装等所有阶段
https://www.pcbway.com/project/shareproject/ESP_12F_DRV88xx_Motor_Driver_Development_Board_bc4e7391.html

让我们看一下允许通过 Web 服务器控制直流电机方向和伺服电机位置的源代码。
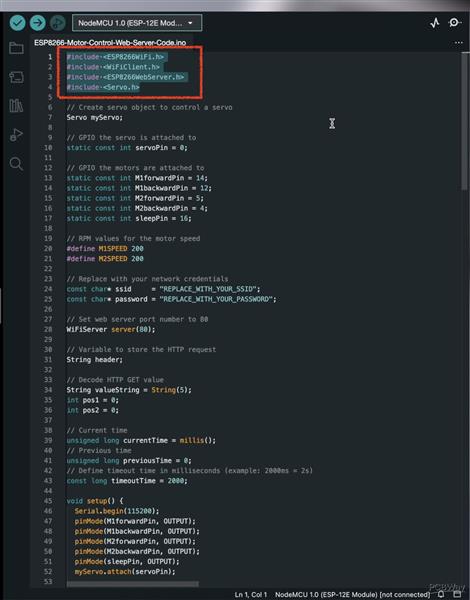
添加了必要的 WiFi 和伺服库以使用 Arduino IDE。
#include #include #include #include
已创建名为“My Servo”的伺服对象。
伺服我的伺服;
定义了连接伺服电机和直流电机的 GPIO 引脚。
// 伺服器连接到 GPIO static const int servoPin = 0 ; //电机连接到 GPIO static const int M1forwardPin = 14 ; static const int M1backwardPin = 12 ; static const int M2forwardPin = 5 ; static const int M2backwardPin = 4 ; 静态常量int sleepPin = 16 ;
如果您的驱动器不包含“睡眠”引脚,请将“睡眠模式”行更改为注释行。
//static const int sleepPin = 16;
电机速度已定义,可根据需要进行更改。
#define M1SPEED 200 #define M2SPEED 200
用这些行替换您的网络详细信息。
const char * ssid = "REPLACE_WITH_YOUR_SSID" ; const char * password = "REPLACE_WITH_YOUR_PASSWORD" ;
创建了一个变量来存储 HTTP 请求的标头。
字符串头;
然后又创建了几个变量,用于从 HTTP 请求中提取滑块位置。
字符串值字符串 = 字符串( 5 ); int pos1 = 0 ; int pos2 = 0 ;
在“设置”部分,启动串行通信并指定连接引脚的模式。如果不使用“sleep pin”,则可以移除该线。
序列号.begin(115200); pinMode(M1forwardPin,输出);pinMode(M1backwardPin,输出);pinMode(M2forwardPin,输出);pinMode(M2backwardPin,输出);pinMode(sleepPin,输出);myServo.attach(servoPin); 数字写入(sleepPin,高);
然后 Wi-Fi 连接开始,IP 地址打印在串口监视器上。
串行。打印(“连接到”); 序列号.println(ssid); WiFi.begin(ssid, 密码); while (WiFi.status() != WL_CONNECTED) { delay( 500 ); 串行。打印(“。”); } // 打印本地IP 地址并启动 Web 服务器 Serial.println( "" ); Serial.println( “WiFi 已连接。” ); Serial.println( "IP地址:" ); Serial.println(WiFi.localIP()); 服务器.开始();
最后,在进入循环部分之前,为电机的移动和方向创建了函数。
void forward () { analogWrite(M1forwardPin, M1SPEED); 模拟写入(M2forwardPin,M2SPEED);模拟写入(M1backwardPin, 0);模拟写入(M2backwardPin, 0);} void backward () { analogWrite(M1backwardPin, M1SPEED); 模拟写入(M2backwardPin,M2SPEED);模拟写入(M1forwardPin, 0);模拟写入(M2forwardPin, 0);} void turnLeft () { analogWrite(M1backwardPin, M1SPEED); 模拟写入(M2forwardPin,M2SPEED);模拟写入(M1forwardPin, 0);模拟写入(M2backwardPin, 0);} void 右转() { 模拟写入(M1forwardPin,M1SPEED);模拟写入(M2backwardPin,M2SPEED);模拟写入(M1backwardPin,0);模拟写入(M2forwardPin,0);} void stopMotors () { analogWrite(M1forwardPin, 0 ); 模拟写入(M2forwardPin,0);模拟写入(M1backwardPin,0);模拟写入(M2backwardPin,0);}
在循环部分,定义了当新客户端首次与 Web 服务器建立连接时会发生什么。当从客户端收到请求时,传入的数据将被保存。只要客户端保持连接,后面的 while 循环就会运行。
WiFiClient client = server.available(); 如果(客户端){ currentTime = millis(); 上一个时间 = 当前时间;Serial.println( “新客户。” ); 字符串 currentLine = "" ; while (client.connected() && currentTime - previousTime <= timeoutTime) { currentTime = millis(); 如果(client.available()) { char c = client.read(); 串口.write(c); 标题 += c; 如果(c == '\n' ) {如果(currentLine.length() == 0 ) {
然后生成 Web 服务器并发送一些 HTML 文本以显示网页。使用“客户端打印”功能将网页发送到客户端。您必须输入要作为参数发送给客户端的内容。
client.println("HTTP/1.1 200 OK"); client.println("内容类型:文本/html"); client.println("连接:关闭"); 客户端.println(); // 显示 HTML 网页 client.println(" < html >< head >< meta name = \ " viewport \" content = \ " width = device-width, initial-scale = 1\ "> "); // 按钮和滑块的样式部分。您可以更改自定义设置,例如颜色等。client.println(" <样式> "); 客户。显示:块;弹性方向:列;对齐项目:居中;}"); client.println(".slider { width : 275px ; accent-color : #ede100 ; cursor : pointer;}"); client.println(".button-container { display : flex ; flex-direction : column; align-items : center;}"); client.println(".row-container { display : flex; flex-direction : row; justify-content : center; align-items : center;} "); client.println(".button {宽度: 135px ;边界:0;背景色:#ede100;框阴影:插图2px 2px 3px #b2b2b2,插图 - 2px - 2px 3px #000;填充:10px 25px;文本对齐:居中;显示:内联块;边界半径:5px;字体大小:16px;边距:10px 25px;光标:指针;}"); client.println(".button:hover {背景颜色:#fff200 ;}"); client.println(".button:active{ box-shadow : inset 2px 2px 3px #000 , inset - 2px - 2px 3px #b2b2b2 ;}"); client.println(" footer { text-align : center; margin : 50px ; width : 400px ; background-color : #ede100 ;}"); client.println(" style >>< script src = \ " https: //ajax.googleapis . com /ajax / libs / jquery / 3.3.1 / jquery.min.js \"> " ) ; // 正文部分。包含按钮和滑块的功能。client.println(" <正文> "); client.println(" < div class = \ "容器\"> "); client.println(" < div class = \ " row-container \">< h2 > ESP8266电机控制面板 h2 >"); client.println(" < div >< div class = \ " button-container \"> "); client.println(" < div class = \ " row-container \">< button class = \ "按钮\" id = \ " forward-btn \" onmousedown = \ " btnVal (' forward ')\" onmouseup = \ " btnVal ('停止')\">前进
" ) ;client.println(" < div class = \ " row-container \">< button class = \ " button \ " id = \ " left-btn \ " onmousedown = \ " btnVal (' left ' )\" onmouseup = \ " btnVal (' stop ' )\"> Left "); client.println("
" ); client.println(" div > "); client.println(" < div class = \ " row-container \">< p > Servo Position:<跨度 标识= \ " servoPos \"> span > p > div > "); client.println(" < div class = \ " row-container \">< input type = \ " range \" min = \ " 0 \" max = \ " 180 \" class = \ " slider \" id = \ "servoSlider \" onchange =\ " servo ( this.value )\" value = "+valueString+" /> div > "); client.println(" < div class = \ " row-container \">< footer > < p > @Maker101io p > footer > div > div > "); // 脚本部分。获取按钮和滑块值并执行函数。client.println(" < script > "); client.println("var滑块 =文档.getElementById(\ "servoSlider\");" ); client.println( "var servoP = document.getElementById(\"servoPos\"); servoP.innerHTML = slider.value;" ); client.println( "滑块。 oninput = function() { slider.value = this.value; servoP.innerHTML = this.value; }" ); client.println( "$.ajaxSetup({timeout:1000});" ); client.println( " function btnVal(dir) { $.get(\"/?btnVal=\" + dir, true);}" ); client.println( "function servo(pos) { $.get(\"/?value=\ " + pos + \"&\");}" ); client.println( "{Connection: close}; script > "); client.println("< /正文> ");
让我们看一下 ESP 发送给浏览器的 HTML 代码。该网页有一些用于按钮和滑块的 CSS。如果您确定自己在做什么,则可以更改此部分中定义的一些属性,例如颜色和大小。
如果您想在网页上进行更改,我会将这些 HTML 代码与源代码一起共享。请记住,您必须更新您对 Arduino IDE 共享源代码中找到的 HTML 行所做更改的 HTML 行。修改时要注意的一点是需要在HTML代码中的“双引号”符号前加上“反斜杠”符号。
 < html >< head >< meta  name = "viewport"  content = "width=device-width, initial-scale=1" >

<样式>
.container {字体:标题;显示:块;弹性方向:列;对齐项目:居中;}
.slider {宽度:275px ; 强调色:#ede100;游标:指针;}
.button-container {显示:flex; 弹性方向:列;对齐项目:居中;}
.row-container {显示:flex; 弹性方向:行;证明内容:居中;对齐项目:居中;}
.button {宽度: 135px ; 边界:0;背景色:#ede100;框阴影:插图2px  2px  3px  #b2b2b2,插图 - 2px - 2px  3px  #000;填充:10px  25px;文本对齐:居中;显示:内联块;边界半径:5px;字体大小:16px;保证金:10px  25px; 游标:指针;}
.button:hover {背景颜色:#fff200 ;}
.button:active{ box-shadow : inset 2px  2px  3px  #000 , inset - 2px - 2px  3px  #b2b2b2 ;}
页脚 {文本对齐:居中;边距:50px;宽度:400px;背景色:#ede100 ;}
  style >< script  src = "https://ajax.googleapis.com/ajax/libs/jquery/3.3.1/jquery.min.js" > script > 头>
添加了四个按钮类,并为每个按钮定义了电机方向。只要按钮一直被按下,按钮的“方向”值就会被获取,当按钮被释放时,“停止”值就会被获取。然后添加一个滑块,为滑块定义最小和最大范围。创建了一个“值字符串”变量来保存滑块值。
< div class = " container" > < div class = "row-container" >
ESP8266电机控制面板
< div class = " button - container " > < div class = "row-container" >> < button class = "button" onmousedown = "btnVal('forward')" onmouseup = "btnVal('stop')" > Forward button > div > < div class = "row-container" >> < button class = "button" id = " left-btn" onmousedown = "btnVal('left')" onmouseup = "btnVal('stop')" > Left button > < button class = "button" id = "right-btn" onmousedown= "btnVal('right')" onmouseup = "btnVal('stop')" > Right button > div > < div class = "row-container" >> < button class = "button" id = "backward -btn" onmousedown = "btnVal('backward')" onmouseup = "btnVal('stop')" > Backward button > div > div > div > < div 类="row-container" >
伺服位置: < span id = "servoPos" >
< div class = " row-container" >< input type = "range " min = “0” max = “180”类= “滑块” id = “servoSlider” onchange = “servo(this.value)” value = “+valueString+" /> div >
@ Maker101io
_ _
最后,您发出 HTTP GET 请求以获取值。执行两个处理按钮方向值和滑块值的函数。
<脚本>
var slider = document .getElementById( "servoSlider" );
var servoP = document .getElementById( "servoPos" );
servoP.innerHTML = slider.value;
slider.oninput = function () { slider.value = this .value; servoP.innerHTML = this .value;}
$.ajaxSetup({超时:1000 });
function  btnVal ( dir ) { $.get( "/?btnVal=" + dir);}
 function  servo ( pos ) { $.get( "/?value=" + pos + "&" );}
{连接:关闭};
 脚本>< /正文>
让我们加载源代码并测试功能。上传代码后,打开串行监视器。复制串行监视器上显示的 IP 地址。打开浏览器,粘贴 IP 地址,您将看到之前创建的网页。按住电机方向按钮并松开。在串行监视器中,您可以看到发送到 ESP 的 HTTP 请求。
“If”和“Else”语句是一个条件。它控制按下哪个按钮并运行根据接收到的数据确定的功能。此数据包含为按钮定义的变量。当您移动滑块时,两个符号之间的滑块位置将被获取并存储在“值字符串”变量中。然后将此字符串值转换为整数值。该转换值被写入伺服电机位置。伺服电机移动到该位置值。
如果(header.indexOf( "GET /?value=" )>= 0 ) {
pos1 = header.indexOf( '=' );
pos2 = header.indexOf( '&' );
valueString = header.substring(pos1+ 1 , pos2);
myServo.write(valueString.toInt()); // 旋转舵机
Serial.println(valueString);
} else  if (header.indexOf( "GET /?btnVal=forward" )!= -1 ) {
Serial.println( “转发” );
向前();// 向前转
} else  if (header.indexOf( "GET /?btnVal=left" )!= -1 ) {
Serial.println( “左” );
左转(); // 向左转
} else  if (header.indexOf( "GET /?btnVal=right" )!= -1 ) {
Serial.println( “正确” );
右转();// 右转
} else  if (header.indexOf( "GET /?btnVal=backward" )!= -1 ) {
Serial.println( “返回” );
落后(); // 向后转
} else  if (header.indexOf( "GET /?btnVal=stop" )!= -1 ) {
Serial.println( “停止” );
停止电机();// 停止
}
// HTTP 响应以另一个空行结束
客户端.println();
// 跳出 while 循环
break ;
} else { // 如果你有换行符,则清除 currentLine
currentLine = "" ;
}
} else  if (c != '\r' ) { // 如果除了回车符之外还有其他任何内容,则
currentLine += c;// 将其添加到当前行的末尾
}
}
}
// 清除头变量
header = "" ;
// 关闭连接
客户端停止();
Serial.println( "客户端断开连接。" );
序列号.println( "" );
}
}
感谢您的关注和阅读。如果您有任何问题或建议,请在评论中告诉我。
代码
ESP8266 直流电机和伺服电机通过网络服务器控制
ESP8266-Motor-Control-Web-Server-Code.ino
下载(18)
网页的 HTML 代码
HTML
| html> | |
|
'
;
$('body').append(setStyle+' × ');
}
// 关闭路障广告
var closeTdkAd=function(){
if($('#fix-tdkad').length){
$('#fix-tdkad').animate({
"opacity" : 0
}, 500, function(){
$('#fix-tdkad').remove();
$('#road-block-bg').hide();
});
}
}
// cookie 设置函数
$.extend({
cookieHelper: function(name, value, options) {
if (typeof value != 'undefined') { // name and value given, set cookie
options = options || {};
if (value === null) {
value = '';
options.expires = -1;
}
var expires = '';
if (options.expires && (typeof options.expires == 'number' || options.expires.toUTCString)) {
var date;
if (typeof options.expires == 'number') {
date = new Date();
date.setTime(date.getTime() + (options.expires * 60 * 60 * 1000));
} else {
date = options.expires;
}
expires = '; expires=' + date.toUTCString(); // use expires attribute, max-age is not supported by IE
}
var path = options.path ? '; path=' + options.path : '';
var domain = options.domain ? '; domain=' + options.domain : '';
var secure = options.secure ? '; secure' : '';
document.cookie = [name, '=', encodeURIComponent(value), expires, path, domain, secure].join('');
} else { // only name given, get cookie
var cookieValue = null;
if (document.cookie && document.cookie != '') {
var cookies = document.cookie.split(';');
for (var i = 0; i < cookies.length; i++) {
var cookie = jQuery.trim(cookies[i]);
// Does this cookie string begin with the name we want?
if (cookie.substring(0, name.length + 1) == (name + '=')) {
cookieValue = decodeURIComponent(cookie.substring(name.length + 1));
break;
}
}
}
return cookieValue;
}
}
});
if($.cookieHelper("tdkad") !== "yes"){
var domain_mwww = location.host;
var domain_www = domain_mwww.replace(/m1?\.elecfans/, 'www.elecfans');
$.ajax({
type:'GET',
url: 'https://' + domain_www + '/webapi/advertisement/roadblock',
data: {site_name:'mwww', format:'jsonp'},
dataType:'jsonp',
success: function(response) {
if (response.error_code != 0) {
return false;
}
var data = response.data;
$.cookieHelper("tdkad", "yes", {expires:data.frequency,path:"/"});
showTdkAd();
setTimeout(function(){closeTdkAd();}, 30000);
}
});
}
$(document).on("click", "#tdk-close", function(){
closeTdkAd();
});
});
|
