资料下载

怎样才能实现高效图片轮播
轮播实现步骤
接下来,笔者将从各方面逐一分析。
层级结构
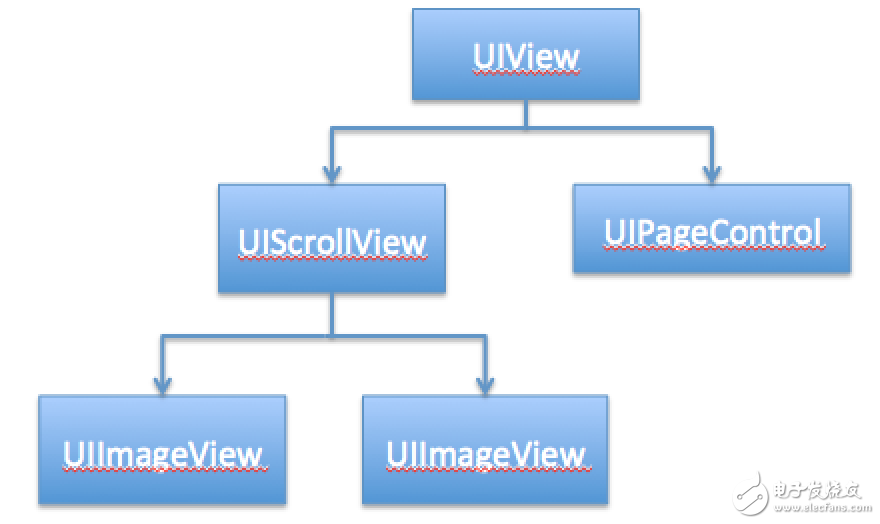
最底层是一个UIView,上面有一个UIScrollView以及UIPageControl,scrollView上有两个UIImageView,imageView宽高 = scrollview宽高 = view宽高

轮播原理
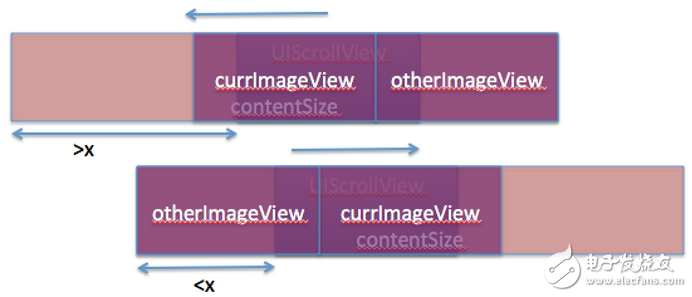
假设轮播控件的宽度为x高度为y,我们设置scrollview的contentSize.width为3x,并让scrollview的水平偏移量为x,既显示最中间内容
scrollView.contentSize = CGSizeMake(3x, y); scrollView.contentOffset = CGPointMake(x, 0);

将imageView添加到scrollview内容视图的中间位置

接下来使用代理方法scrollViewDidScroll来监听scrollview的滚动,定义一个枚举变量来记录滚动的方向
typedef enum{ DirecNone, DirecLeft, DirecRight } Direction;@property (nonatomic, assign) Direction direction; - (void)scrollViewDidScroll:(UIScrollView *)scrollView { self.direction = scrollView.contentOffset.x 》x? DirecLeft : DirecRight; }
使用KVO来监听direction属性值的改变
[self addObserver:self forKeyPath:@“direction” options:NSKeyValueObservingOptionNew context:nil];
判断滚动的方向,当偏移量大于x,表示左移,则将otherImageView加在右边,偏移量小于x,表示右移,则将otherImageView加在左边

- (void)observeValueForKeyPath:(NSString *)keyPath ofObject:(id)object change:(NSDictionary *)change context:(void *)context { //self.currIndex表示当前显示图片的索引,self.nextIndex表示将要显示图片的索引 //_images为图片数组 if(change[NSKeyValueChangeNewKey] == change[NSKeyValueChangeOldKey]) return; if ([change[NSKeyValueChangeNewKey] intValue] == DirecRight) { self.otherImageView.frame = CGRectMake(0, 0, self.width, self.height); self.nextIndex = self.currIndex - 1; if (self.nextIndex 《 0) self.nextIndex = _images.count – 1; } else if ([change[NSKeyValueChangeNewKey] intValue] == DirecLeft){ self.otherImageView.frame = CGRectMake(CGRectGetMaxX(_currImageView.frame), 0, self.width, self.height); self.nextIndex = (self.currIndex + 1) % _images.count; } self.otherImageView.image = self.images[self.nextIndex]; }
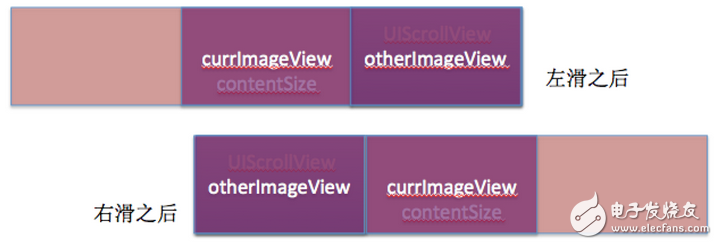
通过代理方法scrollViewDidEndDecelerating来监听滚动结束,结束后,会变成以下两种情况:

此时,scrollview的偏移量为0或者2x,我们通过代码再次将scrollview的偏移量设置为x,并将currImageView的图片修改为otherImageView的图片
- (void)scrollViewDidEndDecelerating:(UIScrollView *)scrollView { [self pauseScroll]; } - (void)pauseScroll { self.direction = DirecNone;//清空滚动方向 //判断最终是滚到了右边还是左边 int index = self.scrollView.contentOffset.x / x; if (index == 1) return; //等于1表示最后没有滚动,返回不做任何操作 self.currIndex = self.nextIndex;//当前图片索引改变 self.pageControl.currentPage = self.currIndex; self.currImageView.frame = CGRectMake(x, 0, x, y); self.currImageView.image = self.otherImageView.image; self.scrollView.contentOffset = CGPointMake(x, 0); }
那么我们看到的还是currImageView,只不过展示的是下一张图片,如图,又变成了最初的效果

自动滚动
轮播的功能实现了,接下来添加定时器让它自动滚动,相当简单
- (void)startTimer { //如果只有一张图片,则直接返回,不开启定时器 if (_images.count 《= 1) return; //如果定时器已开启,先停止再重新开启 if (self.timer) [self stopTimer]; self.timer = [NSTimer timerWithTimeInterval:self.time target:self selector:@selector(nextPage) userInfo:nil repeats:YES]; [[NSRunLoop currentRunLoop] addTimer:self.timer forMode:NSRunLoopCommonModes]; } - (void)nextPage { //动画改变scrollview的偏移量就可以实现自动滚动 [self.scrollView setContentOffset:CGPointMake(self.width * 2, 0) animated:YES]; }
注意:setContentOffset:animated:方法执行完毕后不会调用scrollview的scrollViewDidEndDecelerating方法,但是会调用scrollViewDidEndScrollingAnimation方法,因此我们要在该方法中调用pauseScroll
- (void)scrollViewDidEndScrollingAnimation:(UIScrollView *)scrollView { [self pauseScroll]; }
拖拽时停止自动滚动
当我们手动拖拽图片时,需要停止自动滚动,此时我们只需要让定时器失效就行了,当停止拖拽时,重新启动定时器
- (void)scrollViewWillBeginDragging:(UIScrollView *)scrollView { [self.timer invalidate]; } - (void)scrollViewDidEndDragging:(UIScrollView *)scrollView willDecelerate:(BOOL)decelerate{ [self startTimer]; }
声明:本文内容及配图由入驻作者撰写或者入驻合作网站授权转载。文章观点仅代表作者本人,不代表电子发烧友网立场。文章及其配图仅供工程师学习之用,如有内容侵权或者其他违规问题,请联系本站处理。 举报投诉
- 相关下载
- 相关文章
下载排行榜
- 暂无相关数据


