
资料下载


Yoga AI从单个图像进行3D姿势估计
王玲
分享资料个
描述
介绍
虽然 2D 计算机视觉取得了巨大进步,但 3D 计算机视觉仍然是一项艰巨的任务。我们生成大量 2D 数据(图像、视频),但 3D 数据集很少见且创建成本高。该项目将探索从单个图像获得的 2D 数据获取 3D 人体姿态信息的不同方法。

这项工作基于两篇文章:
- Julieta Martinez、Rayat Hossain、Javier Romero 和 James J. Little为 3d 人体姿态估计提供了一个简单而有效的基线
- 可以仅从 2D 投影中学习 3D 姿势吗?作者:Dylan Drover、Rohith MV、Ching-Hang Chen、Amit Agrawal、Ambrish Tyagi 和 Cong Phuoc Huynh
第一篇文章探索了一种简单而有效的方法,通过使用相对简单的 DNN 将 2D 数据“提升”到 3D。本文中提出的模型将进一步称为“文章模型”或 article.xmodel(来自用于在 VCK5000 卡上进行推理的文件名)。
尝试了“文章”模型的替代方案,一层上的神经元较少,但层数较多。这种替代模型进一步称为“残差”或“res.xmodel”。
这两个模型是在Human3.6M 数据集上训练的。这包含通过在工作室中使用昂贵的高分辨率相机设置、拍摄专业演员而获得的 3D 数据。据作者所知,这是唯一可用于 3D 数据的数据集。
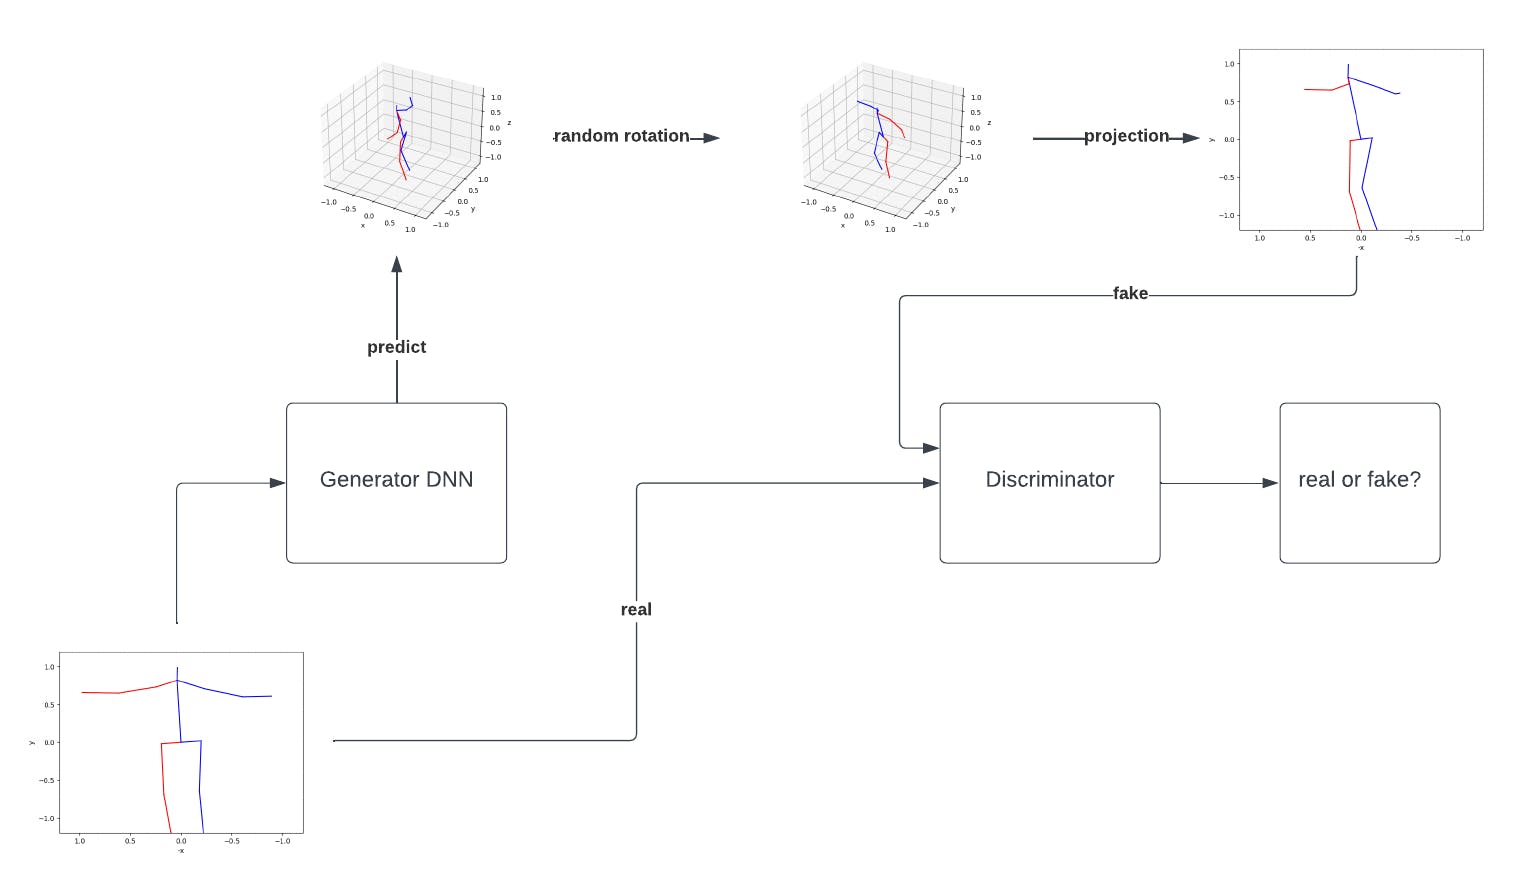
第三个模型,称为 gan (gan.xmodel) 使用了一个新颖的想法:生成对抗网络仅从 2D 数据生成 3D 数据。该模型由生成器(使用残差模型)和鉴别器组成。
生成器的工作是获取 2D 姿势并为它们生成深度,将它们转换为 3D 姿势。鉴别器的工作是采取 2D 姿势并返回它们是真的还是假的(由生成器生成)。生成器生成的 3D 姿势被随机旋转,转换回相机的坐标并以 2D 的形式投影回来。然后将它们反馈给鉴别器。主要思想是,如果生成器能够创建良好的 3D 姿势估计,那么那些随机旋转并投影回 2D 的 3D 姿势对于鉴别器来说将看起来无法区分。生成器和判别器一起训练,一个目标是创建“假” 2D 姿势,而另一个目标是检测“假”。该模型是根据从 YouTube 上的 35 个有关瑜伽姿势的视频中获得的图像进行训练的。GAN 是出了名的难以训练,判别器和生成器都产生良好结果的状态是一种转瞬即逝的状态,而不是稳定的状态。
入门
- 按照此处所述安装 Vitis AI 。对于训练和模型量化,需要构建 GPU Docker,因为它将大大加快该过程。(提示:GPU Docker 构建需要大量 DRAM,如果构建失败,请考虑启用 swap )
- 按照此处所述设置 VCK5000-ES1 卡。如果您有 VCK5000-PROD 卡,那么最新的 Vitis AI 库将有一个类似的页面描述如何操作
- 运行openpose 演示以验证所有内容都已正确安装
- 克隆Vitis AI 目录中的Yoga AI存储库
- 启动 gpu docker 镜像:
./docker_run.sh xilinx/vitis-ai-gpu:1.4.1.978
修改了 docker_run.sh 文件以添加对 X11 和 USB 网络摄像头的支持:
docker_run_params=$(cat <<-END
    -v /dev/shm:/dev/shm \
    -v /opt/xilinx/dsa:/opt/xilinx/dsa \
    -v /opt/xilinx/overlaybins:/opt/xilinx/overlaybins \
    -v /etc/xbutler:/etc/xbutler \
    -e USER=$user -e UID=$uid -e GID=$gid \
    -e VERSION=$VERSION \
    -e DISPLAY=$DISPLAY -v /tmp/.X11-unix:/tmp/.X11-unix -v $HOME/.Xauthority:/tmp/.Xauthority \
    -v $DOCKER_RUN_DIR:/vitis_ai_home \
    -v $HERE:/workspace \
    -w /workspace \
    --device /dev/video0 \
    --rm \
    --network=host \
    --ipc=host \
    ${DETACHED} \
    ${RUN_MODE} \
    $IMAGE_NAME \
    $DEFAULT_COMMAND
END
)
此处描述了完整的命令列表。
2D 姿态估计
这是通过使用此处所述的 Vitis AI 库完成的。
在使用 2D 姿态估计器之前,必须下载模型:
cd /workspace/models/AI-Model-Zoo

sudo mkdir /usr/share/vitis_ai_library/models

tar -xzvf openpose_pruned_0_3-vck5000-DPUCVDX8H-r1.4.1.tar.gz

sudo cp openpose_pruned_0_3 /usr/share/vitis_ai_library/models -r
从 2D 提升到 3D
虽然有很好的 2D 姿态估计器,但 3D 问题仍然悬而未决。主要有两种方法:
- 从图像开始,使用非常大且复杂的 CNN 进行端到端训练
- 使用现有的 2D 姿势估计器并将 2D 结果“提升”为 3D
本项目将使用第二种方法,并尝试使用两篇文章中的想法将 2D 结果“提升”为 3D:
- Julieta Martinez、Rayat Hossain、Javier Romero 和 James J. Little为 3d 人体姿态估计提供了一个简单而有效的基线
- 可以仅从 2D 投影中学习 3D 姿势吗?作者:Dylan Drover、Rohith MV、Ching-Hang Chen、Amit Agrawal、Ambrish Tyagi 和 Cong Phuoc Huynh
第一个是使用简单的 DNN 来学习如何从 2D 开始估计 3D 位置。这需要大量的 3D 姿势数据集。(使用了 Human3.6M 数据集)
生成的 DNN 对于在 Human3.6M 数据集中找到的位置表现良好,但对于在那里没有找到的位置(例如瑜伽位置)表现不佳。另一个缺点是创建 3D 数据集非常昂贵,因此很少有公开可用的。
第二篇文章提出了一个生成对抗网络,它不需要 3D 数据的基本事实。这使得获取训练数据变得非常容易,因为有大量数据(视频、图像)可用。缺点是训练 GAN 更像是一门艺术而不是科学,因为它依赖于校准两个不稳定的神经网络。
用于回归 3D 数据的简单 DNN
在使用 Human3.6M 数据集之前,对数据进行了预处理,然后保存在 .tfrecords 文件中以便于训练。每个 3D 姿势数据为:
- 缩放以使头部锚点和臀部锚点之间的距离为 1 个单位长度
- 以臀部锚点为中心
- 围绕 z 轴在 0 到 360 度之间随机旋转
- 转换为相机坐标
- 在 2D 数据(用作 DNN 的输入)和将作为 DNN 输出的第三个“深度”值之间拆分
这是由 prepare_data.py 脚本完成的:
python prepare_data.py

ls -al ./data/Human36M_subject*
-rw-r--r-- 1 andrei andrei 12172996 mar 19 19:52 ./data/Human36M_subject11_joint_3d.tfrecords
-rw-r--r-- 1 andrei andrei 12977646 mar 19 19:47 ./data/Human36M_subject1_joint_3d.tfrecords
-rw-r--r-- 1 andrei andrei 20707511 mar 19 19:48 ./data/Human36M_subject5_joint_3d.tfrecords
-rw-r--r-- 1 andrei andrei 13055394 mar 19 19:49 ./data/Human36M_subject6_joint_3d.tfrecords
-rw-r--r-- 1 andrei andrei 21238789 mar 19 19:50 ./data/Human36M_subject7_joint_3d.tfrecords
-rw-r--r-- 1 andrei andrei 13517702 mar 19 19:51 ./data/Human36M_subject8_joint_3d.tfrecords
-rw-r--r-- 1 andrei andrei 16598153 mar 19 19:51 ./data/Human36M_subject9_joint_3d.tfrecords
提出了三种模型:
- 文章(article.xmodel)中描述的DNN:
python train-article.py

python -u quantize.py --float_model model/article/article.h5 --quant_model model/article/quant_article.h5 --batchsize 64 --evaluate 2>&1 | tee quantize.log

vai_c_tensorflow2 --model model/article/quant_article.h5 --arch /opt/vitis_ai/compiler/arch/DPUCVDX8H/VCK5000/arch.json --output_dir model/article --net_name article
- 一个 DNN,每层神经元较少,但层数比文章中描述的层多(res.xmodel):
python train-res.py

python -u quantize.py --float_model model/residual/res.h5 --quant_model model/residual/quant_res.h5 --batchsize 64 --evaluate 2>&1 | tee quantize.log

vai_c_tensorflow2 --model model/residual/quant_res.h5 --arch /opt/vitis_ai/compiler/arch/DPUCVDX8H/VCK5000/arch.json --output_dir model/residual --net_name res
- 一个 GAN 模型(gan.xmodel)
本教程介绍了 TensorFlow2 和 Vitis AI 设计流程。
推理
该项目使用两个 DNN:
- cf_openpose_aichallenger_368_368_0.3_189.7G ,可在 Vitis AI 模型动物园中找到
使用 OpenPose 进行推理非常简单:
auto image = cv::imread("sample_openpose.jpg");
auto det = vitis::ai::OpenPose::create("openpose_pruned_0_3");
auto results = det->run(image);
此 API 负责处理图像所需的任何预处理(调整大小等)
- 自定义 DNN 将姿势从 2D 提升到 3D
代码有点复杂,使用 VART API:
auto graph = Graph::deserialize(model);
auto subgraph = get_dpu_subgraph(graph.get());
auto runner = Runner::create_runner(subgraph[0],"run");
TensorShape inshapes[1];
TensorShape outshapes[1];
GraphInfo shapes;
shapes.inTensorList = inshapes;
shapes.outTensorList = outshapes;
getTensorShape(runner.get(), &shapes, 1, 1);
auto inTensors = cloneTensorBuffer(runner->get_input_tensors());
auto outTensors = cloneTensorBuffer(runner->get_output_tensors());
int batchSize = inTensors[0]->get_shape().at(0);
int inSize = inshapes[0].size;
int outSize = outshapes[0].size;
auto input_scale = get_input_scale(runner->get_input_tensors()[0]);
auto output_scale = get_output_scale (runner->get_output_tensors()[0]);
int8_t *datain = new int8_t[inSize * batchSize];
int8_t *dataresult = new int8_t[outSize * batchSize];
/* Copy the data in datain buffer.
Don't forget to scale it by multiplying it with input_scale*/
vector> inputs, outputs;
inputs.push_back(make_unique(datain, inTensors[0].ge() ));
outputs.push_back(make_unique(dataresult, outTensors[0].get() ));
vector inputsPtr, outputsPtr;
inputsPtr.push_back(inputs[0].get());
outputsPtr.push_back(outputs[0].get());
auto job_id = runner->execute_async(inputsPtr, outputsPtr);
runner->wait(job_id.first, -1);
/* Copy the result from dataresult
Don't forget to scale it by mupliplying with output_scale*/
delete[] datain;
delete[] dataresult;
运行演示
首先必须编译演示程序和系统设置。启动 docker gpu 映像后,在 docker 终端中运行以下命令:
cp /tmp/.Xauthority ~/
sudo chown vitis-ai-user:vitis-ai-group ~/.Xauthority
sudo usermod -a -G video $(whoami)
sudo su $(whoami)
cd /workspace/setup/vck5000/
source setup.sh
cd /workspace/models/AI-Model-Zoo
wget https://www.xilinx.com/bin/public/openDownload?filename=openpose_pruned_0_3-vck5000-DPUCVDX8H-r1.4.1.tar.gz -O openpose_pruned_0_3-vck5000-DPUCVDX8H-r1.4.1.tar.gz
sudo mkdir /usr/share/vitis_ai_library/models
tar -xzvf openpose_pruned_0_3-vck5000-DPUCVDX8H-r1.4.1.tar.gz
sudo cp openpose_pruned_0_3 /usr/share/vitis_ai_library/models -r
sudo usermod -a -G video vitis-ai-user
/usr/bin/pip3 install matplotlib
conda activate vitis-ai-tensorflow2
cd /workspace/yoga-ai/
sh build.sh
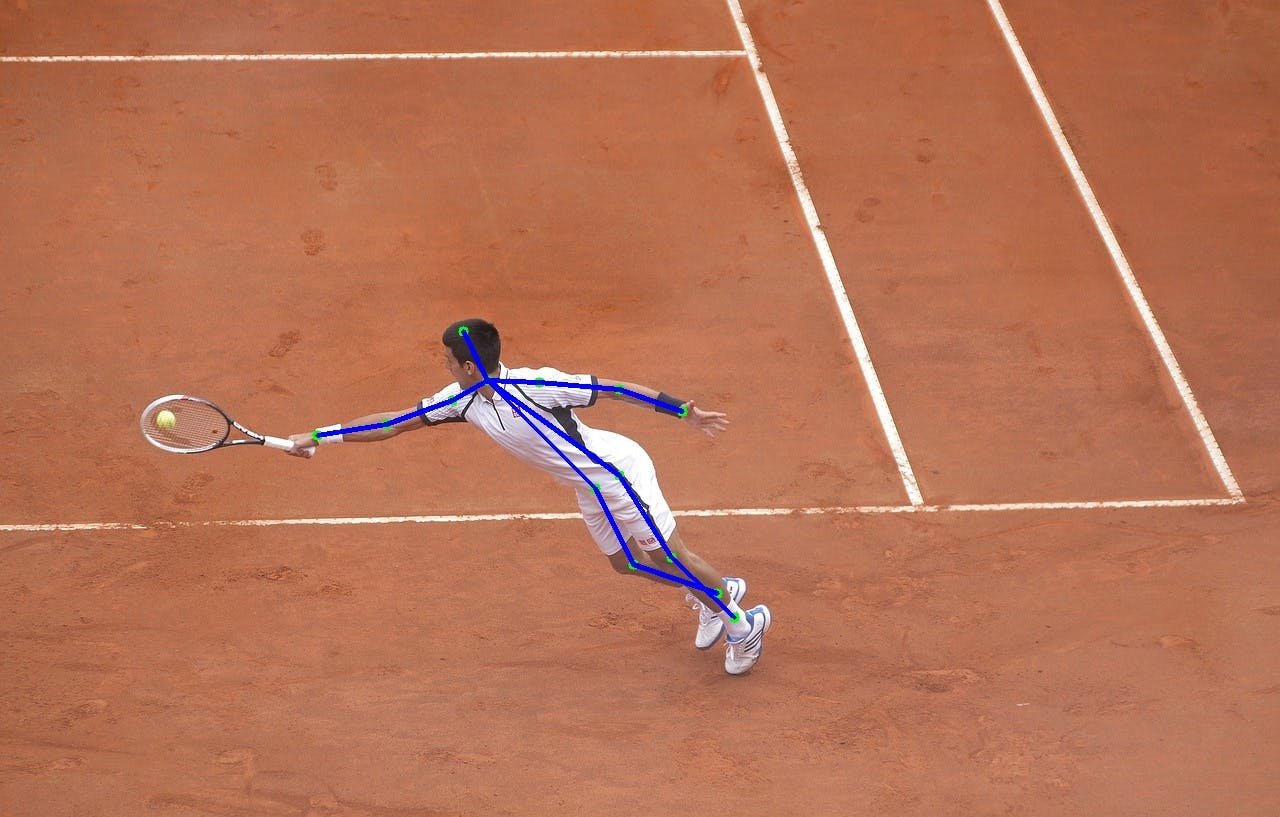
要使用文章中的模型运行 3D 估计器以获取单张图片,请运行以下命令:(如果在冷重启后第一次运行,则需要大约 30 秒来对卡进行编程)
./build/yoga-ai-picture ./model/article/article.xmodel ./data/temp/emily-sea-coiWR0gT8Cw-unsplash.jpg
generated ./data/temp/emily-sea-coiWR0gT8Cw-unsplash_result.jpg
generated ./data/temp/emily-sea-coiWR0gT8Cw-unsplash_1_plot.jpg
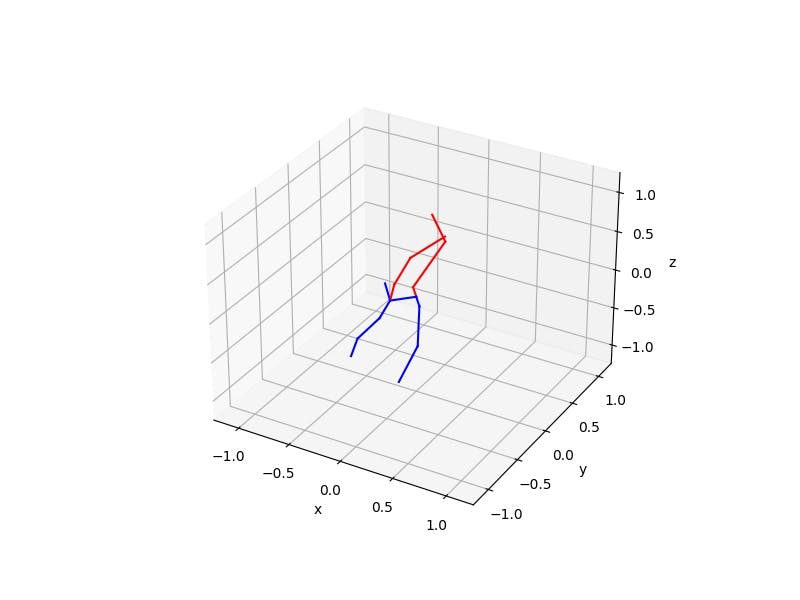
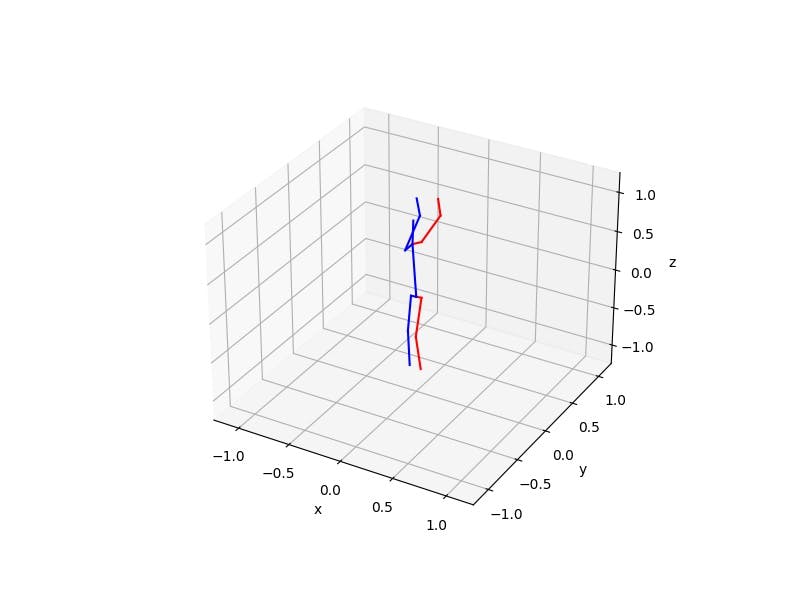
在这张图片上运行 3D 姿态估计器:
将生成此 2D 姿势结果:
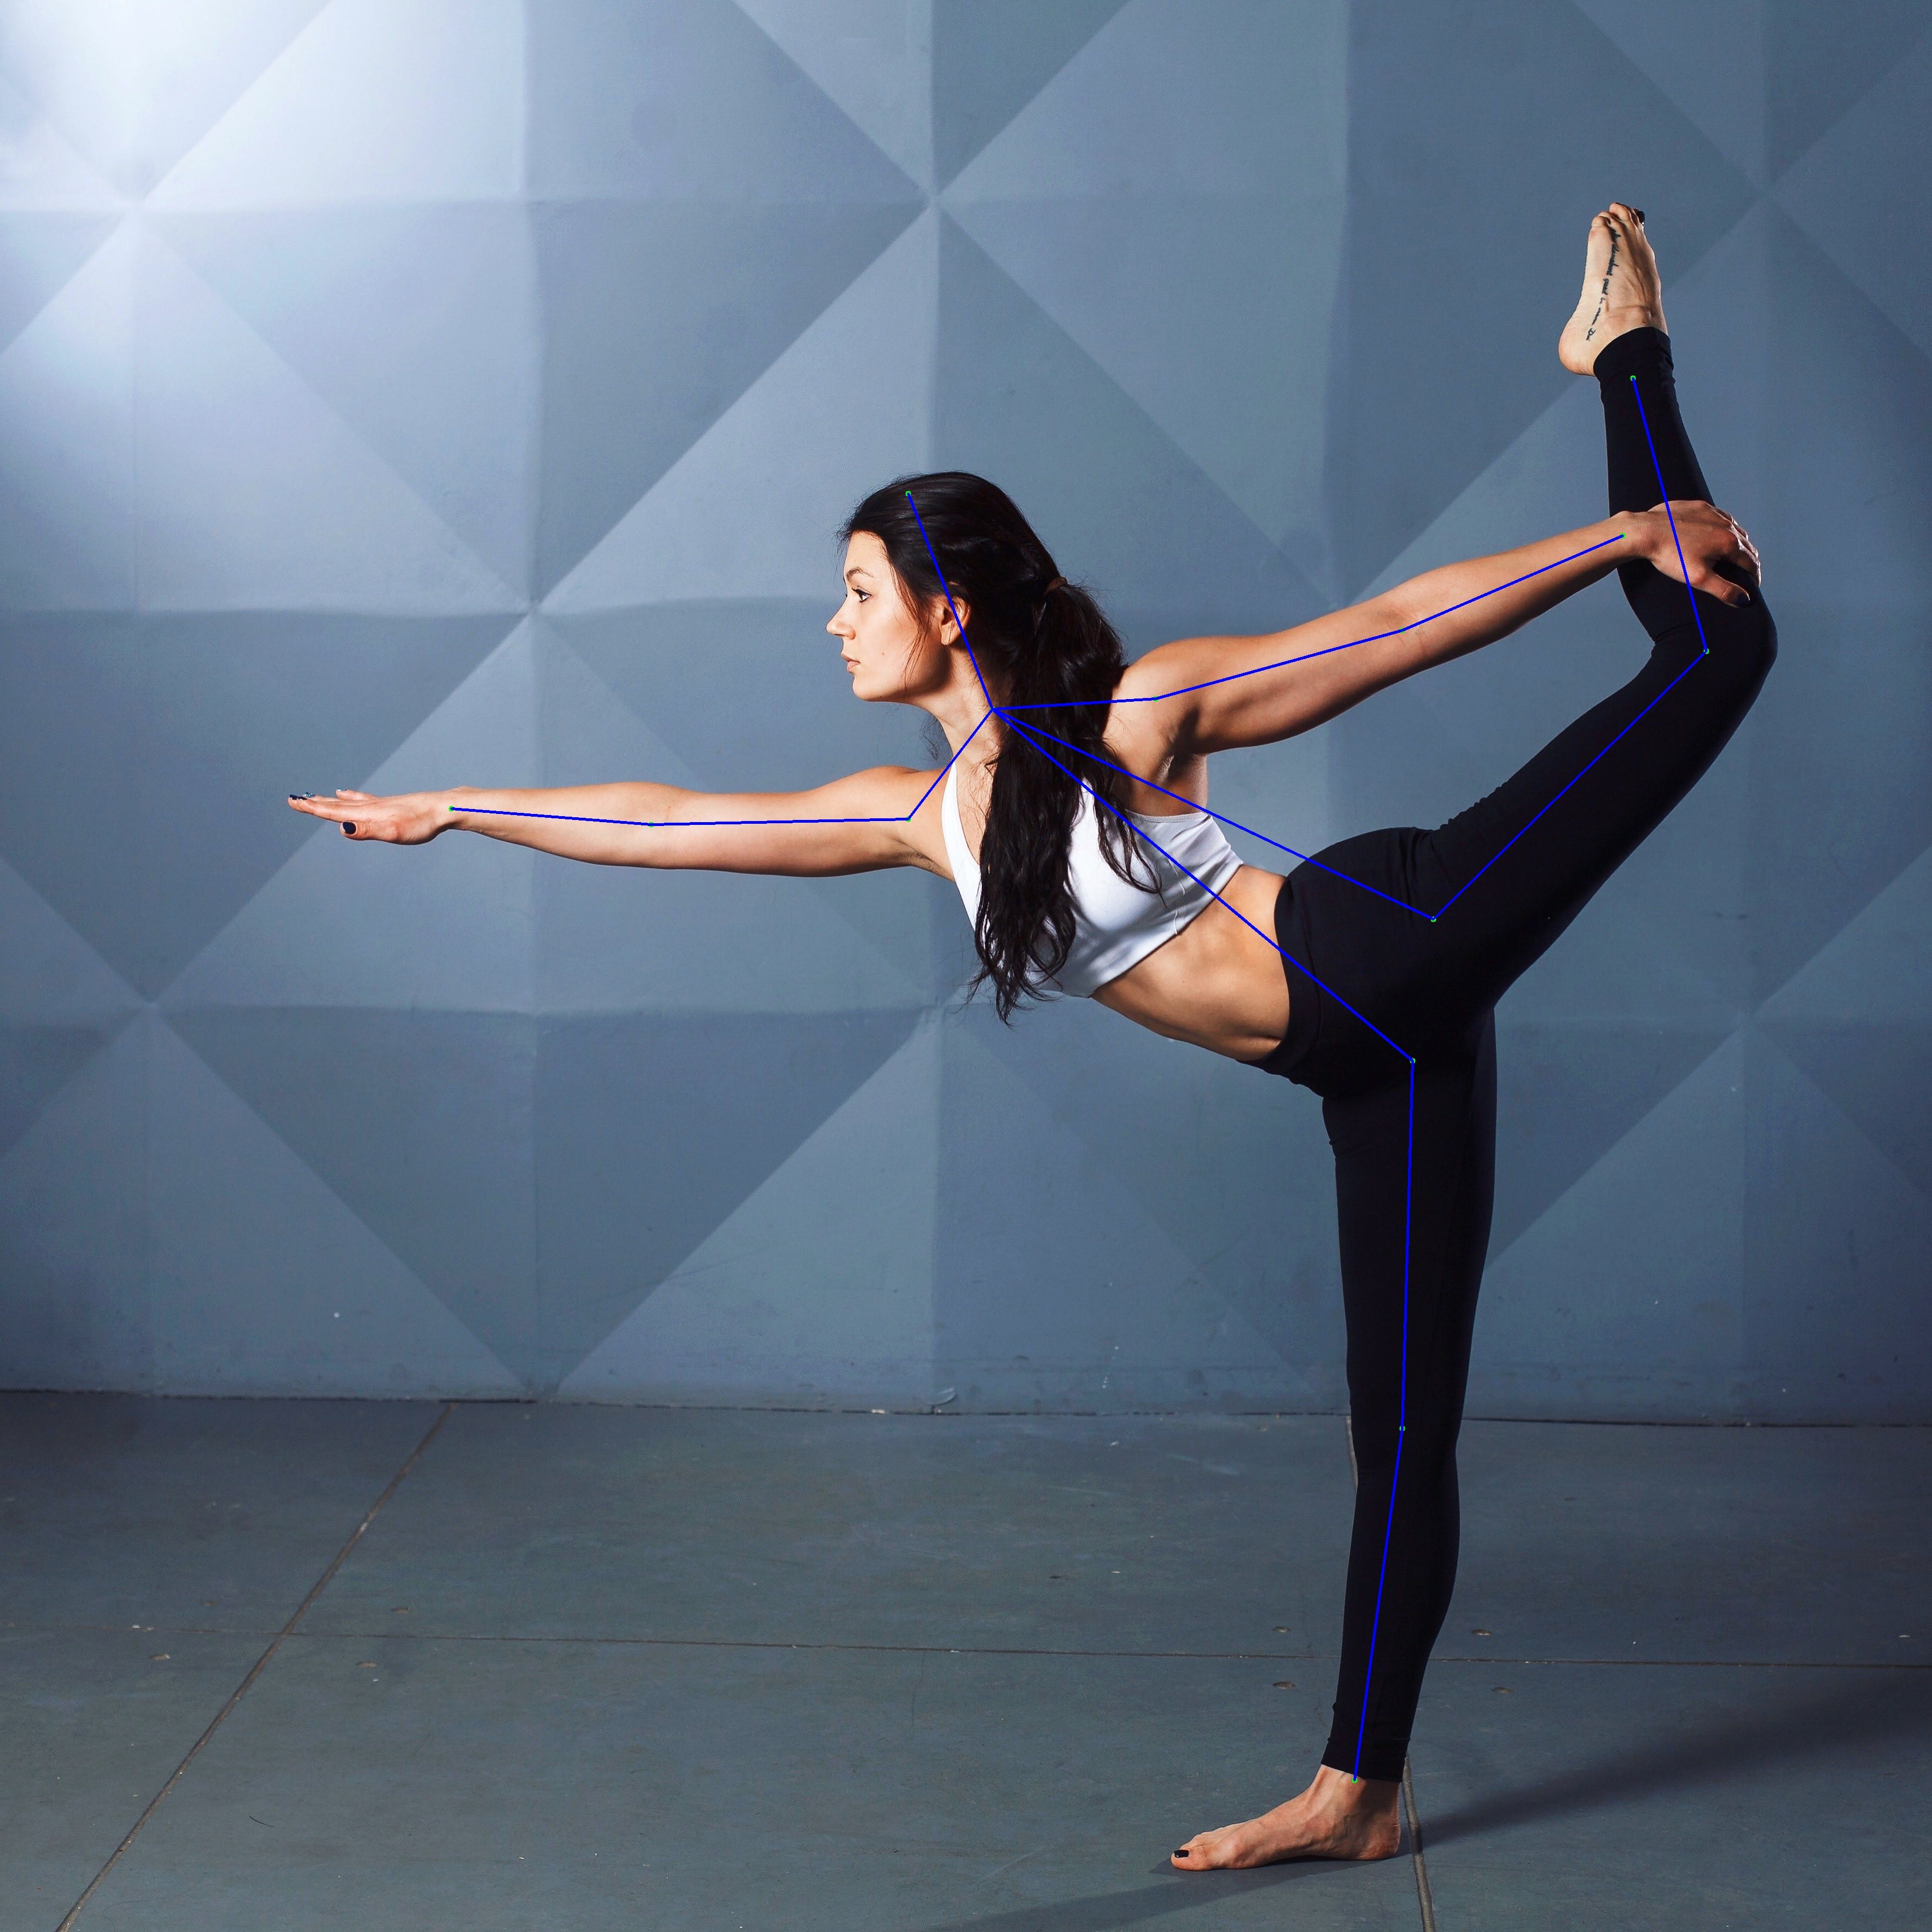
以及以下 3D 结果:

更深层次的 DNN(res.xmodel):
./build/yoga-ai-picture ./model/residual/res.xmodel ./data/temp/emily-sea-coiWR0gT8Cw-unsplash.jpg
generated ./data/temp/emily-sea-coiWR0gT8Cw-unsplash_result.jpg
generated ./data/temp/emily-sea-coiWR0gT8Cw-unsplash_1_plot.jpg
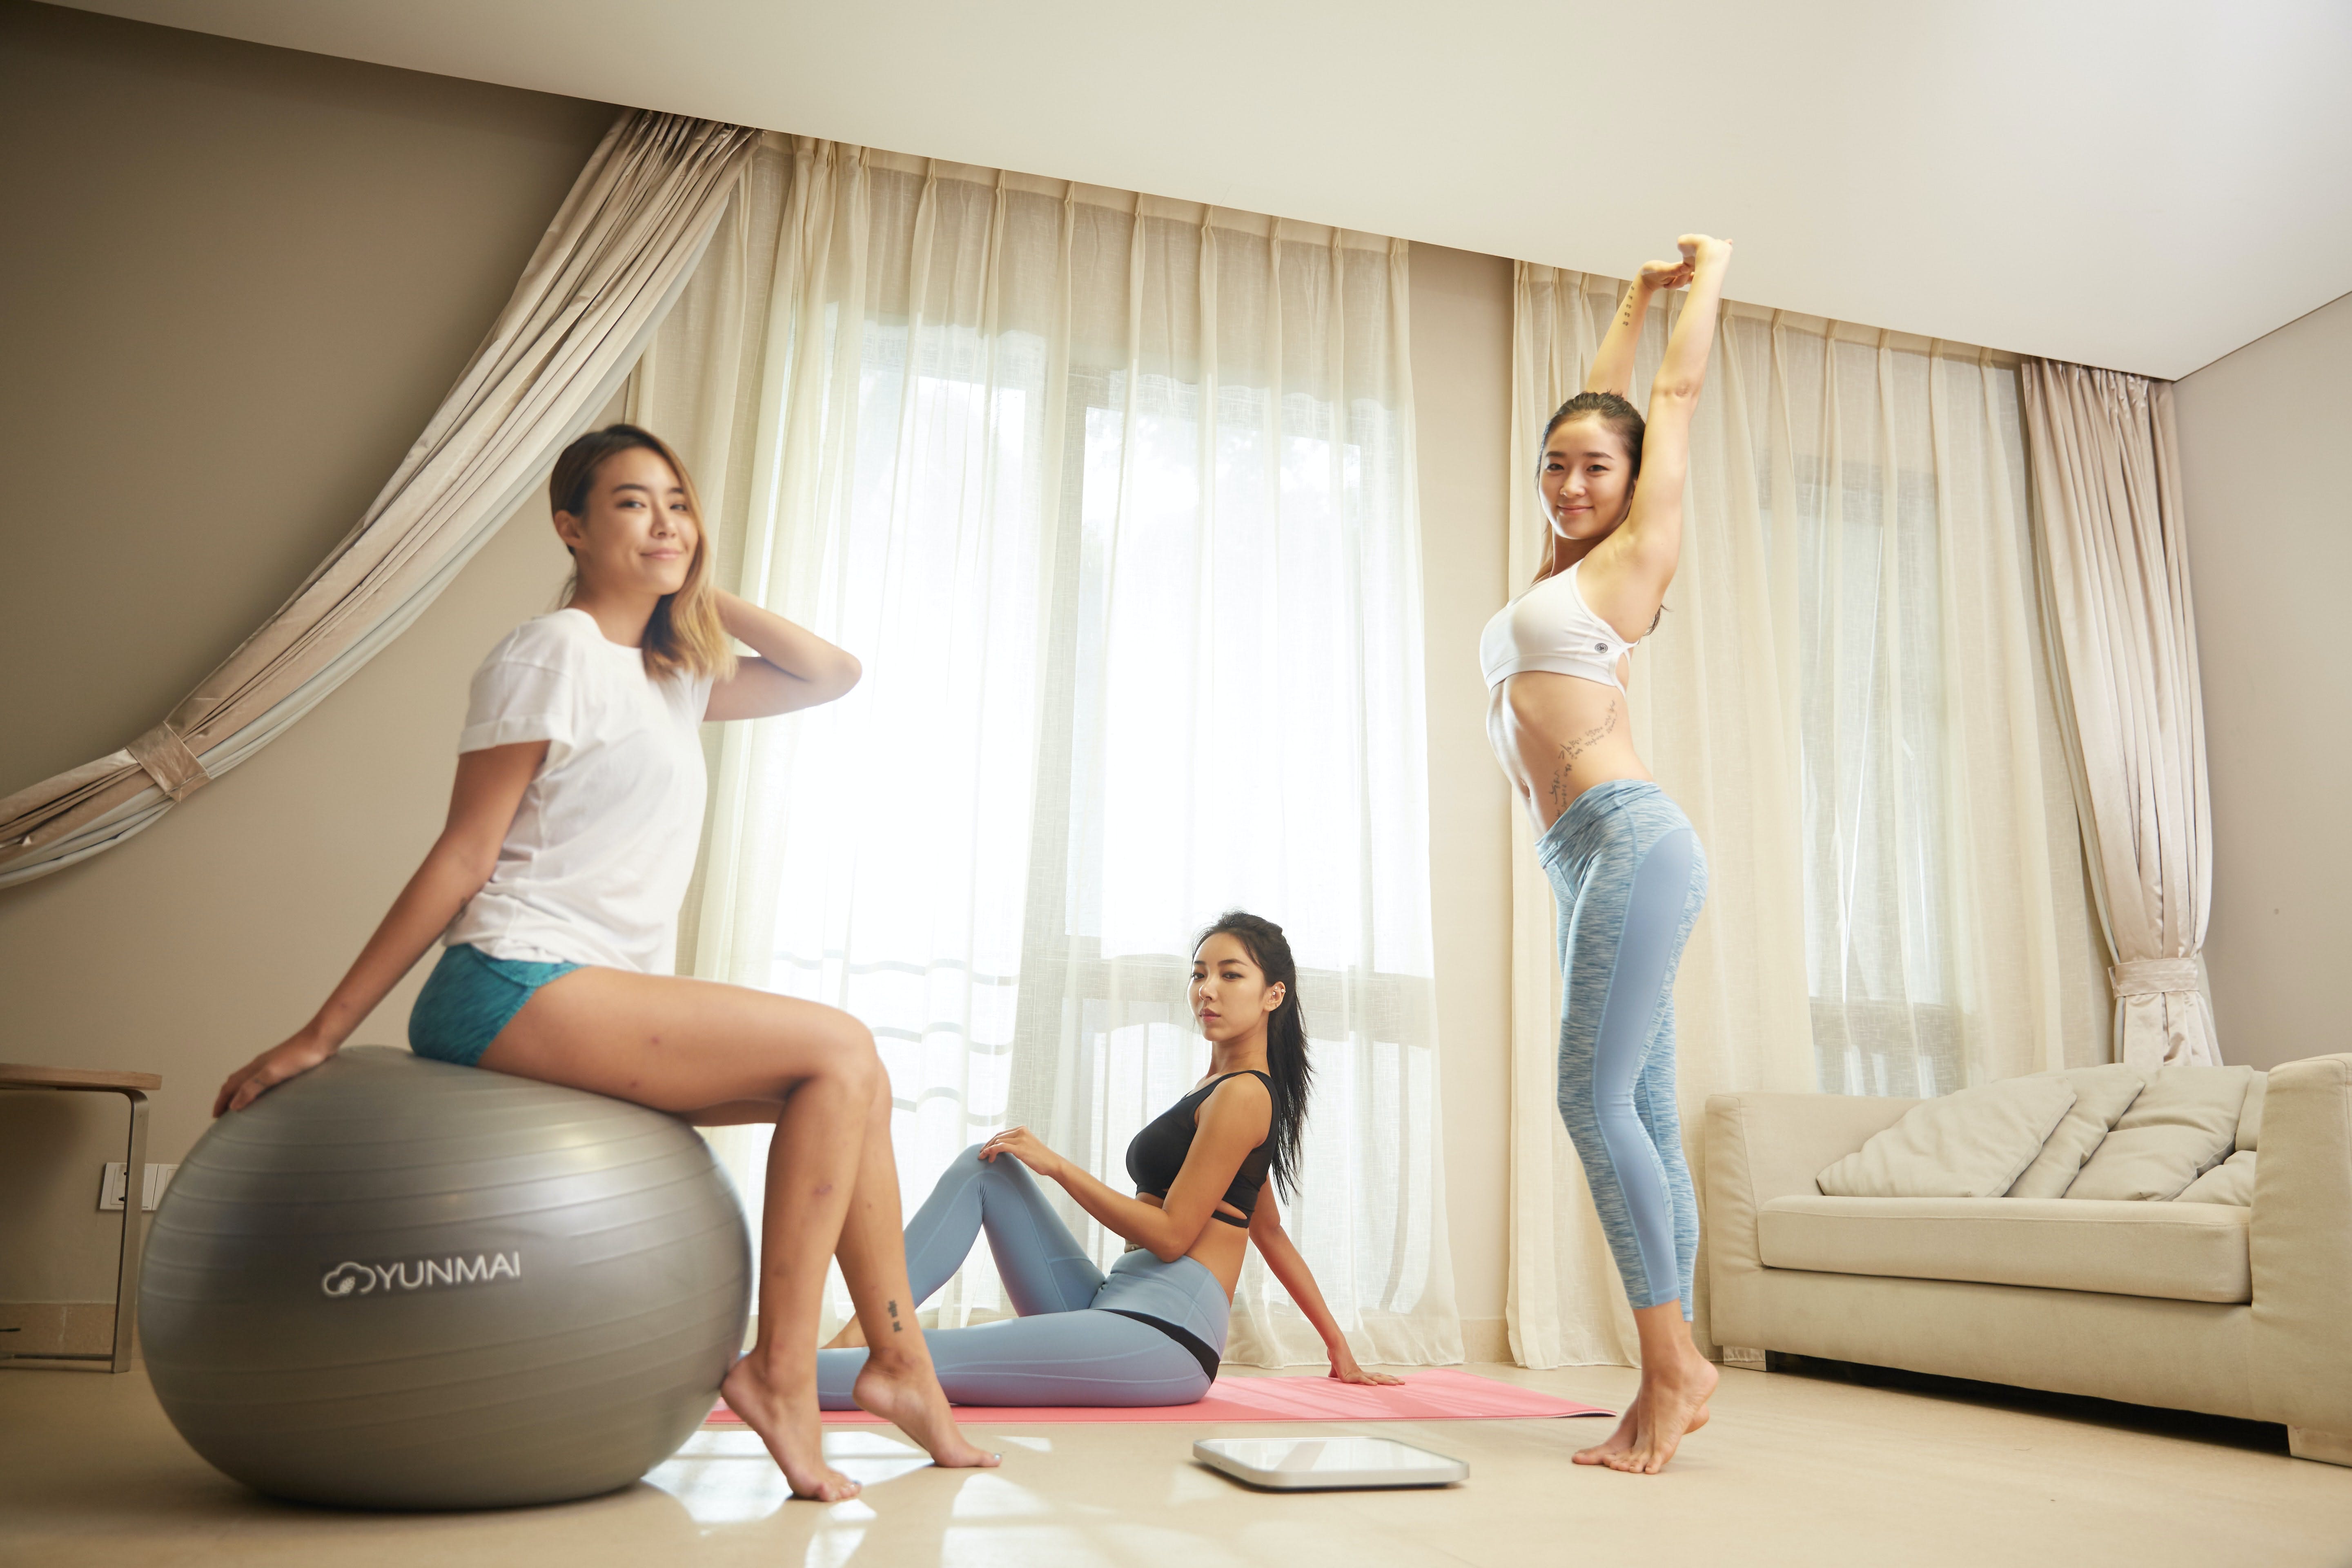
对于多个主题:
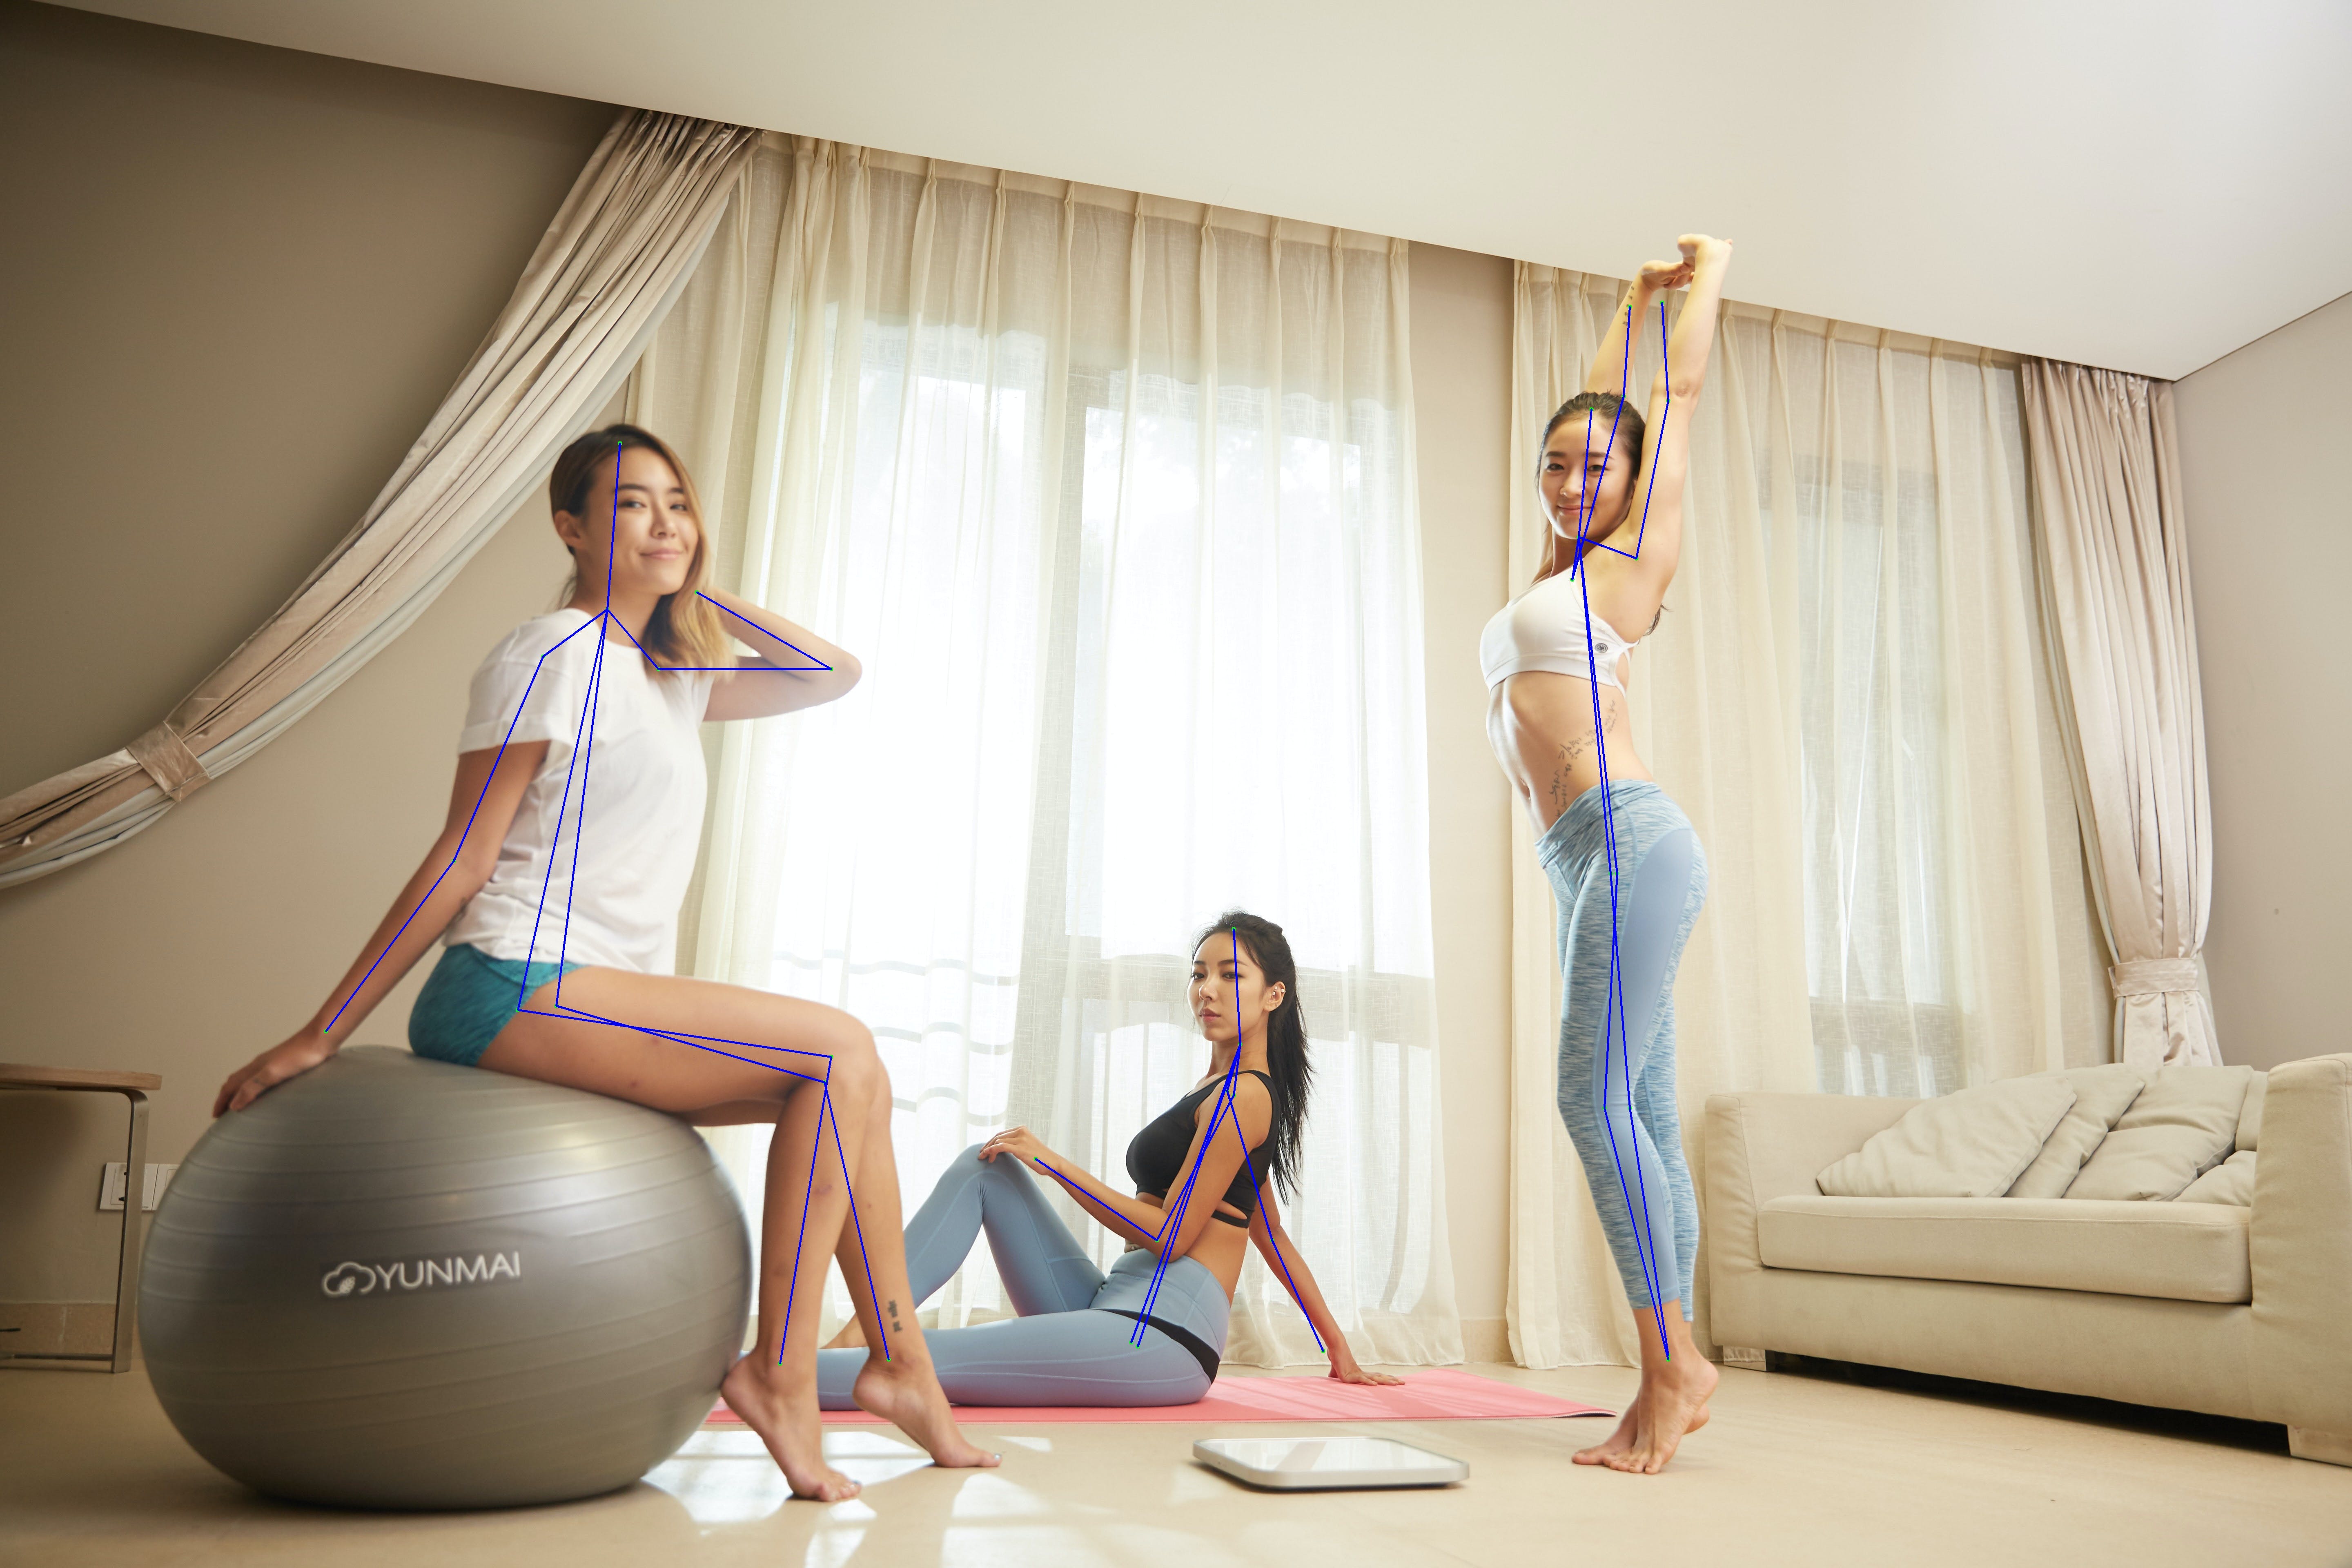
./build/yoga-ai-picture ./model/article/article.xmodel ./data/temp/i-yunmai-BucQCjOvDyM-unsplash.jpg
generated ./data/temp/i-yunmai-BucQCjOvDyM-unsplash_result.jpg
generated ./data/temp/i-yunmai-BucQCjOvDyM-unsplash_1_plot.jpg
generated ./data/temp/i-yunmai-BucQCjOvDyM-unsplash_2_plot.jpg
./build/yoga-ai-picture ./model/residual/res.xmodel ./data/temp/i-yunmai-BucQCjOvDyM-unsplash.jpg
generated ./data/temp/i-yunmai-BucQCjOvDyM-unsplash_result.jpg
generated ./data/temp/i-yunmai-BucQCjOvDyM-unsplash_1_plot.jpg
generated ./data/temp/i-yunmai-BucQCjOvDyM-unsplash_2_plot.jpg
图片中有三个主题,但其中只有两个拥有所有锚点。
实时运行 3D 姿态估计器:
./build/yoga-ai-mt ./model/article/article.xmodel
or
./build/yoga-ai-mt ./model/residual/res.xmodel
这将打开它找到的第一个网络摄像头并运行 3D 姿势估计器
FPS 受到房间照明的限制,而不是 2D 估计器或 2D 到 3D DNN 的限制,它们非常快,尤其是在批处理时(批处理最多 8 帧)。
不幸的是,我找不到 c++ 原生的 3D 绘图库,所以我使用了 python 中的 matplotlib 库和 c++ 包装器。它可以创建绘图的速度约为 2-3 FPS,远低于相机或姿势估计器。
GAN 示例
将以 10 FPS 的速率从视频中提取第一帧:
mkdir -p ./data/video/frames
find ./data/video -maxdepth 1 -name '*.webm' -print0 | xargs -0 -i sh -c 'fullfile="{}"; filename=${fullfile##*/}; name=${filename%%.*}; ffmpeg -i "$fullfile" -r 10/1 ./data/video/frames/"$name"%010d.jpg'
然后 2D 估计器将在每个图像上运行:
./build/yoga-ai-multiple ./data/video/frames > ./data/video/frames.json
最后,带有 2D 姿势的 json 将被预处理(缩放、居中)并保存为 .tfrecords 文件:
python prepare_data_gan.py ./data/video/
训练:
rm -rf ./logs/
rm -rf ./model/gan/*
python train-gan.py
选择型号:
tensorboard --logdir logs/ --bind_all
生成器和鉴别器网络都必须保持平衡,损失函数朝着不同的目标工作。
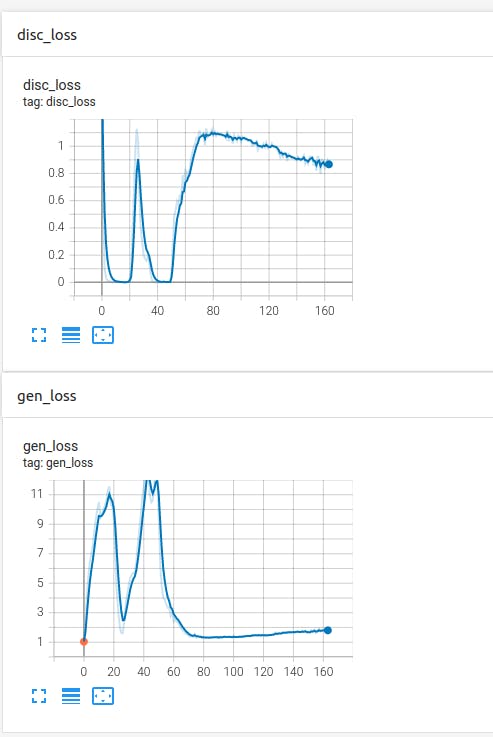
理想情况下,生成器和判别器的损失函数都应尽可能接近 1,这意味着判别器很难区分生成的解决方案和真实的解决方案。
Epoch 100 - 12.01 sec, Gen Loss: 1.3215000629425049, Disc Loss: 1.0641013383865356
Epoch 101 - 12.04 sec, Gen Loss: 1.4143874645233154, Disc Loss: 1.0295127630233765
Epoch 102 - 12.00 sec, Gen Loss: 1.3275189399719238, Disc Loss: 1.0719201564788818
Epoch 103 - 12.00 sec, Gen Loss: 1.3471262454986572, Disc Loss: 1.0649248361587524
Epoch 104 - 12.03 sec, Gen Loss: 1.3648614883422852, Disc Loss: 1.0483965873718262
Epoch 105 - 12.00 sec, Gen Loss: 1.387969732284546, Disc Loss: 1.0464917421340942
Epoch 106 - 12.01 sec, Gen Loss: 1.369732141494751, Disc Loss: 1.0375384092330933
Epoch 107 - 12.01 sec, Gen Loss: 1.3962113857269287, Disc Loss: 1.0418665409088135
Epoch 108 - 12.03 sec, Gen Loss: 1.391349196434021, Disc Loss: 1.0387295484542847
Epoch 109 - 12.02 sec, Gen Loss: 1.4321180582046509, Disc Loss: 1.0043883323669434
Epoch 110 - 12.02 sec, Gen Loss: 1.4454706907272339, Disc Loss: 1.0133466720581055
train-gan.py 脚本在每个 epoch 保存生成器网络,我从 epoch 102 中选择了网络:
cp ./model/gan/gan_102.h5 ./model/gan/gan.h5
量化和编译:
python -u quantize.py --float_model model/gan/gan.h5 --quant_model model/gan/quant_gan.h5 --batchsize 64 --evaluate 2>&1 | tee quantize.log

vai_c_tensorflow2 --model model/gan/quant_gan.h5 --arch /opt/vitis_ai/compiler/arch/DPUCVDX8H/VCK5000/arch.json --output_dir model/gan --net_name gan
结果:
./build/yoga-ai-mt ./model/gan/gan.xmodel
训练
所有模型都训练了 200 个 epoch,batch_size 为 64。
article.xmodel 和 res.xmodel 都使用 Human3.6M 数据集。
gan.xmodel 在一个包含 35 个来自 YouTube 的瑜伽视频的数据库上进行了训练。从这些视频中,使用 ffmpeg 提取了 859812 张图像,然后使用 build/yoga-ai-multiple 实用程序(运行 2D open_pose)提取了 112210 个姿势(存在所有锚点)。
更多结果
源文件
用于预处理数据集的脚本:
https://github.com/andrei-ace/yoga-ai/blob/master/prepare_data.py
https://github.com/andrei-ace/yoga-ai/blob/master/prepare_data_gan.py
https://github.com/andrei-ace/yoga-ai/blob/master/src/yoga-ai-multiple.cpp
用于训练神经网络的脚本:
https://github.com/andrei-ace/yoga-ai/blob/master/train-article.py
https://github.com/andrei-ace/yoga-ai/blob/master/train-res.py
https://github.com/andrei-ace/yoga-ai/blob/master/train-gan.py
演示程序:
https://github.com/andrei-ace/yoga-ai/blob/master/src/yoga-ai-picture.cpp
https://github.com/andrei-ace/yoga-ai/blob/master/src/yoga-ai-mt.cpp
结论
在 Human3.6M 数据集中找到的姿势结果非常好,但对于看不见的姿势却不是很准确。该数据集不包含任何瑜伽姿势,因此准确度有些低。创建更多数据集将大大提高预测的准确性,但最大的问题是它们需要昂贵的设备来生产。
GAN 方法似乎是最有前途的方法,因为它只需要大量存在的 2D 数据。一个简单的改进是从不同角度拍摄相同的姿势,使用的 YouTube 视频大多具有相同的角度。这不需要专业工作室中的任何昂贵设备,可以使用任何消费级相机,并且不需要同步它们,甚至不需要拍摄相同的演员。

声明:本文内容及配图由入驻作者撰写或者入驻合作网站授权转载。文章观点仅代表作者本人,不代表电子发烧友网立场。文章及其配图仅供工程师学习之用,如有内容侵权或者其他违规问题,请联系本站处理。 举报投诉
- 相关下载
- 相关文章


